Before You Begin
Purpose
In this tutorial you learn to manage Oracle Identity Cloud Service's users using REST API calls.
Time to Complete
30 minutes.
Background
The REST APIs provide a way to integrate Oracle Identity Cloud Service with custom applications, so they can externally integrate with and manage Oracle Identity Cloud Service users, groups, applications, and settings.
In this tutorial, you learn to manage users using REST API calls.
Tips:
- Oracle Identity Cloud Service REST APIs complies with the System for Cross-domain Identity Management (SCIM), an open API standard for managing identities across vendors.
- For complete information about the
/Users, API visit the Oracle Identity Cloud Service REST API documentation.
What Do You Need?
- Complete the Oracle Identity Cloud Service: First REST API Call tutorial.
Request an Access Token
The access token is required for performing REST API calls in Oracle Identity Cloud Service.
Tip: If you don't know how to request access tokens, visit the Oracle Identity Cloud Service: First REST API Call tutorial.
- In the Identity Cloud Service console, expand the Navigation Drawer
 , click Applications, and then click Client Application.
 - Click Generate Access Token.
- Click Customized Scopes > Download Token.
- Save the tokens.tok file in a temporary folder.
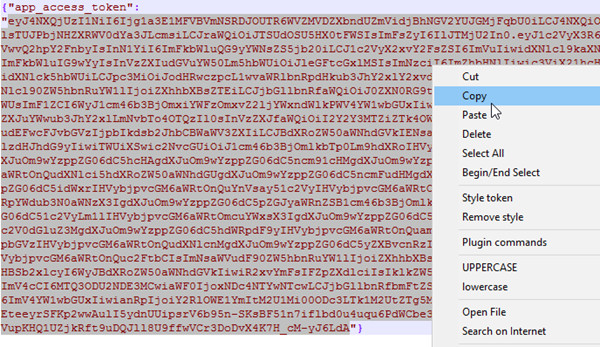
- Open the tokens.tok file in a text editor. Select and copy the access token value - a long sequence of characters placed after the app_access_token property between double quotes (").
Create Users
- Create manually or download (right-click file name and click Save Link As) the following files with their respective content:
- Launch a terminal and run the create user command:
- The IDCS_URL with your Oracle Identity Cloud Service url.
- The ACCESS_TOKEN with your access token obtained in the previous task.
- The FILE_NAME with @ plus the file containing a user for creation. In this case
@file1.json. - In the command output, confirm that the confirmation message HTTP/1.1 201 Created is displayed.

Description of this image - Optionally, review the
user_output.jsoncontents. This file contains details about the user Clarence Saladna created in Identity Cloud Service. - Repeat the create user command, replacing the FILE_NAME variable with
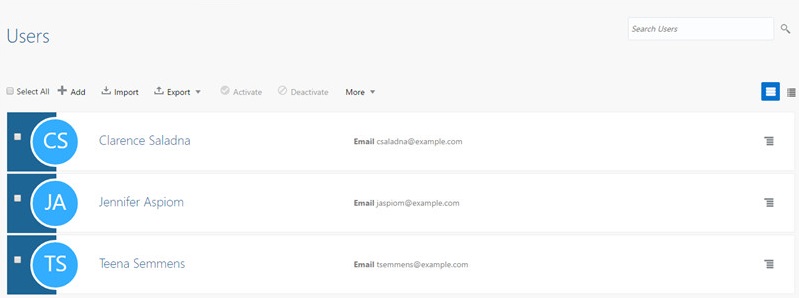
@file2.jsonand@file3.jsonrespectively. - Access the Identity Cloud Service console, expand the Navigation Drawer , click Users, and confirm that the three users (Clarence Saladna, Teena Semeens, and Jennifer Aspiom) are created.
Description of this image
| File name and link | Contents |
| file1.json |
|
| file2.json |
|
| file3.json |
|
curl -k -v -X POST -H "Content-Type: application/scim+json" -H "Authorization: Bearer ACCESS_TOKEN" "IDCS_URL/admin/v1/Users" -d 'FILE_NAME' -o user_output.json{
"displayName": "Clarence Saladna",
"name": {
"givenName": "Clarence",
"formatted": "Clarence Jane Saladna",
"middleName": "Jane",
"familyName": "Saladna"
},
"urn:ietf:params:scim:schemas:oracle:idcs:extension:userState:User": {
"locked": {
"on": false
}
},
"userName": "csaladna@example.com",
"id": "611e3ded55144d50be025185ccb53049",
"active": true,
"emails": [{
"value": "csaladna@example.com",
"type": "recovery",
"verified": false,
"primary": false
}, {
"value": "csaladna@example.com",
"type": "work",
"verified": false,
"primary": true
}],
"schemas": [
"urn:ietf:params:scim:schemas:oracle:idcs:extension:userState:User",
"urn:ietf:params:scim:schemas:core:2.0:User"
],
"meta": {
"resourceType": "User",
"created": "May 18,2016 2:16:45 AM Etc/UTC",
"lastModified": "May 18,2016 2:16:45 AM Etc/UTC",
"location": "https://example.identity.us.oraclecloud.com/admin/v1/Users/611e3ded55144d50be025185ccb53049"
}
}Search Users
In this task, you search for users in Oracle Identity Cloud Service, using search parameters and filter queries.
Tip: The search parameters and filters are features inherited from the SCIM standard.
- Return to the command line.
- To search for all users in Identity Cloud Service, enter:
Replace:curl -k -X GET -H "Authorization: Bearer ACCESS_TOKEN" "IDCS_URL/admin/v1/Users" -o search_results.json- The IDCS_URL with your Oracle Identity Cloud Service url.
- The ACCESS_TOKEN with your access token obtained in the previous task.
- Review the
search_results.jsoncontents. This file will list the users returned by Oracle Identity Cloud Service. - The
countattribute to control how many entries will be retrieved in a search. - The
startIndexattribute to control what will be the first entry returned in a search. - The
countand thestartIndexattributes combined for a full pagination. For example, to return 30 users from a search with 10 users returned by page, you make 3 REST API calls: - To filter the search results to display less attributes, you can use the
attributesfilter. To use theattributesfilter for usernames:
Replace the the IDCS_URL and the ACCESS_TOKEN as you did on previous tasks.curl -k -X GET -H "Authorization: Bearer ACCESS_TOKEN" "IDCS_URL/admin/v1/Users?attributes=userName" -o search_results.json - Review the
search_results.jsoncontents. The file will list the user name and the id for each Identity Cloud Service user:
Tip: The code below is formatted for better reading.{ "schemas": ["urn:scim:api:messages:2.0:ListResponse"], "totalResults": 3, "Resources": [{ "userName": "tsemmens@example.com", "id": "2352ff98f4b044eb891abb255d13aa8b" }, { "userName": "csaladna@example.com", "id": "ac7a646392aa43feaaa92b44a77b01cc" }, { "userName": "jaspiom@example.com", "id": "2e72a521c902482baffe164c3fe7bfcf" }], "startIndex": 1, "itemsPerPage": 50 } - To filter the search results, you can include the
filterparameter as follows: - The filter parameter expression must be url encoded before performing a request. In this task, the filter expression is
userName+sw+%22csaladna%22. This is the url encoded value foruserName sw "csaladna". - The Identity Cloud Service REST API filter expression complies with the SCIM standard. In this example, the filter
userName sw "csaladna"means that you are searching for users with the userName starting with csaladna. - The REST APIs support other types of filter expression such as eq (equals), ne (not equal), and co (contains). For complete information about all the filtering options, visit the Identity Cloud Service REST API documentation.
- Review the
search_results.jsoncontents. The file list only one Clarence Saladna:
Tip: The code below is formatted for better reading.{ "schemas": ["urn:scim:api:messages:2.0:ListResponse"], "totalResults": 1, "Resources": [{ "userName": "csaladna@example.com", "id": "ac7a646392aa43feaaa92b44a77b01cc" }], "startIndex": 1, "itemsPerPage": 50 } - Make a note of Clarence Saladna's id displayed in the search results (in this example, ac7a646392aa43feaaa92b44a77b01cc). This information is required for the remaining tasks in this tutorial.
Tip: The Users REST API implements by default return pagination with up to 50 users retrieved by search. To control the search pagination results, you can use:
IDCS_URL/admin/v1/Users?count=10&startIndex=0
IDCS_URL/admin/v1/Users?count=10&startIndex=10
IDCS_URL/admin/v1/Users?count=10&startIndex=20curl -k -X GET -H "Authorization: Bearer ACCESS_TOKEN" "IDCS_URL/admin/v1/Users?attributes=userName&filter=userName+sw+%22csaladna%22" -o search_results.jsonNotes:
Update Users
In this task, you modify a user using the REST API.
Tip: In this tutorial, you modify a user using the method PATCH. This method updates only the user values you sent. The User REST API also supports modification using the PUT method. This method updates the user values you sent and clears other values within the user you didn't send.- Create or download the update1.json file with the following content:
- Using a text editor, prepare the
cURLcommand as follows: - The IDCS_URL and the ACCESS_TOKEN as you did on previous tasks.
- The CSALADNA_ID with Clarence Saladna's user id attribute, retrieved in the previous search (for example, ac7a646392aa43feaaa92b44a77b01cc).
- Return to the command prompt and run the
cURLcommand. - Optionally, verify the
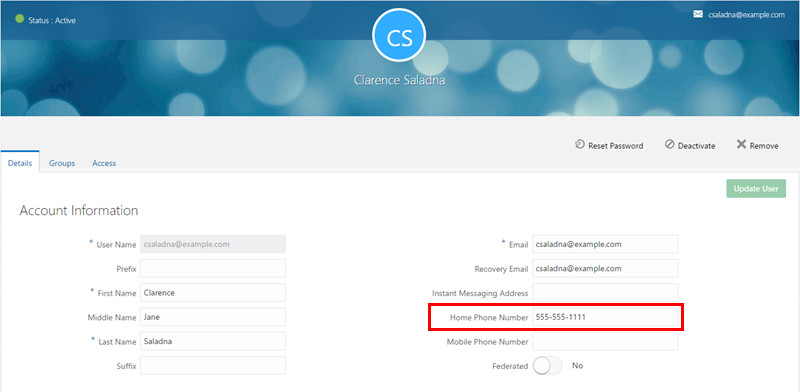
user_output.json. This file contains new details about Clarence Saladna, including her new home phone number. - Access the Identity Cloud Service console, open the
Clarence Saladna user, and confirm that the new home phone number is displayed.
Description of this image
{
  "schemas": [
    "urn:ietf:params:scim:api:messages:2.0:PatchOp"
  ],
  "Operations": [
    {
      "op": "add",
      "path": "phoneNumbers",
      "value": [
        {
          "value": "555-555-1111",
          "type": "home"
        }
      ]
    }
  ]
}curl -k -X PATCH -H "Content-Type: application/scim+json" -H "Authorization: Bearer ACCESS_TOKEN" "IDCS_URL/admin/v1/Users/CSALADNA_ID" -d '@update1.json' -o user_output.jsonDelete Users
In this task, you delete Clarence Saladna in Identity Cloud Service.
- Return to the command prompt and enter the delete command:
Replace:curl -k -v -X DELETE -H "Authorization: Bearer ACCESS_TOKEN" "IDCS_URL/admin/v1/Users/CSALADNA_ID"- The IDCS_URL and the ACCESS_TOKEN as you did on previous tasks.
- The CSALADNA_ID with Clarence Saladna's user id attribute (for example, ac7a646392aa43feaaa92b44a77b01cc).
- On the return, confirm that the http code HTTP/1.1 204 No Content is displayed. This means that Clarence Saladna is deleted.
- Optionally, access the Oracle Identity Cloud Service UI and click Users. Clarence Saladna no longer appear under users.
Want to Learn More?
To learn more about the REST APIs, explore the following tutorials and documents:
-
Oracle Identity Cloud Service: REST API documentation
-
Oracle Identity Cloud Service: Managing Groups Using REST API Calls
To learn more about how to use the REST APIs for Federated SSO (using OpenID Connect plus OAuth 2.0), and Authorization scenarios (using OAuth 2.0), explore the following tutorials: