Before You Begin
Purpose
In this tutorial, you learn to integrate Oracle Identity Cloud Service REST APIs with Splunk for external monitoring.
Time to Complete
30 minutes
Introduction
Oracle Identity Cloud Service (IDCS) follows a REST API-first strategy, which means that 100% of the product (including administrative functionalities) are exposed via REST APIs. Because of this, you can basically perform any task programmatically.
In this tutorial, we take advantage of IDCS REST APIs for implementing a monitoring integration via Splunk.
Tip: Oracle offers native management solutions for Identity Cloud Service (Cloud Portal KPIs/Runtime Graphs, Identity Cloud Service reports, and Management Cloud) that do not require configuration. The integration between IDCS and Splunk can be useful for those that are already using this solution.Architecture
In this tutorial, you integrate Identity Cloud Service and Splunk following the conceptual architecture below:
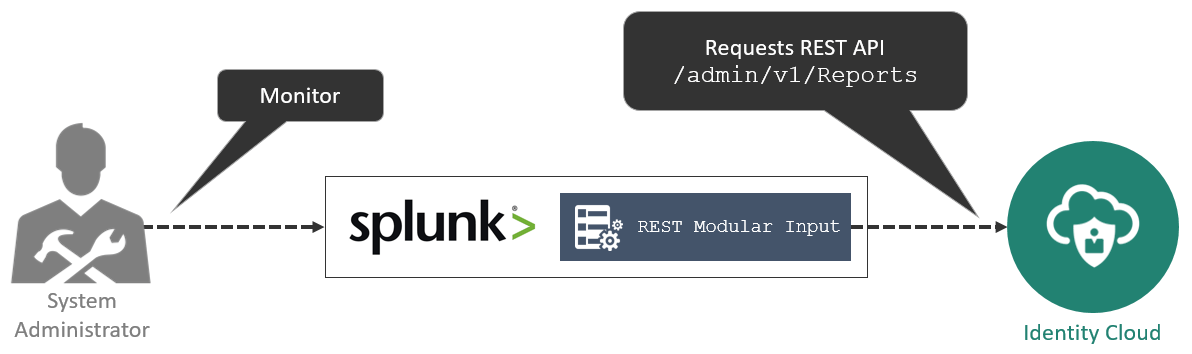
In this integration:
- Splunk regularly requests the Reports endpoint in Identity Cloud Service using the REST Modular Input.
- Identity Cloud Service validates requests from Splunk (using OAuth 2.0) and retrieves report information in JSON, that's parsed by Splunk.
- System Administrators can access Splunk to gather consolidated information.
What Do You Need?
- Splunk Enterprise with the REST Modular Input installed Tip: In this tutorial, we used Splunk v6.5 with REST Modular Input v1.4
- Access to Identity Cloud Service as Identity Domain Administrator.
Register a Client Application in Identity Cloud Service
Create and activate an Application
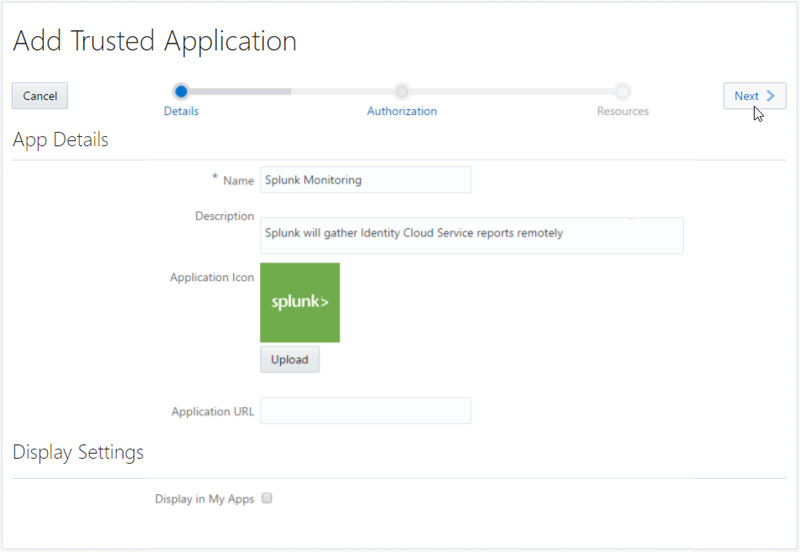
In this task, you configure and activate the Splunk Monitoring application in Oracle Identity Cloud Service.
The application is a requirement for making REST API calls to Identity Cloud Service.
- In the Identity Cloud Service console, expand the Navigation Drawer
 , click Applications, and then click Add.
 -
Select Trusted Application or Confidential Application.
Tip: The UI provides information about each type of application supported by Oracle Identity Cloud Service. - Enter
Splunk Monitoringas the Name, optionally provide an Application Icon and Description and then click Next. - Enter the information as follow and then click Next.
- Click Finish.
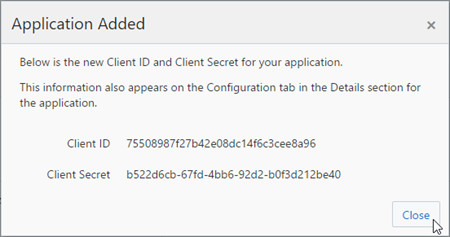
- Save the Client ID and the Client Secret, and then click Close.
- Click Activate, and then click Activate Application. Oracle Identity Cloud Service displays a confirmation message.
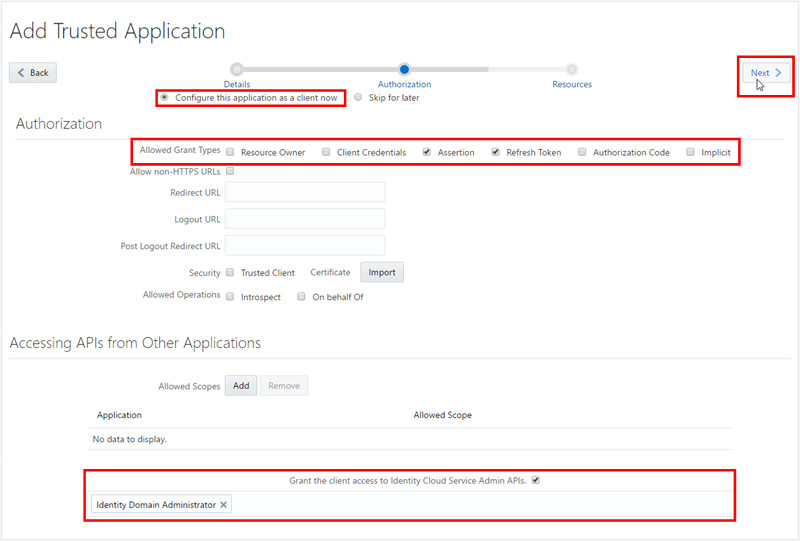
Click Configure this application as a client now.
| Attribute | Value(s) |
| Allowed Grant Types | Assertion Refresh Token |
| Grant the client access to Identity Cloud Service Admin APIs | Identity Domain Administrator |
Get an Access Token
In this task, you get an Access Token for Splunk. The Access Token provides a session (with scope and expiration), that your Splunk can use to make REST API requests in Oracle Identity Cloud Service.
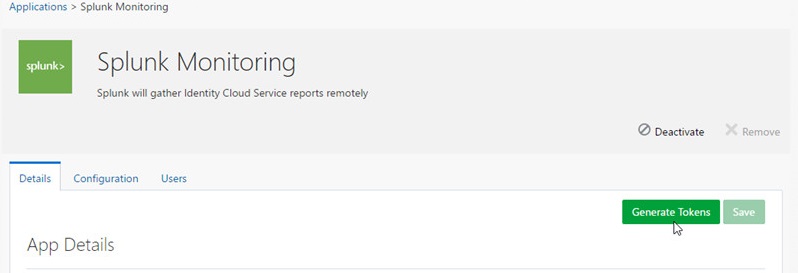
Note: In communications between servers and no users -- like in the Splunk and IDCS integration --, the access token should ideally be obtained programmatically by Splunk using the OAuth client credentials flow. Since Splunk does not support this flow, you generate the access token via UI.- In the Splunk Monitoring application page, click Generate Tokens.
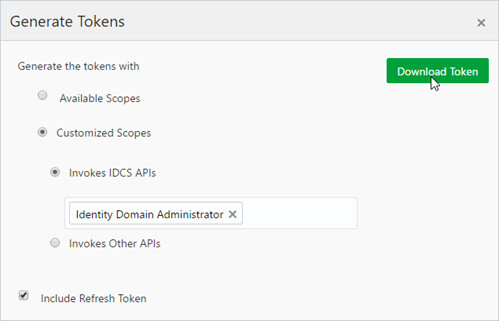
- Select Customized Scopes and Include Refresh Token and then click Download Token.
- Save the tokens.tok file in a temporary folder. Tip: The tokens.tok file contains the access token that identifies your client access in Oracle Identity Cloud Service and will be used by Splunk to make REST API calls. This token is encoded following the JSON Web Token (JWT) standard.
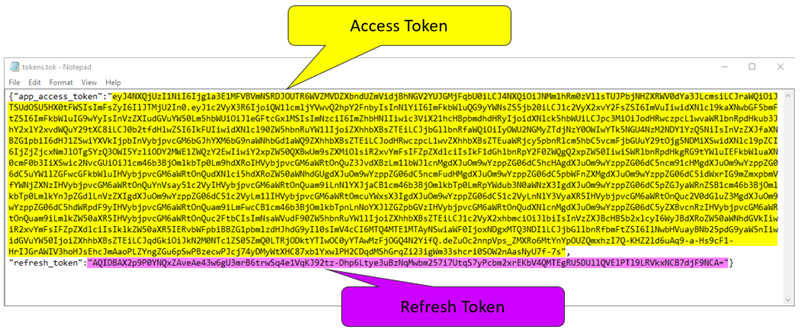
- Open the tokens.tok file in a text editor.
- Copy the Select and copy the access token value -- app_access_token -- and the refresh token -- refresh_token -- values between the double quotes (").
Configure the REST input in Splunk
In this task, you create a REST input for Oracle Identity Cloud Service reports API.
Create the REST Input
- On Splunk and click Add Data.
- Click Monitor.
- Click REST.
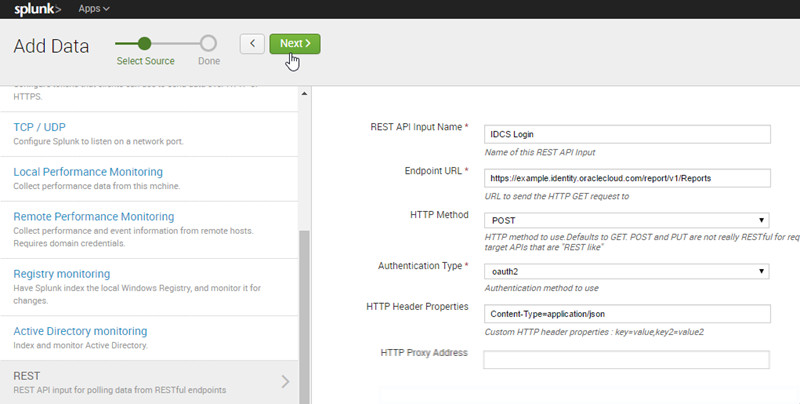
- Enter information as follows and then click Next > Done.
| Attribute | Value(s) |
| Name | IDCS Login |
| Endpoint URL | YOUR_IDCS_HOST/report/v1/Reports |
| HTTP Method | POST |
| Request Payload | { "schemas": ["urn:ietf:params:scim:schemas:oracle:idcs:Report"], "outputFormat": "json", "reports": [{ "name": "userLogin", "type": "count", "correlationId": "userLoginReport" }] } |
| Authentication Type | OAUTH 2 |
| OAUTH 2 Access Token | YOUR_ACCESS_TOKEN |
| OAUTH 2 Refresh Token | YOUR_REFRESH_TOKEN |
| OAUTH 2 Token Refresh URL | YOUR_IDCS_HOST/oauth2/v1/token |
| OAUTH 2 Client ID | YOUR_APP_CLIENT_ID |
| OAUTH 2 Client Secret | YOUR_APP_SECRET |
| HTTP Header Properties | Content-Type=application/json |
| Response Type | json |
| Index Error Responses | selected |
| Source type | _json |
Verify the integration
- In Splunk home, click Search & Reporting.
- Click Data Summary.
- Click Sources > IDCS Login. Splunk displays the Identity Cloud Service login metrics in JSON Format.
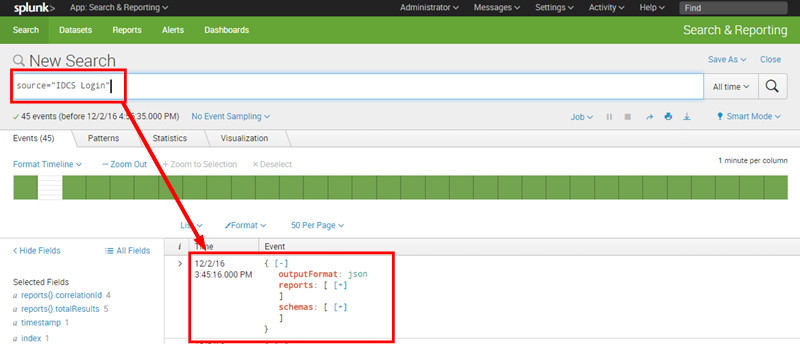
At this point, Splunk is capable of querying report data from Identity Cloud Service REST APIs. With this data, you can setup Splunk reports, dashboards, and instrumentations. In the next section, you have a brief introduction about how to configure a Splunk dashboard based on Identity Cloud Service data.
Optional: Configure Splunk reports and dashboards
In the previous section, you configured Splunk to query report data from Identity Cloud Service REST APIs. With this data, you can setup Splunk reports, dashboards, and instrumentations.
In this optional section, you have a brief introduction about how to configure a Splunk dashboard to present the Identity Cloud Service data.
Generating dashboards and reports in Splunk from REST/JSON requires manual configuration of few objects:
- Field Aliases: Required by Splunk to get specific values from JSON arrays. Tip: You use filter aliases because Splunk is not able to process JSON arrays (containing characters such as "{" and "}"). Trying to consume these fields without an alias generates the error "Field Name can not contain whitespace, double quotes, single quotes, curly braces or asterisks".
- Data Sets: Sets a scope for data model reports based on search criteria.
- Data Model: Enable users to easily create reports in the Pivot tool based on data sets, transformations, lookups, and evaluation rules.
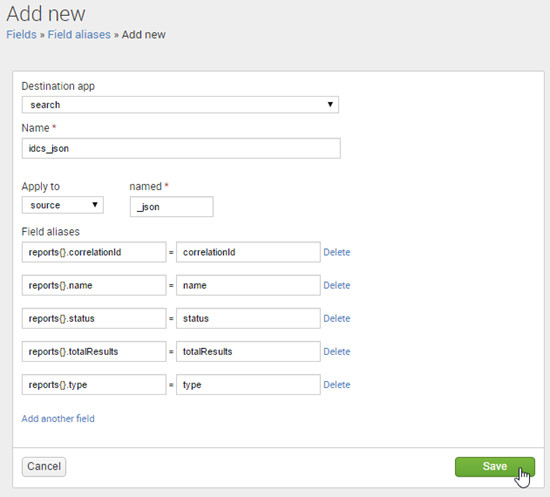
Create a Filter Alias
- In Splunk home, click Search & Reporting.
- Click
Settings >Fields . - On Field aliases, click Add new.
- Enter the following information and click Save.
- reports{}.correlationId = correlationId
- reports{}.name = name
- reports{}.status = status
- reports{}.totalResults = totalResults
- reports{}.type = type
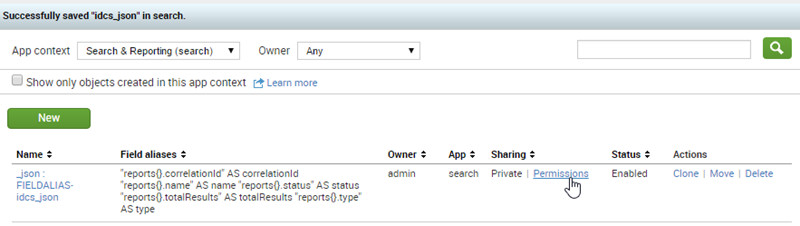
- In the _json : FIELDALIAS-idcs_json row, click Permissions.
- Select All apps and click Save.

| Attribute | Value(s) |
| Source type | _json |
| Destination App | search |
| Name | idcs_json |
| Apply to | sourcetype |
| named | _json |
| Field aliases |
|
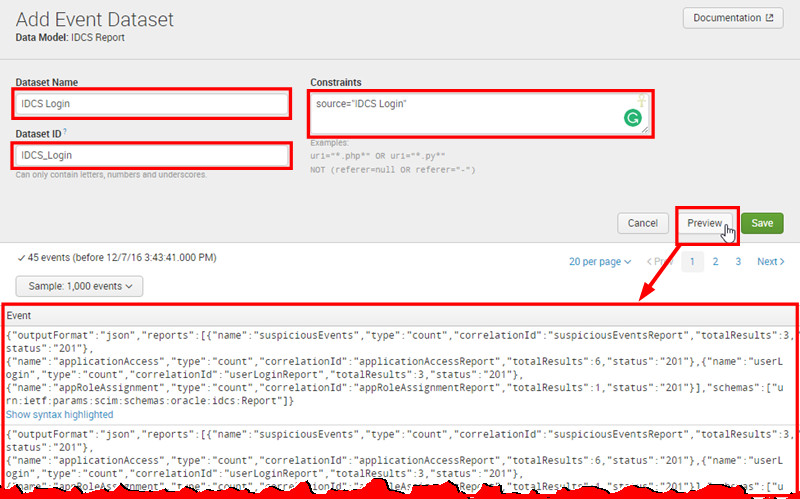
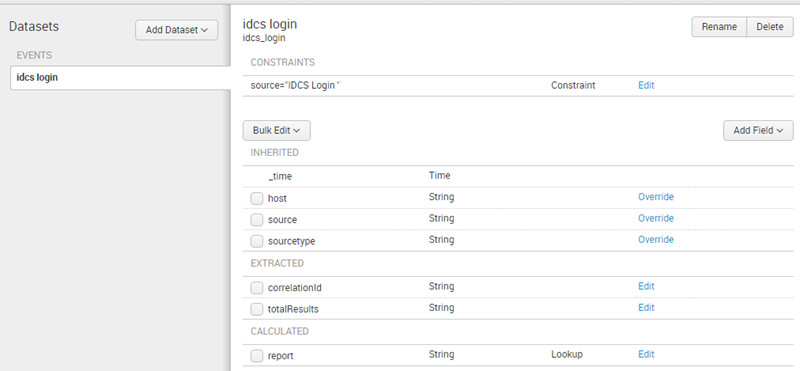
Create a Data Model and Data Set
- Click Settings > Data models.
- Click New Data Model. Enter a Title, ID, and Description of your preference, and then click Create.
- Click Add Dataset > Root Event.
- Enter
IDCS Loginas name andsource="IDCS Login"as a constraint and click Preview.
A sample of results should be displayed on the screen.
- Click Save.
- Click Add Field > Auto-Extracted.
- Click Add by Name. Enter
correlationIdas field. - Click Add by Name. Enter
totalResultsas field.
The data model will display the new fields:
Create a Report and a Dashboard
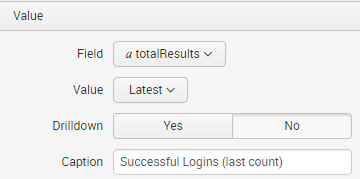
- Click Pivot.
- Click IDCS Login.
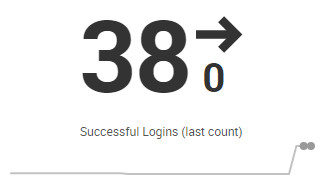
- Click Single Value.
- Under Value, select:
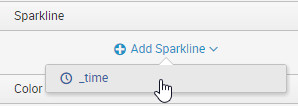
- Click Add Sparkline > time.
- Optionally, save the report to an existing or new dashboard panel or as a report.

| Attribute | Value(s) |
| field | totalResults |
| value | Latest |
| Caption | Successful Logins (last count) |
Optional: What's Next?
Now that you know how to gather Identity Cloud Service data in Splunk, you can expand your queries for a better monitoring experience.

You can expand the integration in the following areas:
- Expand Splunk data models, datasets, and lookups to parse more information retrieved by IDCS.
- Work on Splunk datasets to perform nested searches on JSON. You can do it using Splunk's spath.
- Expand the REST input to query more reports in Identity Cloud Service. The Identity Cloud Service Postman collections provide few samples for making requests for additional reports.
- Customize Splunk to use client_credentials authentication in OAuth, which is the ideal OAuth authorization flow for Server to Server communication.
Want to Learn More?
To learn more about how to integrate Oracle Identity Cloud Service with Java Client and Resource Server applications, try the tutorials:
To learn more about the Identity Cloud Service REST APIs, explore the following tutorials and documents:
Credits
- Developer(s): Frederico Hakamine