 Creating
an Oracle Java Cloud Service Instance for WebCenter Portal Cloud Service
Creating
an Oracle Java Cloud Service Instance for WebCenter Portal Cloud Service Before You Begin
This 15-minute tutorial shows you how to create an Oracle Java Cloud Service instance for WebCenter Portal Cloud Service. You'll learn to create the instance without the load balancer.
This is the second tutorial in the Provisioning WebCenter Portal Cloud Service in the Development Topology series. Read them sequentially.
- Creating an Oracle Database Cloud Service Instance for WebCenter Portal Cloud Service
- Creating an Oracle Java Cloud Service Instance for WebCenter Portal Cloud Service
- Installing WebCenter Portal Cloud Service
- Accessing WebCenter Portal Cloud Service
- Configuring the Load Balancer for WebCenter Portal Cloud Service
- Installing Portlet Server
- Adding Users to Oracle Unified Directory
Background
Oracle WebCenter Portal Cloud Service is delivered on top of Oracle Java Cloud Service. With Oracle Java Cloud Service, you can quickly create and configure an Oracle WebLogic Server domain and set up your service without worrying about infrastructure or platform details. When you create a WebCenter Portal Cloud Service instance, the VM(s) required to support the instance are provisioned and configured for you. Your instance is also preconfigured to use the specified Oracle Database Cloud Service and Oracle Storage Cloud Service instances.
When you provision Oracle WebCenter Portal Cloud Service, the mandatory components are installed, and you can choose to install the optional components.
- Mandatory components: Oracle WebCenter Portal Cloud Service, Oracle WebCenter Content, Oracle Inbound Refinery (IBR), Oracle Unified Directory (OUD)
- Optional components: Oracle Secure Enterprise Search (SES), Portlet Server
When you provision WebCenter Portal Cloud Service in a development topology, all the components except Portlet Server are installed on a single VM. Portlet Server is installed on a separate VM. In this topology, you can create the WebCenter Portal Cloud Service instance without a load balancer. If you want to provide high availability (HA), you can optionally configure the load balancer for the service.
What Do You Need?
Completion of the previous tutorial so that you have an Oracle Database Cloud Service instance for WebCenter Portal Cloud Service.
 Start
the Create Instance Wizard
Start
the Create Instance Wizard
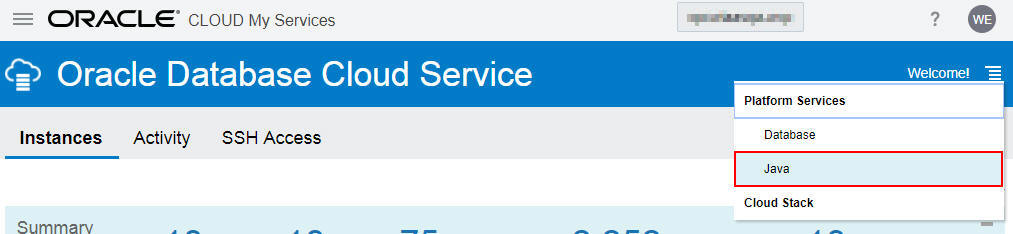
- On
the My
Services console, from
the main services menu, click Java.
Description of the illustration jcs_option.jpg - On the Oracle Java Cloud Service console, click Create Instance.
- From the Create Instance menu, select Java.

Description of the illustration create_wcp_instance.jpg The Create Instance wizard displays the Instance page.
 Configure
Basic Instance Information
Configure
Basic Instance Information
- In the Create New Instance wizard, on the Instance
page, specify the following instance details:
- Instance Name: Specify a unique name for your Oracle Java Cloud Service instance.
- Description: Optionally, specify a description of the instance.
- Notification Email: Specify the email ID to which status updates will be sent.
- Tags: Specify a tag for the instance. You can choose from the list of available tags or create a new one.
- Service Level: Select
Oracle Java Cloud Service for Fusion Middleware.
- Software Release: Select Oracle Weblogic Server 12c, 12.2.1.2.
- Software Edition: Select Enterprise Edition.
Note: If the wizard presents the option to choose a region, then specify your region and select an availability domain within the region and a subnet for your instance.
- Click Next.
 Configure
Instance Details
Configure
Instance Details
- On the Simple tab of the Instance
Details page, specify the following in the WebLogic
Configuration section:
- Compute Shape: Select the compute shape as OC1m - 1.0 OCPU, 15.0 GB RAM when creating the instance in Oracle Cloud Infrastructure Classic.Compute shape allows you to specify the number of OCPUs and RAM that each node on your instance should have.
- Server Count: Select the server size as 1. This determines the number of managed servers created.
- Fusion Middleware: Select WebCenter Portal.
Note: If you are creating the Java Cloud Service instance in Oracle Cloud Infrastructure, you need to select the compute shape as VM.Standard1.2 - 2.0 OCPU, 14.0GB RAM.
- Click the Advanced tab on the Instance Details page.
- In the WebLogic Configuration section of
the Advanced tab, specify the following:
- Domain Partitions: Retain the default selection.
- Enable to access Administration Consoles: Select to enable default access rules for the load balancer and WebLogic Server administration consoles.
- Deploy Sample Application: Clear the selection to disable deployment of a sample application with your service instance.
- In the WebLogic Access section, specify
the following:
- SSH Public Key: Specify the virtual machine SSH public key. You must use the same SSH public key that you used for creating the database instance for WebCenter Portal Cloud Service.
- Local Administrative Username: Specify
the user name that will be used as the administrator for
WebCenter Portal Cloud Service. For example,
weblogic. - In the Password and Confirm Password fields, specify the password you want to use.
To specify the key, click Edit. In the SSH Public Key for VM Access dialog, ensure Key File Name is selected. Click Choose File, then choose your SSH public key file, and click Enter.
- In the Database Configuration section,
enter or select the following:
- Database Instance Name: Select the name of the Oracle Database Cloud Service instance that you created earlier for use with WebCenter Portal Cloud Service.
- Administrator Username: Specify
SYS. - Password: Enter the Administrator password that you specified while creating the Oracle Database Cloud Service instance.
- Add Application Schema: Retain the default selection.
- In the Backup and Recovery Configuration
section, set the following values:
- Backup Destination: Select Both
Remote and Disk Storage.
- Cloud Storage Container: Specify the address of your cloud storage container. This can be an existing container or a new one that you want to create now.
- Username: Enter the user name of the administrator for the storage container.
- Password: Enter the password for the storage container administrator.
- If you wish to create a new storage container using the specified details rather than use an existing one, select the Create Cloud Storage Container check box.
- Backup Destination: Select Both
Remote and Disk Storage.
- In the Load Balancer section, for the Provision Local Load Balancer field, retain the default selection No. You can add the load balancer later.
- Click Next.
- Review the details on the Confirmation
page. Click Create if the details are
correct.
The Services page displays, listing your new Java Cloud Service instance for WebCenter Portal Cloud Service. It will show the status as "Creating service" until the instance creation is complete. The process to create the Java Cloud Service instance will take a number of minutes; possibly 30 or more.
Your Java Cloud Service instance will create a VM containing an administration server and a managed server.
Description of the illustration wcp_instance.jpg
The Advanced tab displays.

 Add
Storage to the Instance
Add
Storage to the Instance
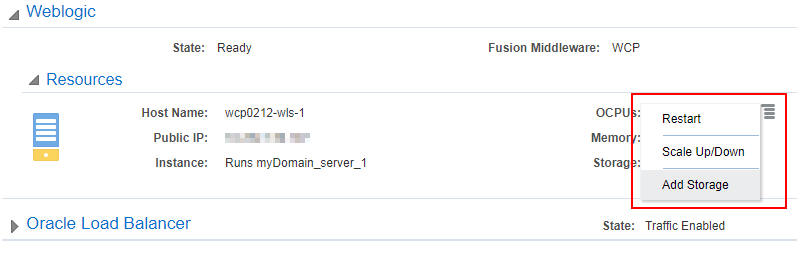
- On the Oracle Java Cloud Service console, click the Oracle
Java Cloud Service instance you just created for WebCenter
Portal Cloud Service.
This displays the service instance details.
- In the WebLogic section, click the Manage
this node menu for the administration server node,
and select Add Storage.
Description of the illustration select_scale_up_down.jpg - In the Add Storage dialog, select the Additional
Partition Size GB option and type
20to create a new storage volume of 20 GB.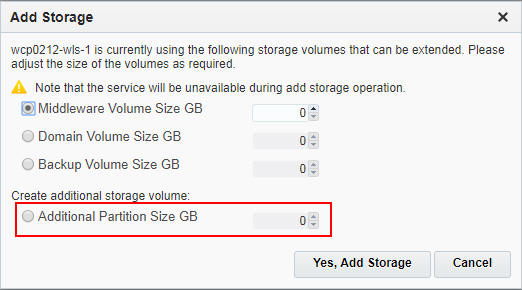
Description of the illustration create_storage_volumes.jpg - Click Yes, Add Storage to confirm the
change.
- Using the same procedure, you must create two more storage
volumes. Create a second storage volume of 30 GB in size.
If you are not able to access the Manage this node drop-down menu, the previous scale-up operation might still be in progress.
- Create a third storage volume of 10 GB.