This tutorial tells you how to create a secure
shell (SSH) tunnel to access the services and
resources provided by your Oracle Java Cloud Service
instance's virtual machine (VM).
Time to Complete
Approximately 30 minutes.
Background
Oracle Cloud services such as Oracle Java Cloud
Service and Oracle Database Cloud Service are built
on top of infrastructure and functionality that are
provided by Oracle Compute Cloud Service. When you
create an instance of one of these services, all the
Oracle Compute VMs required to support the service
are provisioned and configured for you.
You can access
the services and resources provided by the VMs by
logging into the machine through a secure shell
(SSH). If
the port for a resource provided by a VM is not
directly accessible through the internet, you can
access that resource by creating an SSH "tunnel" to
a port in the VM hosting the service instance. For
example, a tunnel is required for connecting a local
Integrated Development Environment (IDE) such as
Eclipse to your Oracle Java Cloud Service instance.
Scenario
In this tutorial you will create tunnels in two
ways: first by using the PuTTY for Windows
application, and then by using the ssh
command in a UNIX command shell. You will confirm
that the tunnel was created by launching the remote
WebLogic Server Administration Console on the VM as
though it was local.
What Do You Need?
You need an SSH client to create an SSH tunnel.
This tutorial describes two ways to create a tunnel,
one using a Windows GUI client, called PuTTY, and
one using the ssh utility at the
command line. You don't have to do both, although
you might want to learn both ways. You'll need one
or both of the following:
PuTTY
PuTTY is a free, open-source implementation of
several network protocols, including SSH. It is
available for Windows and for UNIX platforms.
PuTTY includes several utilities including a
terminal emulator, an SSH key generator, and a
network transfer application. You'll need the
Windows version for this tutorial.
PuTTY is available from many sites, but you can
reach the main download site http://www.putty.org.
An SSH client, including support for the SSH
protocol and a command line shell. Many
implementations of UNIX and UNIX-like operating
systems already include ssh; so if
you have one of those, you won't have to install
ssh. Check the documentation for
your operating system to see if you have ssh
already (or simply try typing ssh
at the command line to see if it is installed
already).
Some knowledge of UNIX, for working at the
command line.
An Oracle Java Cloud Service instance for which
you have log-in credentials. For information
about creating an Oracle Java Cloud Service
instance, go to the tutorial Getting
Started with Oracle Java Cloud Service.
An SSH private key file that matches the SSH
public key used when the Oracle Java cloud
Service instance was created. For PuTTY, you
need a private key in the proprietary PuTTY (.ppk)
format. For ssh at the command
line, you need an SSH format such as OpenSSH.
Finding the IP Address of the VM
Whether you use PuTTY or a command line shell, you
must find the IP address of the VM hosting your
Oracle Java Cloud Service instance before you can
create an SSH tunnel.
Sign in to the My Services application by
clicking the link in your Welcome email. Or, you
can go to http://cloud.oracle.com,
click Sign In, and select the Public Cloud
Services value for your region from the My
Services - Select Data Center dropdown list.
Either way you must provide an identity domain,
user name, and password to sign in.
When logged in, you will see the My Services
Dashboard.
From the navigation menu at the top of
the page, choose Java.
The Oracle Java Cloud Service Console is
displayed. An example is shown in the following
illustration.
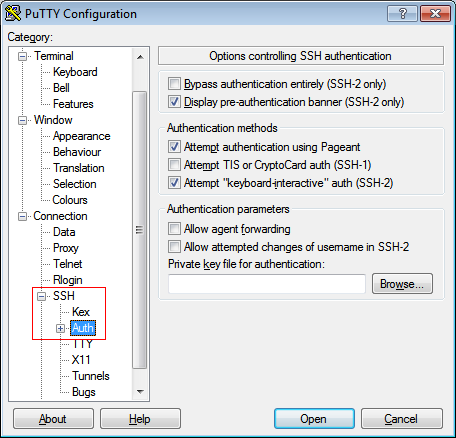
This optional step ensures that only the SSH
tunnel is enabled. You will not be able to use
the SSH session to run commands in the command
shell (although you will be able to enter the
passphrase for your SSH key, as described later
in this tutorial).
In the Category tree, expand SSH,
and then click Auth.
The Options controlling SSH authentication
panel is displayed.
In the Select private key file
window, click PuTTY Private Key Files
(.ppk) to find and open the private
key file that matches the public key used when
the instance was created.
Note: The .ppk
extension indicates that the private key is in
PuTTY's proprietary format. You must use a key
of this format when using PuTTY. If you have to
use a key saved in a different format, see the
PuTTY documentation.
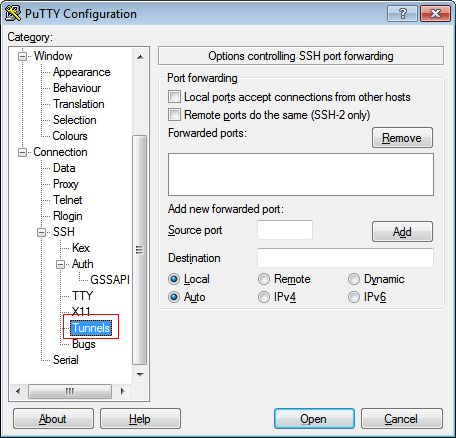
In the Category tree, click Tunnels.
The Options controlling SSH port forwarding
panel is displayed.
In the Destination box, enter
admin_server_ip:9001, where
admin_server_ip is the
public IP address for the Administration Server
that you found and recorded earlier in this
tutorial. Also select Local
and Auto, if they aren't
already selected.
Note: Port 9001
is the default port created specifically for
connecting to the Administration Server via SSH
tunnels.
In the Source Port box, type
9001, to match the the VM's port
number.
Note: It is not a general
requirement of SSH tunnels that the port numbers
match. However, it is a requirement of the
JMX/RMI protocol that is used for communicating
with the port on the Administration Server.
In the Saved Sessions box,
enter a name for this connection configuration.
For the tutorial, type vm_session,
and then click Save. When you
open PuTTY the next time, you can load this
configuration by selecting it and clicking Load.
Click Open to open the
connection to the VM. If this is the first time
you are connecting to the VM, the PuTTY Security
Alert window is displayed, prompting you to
confirm the public key.
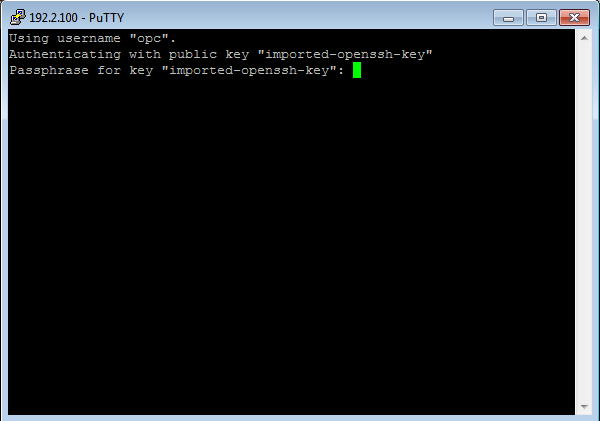
The PuTTY Configuration window closes and the
PuTTY command window is displayed. The user name
is the value you supplied earlier, in the Auto-login
username box in step 5.
When prompted, enter the passphrase for the
key, if one was defined.
The tunnel is now created. Any packets sent to
the client's port 9001 will reach the VM's port
9001. In this tutorial, you established a
connection between port 9001 on your client and
port 9001 on the VM that hosts WebLogic Server.
So you can now access port 9001 on the
Administration Server (on the VM) by connecting
to your client's port 9001.
Note: This "port forwarding"
established by the tunnel is different from a
regular SSH session, which simply provides the
secure shell for logging into and issuing
commands on a remote computer.
You can see that the tunnel is working by
displaying the WebLogic Server Administration
Console for the service instance. Enter the
following into a web browser's address bar:
localhost:9001/console
The WebLogic Server Administration Console
log-in page is displayed.
Log in with your usual WebLogic Server
administration log-in credentials for the Oracle
Java Cloud Service instance.
The WebLogic Server Administration Console is
displayed. You can see from the localhost:9001
in the address that the tunnel is working. The
local port is being forwarded to the remote host
(VM) and port.
Also, under Domain Structure in the
Administration Console, you can see the name of
the WebLogic Server domain in your Oracle Java
Cloud Service instance.
In a command line shell, set the file
permissions of the private key file so that only
you have access to it:
$ chmod 600 private-key-file
where private-key-file
is the path to the SSH private key file that
matches the public key used when your Oracle
Java Cloud Service instance was created.
-L specifies that the local
(client) port is to be forwarded to the remote
host and port. This allocates a socket to
listen to the local port. Whenever a
connection is made to the local port, it is
forwarded over the secure channel, and a
connection is made to the host port from the
remote machine.
private-key-file is
the path to the SSH private key file that
matches the public key used when your
instance was created.
Note: When using an SSH
client at the command line, you cannot use a
private key saved in PuTTY (.ppk)
format. If the only private key you have is
in PuTTY (.ppk) format, see the
PuTTY documentation for instructions on how
to convert it to OpenSSH format.
local-port is the
port number on your client.
Because the VM uses 9001 as the listen port
for the Administration Server, and because
the client and the VM port numbers must
match, use 9001 for local-port.
vm-ip-address is the
IP address of the VM in x.x.x.x format. For
an Oracle Java Cloud Service instance, you
can use the IP address of the Administration
Server or the IP address of the load
balancer, if one is enabled.
vm-port is the port
number on the VM to which you want to create
a tunnel. Oracle Java Cloud Service uses 9001
as the listen port for the Administration
Server. Therefore, use 9001 as the vm-port.
opc@vm-ip-address is
the user account (opc) and the
VM's IP address.
-N ensures only the SSH tunnel
is enabled. You will not be able to use the
SSH session to run commands in the command
shell.
Now you are logged in, and you can use any
resources of that server as if it were local.
You can see that the tunnel is working by
displaying the WebLogic Server Administration
Console for the service instance. Enter the
following into a web browser's address bar:
localhost:9001/console
The Weblogic Server Administration Console
log-in page is displayed.
Log in with your usual WebLogic Server
administration log-in credentials for the Oracle
Java Cloud Service instance. The WebLogic Server
Administration Console for your instance is
displayed.
 navigation menu at the top of
the page, choose Java.
navigation menu at the top of
the page, choose Java.