Before You Begin
Purpose
This tutorial explains how to apply a patch and roll back a patch for an Oracle Java Cloud Service instance.
Last Updates
May 2017, Release 17.2.3
Please note that Oracle develops its cloud services in an agile manner and makes rapid changes to meet our users' needs. Therefore this tutorial may not reflect all of the changes since the last update to this service. For the very latest information see:
Time to Complete
Approximately 30 minutes
Background
Patching and rollback are one-click processes that do not interrupt Oracle Java Cloud Service operation.
Scenario
To keep your service current, you can apply patches that Oracle makes available quarterly.
What Do You Need
A web browser is required for working with Oracle Cloud Services. These are the minimum requirements:
- Microsoft Internet Explorer 9 or 10.
- Set Browser Mode to IE9 or IE10
- Set Document Mode to IE9 or IE10 standards
- Google Chrome 29 and later
- Mozilla Firefox 24 and later
- Apple Safari 6 and later
Before starting this tutorial, you should have:
- Created an Oracle Java Cloud Service instance. See the tutorial Getting Started with Oracle Java Cloud Service.
- Deployed and started an application on that instance. See the Deploying an Application by Using the WebLogic Server Administration Console tutorial.
Verifying that Your Application is Running
Before you patch your instance, perform the following steps to verify that your application is running.
-
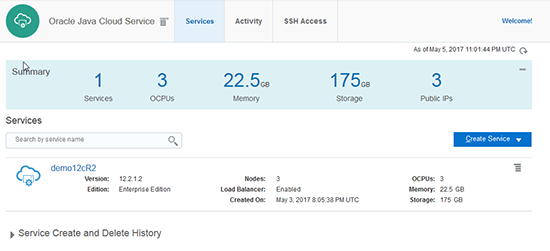
Navigate to the Java Cloud Service Console.
Description of this image -
Select the instance you have created.

Description of this image The Java Cloud Service Instance Overview page is displayed.
Description of this image -
Note the IP address of the load balancer. You will need this information later to run your application.
Description of this image -
Click the menu icon on the top right corner of the page, and select Open WebLogic Server Console.

Description of this image -
A message might appear, warning of an untrusted certificate. Allow the exception.
-
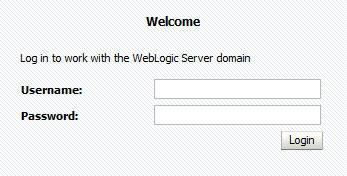
Enter your log-in credentials to complete access. These are the credentials you specified when you created the instance.
Description of this image -
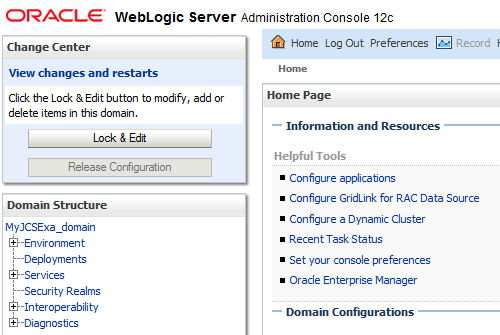
On the Administration Console, click domain > Deployments, where domain is the domain where the application is deployed.
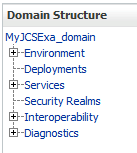
Description of this image -
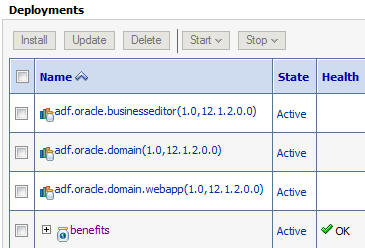
Find your application on the deployments table and verify that the status is Active.

Description of this image -
Leave the Administration Console open.
-
Open a browser window and type the following information into the address bar:
https://IP_addr_load_balancer/context_root_of_appIn this example, the URL is:
https://IP_addr_load_balancer/benefitsThe application is displayed.

Description of this image
The WebLogic Server Administration Console home page is displayed.
Applying a Patch
To apply a patch, perform the following steps:
-
Navigate to the Patching page.
-
Open the Oracle Java Cloud Service Console.
Description of this image -
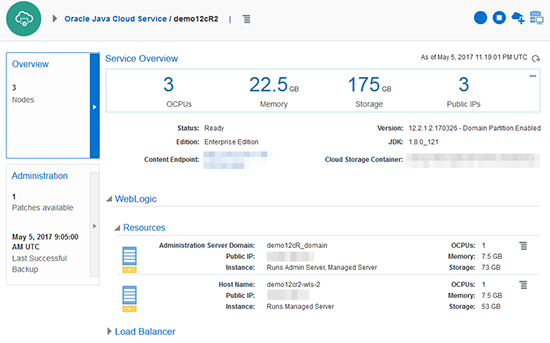
Click the name of the instance you want to patch.
Description of this image The Java Cloud Service Instance page is displayed with the Overview tile in focus.
Description of this image -
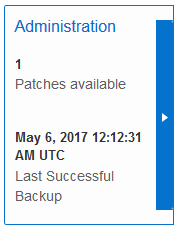
Click the Administration Tile. It shows how many patches are available to apply, and the date and time of the last backup.
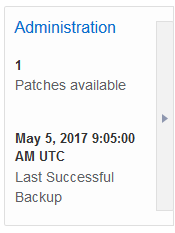
Description of this image -
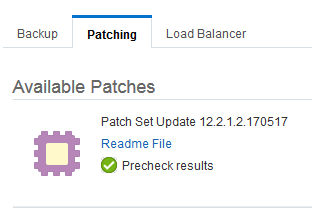
Click the Patching tab.The Patching page is displayed.
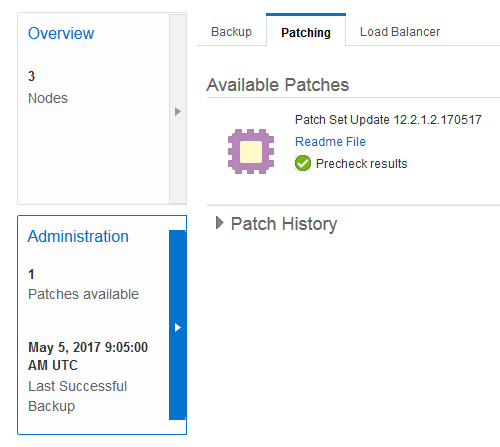
Description of this image
-
-
In the Available Patches section, click the
 menu to the right of the patch you want to apply
and select Patch.
menu to the right of the patch you want to apply
and select Patch.
Description of this image Note: You can choose to run patching prechecks in order to identify and address any issues found before you attempt to patch the service instance. In this case, we choose to proceed directly to patching.
-
In the Patch Service dialog:
-
Type a note for your reference, describing the purpose of the patch. Note: This note is required.

Description of this image -
If Oracle Coherence is enabled for your instance: Select the Confirm checkbox to override the default behavior, which is to verify the high availability status of the data stored in the Coherence data tier before shutting down a node to apply the patch.
When Confirm is selected, know that this means there's a possibility of data loss by not requiring the services within the Coherence cluster to reach NODE-SAFE before stopping a server to apply the patch. If Confirm is not selected, understand that patching will fail if NODE-SAFE cannot be reached.
If there's only one Managed Server on the Coherence data tier of your instance, the Confirm checkbox is selected and disabled by default.
Note: If Coherence is not enabled, the Coherence information on this dialog does not appear.
-
-
In the Patch Service dialog, click Patch.
An hourglass is superimposed on the patch icon for the patch you are applying to show that patching is in progress.

Description of this image Note the status message shown on the Administration tile. The software will be updated to the version number shown.

Description of this image
Verifying Your Application During Patching
-
Return to the Deployments table on the Administration Console.
Description of this image -
On the Domains table, look for the status of your application.
Description of this image The application is still active while patching is in progress.
-
Leave the Administration Console open.
-
Open your browser and verify that your application is running.
Description of this image
Viewing the Backup
-
Return to the Oracle Java Cloud Service Instance page.
-
Click the Backup tab.The Backup page is displayed.

Description of this image A message shows that the backup is for applying a patch.

Description of this image If you need to restore the original state of the service instance, you can perform a restoration from the Backup page.
Verifying the Patch
-
Click the Patching tab to return to the Patching page.
When the patching operation completes, information about the patch is displayed in the Patch History section.
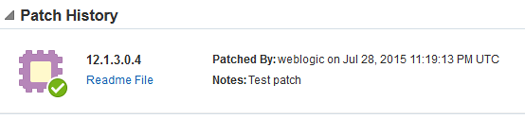
Description of this image A Roll Back button is displayed adjacent to the patch.

Description of this image
Verifying Your Application After Patching
After applying a patch, verify that the application you deployed is still running.
To verify that your application is running:
-
Return to the Administration Console.
-
Find your application on the deployments table and check that the status is Active.
Description of this image -
Leave the Administration Console open.
-
Go back to your browser window and check that the application is still running.
Description of this image
Rolling Back a Patch
To roll back a patch, perform the following steps:
-
Return to the Patching page.

Description of this image -
In the Patch History section, click the Roll Back button adjacent the patch you want to roll back.

Description of this image -
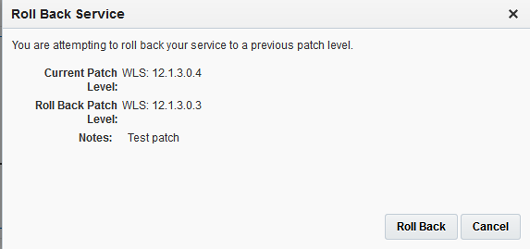
The Roll Back Service dialog is displayed. Click Roll Back.
Description of this image
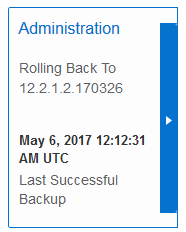
A Rolling Back... message appears on the Rollback button.

Note the status message on the Administration tile. The version number is shown.
The service instance returns to the previous patch state.
When the operation is complete, the Roll Back button in the Patch History section becomes inactive, preventing you from trying to rollback the patch again.

The patch returns to the Available Patches section.
 _
_ The Administration tile shows that the original patches are available. It also shows the last backup, which occurred during the patching operation.
Rolling back a patch has returned the service instance to its previous patch state.
Verifying Your Application After Rolling Back a Patch
Rollback does not undeploy your application, and in most cases the application remains running. If your application depends upon new features applied by the patch, the application remains deployed, but will not start.
To verify that your application is running:
-
Return to the Administration Console.
-
Find your application on the deployments table and check that the status is Active.
Description of this image -
Return to your browser window and check that the application is still running.
Description of this image
Want to Learn More?
- About Patching Oracle Java Cloud Service in the Oracle Help Center
- Oracle Java Cloud Service Tutorials in the Oracle Help Center
- Oracle Java Cloud Service Documentation in the Oracle Help Center