Using the Command Line Interface and an IDE with a Java Cloud Service
Overview
- Signing Up for a Java Cloud Service
- Deploying an Application to a Java Cloud Service
- An Oracle.com account
- Already completed the two previous Oracle by Example tutorials titled:
- Signing Up for a Java Cloud Service
- Deploying an Application to a Java Cloud Service
- Downloaded the Java Cloud Service SDK as part of the second tutorial.
Purpose
This tutorial covers using the Command Line Interface (CLI) and an Integrated Development Environment (IDE) with a Java Cloud Service.
Time to Complete
Approximately 30 minutes.
Introduction
In the tutorial you will see how to use the Command Line Interface with a Java Cloud Service. The tutorial also covers using an IDE with a Java Cloud Service. The IDE demonstrated is Oracle Enterprise Pack for Eclipse (OEPE).
Scenario
This tutorial assumes you are an Oracle customer. It also assumes you have completed two other Oracle by Example tutorials titled:
Prerequisites
Before starting this tutorial, you should have:
Using the Command Line Interface (CLI)
- <admin URL> is
https://javaservices.<datacenter>.cloud.oracle.com
This is the "Administration URL" used for all CLI and IDE interactions with the Java Cloud Service.
The <datacenter> is one of:- us1 (US Commercial 1)
- us2 (US Commercial 2)
- em1 (EMEA Commercial 1)
- em2 (EMEA Commercial 2)
- ap1 (APAC Commercial 1)
- ap2 (APAC Commercial 2)
- <service administrator> is the username of your Service Administrator. In this tutorial it is bill.bell@oracle.com. (Use your Service Administrator username instead.)
- <identity domain name> is the name of your Identity Domain. In this tutorial it is trialaakf. (Yours will be different.)
- <java service name> is the name of your Java Cloud Service. In this tutorial it is java.
- <application name> is the name of the application. In this tutorial the application name is visitors.
To use the Command Line Interface with a Java Cloud Service, perform the following steps:
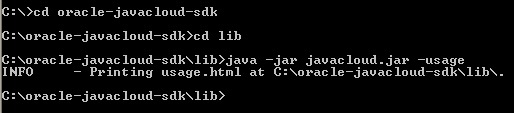
Open a command prompt and navigate to the lib
directory under the <SDK_HOME> directory.
<SDK_HOME> is where you previously unzipped the
Java Cloud Service SDK. In this tutorial, the SDK was unzipped to:
C:\oracle-javacloud-sdk
Run the usage command to generate a help file on the
Command Line Interface (CLI) named usage.html.
This file will be placed in the current directory. The command is:
java -jar javacloud.jar -usage
The usage.html file contains detailed instructions on how to use the CLI.
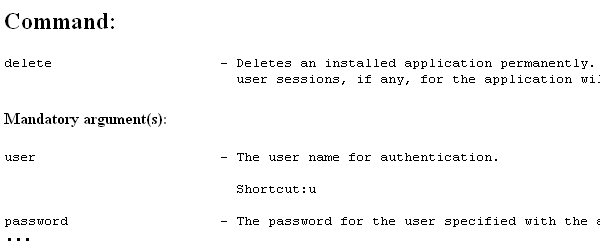
Open the usage.html file in a web browser and read the information on the describe-application and delete commands. These are the two main commands that will be used in this tutorial.
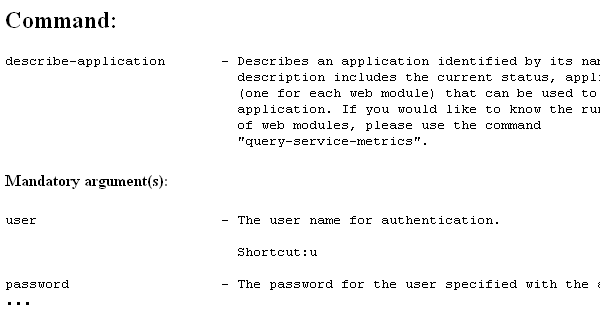
The CLI can be used to check the status of an application deployed to a Java Cloud Service. In a previous Oracle by Example tutorial titled Deploying an Application to a Java Cloud Service, you deployed a web application called visitors. This application's status can be checked by running the CLI with the describe-application command as follows:
java -jar javacloud.jar -describe-application
-adminurl <admin URL>
-user <service administrator>
-identitydomain <identity domain name>
-serviceinstance <java service name>
-application <application name>
Where:
So, the command filled in with the valid values for this tutorial looks like this:
java -jar javacloud.jar -describe-application
-adminurl https://javaservices.us1.cloud.oracle.com
-user bill.bell@oracle.com
-identitydomain trialaakf
-serviceinstance java
-application visitors
When the command is entered, it will prompt for the password.
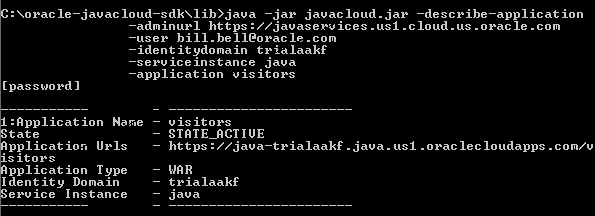
Notice the password prompt and that the password cannot be seen.
Also notice that when the application information prints out in the command prompt, the state of the application is "active."
Next you will see how to use the CLI to undeploy the visitors application. The command to stop, undeploy, and delete an application is delete. Any existing user sessions will be lost. Here is what the command looks like:
java -jar javacloud.jar -delete
-adminurl <admin URL>
-user <service administrator>
-identitydomain <identity domain name>
-serviceinstance <java service name>
-application <application name>
Filling in valid values for this tutorial, the command becomes:
java -jar javacloud.jar -delete
-adminurl https://javaservices.us1.cloud.oracle.com
-user bill.bell@oracle.com
-identitydomain trialaakf
-serviceinstance java
-application visitors
When you enter the command, use your Service Administrator username, Identity Domain name, and Java Cloud Service name.
This command will also prompt you for the password.
The command prints out some information, including a "Job Id."
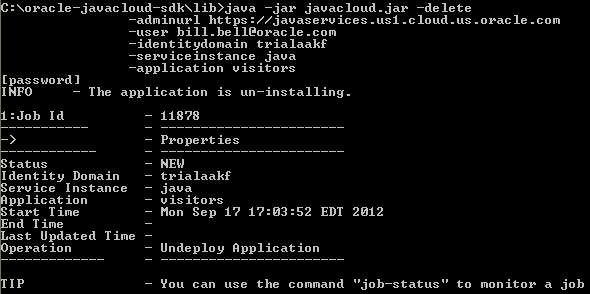
The delete command gives you a Job Id, because application deployment and undeployment are performed asynchronously. The Job Id can be used with the job-status command to verify the status of an asynchronous job, like undeploying an application.
Here is the job-status command with valid values for this tutorial:
java -jar javacloud.jar -job-status
-adminurl https://javaservices.us1.cloud.oracle.com
-user bill.bell@oracle.com
-identitydomain trialaakf
-jobid 11878
You will be prompted for the password.
When you enter the command, use the correct values for your situation, including the Job Id that printed out for you.
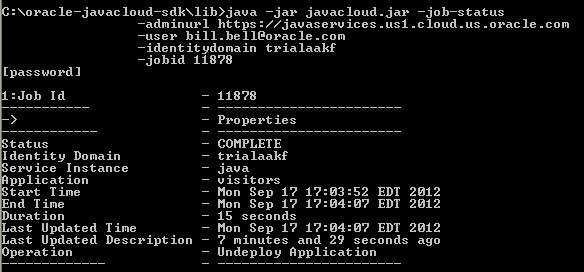
Notice that the job status is "COMPLETE." That means the application has been undeployed and deleted.
The delete command created the undeploy log file. This file can be downloaded with the job-log-file command. The file contains the details of the undeployment process.
Here is the command to download the undeploy log file, with valid values for this tutorial:
java -jar javacloud.jar -job-log-file
-adminurl https://javaservices.us1.cloud.oracle.com
-user bill.bell@oracle.com
-identitydomain trialaakf
-jobid 11878
-log undeploy
Use the correct values for your situation, including your Job Id.
This command will also prompt you for the password.

When the undeploy log file is examined, you can see that the undeployment was successful.

Using an IDE with the Java Cloud Service
- Oracle JDeveloper
- NetBeans
- Oracle Enterprise Pack for Eclipse (OEPE)
- Name: This is the name used in OEPE for the server on the Java Cloud Service. In this tutorial, the name selected is trainingdemo. (You can name the server anything you like.)
- Data center: This is the name of the data center of your service. In this tutorial, it is US Commercial 1. (Yours might be different.)
- Identity domain: This is the name of the Identity Domain of the Java Cloud Service. In this tutorial, the Identity Domain is trialaakf. (Yours will be different.)
- Java service name: This is the name of the Java Cloud Service. In this tutorial, the name is java.
- Administrator: This is the username of the Service Administrator. In this tutorial, the username is bill.bell@oracle.com. (Use your Service Administrator username.)
- Password: The password of the Service Administrator.
- Cloud SDK: The location of the Cloud SDK. Browsing for the Cloud SDK will be shown in the next step.
- Java Runtime Environment: The location of the Java Runtime Environment (JRE). If the default location is not correct, use the browse button to find the JRE. In this tutorial, the default location is correct.
The Integrated Development Environments (IDEs) that work with a Java Cloud Service are:
This tutorial shows how to use Oracle Enterprise Pack for Eclipse (OEPE). Documentation on using OEPE with the Oracle Cloud can be found at this link: Oracle Cloud Tools.
To use OEPE with a Java Cloud Service, perform the following steps:
You need to download OEPE.
Open a web browser to the Oracle Cloud home page:
https://cloud.oracle.com.
Once there, from the Resources drop-down list, select Downloads.
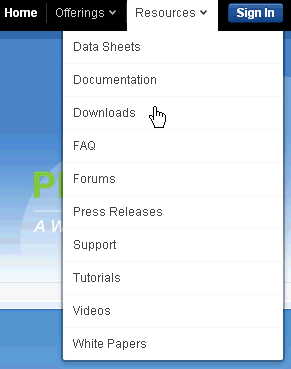
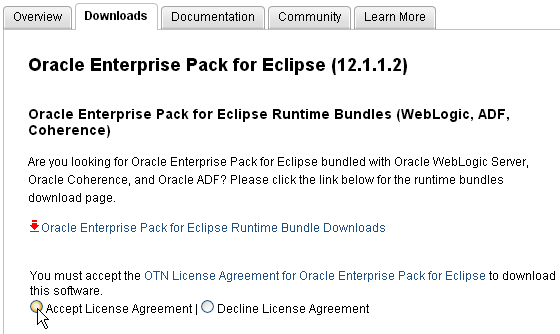
Under Oracle Cloud Downloads and Java Cloud Service, click the link for Oracle Enterprise Pack for Eclipse.
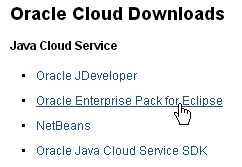
This jumps down to the Oracle Enterprise Pack for Eclipse area.
Click the link to download OEPE.

Next, select Accept License Agreement.
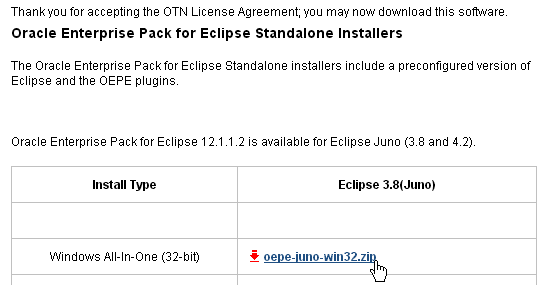
Then find the correct version of OEPE for your operating system, and click the link to download that version.
In this tutorial, the standalone installer for Windows 32 is selected.
Unzip the downloaded file to a directory of your choice, which in this tutorial will be referred to as <OEPE_HOME>.
To start OEPE, go to the <OEPE_HOME> directory and run the eclipse executable (eclipse.exe in Windows). When the Workspace Launcher window appears, enter a workspace directory, or click the Browse button to select one.
Then click OK.

In this tutorial, the workspace directory is C:\workspace.
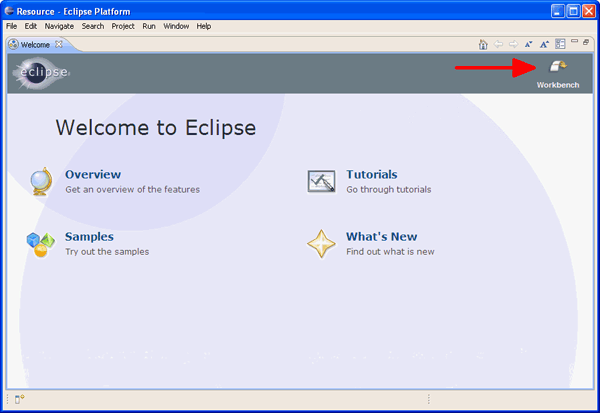
On the Eclipse Welcome screen, which appears the first time in Eclipse, click the Workbench button.
Note: If any warning or informational dialog boxes appear, click the OK button to dismiss them and then click the Workbench button. You may select "Do not show again" on them if you wish.
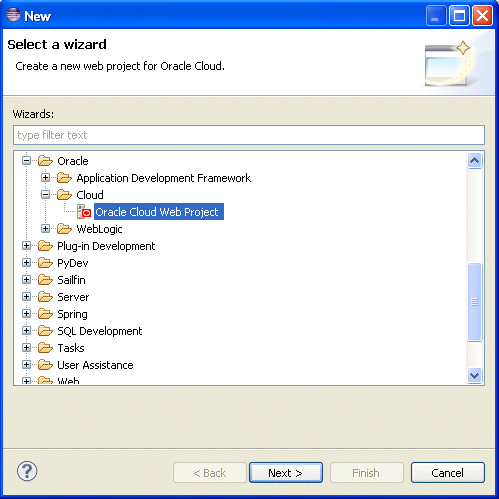
Once in the Workbench, from the menu select File > New > Other.

In the New dialog window, select Oracle > Cloud > Oracle Cloud Web Project.
Then click Next.
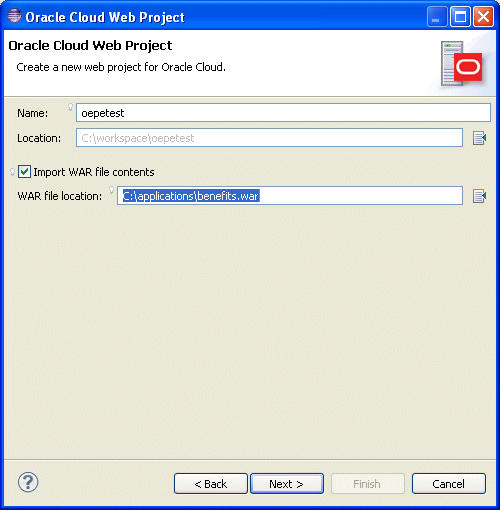
On the next page of the wizard, specify a Name for the project. The Location will be filled in for you. If you already have a WAR file you want to use, check Import WAR file contents and enter the WAR file location, or click the browse button to browse the file system for the WAR file.
Then click Next.
Note: If you do not already have a WAR file you want to use, you can download this sample WAR file, benefits.war.
Note for Internet Explorer Users: IE may download benefits.war as benefits.zip. It is really the same file. To get the WAR file back, just rename it to benefits.war.
On the next page of the wizard, select Define a new cloud target. Then specify:
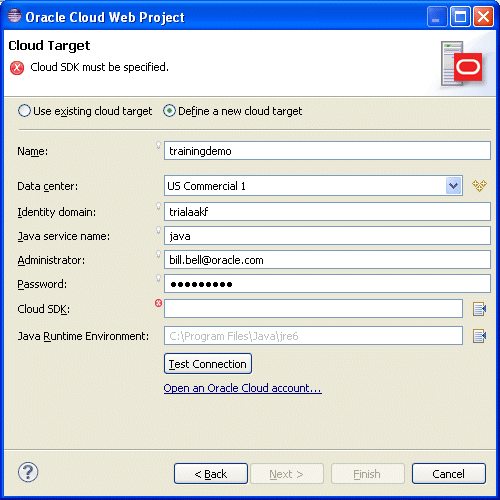
Next to the Cloud SDK field is a button. Click that button to browse for the location of the Cloud SDK downloaded in an earlier Oracle by Example tutorial. Select the SDK directory, and click OK.

Once all the fields on the Cloud Target screen have valid values, you should test that the Java Cloud Service can be accessed by clicking the Test Connection button.
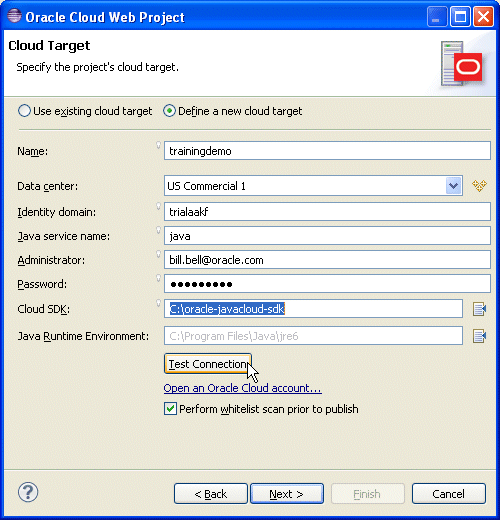
Also notice the Perform whitelist scan prior to publish check box. This means that before your application is "published" (the Eclipse term for deployed) to the server on the Java Cloud Service, it will be checked by the Whitelist utility to ensure that it does not use any disallowed Java packages.
A dialog window appears to indicate whether the connection test was successful or not. If the test is successful, click OK.
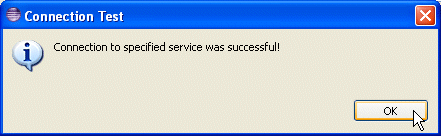
Then back on the wizard, click Next.
Note: If the test is not successful, you need to alter some of the information entered about the Java Cloud Service and try again.
On the next wizard screen, called Local Target, you enter information about the local installation of WebLogic Server. If you wish to define a local WebLogic Server target, select Define a new local target, because the local target has not been defined to Eclipse before. Then, you enter a Name and the Location of the WebLogic Server installation.
A local target is not required, so you can select Do not use a local target. If that is selected, the fields disappear. That is what is done in this tutorial.
Click the Finish button.

Next, OEPE asks if you want to switch to the Java EE perspective. Applications for WebLogic Server are usually built from this perspective, so click Yes.

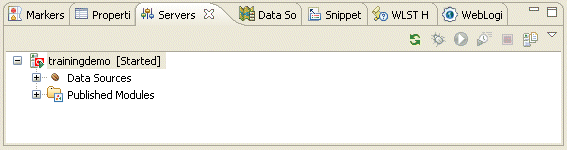
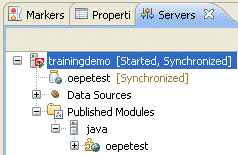
Now that the Workbench is in the Java EE perspective, click the Servers tab to see the servers associated with the workspace. Notice the server just created called trainingdemo. (Your name may be different.) This is the server on the Java Cloud Service.
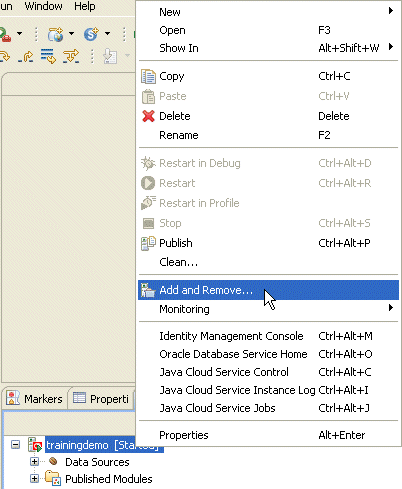
To deploy an application to WebLogic Server from Eclipse, first you "add" the project containing that application to the server. So, in the Servers tab, right-click the server for the Java Cloud Service. In the pop-up menu select Add and Remove.
In the Add and Remove wizard, click the Add All button. This adds the Oracle Cloud Web Project as an application you want to deploy to the server. In this tutorial, the project is called oepetest. (Your name may be different.)
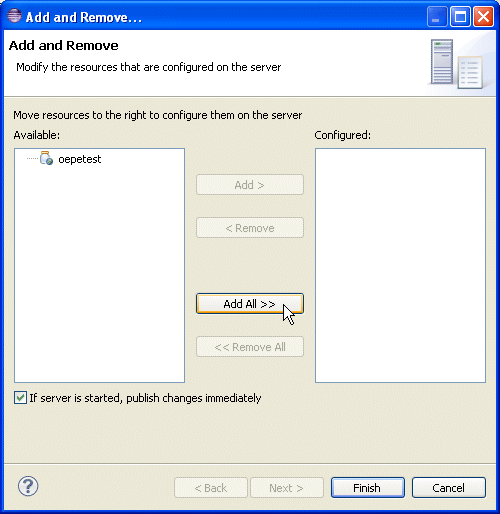
When the Oracle Cloud Web Project is in the Configured column, click the Finish button.

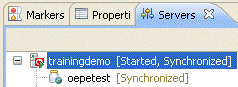
You will see a message that OEPE is "publishing." Once the application has been uploaded and deployed, you will see the message "Synchronized" on the Java Cloud Service server. This lets you know that the latest version of the web application is deployed on that server.
If you expand Published Modules under the server, you can see the Java Cloud Service called java. Under that you can find the web application called oepetest.
Note: Your names may be different. Also, there may be other applications listed besides the one just deployed from OEPE.
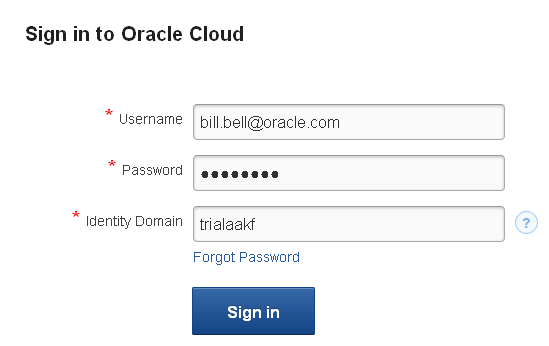
To double-check that the application has really been deployed, in a web browser enter the URL for the Java Cloud Services Control console. This URL can be found in your welcome email under Java Service Console.
Sign in with the Service Administrator's credentials, and the Identity Domain name.
In this tutorial, the Username is bill.bell@oracle.com.
The Identity Domain is trialaakf. (Yours will be something else.)
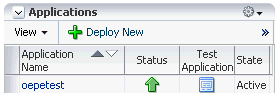
After signing in, you will see the Java Cloud Services Control console for your Java Cloud Service. In this tutorial, the Java Cloud Service name is java.
In the Applications table you can see an entry for the oepetest application (your name may be different). You can tell that the deployment was successful by the green arrow in the Status column and the indication of "Active" in the State column.
Summary
- Use the Command Line Interface utility to check the state of an application deployed to a Java Cloud Service
- Use the Command Line Interface utility to undeploy an application from a Java Cloud Service
- Create an Oracle Cloud Web Project in Oracle Enterprise Pack for Eclipse (OEPE) and deploy that web application to a Java Cloud Service by using OEPE
- Oracle Java Cloud Service
- Oracle Cloud Tools
- Using the Oracle Java Cloud Service
- To learn more about the Oracle Cloud or the Java Cloud Service, refer to additional OBEs in the OLL website.
- Lead Curriculum Developer: Bill Bell
- Other Contributors: Reza Shafii, Anand Kothari
In this tutorial, you have learned how to:
Resources
Credits
To help navigate this Oracle by Example, note the following:
- Hiding Header Buttons:
- Click the Title to hide the buttons in the header. To show the buttons again, simply click the Title again.
- Topic List Button:
- A list of all the topics. Click one of the topics to navigate to that section.
- Expand/Collapse All Topics:
- To show/hide all the detail for all the sections. By default, all topics are collapsed
- Show/Hide All Images:
- To show/hide all the screenshots. By default, all images are displayed.
- Print:
- To print the content. The content currently displayed or hidden will be printed.
To navigate to a particular section in this tutorial, select the topic from the list.