Before You Begin
Purpose
This tutorial shows you how to deploy a sample web application on an Oracle Java Cloud Service instance and manage and monitor the web application from Oracle Application Performance Monitoring (APM) by using APM Java Agents (APM_AS_JAVA_Agents).
Time to Complete
30 mins; This time doesn't include the time taken to create the Oracle Database Cloud Service and the Oracle Java Cloud Service instances.
Background
Oracle Application Performance Monitoring Cloud Service provides deep visibility into the performance of your application from end user to application logs. The service integrates user experience information and application metrics along with log data analytics.
Oracle Java Cloud Service provides a platform to develop and deploy business applications in the cloud. Oracle Java Cloud Service provides instant access to a cloud environment with Oracle WebLogic Server, integrated security, and database access.
It is assumed that you've created an Oracle WebLogic Server domain that contains an Administration Server and a Managed Server. Your actual topology may vary.
What Do You Need?
Ensure that you have a subscription to each of the following:
- Oracle Storage Cloud Service
- Oracle Database Cloud Service
- Oracle Java Cloud Service
- Oracle Management Cloud Service
For more information, see Getting Started with Oracle Cloud.
Note: Oracle Application Performance Monitoring Service and Oracle Java Cloud Service can be in the same identity domain or in different identity domains depending on the topology.
This tutorial assumes that your environment is set up as follows:
- Operating System: Oracle Linux 6.6 or higher.
- Secure Shell (SSH) key: You need an SSH key to create your Oracle Database Cloud Service and Oracle Java Cloud Service instances. Ensure that your SSH key has a bit size of 2048 or higher.
- Database version: 12c Release 1 (Enterprise Edition). You select the database version when you create your Oracle Database Cloud Service instance.
- Oracle WebLogic Server version: 12.1.3.0.3 (Enterprise Edition). You select the Oracle WebLogic Server version when you create your Oracle Java Cloud Service instance.
- Oracle Java Cloud Service cluster size: 1 node, 1 cluster. You select the cluster size when you create your Oracle Java Cloud Service instance. For this tutorial, ensure that you select the Virtual Image service level. When your Oracle Java Cloud Service instance is created, you will see one Oracle Compute Unit (OCPU) in the service console.
- Compute Shape: You select a compute shape while creating Oracle Database Cloud Service and Oracle Java Cloud Service instances. Select the compute shape: OC3 – 1 OCPU, 7.5 GB RAM
- Software:
- APM Java Agent
- cURL (with support for HTTPS) on the Oracle Java Cloud Service instance
Note:
While performing these tasks, keep a record of all the user names and passwords that you enter, because you'll need them later while performing provisioning or administration tasks.
Setting Up Your Environment
If you already have an Oracle Java Cloud instance with an active web application, then you can skip this section and proceed to Downloading the APM Java Agent Software.
Creating an Oracle Database Cloud Service Instance
See "Creating an Oracle Database Cloud Service Instance" in Getting Started with Oracle Java Cloud Service.
Creating an Oracle Java Cloud Service Instance
See "Creating an Oracle Java Cloud Service Instance" in Getting Started with Oracle Java Cloud Service.
When creating the Oracle Java Cloud Service instance, ensure that you've selected Enable access to Administration Consoles under Advanced Settings in the Service Details page of the Create Service Wizard.
Connecting to the Oracle Java Cloud Service Environment Using SSH
You'll access the instance from your local machine by using the ssh command in a Linux command shell or from Windows by using Putty.
- To open an SSH connection, you must find the IP address of your Oracle Java Cloud Service instance.
- Sign in to the My Services application at http://cloud.oracle.com.
- On the My Services Dashboard, click the Action menu (
 ) on the right side of the Java tile and select Open Service Console.
 - On the Oracle Java Cloud Service console, click the service instance name.
- The public IP address of the Administration Server is available under the Resources section in the WebLogic section. Make a note of the IP address.
- In a command shell, run the
sshutility:$> ssh -i path_to_SSH_private_key opc@IP_address_of_instanceIn the preceding command:
path_to_SSH_private_keyis the path to the SSH private key file that matches the public key used when your instance was created.IP_address_of_instanceis the public IP address of the Administration Server inn.n.n.nformat.opcis the user account.
For example:
$> ssh -i keys/id_rsa opc@192.0.2.100 - If this is the first time that you're connecting to the instance, then the
sshutility prompts you to confirm RSA key fingerprint of the instance. In response to the prompt, enteryes.At the prompt, enter the passphrase for the SSH key, if one was created.
Deploying a Sample Application
Deploy a sample web application, Benefits, in both the Administration Server and the Managed Server of the Oracle Weblogic Server. This application will be monitored by Oracle Application Performance Monitoring Cloud Service.
- Download the benefits.war file to your local machine.
- Log on to the Oracle Java Cloud Service instance (running the Oracle Weblogic Server) as the
opcuser by using SSH. - Change the permission of the folder (
$DOMAIN_HOME) in the Oracle Java Cloud Service instance where you want to save thebenefits.warfile.sudo chmod -R 777 /u01/When you provision an Oracle Java Cloud Service instance, two users are created by default,
opcandoracle.opcis the superuser andoracleis the application user. In the previous command, you changed the permission of the/u01folder and its subfolders (location of$DOMAIN_HOME), which are owned by theoracleuser, to be able to copy thebenefits.waras theopcuser. - From your local machine, copy the
warfile to the$DOMAIN_HOMEdirectory in the Oracle Java Cloud Service instance.scp -i path_to_SSH_private_key <location_of_benefits.war_in_local_machine> opc@IP_address_of_instance:/u01/data/domains/<domain_name>/ - On the Oracle Java Cloud Service instance, change the permission of the
benefits.warfile to make it executable.sudo chmod 777 /u01/data/domains/<domain_name>/benefits.war - Log on to the Oracle WebLogic Server Administration Console by typing the following in the address bar of your browser and using the Weblogic Administrator username and password that you had specified at the time of creating the Oracle Java Cloud Service instance:
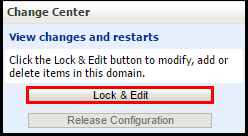
https://<Public_IP_address of_Oracle_Java_Cloud_Service_instance>:7002/console - Click Lock & Edit under Change Center.
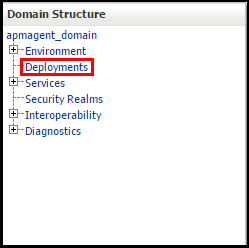
- Click Deployments under Domain Structure.
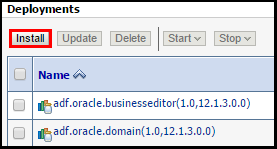
- Click Install under Deployments.
- Navigate to the
$DOMAIN_HOMEdirectory where you've saved thebenefits.warfile, select the file, and then click Next.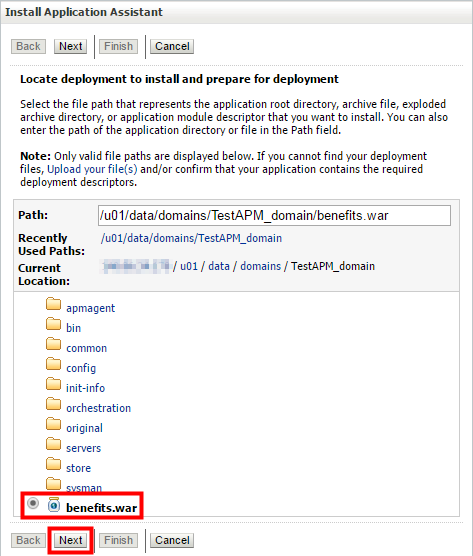
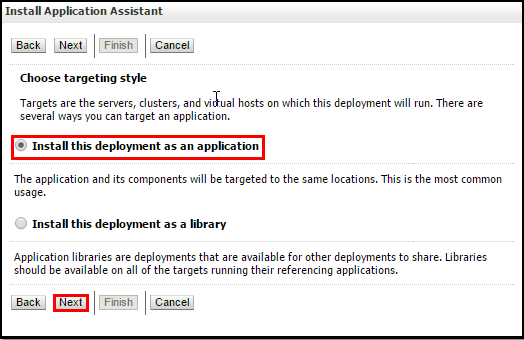
- Select Install this deployment as an application as the targeting style and click Next.
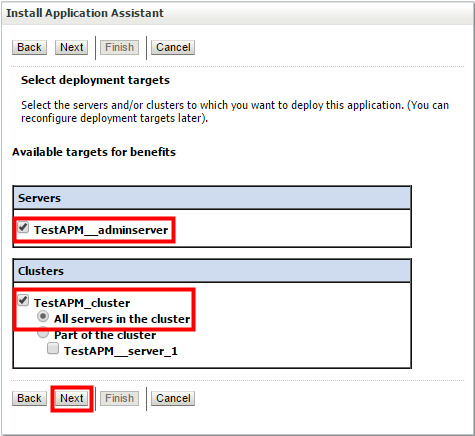
- Select the Administration Server name and also the cluster name to target the web application to both the Administration Server and the Managed Server. Click Next.
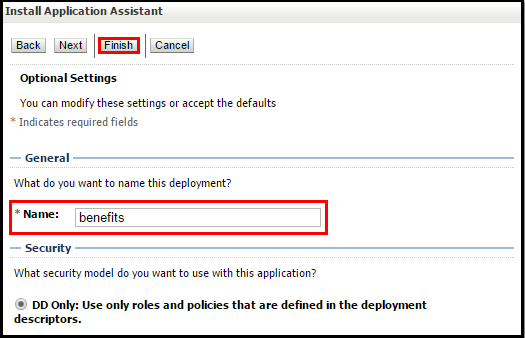
- Specify the name of the web application and click Finish.
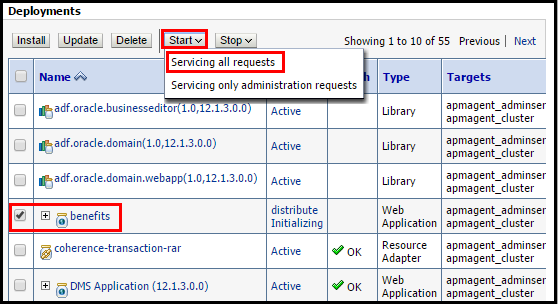
- Click Activate Changes under Change Center. The web application is deployed and listed under Deployments.

- Select benefits under Deployment, click Start, and then Servicing all requests.
- Click Yes in the confirmation page to start the web application.
Downloading the APM Java Agent Software
You use the Oracle Management Cloud Agents page to download the APM Java Agent software and a valid Registration Key.
If you're signed in to Oracle Java Cloud Service, sign out and then sign in to My Services by using Oracle Application Performance Monitoring Cloud Service credentials (username, password, and identity domain name).
The download of the software is done in four steps:
- Launch Oracle Application Performance Monitoring Cloud Service from My Services and use the Oracle Management Cloud Agents page to download a generic agent downloader script in a
ZIPformat. - Create and download a Registration Key to be passed as a parameter to the downloader script.
- Extract the ZIP file to obtain the actual agent downloader script.
- Run the downloader script to download the APM Java Agent software.
Downloading the Generic Agent Downloader ZIP File
- On your local machine, run the following command to create the download directory for the agent:
sudo mkdir /scratch - Log on the Oracle Management Cloud Service console by using a web browser and navigate to Oracle Management Cloud Agents page.
- Click the Download tab and then click the Download icon.
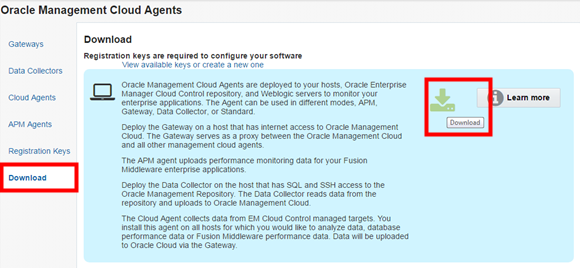
- Specify the
/scratchdirectory in your local machine as the download location.This downloads the
AgentInstall.zipfile in your local machine.
Creating and Downloading a Registration Key
You need to create or download a valid Registration Key to be passed as a parameter to the downloader script.
- On the Oracle Management Cloud Agents page, click Registration Keys.
- On the Registration Keys page, enter the name of the key in the Name field and click Create New Key.
- Navigate to the newly created Registration Key entry and click Download from the Action menu on the right.
- Specify the
/scratchdirectory in your local machine as the download location.This downloads the
registrationKey.txtfile to your local machine.
Copying and Extracting the ZIP File to the Oracle Java Cloud Service Instance
- Log on to the Oracle Java Cloud Service instance (running the Oracle Weblogic Server) as the
opcuser by using SSH. - Run the following commands to create the download directory:
sudo mkdir /scratch sudo chown -R opc /scratch - On your local machine, run the following command to copy the
AgentInstall.zipfile to the Oracle Java Cloud Service instance (running the Oracle Weblogic Server):scp -i path_to_SSH_private_key /scratch/AgentInstall.zip opc@Public_IP_address of_Oracle_Java_Cloud_Service_instance:/scratch/ - On the Oracle Java Cloud Service instance (running the Oracle Weblogic Server), extract the ZIP file by using the following commands:
cd /scratch
chmod 755 AgnetInstall.zip
unzip ./AgentInstall.zip
The previous command extracts two files:
AgentInstall.shandREADME.-rwxr-x--- 1 johnsmith 31010 Jun 10 15:53 AgentInstall.sh -rw-r----- 1 johnsmith 4735 Jun 10 15:53 README
Running the Script to Download the APM Java Agent Software
- Ensure that the
$DOMAIN_HOMEvariable is set to the domain home directory of your Oracle Weblogic Server install. - Set the
$STAGE_DIRvariable to the location of the staging directory where you want to download the APM Java Agent software. For this tutorial, set it to/scratch/apm_staging.If you're using a Bash shell:
export STAGE_DIR=/scratch/apm_stagingIf you're using a C shell:
setenv STAGE_DIR "/scratch/apm_staging"Note: You should only set the value of the staging directory, but you shouldn't actually create the directory. The script will create the directory at runtime. If the directory already exists, the script will throw an error.
- Run the following command to download the software:
./AgentInstall.sh AGENT_TYPE=apm_java_as_agent STAGE_LOCATION=${STAGE_DIR} AGENT_REGISTRATION_KEY=<value of the Registration Key that you've created earlier> -download_only
Installing and Provisioning the APM Java Agent in an Oracle WebLogic Server Domain
Installing and provisioning the APM Java Agent involves:
- Running the provisioning script
- Modifying the Oracle Weblogic Server startup scripts
- Restarting the servers
Running the Provisioning Script
- Run the provisioning script from the staging directory after making the script executable.
cd ${STAGE_DIR} chmod +x ProvisionApmJavaAsAgent.sh ./ProvisionApmJavaAsAgent.sh -d ${DOMAIN_HOME}-no-walletThe script displays the settings that you've specified in the command line, and prompts you to accept the settings if those are correct.
If the
-no-walletflag is specified, then the provisioning script will not use Oracle Wallet even if one was provided by theAgentInstall.shscript. Instead, the APM Java Agent's encrypted authorization token will be taken from the properties file created by theAgentInstall.shscript in the staging directory and provisioned in an alternative (non-wallet) credential store for the APM Java Agent to use. - Type
yesand then pressEnterto accept the default settings and complete the execution of the script.
If your setup requires use of proxy servers to install and provision APM Java Agents, then you need to specify the following parameters to your provisioning script:
-ph {http_proxy_host}: The host name of the proxy server-pp {http_proxy_port}: The port number of the proxy server-pt {http_proxy_auth_token}: If the proxy server requires authentication, then the authentication token to use
./ProvisionApmJavaAsAgent.sh -d ${DOMAIN_HOME} \
                             -ph "www-proxy.us.example.com" -pp 80 \
                             -pt "Basic am9lOmNvb2w="
Note: If your deployment topology contains two Managed Servers in a cluster, one local to the Administration Server and the other one on a remote Oracle Java Cloud Service instance, then to install the APM Java agent on the Managed Server on the remote instance:
- On the Oracle Java Cloud Service instance (running the Administration Server), run the following commands to pack the
apmagentdirectory:sudo su - oracle cd $DOMAIN_HOME zip -r apmagent.zip $DOMAIN_HOME/apmagent/ - Copy the
apmagent.zipfile to the$DOMAIN_HOMEdirectory of the remote Managed Server.scp apmagent.zip Private_IP_address_of_Remote-Managed_Server_instance:$DOMAIN_HOME/
You can obtain the private IP address from the Oracle Compute Cloud Service console.
- As the
oracleuser on the Administration Server instance, use thesshcommand to log on to the remote Managed Server:ssh –X Private_IP_address_of_Remote-Managed_Server_instance - Extract the
apmagent.zipfile.cd $DOMAIN_HOMEunzip -R apmagent.zip
Modifying the Oracle Weblogic Server Startup Scripts
After running theProvisionApmJavaAsAgent.sh script, you need to manually edit the startWebLogic.sh script (within the Oracle Weblogic Server install directory) to add the required -javaagent flag to the JAVA_OPTIONS section. This flag enables the Oracle Weblogic Server to invoke the APM Java Agent in your Oracle Weblogic Server domain.
- Make a copy of your
startWebLogic.shfile.cd $DOMAIN_HOME/bin cp startWebLogic.sh startWebLogic.sh.orig - Edit the
startWebLogic.shfile and add the following line immediately after thesetDomainEnv.shentry.JAVA_OPTIONS="${JAVA_OPTIONS} -javaagent:${DOMAIN_HOME}/apmagent/lib/system/ApmAgentInstrumentation.jar" - Save the
startWebLogic.shfile.
Note: If your deployment topology contains two Managed Servers in a cluster, one local to the Administration Server and the other one on a remote Oracle Java Cloud Service instance, then to modify the startWebLogic.sh script in the remote Managed Server:
- SSH to the Oracle Java Cloud Service instance that is running the remote Managed Server.
- Make a copy of your
startWebLogic.shfile.cd $DOMAIN_HOME/bin cp startWebLogic.sh startWebLogic.sh.orig - Edit the
startWebLogic.shfile and add the following line immediately after thesetDomainEnv.shentry.JAVA_OPTIONS="${JAVA_OPTIONS} -javaagent:${DOMAIN_HOME}/apmagent/lib/system/ApmAgentInstrumentation.jar" - Save the
startWebLogic.shfile.
Restarting the Oracle Weblogic Servers
- Stop and restart the Oracle Weblogic Administration Server.
Note: You usecd $DOMAIN_HOME/bin ./stopWebLogic.sh cd .. nohup ./startWebLogic.sh >& startup.log &$DOMAIN_HOME/bin/stopWebLogic.shscript to stop the server. However, you use$DOMAIN_HOME/startWebLogic.shscript to restart the Administration server, even though you edited the$DOMAIN_HOME/binversion of the script. At runtime,$DOMAIN_HOME/startWebLogic.shinvokes the$DOMAIN_HOME/bin/startWebLogic.shscript. - Stop and restart the Managed Server.
cd $DOMAIN_HOME/bin
./stopManagedWebLogic.sh {SERVER_NAME} {ADMIN_URL} {USER_NAME} {PASSWORD}
nohup ./startManagedWebLogic.sh SERVER_NAME {ADMIN_URL} >& SERVER_NAME.log &
Note: If your deployment topology contains two Managed Servers in a cluster, one local to the Administration Server and the other one on a remote Oracle Java Cloud Service instance, then use the Node Manager in the Weblogic Administration Server console to restart the remote Managed Server.
Verifying your APM Java Agent Installation
When you restart your Oracle WebLogic Servers, the APM Java Agent creates a log directory for each server for which you activated the agent.
- Run the following commands to check if the log files are generated inside each server log directory:
The following log files will be available:cd $DOMAIN_HOME/apmagent/logs/<Administration_Server_Name> ls -lF *.logAgentErrors.logAgent.logAgentStartup.logAgentStatus.log
If the server-specific log directories are not found, or if the contained log files were not created or updated during server start up, then installation and provisioning was not successful.
- Check for errors in the
AgentErrors.logfile.
Themore $DOMAIN_HOME/apmagent/logs/<wls server name>/AgentErrors.logAgentErrors.logfile should have only the following line:INFOException log is initialized - Check for successful agent start up message in the
AgentStartup.logfile. After a successful start up, the "Agent startup successfully completed" message is displayed at the end of theAgentStartup.logfile.more AgentStartup.logmore AgentStartup.log 0x1<2015-01-16T12:36:27.27-0800> INFO <bootstrap> Bootstrap logger is initialized 0x1<2015-01-16T12:36:27.27-0800> INFO <bootstrap> Using Aspect.Filters from jar:file:/scratch/islam/WL_1213/user_projects/domains/BlueDomain/apmagent/lib/system/ApmAgentInstrumentation.jar!/oracle/apmaas/agent/instrumentation/Aspect.filters 0x1<2015-01-16T12:36:27.27-0800> INFO <bootstrap> Loading WLDF property file: jar:file:/scratch/islam/WL_1213/user_projects/domains/BlueDomain/apmagent/lib/system/ApmProbeSystem.jar!/META-INF/apm-wldf.properties 0x1<2015-01-16T12:36:27.27-0800> INFO <bootstrap> Agent startup sequence has been signaled 0x9<2015-01-16T12:36:27.27-0800> INFO <bootstrap> Initiating agent startup sequence ... 0x9<2015-01-16T12:36:34.34-0800> INFO <bootstrap> ConfigurationManager initialized 0x9<2015-01-16T12:36:34.34-0800> INFO <bootstrap> MetricCollector initialized 0x9<2015-01-16T12:36:34.34-0800> INFO <bootstrap> MetricProcessor initialized 0x9<2015-01-16T12:36:35.35-0800> INFO <bootstrap> AgentSender initialized 0x9<2015-01-16T12:36:35.35-0800> INFO <bootstrap> SamplingProcessor initialized 0x9<2015-01-16T12:36:35.35-0800> INFO <bootstrap> InstanceManager initialized 0x9<2015-01-16T12:36:35.35-0800> INFO <bootstrap> EntryPointManager initialized 0x9<2015-01-16T12:36:35.35-0800> INFO <bootstrap> PermissionChecker initialized 0x9<2015-01-16T12:36:35.35-0800> INFO <bootstrap> Sending startup discovery observations 0xc<2015-01-16T12:36:35.35-0800> INFO <bootstrap> Agent startup successfully completed - Traffic is now being monitored by the agent - Check for agent activities in the
AgentStatus.logfile.more AgentStatus.logmore AgentStatus.log 0x1<2015-01-16T12:36:27.27-0800> INFO <status> Agent aliveness status logger initialized 0x9<2015-01-16T12:36:35.35-0800> INFO <status> Agent core non-aggregated count values, logged per status reporting period: Traffic: inbound and outbound observed messages Metrics: observed request and link metrics (count < reported metrics) Instance: observed request instances (count < reported instances) Failures: exceptions caught (count <= warnings + errors) Warnings: logged warnings (details logged in AgentErrors.log) Errors: logged severe messages (details logged in AgentErrors.log) Traces: logged trace messages (details logged in Agent.log) Transport: count of observations sent GENRE: traffic per operation genre 0x9<2015-01-16T12:36:35.35-0800> INFO <status> Agent idKey: 2CE5C32D4961BA89E3209378E7D46748E364D69D, verKey: CC09CDAE186B2594AB994567FE0E9E58206FEEE8 0x2a<2015-01-16T12:38:00.0-0800> INFO <status> traffic: 206, rMetrics: 103, lMetrics: 0, instances: 103, failures: 0, warnings: 0, errors: 0, traces: 0, transport: 61 0x2a<2015-01-16T12:38:00.0-0800> INFO <status> JDBC: 206 0x2a<2015-01-16T12:39:00.0-0800> INFO <status> traffic: 0, rMetrics: 0, lMetrics: 0, instances: 0, failures: 0, warnings: 0, errors: 0, traces: 0, transport: 11Non-zero counts for traffic and transport indicates that the APM Java Agent is active, and it is monitoring and reporting data.
Note: If your deployment topology contains two Managed Servers in a cluster, one local to the Administration Server and the other one on a remote Oracle Java Cloud Service instance, then run the preceding checks on the remote Managed Server as well.
Accessing the Application Performance Monitoring Console to View Monitored Data
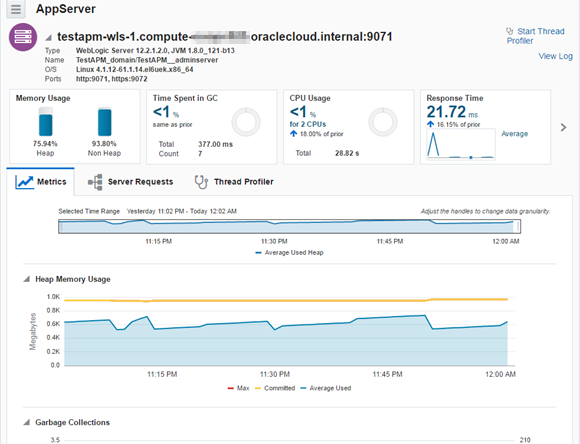
To view the data monitored by the APM Java Agent, log on the Oracle Management Cloud Service console by using a web browser.
On the home page, you can see the name of the Oracle Java Cloud Service instance that runs the Oracle Weblogic Server listed in the APPSERVERS section of the home page.
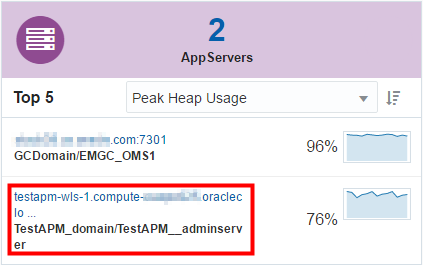
Clicking the instance name link displays the detailed monitoring page.
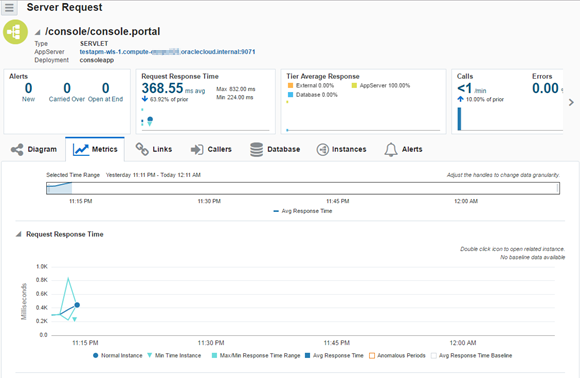
If you have traffic running through your monitored applications, you should also see Request data as well.
Want to Learn More?
-
Setting up Application Performance Monitoring on Oracle WebLogic Server in Deploying and Managing Oracle Management Cloud Agents
Credits
- Lead Curriculum Developer: Anirban Ghosh
- Other Contributors: Gene Thurston, Iris Lam