 Backing up MySQL Cloud Service Instances
 Before You Begin
This tutorial shows how to back up data in a MySQL Cloud Service instance. MySQL Cloud Service uses MySQL Enterprise Backup for hot, online, non-blocking, high performance backups, that are not encrypted. This tutorial takes approximately 15 minutes to complete.
Background
The tutorial assumes that you have an active MySQL Cloud Service subscription.
In addition, MySQL Cloud Service uses Oracle Cloud Service Containers to store cloud backups. Before you can create a container, you must have an active subscription to Oracle Storage Cloud Service.
What Do You Need?
-
An Oracle Public Cloud account with both the MySQL Cloud Service and Oracle Storage Cloud Service activated, together with the following associated information:
- Data center
- Identity domain
- Credentials (username and password) for your account, which you might need to request from your account administrator.
 Creating Backups
In this section, you configure backups using the default backup schedule, which is based on Oracle best practices.
- Create a new MySQL Cloud Service instance. Provide the service name and service description in the first page of the instance creation wizard, then click Next.
- On the second page of the instance creation wizard, complete the Configuration and MySQL Configuration sections, as described in the Getting Started With MySQL Cloud Service tutorial.
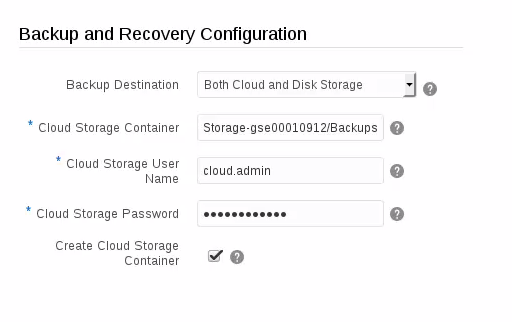
- In the Backup and Recovery Configuration section, note that the Backup Destination field value is Both Cloud and Disk Storage. Backups are enabled by default and stored on both the local compute node and on an Oracle Storage Cloud container. If you don’t want your instance to be backed up automatically, select None in the Backup Destination drop-down list.

Description of this image - In the Cloud Storage Container field, provide details of an Oracle Cloud Storage Service container. If the container you specify does not yet exist, select Create Cloud Storage Container and the wizard will create it for you.
Enter the container details as follows:
[Cloud Storage Service name]-[Identity Name]/[Container Name].
For example:Storage-id001/BackupContainer. - Enter the user name and password for the cloud storage user.
Description of this image - Click Next in the instance creation wizard.
- On the third page of the instance creation wizard, verify the configuration details you provided and click Create.
- When the wizard has finished creating the service, click on the service name in the list of services.

Description of this image - From the Service Overview page, click the Administration tile.
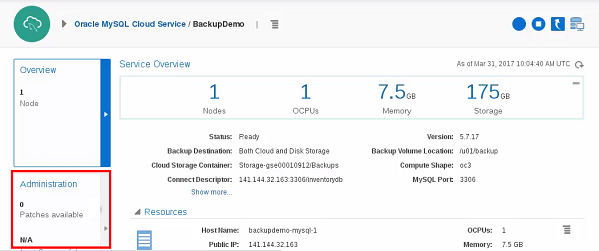
Description of this image -
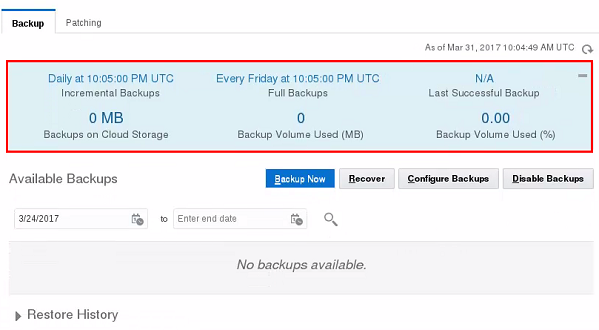
The Backup tab in the Administration section shows details of the backup schedule configured for the instance. It also lists available backups and provides options to create, disable, configure, and restore from backups.
Description of this image -
The default backup configuration follows a set of Oracle best-practice guidelines:
- Full backup of the contents of the database server’s data directory, followed by rolling incremental backups on a seven-day cycle.
- Automatic backups daily, at the time configured in the Configure Backups dialog of the service administration page.
- Backups are stored for 30 days on both cloud and local storage, with the seven most recent days' backups available on local storage.
-
When scheduled backups execute, they appear in the list of available backups.

Description of this image - When complete, the backups remain in the list until they are older than the retention period, when they are automatically removed during another scheduled backup.
 Customizing the Backup Schedule
- To define your own schedule for backups, click the Configure Backups button.

Description of this image - In the Configure Backups dialog box, specify the schedule for full and incremental backups, and the retention period.

Description of this image - Click Save.
 Performing a Manual Backup
- To execute an immediate backup, click the Backup Now button.

Description of this image - In the Backup Now dialog box, you can optionally enter a note to help you identify the backup. Click Back Up to execute the backup.

Description of this image - The backup executes immediately and appears in the list of available backups. The Type field identifies this as a backup initiated by a user, rather than a scheduled backup.

Description of this image