Getting Started with MySQL Cloud Service
Before you Begin
Purpose
This tutorial shows you how to create a new MySQL Cloud Service instance using the web interface.
Time to Complete
Approximately 10 minutes.
Background
The tutorial assumes that you have already activated a MySQL Cloud Service subscription but have not yet created an instance.
What do you need?
Before starting this tutorial, you should have:
- An Oracle Public Cloud account with the MySQL Cloud Service activated, together with the following associated information:
- Data center
- Identity domain
- Credentials (username and password) for your account, which you might need to ask your account administrator for.
- A supported browser
- Microsoft Internet Explorer: 11.x
- Mozilla Firefox: version ESR 38 and later
- Google Chrome: version 42 and later
- Apple Safari: version 7.x and 8.x
- Optionally, a public/private key pair to enable a SSH connection to Oracle Public Cloud. Note: If you do not have a key pair before you create your MySQL Cloud Service instance, you can create one during the instance creation process.
 Logging In to the Service Web GUI
Before you Log in
To log in, you'll need an Oracle Public Cloud account with the MySQL Cloud Service activated. Associated with such an account will be:
- A Data center
- An Identity domain
- Account credentials (username and password), which might be provided by an account administrator
Logging In
- Sign into the My Services application by clicking the link in your Welcome email. Or go to https://cloud.oracle.com and click Sign In. Select your Data Center and click My Services.
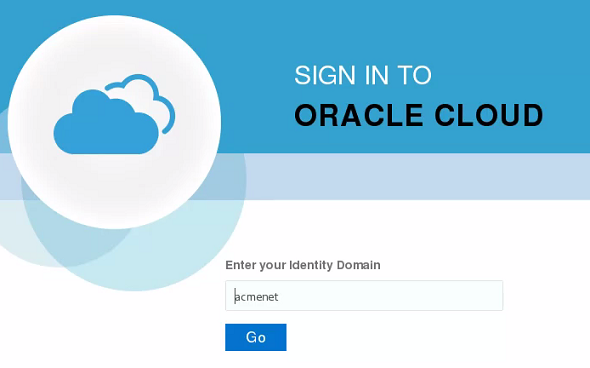
- Type the name of your Identity Domain and click Go.
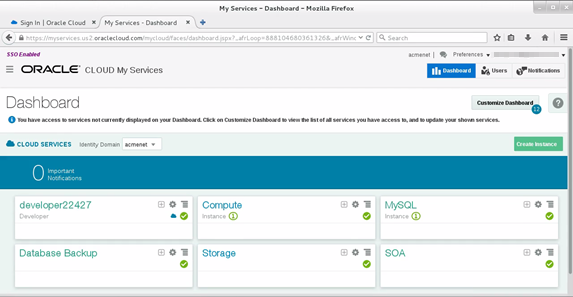
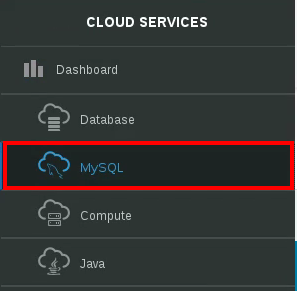
- Click the menu icon in the top left corner of the Dashboard to display the Cloud Services menu and select MySQL.
The Oracle Cloud "My Services" page opens at the Dashboard.
The MySQL Cloud Service Services page appears. Initially, the page shows that you have no MySQL Cloud Service instances.

 Creating a MySQL Cloud Service Instance
Before You Create an Instance
When you create a MySQL Cloud Service instance, you are asked to provide an SSH key pair which will allow you to connect to the instance from an SSH client.
You can generate a public/private key pair with your SSH client, or during the instance creation process. The private key remains on your local machine, and you can install the public key on any machine you want to connect to via SSH.
In the case of Oracle Public Cloud, the presence of your public key on the Cloud instance means that your private key (on your local machine) can be used to access the instance. Only your private key can unlock an instance protected by your public key.
Creating an Instance
- From the Oracle MySQL Cloud Service Console, click the Create Service button.
- Enter the service name and description in the first page of the Create Service wizard:
- Service Name: A unique name of your choice, up to 50 characters. This appears on dashboards and other screens to identify the service.
- Service Description (optional): Further identifying information for the service. This text appears when you drill into the service.

Description of this image - Click the Edit button next to the SSH Public Key field. The Public key input for VM access dialog appears.
- Provide the SSH key pair.
- If you already have an SSH key pair, then you can select the Key File Name option and click the Browse button to locate the public key on your local machine. Or, you can select the Key Value option and paste the contents of the public key file into the text box. Then click the Enter button.
- If you do not have an SSH key pair, then the wizard can create one for you. Select the Create a New Key option and click the Enter button.
- In the Download Keys dialog, click the Download button and save the
sshkeybundle.zipfile to your local machine. - Extract the contents of the
sshkeybundle.zipfile to a location accessible by your SSH client. It contains a public key and private key.
- In the Download Keys dialog, click the Download button and save the
- In the Compute Shape drop-down list, select the hardware specification for your instance.
The Service page of the Create Service wizard appears.


The process for specifying the SSH key pair depends on whether you already have one, as discussed in the "Before You Create an Instance" section:

Each compute shape specifies the number of Oracle CPUs (OCPU). Each OCPU is equivalent to one physical core with hyper-threading and corresponds to two hardware execution threads. You can scale up later as demand for your application increases.
 Configuring the Instance
- Click the Next button in the Create Service wizard.
- In the Configuration section, specify the following:
- Usable Database Storage (GB): The default is 25 GB.
- Administration User and Password: The MySQL administration user credentials, usually
root. - Database Schema Name: The default database.
- In the Backup and Configuration section, note that backups (using MySQL Enterprise Backup) are enabled by default. You need an Oracle Cloud Service container so that backups can be stored both in the cloud and on the local compute node. For this tutorial, select None from the Backup Destination drop-down list to disable backups on the instance.
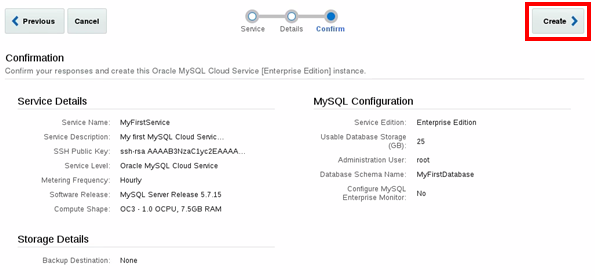
- Click the Next button in the Create Service wizard. The third and final page of the wizard displays. Verify the settings for your instance and then click Create.
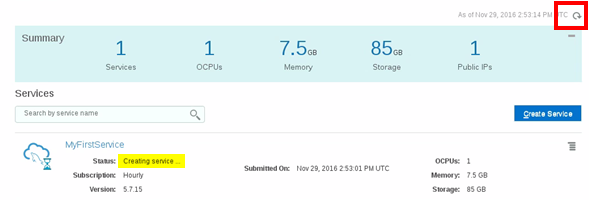
- The instance is displayed with a status of Creating service.... Click the refresh button to monitor the status of the creation request.
- When the instance is ready, it appears in the list of available services. Click the service name link to view the service details, which include the public IP address of the virtual machine that hosts the instance. On this screen you can perform many instance administration tasks such as backups, patching, and scaling.
The second page of the wizard displays. This is where you configure the instance.
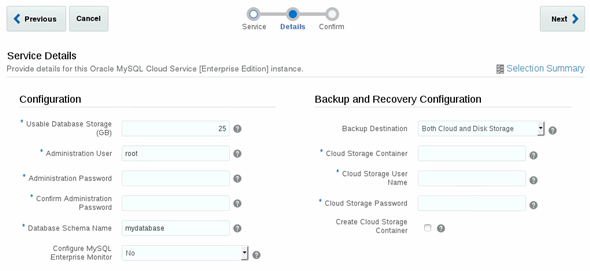
Note: You can also configure MySQL Enterprise Monitor in this section if you want to monitor the instance from the same machine that hosts it. This is not best practice, so for this tutorial select No from the Configure MySQL Enterprise Monitor dropdown.