Before You Begin
Purpose
This tutorial shows you how to scale your MySQL Cloud Service instance to a larger Compute Shape which increases the assigned OCPUs and memory.
Time to Complete
Approximately 10 minutes
Background
When creating a MySQL Cloud Service instance, you choose an initial Compute Shape, which combines a specified number of OCPUs and amount of memory in GB. To increase or decrease the OCPUs or memory for the instance, you scale up or down to a different Compute Shape.
Scenario
You have used Enterprise Monitor or checked the monitoring information for a particular MySQL Cloud Service instance and determined that CPU utilization or memory usage is high. You are going to scale the instance up to the next larger Compute Shape.
What Do You Need?
- An Oracle Cloud account with an Oracle MySQL Cloud Service instance
- Understanding of the use of Enterprise Monitor or checking the monitoring information for a MySQL Cloud Service instance to determine if CPU utilization or memory usage is high
Scaling Up a MySQL Cloud Service Instance
-
Log in to your Oracle Cloud account. Enter your Identity Domain, User Name, and Password.
-
Open the Service Console for MySQL Cloud Service and select the service that you are going to scale up.
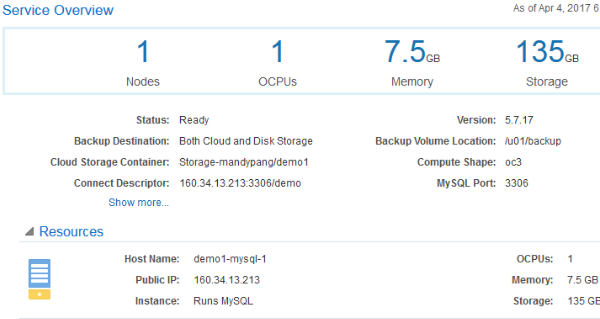
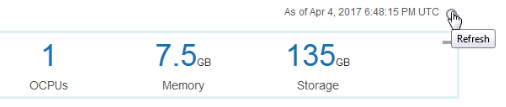
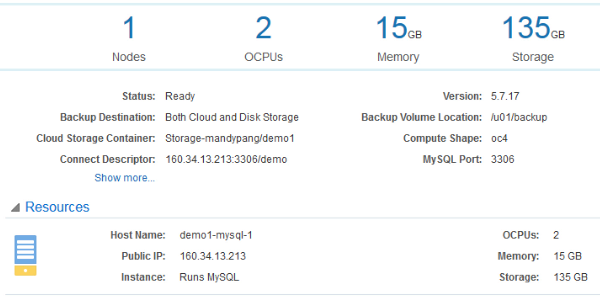
The current Compute Shape is listed in the Service Overview, and the OCPUs and Memory for that Compute Shape are listed under the Service Overview and also under Resources.
Description of this image -
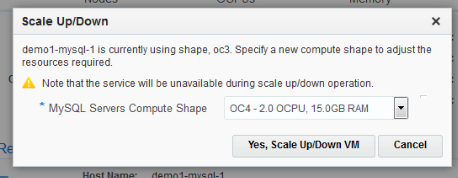
From the MySQL service's menu, select Scale Up/Down.

Description of this image The dialog indicates that the service will be unavailable during the scale up/down operation.
Description of this image -
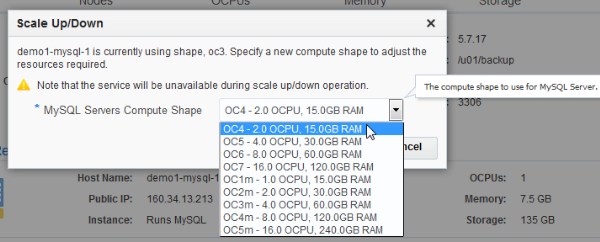
From the list of Compute Shapes, select an option that is either larger or smaller than the current Compute Shape. For this example, select an option larger than the current Compute Shape.
Description of this image -
After selecting the new Compute Shape, click Yes, Scale Up/Down VM.

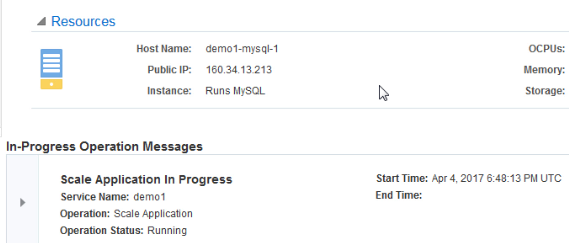
Description of this image The In-Progress Operations Messages at the bottom indicate that the Scale Application is in progress.
Description of this image -
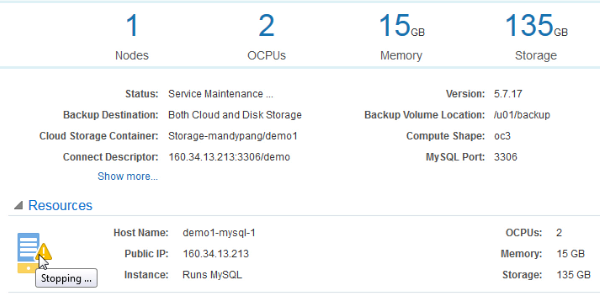
Refresh the page.
Description of this image The number of OCPUs and Memory are updated to the new values. An icon appears, indicating that the service is stopping. The Status changes to Service Maintenance.
Description of this image -
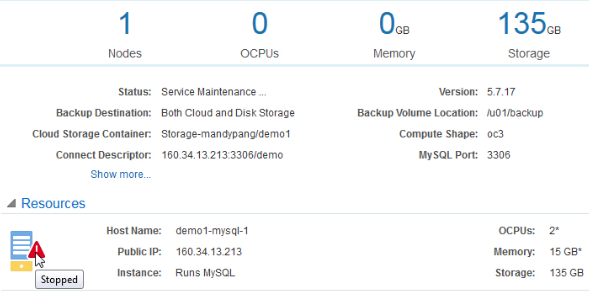
Refresh the page occasionally.
After a few moments, the icon changes to indicate that the service is stopped. OCPUs and Memory in the Service Overview appear as zeros.
Description of this image -
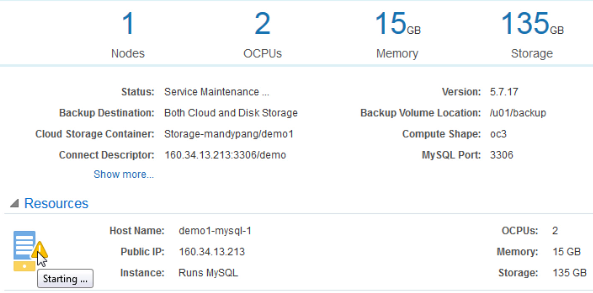
Refresh the page occasionally.
After a few moments, the icon changes to indicate that the service is starting, and the OCPUs and Memory in the Service Overview appear as their new scaled up values.
Description of this image -
Refresh the page occasionally.
After a few moments, the In-Progress Operation Messages disappear and the environment is available displaying the new Compute Shape. The Status changes to Ready. You can continue to monitor processor utilization and available memory to determine if the scaling provided improvements and if you need to scale up even more or if you can scale down in the future.
Description of this image
Want to Learn More?
-
Using Oracle MySQL Cloud Service in the Oracle Help Center
-
Scaling MySQL Cloud Service in the Oracle Help Center