 Producing and Consuming Messages with Oracle Identity Cloud Service Authentication
 Before You Begin
This 15-minute tutorial shows you how to produce messages and consume messages using REST APIs to an Oracle Event Hub Cloud Service instance that uses Oracle Identity Cloud Service (IDCS) based authentication mechanism.
Background
Oracle Event Hub Cloud Service is a managed, cloud-based offering that provides a highly available and scalable messaging platform for working with streaming data.
An instance of Oracle Event Hub Cloud Service is called a Topic. You can send messages to a Topic and you can read messages from a Topic. A system that sends messages to a Topic is called Producer. A system that reads messages from a Topic is called Consumer.
What Do You Need?
- A subscription to Oracle Cloud Service.
- An Oracle Event Hub Cloud Service instance.
- IDCS username and password.
- cURL installed in your system. To install cURL, see http://curl.haxx.se/.
 Get Topic name and URL
- Sign in to Oracle Cloud at https://cloud.oracle.com/ and go the Oracle Event Hub Cloud Service Instances page.
- Click on the name of the Topic. A More Information popup with the Topic details will appear.
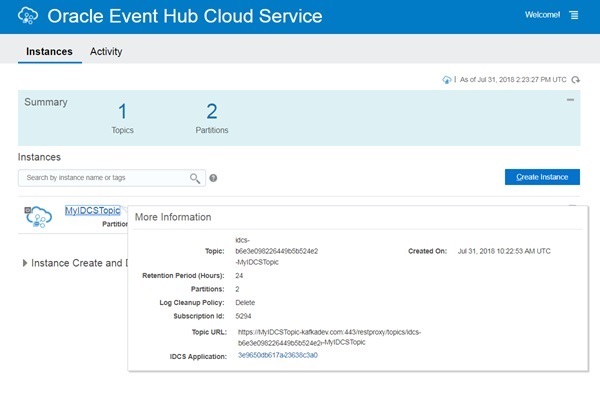
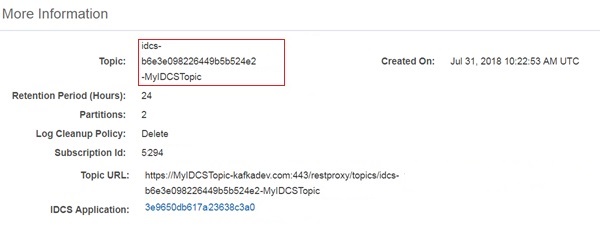
Description of the illustration [moreinfo_popup.jpg] - Copy and save the value in the Topic field. This is the name of the topic to which you will produce a message and later from which you will consume that message.
Description of the illustration [moreinfo_topic.jpg] - Copy and save the value in the Topic URL field. The value till
restproxydenotes the basepath for the Produce and Consume REST API.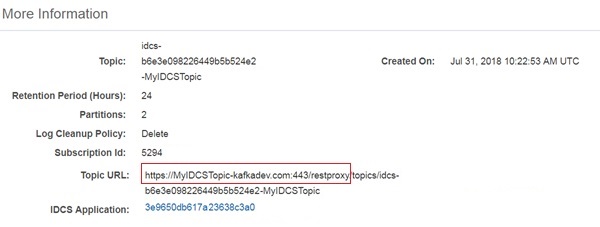
Description of the illustration [moreinfo_topicurl.jpg]
 Get details from Oracle Identity Cloud Service
Perform the following steps to get details from Oracle Identity Cloud Service (IDCS).
- In the More Information popup, click the link in the IDCS Application field.
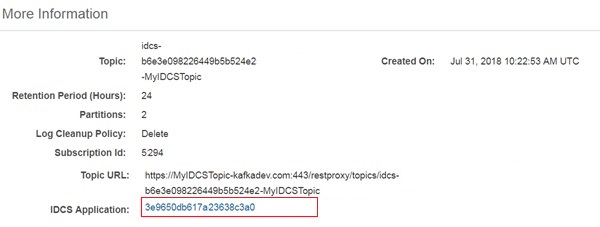
Description of the illustration [moreinfo_idcsapp.jpg] - You will be redirected to IDCS application page. Provide your IDCS login credentials. The page with App Details will be displayed.
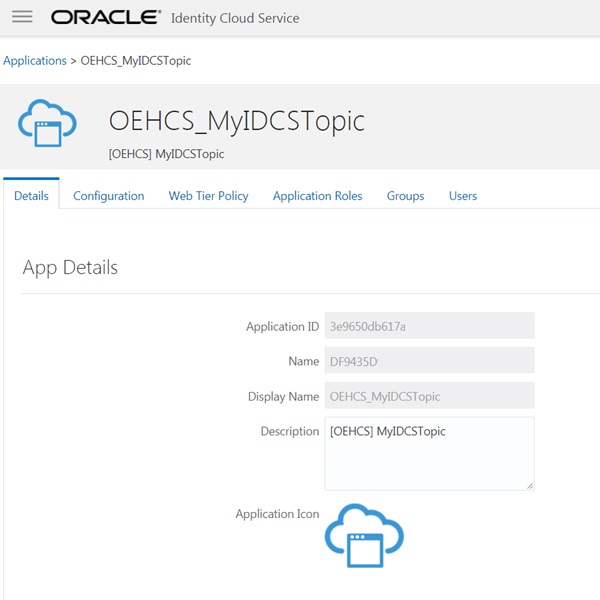
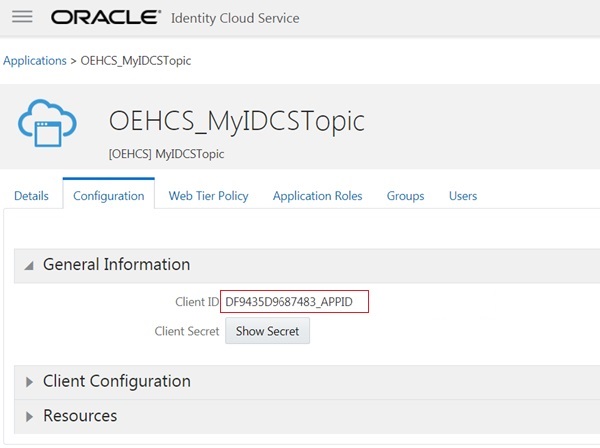
Description of the illustration [idcs_appdetails.jpg] - Click the Configuration tab and expand the General Information section.

Description of the illustration [idcs_configuration.jpg] - Copy and save the value in the Client ID field.
Description of the illustration [idcs_clientid.jpg] - Click Show Secret. The Client Secret will be displayed as a popup. Copy and save the value of the Client Secret.
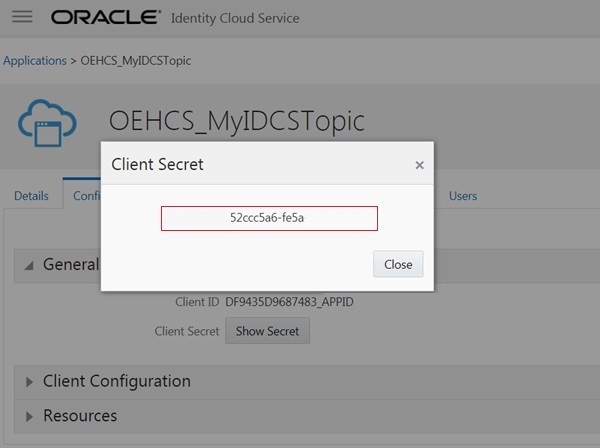
Description of the illustration [idcs_clientsecret.jpg] Note: The Client Secret is essentially the client password and should NOT be shared.
- In the Configuration tab, expand the Resources section.
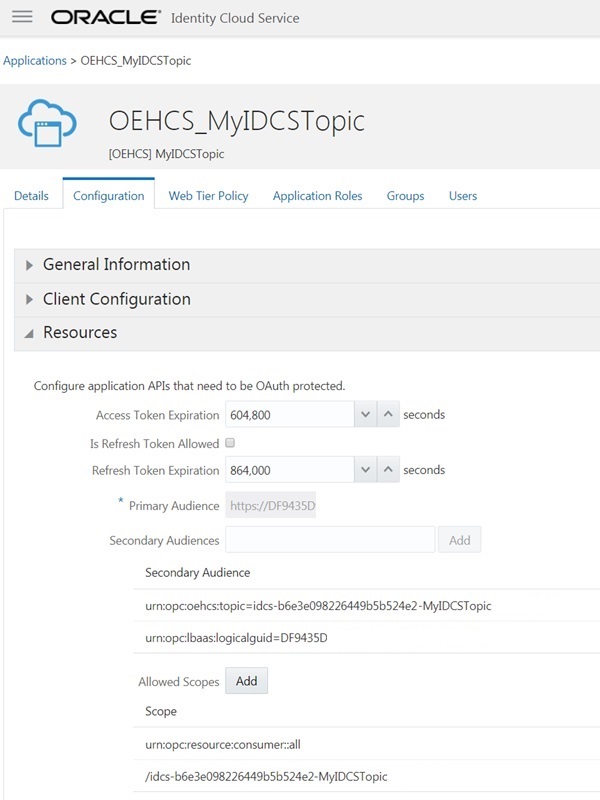
Description of the illustration [idcs_resources.jpg] - Copy and save the value in the Primary Audience field.
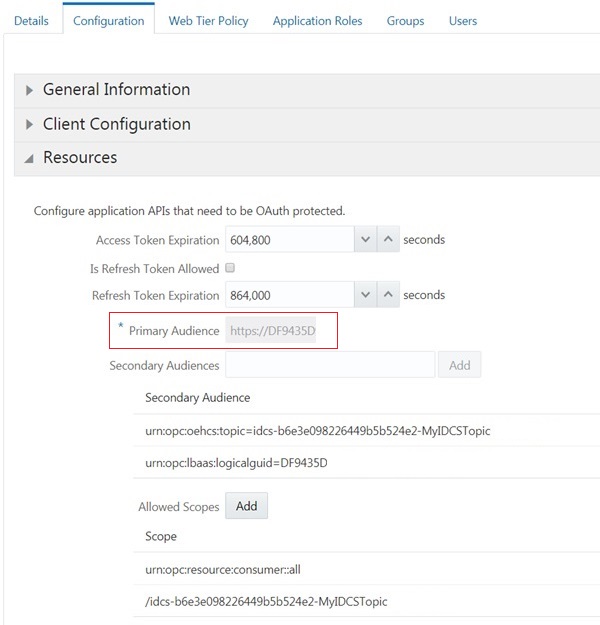
Description of the illustration [idcs_primaryaudience.jpg] - Copy and save the value in the Scope field.
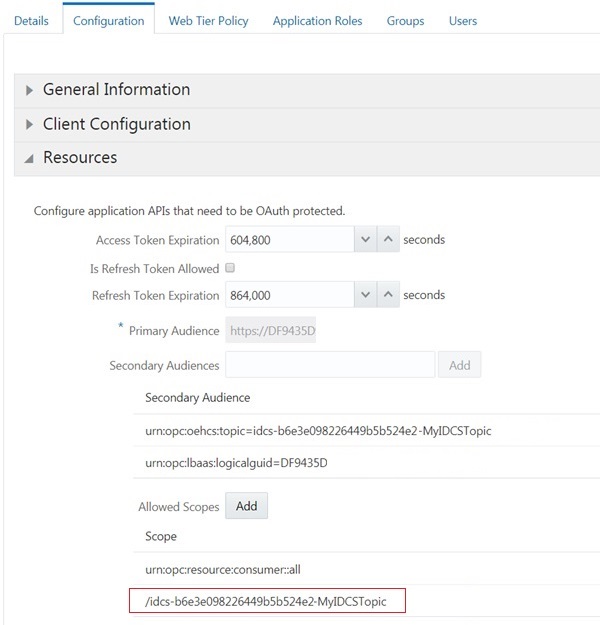
Description of the illustration [idcs_scope.jpg] - Copy and save the URL of the current IDCS page. The value till
/ui/denotes the idcsurl for getting the IDCS access token.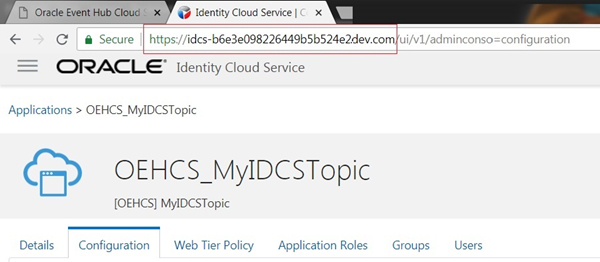
Description of the illustration [idcs_url.jpg]
 Get IDCS Access Token
Perform the following steps to create the IDCS access token using REST request.
- Update the following code with appropriate values.
- clientid: The name of the Client ID. Note that you saved this in the previous section.
- clientsecret: The value of the client secret. Note that you saved this in the previous section.
- myusername: Your IDCS username.
- mypassword: Your IDCS password.
-
myscope: The myscope is the concatenation of the primary audience and scope that you saved in the previous section. For example, in the below code, "https://primary-audience-url.com:443" is the primary audience and "/myfulltopicname" is the scope.
https://primary-audience-url.com:443/myfulltopicname - idcsurl: The Oracle Identity Cloud Service URL for the IDCS instance. Note that you saved this in the previous section.
curl -k -X POST \
-u "<clientid>:<clientsecret>" \
-d "grant_type=password&username=<myusername>&password=<mypassword>&scope=<myscope>" \
"<idcsurl>/oauth2/v1/token"
Note: Additional back slash ( \ ) has been provided to escape new line and string double quotes.
- Provide the above code in the command prompt and press enter.
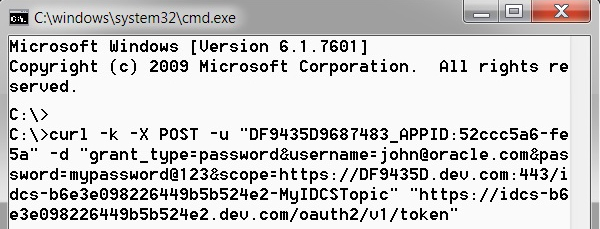
Description of the illustration [accesstoken_command.jpg] - On successful execution, you will see similar output as given below. In the output, copy and save the value of access_token. This is required in subsequent steps.
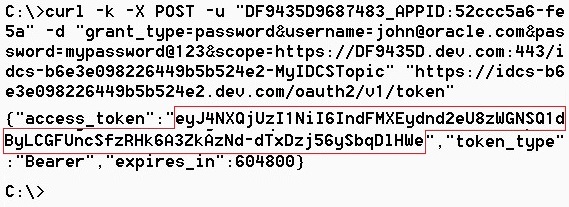
Description of the illustration [accesstoken_output.jpg] Note: The
access_tokencannot be recovered again. There is no means to see the already generated access token. However, you can generate a different access token anytime.
 Produce message to Topic
Perform the following steps to produce message to a Topic. A JSON formatted message is used here.
- Open Command Prompt.
- Update the following code with appropriate values.
- token: The value of the access_token. Note that you saved this in the earlier section.
- basepath: The name of the basepath. Note that you saved this in the earlier section.
- mytopicname: The name of the topic to which you will produce the message. Note that you saved this in the earlier section.
curl -k -X POST \
-H "Authorization: Bearer <token>" \
-H "Content-Type:application/vnd.kafka.json.v2+json" \
-d "{\"records\":[{\"value\":{\"foo\":\"bar\"}}]}" \
<basepath>/topics/<mytopicname>
Note: Additional back slash ( \ ) has been provided to escape new line and string double quotes.
- Provide the above code in the command prompt and press enter.
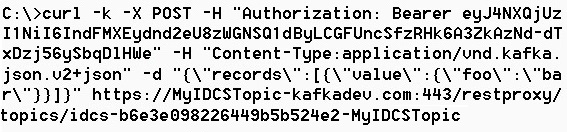
Description of the illustration [produce_command.jpg] - On successful execution, you will see similar output as given below.
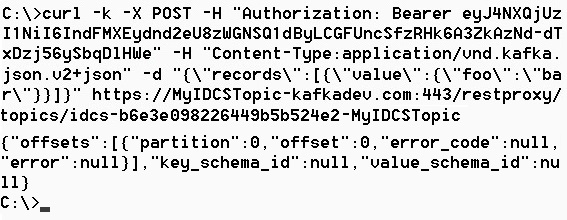
Description of the illustration [produce_output.jpg]
 Create Consumer Group
Perform the following steps to create a consumer group.
- Update the following code with appropriate values.
- token: The value of the access_token. Note that you saved this in the previous section.
- basepath: The name of the basepath. Note that you saved this in the previous section.
curl -k -X POST \
-H "Authorization: Bearer <token>" \
-H "Content-Type:application/vnd.kafka.json.v2+json" \
-d "{\"format\": \"json\", \"auto.offset.reset\": \"earliest\"}" \
<basepath>/consumers/oehcs-consumer-group
Note: Additional back slash ( \ ) has been provided to escape new line and string double quotes.
- Provide the above code in the command prompt and press enter.
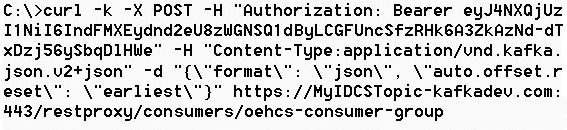
Description of the illustration [consumergroup_command.jpg] - On successful execution, you will see similar output as given below. In the output, copy and save the value of
base_uri. This is required in subsequent steps.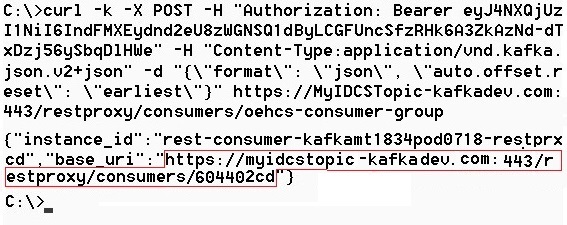
Description of the illustration [consumergroup_output.jpg] Note: The
base_uricannot be recovered again. There is no means to see the already generated base_uri. Do save this carefully.
 Subscribe to the Topic
You need to subscribe to a Topic before consuming. Perform the following steps to subscribe to the Topic.
- Update the following code with appropriate values.
- token: The value of the access_token. Note that you saved this in the previous section.
- mytopicname: The name of the topic you want to consume from. This is the same topic to which you produced the message earlier.
-
groupbaseuri: The name of the
base_urithat was returned during consumer group creation. Note that you saved this in the previous section.
curl -k -X POST \
-H "Authorization: Bearer <token>" \
-H "Content-Type:application/vnd.kafka.json.v2+json" \
-d "{\"topics\": [\"<mytopicname>\"]}" \
<groupbaseuri>/subscription
Note: Additional back slash ( \ ) has been provided to escape new line and string double quotes.
- Provide the above code in the command prompt and press enter.
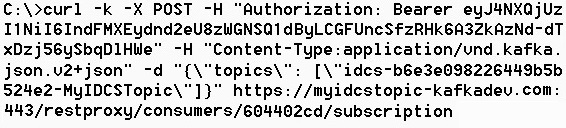
Description of the illustration [subscribe_command.jpg] - On successful execution, you will see blank screen as output.
 Consume message from Topic
Perform the following steps to consume from a Topic.
- Update the following code with appropriate values.
- token: The value of the access_token. Note that you saved this in the previous section.
-
groupbaseuri: The name of the
base_urithat was returned during consumer group creation. Note that you saved this in the previous section.
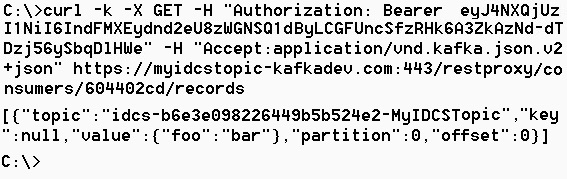
curl -k -X GET \
-H "Authorization: Bearer <token>" \
-H "Accept:application/vnd.kafka.json.v2+json" \
<groupbaseuri>/records
Note: Additional back slash ( \ ) has been provided to escape new line and string double quotes.
- Provide the above code in the command prompt and press enter.

Description of the illustration [consume_command.jpg] - On successful execution, you will see similar output as given below.
Description of the illustration [consume_output.jpg]