 Setting up SSH Key Pairs in a Published VM in Oracle Cloud Infrastructure Ravello Service
 Before You Begin
This tutorial shows how you can generate key pairs and SSH (Secure Shell) into a published VM from a Windows machine. This tutorial takes approximately 20 minutes to complete.
Background
Oracle Infrastructure Cloud Ravello Service instances use an SSH key pair to authenticate a remote user accessing from an external device. A key pair file contains a private key and public key. The public key is saved on the VM and you will save the private key on your computer.
What Do You Need?
- An activated subscription to Oracle Cloud Infrastructure Ravello Service
- Your login credentials
- An SSH client, PuTTY
- A key generator tool, PuTTYGen
 Generate a Key Pair
- Sign in to Oracle Cloud Infrastructure Ravello Service.
- In the Applications page, click +Create Application.
- In the Create Application dialog box, enter a name for your application (for example,
MySampleAPP), and click Create.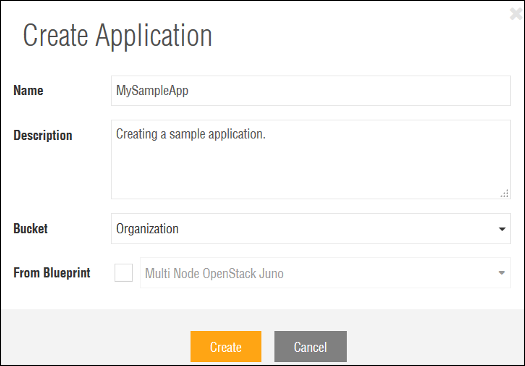
Description of the illustration create_application.png - In the Canvas workspace, drag and drop
CentOS 6.3 vanillaVM from the VM Library to the workspace. If you do not see the predefined VMs in the left pane, click next to Actions to get a list of VMs.
 - On the right pane, click the General tab. Under Cloud Init Configuration, select Create a Key Pair in the Key Pair drop-down list.
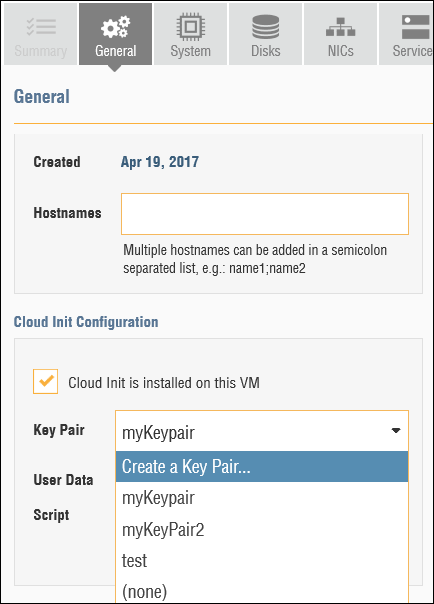
Description of the illustration create_keypair.png - In the Key Pairs dialog box, select the Generate Key Pair option for the key pair assignment.
- Enter a name for the key pair (for example,
demoKeyPair), and click Create. When you generate a key pair, the private key is downloaded as a file in the.pemformat. Save thedemoKeyPair.pemfile on your desktop. The public key is saved in the VM.Save the key pair configuration.
- Return to the MySampleApp application you created earlier and click Publish.
- In the Publish Application dialog box, leave the default selection for the optimization method and click Publish. It may take a few minutes to publish the application.
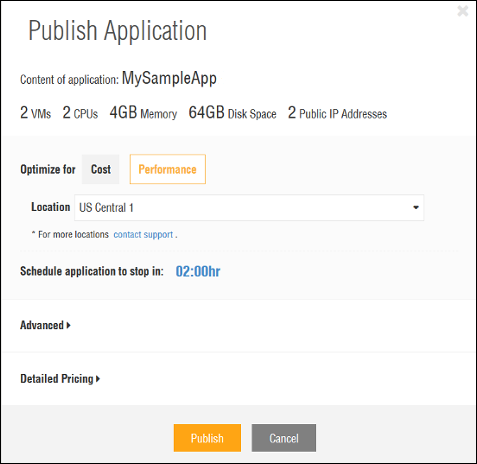
Description of the illustration publish_application.png - Click Console in the Summary tab to open a VNC session and verify if the VM is up and running.

Description of the illustration console.png
You cannot change the key pairs after you publish the application.
 Convert Keys to the PuTTy (.ppk) Format
The key pair was saved in the .pem format. Use PuTTYGen to convert the .pem to .ppk format. You can then use PuTTY and the new SSH key pair you just created with Ravello to connect to your Published VM.
- Open PuTTYGen and select File > Load Private Key.
- Browse to your Desktop and open the
demoKeyPair.pemfile. Note that by default, PuTTYGen displays only the files with extension.ppk. Select All Files from the drop down list to view all file types. - Click Save private key. When prompted to indicate whether you want to save the key without a pass phrase, click Yes and save it on your desktop as
demoKeyPair. The key is saved in the.ppkformat and is used to connect to your VM using PuTTY SSH.
Description of the illustration putty_key_generator.png
 SSH into the Published VM Using your Windows Machine
- Return to Ravello and the MySampleApp application, and select the CentOS 6.3 vanilla VM. In the Summary tab, note down the public DNS name of CentOS 6.3 vanilla. For example,
centos63vanilla-mysampleapp-2r1whyjx.srv.ravcloud.com. - Open PuTTY and SSH to the public DNS name that you noted in the previous step.
- Start PuTTY. The PuTTY Configuration window is displayed, showing the Session panel.
- In the Host Name (or IP address) field, enter the DNS name in this format:
<user name>@DNS name.For example, ravello@centos63vanilla-mysampleapp-2r1whyjx.srv.ravcloud.com. - Confirm that the Connection type option is set to SSH.
- On the left side, in the Category tree, expand SSH if necessary and then click Auth.
- In the Auth panel, under the Private key file for authentication field, click Browse. Navigate and open the private key file that was saved. The private key matches the public key that is associated with your instance.
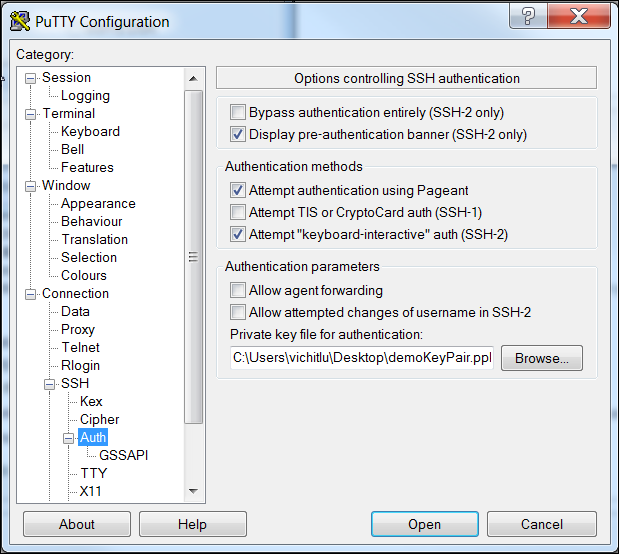
Description of the illustration putty_configuration.png - On the left side, click Session. In the session panel, under Saved Sessions, enter a name and Save the session.
Try opening the connection. If this is the first time you are connecting to an instance, the PuTTY Security Alert window is displayed, prompting you to confirm the public key. Click Yes to continue connecting.
Now you are connected to the published VM.