Before You Begin
Purpose
This tutorial shows you how to create a Data Load Wizard for your application so that end users can load bulk data into a table.
Time to Complete
Approximately 20 minutes.
Overview
Oracle Application Express (Oracle APEX) is a rapid web application development tool for the Oracle database. Using only a web browser and limited programming experience, you can develop and deploy professional applications that are both fast and secure. Oracle Application Express is available with the Oracle Database, whether it's on-premises or in an Oracle Database Cloud Service.
Applications with data loading capability allow end users to dynamically import data into a table within any schema to which the user has access. To do this, end users run a Data Load Wizard that uploads data from a file or copies and pastes data entered by the end user directly into the wizard. With Oracle Application Express 5.0, you can create a series of data load wizard pages in your application using the new Data Loading page wizard. The wizard allows you to add table look-ups and transformation rules that are executed when the Data Load Wizard runs.In this tutorial, you create a series of Data Load Wizard pages declaratively. You will also define table look-up and data transformation rules while creating the Data Load Wizard. For more information on using a Data Load Wizard, reference the Data Loading Wizard Examples in the Oracle Application Express Application Builder User's Guide.
Please keep in mind the following while running this tutorial:
- Logging into your Oracle Application
Express workspace: Your Oracle
Application Express workspace may reside in an
on-premises Oracle Database or in Oracle Database
Cloud Services. The login credentials differ
depending on where your workspace is located:
- Logging into Oracle Application Express in a Oracle Database Cloud Service: Reference the Oracle Help Center for your Oracle Database Cloud Service. To do this, go to the Oracle Help Center for Cloud, and select Platform and Infrastructure. From here, select your Database Cloud Service and the Get Started page will appear.
- Logging in to Oracle Application Express on-premises: From your browser, go to the location of your on-premises installation of your Oracle Application Express workspace provided by your Workspace Administrator.
- Application ID: Screenshots in this tutorial show a blurred Application ID. Your Application ID can be any value assigned automatically while creating the application.
- Schema: If you are accessing an Oracle Application Express workspace in Database Schema Service, you have one schema assigned to you with a schema name that you cannot change. If you are accessing the workspace in an on-premises Oracle database, you may have more than one schema assigned to your workspace by the Oracle Application Express Instance Administrator.
What Do You Need?
Before starting this tutorial, you should:
- Have access to an Oracle Database 11g or later release, either on-premises or in a Database Cloud Service.
- Install Oracle Application Express Release 5.0 into your Oracle Database (for on-premises only).
- Download and unzip the files.zip into your working directory.
- Provision at least one Oracle Application Express user. See Creating New User Accounts in Oracle Application Express Administration Guide.
Creating DEPENDENTS Table Using a SQL Script
-
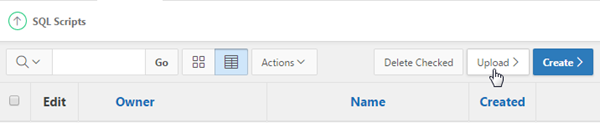
From the Oracle Application Express home page, click the down arrow next to SQL Workshop, and select SQL Scripts.

Description of this image -
Click Upload >.
Description of this image -
Click Choose File.

Description of this image -
Locate the
dependents.sqlfile in your working directory, and click Open. Once thedependents.sqlis chosen for File, click Upload.

Description of this image -
Locate the entry for the script uploaded in the previous step, and click the Run icon.

Description of this image -
Click Run Now.

Description of this image -
The script completed execution. To view the results, click the View Results icon.

Description of this image -
The script results show that all the statements in the script processed successfully.

Description of this image
Creating an Application with a Report on DEPENDENTS table
DEPENDENTS table. Perform the
following steps:-
Click the down arrow next to the Application Builder tab and select Database Applications.

Description of this image -
Click the Create icon.

Description of this image -
Accept the default, and click Next >.
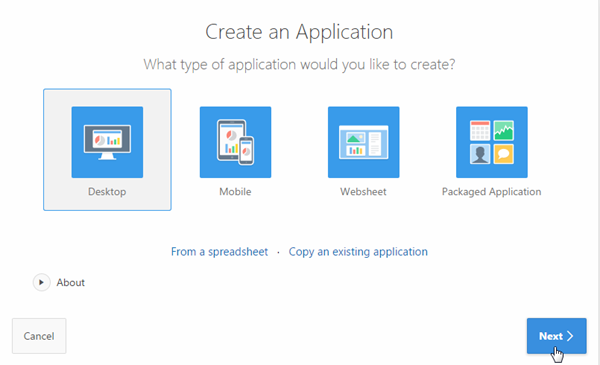
Description of this image -
Enter Data Loading Sample for Name, and click Next >.

Description of this image -
Accept the default, and click Next >.

Description of this image -
Select Application Express Accounts for Authentication Scheme, and click Next >.

Description of this image -
Click Create Application.
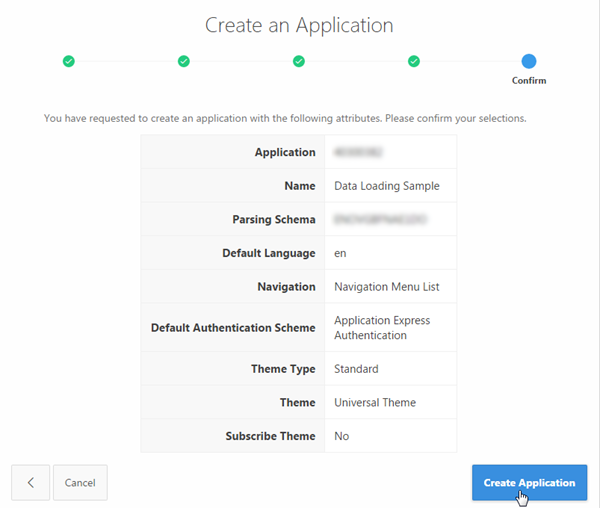
Description of this image -
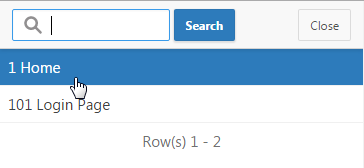
Data Loading Sample application created successfully. You want to add a report region to the Home page, click 1 - Home.

Description of this image -
Click the Regions tab in the gallery, located under the Grid Layout.

Description of this image -
Drag Interactive Report from the Regions gallery, and drop it into CONTENT BODY in the Grid Layout.
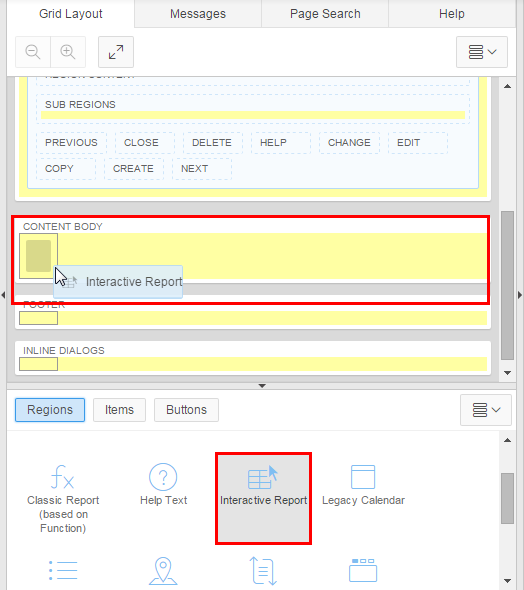
Description of this image -
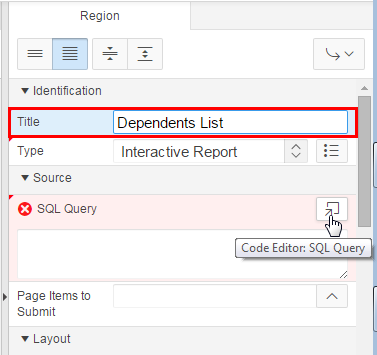
In its property editor, under Identification, enter Dependents List for Title, and click the Code Editor: SQL query icon.
Description of this image -
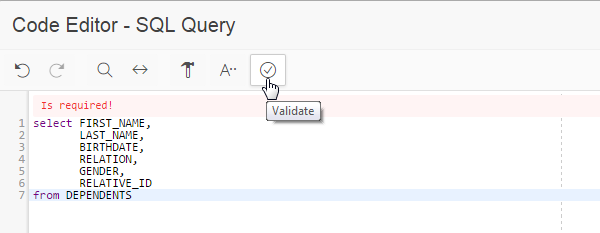
Enter the following SQL query in the Code Editor - SQL Query, and click the Validate icon.
select
                                  FIRST_NAME,


                                  LAST_NAME,


                                  BIRTHDATE,

                                         RELATION,

                                         GENDER,


                                  RELATIVE_ID

                                  from DEPENDENTS
Description of this image -
Click OK.

Description of this image -
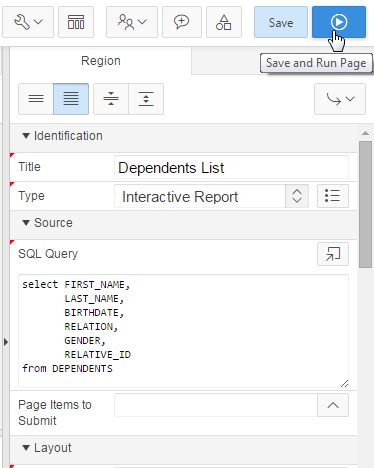
Click Save and Run Page.
Description of this image -
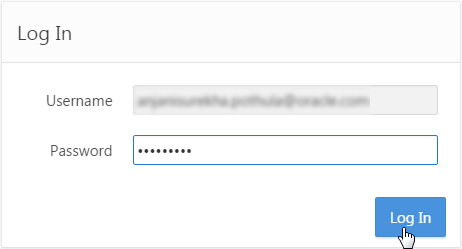
Enter your Oracle Application Express credentials, and click Log In.
Description of this image -
Data Loading Sample application displays the Home page with an empty report, because there are no records in
DEPENDENTStable. To enable the end-user load data into this table, you create a Data Load Wizard. Click Application<n> in the developer toolbar.
Description of this image
Creating a Data Load Wizard Using the Data Loading Page Wizard
DEPENDENTS
table. Perform the following steps:-
Click Create Page >.

Description of this image -
Click the Data Loading icon.

Description of this image -
Enter Load Dependents for Definition Name, select the following values for the remaining fields, and click Next >.
Table Name DEPENDENTS (table) Unique Column 1 FIRST_NAME (Varchar2) Unique Column 2 LAST_NAME (Varchar2) 
Description of this image -
You want to add a Transformation Rule which ensures that all the values of the
GENDERcolumn are always stored in Upper Case. Enter Uppercase Gender for Rule Name, move GENDER (Varchar2) to the selected group for Select Column(s), select To Upper Case for Type, and click Add.

Description of this image -
The new transformation rule is created. Click Next >.

Description of this image -
You want to create a Table Lookup such that, when you give a name for the
RELATIVE_IDcolumn in the data load file, that name is matched withENAMEinEMPtable, and the correspondingEMPNOwill be stored in theRELATIVE_IDcolumn of theDEPENDENTStable. Select the following values, and click Add.Column Name RELATIVE_ID (Number)
Table Name EMP (table)
Return Column EMPNO (Number) Upload Column ENAME (Varchar2)

Description of this image -
The Table Lookup is created. Click Next >.

Description of this image -
The details of the four pages to be created as part of the Data Load Wizard are displayed. Accept the defaults, and click Next >.

Description of this image -
Select Identify an existing navigation menu entry for this page for Navigation Preference, Home for Existing Navigation Menu Entry, and click Next >.
Note: By selecting "Identify an existing Navigation Menu Entry for this Page" for Navigation Preference, the new page will be highlighted on an existing, top level, menu entry.

Description of this image -
You want to branch to the Home page, if the user clicks the Cancel of Finish buttons on the Data Load Wizard. Click the List of Values icon for Cancel Button Branch to Page.

Description of this image -
Select 1 Home.
Description of this image -
Enter 1 for Finish Button Branch to Page, and click Next >.

Description of this image -
Click Create.

Description of this image -
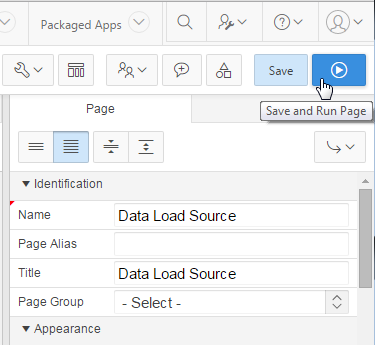
Data Load Source page, which is the first page of the Data Load Wizard opens. Click Save and Run Page.
Description of this image
Using the Data Load Wizard to Load the Data from a File
DEPENDENTS table from a file. Perform
the following steps:-
In the Data Load Source step of the Data Load Wizard, select Upload file, comma separated (*.csv) or tab delimited for Import From.

Description of this image -
Click Choose File.

Description of this image -
Locate the dependents_data1.txt file in your working directory, and click Open. Once the dependents_data1.txt is chosen for File Name, click Next.

Description of this image -
The next step in the Data Load Wizard is Data/Table Mapping. In this step, the tab delimited data from the file is mapped against each column name of the
DEPENDENTStable. Notice that some of the values of theGENDERcolumn are in lower case, and all the values forRELATIVE_IDare names instead of IDs. Check the data/table mapping, and click Next.

Description of this image -
The Data Validation step of the wizard appears. All the transformation rules and table lookups are applied in this step.Notice that all the
GENDERvalues are in upper case and theRELATIVE_IDvalues are replaced by correspondingEMPNObased on the table lookup created earlier. Click Load Data.
Notice that theRELATIVE_IDvalue for Pierre and CLAUDE is not replaced with the correspondingEMPNOfromEMPtable. This is because, a suitable match is not found for these values in theENAMEcolumn ofEMPtable.
Description of this image -
The next step in the wizard displays the Data Load Results. Notice that two records failed because no match is found for the
RELATIVE_IDvalue in theEMPtable. Click Finish.
Description of this image -
The report displays all the records inserted into the
DEPENDENTStable. You want to add a button on this page which opens the Data Load Wizard, when clicked. Click Edit Page 1 in the developer toolbar.
Description of this image
Loading Data Using Copy-Paste Option of the Data Load Wizard
DEPENDENTS
table, using the copy and paste option of the
Data Load Wizard. Perform the following steps:-
In the Rendering tab, right-click Dependents List, and select Create Button.

Description of this image -
In the property editor of the new button, under Identification, enter P1_Load_Dependents for Button Name and Load Dependents for Label. Under Layout, select Above Region for Button Position. Under Behavior, select Redirect to Page in this Application for Action, and click No Link Defined for Target.

Description of this image -
Click the List of Values icon for Page.

Description of this image -
Click 2.

Description of this image -
Click OK.

Description of this image -
Click Save and Run Page.

Description of this image -
Notice the Load Dependents button on the Home Page. Click Load Dependents.

Description of this image -
The Data Load Wizard opens. Select Copy and Paste for Import From.

Description of this image -
Locate and open dependent_data2.txt from your working directory. Select the entire contents, and copy them to the clipboard.

Description of this image -
Paste the copied contents in the text area provided for Copy and Paste Delimited Data.

Description of this image -
Click Next.

Description of this image -
Notice that the third column is not mapped to any column of the
DEPENDENTStable. Select BIRTHDATE - date for the third column.

Description of this image -
Click Next.

Description of this image -
Notice that the
GENDERvalues are all converted to uppercase and all theRELATIVE_IDs are mapped withEMPNO. Click Load Data.
Description of this image -
The Data Load Results displays. Click Finish.

Description of this image -
All the new records are now seen in the report. Click Application<n> in the developer toolbar.

Description of this image
Review the Data Load Definition
-
Click Shared Components.

Description of this image -
Under Data References, click Data Load Definitions.

Description of this image -
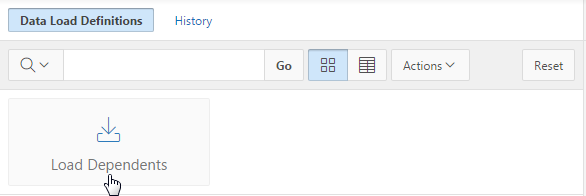
Notice that Load Dependents is listed as an existing Data Load Definition. To review its definition, click Load Dependents.
Description of this image -
The entire definition for Load Dependents displays.

Description of this image -
Scroll down, and notice that you can create new Transformation Rule, Table Lookup, or Column Aliases List of Values by clicking the corresponding buttons on this screen. In this case, you are not modifying this Data Load Definition. Therefore, click Cancel.

Description of this image
Summary
In this tutorial, you have learned how to:
- Create a Data Load Wizard using Data Loading Page Wizard in Oracle Application Express 5.0
- Load data into the table using the File Upload option of the Data Load Wizard
- Load data into the table using the Copy-Paste option of the Data Load Wizard
Want to Learn More?
Credits
-
Curriculum Developer: Anjani Pothula
- Other Contributors:Drue Swadener