Before You Begin
Purpose
This tutorial shows you how to manipulate database objects using Oracle Application Express 5.0.
Time to Complete
Approximately 30 minutes.
Overview
Oracle Application Express (Oracle APEX) is a rapid web application development tool for the Oracle database. Using only a web browser and limited programming experience, you can develop and deploy professional applications that are both fast and secure. Oracle Application Express is available with the Oracle Database, whether it's on-premises or in the Oracle Cloud.
In this tutorial, you use Oracle Application Express Release 5.0 to create and run a database application.
Please keep in mind the following while running this tutorial:
- Logging into your Oracle Application
Express workspace: Your Oracle
Application Express workspace may reside in an
on-premises Oracle Database or in Oracle Database
Cloud Services. The login credentials differ
depending on where your workspace is located:
- Logging into Oracle Application Express in a Oracle Database Cloud Service: Reference the Oracle Help Center for your Oracle Database Cloud Service. To do this, go to the Oracle Help Center for Cloud, and select Platform and Infrastructure. From here, select your Database Cloud Service and the Get Started page will appear.
- Logging in to Oracle Application Express on-premises: From your browser, go to the location of your on-premises installation of your Oracle Application Express workspace provided by your Workspace Administrator.
- Application ID: Screenshots in this tutorial show a blurred Application ID. Your Application ID can be any value assigned automatically while creating the application.
- Schema: If you are accessing an Oracle Application Express workspace in Database Schema Service, you have one schema assigned to you with a schema name that you cannot change. If you are accessing the workspace in an on-premises Oracle database, you may have more than one schema assigned to your workspace by the Oracle Application Express Instance Administrator.
What Do You Need?
Before starting this tutorial, you should have:
- Access to an Oracle Database 11g or later release, either on-premises or in a Database Cloud Service.
- Installed Oracle Application Express Release 5.0 into your Oracle Database (for on-premises only).
- At least one Oracle Application Express user provisioned. See Creating New User Accounts in Oracle Application Express Administration Guide.
- Download and unzipped the files.zip file into your working directory.
Creating a Table from a Spreadsheet
In this section, you load the data for this tutorial from a spreadsheet. Log in to your Oracle Application Express workspace, either on-premises or in a Database Cloud Service, and perform the following steps:
-
To create the table, first you need to load the spreadsheet data. From the Oracle Application Express home page, click the down arrow next to SQL Workshop and then select Utilities > Data Workshop.

Description of this image -
Click Spreadsheet Data.

Description of this image -
Ensure that Load To is set to New table. For Load From, select the Upload file (comma separated or tab delimited) option. Click Next >.

Description of this image -
Click Choose File.

Description of this image -
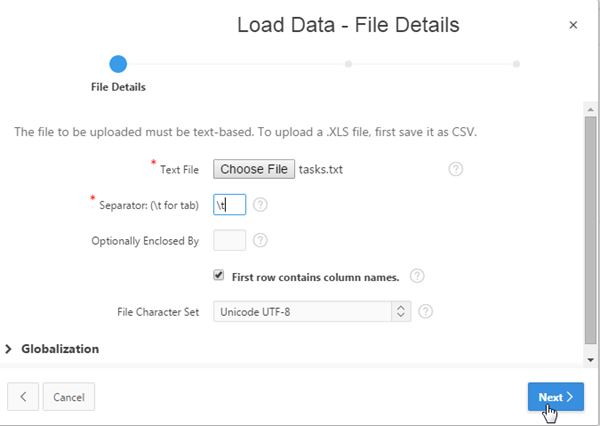
Locate the tasks.txt file in your working directory and click Open. Because the data in the text file is tab delimited, enter \t in the Separator field. Click Next >.
Description of this image -
The Table Properties page displays the columns in the table and their formats based on the file selected in previous step. For Table Name, enter OBE_TASKS, and click Next >.

Description of this image -
Using the Primary Key page, you can add a system-generated primary key to your table and populate that column with a new sequence. Retain the default values, and click Load Data.

Description of this image -
After the table is created and the data is loaded, you are left on the Text Data Load Repository page. You can see an entry that shows the file you just successfully uploaded with 16 rows. To view your new table, click the down arrow next to the SQL Workshop tab and then select Object Browser.

Description of this image -
To view the table definition, click the OBE_TASKS table under the list of tables in the left navigator.

Description of this image -
This page displays the table definition. To view the data in the table, click the Data tab.

Description of this image -
You see all the data in the table. You can change any of the data in the table from this page, and also add rows to the table.

Description of this image
Adding a Master Table
To make the project name maintainable and to be able to track other information about a project, you can move the Project information into a separate table. Perform the following steps:
-
Click the Table tab.

Description of this image -
Click Create Lookup Table.

Description of this image -
To specify the column on which the master table is to be created, select PROJECT - varchar2, and click Next > .

Description of this image -
Enter the following values, and click Next >.
New Table Name: OBE_PROJECTS
New Sequence: OBE_PROJECT_SEQ
Description of this image -
Click Create Lookup Table.

Description of this image -
Notice that the new table
OBE_PROJECTScontains a numeric primary key along with thePROJECTcolumn.
Description of this image
Modifying a Table
Now that you have the two main tables, enhance the OBE_PROJECTS table by adding some additional columns. To do this, perform the following steps:
-
Make sure the
OBE_PROJECTStable is selected. You are going to add a column to the table. Click Add Column.
Description of this image -
Enter the following values, and click Next >.
Add Column: PROJECT_DEADLINE
Type: DATE
Description of this image -
Click Finish.

Description of this image -
You see the modified table definition with the new
PROJECT_DEADLINEcolumn added. You want to create one more column,PROJECT_PRIORITY.
Click Add Column.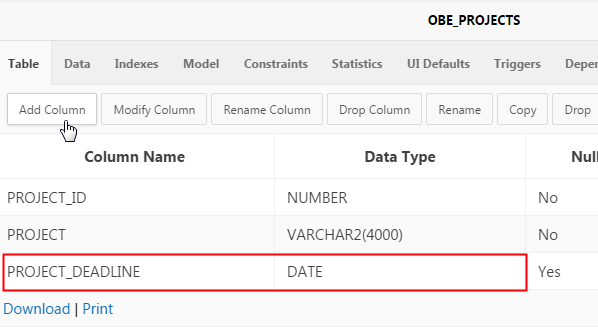
Description of this image -
Enter the following values, and click Next >.
Add Column: PROJECT_PRIORITY
Type: NUMBER
Precision: 1
Description of this image -
Click Finish.

Description of this image -
The
PROJECT_PRIORITYcolumn is added. Click the Data tab to view the data.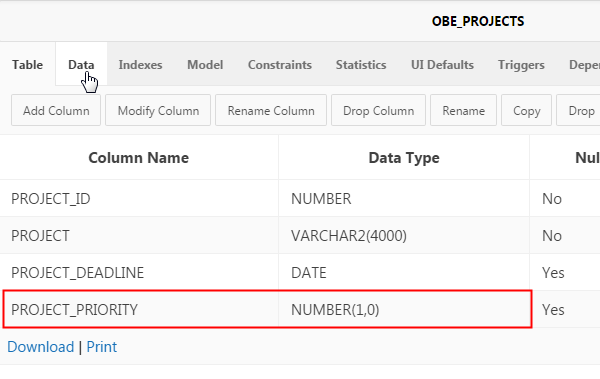
Description of this image -
You see all the projects that were referenced in the
OBE_TASKStable. You can change data from here. Click the Edit icon on the left ofPROJECT_IDfor Public Website.
Description of this image -
For Project Deadline, enter a date greater than today's date. Enter 1 for Priority. Then, click Apply Changes.

Description of this image -
You see the data that you added. Another way to create database objects and load data is to use a script. Click the down arrow next to the SQL Workshop tab and select SQL Scripts.

Description of this image
Adding a Table Using a Script
You may have noticed that the ASSIGNED_TO
column in OBE_TASKS table is a number.
In this topic, you run a script to create the OBE_EMPLOYEES
table and load a list of current employees. Each
employee has an EMPLOYEE_ID that
corresponds to the numbers found in the ASSIGNED_TO
column of OBE_TASKS table. Perform the
following steps:
-
You are in the SQL Scripts page. Click Upload >.

Description of this image -
Click Choose File.

Description of this image -
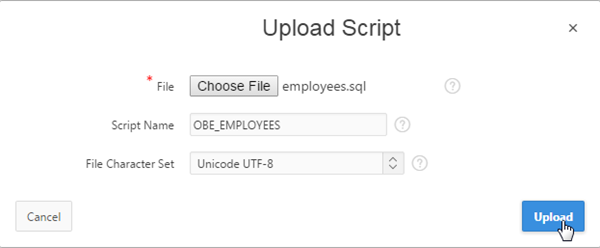
Select employees.sql from your working directory and click Open. Enter OBE_EMPLOYEES for the Script Name and click Upload.
Description of this image -
Locate the entry for the script uploaded in the previous step, and click the Run icon.
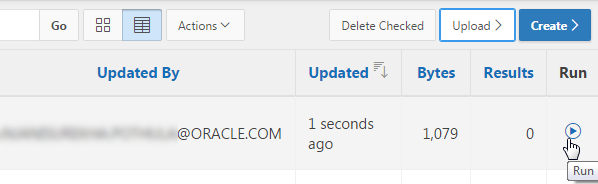
Description of this image -
Click Run Now.

Description of this image -
The script completed execution. To view the results, click the View Results icon.

Description of this image -
The
OBE_EMPLOYEEStable is created with 10 records of data.
Description of this image -
Click the down arrow next to the SQL Workshop tab and select Object Browser.

Description of this image
Adding a Constraint
You now have the employee data that is referenced
by the ASSIGNED_TO column of
OBE_TASKS table. But, you need to identify
a foreign key between these two tables to ensure
that each ASSIGNED_TO column
references a valid employee. It also ensures that an
employee cannot be deleted who has tasks assigned.
Perform the following steps:
-
You are on the Object Browser page. Select the OBE_TASKS table under the list of tables in the left navigator.

Description of this image -
Click the Constraints tab.
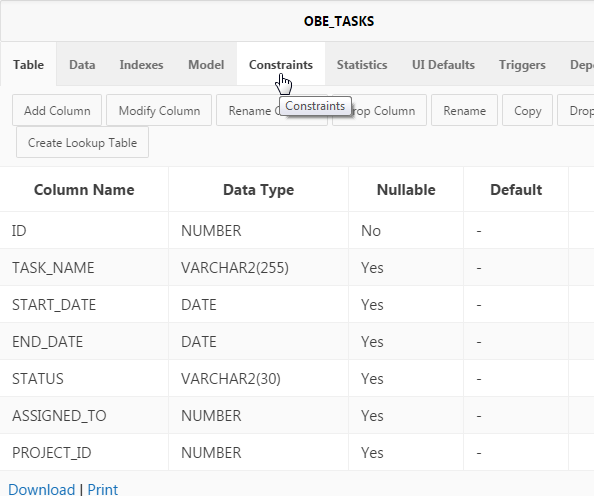
Description of this image -
Click Create.

Description of this image -
Select Foreign Key for the Constraint Type. Select ASSIGNED_TO for the Foreign Key Column, and click the Move icon.
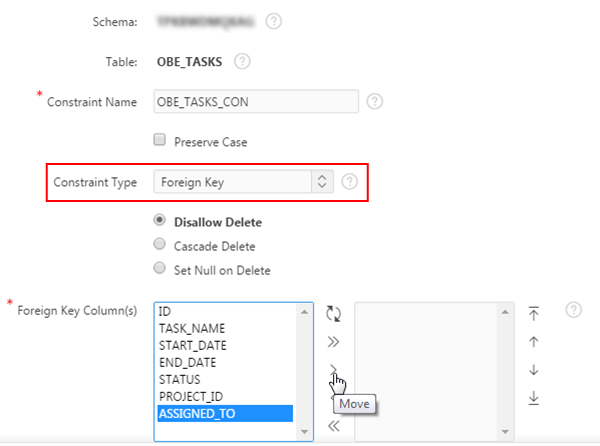
Description of this image -
Select OBE_EMPLOYEES for Reference Table Name, EMPLOYEE_ID for Reference Table Column(s), and click Next >.

Description of this image -
Click Finish.
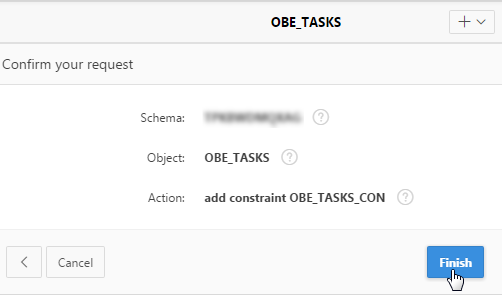
Description of this image -
The Foreign Key Constraint is created successfully. You also want to create a check constraint on the
PROJECT_PRIORITYcolumn so that the data is validated every time a record is inserted or updated. Select OBE_PROJECTS table under the list of tables in the left navigator.
Description of this image -
Ensure you are on the Constraints tab, and click Create.

Description of this image -
Select PROJECT_PRIORITY (NUMBER) for the Constraint on Column field, and enter in ('1','2','3') for the Constraint Expression. Ensure that Check Constraint Type is selected, then click Next >.

Description of this image -
Click Finish.
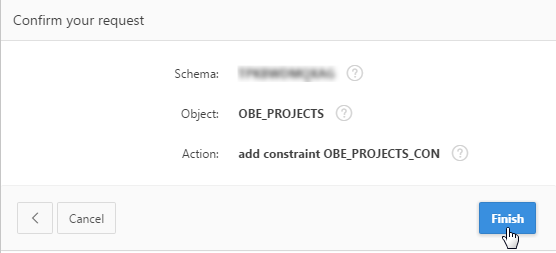
Description of this image -
The constraint is created successfully. Click the up arrow in the navigation bar to come out of Object Browser.

Description of this image
Summary
In this tutorial, you have learned how to:
- Create a table from a spreadsheet
- Create a look up table
- Modify a table
- Run a script to create a table
- Create a constraint in a table
Want to Learn More?
- Other tutorials on Oracle Database Cloud Service - Database Schema Service
Credits
-
Curriculum Developer: Anjani Pothula
- Other Contributors:Drue Swadener