Configuring Active Directory Federation Services 3.0 as an Identity
Provider with Oracle Cloud as Service Provider
Overview
Purpose
This tutorial describes how to configure Active Directory
Federation Services (ADFS) 3.0 as an Identity Provider( (IdP) to
be used with Oracle Cloud as the Service Provider (SP).
Time to Complete
Approximately 1 hour
Introduction
The Oracle Cloud documentation describes the
tasks for configuring Oracle Cloud as a SP, using the SSO
Configuration tab of the My Services UI. SP configuration,
however, is only half of the configuration process. To enable SSO,
you need to configure the IdP as well as the SP.
The My Services configuration page for SSO requires you to
configure the SP first. To do that, you must have metadata from
the IdP to upload into the SP. Therefore, you need to move back
and forth between the IdP and the SP to perform the complete
configuration. Specifically, you will:
Obtain the IdP metadata for SP configuration
Configure the SP
Obtain the SP metadata for IdP configuration
Configure the IdP
Test and enable SSO from the SP
Software Requirements
The following is a list of software requirements for the IdP:
Active Directory and IIS web server are installed and
configured on-premise. In this tutorial we shall assume AD
domain is adfs30.fed.oracle.com
The on-premise Active Directory Federation Services 3.0 must
be:
Installed. In our tutorial we assume that there is
pre-installed ADFS 3.0 on Windows Server 2012 R2 Data Center
machine. You can review the basic steps on how we setup ADFS
3.0 in our environment here.
Configured for local user authentication by using either
of the following authentication methods:
Windows Integrated Authentication (for example,
Kerberos and HTTP Basic Authentication)
FORM Based Authentication
Enabled for SSL. To enable the server for SSL, its public
endpoints are configured for SSL. For example, the reverse
proxy fronting OIF configured for SSL Note: Well known
Certificate Authorities issue the SSL certificates.
Prerequisites
Before starting this tutorial, you should:
Familiarize yourself with the documentation for configuring Oracle Cloud
as an SP.
Decide whether to use the email address or the userID as the
Federation attribute for identifying the user in the Federation
message.
Ensure that the each user in the LDAP directory at the IdP
contains the attribute you will use to identify the user in the
Federation message:
If you want to use the email address, then each user must
have a specific attribute containing a unique email address.
For example, if the LDAP directory is OID, mail
would be such an attribute.
If you want to use the user identifier, then each user
must have a specific attribute containing a unique userID.
For example, if the LDAP directory is OID, uid
would be such an attribute or if AD is the directory,
SamAccountName would be such an attribute.
Ensure that the user population has been synchronized between
the IdP LDAP directory and the SP directory, with the attribute
used to identify the user being the same in both directories for
each user. Note: Only the user footprint (not the password)
should exist on Oracle Cloud. Password validation would be done
using the ADFS 3.0 IdP. Importing a Batch of User Accounts in Getting
Started with Oracle Cloud describes a method for
synchronizing users between the two directories.
Obtaining IdP Metadata for SP Configuration
To obtain the Active Directory Federation Services 3.0 IdP
metadata for configuring the Oracle Cloud SP, perform the
following steps:
Launch a browser.
Access the Active Directory Federation Services 3.0 IdP
metadata. The URL is of the form: https://<host>/FederationMetadata/2007-06/FederationMetadata.xml
Save the file locally as IdP_metadata.xml.
Perform Oracle Cloud SP Configuration
You must configure the Oracle Cloud SP before you configure the
Identity Provider.
Perform the following steps:
If necessary, copy the metadata file you obtained from Active
Directory Federation Services 3.0 IdP to the environment where
you will configure Oracle Cloud
In a browser, navigate to the SSO Configuration page of My
Services in Oracle Cloud.
Click Configure SSO.
Select Import identity provider metadata.
Click Browse and upload the identity provider
metadata file (such as IdP_metadata.xml in our tutorial)
For SSO Protocol, HTTP POST is
recommended, and is the default.
Select User identifier. This is the Oracle LDAP
Directory attribute that is used to map the user information
contained in the incoming SSO SAML Assertion to an Oracle Cloud
User.
It is either User's email address or UserID.
Select User's email address for this tutorial.
Select Contained in. If the User identifier
is User's email address, Contained in
must be NameID.
If the User identifier is the User ID,
Contained in must be SAML Attribute and
you must specify the name of the SAML Attribute to use for Contained
in such as SamAccountName in case of AD.
Click Save.
The screen now displays the remaining tasks to be performed on
the SSO configuration page:
Obtaining SP Metadata for IdP Configuration
To obtain the Oracle Cloud SP metadata for configuring Active
Directory Federation Services 3.0 as an IdP, perform the following
steps:
Go to the Configure your Identity Provider Information
section of the SSO Configuration page and click Export
Metadata, then select Provider Metadata.
Save the metadata to a local file as SP_metadata.xml
Adding Oracle Cloud SP as a Trusted Relying Party
To configure Active Directory Federation Services 3.0 as the
Identity Provider, you must add Oracle Cloud SP as a Trusted
Relying Party. Perform the following steps on the Windows server:
If necessary, copy the metadata file (SP_metadata.xml) you
obtained from the Oracle Cloud SP to the Windows server.
If Server Manager is not running, invoke it from the Start
menu. by using either of these methods:
On the Start menu, right-click Computer (This PC), then
click Manage
On the Start menu, point to Administrative Tools, then
click Server Manager
Click Tools > AD FS Management
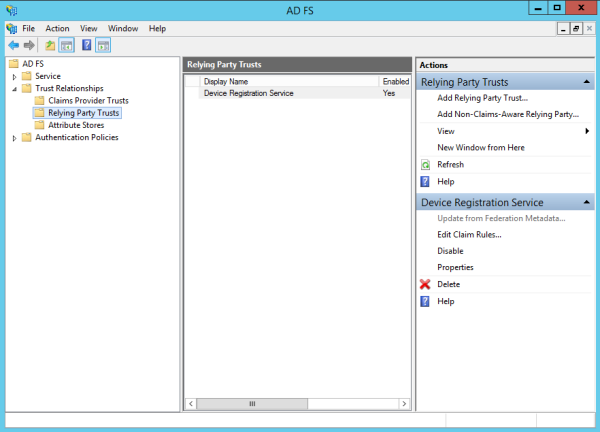
Expand AD FS > Trust Relationships > Relying Party
Trusts
Right-click Relying Party Trusts, then click Add
Relying Party Trust. The Add Relying Part Trust Wizard
opens.
Click Start.
Select Import data about the relying party from a file.
Browse and select the Metadata file you saved from the Oracle
Cloud SP, and click Open.
Click Next.
If a message box like the following one is displayed, click OK.
Enter a name for the Oracle Cloud SP.
Click Next.
Select I do not want to configure multi-factor
authentication settings for this relying party trust at this
time or Configure multi-factor authentication
settings for this relying party trust, depending on your
requirements. (See the Microsoft documentation for more
information.) Note: In this example, I do not want to
configure multi-factor authentication settings for this
relying party trust at this time is selected.
Click Next.
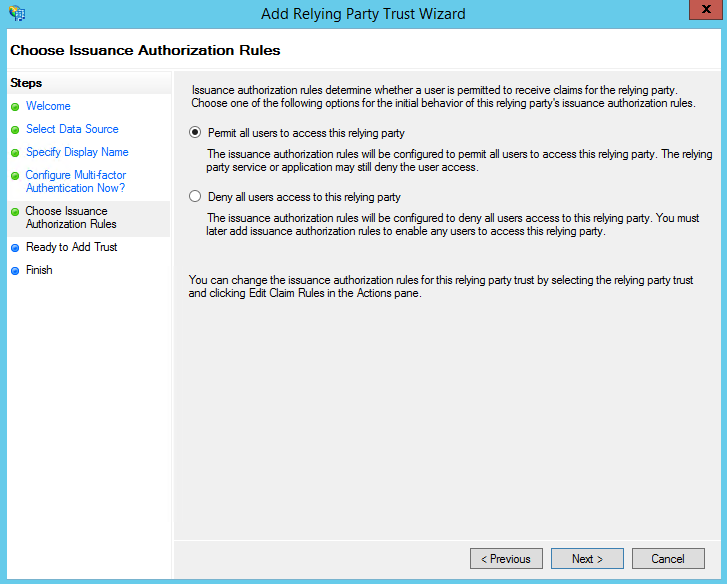
Select Permit all users to access this relying party.
Click Next. A summary window appears.
Click Next.
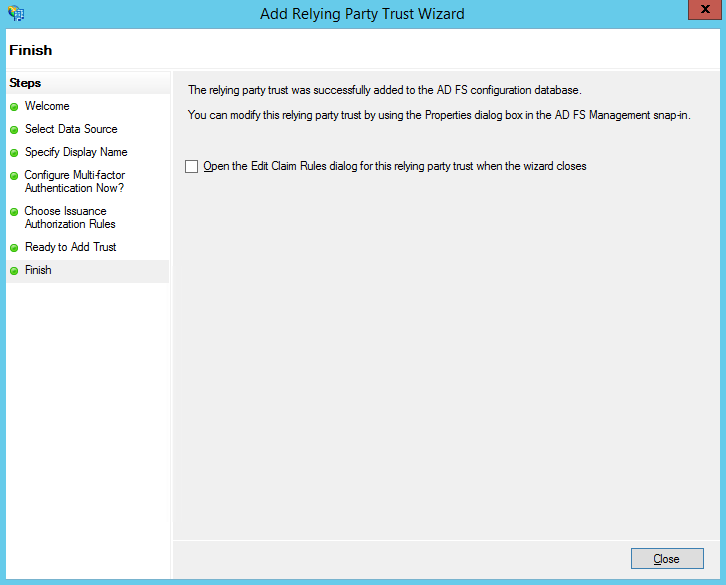
Deselect the Open the Edit Claim Rules dialog for this
relying party trust when the wizard closes check box.
Click Close.
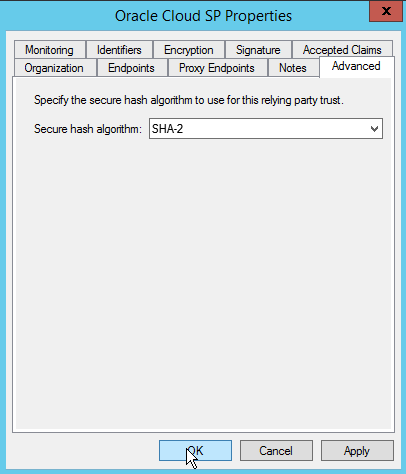
Right-click the newly created relying party, and click Properties.
Click the Advanced tab.
Select SHA-2.
Click OK.
Configuring Claims Using Email Address
Perform the configuration in this section ONLY if you are using
the email address to identify the user in the Federation message.
This section describes how to configure the newly added relying
party entry to instruct ADFS 3.0 IdP to send the user’s email
address as the NameID with the Email Address NameID format.
Perform the following steps to configure ADFS 3.0 to send the
user’s email address to the Oracle Cloud SP:
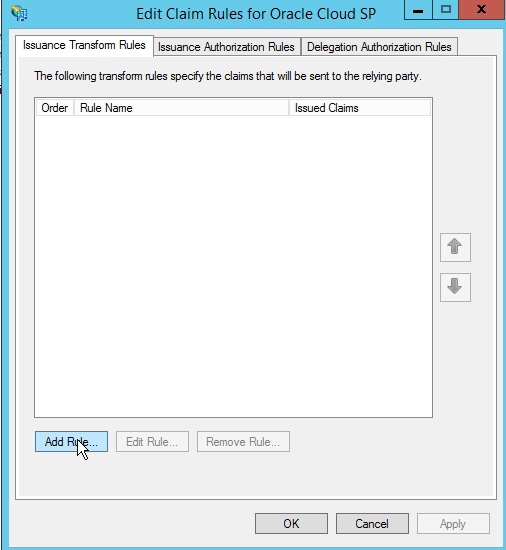
In Server Manager, click Tools > AD FS Management.
Expand AD FS > Trust Relationships > Relying Party
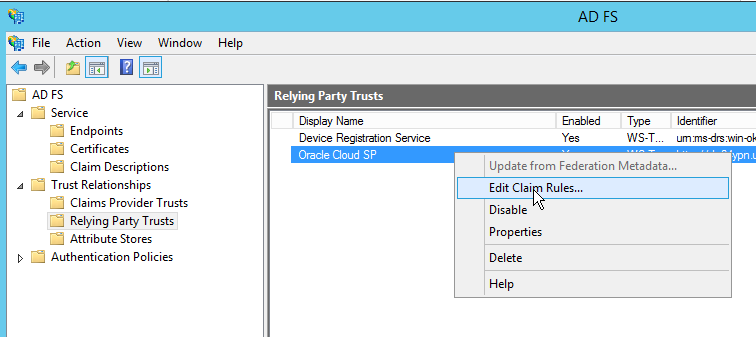
Trusts. Right-click the newly created relying party, and
click Edit Claim Rules
The Edit Rule window appears
Click Add Rule.
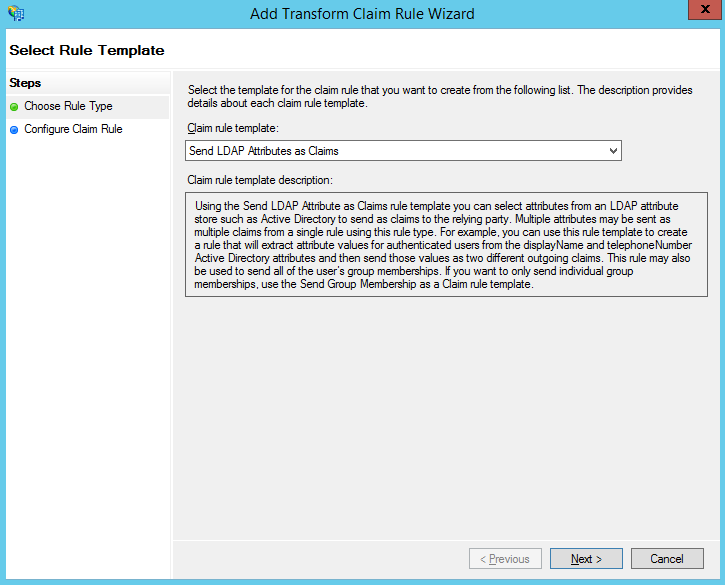
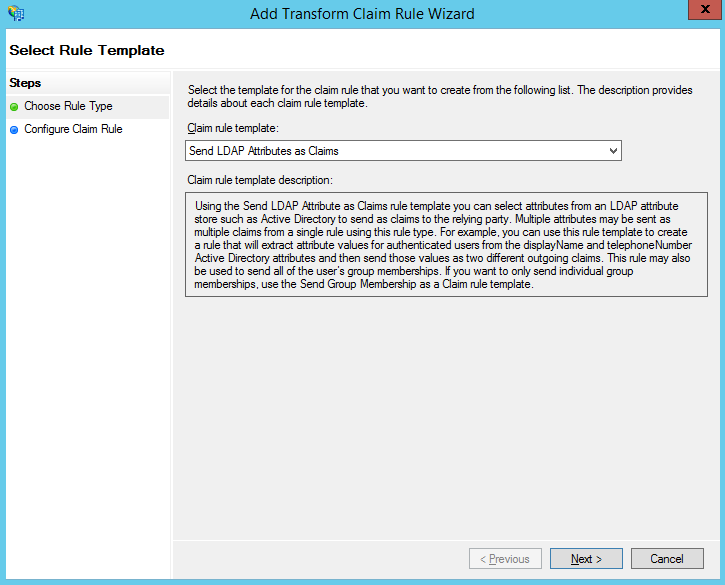
Select Send LDAP Attributes as Claims.
Click Next.
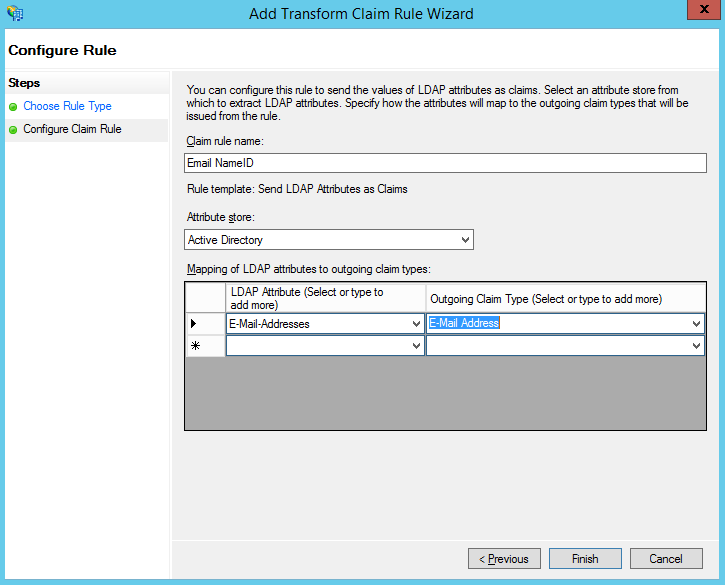
Enter a name for the claim rule, such as, Email NameID.
Select Active Directory as the attribute store.
In the first row, select E-Mail-Addresses as the
LDAP Attribute, and E-Mail Address as the outgoing
claim type.
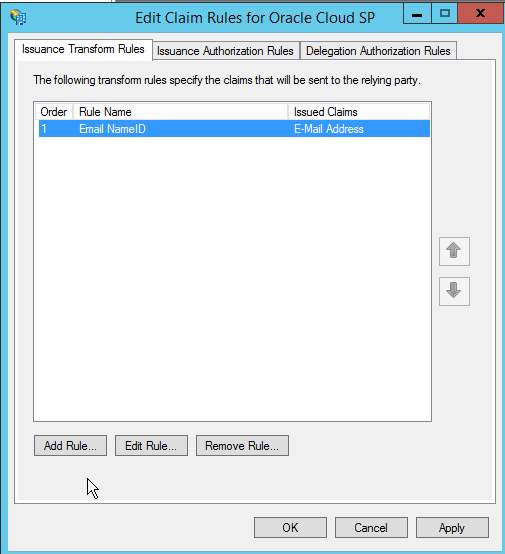
Click Finish. The list of rules is displayed.
Click Add Rule.
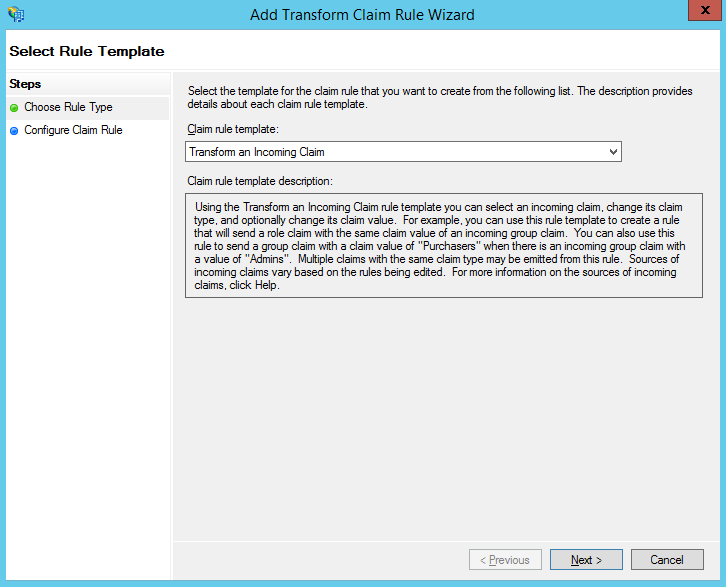
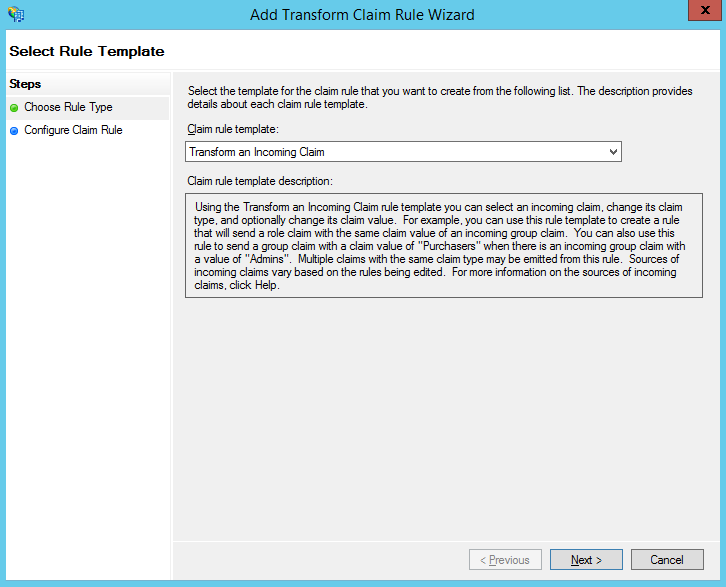
Select Transform an Incoming Claim as the claim
rule template.
Click Next.
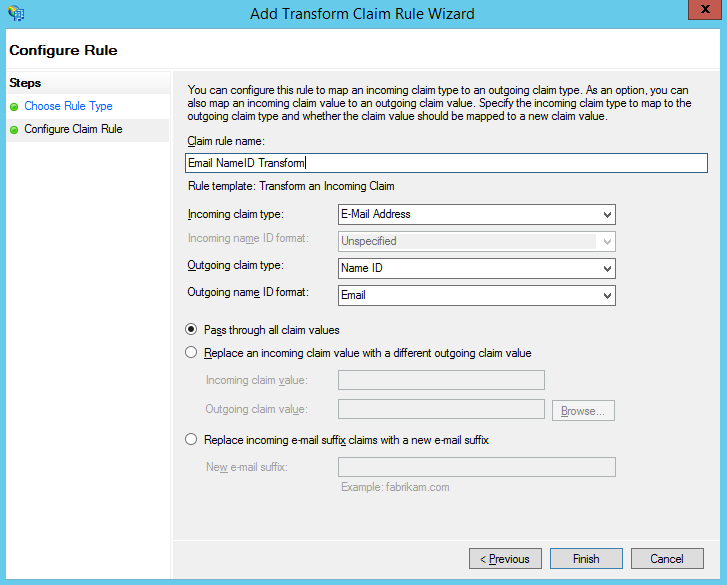
Enter a name for the rule, such as, Email NameID Transform.
Select E-Mail Address as the incoming claim type.
Select NameID as the outgoing claim type.
Select Email as the outgoing name ID format.
Select Pass through all claim values.
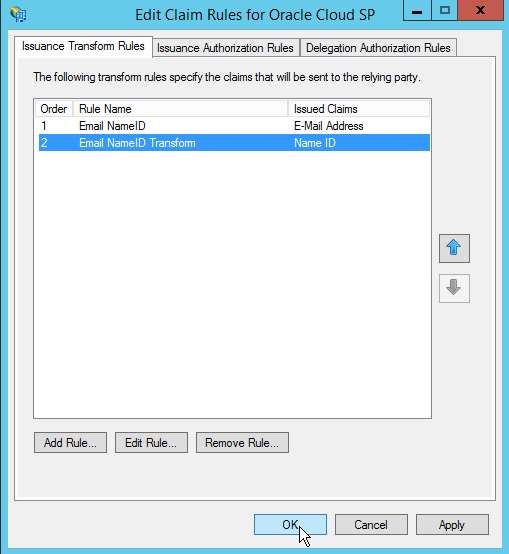
Click Finish. The list of claim rules is
displayed.
Click OK.
Configuring Claims Using UserID
Perform the configuration in this section ONLY if you are using
the UserID to identify the user in the Federation message.
This section describes how to configure the newly added relying
party entry to instruct ADFS 3.0 IdP to send the user’s identifier
as the NameID with the Unspecified NameID format.
Perform the following steps to configure ADFS 3.0 to send the
user’s identifier, SamAccountName, to Oracle Cloud SP:
From the Start menu, select Server Manager. Click Tools
> AD FS Management.
Expand the Service node on the left side, and select Claim
Descriptions.
Right-click Claim Description, and click Add
Claim Description.
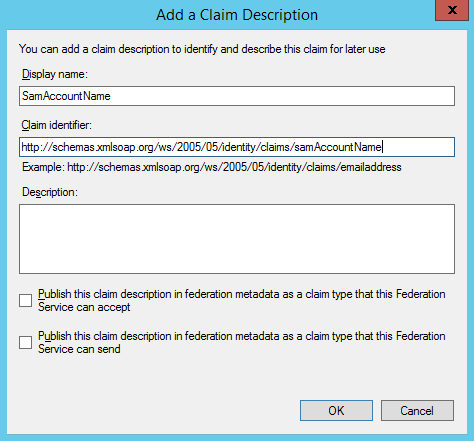
Enter SamAccountName as the display name.
Enter http://schemas.xmlsoap.org/ws/2005/05/identity/claims/samAccountName
as the claim identifier.
Leave the two check boxes deselected.
Click OK.
Expand ADFS > Trust Relationships > Relying Party
Trusts. Right Click and select Edit Claim Rules.
Click Add Rule on the Edit Rule window.
Select Send LDAP Attributes as Claims.
Click Next.
Enter a name for the claim rule, such as, User ID Claim.
Select Active Directory as the attribute store.
In the first row, select SAM-Account-Name as the
LDAP attribute, and SamAccountName as the outgoing
claim type.
Click Finish. The list of rules appears.
Click Add Rule.
Select Transform an Incoming Claim.
Click Next.
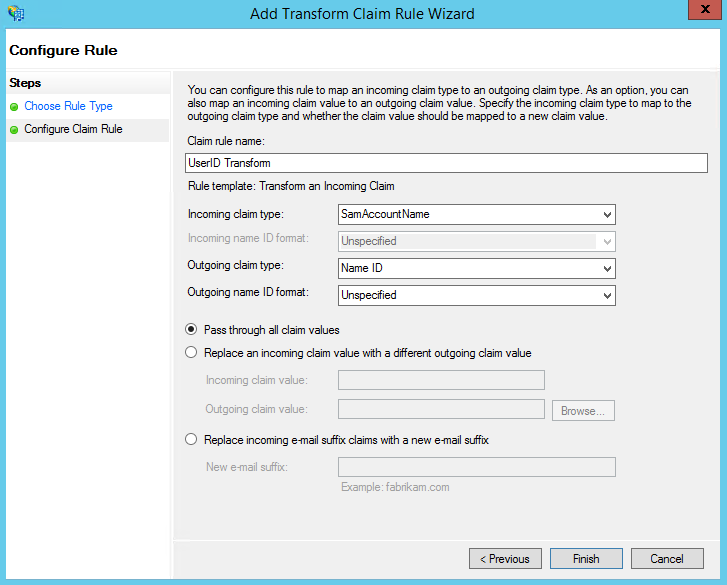
Enter a name for the rule, such as, UserID Transform.
Select SamAccountName as the incoming claim type.
Select NameID as the outgoing claim type.
Select Unspecified as the outgoing name ID format.
Select Pass through all claim values.
Click Finish. The list of claim rules appears.
Click OK.
Complete the Configuration on the Service Provider
To complete the configuration, proceed as follows:
Return to the browser window containing the SSO Configuration
page of My Services in Oracle Cloud.
In the Test your SSO section of the page, click Test.
In the Initiate Federation SSO page,
click Start SSO to initiate testing.
This triggers a Federation SSO flow. You are
redirected to the IdP and challenged for authentication.
Log in using the UserPrincipalName for ahall user.
Note: For the federation to work successfully, ahall
user must exist both on AD (on-premise LDAP directory) and
Oracle Cloud. The user password is however only stored in AD.
If the test authentication is successful, you should see
Federation SSO operation result page with Authentication
Success message. Notice the Assertion attribute is set to
email address.
After the test has completed successfully, go to the Enable
SSO section of the page. Note that the Status
is SSO is Not Enabled.
Click the Enable SSO button to enable SSO for
all Cloud services. Until you do this, SSO is not enabled.
You should see Enable SSO pop up window, click OK to
confirm. The Enable SSO section of the page now
shows Status: SSO is Enabled.
Once you have tested and validation that SSO configuration
is working correctly, navigate to MyServices Oracle Cloud
Sign in URL. You will be prompted to enter your Identity
Domain (you can save this for subsequent logins). Enter your
Identity Domain Name and click on Go.
You should be able to authenticate through the IdP, after
entering your AD credentials (UPN - UserPrincipalName for
Andy Hall user) and selecting Sign In using Company option.
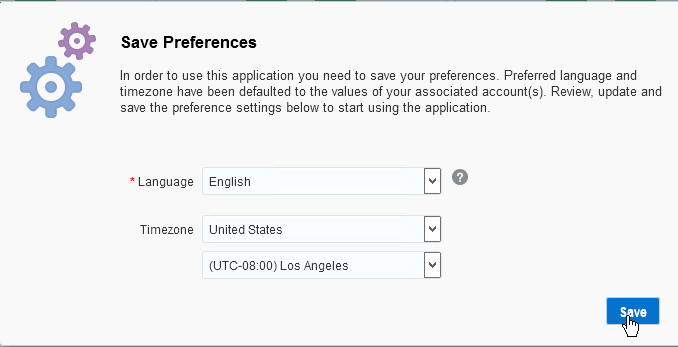
The first time you login, you can save your preference for
Language and Time Zone.
You should now see your MyServices home page. Notice the
top right corner, which shows you are logged in as ahall
user (UPN login username) to the docs identity domain and
SSO is enabled.
Summary
In this tutorial, you learned to:
Obtain a file containing Active Directory Federation Services
3.0 metadata to use for SP configuration
Perform Oracle Cloud SP Configuration
Configure Active Directory Federation Services 3.0 as the IdP,
using metadata from Oracle Cloud
Use the Oracle Cloud documentation to test and enable SSO at
the SP