The goal of this tutorial is to show you how to manage data during its lifetime using the Information Lifecycle Management strategy with the ILM Assistant.
Approximately 30 minutes
This tutorial covers the following topics:
| Overview | ||
| Prerequisites | ||
| Opening the ILM Assistant | ||
| Setting Preferences to Demonstration Mode | ||
| Creating Logical Storage Tiers | ||
| Analyzing Results Using Reports | ||
| Summary | ||
![]() Place
the cursor over this icon to load and view all the screenshots for this tutorial.
(Caution: This action loads all screenshots simultaneously, so response time
may be slow depending on your Internet connection.)
Place
the cursor over this icon to load and view all the screenshots for this tutorial.
(Caution: This action loads all screenshots simultaneously, so response time
may be slow depending on your Internet connection.)
Note: Alternatively, you can place the cursor over an individual icon in the following steps to load and view only the screenshot associated with that step. You can hide an individual screenshot by clicking it.
Information Lifecycle Management (ILM) is a set of policies and procedures for managing data during its lifetime.
The ILM Assistant manages information by recommending the correct placement of data on logical storage tiers as specified by a lifecycle definition, where a lifecycle definition describes the stages and storage tiers that data resides on during its lifetime.
Each stage specifies a retention period during which the data resides on a logical storage tier. A logical storage tier is a collection of Oracle tablespaces in which partitions may reside.
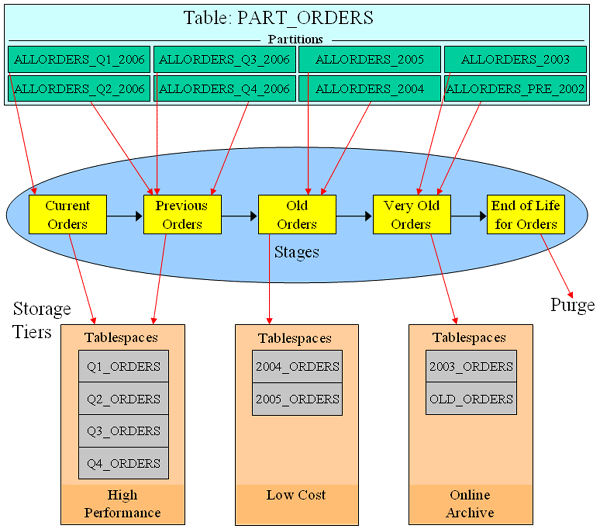
As an example, assume that it is Q4 in 2006 and you want to use the ILM Assistant to manage the table TL. MYSALES contains several partitions (ALLORDERS_Q1_2006, ALLORDERS_Q2_2006, ALLORDERS_Q3_2006, ALLORDERS_Q4_2006, ALLORDERS_2005, ALLORDERS_2004, ALLORDERS_2003, ALLORDERS_PRE_2002). The logical storage tiers High Performance, Low Cost, and Online Archive are defined in the ILM Assistant and each one contains one or more Oracle tablespaces. The lifecycle definition, SOX_ORDERS, which is used to manage the table MYSALES contains the following stages:
This OBE takes you through a scenrio similar to the example shown here involving the TL.SALES. Another scenario involving the TL.PART_ORDERS tables is also used to highlight further functionality of the ILM Assitant.
For the purposes of this tutorial, the following steps have already been completed:
| 1. | The Oracle Database 11g R2 database has been installed..
|
|
| 2. | Oracle Application Express has been configured in the database.
|
|
| 3. | The ILM Assistant application has been installed and an ILM_ADMIN user with a password of oracle has been configured. The ILM_ADMIN user will be used during this tutorial. |
|
When the ILM Assistant application was installed, a workspace and an application are created in Oracle Application Express. To open the ILM Assistant, perform the following steps:
| 1. | Open a browser window and enter the following URL: http://localhost:8080/apex/f?p=737677 Log in as ilm_admin specifying oracle as the password and click Login.
|
|
Preferences permit customization of the behavior and information displayed in the ILM Assistant. In this topic, you change the Demonstration Mode preference value to something greater than 1 so that you can review the capabilities of the tool without the actual data. Perform the following steps:
| 1. | Click the Lifecycle Setup tab.
|
|
| 2. | Click the Preferences subtab.
|
|
| 3. | Click the Edit icon in front of the Demonstration Mode preference.
|
|
| 4. | Change the value to 100000 and click OK.
|
|
| 5. | The Demonstration mode preference has been updated. Now you can perform the rest of the OBE.
|
|
ILM is concerned with ensuring that data is placed on the most optimal storage devices depending on how it is being used. This is achieved in the ILM Assistant by specifying logical storage tiers that represent the different types of storage tiers available in your system. In this example, you create three logical storage tiers: high performance for the very fast, high-throughput storage devices and low-cost and online archive for the placement of data that is infrequently accessed. Perform the following steps:
| 1. |
Click the Logical Storage Tiers subtab.
|
|
| 2. |
Click New storage tier.
|
|
| 3. | Click Refresh tablespace cache.
|
|
| 4. | Click OK.
|
|
| 5. |
Enter High Performance in the Name field, Very high performance disks in the Description field and 72 in the Cost per GB field. Click Show filter options.
|
|
| 6. |
Enter 20 for Rows Displayed and click Go.
|
|
| 7. |
Select the check box in the Read-Write Preferred column for Q4_ORDERS. Select the check box in the Secondary Tablespace column for CC_THIS_MONTH, Q1_ORDERS, Q2_ORDERS, and Q3_ORDERS.
|
|
| 8. | Scroll up and click Create.
|
|
| 9. | Your Logical Storage Tier has been created. You need to create two more logical tiers: Low Cost and Online Archive. Click New storage tier.
|
|
| 10. | Enter Low Cost in the Name field, Lower Cost ATA disks, used for older data in the Description field and 14 in the Cost per GB field. Select the check box Read-Write Preferred for 2005_ORDERS. Then click Go to display a list of available tablespaces.
|
|
| 11. | Select the check box in the Read-Write Preferred column for 2005_ORDERS. Select the check box in the Secondary Tablespace column for 2004_ORDERS, CC_PREV_MONTH, and CC_THIS_YEAR.
|
|
| 12. | Scroll up and click Create.
|
|
| 13. | Your Logical Storage Tier has been created. You need to create one more logical tier. Click New storage tier.
|
|
| 14. | Enter Online Archive in the Name field, Used for data older than 2 years in Description and 7 in the Cost per GB field. Then click Show filter options.
|
|
| 15. | Enter 20 for Rows Displayed and click Go.
|
|
| 16. | Select the check box Read-Write Preferred for 2003_ORDERS. Select the check box Read-Write Secondary for CC_OLD_TRAN, and OLD_ORDERS.
|
|
| 17. | Scroll up and click Create.
|
|
| 18. | All the Logical Storage Tiers have been created.
|
|
Lifecycle definitions describe how data migrates across logical storage tiers during its lifetime. A lifecycle definition comprises one or more lifecycle stages that select a logical storage tier, data attributes such as compressed/uncompressed and read only and a duration for data residing on that lifecycle stage. A lifecycle definition is valid if it contains at least one lifecycle stage and there must be a final stage, which is either user specified or automatically generated by the ILM Assistant upon completion of the lifecycle definition process. For the final stage, you must specify what happens to the data at the end of the lifecycle: it is archived offline, or remains online, or it is purged. In this topic, you create a lifecycle definition that contains four lifecycle stages. Perform the following tasks:
| 1. |
From the Lifecycle Setup tab, select the Lifecycle Definitions subtab.
|
|
| 2. |
Click New lifecycle definition.
|
|
| 3. |
Enter SOX_ORDERS in the Name field and Orders that must comply with Sarbanes Oxley and will be kept for 7 years in the Description field. A lifecycle is defined by STAGES. A Stage describes what happens to data for that period of time. Enter Current Orders in Current Stage name and This months orders as the description. Enter 1 in the Retain Data for field and choose Months from the drop-down list. Select High Performance for the Logical Storage Tier. Click Continue.
|
|
| 4. |
Enter Previous Orders in the Stage Name field and Previous 2 months' orders in the Description field. Enter 2 in the Retain Data for field and select Months from the drop-down list. Select High Performance for the Logical Storage Tier and select Compressed for the Stage Attributes. Then click Create and Add Another.
|
|
| 5. | Enter Old Orders in Stage Name and Last 11 months' orders in Description. Make sure No is selected for Final Stage for Lifecycle Definition. Make sure Previous Orders is selected for Stage immediately Preceeds Stage. Enter 11 in the Retain Data for field and select Months from the drop-down list. Select Low Cost for the Logical Storage Tier. Then click Create and Add Another.
|
|
| 6. | Enter Very Old Orders in the Stage Name field and 6 years or older in the Description field. Make sure No is selected for Final Stage for Lifecycle Definition. Make sure Old Orders is selected for Stage immediately Preceeds Stage. Enter 6 in the Retain Data for field and select Years from the drop-down list. Select Online Archive for the Logical Storage Tier and select Compressed for the Stage Attributes. Then click Create and Add Another.
|
|
| 7. | Enter End of Life for Orders in Stage Name and Purge after 7 years in the Description field. Click Yes for Final Stage for Lifecycle Definition. Select Purge for End of Life Action. Then click Create.
|
|
| 8. | Click OK to finish creating the lifecycle definition.
|
|
| 9. | Your Lifecycle definition has been created. Click the Edit icon.
|
|
| 10. |
To see a graphical view of the lifecycle, click Graphical View.
|
|
| 11. |
The graphical view appears. Click OK.
|
|
| 12. |
Your Lifecycle definition has been created successfully.
|
|
For tables having no partitioning, a simulated partitioning strategy can be generated showing how to partition the table and how data would be migrated if managed by the ILM Assistant. Perform the following steps:
| 1. |
Under the Lifecycle Setup tab, select the Lifecycle Table subtab.
|
|
| 2. | The tables you want to use in this demo are owned by the TL user. Click Refresh table list to get started.
|
|
| 3. | Click Submit Refresh.
|
|
| 4. | Click OK in response to the warning that the table refresh can take a long time.
|
|
| 5. | The ILM Assistant is refreshing the table list.
|
|
| 6. | Once the refresh is complete click Show filter options.
|
|
| 7. | Enter TL in the Table Owner field and click Go.
|
|
| 8. |
The list is narrowed to show the tables owned by the TL user. Because the table is not partitioned, the TL.SALES table is a candidate to be managed by the ILM Assistant. Click the Candidate link for the TL.SALES table.
|
|
| 9. |
Select the SOX Orders Lifecycle you created.The ILM Assistant automatically identifies suitable partitioning keys (in this example TIME_ID). Click Load table statistics to determine the range of the data and compression that may be achieved.
|
|
| 10. | Click OK in response to the warning that loading table statistics can take a long time.
|
|
| 11. | Click Reset near the Compression Factor field to reset the compression to a number other than 1. You could also enter your own compression factor. Note: your statistical information may be different than the screenshot.
|
|
| 12. | Notice in our example the compression has been changed to 2.5. Click Preview Simulation.
|
|
| 13. |
You can modify any of these values such as number of rows to view the projected costs and savings. In this case, you can see the projected savings of using tiered storage and the additional savings that are likely to result from using compression. Click Create a migration script.
|
|
| 14. |
Click Preview.
|
|
| 15. | Review the script. Click Return to Partition Simulation.
|
|
| 16. | Alternatively, you can place this table in simulation mode where the ILM Assistant will advise how and when data should be moved. To create the simulation, click OK.
|
|
| 17. | Click OK again to confirm.
|
|
| 18. | The SALES table is now simulating being partitioned. In the next example you are going to take an already partitioned table and simulate using ILM to manage that table. To do this, you click a candidate table that is already partitioned. Click Candidate for the TL.PART_ORDERS table.
|
|
| 19. | Select SOX_ORDERS for the Lifecycle Definition and click Preview.
|
|
| 20. | The storage cost information is displayed. Click OK.
|
|
| 21. | The PART_ORDERS table is now being managed.
|
|
Lifecycle event scanning determines when it is time to move data across storage tiers, or it is ready for archiving, deletion, compression, or should be set to read-only. Perform the following steps:
| 1. |
Click the Lifecycle Management tab.
|
|
| 2. |
Click Scan for Events.
|
|
| 3. |
Click Submit Event Scan.
|
|
| 4. | Click OK to confirm.
|
|
| 5. | The ILM Assistant is scanning for events.
|
|
| 6. | Some events were found. To review some of the events, in the Overdue Events section click the 4 Managed events link for the Move Data type of event. Note: the number of events may be different in your environment.
|
|
| 7. | The events are shown. Click Show filter options.
|
|
| 8. | Change the Current Tier to High Performance and click Go.
|
|
| 9. | A list of the events for managed tables is shown. Click Events for Simulated Tables.
|
|
| 10. | There are no events for simulated tables assigned to the High Performance tier shown. Click Show filter options .
|
|
| 11. | Change the Current Tier back to ---All storage tiers--- and click Go.
|
|
| 12. | Now you see that there is an event for the TL.SALES simulated table. Lets simulate the events for the TL.SALES table. Check the checkbox for the event shown and click Simulate accepted recommendations.
|
|
| 13. | Click Selected Tables (in this example there is only one table in the list). Select the Sales table by clicking the check box for the table. Then click Simulate Recommendations.
|
|
| 14. | To see the status click View implementation status.
|
|
| 15. | The implementation has finished so you don't see your event listed. Click Lifecycle Event Calendar .
|
|
| 16. | Refresh the list of events by clicking Scan for Events.
|
|
| 17. | Click Start Event Scan.
|
|
| 18. | Click OK in response to the warning that event updates may take a long time.
|
|
| 19. | The ILM Assistant is scanning for events.
|
|
| 20. | Notice that there are not any overdue Simulated events listed. Click View event scan history.
|
|
| 21. | The list of event scans is shown.
|
|
There are a number of reports supplied with the ILM Assistant to provide you with valuable information about your ILM environment. Perform the following steps:
| 1. | Click the Reports tab.
|
|
| 2. | Click the By Table link.
|
|
| 3. | Click the Simulated Tables link.
|
|
| 4. | This report displays cost comparisons when using a multi-tier storage strategy versus a single-tier strategy for simulated tables. Click the Storage Tiers subtab.
|
|
| 5. | This report displays information about the tablespaces associated with each logical storage tier. Click the Tables subtab.
|
|
| 6. | This report displays information about the tables being managed, simulated, or placed by the ILM Assistant. Click the Partitions subtab.
|
|
| 7. | This report displays the partitions for the managed tables. Click the Data Usage subtab.
|
|
| 8. | This report displays data usage statistics for lifecycle tables. Click the Lifecycle Retention subtab.
|
|
| 9. | This report displays the lifecycle definitions and retention periods. Click the Data Protection subtab.
|
|
| 10. | This report displays the status of currently implemented data protection strategies.
|
|
The Compliance & Security section within the ILM Assistant displays information that can be used to enforce security and help maintain compliance with the numerous regulations from around the world. Perform the following steps:
| 1. | Click the Compliance & Security tab.
|
|
| 2. | The Overview displays the current status of all security and compliance features in use. Click the Immutability subtab.
|
|
| 3. | Immutability proves that data hasn't changed by generating and comparing a digital signature. In this case, no signed result sets are defined. Click the Privacy & Security subtab.
|
|
| 4. | This table shows which tables have security policies against them. Click the Virtual Private Database Policies link.
|
|
| 5. | The VPD policies are shown. Click the Auditing subtab.
|
|
| 6. | The current audit status is displayed. Click the Fine-Grained Auditing Policies link.
|
|
| 7. | The FGA auditing policies are displayed. Click the Auditing Records link.
|
|
| 8. | Currently there are no Audit Records. Click the Policy Notes subtab.
|
|
| 9. | Currently you have no Policy Notes defined.
|
|
In this tutorial, you learned how to:
| Create a logical storage tier | ||
| Define a lifecycle | ||
| Assign a lifecycle to a table | ||
| View a lifecycle event | ||
| Analyze the results using reports | ||
| Ensure compliance and security | ||
![]() Place your cursor on this icon to hide all screenshots.
Place your cursor on this icon to hide all screenshots.
