Managing Pluggable Databases (PDBs) using Oracle SQL Developer
Overview
- Modifying the state of a pluggable databas
- Creating a pluggable database from an existing pluggable database
- Unplugging and plugging a pluggable database
- Oracle SQL Developer 4.0 software, which is available on the Oracle Technology Network
- Oracle Database 12c software, which is available at Oracle Database Software Downloads
- Understand Oracle Database 12c concepts. Documentation is available online at Oracle® Database Concepts 12c Release 1 (12.1).
Purpose
This tutorial describes three important activities to help you manage pluggable databases (PDB) using Oracle SQL Developer.
Time to Complete
Approximately 45 minutes
Introduction
The tutorial covers the three following activities:
Prerequisites
Before starting this tutorial, you should have:
Setting up the Environment
Creating a Database Connection
Double-click on sqldeveloper.exe to launch SQL Developer.

The Oracle SQL Developer window is displayed.

On the Connections tab, right-click Connections and select New Connection.
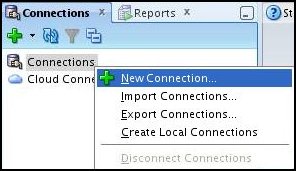
The New / Select Database Connection dialog box is displayed.

You will be connecting to the root multitenant container database (CDB). The root container is where you can manage the pluggable databases (PDB). Enter the parameters for the new connection. In this example, the entries are:
Name: sys
Username: sys
Password: Enter the password for your system.
Save Password: Selected
Connection Type: Basic
Role: SYSDBA
Hostname: localhost
Port: 1521
SID: orcl
Click Test and confirm a status of "Success."

Click Save.
Close the New / Select Database Connection dialog box.
Adding a Connection to the DBA Navigator
In SQL Developer, the DBA Navigator enables you to perform full administration of container databases and pluggable databases.
Select View > DBA.

On the DBA tab, right-click Connections and select Add Connection.

In the Select Connection dialog box, select sys and click OK.

The sys connection is added to the DBA Navigator.
Modifying the State of a Pluggable Database
Before you can clone a pluggable database, it has to be Closed and Opened in Read Only mode.
Expand the sys connection. In the Container Database node, right-click PDB1 and select Modify State.

The Modify Pluggable State dialog box is displayed. Since database PDB1 is opened, the value of New State is CLOSE. Click Apply.

Right-click PDB1 and select Modify State.
Click to open the State Option list. Select READ ONLY.

Click Apply.

When the success message is displayed, click OK.

In the PDB1 tab, under General, confirm that the value for OPEN_MODE is READ ONLY.

You are now ready to create a new Pluggable Database by cloning an existing Pluggable Databse.
Cloning a Pluggable Database
You can create additional pluggable databases by cloning an existing pluggable database. Perform the tasks below to create a clone of PDB1 named PDB3.
Expand the sys node and then the Container Database node.

Right click PDB1 and select Clone.

The Clone Pluggable Database dialog box is displayed.
On the Properties tab, provide the parameters for cloning. In this example, the parameters are:
Database Name: PDB3
Source PDB: PDB1
Database Link: NONE (default)
Storage: Unlimited
File Name Conversions: Custom Names (creates datafiles for
your new PDB3 by copying the files from the PDB1 datafiles).

When you select Custom Names, Source File and Target File paths are revealed. Examine the Target file entries.

Double-click the Target File entries and revise them to reflect the cloned database name, according to the following instructions:
Revise each Target File entry by changing the folder name
where the .dbf.clone files reside to the folder name for the new (cloned)
database. Example: /datafile/01_mf_system_90t6yfk4_.dbf.clone
changes to /pdb3/01_mf_system_90t6yfk4_.dbf.clone.
Change the folder name for each file entry. Your results
should look similar to this:

Click the SQL tab to view the CREATE statement (optional), and then click Apply.

When the success message is displayed, click OK.

PDB3 is created and displayed under Container Database.

To view the data files for the cloned database, click PDB3.

Click the DataFiles tab to view the data files.

Right Click on PDB3 and select Modify State. Change state to Open with mode set to Read and Write.

Unplugging and Plugging a Pluggable Database
Unplugging the Database
You can unplug a database from one container database and later plug it into the same (or another) container database.
A Pluggable Database has to be 'Closed' before it can be unplugged. In the Container Database tree, right-click PDB3 and select Modify State. Click Apply to 'Close' PDB3.

In the Container Database tree, right-click PDB3 and select Unplug.

In the Unplug Database dialog box, confirm the database name PDB3 and XML file name PDB3.XML. The XML file stores the location of the data files for the unplugged database.

Optional: To view the code, click SQL, view the code, and then click Cancel.

Click Apply.

PDB3 is no longer displayed in the Container Database tree.

Plugging in the Database
Note: The steps for plugging a PDB into a different container database are essentially the same as those for plugging it into the container database from which it was unplugged. Here, you will plug PDB3 back into the same container database--while recognizing that, in the real world, selecting a different container database would make more business sense.
In the Connections tree, right-click the Container Database node, and then select Plug In Pluggable Database.

The Plug In Pluggable Database dialog box is displayed.

Enter the following:
Database Name: PDB3
XML File Name: PDB3.XML
Click Apply.

Database PDB3 is plugged in and, once again, appears in the Container Database tree.

Congratulations! You have completed the tutorial.
Summary
- Modify the state of a pluggable database
- Create a pluggable database from an existing pluggable database
- Unplug and plug a pluggable database
- To learn more about Oracle database technologies, visit www.oracle.com.
- To view Oracle Database documentation, see Oracle Database Documentation on the Oracle Technology Network.
- To look for more OBEs related to Oracle Database, visit the Oracle Learning Library.
- Lead Curriculum Developer: Pete DeHaan
- Other Contributors: Ashley Chen, Nancy Greenberg
This brief tutorial described three important activities to help you manage pluggable databases.
In this tutorial, you learned how to:
Resources
Additional information about Oracle and Oracle technologies is available at the following sites:
Credits
To navigate this Oracle by Example tutorial, note the following:
- Hide Header Buttons:
- Click the title to hide the buttons in the header. To show the buttons again, click the title again.
- Topic List:
- Click a topic to navigate to that section.
- Expand All Topics:
- Click the button to show or hide the details for the sections. By default, all topics are collapsed.
- Hide All Images:
- Click the button to show or hide the screenshots. By default, all images are displayed.
- Print:
- Click the button to print the content. The content that is currently displayed or hidden is printed.
To navigate to a particular section in this tutorial, select the topic from the list.