Setting up SQL Translation Framework OBE for Database 12cR1
Overview
- Online Capture: This requires creating a connection in SQL Developer to a live Sybase database. Using JDBC, the Sybase database metadata can be accessed and the Capture Model created.
- Offline Capture: This involves BCP scripts generated
by SQL Developer to extract the Sybase database
metadata to files. These files can then be "captured"
by SQL Developer to create the Captured Model.
The second method is what you will perform in this tutorial. - Online Data Move: You can create a connection from
within Oracle SQL Developer to your Sybase source
database and migrate the data.
- Offline Data Move: You can export the data from
Sybase. SQL Developer will create a series of BCP and
sqlldr files that you can run from a batch file.
The second method is what you will perform in this tutorial. - Oracle Database 12c
- SQL Developer 3.2.20_09 or later.
- Download and install Oracle Database 12c.
- Download and unzip the files.zip file into your working directory (i.e.wkdir)
- Download and unzip the SQLApp.zip file into your desktop
- Before starting the OBE, please perform the following:
- Open the terminal
- Type : . oraenv
- To Make sure ORACLE_SID and ORACLE_HOME are set properly type: env | grep ORA
- Start sqlplus
- Enter username: sys as sysdba
- Enter Password: oracle
Purpose
This tutorial shows you how to use have an environment ready
to demo the new Oracle Database 12c feature, SQL Translation
Framework, which is used to aid in the migration of 3rd party
database and applications to the Oracle database. In this OBE,
you will migrate a Sybase ASE database and its associate Java
application to Oracle 12c Database. This tutorial will show how
to migrate a Java Sybase Application to run against Oracle
Database with minimal code changes using the SQL Translation
Framework.
Time to Complete
Approximately 90 minutes
Introduction
What Is SQL Developer?
Oracle SQL Developer is a free graphical tool that enhances
productivity and simplifies database development tasks. Using
Oracle SQL Developer, you can browse database objects, run SQL
statements, edit and debug PL/SQL statements and run reports,
whether provided or created.
Sybase Migration Overview
Using Oracle SQL Developer, you can quickly migrate your
third-party database to Oracle.
There are four main steps in the database migration process:
| Capture the Source Database |
The first step is to capture a "snapshot" of the Sybase
database. This can be done in two ways. Using SQL Developers Offline Capture feature, the pubs2 sample database has been extracted into offline data files. The files generated by the Capture tool contains the database schema information for the Sybase pubs2 database. Oracle SQL Developer uses these files as the basis for building a representation of the structure of the source Sybase database. This structure is called the Captured Model. |
| Convert the Captured Database |
Oracle SQL Developer uses the Captured Model to convert the captured objects to Oracle-format objects, building up a representation of the structure of the destination database. This structure is called the Converted Model. |
| Generate the Oracle Database | Oracle SQL Developer generates DDL statements to create the new Oracle database, based upon the Converted Model objects. Running the DDL statements will result in the creation of the objects in the Oracle database. |
| Migrate the Data | The
last step in the process is to migrate the data. You can
do this in one of two ways. |
SQL Translation Framework
SQL Translation Framework translates the SQL statements of a
client application from a foreign (non-Oracle) SQL dialect into
the SQL dialect used by the Oracle Database. In addition to
translating non-Oracle SQL statements, the SQL Translation
Framework can also be used to substitute an Oracle SQL statement
with another Oracle statement to address a semantic or a
performance issue. In this way, you can address an application
issue without patching the client application.The SQL
Translation framework is installed as part of Oracle Database
installation. However, it must be configured to recognize the
non-Oracle SQL dialect of the application and you must install
at least one translator to fully utilize the framework. Before
using the SQL Translation Framework, you should migrate your
data, schema, stored procedures, triggers, and views.
The SQL translation framework consists of the following two
components:
The SQL Translator : The SQL Translator is a software
component, provided by Oracle or third-party vendors, which can
be installed in Oracle Database. It translates the SQL
statements of a client application before they are processed by
the Oracle Database SQL compiler. If an error results from
translated SQL statement execution, then Oracle Database SQL
compiler generates an Oracle error message. The SQL Translator
automatically translates non-Oracle SQL to Oracle SQL, thereby
enabling the existing client-side application code to run
largely unchanged against an Oracle Database. This reduces the
cost of migration to Oracle Database significantly.
The SQL Translation Profile: The SQL Translation
Profile is a database object that contains the set of captured
non-Oracle SQL statements, and their translations and
translation errors.The SQL Translation Profile is used to
review, approve, and modify translations. A SQL Translation
Profile is associated to a single SQL Translator. However, a
translator can be used in one or more SQL Translation Profiles.
Typically, there is one SQL Translation Profile per application,
otherwise applications can share translated queries. You can
export profiles among various databases. Inside the Database,
the SQL statements are translated by the SQL Translator,
registered with the SQL Translation Profile, to handle the
translation for the non-Oracle client application.
Hardware and Software Requirements (Optional)
The following is a list of hardware and software requirements:
Prerequisites
Before starting this tutorial, you should:
Creating the mwrep User
SQL Developer persists information about the migration into a set of Oracle database tables called the migration repository. Its best to create a new user (mwrep) in the Oracle database to contain the migration repository. To create a new database user, perform the following steps:
Note:If you already have a noncdb_user connection and a mwrep user, you can skip these steps.
If you installed the SQL Developer icon on your desktop, click the icon to start your SQL Developer session. If you do not have the icon located on your desktop, find the executable file (either named "sqldeveloper.exe" on Windows or "sqldeveloper.sh" on Linux), and run it.
Select View > Connections.

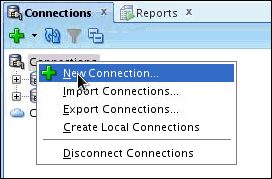
In the Connections tab, right-click Connections and select New Connection. A New / Select Database Connection window will appear.

The New / Select Database Connection dialog opens. Enter
the connection details as follows and click Test.
Connection Name: noncdb_user
User Name: sys
Password:
Role: SYSDBA
Hostname: localhost
SID: <your_own_SID>
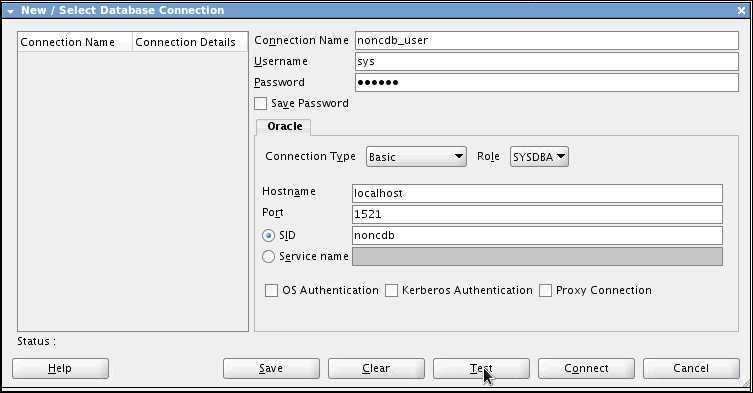
Check for the status of the connection on the left-bottom
side (above the Help button). It should read Success. To
save the connection, click Save.
Then click Connect. Close the window.

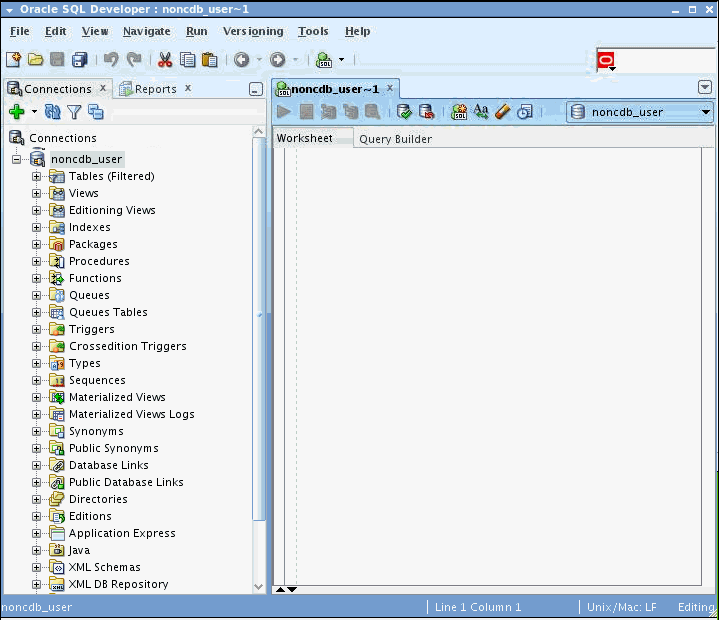
The connection is saved and you can see it listed under Connections in the Connections navigator.

Expand noncdb_user.
Note: When a connection is opened, a SQL Worksheet is opened automatically. The SQL Worksheet allows you to execute SQL against the connection you just created.
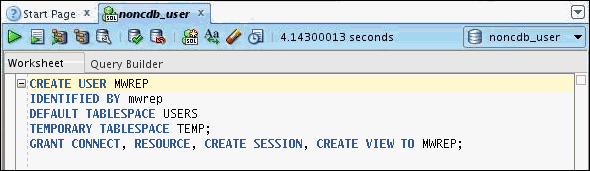
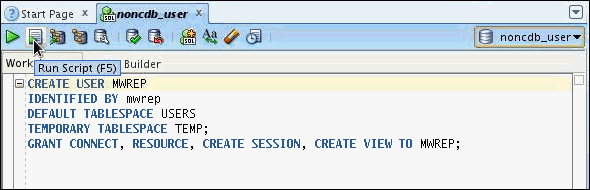
Enter the following code in the SQL Worksheet to create a
user for the migration repository
CREATE USER MWREP IDENTIFIED BY mwrep
DEFAULT TABLESPACE USERS
TEMPORARY TABLESPACE TEMP;
GRANT CONNECT, RESOURCE, CREATE SESSION, CREATE VIEW TO MWREP;
Click Run Script  .
.
The mwrep user was created successfully.

Grant unlimited quota to USERS
tablespaces to MWREP using
the following command:
alter user mwrep quota unlimited on users ;

Note: It's a new privilege in 12c required to write to tablespaces.
Creating the Migration Repository
To convert the Sybase database to Oracle, you need to create a
repository to store the required repository tables and PL/SQL
packages. To do this, perform the following steps:
Note: If you already have a mwrep_noncdb connection and a migration repository for it, you can skip these steps.
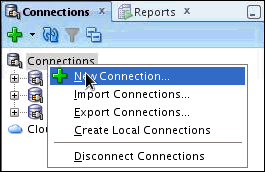
Before you create the repository, you need to create a connection to the mwrep user. In the Connections tab, right-click Connections and select New Connection.
A New / Select Database Connection window will appear.
Note: If this tab is not visible, select View > Connections.
The New / Select Database Connection dialog opens. Enter
the connection details as follows and click Test.
Connection Name: mwrep_noncdb
User Name: mwrep
Password:
Hostname: localhost
SID: <your_own_SID>

Check for the status of the connection on the left-bottom
side (above the Help button). It should read Success.
To save the connection, click Save. Then click Connect. Close the window.

The connection is saved and you can see it listed under Connections in the Connections tab.
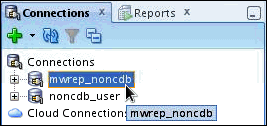
Right-click the mwrep_noncdb connection and select Migration Repository > Associate Migration Repository.

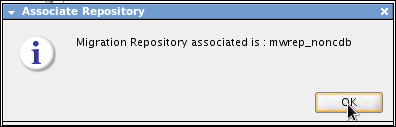
Check for the status of the connection on the left-bottom
side (above the Help button). It should read Success.
A progress window appears. Click OK.
Capturing the Sybase Exported Files
The procedure for creating and running the Offline Capture Scripts the Sybase database scripts has been completed for you and the files are available in the zip file provided in the prerequisites. To load the Offline Capture Scripts captured Sybase database scripts into Oracle SQL Developer, perform the following steps:
Note: It is important that the password is saved with
the connection, otherwise the installing of the SQL Translation
Profile will not work.
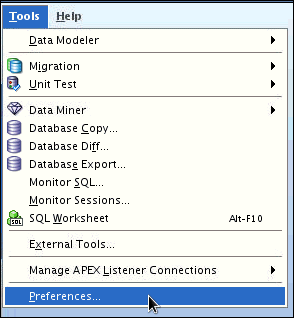
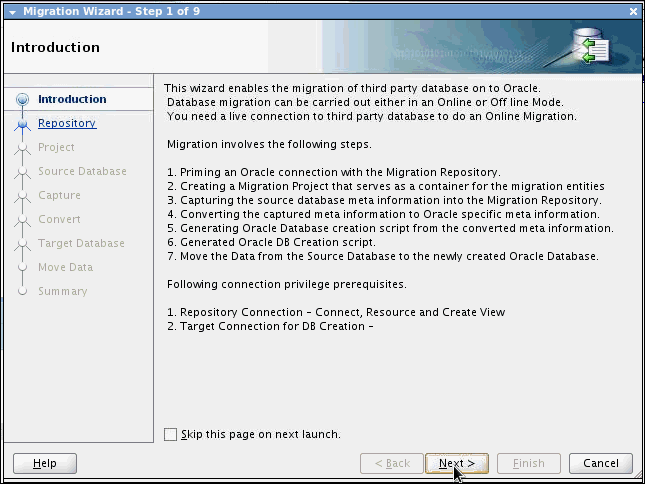
Select Tools > Migration > Migrate.

The
migration wizard appears and it will walk you through the
steps to convert third party databases to Oracle.
Click Next.

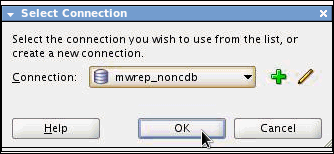
In step 2, you need to select a connection for the migration repository. Select the mwrep_noncdb connection, and click Next.

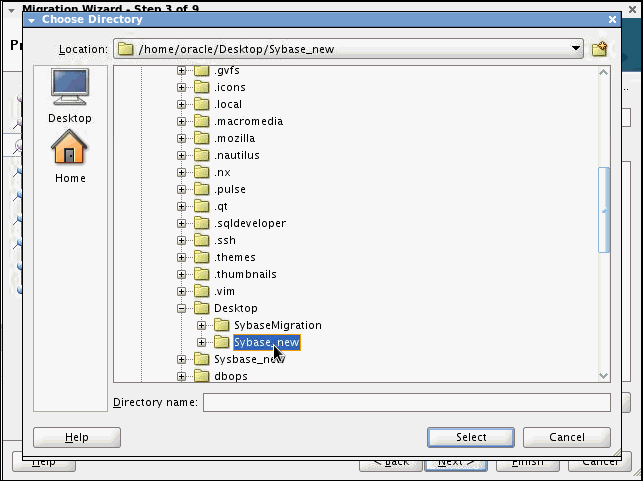
In step 3, you need to provide the Project details. A
Project is a container for the migration entities. Provide a
Name to the project, and specify the Output Directory. Click
Next.


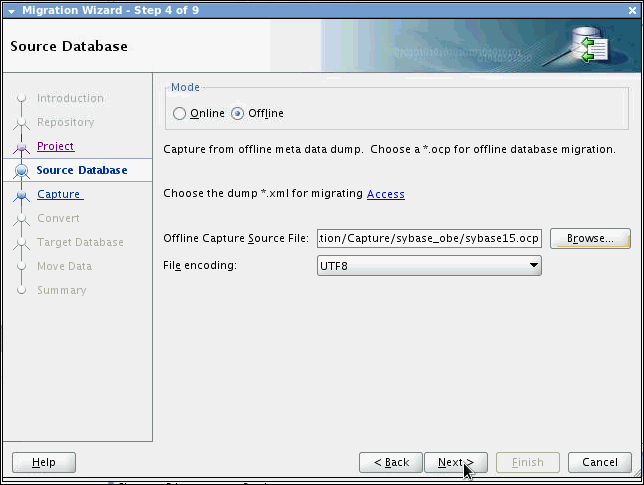
In step 4, you need to provide the Source Database details. Select the mode as Offline. Click Browse to select the Offline Capture Source File.
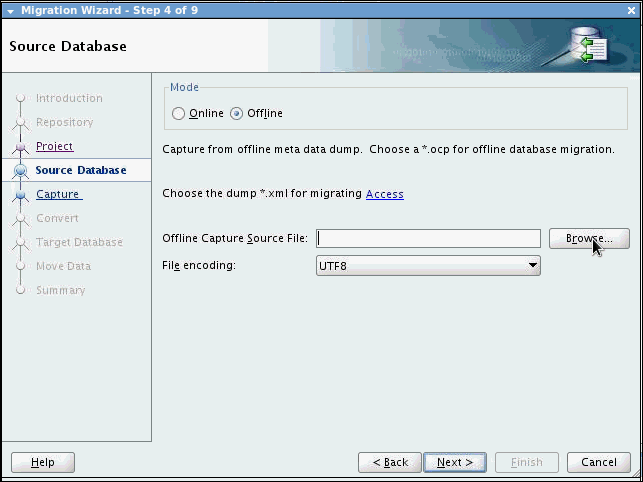
Select sybase15.ocp file from the files downloaded onto your working directory as part of the prerequisites and click Open.
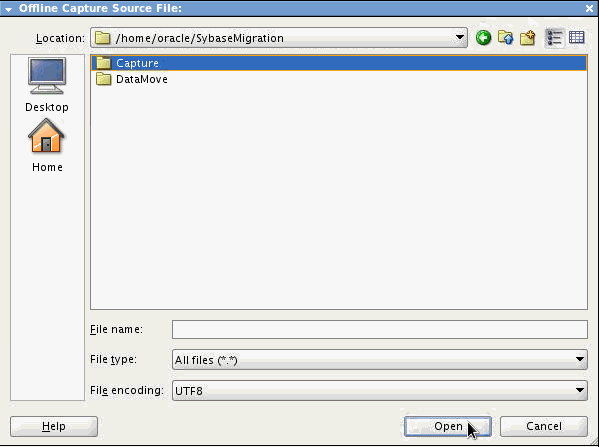
Click Next.
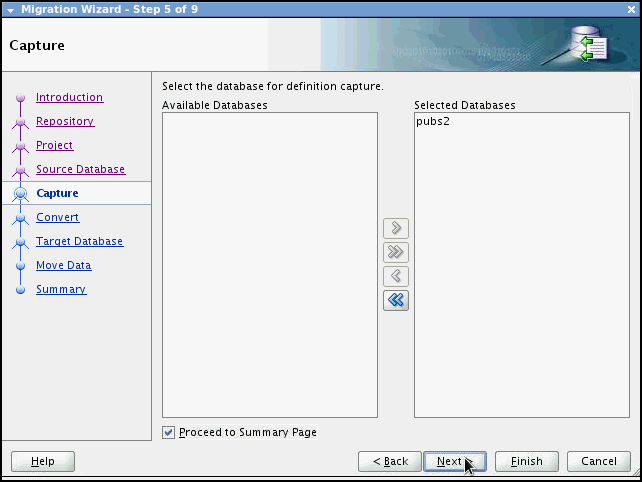
In step 5, you need to select the database to capture. Select the pubs2 database and check Proceed to Summary Page. Click Next.
Click Finish.
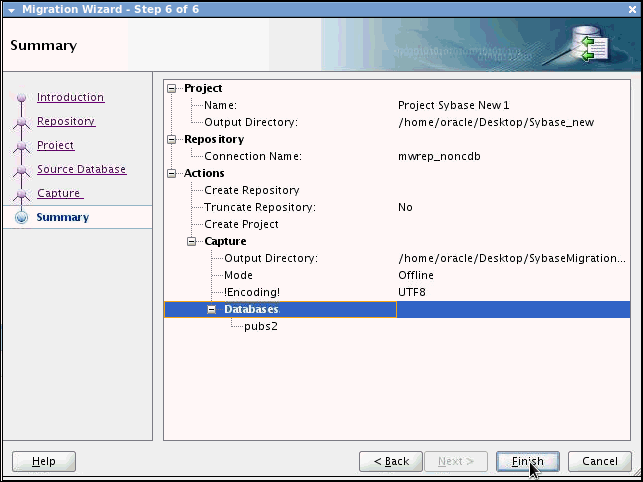
The Database Migration actions are completed successfully. A message dialog box appears. Click OK.


Checking Conversion Preferences
It is important to review the conversion preferences at this point. To do so, perform the following steps:
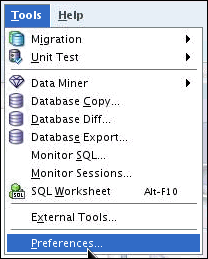
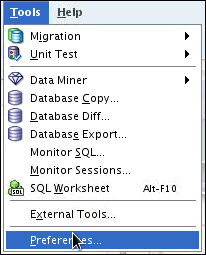
Select Tools > Preferences.
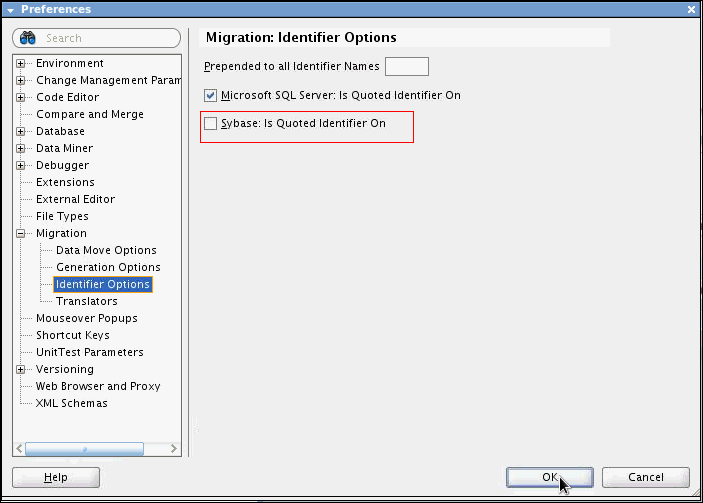
Expand Migration and select Identifier Options. Make sure "Sybase: Is Quoted Identifier On" is not selected. This is because the Sybase pubs2 database recognizes double quotes as String literals. If this is set incorrectly it can cause the conversion failure of procedures, triggers and views. Click OK.
Converting the Captured Model
To convert the captured model into the converted model, perform the following steps:
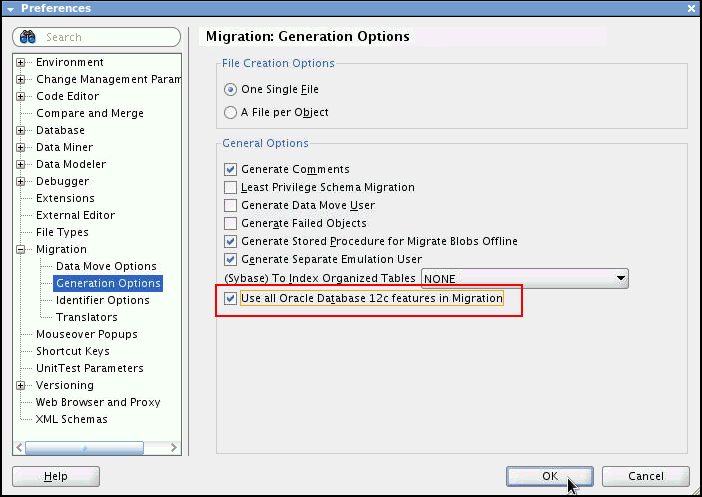
As part of the convert, you should first set the "Use all Oracle 12c features in Migration". Go to Tools->Preferences. Expand Migration and select Generation Options.
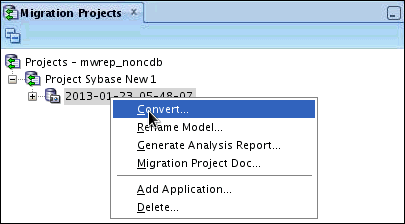
In the Migration Projects tab, select and right-click the captured database. Click Convert.
In the Migration Wizard, click Next.
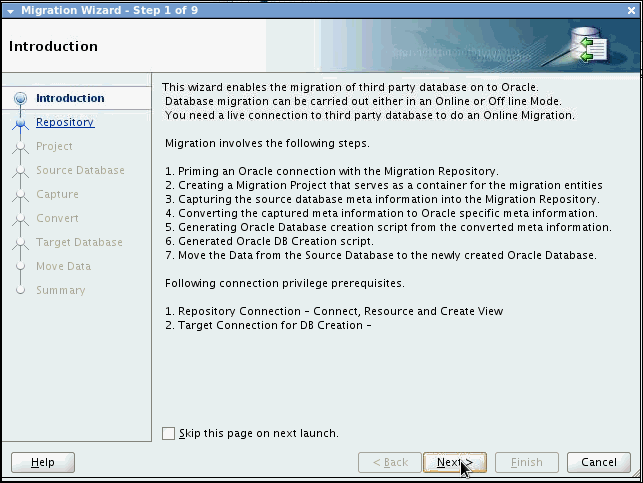
You can review the default data type mappings. Check Proceed
to Summary Page. Click Next.
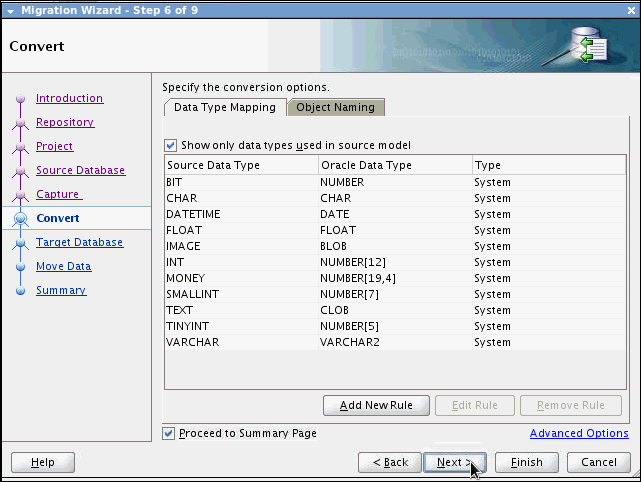
Click Finish.

The Database Migration actions are completed successfully.
A message dialog box appears. Click OK.

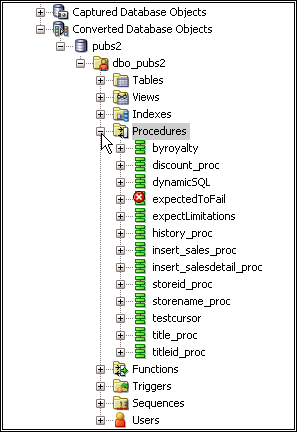
In the Migration Projects tab, expand Converted
Database Objects. Expand pubs2 > dbo_pubs2 >
Procedures. Here you will find a procedure "expectedToFail"
that has a red "x" icon against it. This is a failed
procedure.
Select dbo_pubs2 tab. Select Conversion Issues. This will display a report of "Translation limitation" and "Errors".
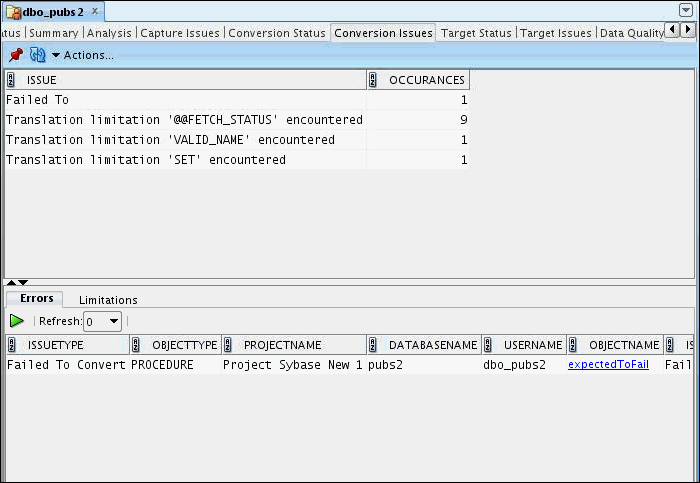
Resolving Stored Procedure Conversion Failures
An error represents the failure to convert an object. This generally only affects objects defined in T-SQL (Procedures, Triggers, Functions, and Views). These objects are available in the Converted Model after the conversion, but they remain defined in Sybase T-SQL and have not been converted to Oracle PL/SQL. Generally an object fails to convert because a part of the T-SQL is not recognized. Once this part of the T-SQL is identified, it can be worked around so that the majority of the translation can be performed automatically. Leaving only a small section of T-SQL to manually translate. In this tutorial, the sample database has been seeded with one procedure that fails to convert. The following steps outline how to go about identifying the issue and complete its conversion. The steps used here are the same for any type of conversion failure. To resolve the errors, perform the following steps:
Select the Converted Database Objects in the Migration Projects and expand dbo_pubs2.
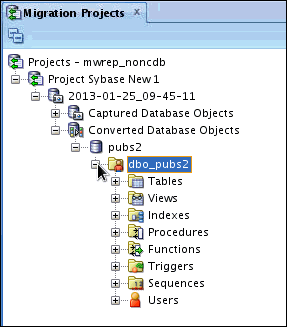
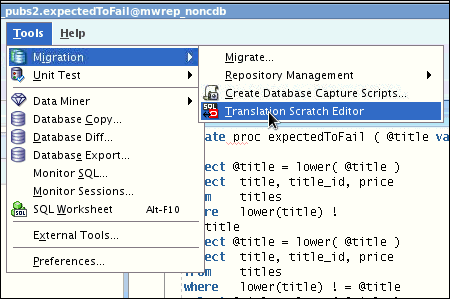
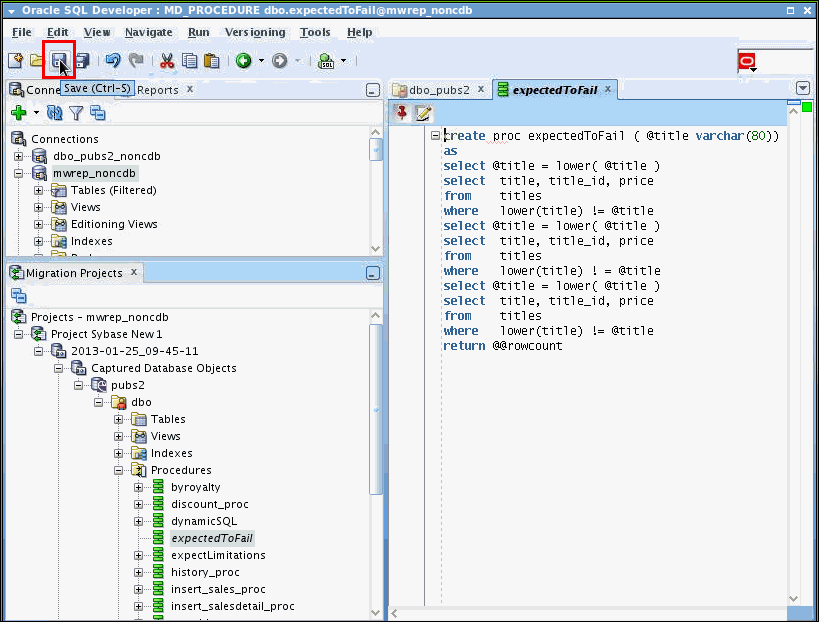
Expand Procedures and select expectedToFail.

Copy the contents of the expectedToFail procedure.

Select Tools > Migration > Translation Scratch
Editor.
Paste the copied text from the expectedToFail procedure in the left side text box.

Click the drop-down list and select Sybase T-SQL To PL/SQL.

Also, select the project model from the drop-down list.

Click Translate  .
.
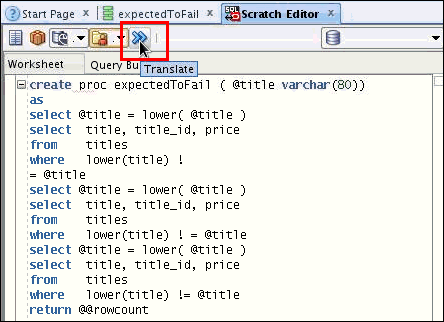
You get an error as expected. Click OK.

Commenting out statements until the procedure translates
will help you identify the problematic statement. In this
case there is a new line between the bang and equals -"where
lower(title) != @title".
A quick solution would be to remove the space, but a more
generic approach for all issues would be to comment out the
clause with a TODO comment.
Then manually replace it once in Oracle. Workaround the
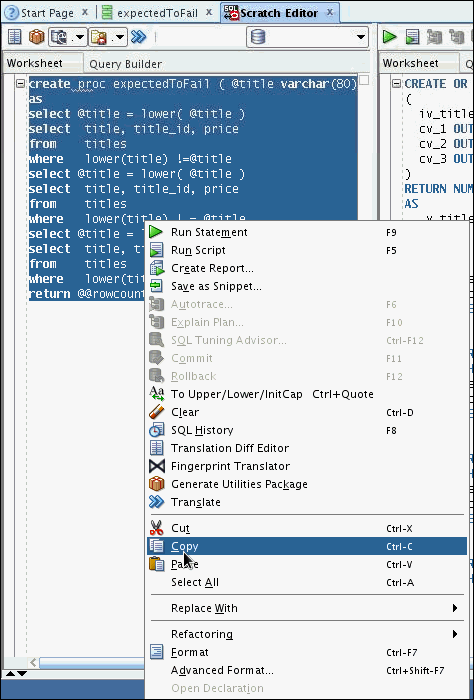
issue and click Translate again.
You can notice that the code has been successfully
translated into PL/SQL on the right side textbox.

Select the contents of the corrected expectedToFail procedure from the left side text box and copy it.
In the Migration Projects navigator, click Captured
Database Objects > pubs2 > dbo > Procedures.
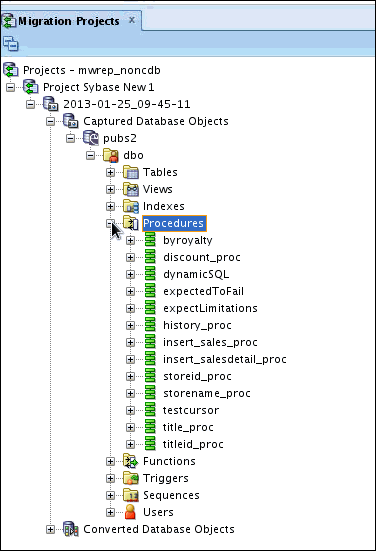
Select the expectedToFail procedure. Paste the copied
content over the existing expectedToFail procedure.

Click Save.
Right-click expectedToFail procedure in the left-side
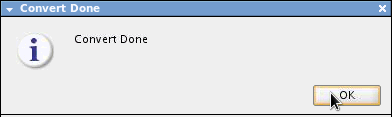
navigation bar under Procedures. Select Reconvert.
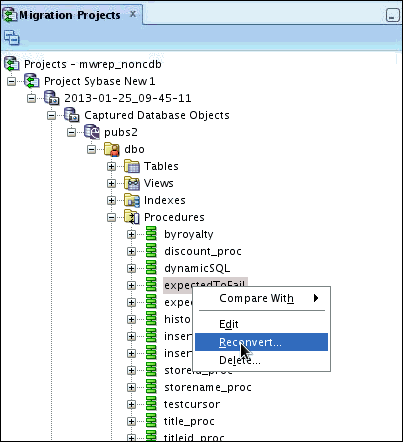
Click OK on the dialog box.
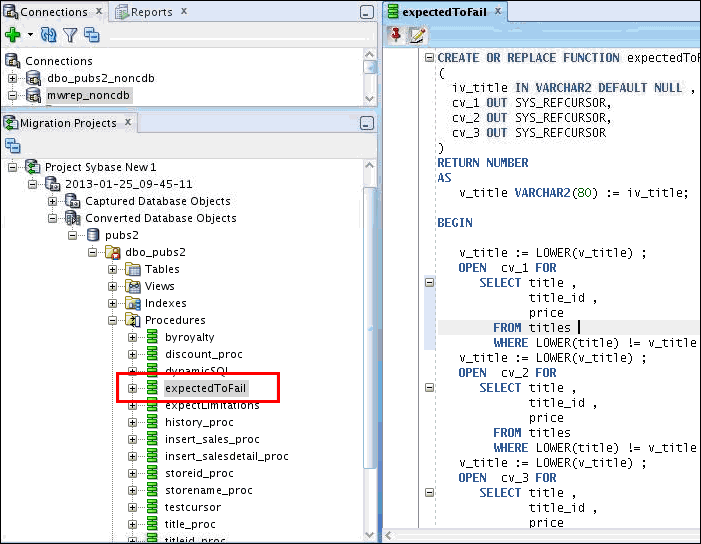
The procedure "expectedToFail" in the Converted Database Objects is not erroneous after conversion.
Generate Target Database for Database Creation
To generate target database, perform the following steps:
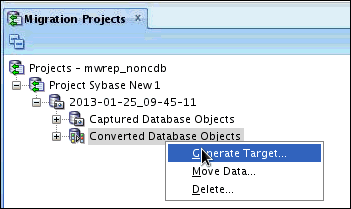
In the Migration Projects tab, right-click Converted Database Objects. Select Generate Target.
In the Migration Wizard, click Next.
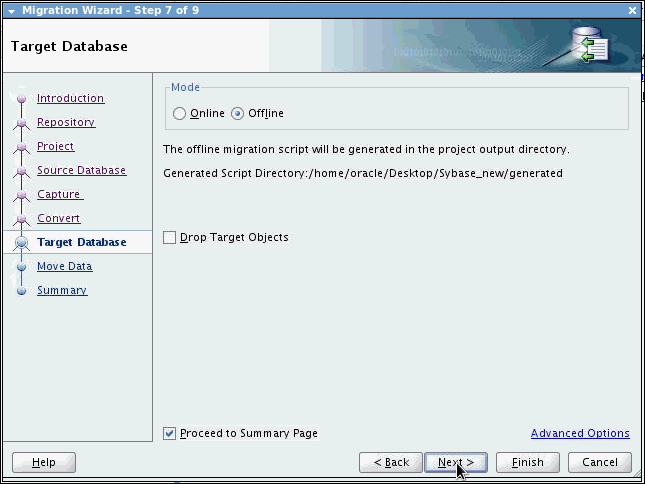
This step provides you the Target Database details. Select
the mode as Offline. You can select to drop the
target objects here. Note down the Generated Script
Directory location. Check Proceed to Summary Page.
Click Next.
 >
> Expand Generate Script. Click Finish.
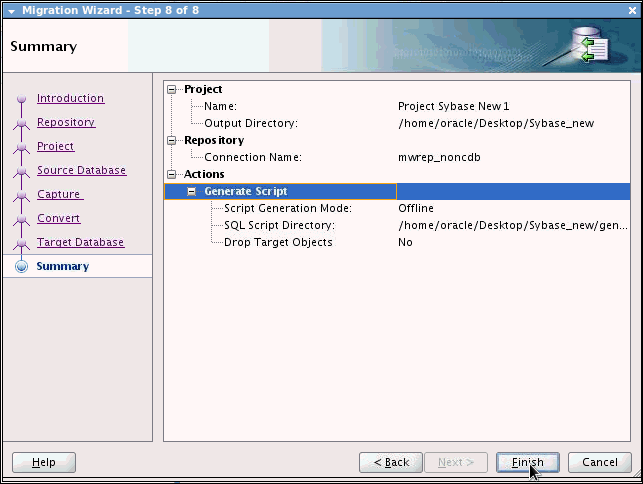 >
> The Database Migration actions are completed successfully.
A message dialog box appears. Click OK.
> Executing the Script to Create the Oracle Database Objects
To generate the SQL script with DDL statements that will be executed to create the objects in an Oracle Database, perform the following steps:
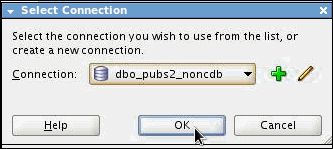
On the SQL Worksheet Toolbar, select noncdb_user from the drop-down list on the right.

Click Run Script.

Now that your scripts have run successfully, you can create
a connection for the dbo_pubs2 user. Right-click
Connection and select New Connection.
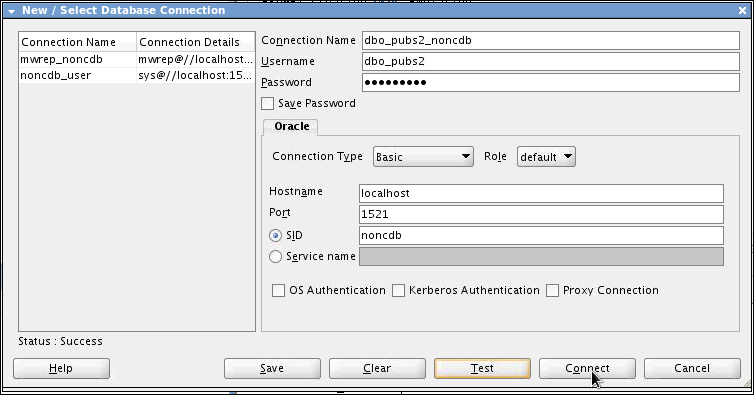
The New / Select Database Connection dialog opens. Enter
the connection details as follows and click Test.
Connection Name: dbo_pubs2_noncdb
User Name: dbo_pubs2
Password:<your_password> (Select Save
Password)
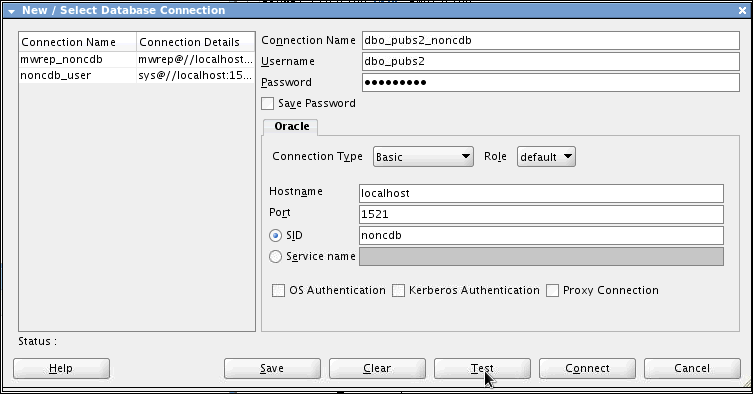
Check for the status of the connection on the left-bottom
side (above the Help button). It should read Success. To
save the connection, click Connect. Close the
window.
Expand dbo_pubs2_noncdb.
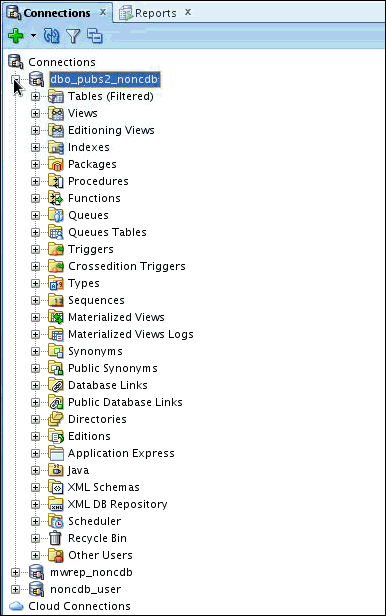
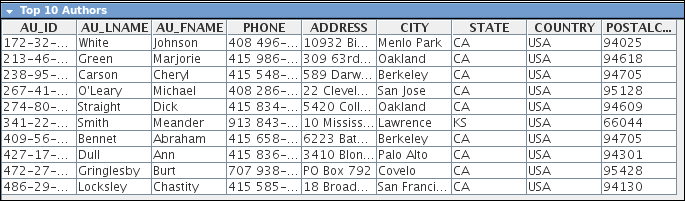
Expand Tables.
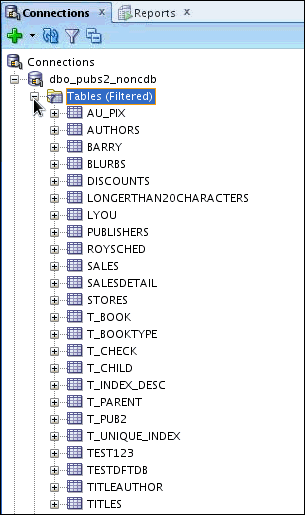
The database tables that were converted to Oracle are
listed. Select AUTHORS.
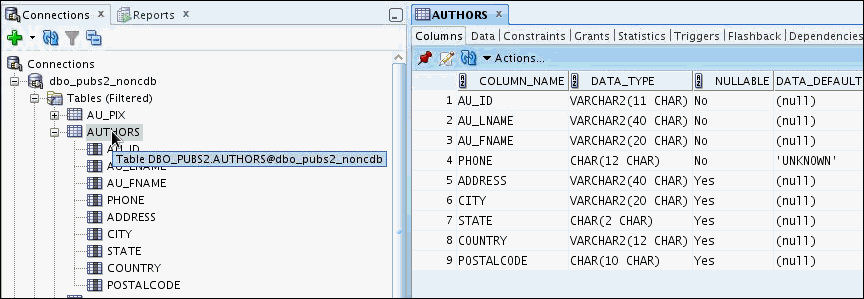
Select Data tab. Notice that currently there is no data in the table. You will migrate the data later in this OBE.

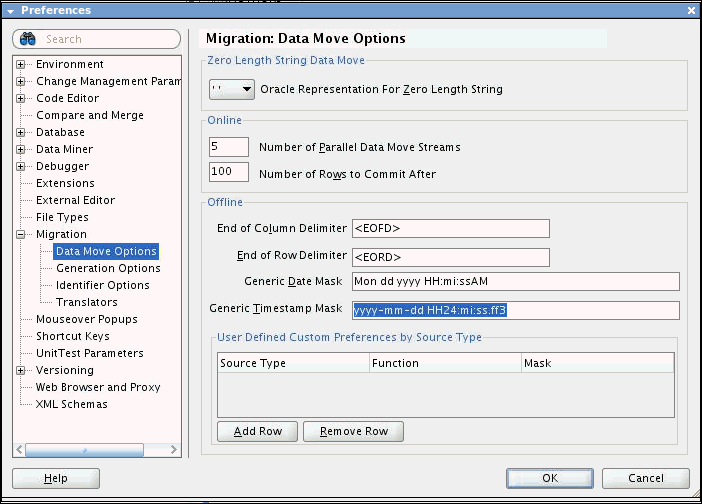
Checking Offline Data Move Preferences
A date format mask can be specified in the preferences so that the Offline Data Move scripts (in particular, the Oracle SQL*Loader control files) can reference the correct format. To do so, perform the following steps:
Select Tool > Preferences.
Expand Migration and select Data Move Options.
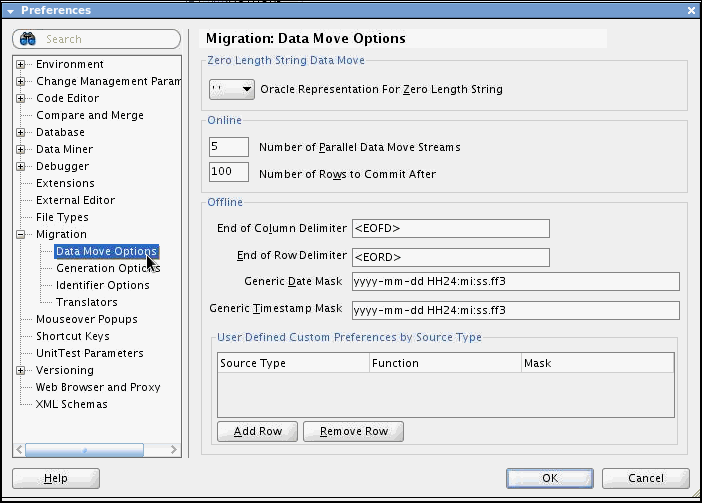
Make sure the Generic Date Mask format matches the
following
Mon dd yyyy HH:mi:ssAM
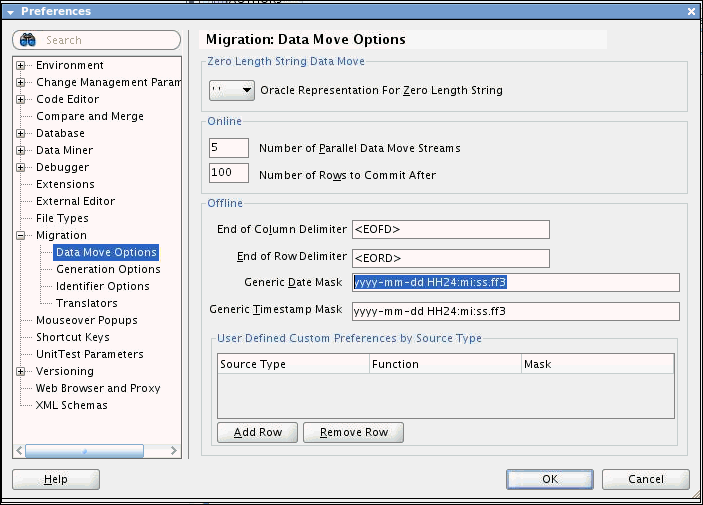
Make sure the Generic Timestamp Mask matches the following.
Mon dd yyyy HH:mi:ss:ff3AM
Click OK.

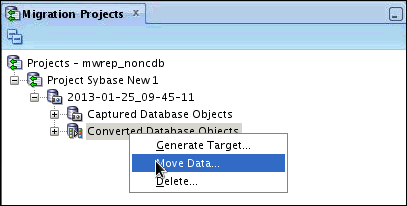
Create the Offline Data Move Scripts
To move data to the target database, perform the following steps:
In the Migration Projects tab, right-click Converted Database Objects. Select Move Data.
In the Migration Wizard, click Next.
This step provides details about the Data Move . Select Offline.
Note down the location of Data Move Script Directory. Click
Next.
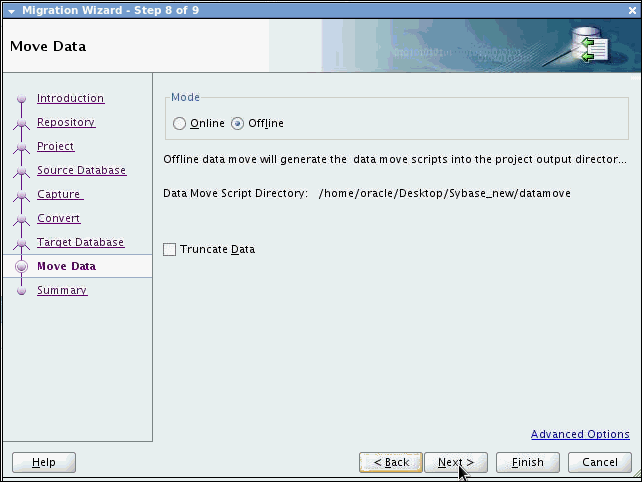
Expand Move Data. Click Finish.
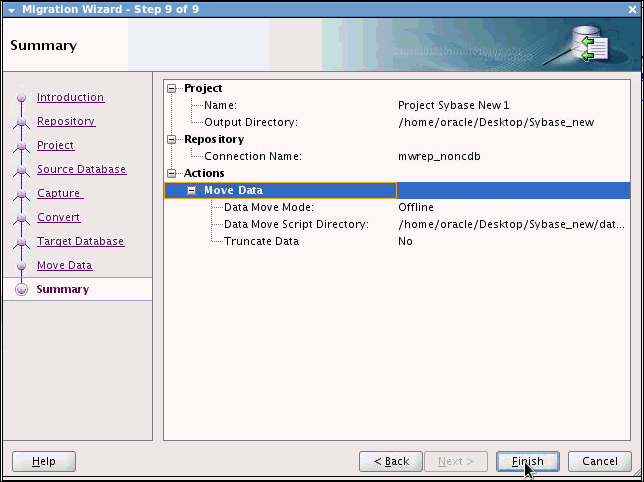
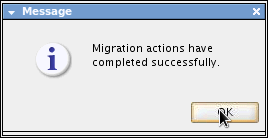
The Database Migration actions are completed successfully. A message dialog box appears. Click OK.
Migrating the Data
The data has already been exported generated from Sybase.To import the data using the scripts provided, perform the following steps:
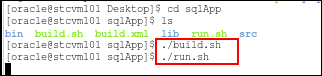
Open a terminal and execute the following commands:
<prompt> cd <location of
the unzipped
files\files\DataMove\sybase_obe\2011-02-01_09-25-25>
<prompt> oracle_ctl.sh
<username> <password>@<connection>
Here we used: ./oracle_ctl.sh system oracle@noncdb
Note: To
make oracle_ctl.sh executable run the following command.

Note: oracle_ctl is a sh file that contains statements to load the data. It uses sqlldr to load the data.

Switch to Oracle SQL Developer and click Refresh.

The data for the table has been loaded successfully.

Setup SQL Translation Framework
- From the SQL Translator drop-down box, select Sybase SQL Translator.
- Check Create New Profile.
- Enter Sybase_profile in Profile Name field.
- In Profile Schema, select dbo_pubs2_noncdb.
- Click Apply.
Perform the following steps to setup the SQL Translation Framework
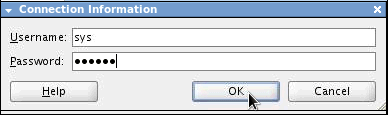
Log into the database using sys privileges.Using the SQL Worksheet, enter the following commands:
GRANT CONNECT, RESOURCE, CREATE VIEW TO DBO_PUBS2;ALTER USER DBO_PUBS2 QUOTA UNLIMITED ON USERS;

Grant the following permission to mwrep user to load
a SQL Translator (java).
BEGIN
DBMS_JAVA.GRANT_PERMISSION(UPPER('MWREP'),'SYS:java.lang.RuntimePermission','getClassLoader','');
END;
/

Using the SQL Developer migration repository schema owner, create a DBA connection in SQL Developer (using the DBA panel).
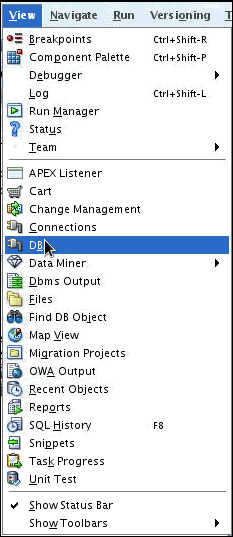
From the View menu, select DBA.
In the DBA Navigator, right-click Connections and select Add Connection.
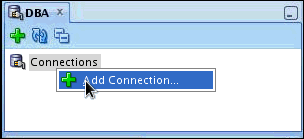
In the Select Connection box, select the mwrep_noncdb connection and click OK. Again, repeat the same step and select dbo_pubs2_nondcb connection and click OK.
Grant the following privileges to the mwrep and dbo_pubs2
user using ADMIN privileges to allow the users to explicitly
alter the session to use a profile.

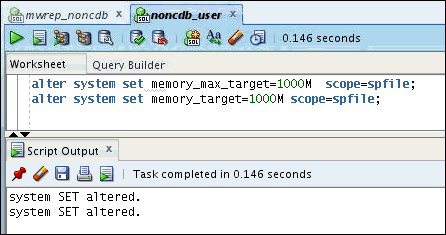
Increase the size of the SGA (required to load the java
into memory when invoking the translator.
Select the noncdb_user connection and open a SQL
worksheet Run the following commands using F5.
alter system set
memory_max_target=1000M scope=spfile;
alter system set memory_target=1000M scope=spfile;
Grant the following privilege to allow dbo_pubs2 to create profiles.

Expand mwrep_noncdb.

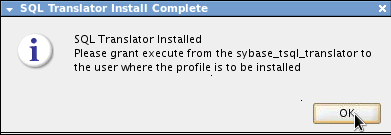
Expand SQL Translation Framework. Right-click SQL Translators and select Install SQL Translator.

Along with installing the SQL Translator, the Install SQL
Translator dialog box also enables you to create a
translation profile by performing the following steps:
Note: Be sure to install the Profile into the same connection/schema as the dbo_pubs2 user.

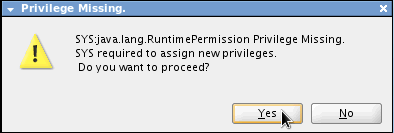
Verify that the user has sufficient privileges to run the translation profile. When prompted, supply SYS password to grant LoadJava privileges to dbo_pubs2 user.
Install Translator.

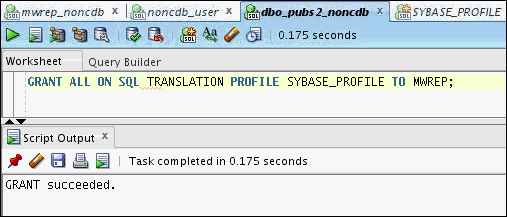
Grant the following permission using the dbo_pubs2 user to the mwrep user to allow the translator to reference the Profile.
GRANT ALL ON SQL TRANSLATION
PROFILE SYBASE_PROFILE TO MWREP;
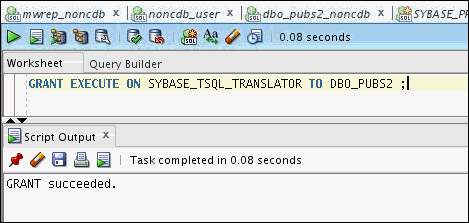
Grant the following privileges using the and mwrep user to the dbo_pubs2 user to allow the profile to reference the Translator.
GRANT EXECUTE ON
SYBASE_TSQL_TRANSLATOR TO DBO_PUBS2;
Close all connections at this point to ensure the privileges are granted.
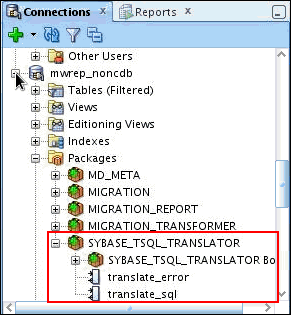
To ensure that both the Profile and Translator are properly installed, verify whether the appropriate package and Java class files are present or not in the Connections pane.
Test Sybase Translator
You can test the SQL Translation Profile by using SQL worksheet in the following way:
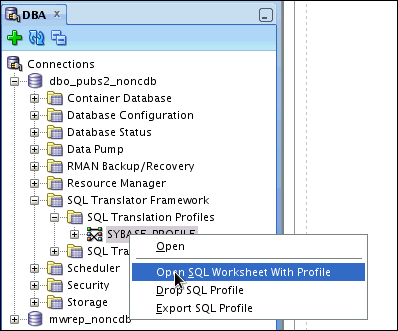
Right click on the SQL Translation Profile in the DBA tree and select Open SQL Worksheet with Profile.
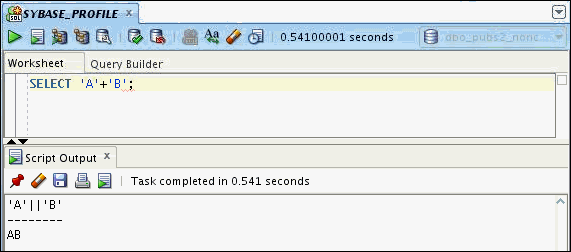
Run some basic sybase queries. For example, SELECT 'A' + 'B';

You should get the results as follows:
SELECT 'A' || 'B' with AB → results
Open the SQL Translation Profile and confirm the contents of the SQL Translations Page.

Convert the Sybase Java application to Oracle
This section shows you a Java application running Sybase SQL against Oracle. Perform the following steps to run the java application which converts a Sybase Java application to Oracle.
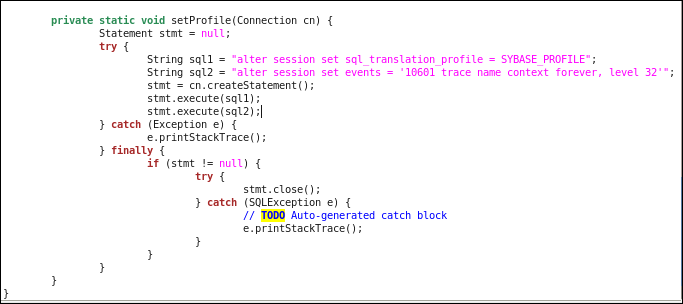
Change the Sybase connection to connect to Oracle (using the Oracle JDBC driver and Oracle connection details).
Note: All the changes are already done for you.
The below screenshot just shows you the changes made to
this application.

Set the SQL Translator Profile for the Oracle connection.
Build and run the application.
The result is shown below:
Summary
- Lead Curriculum Developer: Dimpi Sarmah
- Other Contributors: Jeff Smith,Dermot ONeill
In this tutorial, you have successfully migrated a Sybase ASE database to an Oracle 12c database, including the objects and data. You have also used the new SQL Translation Framework to allow an existing Sybase ASE application to run against our new Oracle database without making any changes to the application SQL statements. Customers migrating existing Sybase ASE and SQL Server databases and applications to Oracle Database 12c will greatly reduce time and effort in their migration projects.
Resources
Credits
To help navigate this Oracle by Example, note the following:
- Hiding Header Buttons:
- Click the Title to hide the buttons in the header. To show the buttons again, simply click the Title again.
- Topic List Button:
- A list of all the topics. Click one of the topics to navigate to that section.
- Expand/Collapse All Topics:
- To show/hide all the detail for all the sections. By default, all topics are collapsed
- Show/Hide All Images:
- To show/hide all the screenshots. By default, all images are displayed.
- Print:
- To print the content. The content currently displayed or hidden will be printed.
To navigate to a particular section in this tutorial, select the topic from the list.