Develop and Diagnose JDBC Programs and Java Classes in the Database
Purpose
In this tutorial, you develop an diagnose JDBC and Java in the database. You will also examine the functionality of UCP.
Time to Complete
Approximately 2 hour 30 minutes
Prerequisites
The exercises in this tutorial require you to perform the following prerequisite actions:
- Create a wkdir folder and set it as your default working directory
- Unzip these files into your wkdir location
- Install Oracle Database 11g, Release 2 locally or access a remote database (either another host or a Virtual Machine, using guest host) and set the ORACLE_HOME and ORACLE_SID variables
- Install JDK 1.5 and set JAVA_HOME and $JAVA_HOME/bin to PATH
- ojdbc5.jar and ucp.jar are referenced from the UCPDemo.xml
- Create jdbchol/jdbchol schema
- Grant the privilege "change notification" to scott/tiger
Note: For the Open World 2010 Hands On sessions, the prerequisites are completed for you.
Java In Database
Stored procedures allow the exploitation of capabilities of relational database management systems (RDBMS) to their fullest extent. Stored procedures simplify database programming, improvise performance, provides central management of data logic, and optimizes network traffic.
Java for Stored Procedures
The Java language is by design an object-oriented programming language that has a built-in security mechanism and an efficient garbage collection system. Java also has a rich and very large set of standard libraries which results in quicker and lower-cost applications development. With Java stored procedures, developers have the ability to harness all above stated powers of Java when building database applications.The following OBE is based on the book Oracle Database Programming using Java and Web Services written by Kuassi Mensah. The description of the book is available at http://db360.blogspot.com/2006/08/oracle-database-programming-using-java_01.html and the code samples are available on OTN at http://download.oracle.com/technology/tech/java/jsp/pdf/Code_depot.zip
Loading and Running a Java Application in the Database
Using the following steps, load the TrimLoad.java routine into the database using the default server-side connection (conn = DriverManager.getConnection("jdbc:default:connection:");) and then execute it by calling it from the PL/SQL TrimLobProc procedure:
. |
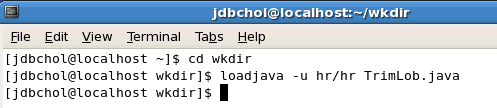
Open a terminal window and change to the directory wkdir. Execute the following command to load the TrimLob java routine into the database cd wkdir
|
|---|---|
. |
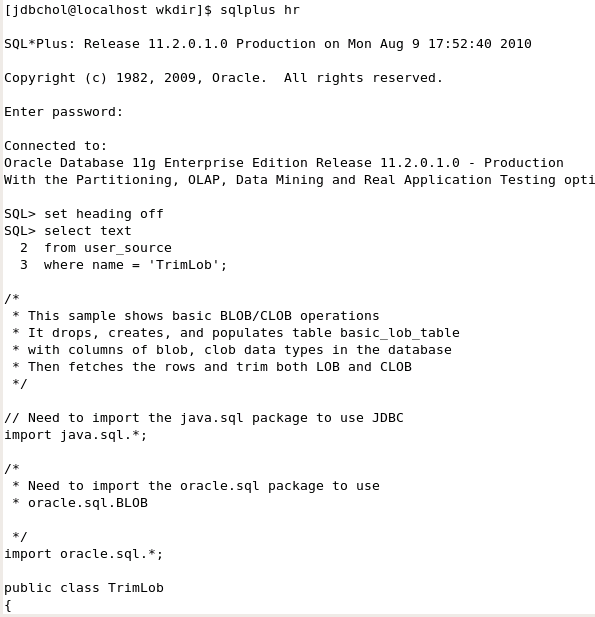
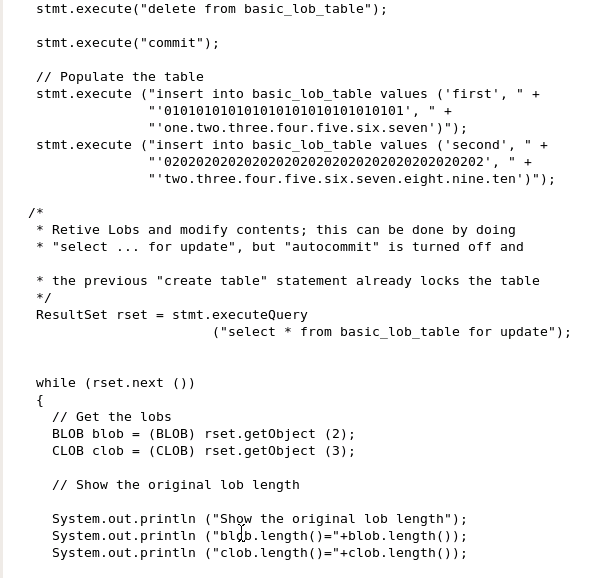
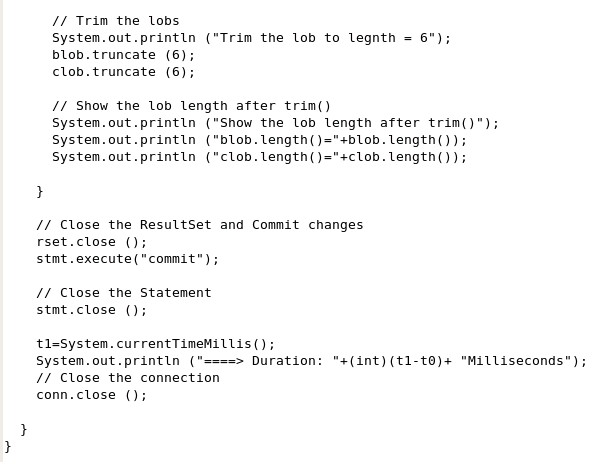
Start SQL*Plus and connect as hr/hr. To verify that the TrimLob java routine is loaded into the database, start SQL*Plus from your terminal window and execute the following statements: set heading off
|
. |
Execute the following commands to create a table (and remove the table if it existed previously). This table is used by the stored TrimLob java routine to manipulate LOB data: drop table basic_lob_table;
|
. |
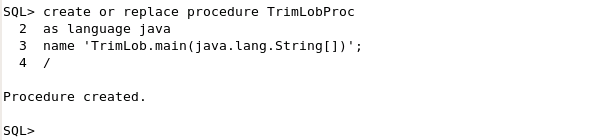
Publish the Java class method by creating the TrimLobProc PL/SQL Call specification that references the Java class methods. Within the TrimLobProc PL/SQL specification, you identify the name of the Java class method and its parameters. This is called "Publishing" the Java class method. create or replace procedure TrimLobProcas language java name 'TrimLob.main(java.lang.String[])'; /
|
. |
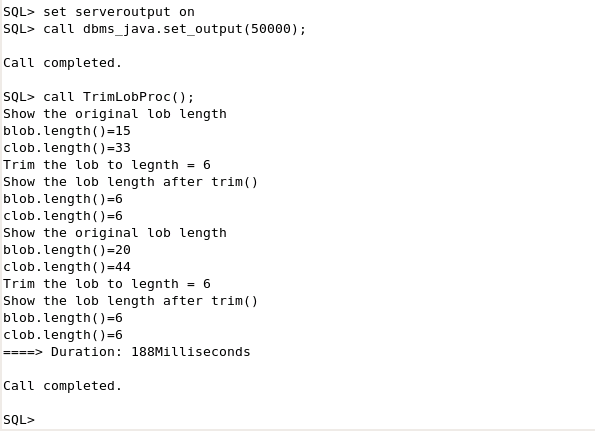
Execute the procedure TrimLobProc using the following commands: set serveroutput on
|


Mapping SQL Type to Java Type
Because data types in SQL and data types in the Java programming language are not identical, mapping the data types enables you to transfer data between an application using Java types and a database using SQL types. You can use the following steps to map various SQL types to/from corresponding Java types:
. |
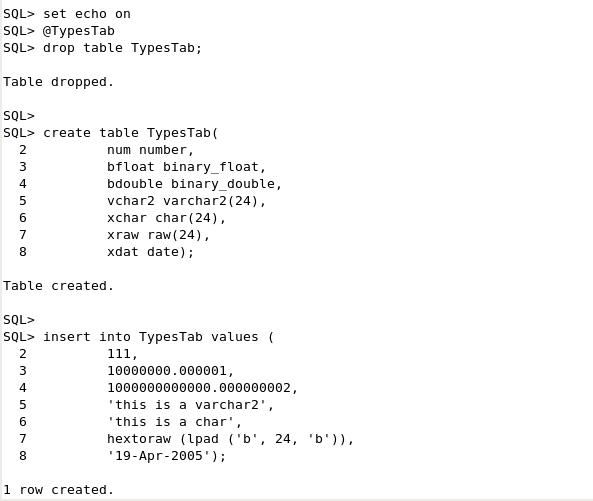
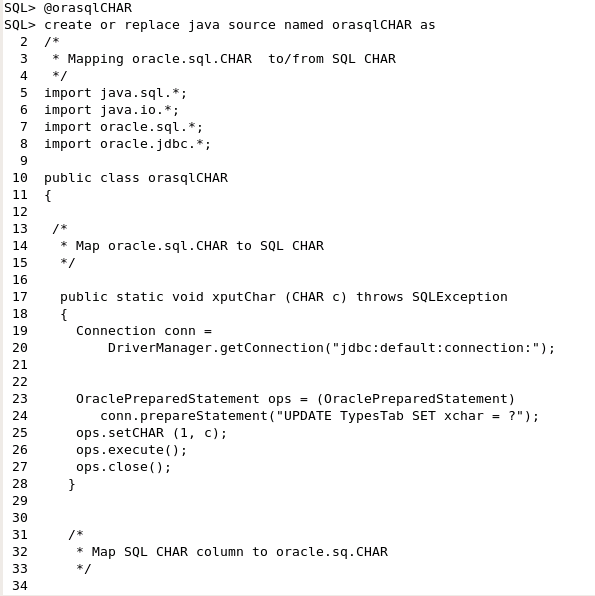
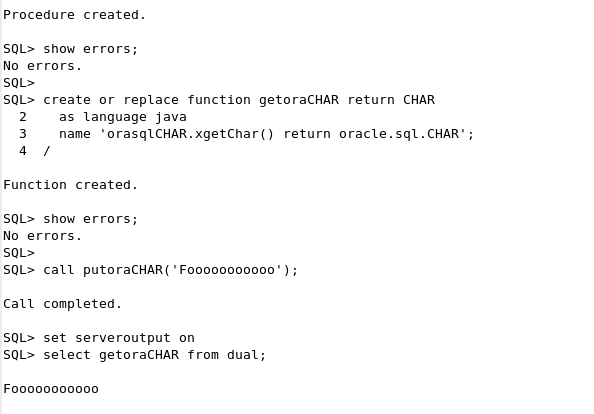
Execute the TypesTab.sql and orasqlCHAR.sql scripts. The TypesTab.sql script creates a table that holds several different Oracle data types. The orasqlCHAR.sql script creates the mapping between the oracle.sql.CHAR data type to the SQL CHAR data type. set echo on
|
|---|---|
. |
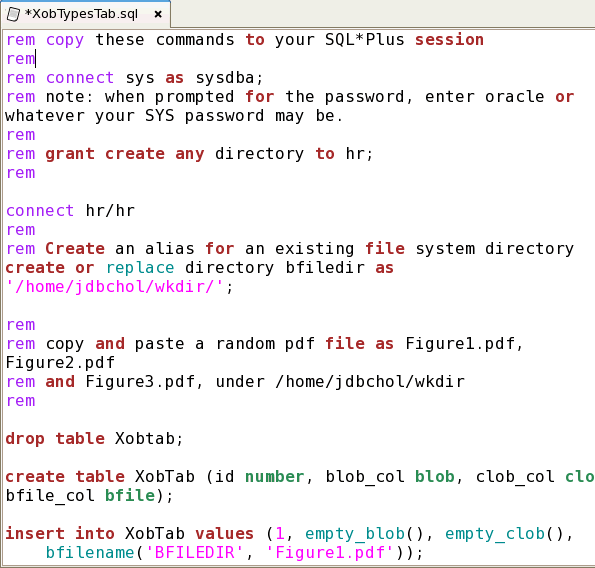
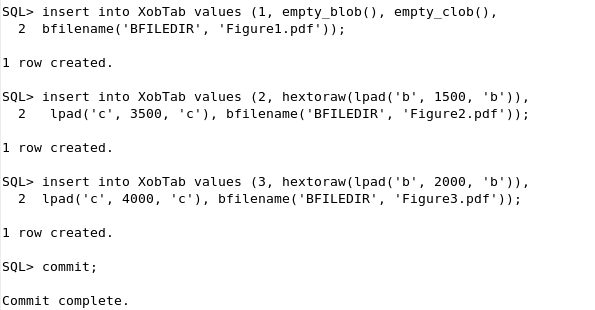
Examine the XobTypesTab.sql script. You need the CREATE DIRECTORY privilege to complete this step. Follow the directions in the script. Copy and paste the statements in the script into your SQL*Plus session. Ensure that your directory structure is valid for your setup.
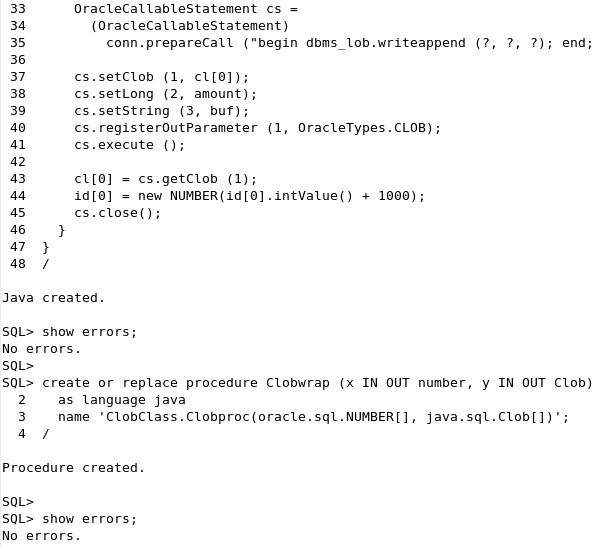
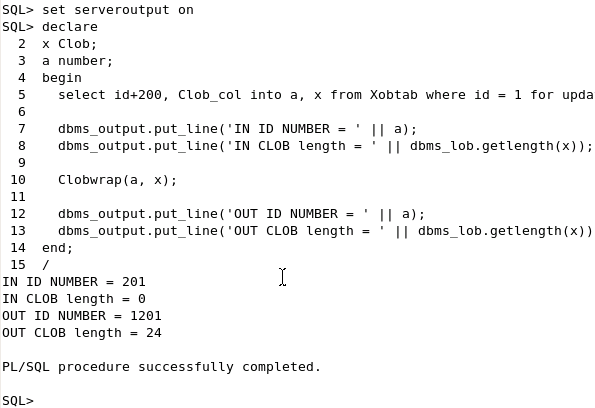
Map the CLOB locator to/from java.sql.Clob by executing the ClobMap.sql script: @ClobMap
|
. |
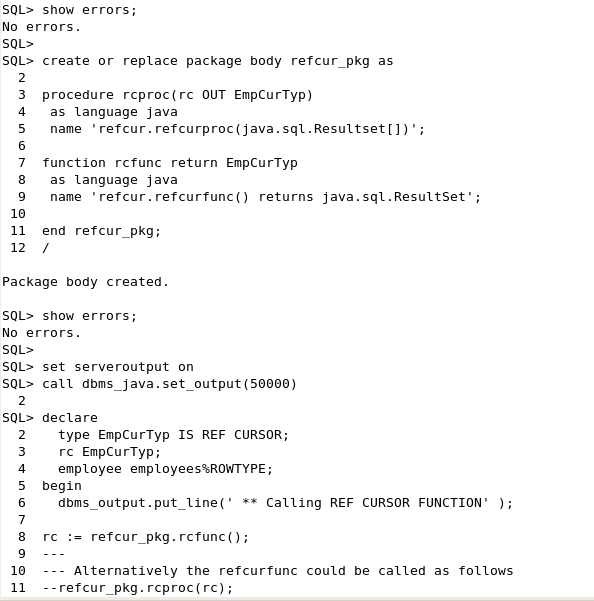
Examine the ResultSet.sql script. Run the ResultSet.sql script to map REF Cursor to java.sql.ResultSet. @ResultSet
|
. |
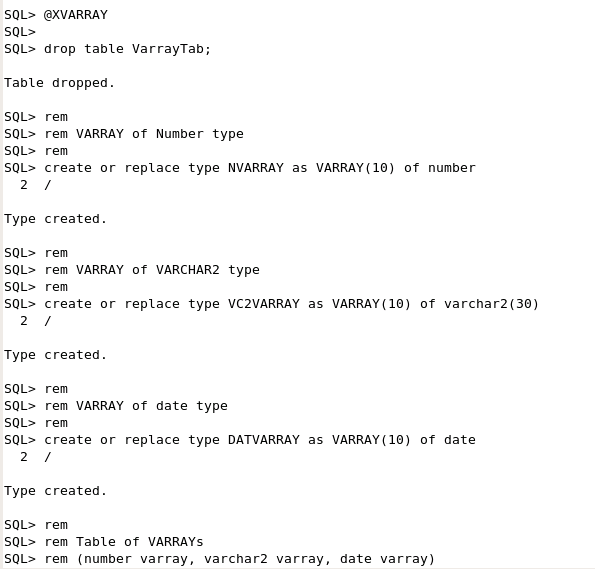
Execute the XVARRAY.sql script to create and populate a table with VARRAY column types. @XVARRAY
|
. |
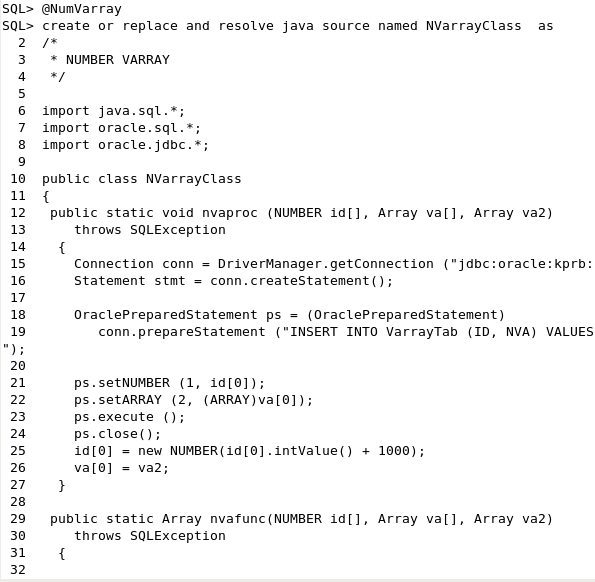
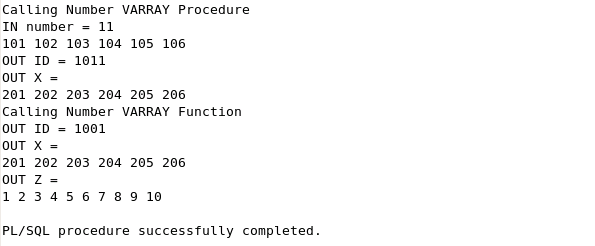
Execute the NumVarray.sql script to map VARRAY to Scalar SQL Type, Number. @NumVarray
|


Invoking Java in Database
Perform the following steps to invoke a Java application using ojmjava or PL/SQL wrapper:
. |
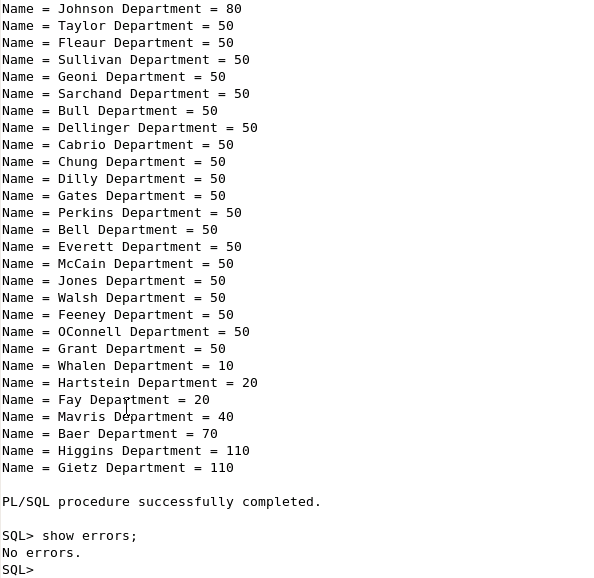
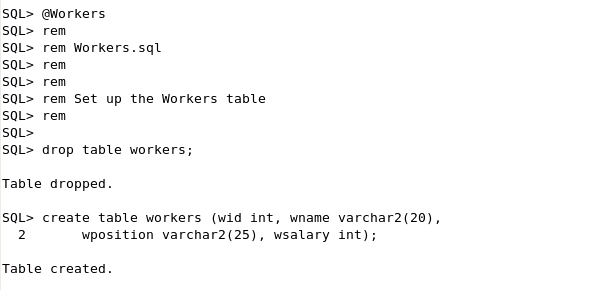
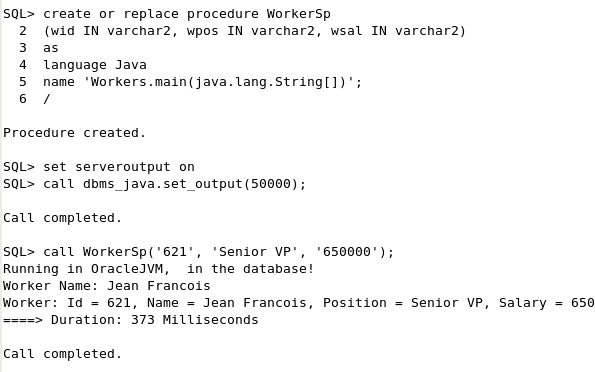
Execute the Workers.sql script to create and populate a WORKERS table. @Workers
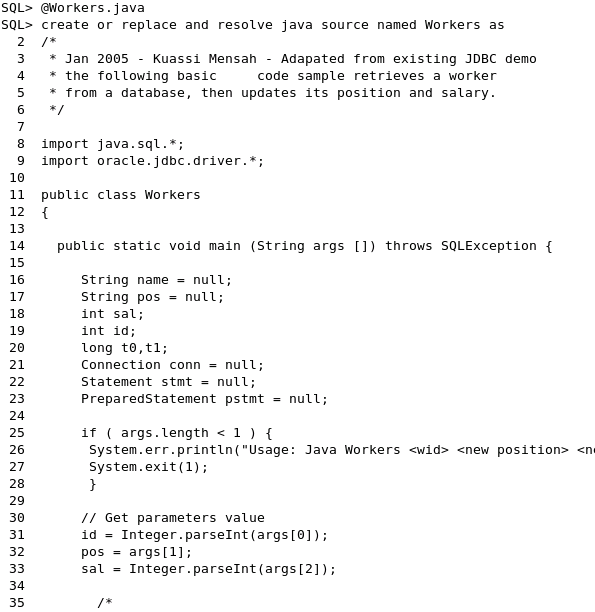
Execute the Workers.java script to create and store a Workers java class method in the database. @Workers.java
|
|---|---|
. |
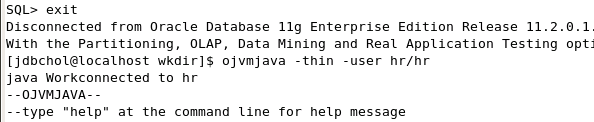
Invoke Java in the Database using ojmjava, which is an interactive command-line utility that can run Java classes in the database from the client machine. The ojmjava uses the JDBC connection to create a database session to pass a byte array from ojmjava client to ojmjava server where the main method of the user class is executed. The ojmjava server then passes the output back to the client. Exit SQL*Plus and from your terminal window, execute the following commands: exit
Exit the OJVMJAVA utility by typing exit at the command prompt. exit
|
. |
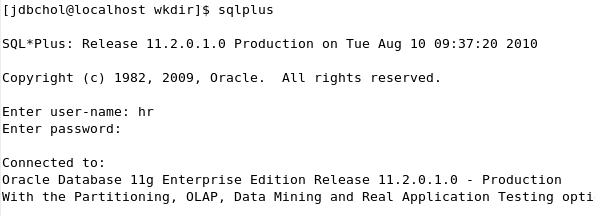
You can also invoke Java in Database through your SQL*Plus session using a PL/SQL wrapper that identifies the Java class and its parameters. From your terminal window, start SQL*Plus (use hr/hr for the user-name and password), then create the PL/SQL wrapper using the code shown below: sqlplus
|


Illustrating an Object Type Call Spec
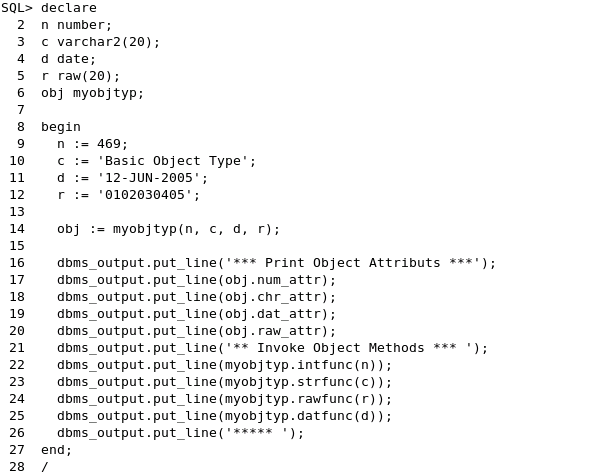
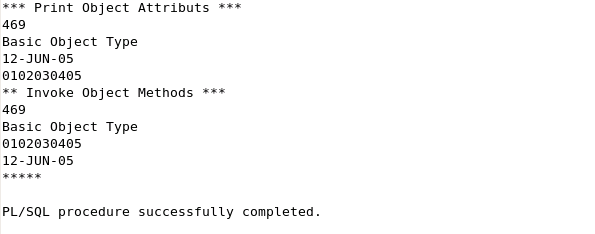
An object type call specification can publish public static member methods of an object type using the STATIC keyword. However, unlike any other PL/SQL packaged call specification, using the MEMBER keyword, the object type call specification can also publish non-static instance methods.Use following steps to create and test an object type call specification:
. |
Invoke Java in database through using the PL/SQL wrapper. In SQL*plus, execute the BasicObjTyp.sql script: set echo on
|
|---|


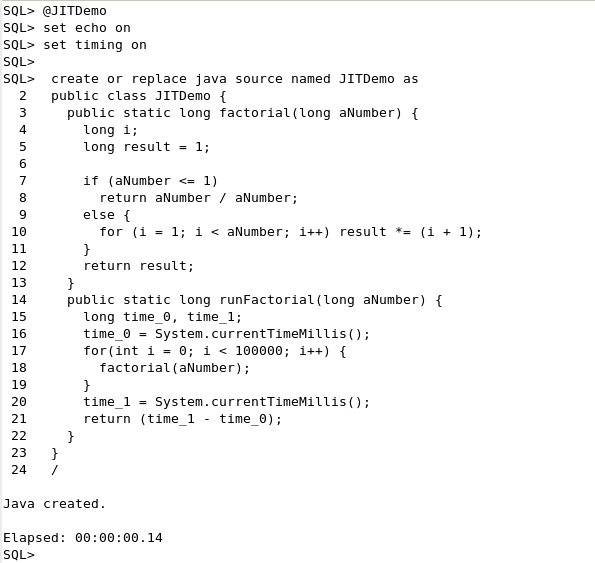
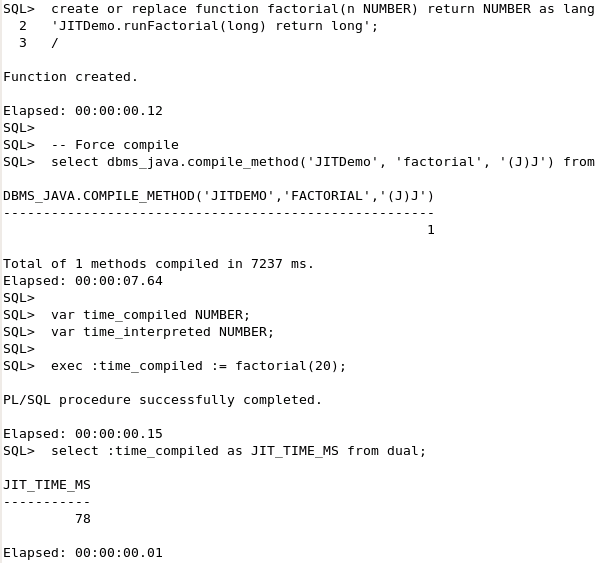
Compiling Java with JIT
You can achieve the best execution performance for Java by using binary executables, which are obtained by compiling Java source code using JIT compilers and/or static compilers. Starting with Oracle Database 11g OJVM uses a JIT compiler which allows dynamic selection, native-compilation, and execution of most frequently used Java methods hence leading to better performance and manageability compared to NCOMP used in Oracle Database 10g. You can display the benefits of JIT compilation compared to interpretation of Java application using the following steps:
. |
From your SQL*Plus session, execute the JITDemo.sql script: @JITDemo Notice the timing ratio between interpreted and compiled code
|
|---|

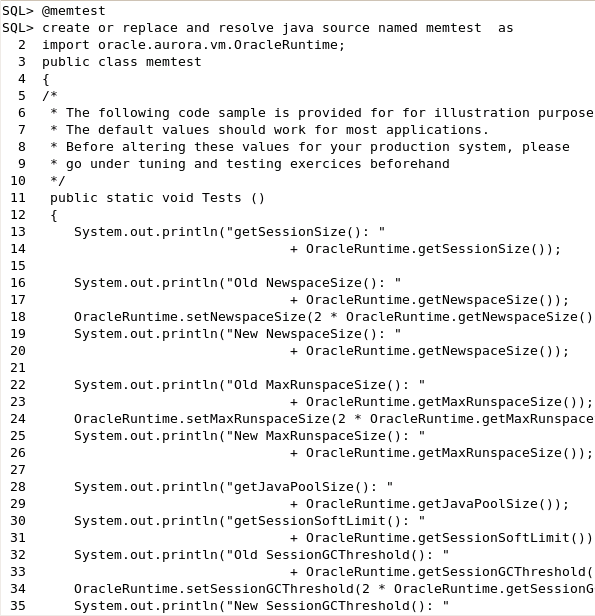
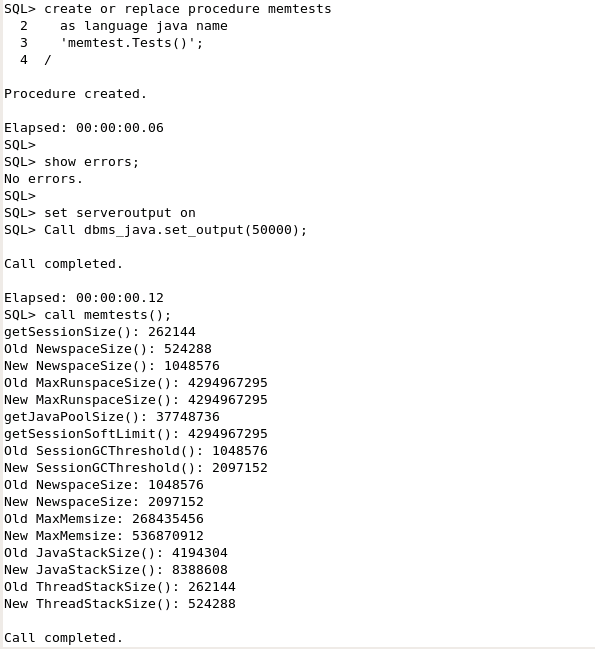
Displaying Java Memory Areas
In OracleJVM the states of Java objects, used for specific needs, are preserved in various specific memory ares (such as Newspace, Oldspace, Runspace, Stackspace, Sessionspace) called "object memories".Perform the following step to display various Java memory areas
. |
From your SQL*Plus session, execute the memtest.sql script: @memtest
|
|---|

Monitoring Oracle JVM Using JMX
Overview
JMX (Java Management Extensions) is a Java technology that supplies tools for managing and monitoring applications, system objects, devices, service-oriented networks, and the JVM (Java Virtual Machine).
Configuring The Database
You need to configure the Database before using JMX. Perform the following steps:
. |
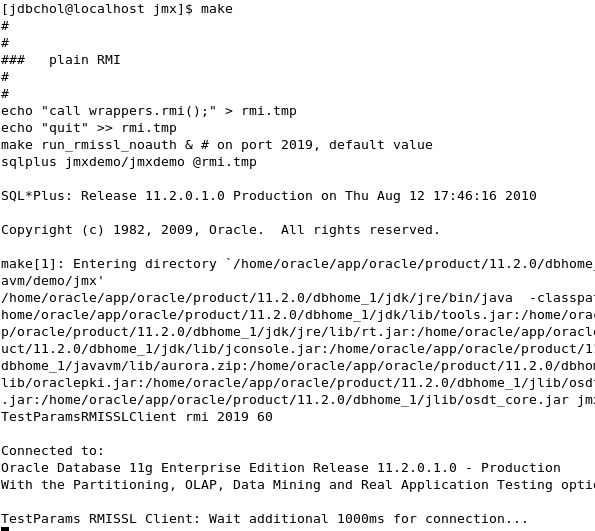
Open a terminal window and change your directory to $ORACLE_HOME/javavm/demo/jmx cd $ORACLE_HOME/javavm/demo/jmx
|
|---|---|
. |
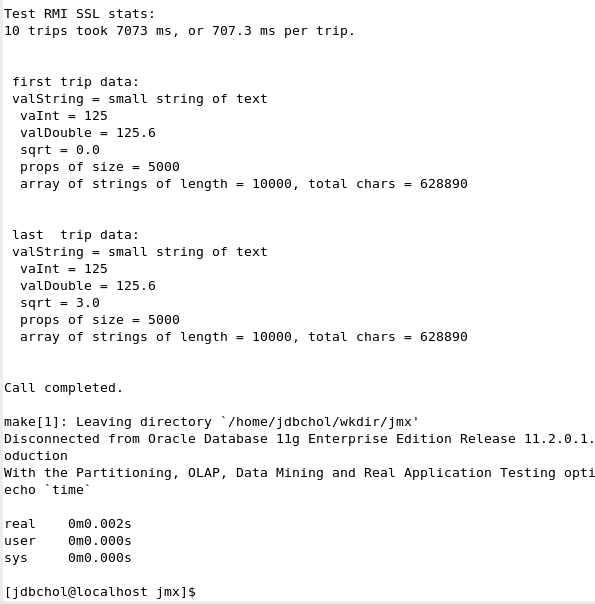
Enter the following command: make
|
. |
This script takes some time to complete. Once the script terminates press the Enter key to return to the prompt.
|
. |
In your terminal window, change to the wkdir/jvm directory by issuing these commands: cd
|
. |
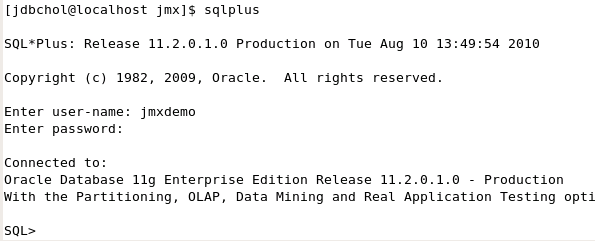
Start SQL*Plus and connect to the jmxdemo user. Use the password jxmdemo.
|
. |
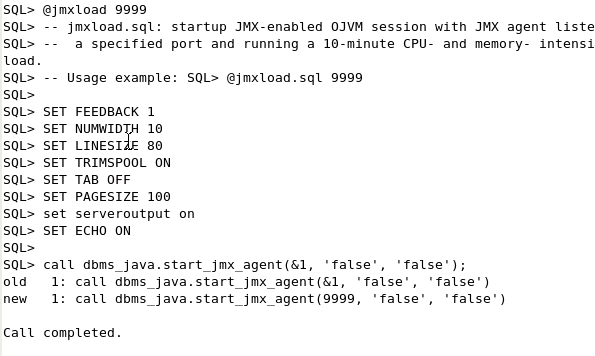
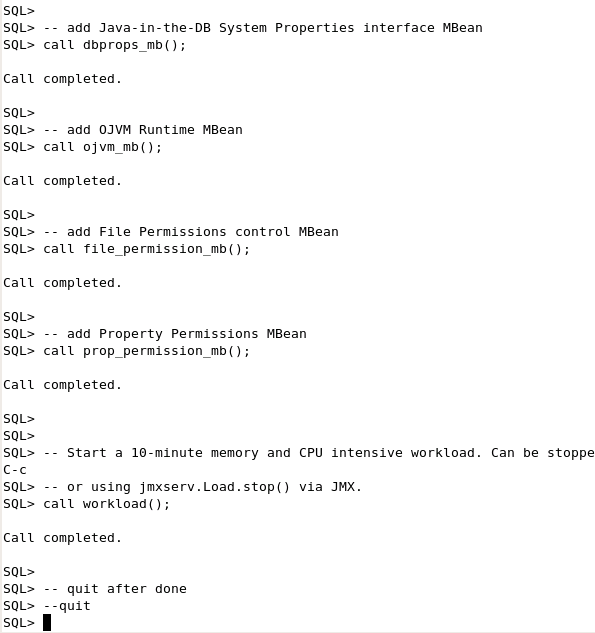
To start the JMX, enter the following command: @jmxload 9999
Note: Leave your SQL*Plus session open. |


Using JConsole to Monitor and Control Oracle JVM
You can use JConsole, a Sun JMX client tool, for monitoring and controlling Oracle JVM. To monitor Oracle JVM with JConsole perform the following steps:
. |
Start a terminal window. Change to the wkdir directory. Start JConsole.
|
|---|---|
. |
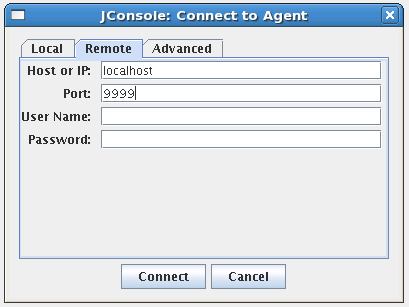
Enter the hostname or IP of your server. For this demo localhost has been entered as the machine to be monitored. Enter 9999 as port. Click Connect.
|
. |
Click on the Summary tab. It displays summary information on Oracle JVM and the values monitored by JMX.
|
. |
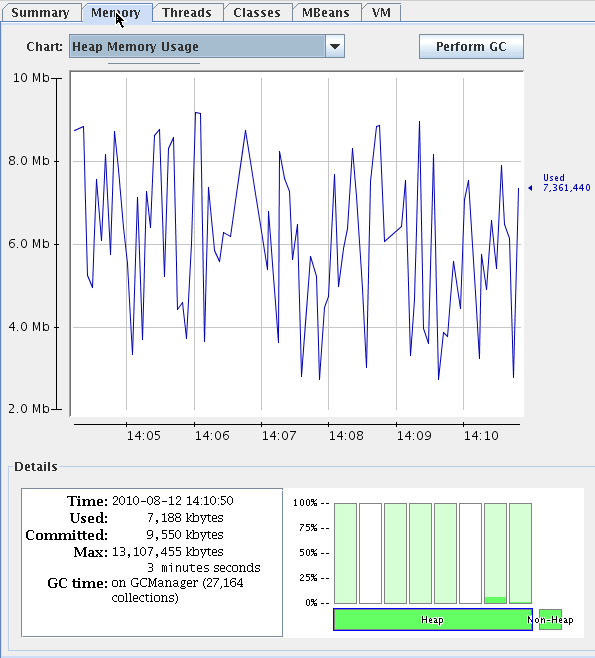
You can use the Memory tab of the JConsole interface to monitor memory consumption. This tab provides information on memory consumption and memory pools.
|
. |
You can use the Threads tab of the JConsole interface to monitor thread usage.
|
. |
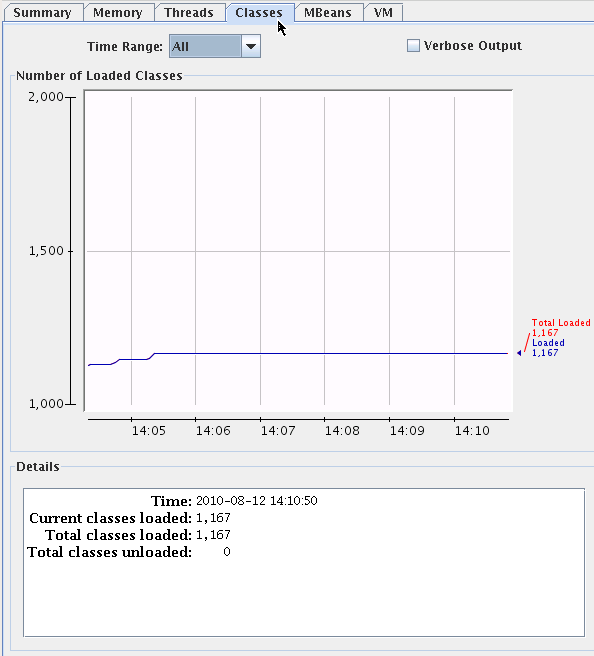
You can use the Classes tab of the JConsole interface to monitor class loading.
|
. |
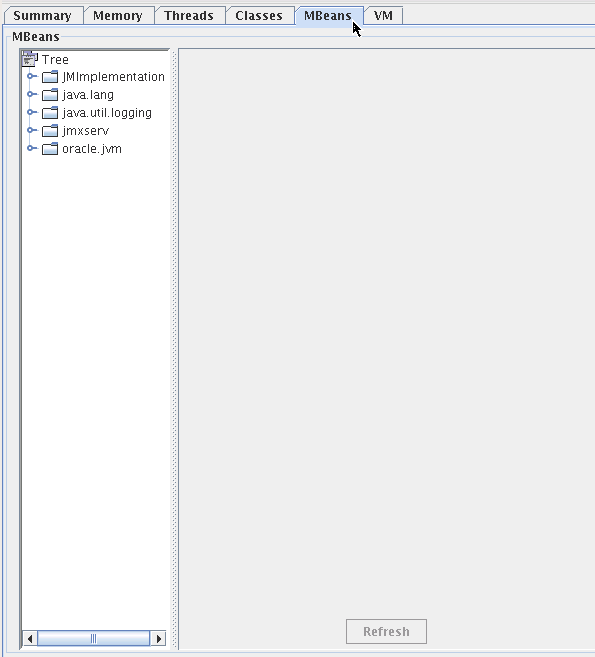
You can use the MBeans tab to monitor and manage MBeans. This tab displays information on all the MBeans registered with the platform MBean server.
|
. |
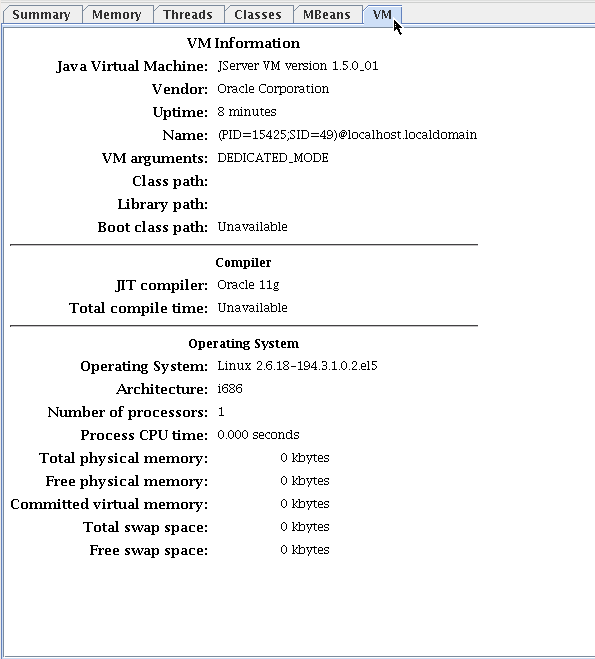
You can use the VM tab of the JConsole interface to view VM information.
|


Using JDBC in the Database
In this exercise, you start with a basic JDBC program (JDBCPrimer.java), then learn how to programmatically get the JDBC version, implement both Implicit and Explicit Statement Cache, and Query Change Notification.
In this section, you use the Apache Ant build tool, which is simpler than Make. We have supplied a default build file (build.xml) which prints the topics to be covered through the lab.
You will examine each of these topics:
Available targets:
- JDBCPrimer Basic JDBC program (JDBCPrimer.java)
- GetJDBCVersion Get Jdbc Version (GetJDBCVersion.java)
- ExplStmtCache Statement Cache (ExplStmtCache.java)
- ImplStmtCache Implicit Statement Cache (ImplStmtCache.java)
- QCNGuiDemo Query Change Notification (QCNGuiDemo.java)
We also furnish an Ant file for each topic: BatchUpdates.xml, JDBCPrimer.xml, GetJDBCVersion.xml ExplStmtCache.xml ImplStmtCache.xml QCNGuiDemo.xml. These files are available in the wkdir directory.
You can view the targets of each topic by running the ant command followed by the name of the element you are examining.
Examining the Basic JDBC Program
Examine the basic JDBCPrimer program using the ant tool.
. |
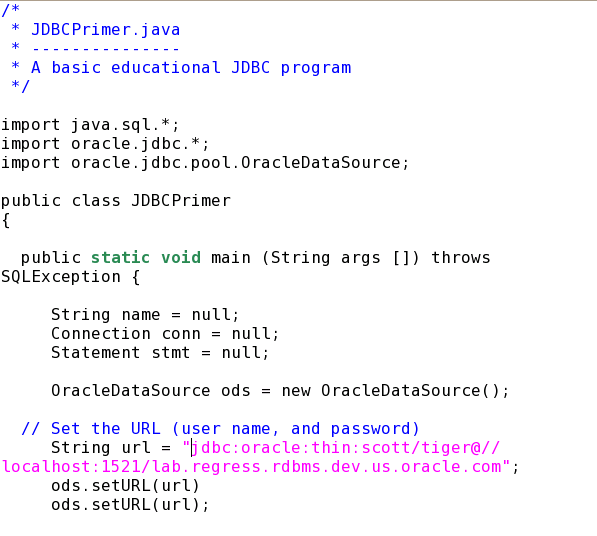
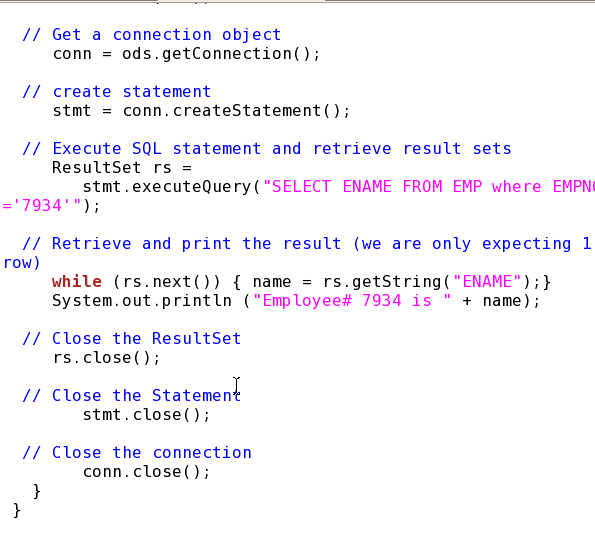
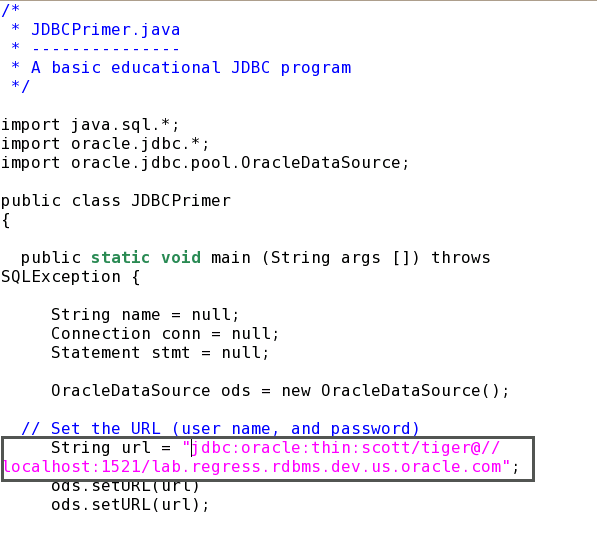
Open and examine the JDBCPrimer.java file located in the wkdir directory. This program retrieves data from the EMP table.
|
|---|---|
. |
Change the JDBC string URL to: "jdbc:oracle:thin:scott/tiger@//localhost:1521/orcl"
Save the file.
|
. |
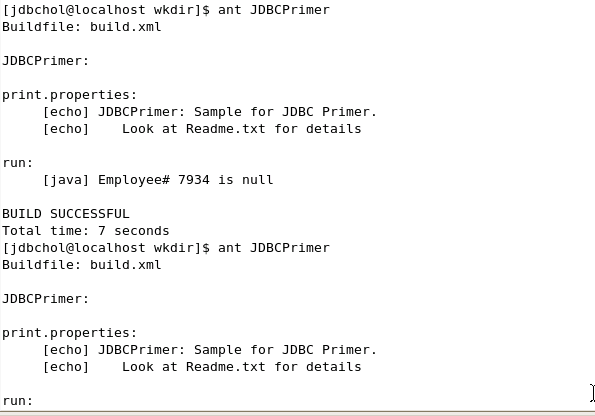
In a terminal window, change to the wkdir directory. Use ant to build and run the xml file. cd wkdir
|


Examining the GetJDBCVersion Program
Examine the basic GetJDBCVersion program using the ant tool.
. |
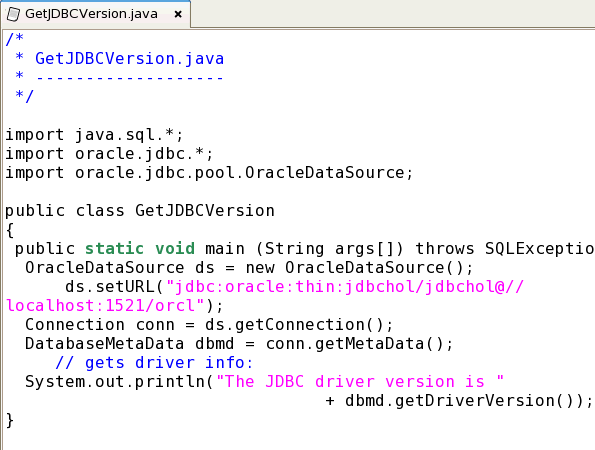
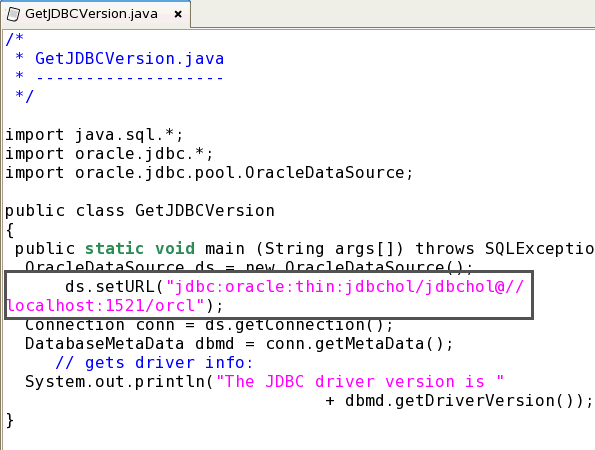
Open and examine the GetJDBCVersion.java file located in the wkdir directory. This program returns the JDBC driver version from the database.
|
|---|---|
. |
Change the database server URL to: "jdbc:oracle:thin:jdbchol/jdbchol@//localhost:1521/orcl"
Save the file.
|
. |
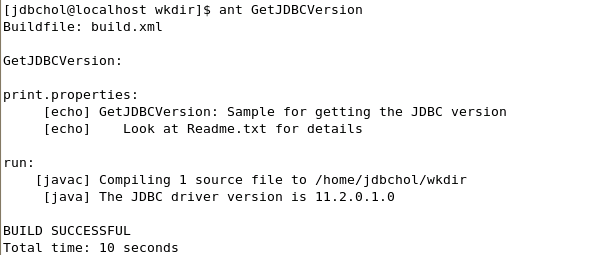
In a terminal window, change to the wkdir directory. Use ant to build and run the xml file. ant GetJDBCVersion
|
Examining the ExplStmtCache Program
Unlike implicit statement caching, explicit statement caching is managed by the application, because it requires explicit instructions for caching and searching using a user-defined key.
Explicit statement caching is enabled by invoking setExplicitStatementCaching( true) on the connection object.
Determining whether explicit caching is enabled is achieved by invoking getExplicitStatementCachingEnabled(). This method returns true if explicit caching is enabled. It returns false is explicit caching in not enabled. A cache entry is allocated to a new SQL statement (if not already in the cache) upon the invocation of the createStatement(), prepareStatement(), and prepareCall() methods. It is up to the application to search the cache for a match using the user-defined key (a Java string) specified during the closeWithKey(String) method, using the following:
- getStatementWithKey(String);
- getCallWithKey(String);
If a match is found, then the cached statement with the parameter and metadata defined in the last usage is returned. Otherwise, a null value is returned to the application.
. |
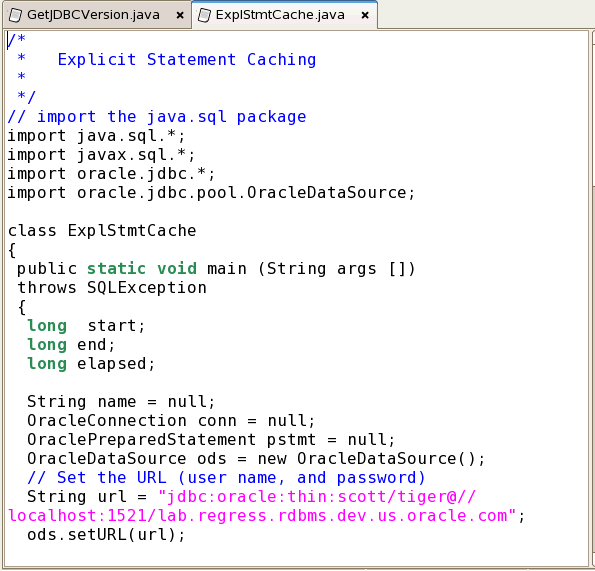
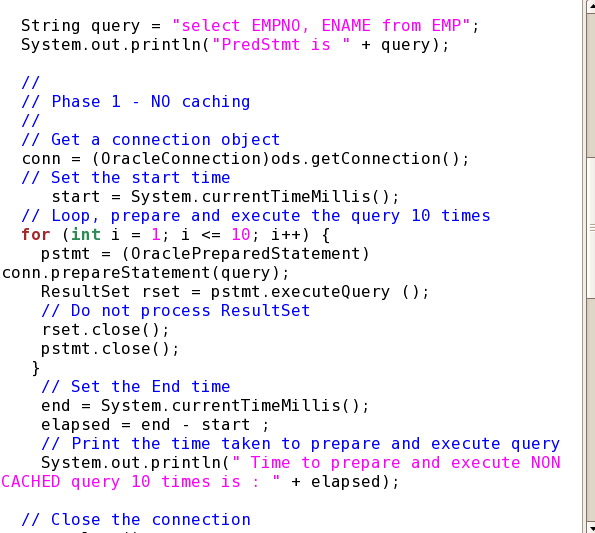
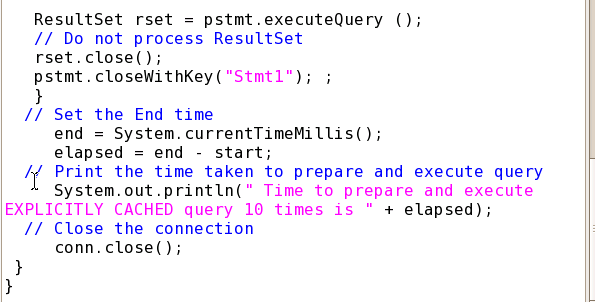
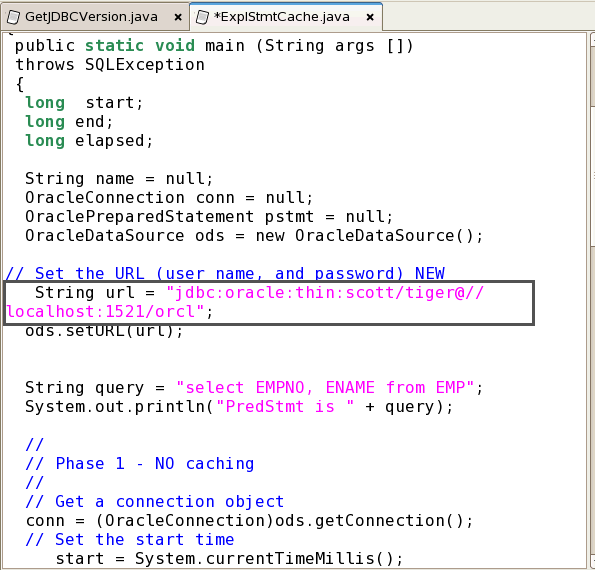
Open and examine the ExplStmtCache.java file located in the wkdir directory.
|
|---|---|
. |
Change the database server URL to: "jdbc:oracle:thin:scott/tiger@//localhost:1521/orcl"
Save the file.
|
. |
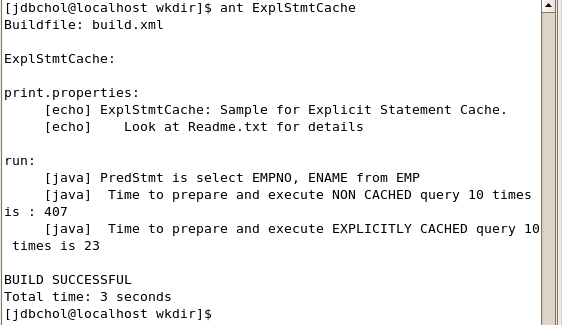
In a terminal window, change to the wkdir directory. Use ant to build and run the xml file. ant ExplStmtCache
|

Examining the ImplStmtCache Program
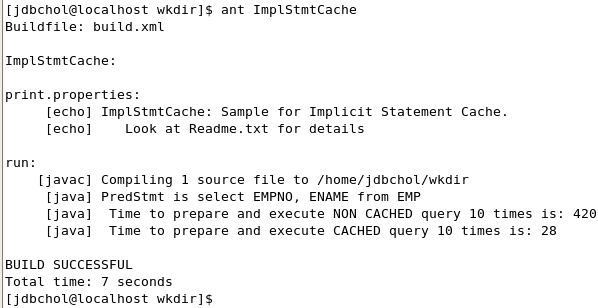
The Oracle JDBC driver automatically caches the PreparedStatement or the CallableStatement objects upon the invocation of the close() method.
A cache entry is automatically allocated to a new SQL statementif not already in the cacheupon the invocation of preparedStatement() and prepareCall() methods. The Oracle JDBC driver transparently searches the cache for a match using the following criteria:
- The SQL string must be identical.
- The statement type must be identical PreparedStatement or CallableStatement .
- The type of scrollable result sets FORWARD-ONLY or SCROLLABLE must be the same.
If a match is found, then the cached statement is returned; otherwise, a new statement is created and returned.
Implicit statement caching is enabled using one of the two following approaches:
- Invoke ((OracleConnection)conn).setImplicitCachingEnabled(true); on the connection object.
- Set the ImplicitCachingEnabled property to true and invoke OracleDataSource.getConnection(), OracleDataSource.setImplicitCachingEnabled(true), and OracleDataSource.getConnection() ;
. |
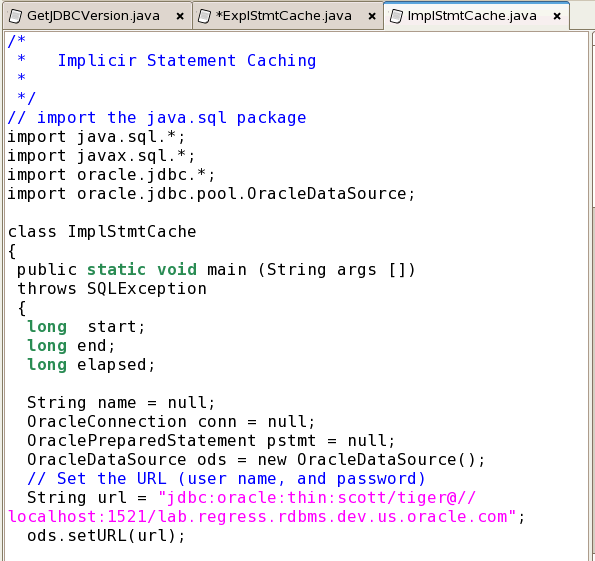
Open and examine the ImplStmtCache.java file located in the wkdir directory.
|
|---|---|
. |
Change the database server URL to: "jdbc:oracle:thin:scott/tiger@//localhost:1521/orcl"
Save the file.
|
. |
In a terminal window, change to the wkdir directory. Use ant to build and run the xml file. ant ImplStmtCache
|


Examining the QCNGuiDemo Program
What Is DCN?
The Database Change Notification (DCN) is a system where the client registers its interest to the result of certain queries with the database. When the objects associated with these queries change, the database server notifies the client. Using JDBC driver’s DCN feature, multi-tier systems can maintain a data cache as updated as possible by receiving invalidation events from the JDBC drivers.To perform DCN you need to perform following steps:
Creating a Registration
In order to use DCN, you first need to create a registration. You can use the registerDatabaseChangeNotification() method of the oracle.jdbc.OracleConnection interface to create a JDBC-style of registration. To activate query change notification instead of object change notification you can set the option, OracleConnection.DCN_QUERY_CHANGE_NOTIFICATION to "true". Using this option means that when you register a SELECT statement query, you are registering the actual result of the query and not the database object that the query is based on. Query registration provides finer granularity than when you register the tables.DatabaseChangeRegistration dcr = null;
Properties prop = new Properties();
prop.setProperty(OracleConnection.DCN_QUERY_CHANGE_NOTIFICATION,"true");
try
{
dcr = conn.registerDatabaseChangeNotification(prop);
...Associating a Query With a Registration
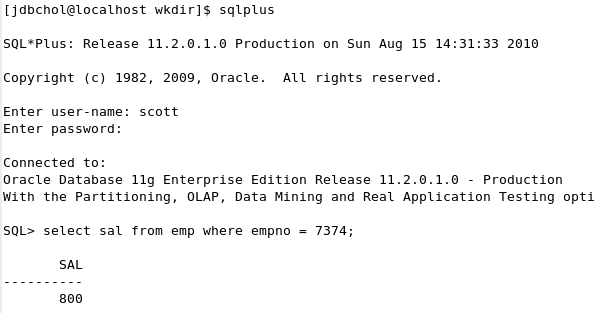
After you have created a registration, you can associate a query with it. You can associate a query with registration using the Statement class method setDatabaseChangeRegistration(). This method takes an object of DatabaseChangeRegistration as a parameter. In this demo you associate the query select sal from emp where empno=7374 to the registration.Statement stmt = conn.createStatement();
String query = "select sal from emp where empno=7374";
((OracleStatement)stmt).setDatabaseChangeRegistration(dcr);Notifying Database Change Events
You need to attach a listener to the registration, using its addListener() method, to receive database change notifications.DCNListener list = new DCNListener();
dcr.addListener(list);The program QCNGuiDemo.java creates a GUI with a pair of sliders. When the upper slider is moved, a DML operation, update emp set sal=? where empno =7374, is performed. On occurrence of the database change event, the database server notifies the JDBC driver. The driver then constructs a new Java event, identifies the registration to be notified, and notifies the listeners attached to the registration. QCNSlider handles the change event by moving the bottom progress bar in accordance to the salary of empno=7374.
Setting Up the Environment for QCN
To execute the QCNGuiDemo.java you need to perform the following steps to set up the environment to enable the QCN demonstration to work correctly:
. |
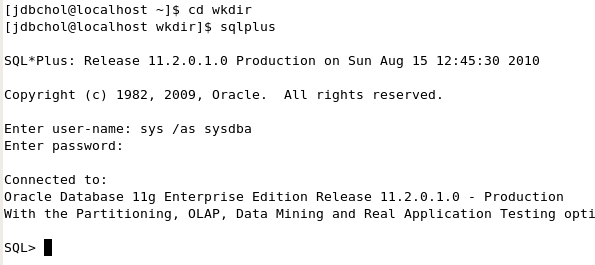
You need to grant the user hr the change notification privilege. Open a terminal window, change to the wkdir directory. Start SQL*Plus. When prompted, enter sys /as sysdba for the user-name and oracle for the password. cd wkdir
In SQL*Plus, execute the following commands: grant change notification to scott;
|
|---|

Reviewing the Connection String
. |
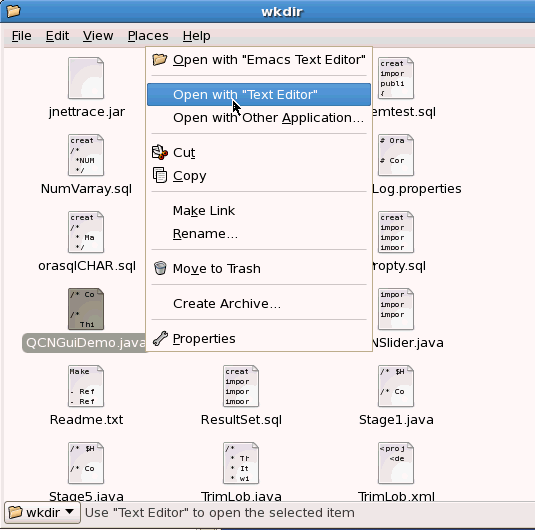
Select the QCNGuiDemo.java file from the wkdir directory and click Open.
|
|---|---|
. |
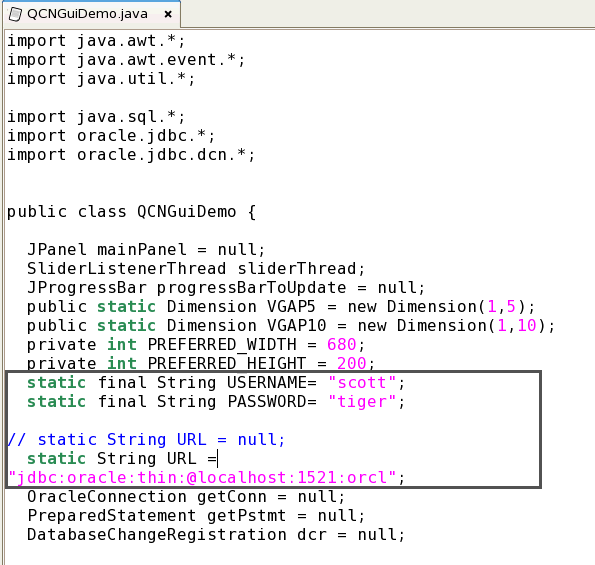
Scroll down a little in the QCNGuiDemo.java file and review the connection URL string information.
Make sure that the username and password match what is shown above. Check that your connection url is: "jdbc:oracle:thin:@localhost:1521:orcl"
|
. |
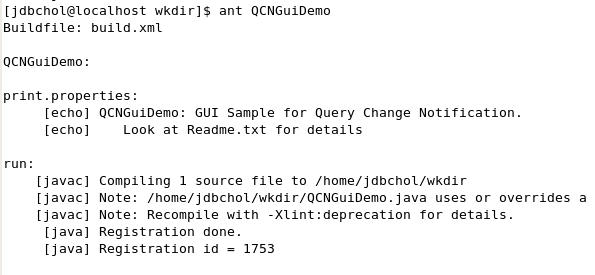
In a terminal window, change to the wkdir directory. Use ant to build and run the xml file.
Note the the slider GUI tool appears. This GUI has a slider feature where you can drag the placeholder in the sender frame to various positions within the horizontal bar.
|
Executing QCNGuiDemo.java
In this section, you examine the QCNGuiDemo as you modify data in the EMP table.
. |
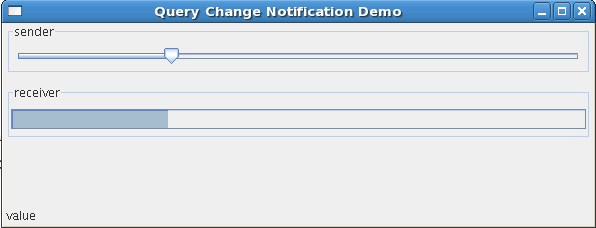
Your QCNGuiDemo tool should appear as follows.
Note that the value is null.
|
|---|---|
. |
Open a terminal window, start a SQL*Plus session (use scott/tiger), and execute the following SQL command: sqlplus
|
. |
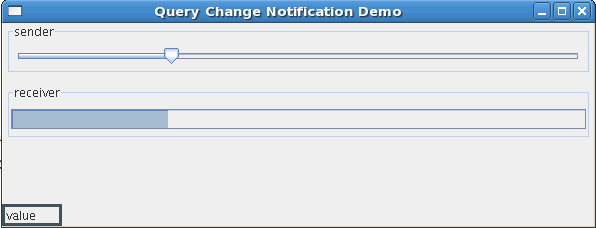
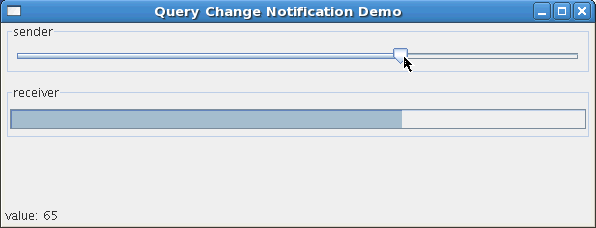
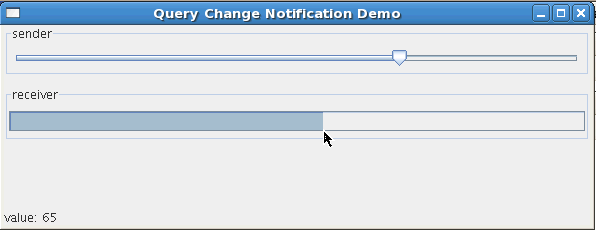
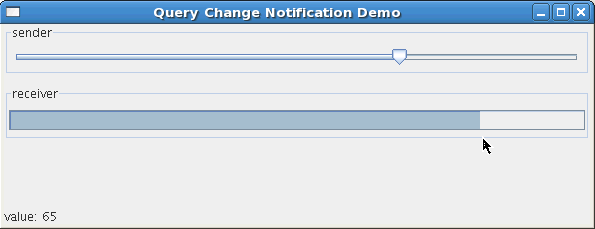
Move the slider so that the value being displayed at the bottom left changes to 65.
|
. |
Re-execute the following query: select sal from emp where empno = 7374; Notice the change in the salary is now 65.
|
. |
Update the salary of empno=7374 to 50 by executing the following commands: update emp set sal=50 where empno=7374;commit; You notice the change in Progress Bar labeled receiver.
|
. |
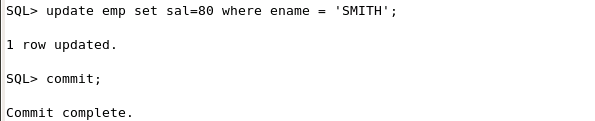
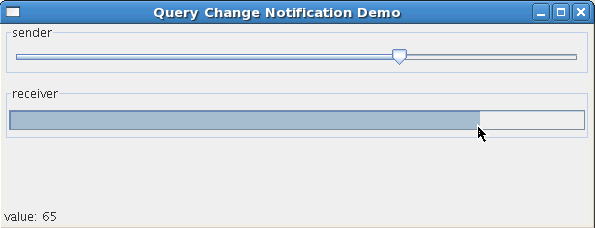
The query notification is not only bound to the where clause empno=7374, but also to any update that logically effects the same row. Execute the following command: update emp set sal=80 where ename='SMITH';
Making an update to ename='SMITH' (which is empno=7374) sends the notification and the Progress Bar on the window slides.
|
. |
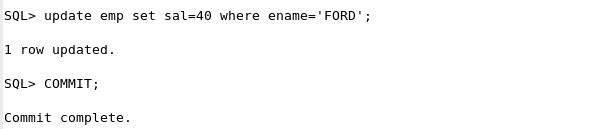
However making an update to ename='FORD' does not effect empno=7374, hence no notification is sent and the Progress Bar remains as is. Execute the following command: update emp set sal=40 where ename='FORD';
|
. |
Close the QCNGuiDemo window.
|


Using Universal Connection Pool (UCP)
Overview
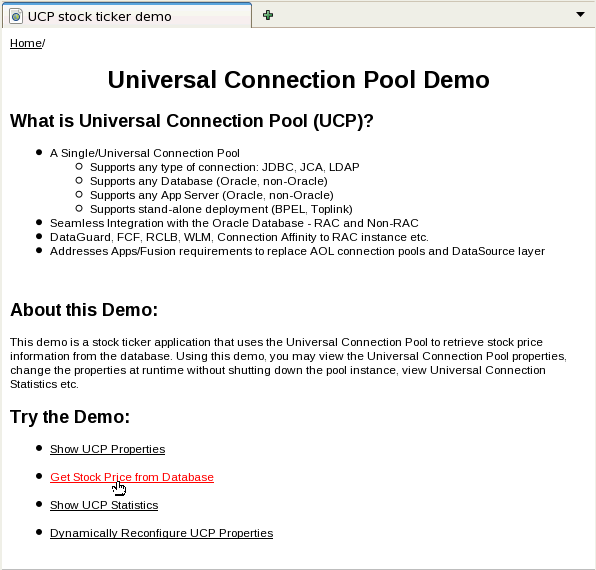
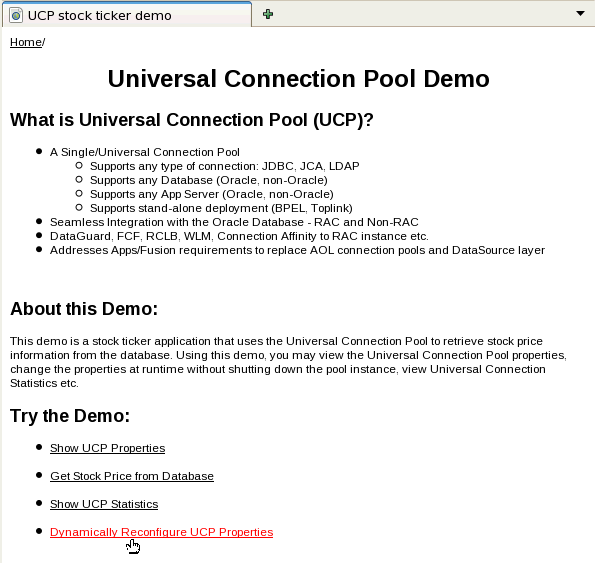
The Oracle Universal Connection Pool (UCP) for JDBC is a full-featured connection pool for managing database connections. Java applications that are database-intensive use the connection pool to improve performance and better utilize system resources. Oracle Universal Connection Pool (UCP) for JDBC has following features:- Can support:
- Any type of connection: JDBC, JCA, LDAP
- Any Database (Oracle, non-Oracle)
- Any App Server (Oracle, non-Oracle)
- Has stand-alone deployment (BPEL, Toplink)
- Can be integrated seamlessly with the Oracle Database - RAC and Non-RAC
- Addresses Apps/Fusion requirements to replace AOL connection pools and DataSource layer
Executing Stock Ticker Demo
This demo is a stock ticker application that uses the Universal Connection Pool to retrieve stock price information from the database. Using this demo, you may view the Universal Connection Pool properties, change the properties at runtime without shutting down the pool instance, view Universal Connection Statistics etc. To perform this demo execute the following steps:
. |
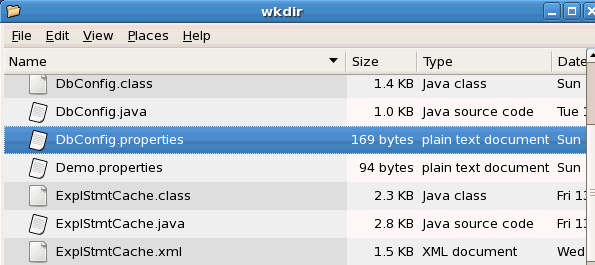
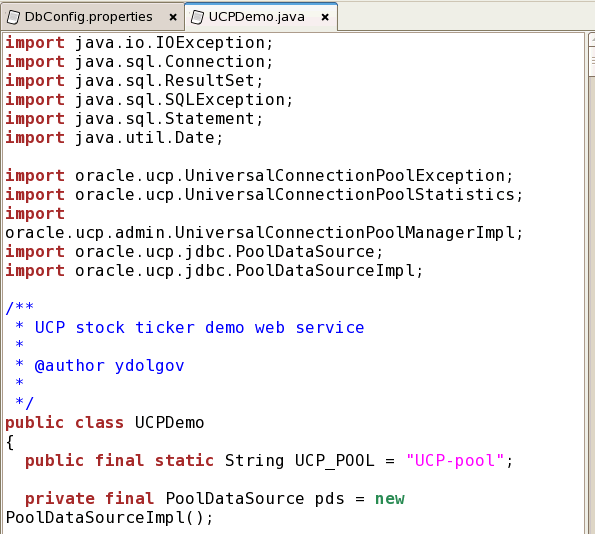
Select the UCPDemo.java and DbConfig.properties from the wkdir directory and click Open with "Text Editor".
Both files should open in your text editor.
|
|---|---|
. |
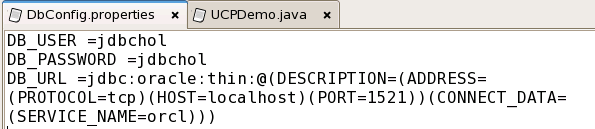
In the file DbConfig.properties, verify the URL, username and password information about your Oracle database DB_USER =jdbchol
Note: The DB_URL string should be in a single line.
|
. |
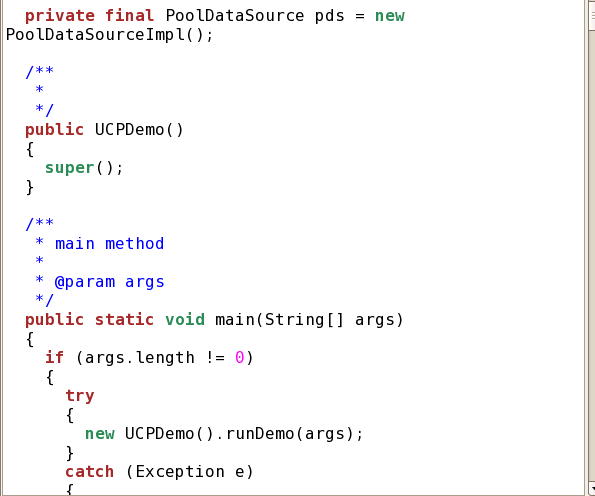
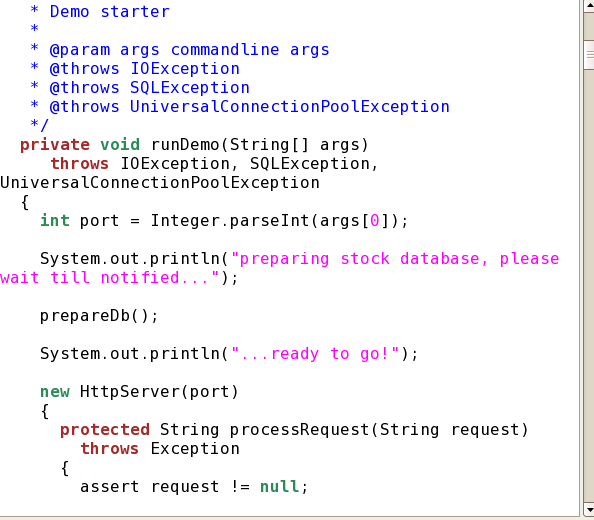
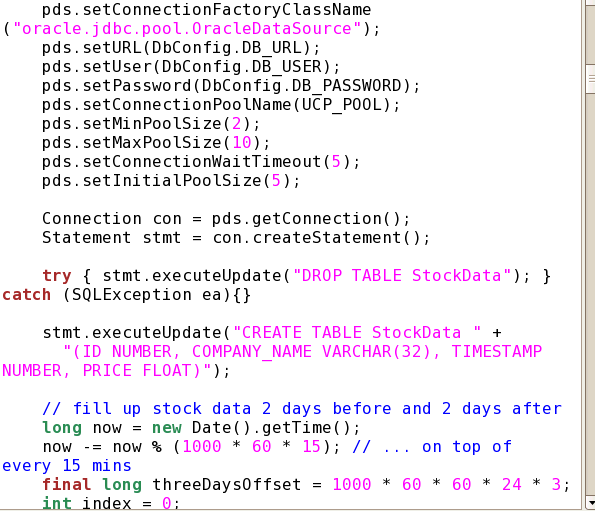
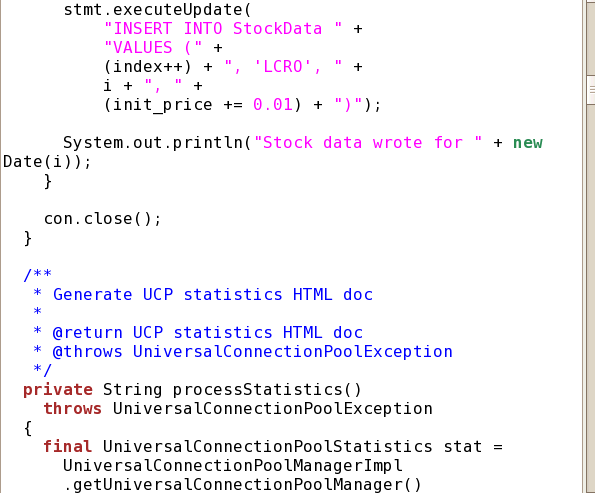
Examine the contents in the UCPDemo.java file.
|
. |
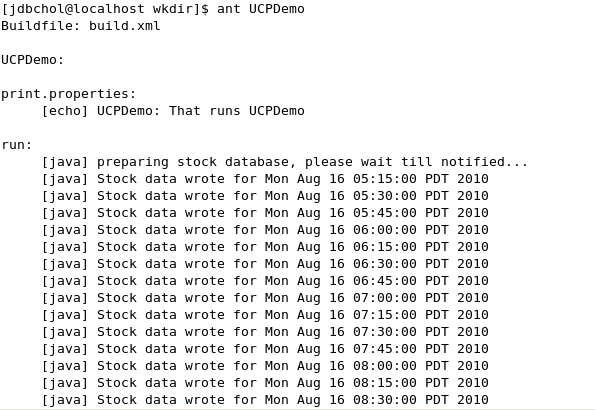
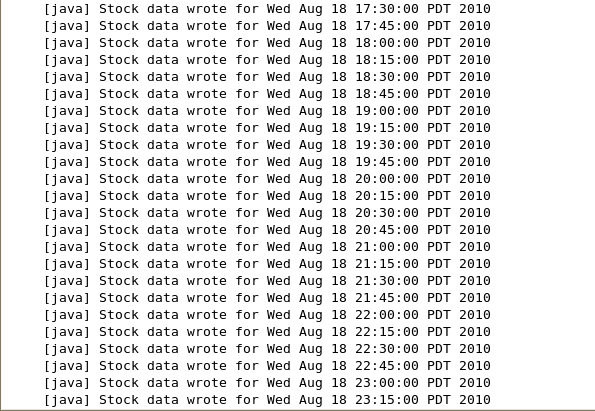
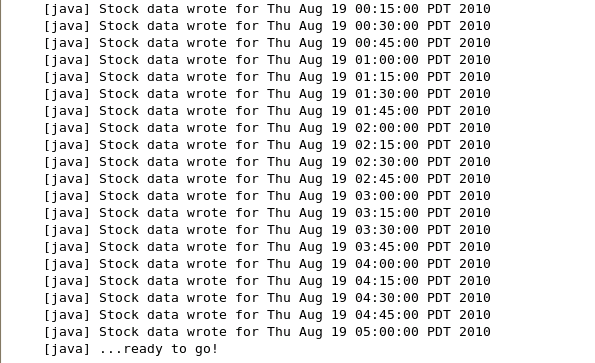
In your terminal window, from the wkdir directory, use the ant tool to build and run the UCPJava code. ant UCPDemo
|
. |
Observe the output.
|
. |
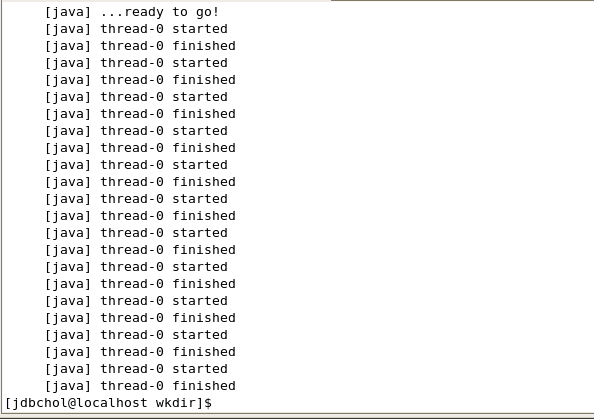
Upon startup the UCPDemo will spend a few seconds to store the stock price data onto the database, so wait until the message "...ready to go!" is printed out on the screen.
Now, the UCP demo server is up and running and you can use it.
|
. |
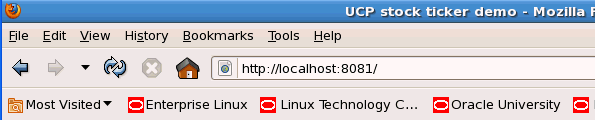
Enter the following URL into the Internet Explorer or Firefox: http://localhost:8081( http://<machine-address>:<port>)
|
. |
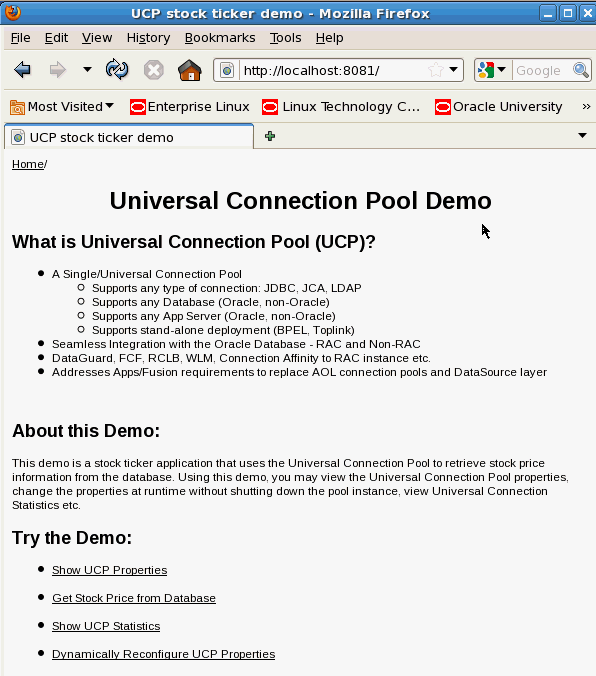
Observe the result in the browser.
|
. |
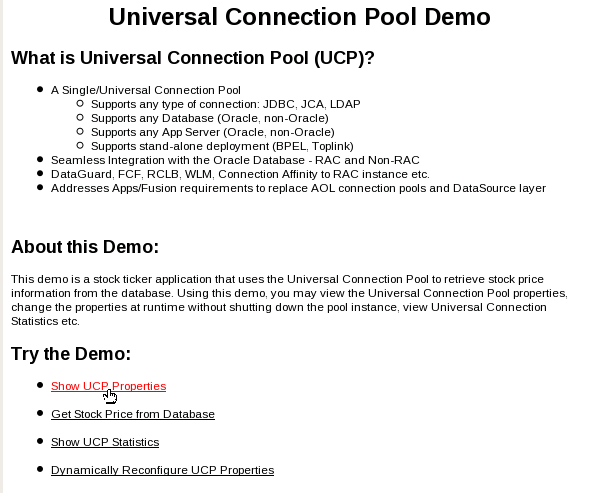
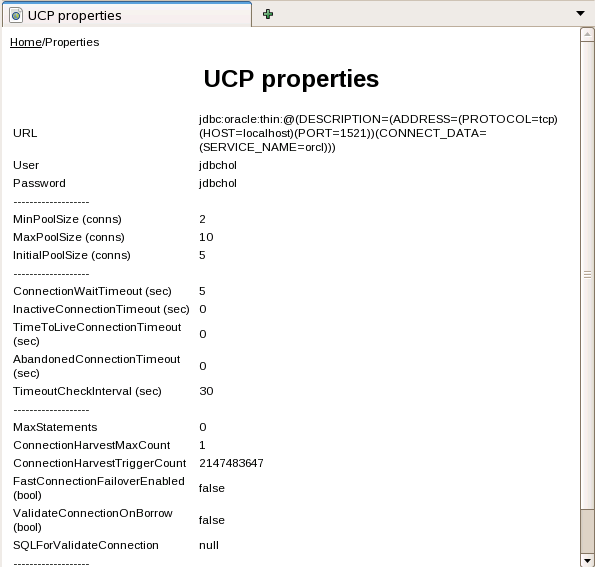
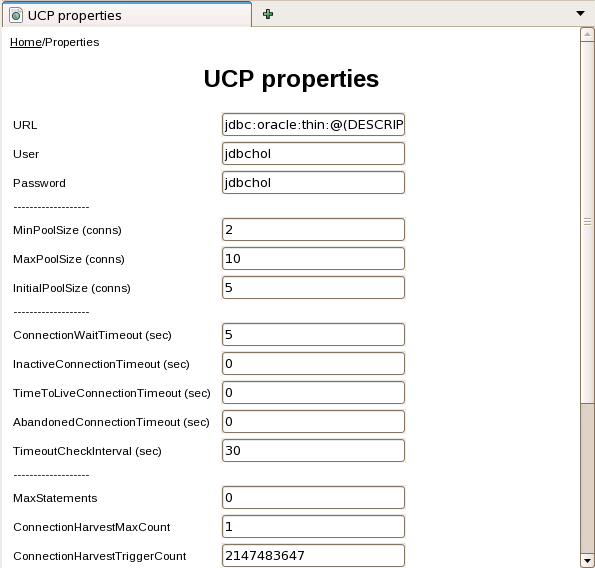
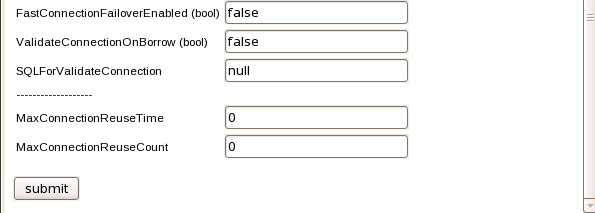
Click on Show UCP Properties.
Return to Home by clicking the Home breadcrumb on the top left side of the window.
|
. |
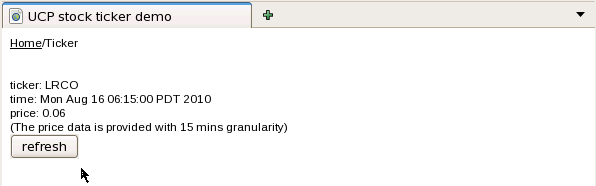
Click on Get Stock Price from the Database.
Return to Home by clicking the Home breadcrumb on the top left side of the window.
|
. |
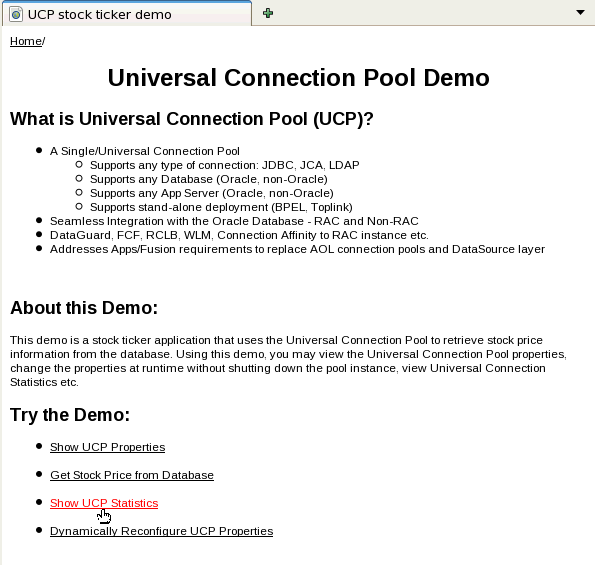
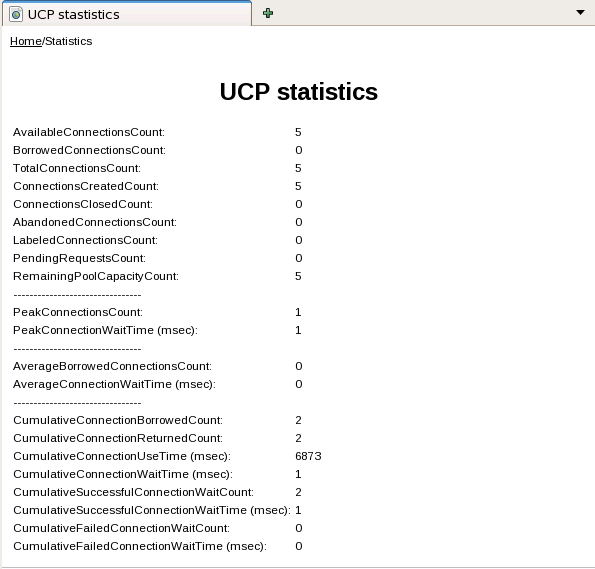
Click on Show UCP Statistics.
Return to Home by clicking the Home breadcrumb on the top left side of the window.
|
. |
Click on Dynamically Reconfigure UCP Properties.
Return to Home by clicking the Home breadcrumb on the top left side of the window.
|
. |
Exit out of the browser and stop the service.
In your terminal session window, stop the service by pressing the control key and the letter c on the keyboard. This will end the service.
|


Summary
In this tutorial, you have learned how to:
- Load and Run a Java Application in the Database
- Map a SQL Type to a Java Type
- Invoke Java in the Database
- Illustrate an Object Type Call Spec
- Compile Java with JIT
- Use Database Change Notification.
- Monitor Oracle JVM with JMX
Resources
- Java Developer Center
- The book Oracle Database Programming using Java and Web Services written by Kuassi Mensah
- The Blog: 360 Degree DB Programming
Credits
- Contributors: Ashok Shivarudraiah, Kuassi Mensah, Nancy Greenberg,
![]()

|
About
Oracle |Oracle and Sun | |