Utilizing Advanced Interactive Report Region Techniques in Oracle Application Express 4.0
Purpose
This tutorial shows you how to use some advanced techniques with Interactive Report Regions in Oracle Application Express 4.0.
Time to Complete
Approximately 50 minutes
Overview
In this tutorial, you explore some of the more advanced tasks related to Interactive Report Regions in Oracle Application Express.
In this tutorial, you use the same application you used in the Building and Customizing an Interactive Report tutorial. If you did not perform this tutorial, you will need to import the New Features application using the new_features_app.sql.
Linking a Saved Report from Another Page in Your Application
In the Building and Customizing an Interactive Report tutorial, you created an application with an Interactive Report. In this section of this tutorial, you add a link to a saved report on your Home page. Perform the following steps:
|
. |
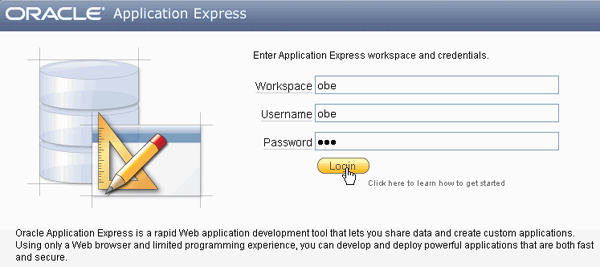
Enter the following URL to log in to Oracle Application Express. http://localhost:8080/apex
|
|---|---|
|
. |
To log in to Oracle Application Express, enter the following details,
and click Login.
|
|
. |
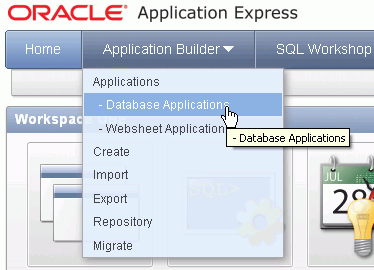
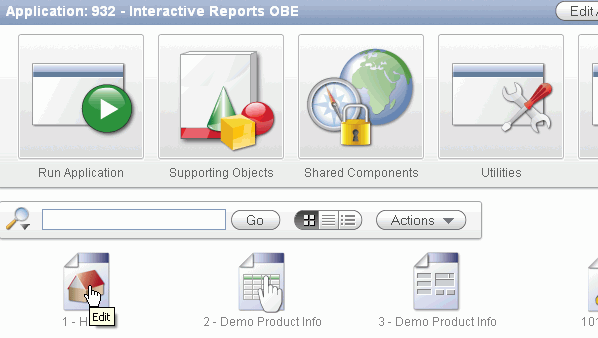
Select the drop down next to Application Builder and select Database Applications.
|
. |
If you performed the prerequisite tutorial, the list of application is in View Report mode. Click the Run icon for the Interactive Reports OBE.
|
. |
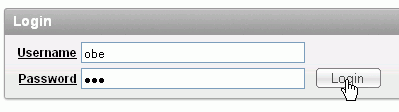
Enter obe for Username and Password and click Login.
|
| . |
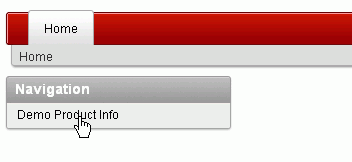
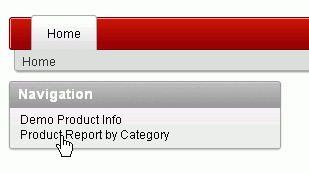
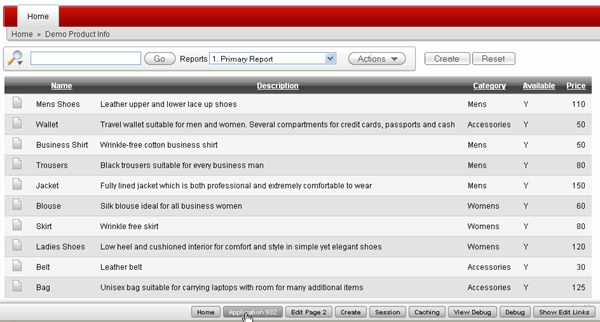
Select the Demo Product Info link from the Home Page to view the report.
|
| . |
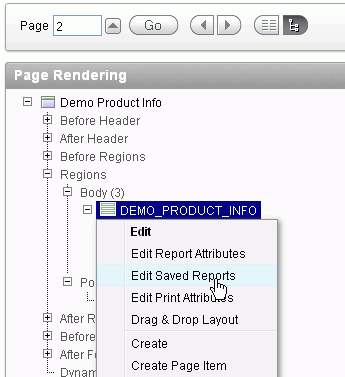
The last saved report you viewed is displayed. You want to manage the saved reports you created. Select the Edit Page in your developer toolbar.
|
. |
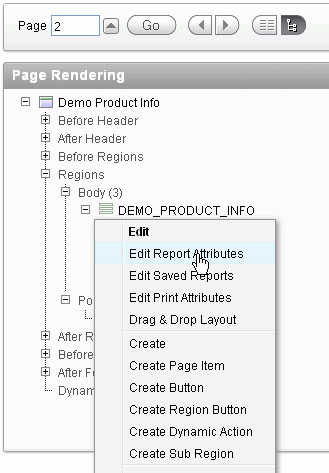
Right-click DEMO_PRODUCT_INFO and select Edit Saved Reports.
|
. |
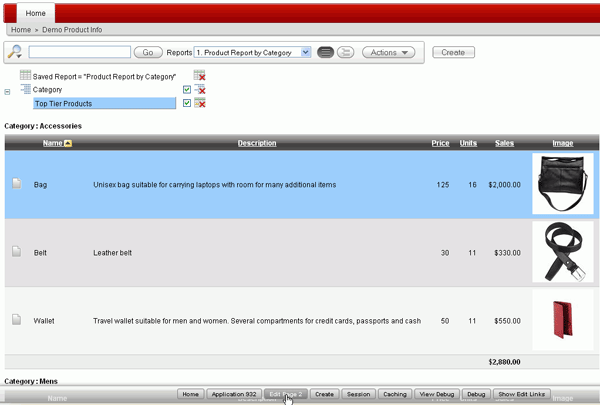
The list of saved reports are displayed. You can change the Report Alias to be more meaningful. Enter PROD_CATEGORY for the Report Alias for the Public report and click Apply Changes.
|
. |
Notice that the alias in the Link Example changed. You can add this link to your Navigation region on the Home Page. Select the Link Example and press ctrl+c to copy it to the clipboard. Then select the Application breadcrumb.
|
. |
You want to add the link to the Home page. Select the Home page icon.
|
. |
Right click the Navigation Region and select Edit List.
|
. |
Click Create List Entry >.
|
. |
Enter Product Report by Category for List Entry Label, select URL for Target type and enter the URL you copied from the Saved Reports page to the URL field and click Create.
|
| . |
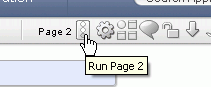
Your entry was created successfully. Click the Run Page icon.
|
. |
Select the Product Report by Category link.
|
. |
The Saved Report is displayed. In the next section you will create a reset button to reset the report manually. Select the Edit Page link in the developer toolbar.
|


Resetting your Interactive Report Manually
As a developer, you have the ability to include or exclude the Reset function, Actions Menu, or Search Bar all together. Without the Reset function on the Actions Menu, your end-users will not have the ability to reset their report after they have customized it using the Column Heading menu. To allow for resetting, you can programmatically provide a reset button.
In this topic, you will first create an Interactive Report, then exclude the Search bar, and lastly, create a reset button. Perform the following steps:
| . |
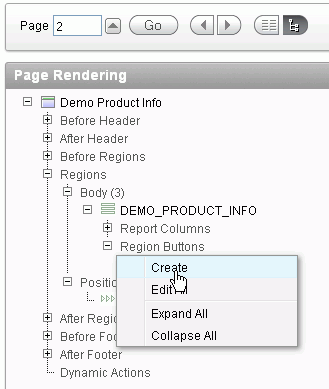
You want to create a button to perform the reset function. Right click Region Buttons for the DEMO_PRODUCT_INFO region and select Create.
|
|---|---|
| . |
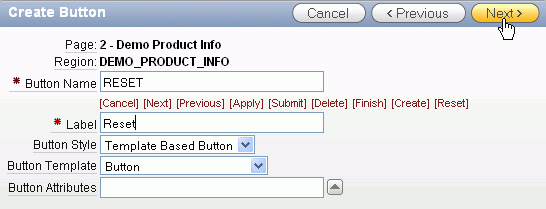
Enter Reset for the button name and click Next.
|
. |
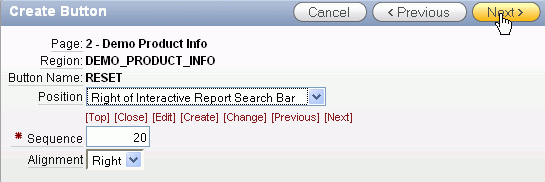
Select Right of Interactive Report Search Bar for Position and click Next.
|
| . |
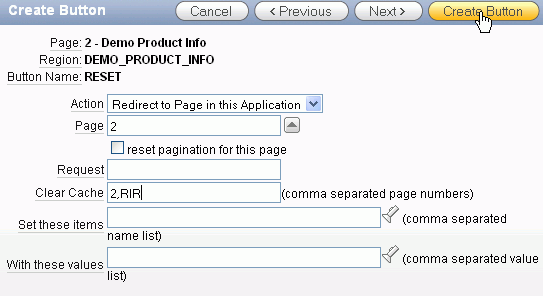
To reset an Interactive Report, you send a clear cache request of 'RIR'. This resets the Interactive Report on whichever page is called. Select Redirect to Page in this Application for Action. Enter the current page for Page. For Clear Cache, and enter 2,RIR and click Create Button. Note: The RIR string is equivalent to the end user choosing the Reset option from the interactive report actions menu on the target page and causes the report to be returned to the default report settings specified by the developer.
|
. |
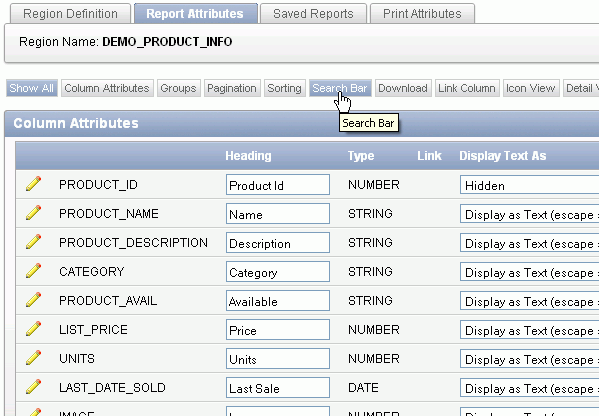
You also need to remove the Reset option from the Actions menu. Right click the DEMO_PRODUCT_INFO region and select Edit Report Attributes.
|
. |
Click the Search Bar subtab.
|
. |
Deselect the Reset check box and click Apply Changes.
|
. |
Your button was created successfully. Click the Run Page icon.
|
. |
Click the Reset button.
|
. |
The report is reset back to the Primary Report (rather than the Product Report by Category public report). In the next section you create a declarative filter which passes filter values using a URL item value. Select the Application link in the developer toolbar.
|


Creating a Declarative Filter
You can define declarative filters on Interactive Reports by passing filter criteria using the URL item values. This allows you to define complex query criteria that can be translated into filters or drill downs from a report to an interactive report. To create a drill down from one interactive report to another perform the following steps:
|
. |
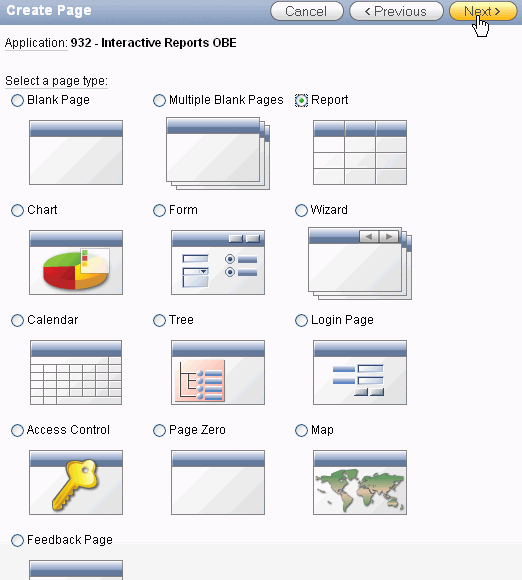
Navigate to the Application page. Click Create Page.
|
|---|---|
. |
Select the Report radio button and click Next.
|
| . |
Click Interactive Report and click Next.
|
. |
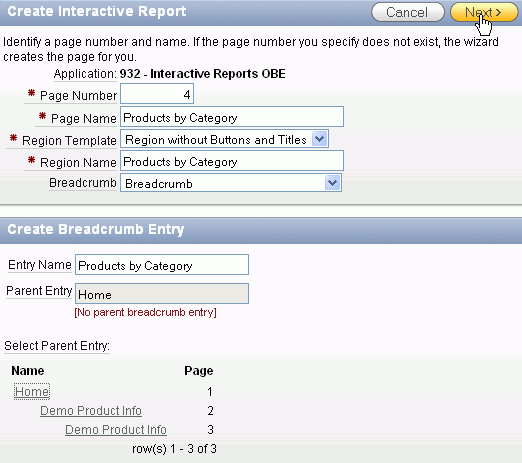
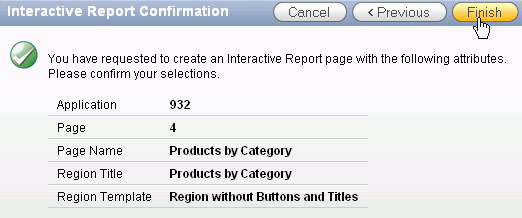
Enter Products by Category for the Page Name and Region Name. Select Breadcrumb for Breadcrumb. Enter Products by Category for Entry Name. Select the Home link for the Parent Entry and click Next.
|
. |
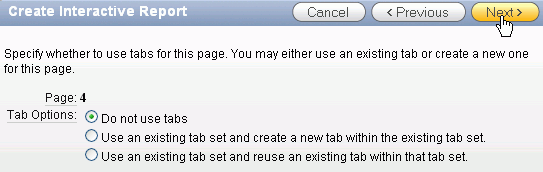
Accept the default and click Next.
|
. |
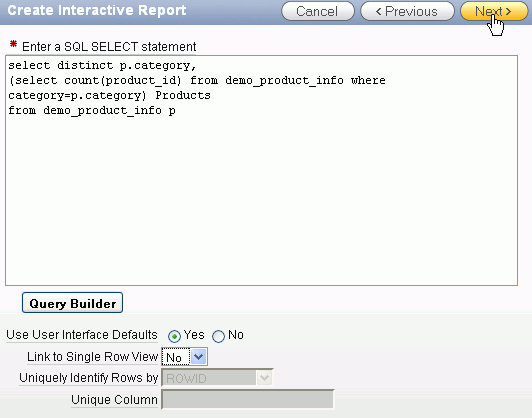
Enter the following SQL, select No for Link to Single Row View and click Next. select distinct p.category,
|
. |
Click Finish.
|
. |
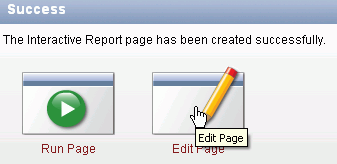
Your interactive report page was created successfully. Before you run the page, you need to make some changes. Click Edit Page.
|
. |
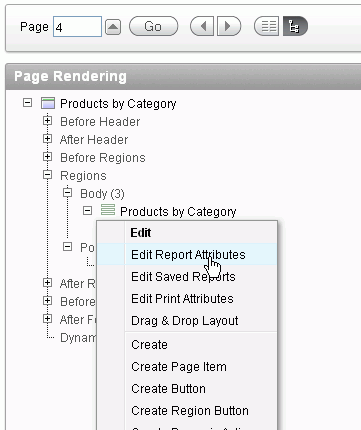
Under Regions, right click Products by Category and select Edit Report Attributes.
|
. |
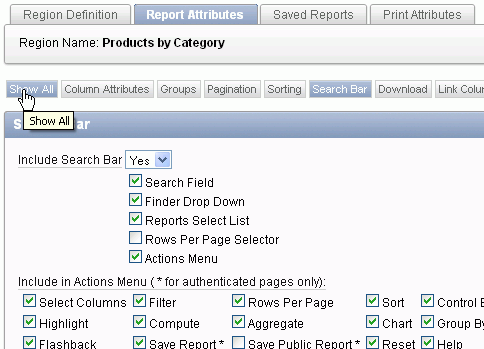
Click the Show All tab.
|
. |
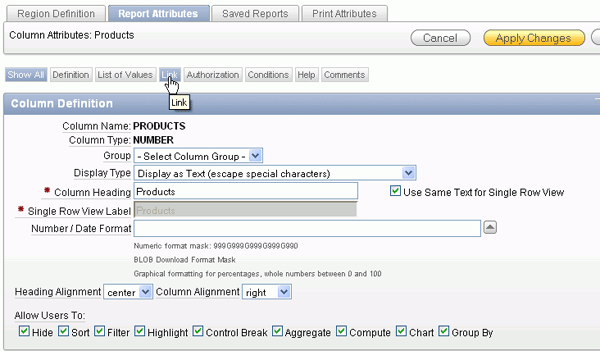
You want to create a link to the interactive report on page 2 from Products. Select the Edit icon in front of the PRODUCTS column.
|
. |
Click the Link tab.
|
. |
You need to define a link that will display the list of products for a category on Page 2, clear the cache on Page 2 and reset the interactive report region on Page 2 to remove any previously set filters that might interfere with the filter being passed. In addition, you need to pass in a value for the hidden CATEGORY. To reference a column within an interactive report, you preface the column alias with 'IR_'. Select [PRODUCTS] for Link Text, enter the 2 for Page (which is the page you just created) and enter 2,RIR in the Clear Cache field. Enter IR_CATEGORY in the Item 1 Name field and select #CATEGORY# for Value. Then click Apply Changes. Note: By prefixing the item name with IR_, in this example IR_CATEGORY, the URL item will be associated with an interactive report column rather than an item on a page.
|
| . |
Click Run Page.
|
. |
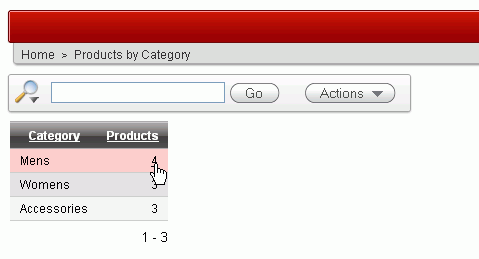
The Products value now has a link. Click one of the numbers.
|
| . |
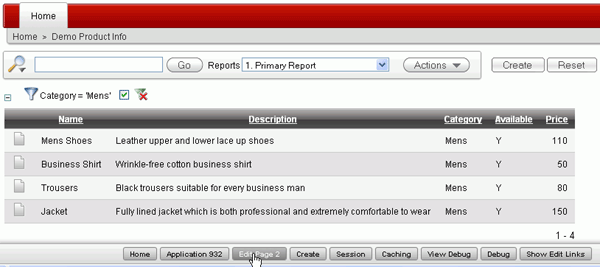
The Demo Product Info Interactive report is now shown and there is a filter created on Category. In the next section, you create a derived column and then create a highlight based on the filter. Click Edit Page in the developer toolbar.
|


Creating Derived Columns
In this section, you add a derived column to your query. Specifically, you use a case statement to determine whether the a product has been undersold based on how many customers have ordered a product. You then use the value of this derived column to create a highlight rule to highlight all undersold products. Perform the following steps:
. |
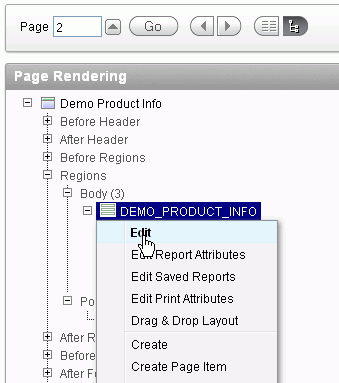
Right click the region DEMO_PRODUCT_INFO and select Edit.
|
|---|---|
. |
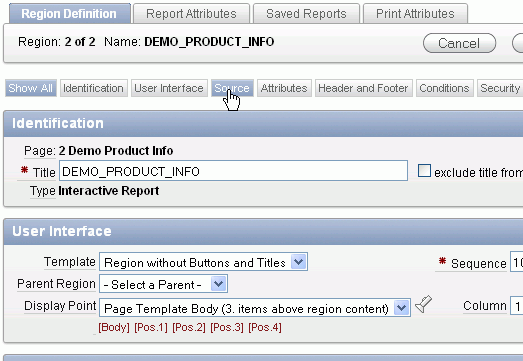
Select the Source tab.
|
. |
Change the source to the following query and click the Report Attributes tab. Note that the CASE statement in this SQL statement checks to see if the employee's salary is less than the minimum salary for their job. If so, the value of the derived column, UnderPaid_Yes_No, is set to Yes, otherwise, it is set to No. The derived column is not displayed initially but it is available for use with many actions on the Actions menu such as a Filter and Highlight. select p.product_id,
|
. |
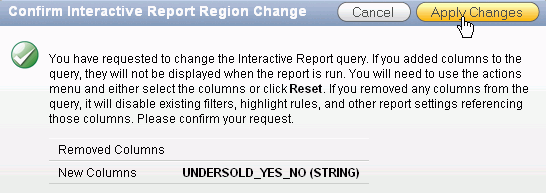
The additional column will be added to your report. Click Apply Changes.
|
. |
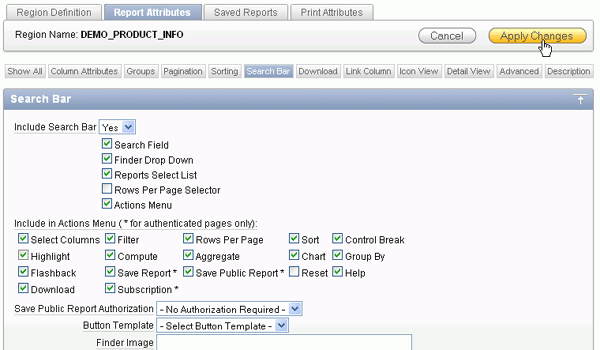
Notice that your derived column is in the list of Column Attributes. You need to turn Highlight back on in your Search Bar. Click the Search Bar subtab.
|
. |
Select the check box next to Highlight and click Apply Changes.
|
| . |
Click the Run Page icon.
|
. |
Your report is displayed. To show the products that are undersold, select the Actions menu and select Format > Highlight.
|
. |
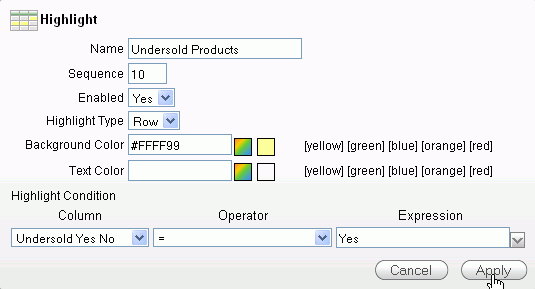
Enter Undersold Products for the Name and select [yellow] for Background Color. Select Undersold Yes No for Column and enter Yes for Expression and click Apply.
|
|
. |
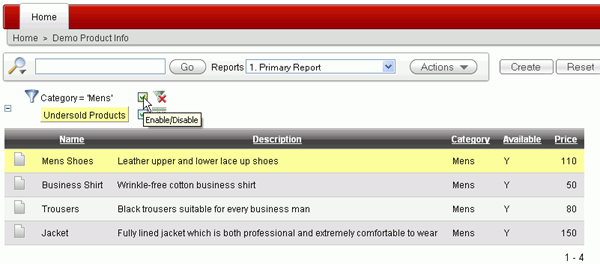
Notice that the products that are undersold are now highlighted in yellow. Deselect the check box to disable the Category filter.
|
|
. |
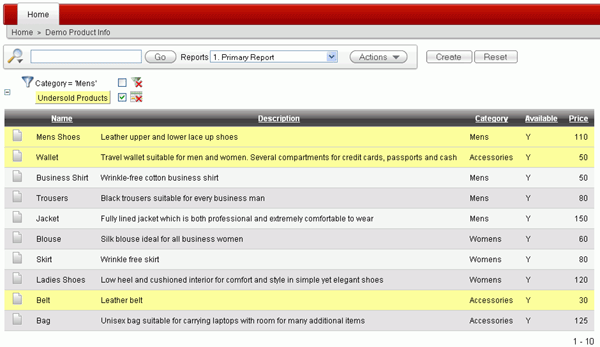
The filter is disabled so that all the products that are undersold are now highlighted in yellow.
|


Summary
In this tutorial, you have learned how to:
- Link your saved report from another page
- Reset your Interactive Report Manually
- Create a declarative filter
- Create a derived predefined filter
![]()

|
About
Oracle |Oracle and Sun | |