Before You Begin
Purpose
This tutorial covers how to execute a DDL script, review changes to the database objects, create, execute, test and debug a procedure.
Time to Complete
Approximately 60 minutes
Introduction
Oracle SQL Developer is a free and fully supported graphical tool that enhances productivity and simplifies database development tasks. Using SQL Developer, users can browse, edit and create database objects, run SQL statements, edit and debug PL/SQL statements, build PL/SQL unit tests, run reports, and place files under version control.
In this tutorial, you use SQL Developer Release 4.1 to examine various tasks.
Prerequisites
Before starting this tutorial, you should:
- Have installed Oracle SQL Developer Release 4.1 or above
- Have access to an Oracle Database 11g database that has the sample schema installed.
- Grant HR user DEBUG CONNECT SESSION and DEBUG ANY PROCEDURE privileges.
- Performed the Re-engineering Your Database Using Oracle SQL Developer Data Modeler 4.1 tutorial.
- Downloaded and unzipped the files.zip into your working directory.
Creating a Database Connection
In this topic, you will create a database connection to the HR Schema in SQL Developer:
- Double click on the SQL Developer icon on the
Desktop.
-
The first time SQL Developer is open, the "Start Page" is displayed. You can deselect the Show on Startup check box to turn it off.

Description of this image -
In the Connections tab, right click Connections and select New Connection

Description of this image -
Instructions and result (including collapsible image with text file for accessibility):
A New / Update Database Connection dialog opens. Enter the connection details as follows and click Test.
Connection Name: hr_orcl
User Name: hr
Password: <your password> (Select the Save Password checkbox)
SID: <your own SID>
Description of this image Note: In this tutorial the Service Name is specified instead of SID.
-
The status of your test is 'Success'. Click Connect in the New/ Update Database Connection dialog to create the connection.

Description of this image -
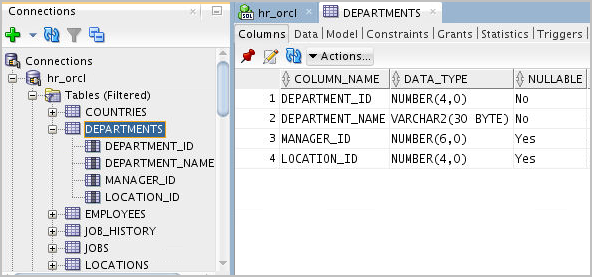
Expand the hr_orcl connection. Notice all the object types. Expand Tables. In the next section, you examine the objects currently in the hr schema.

Description of this image
Review Existing Objects in the HR Schema
In this topic, you review the existing objects in the hr schema.
-
Expand the EMPLOYEES table. Notice that the column definitions are listed.

Description of this image -
Click the DEPARTMENTS table in the navigator.
Description of this image -
Notice that the information in the EMPLOYEES tab was replaced by the DEPARTMENTS table information. If you want the table information in the tab to remain frozen, select the Pin icon to Freeze the pane.

Description of this image -
Then click the EMPLOYEES table again in the navigator.

Description of this image -
Notice this time you have 2 tabs, one for each of the tables because the DEPARTMENTS table pane is frozen.

Description of this image -
You can see the data in the EMPLOYEES table. Click the Data subtab.

Description of this image -
The data in the EMPLOYEES table is displayed. You can also enter a SQL statement in the SQL Worksheet. Click the hr_orcl tab.

Description of this image -
Enter the following SQL statement and select the Execute SQL Statement icon.
select * from employees
where job_id like '%SA%';
Description of this image -
The Query Results are displayed. In the next topic, you run the script you generated in the previous tutorial on Data Modeler.

Description of this image
Executing a DDL Script
In this topic, you execute the DDL script you
generated in the Data Modeler tutorial. If you did
not complete the previous tutorial, you can access
the solution using the dm_mods.sql in the
files folder.
-
Select File > Open.

Description of this image -
Locate the dm_mods.sql file and click Open.

Description of this image -
This SQL file contains all the DDL to change the HR Schema so that it is synchronized with the model changes you made in the previous tutorial. When you execute this script, the PROJECTS and TASKS tables will be created, and the new COST_CENTER column will be added to the DEPARTMENTS table. Scroll down to review the DDL.

Description of this image -
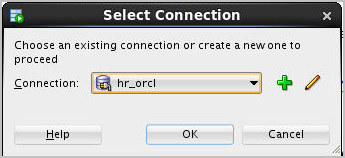
Select the hr_orcl connection from the list and click OK.

Description of this image -
All the statements in the DDL script executed successfully

Description of this image -
Click the Refresh icon to refresh the list of tables.

Description of this image -
Notice that the new tables PROJECTS and TASKS are contained in the list. Expand the DEPARTMENTS, PROJECTS and TASKS table nodes and review the results. In the next topic, you create a procedure and run it.

Description of this image
Creating and Executing a Procedure
In this topic, you create, execute and debug a procedure that determines the commission any employee receives based on a sales amount and the employees commission percentage.
-
A script with the procedure has already been created so you can open the file. Select File > Open.

Description of this image -
Locate the proc.sql and click Open.

Description of this image -
Click the Run Script icon to create the AWARD_BONUS procedure.

Description of this image -
Select the hr_orcl connection and click OK.
Description of this image -
The procedure was created and compiled with an error. To see the error, expand Procedures in the navigator.

Description of this image
Debugging a Procedure
The procedure created in the earlier section was created with an error. You can locate errors in the code by debugging the code. You have to run a script before you actually start the debug process
Before you Debug
In order to debug a sub program you should have DEBUG privileges.
-
To check the privileges you can execute a SQL statement

Description of this image -
If you don't have the required DEBUG privileges, a SYSDBA role user has to assign them. Login as a SYSDBA user

Description of this image -
Execute the grant commands and ACL(Access Control List) script shown as a SYSDBA user

Description of this image 
Description of this image -
Now login as hr user, who has a non-sysdba user role

Description of this image -
Execute the SQL statement shown to check whether required privileges are granted to hr user

Description of this image
You can see that the hr user doesn't have DEBUG CONNECT and DEBUG privileges
Debugging
-
Now open the AWARD_BONUS procedure you created earlier. Compile the procedure

Description of this image You can see the error message in the compiler log. It specifies a line number where the error occurred
-
Modify the code in line 13 by adding a semi colon. Select the Compile icon.

Description of this image Run the procedure by clicking on Run icon.
-
The Run PL/SQL dialog window appears. Notice that the values for EMP_ID and SALES_AMT are currently set to 1.

Description of this image -
Change the default values to 149 for EMP_ID and 2000 for SALES_AMT and click OK.

Description of this image -
Note that the procedure executed successfully and the value for salary was changed. To see how debug works, you create a break point. Click the line number 7.

Description of this image -
When a break point is created at line 7, the execution will break at line 7 and allows developer to monitor the data held in different variables. Click the Debug icon.

Description of this image -
Click OK to accept the same input values as before.
Description of this image -
The debugger is running and has stopped at line 8. Click the Smart Data tab. The Smart Data tab holds the values of variables in the PL/SQL block. These are currently set to NULL.

Description of this image -
You can see all the data manipulated in the procedure in the Data tab.

Description of this image You see that the current values of l_salary and l_commission are NULL.
-
Click the Step Over icon to move to the next statement in the procedure.

Description of this image -
Notice the values for l_salary and l_commission have changed to the existing values in the database, as the execution of select statement is complete, you can see the values from the database are fetched into the variables in the procedure.

Description of this image -
Click the Step Over icon again to move to the next statement.As the execution of the update statement completes, you can see the new values of salary and commission in the Data tab

Description of this image -
Notice that the debugger moved to the next statement in the procedure. You want to run the rest of the procedure, click the Resume icon.

Description of this image -
Procedure execution and debugging is complete. In the next topic, you create a test repository so that you can create and run a unit test.
Description of this image
Creating a Unit Test Repository
In this topic, you create a database user called UNIT_TEST_REPOS. You create this user to hold the Unit Testing Repository data. You will then create the repository in the schema of the user that you created.
-
Create a connection for the SYS User. Right-click Connections and select New Connection.

Description of this image -
Enter the following information and click Connect.
Connection Name: sys_orcl
Username: sys
Password: oracle
Select Save Password checkbox
Role: SYSDBA
Service Name: pdb1
Description of this image -
Your connection was created successfully. Collapse the hr_orcl connection. Expand the sys_orcl connection and right-click Other Users and select Create User.

Description of this image -
Enter the following information and select the Granted Roles tab.
Username: unit_test_repos
Password: oracle
Default Tablespace: USERS
Temporary Tablespace: TEMP
Description of this image -
Select the Connect and Resource roles and click Apply.

Description of this image -
In the Quotas tab, check the Unlimited check box for the USERS tablespace

Description of this image -
The unit_test_repos user was created successfully. Click OK.

Description of this image -
You now need to create a connection to the unit_test_repos user. This user will hold the unit testing repository data. Right-click Connections and select New Connection.

Description of this image -
Enter the following information and click Connect.
Connection Name: unit_test_repos_orcl
Username: unit_test_repos
Password: oracle
Select Save Password checkbox
Service Name: pdb1
Description of this image -
The unit_test_repos user and unit_test_repos_orcl connection were created successfully.

Description of this image -
Select Tools > Unit Test > Repository, then select Select Current Repository.

Description of this image -
Select the unit_test_repos_orcl connection and click OK.

Description of this image -
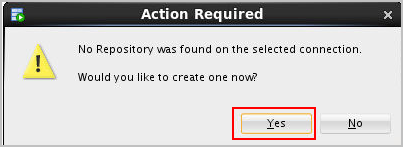
You would like to create a new repository. Click Yes.
Description of this image -
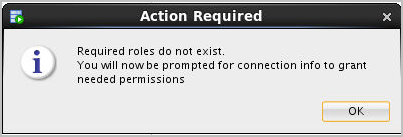
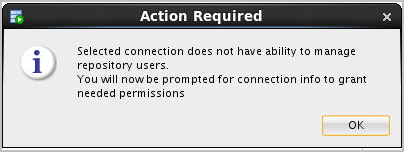
This connection does not have the permissions it needs to create the repository. Click OK to show the permissions that will be applied.
Description of this image -
Enter oracle for the sys password and click OK.

Description of this image -
The grant statement is shown. Click Yes.

Description of this image -
The UNIT_TEST_REPOS user needs select access to some required tables. Click OK.

Description of this image -
The grant statements are displayed. Click Yes.

Description of this image -
The UNIT_TEST_REPOS user does not currently have the ability to manage repository owners. Click OK to see the grant statements that will be executed.
Description of this image -
The grant statements are displayed. Click Yes.

Description of this image -
Your repository was created successfully. Click OK.

Description of this image
Creating and Running a Unit Test
Now that the Unit Testing Repository has been created, you will create a unit test for the PL/SQL procedure you created earlier in this tutorial. Then you will run the unit test to see if various values will work
-
Select View > Unit Test.

Description of this image -
In the Unit Test navigator, right-click Tests and select Create Test.

Description of this image -
In Select Operation, select the hr_orcl connection that you used to create the AWARD_BONUS procedure.

Description of this image -
Expand Procedures, select AWARD_BONUS and click Next.

Description of this image -
In Specify Test Name window, make sure that AWARD_BONUS is specified for Test Name and that Create with single Dummy implementation is selected, then click Next.

Description of this image -
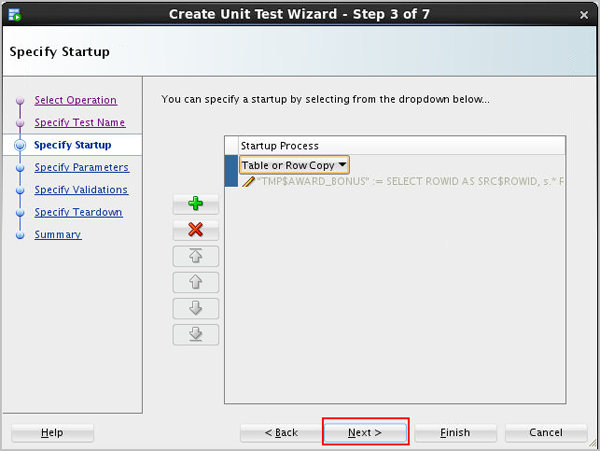
In Specify Startup window, click '+' icon and select Table or Row Copy from the drop down list box.

Description of this image -
Enter EMPLOYEES for Source Table and click OK. Note that the table affected by the test will be saved to a temporary table and the query to the table is automatically generated.

Description of this image -
Click Next.
Description of this image -
In the Specify Parameters window, change the Input string for EMP_ID to 149 and SALES_AMT to 2000 and click Next.

Description of this image -
Select the '+' icon to add a validation and select Query returning row(s) from the drop down list.

Description of this image -
Specify the following query and click OK. This query will test the results of the change that the unit test performed.
SELECT * FROM employees
WHERE employee_id = 149
AND salary = 11200;
Description of this image -
Click Next.

Description of this image -
In the Specify Teardown window,click the '+' icon and select Table or Row Restore from the drop down list.
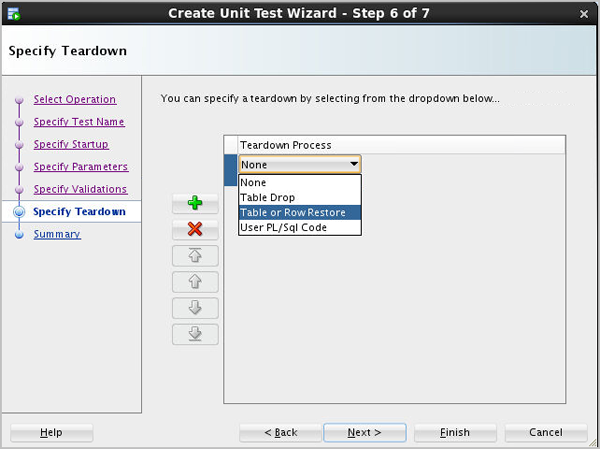
Description of this image -
Leave the Row Identifier as Primary Key and click OK.

Description of this image -
Click Next.

Description of this image -
Click Finish.

Description of this image -
Expand Tests. Your test appears in the list.

Description of this image -
Select the AWARD_BONUS test in the left navigator. Notice that the test details are displayed on the right panel.

Description of this image -
Run the test by clicking the Debug Implementation icon.

Description of this image -
The Progress window appears.

Description of this image -
When the test completes, the results are displayed. Click Close.

Description of this image