This tutorial describes how you can build ASP.NET web applications that access Oracle Database using Oracle Developer Tools for Visual Studio.
Time to Complete
Approximately 30 minutes
Background
Oracle Developer Tools for Visual Studio is a tightly integrated "add-in" for Visual Studio. This tight integration makes it easy to create ASP.NET Web Applications that access Oracle database with minimal coding. This tutorial will guide you how to create such an application.
What Do You Need?
Before starting this tutorial, you should:
Install Microsoft Visual Studio 2015 or later.
Have access to Oracle Database 12c or later.
Install Oracle Data Access Components (ODAC) 12c Release 4 or later from OTN. Be sure to use the Oracle Universal Installer and include Oracle Developer Tools for Visual Studio as part of the installation. During the install process, choose the machine-wide configuration option.
Creating a Web Site
In this section, you will create a new ASP.NET web site.
Open Visual Studio. Click File. Select New > Web Site.
Observe the screen. The design area gets the GridView control.
Description of this imageNote: You can open the GridView task pane, by clicking the < symbol on the top right corner of the GridView.
Creating a Data Source
In this section, you will create a new Oracle data source for the grid in the ASP.NET web site. That will allow the grid to retrieve and show Oracle data when the web site is run.
Goto Choose Data Source field in the Grid View tasks. Select <New data source...> from the Choose Data Source dropdown.
The Data Source Configuration Wizard opens up. We will retrieve data from the Oracle HR sample schema. Select Database in the Where will the application get data from? field. Enter HR in the Specify an ID for the data source field. Click OK.
The Configure Data Source wizard opens up. Click New Connection... in the Which data connection should your application use to connect to the database? field.
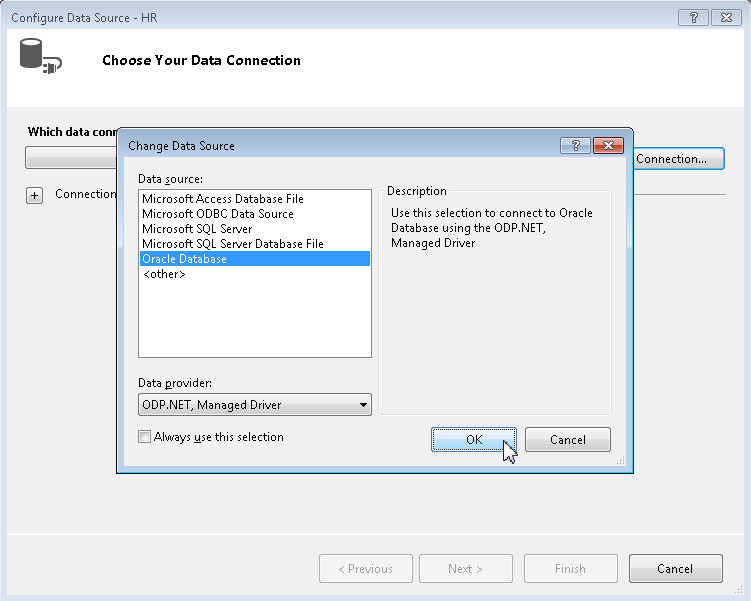
In the Change Data Source dialog box, select Oracle Database as the Data Source and ODP.NET, Managed Driver as the Data Provider. Click OK. This step is required only if Data Source is not already set to Oracle Database (ODP.NET, Managed Driver).
We will now choose the data to retrieve from the database. In this tutorial, we will select all columns and rows from the EMPLOYEES table. Choose the Specify columns from a table or view option. Select EMPLOYEES option from the name drop down. Select * from the columns check box. Click Next.
We can organize the data to make it easier for the end user to consume, such as enabling pagination. Select the Enable Paging check box in the Grid View tasks.
Observe the output. The query results are displayed. Browse through the results using pagination. Close the application.
Description of this imageNote: If you are using Internet Explorer, make sure that it is not in "Work Offline" mode as it doesn't operate as expected in this mode.