This tutorial shows how to use Entity Framework 6, Language Integrated Query (LINQ), and generate Data Definition Language (DDL) scripts using Model-First for Oracle database.
Time to Complete
Approximately 60 minutes.
Background
Microsoft Entity Framework abstracts the relational, logical database schema and presents a conceptual schema to the .NET application. It provides object-relational mapping for .NET developers.
LINQ is a .NET data querying language which can query a multitude of data sources, one of which is entities via LINQ to Entities.
Model-First allows the conceptual model to be created first by the developer. Next, Visual Studio can create Oracle DDL scripts to generate the relational database model based on the conceptual model.
In this tutorial, you will learn how to use Oracle Database and these three technologies with Microsoft Visual Studio and Oracle Data Provider for .NET (ODP.NET). You will start by creating an Entity Data Model (EDM) from an existing Oracle Database schema using Entity Data Model Wizard. Then, you will query the EDM using three different methods:
LINQ query
LINQ query with a lambda expression and calling a stored procedure to perform an update against the results
Entity SQL
Next, you will call a stored procedure added to the EDM via a function import. The stored procedure will modify the database data and return the results with an implicit resultset. To return the resultset, you will run an Oracle wizard that provides the resultset parameter information in a .NET config file. You will then see how to run a stored procedure returning a scalar parameter value. Then, you will see how to insert and delete data to the database without using a stored procedure.
Lastly, you will use Model-First with Oracle database. In a Model-First scenario, a developer first creates an Entity Framework object-relational data model. From that data model, the developer can automatically generate an Oracle relational database model in the form of DDL scripts.
What Do You Need?
Microsoft Visual Studio 2015 or later with .NET Framework 4.5 or later.
Oracle Database 12c or later.
Oracle Data Access Components (ODAC) 12c Release 3 (12.1.0.2.1) or later from OTN. The ODAC download includes Oracle Developer Tools for Visual Studio and ODP.NET
Note: If you have installed ODAC 12c Release 3 configured on a machine-wide level, you will see an error when trying to generate database scripts using Entity Framework Model-First. To resolve this issue, use an ODAC version later than this release or reinstall ODAC 12c Release 3 with the "Configure ODP.NET at a machine-wide level" box Unchecked.
Creating a new Project in Visual Studio
Create a new .NET console application to run Entity Framework and LINQ application.
Open Visual Studio. Go to File menu. Select New within which select Project.
The New Project windows opens up. In the left pane, select Installed within which select Templates within which select Visual C# within which select Windows. In the Middle pane, select Console Application. In the Name input field enter the name as EntityFramework. Click OK button.
For creating the Entity Data Model (EDM), an Oracle database connection that uses ODP.NET is required. To create an Oracle Connection perform the below steps.
In the Server Explorer window, expand Data Connections. Under the Data Connections, if you already have a HR schema connection, expand it to connect to the database and skip the rest of this section.
You will now create the stored procedures that will be used later in this lab to perform updates and data retrieval. The source code of three stored procedures , fINCREASE_SALARY_BY_10, fUPDATE_AND_RETURN_SALARY and OUTPARAM is provided to you in the files.zip file.
In the Server Explorer, expand Data Connections and then right click HR.ORCL to select Query Window.
Enter the following code for INCREASE_SALARY_BY_10 into the SQL Query Window.
CREATE PROCEDURE "INCREASE_SALARY_BY_10" (
  "ID" IN NUMBER,
  "SAL" IN NUMBER) IS

BEGIN  -- Update the employee's salary

	UPDATE EMPLOYEES E SET E.SALARY = SAL+10 WHERE E.EMPLOYEE_ID = ID;

END;
/
Enter the following code for UPDATE_AND_RETURN_SALARY into the SQL Query Window.
CREATE PROCEDURE "UPDATE_AND_RETURN_SALARY" (
  "ID" IN NUMBER,
  "SAL" IN NUMBER,
  "NEW_SALARY" OUT SYS_REFCURSOR) IS

BEGIN -- Update the employee's salary and return new employee name and salary value

	UPDATE EMPLOYEES E SET E.SALARY = SAL WHERE E.EMPLOYEE_ID = ID;
	OPEN NEW_SALARY FOR SELECT FIRST_NAME, SALARY FROM EMPLOYEES WHERE EMPLOYEE_ID = ID;

END;
/
In the Server Explorer window, expand Data Connections, within which expand HR.ORCL, within which expand Procedures. Observe the newly added three stored procedures present there.
Creating an Entity Data Model using the Entity Data Model Wizard
You will now create an Entity Data Model (EDM) based on DEPARTMENTS table and EMPLOYEES table and the three new stored procedures that you just added in the HR schema. To do so, you will add an EDM to our project. The EDM will be automatically generated using the Entity Data Model Wizard.
Perform the steps mentioned in the Installing NuGet ODP.NET section and Configuring NuGet ODP.NET section of the Using NuGet to Install and Configure Oracle Data Provider for .NET tutorial. These steps install and configure the ODP.NET Entity Framework 6 and Entity Framework 6 assemblies.
Go to Build menu and select Rebuild Solution, which will allow this project to start using Entity Framework 6.
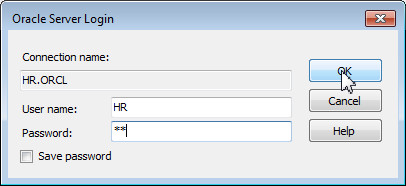
In the Entity Data Model Wizard, Select HR.ORCL as the data connection. Select Yes, include the sensitive data in the connection string and name it as HREntities and click Next.
Select DEPARTMENTS and EMPLOYEES from Tables and INCREASE_SALARY_BY_10, UPDATE_AND_RETURN_SALARY and OUTPARAM from Stored Procedures and Functions. Rename the Model Namespace to HRModel and click Finish.
Note: If these stored procedures do not appear, make sure that you added them earlier in the tutorial - INCREASE_SALARY_BY_10, UPDATE_AND_RETURN_SALARY and OUTPARAM to the HR schema under Procedures.
Description of this image
you may receive a Security Warning pop up multiple times. Click Okand continue.
There are a number of ways to query the EDM, which then retrieves data from the database. This section will demonstrate three common EDM querying methods: LINQ, LINQ with lambda expressions, and Entity SQL. Source code is provided in the Programcs.txt in the files.zip file.
Executing a LINQ query
To execute a LINQ query against an Oracle database, you will create the code to execute a LINQ query and return the results to the console window.
Add the following name space references to the Program.cs file.
using System.Data;
using System.Data.Entity.Core.EntityClient;
using System.Data.Entity.Core.Objects;
Enter the following code in the Program.cs file, inside the Main block.
The code executes a LINQ query against the EDM you just created. It then accesses the result and outputs it to the screen. The LINQ query retrieves all employee information with EMPLOYEE_ID less than the max_id variable.
using (HREntities ctx = new HREntities())
    {
        int max_id = 102;

        // LINQ to Entities query -- Retrieve employees with ID number less than max_id
        var OraLINQ1 = from e in ctx.EMPLOYEES
                       where e.EMPLOYEE_ID < max_id
                       select e;

        Console.WriteLine("LINQ to Entities Result");
        foreach (var result in OraLINQ1)
        {
            Console.WriteLine("ID: " + result.EMPLOYEE_ID +
                "    Name: " + result.FIRST_NAME +
                "    Salary: " + result.SALARY);
        }

        Console.WriteLine();
        Console.ReadLine();
    }
Executing a LINQ query using a lambda expression and Entity Framework stored procedure mapping
LINQ queries can include lambda expressions. Lambdas are used as LINQ arguments to standard query operator methods.
Updates, inserts, and deletes can be executed on an entity by mapping Oracle stored procedures to these operations in the EDM.
In the below mentioned steps, you will execute a LINQ query with a lambda expression against the EMPLOYEE entity, and then map a stored procedure to execute an update against all rows selected. You will use one of the stored procedures you imported earlier into the EDM.
First, you will create a stored procedure mapping for updating the data. When .NET tries to update the data, the mapped stored procedure will execute for every row selected by LINQ.
In the Solution Explorer window, double click HRModel.edmx.
Parameter data types must now be mapped between the entity and Oracle database. Select EMPLOYEE_ID for ID and SALARY for SAL from the drop down lists. Go to File menu and select Save All.
Enter the following code in the Program.cs after the previous code statements.
    // LINQ using lambda expressions -- Select employees with ID number less than max_id
    // Then increase salary using stored procedure mapping
    var OraLINQ2 = ctx.EMPLOYEES.Where(emp => emp.EMPLOYEE_ID < max_id);

    foreach (var result in OraLINQ2)
        result.SALARY = 17000;

    ctx.SaveChanges();

    Console.WriteLine("Salaries Updated");
    Console.WriteLine();
    Console.ReadLine();
Description of this image
In the application, you will notice that the result.SALARY is set to 17000. Under the covers, Entity Framework is executing the stored procedure as well. The salary is set to 17000, then increased by 10 in the stored procedure, providing custom logic in addition to the default behavior. In the next section, you will query these same rows to demonstrate the salaries have indeed been set to 17010. You may define your own stored procedures to override default behavior.
Go to Build menu, select rebuild all option and then go to debug menu and select run without debugging.
Observe the output. LINQ retrieves the two rows of data and updates each row by executing the stored procedure. You should see the text, salaries have been updated.
In this section, you will query the same rows as in the previous section to show that the stored procedure successfully updated the selected rows. You will use another query method available in Entity Framework called Entity SQL.
Enter the following code in the Program.cs after the previous code statements.
    //Entity SQL  -- Retrieve employees with ID number less than max_id
    string esql = "select e.EMPLOYEE_ID, e.FIRST_NAME, e.SALARY from HREntities.EMPLOYEEs as e where e.EMPLOYEE_ID < " + max_id;
    EntityConnection econn = new EntityConnection("name=HREntities");

    econn.Open();
    EntityCommand ecmd = econn.CreateCommand();
    ecmd.CommandText = esql;
    EntityDataReader ereader = ecmd.ExecuteReader(CommandBehavior.SequentialAccess);

    Console.WriteLine("Entity SQL Result");
    while (ereader.Read())
    {
        Console.WriteLine("ID: " + ereader.GetValue(0) +
            "    Name: " + ereader.GetValue(1) +
            "    Salary: " + ereader.GetValue(2));
    }
    Console.WriteLine();
    Console.ReadLine();
Function Imports and Retrieving Implicit Resultsets | Inserting and Updating Data Directly
Entity Framework allows developers to define their own .NET methods to execute database stored procedures. This is done by creating function imports in the conceptual model that map to stored procedures. In this section, you will define your own method that is mapped to an Oracle stored procedure, which performs an update. The stored procedure will also return the modified data using an implicit resultset. The resultset metadata is defined by the developer in a .NET config file so that Entity Framework can properly retrieve the data. Oracle has introduced a wizard to automatically generate the resultset metadata.
This section shows you how to modify Oracle database data programmatically in Entity Framework. You will perform an insert and a delete on the DEPARTMENTS table.
You will use Visual Studio's Function Import tool to map the stored procedure to a user-defined .NET method. Since the stored procedure returns an implicit resultset, you need to use a wizard to generate the resultset metadata in the .NET config file before using the tool.
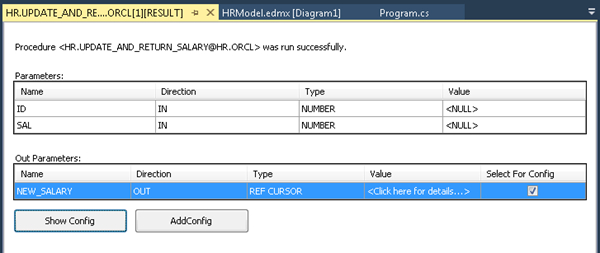
In the Server Explorer window, expand Data Connections, within which expand HR.ORCL, within which expand Procedures. Right-click on UPDATE_AND_RETURN_SALARY and choose Run.
Note: Use the exact same connection you started off this tutorial with. Do not use an ODP.NET, Managed Driver connection if you began with an ODP.NET, Unmanaged Driver connection and vice versa.
The Run Procedure dialog opens up. Since we're not interested in the stored procedure's result running outside the application, we can just leave the input parameters unchanged and click OK.
The procedure runs successfully. In the Out Parameters section of the window, select the Select For Config option for the NEW_SALARY parameter and click the Show Config button. It displays the resultset and column metadata that will be added to the App.config file.
The App.config file opens with the added REF CURSOR information.
Note: A window might pop up asking if you want to reload the App.config file. Click Yes.
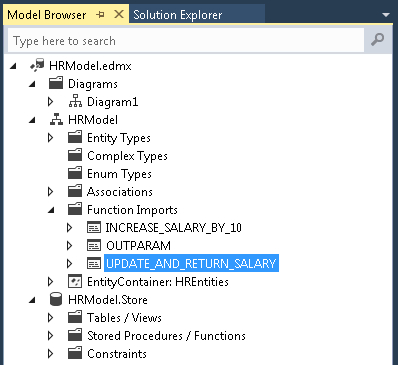
In the Model Browser, expand the HRModel, then expand the Function Imports node. Double click to open the UPDATE_AND_RETURN_SALARY procedure.
Note: You imported this procedure earlier when you created the EDM.
In the Edit Function Import window, select Complex in the Returns a Collection Of section. And then click Get Column Information.
In this, the stored procedure returns a result set with two columns, not a fully-defined entity nor a scalar value. The column information will be retrieved from the .NET config file.
Click Create New Complex Type in the Stored Procedure / Function Column Information section and click OK. Go to File menu and select Save All.
Description of this image
To call the method from .NET, you will use the default UPDATE_AND_RETURN_SALARY Function Import name.
Enter the following code in the Program.cs after the previous code statements.
Since the entity context now has an UPDATE_AND_RETURN_SALARY method defined. This method will call the mapped stored procedure and return the implicit resultset.
    //Update salary using a stored procedure function import
    int id = 100;
    int salary = 24000;

    foreach (var result in ctx.UPDATE_AND_RETURN_SALARY(id, salary))
    {
        Console.WriteLine("Name: " + result.FIRST_NAME + "  Updated Salary: " + result.SALARY);
    }

    Console.WriteLine();
    Console.ReadLine();
Retrieving Output Parameters from Stored Procedures
This section demonstrates how to retrieve output parameters from stored procedures within Entity Framework. The output parameter needs only to be declared explicitly in .NET and map to an output parameter in the stored procedure. This is different from older Entity Framework versions when a function import was required for stored procedure output parameters.
Enter the following code in the Program.cs after the previous code statements.
Notice that the entity context has an OUTPARAM method defined. An ObjectParameter is bound to the OUTPARAM method to retrieve the output parameter. This method will call the mapped stored procedure that returns the parameter.
    //Return an output parameter from a stored procedure
    ObjectParameter outparam = new ObjectParameter("outp", typeof(string));

    ctx.OUTPARAM(outparam);
    Console.WriteLine(outparam.Value);

    Console.WriteLine();
    Console.ReadLine();
This section demonstrates how LINQ can be used to insert and delete data programmatically.
Enter the following code in the Program.cs after the previous code statements.
    //Create new department entry
    var OraLINQ3 = new DEPARTMENT() { DEPARTMENT_ID = 280, DEPARTMENT_NAME = "Research" };
    ctx.DEPARTMENTS.Add(OraLINQ3);
    ctx.SaveChanges();
    Console.WriteLine("New department added");

    //Verify the new department exists
    var OraLINQ4 = from d in ctx.DEPARTMENTS
                   where d.DEPARTMENT_ID == 280
                   select d.DEPARTMENT_NAME;
    Console.WriteLine("Department Name: " + OraLINQ4.First());
    Console.ReadLine();

    //Delete new department entry
    ctx.DEPARTMENTS.Remove(OraLINQ3);
    ctx.SaveChanges();
    Console.WriteLine("New department removed?");

    //Verify the department was removed
    if (OraLINQ4.FirstOrDefault() == null)
        Console.WriteLine("Yes, it was removed.");
    else
        Console.WriteLine("No, it was not removed.  Department Name: " + OraLINQ4.First());
    Console.ReadLine();
In this section, you will add a new property to the EMPLOYEE entity. To reflect the new property in the Oracle database schema as a column, Visual Studio will generate Oracle DDL scripts from the new EDM. These scripts can then be run against the Oracle database to update the relational model.
In the HRModel.edmx, select the EMPLOYEE entity. To create a new property in EMPLOYEE entity, right-click on it and select Add New, within which select Scalar Property and name the property as ADDRESS.
To generate the DDL scripts, right-click on the HRModel in the Model Browser and select Properties and update the following fields.
These ensure that Oracle DDL is created for the HR schema where each type represents a separate database table.
Database Generation Workflow: Generate Oracle via T4(TPT).xaml (VS)
The Generate Database Wizard generates DDL scripts for Oracle database to execute. These scripts can be saved to a file to be run later, such as through the built-in SQL*Plus execution engine that is part of Oracle Developer Tools for Visual Studio.
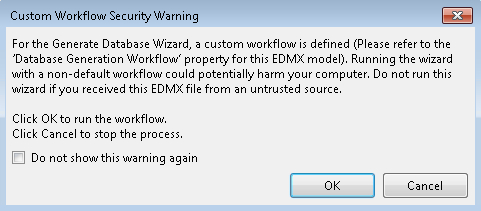
Description of this imageNote: The script creates and deletes database objects. By default, the deleted scripts are commented out. If you wish to use them, make sure to uncomment them before executing.