Tuning .NET Applications in Visual Studio with SQL Tuning Advisor and Oracle Performance Analyzer
Purpose
This tutorial describes how you can use SQL Tuning Advisor to tune ad-hoc SQL statements in Visual Studio. It also shows how you can use Oracle Performance Analyzer to tune your running application's use of the Oracle Database.
Time to Complete
Approximately 20 minutes (Note: 15 of these minutes are simply waiting for performance analysis to complete. During that wait you can work on another lesson)
Overview
SQL Tuning Advisor and Oracle Performance Analyzer are features
of Oracle Developer Tools for Visual Studio. SQL Tuning advisor provides recommendations
to improve performance of SQL statements typed into the Oracle Query Window.
Oracle Performance Analyzer examines the use of the database over time by
a running Visual Studio application and gives recommendations based on the
actual workload on the database.
SQL Tuning Advisor requires that the user have the ADVISOR privilege as well
as an Oracle Database license for the Oracle Tuning Pack and Oracle Diagnostic
Pack.
Oracle Performance Analyzer requires that the user have SYSDBA privileges
as well as an Oracle Database license for the Oracle Diagnostic Pack.
Prerequisites
Before starting this tutorial, you should:
|
. |
Install Microsoft Visual Studio 2010 |
|---|---|
|
. |
Install Oracle Database 10g or later |
|
. |
Install Oracle 11g Oracle Data Access Components (ODAC) with Oracle Developer Tools for Visual Studio version 11.2.0.1.2 or later from OTN |
|
. |
Extract these files into your working directory |
Setting Up Your Environment
In this section, you will create two data connections for SYS and HR and also add the Advisor privilege to the HR user. Perform the following steps:
|
. |
Open Visual Studio.
|
|---|---|
|
. |
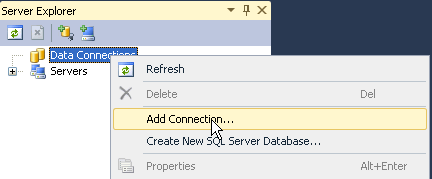
Select View > Server Explorer. Right-click Data Connection and select Add Connection.
|
|
. |
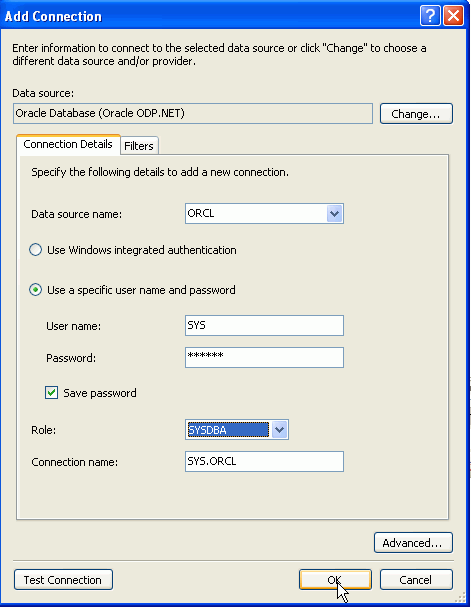
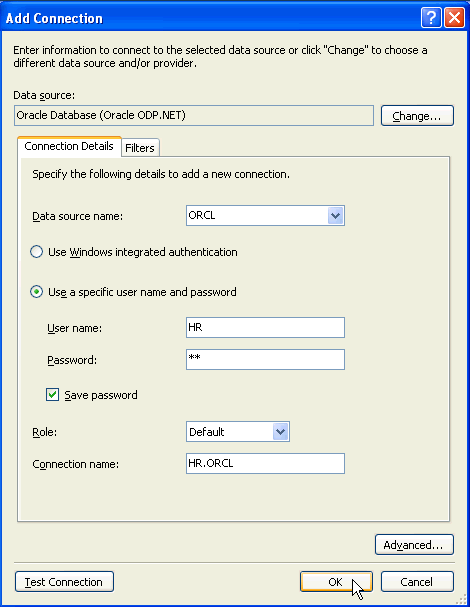
Select ORCL for Data Source Name, enter SYS for Username, <your sys password> for Password and select SYSDBA for Role. Then click OK.
|
|
. |
Your SYS.ORCL connection was created successfully. You need to make sure that HR user has the ADVISOR privilege so that you can run the SQL Tuning Advisor as the HR user in the next section of this tutorial. Right-click the SYS.ORCL connection and select Privileges.
|
|
. |
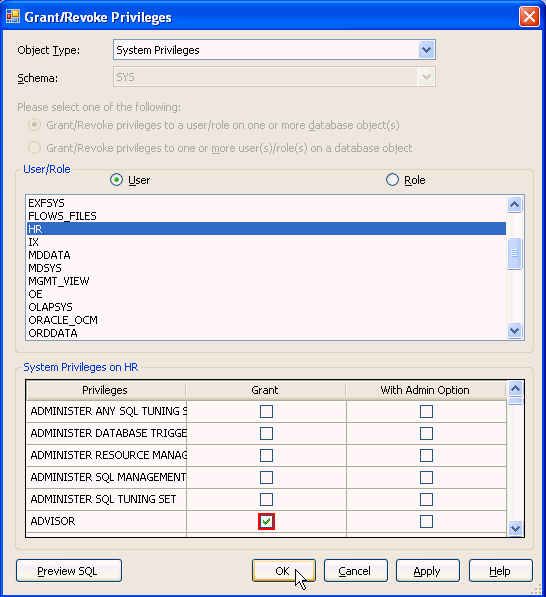
Make sure that System Privileges is selected for Object Type. Select HR from the list of Users and select the Grant check box for the ADVISOR privilege and click OK.
|
|
. |
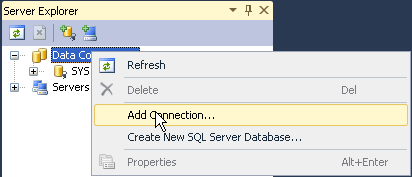
You want to add one more connection for the HR schema. Right-click Data Connections and select Add Connection.
|
|
. |
Select ORCL for Data Source Name, enter HR for Username and Password. Then click OK.
|

Using SQL Tuning Advisor to Tune AdHoc SQL
In this section, you will tune a SQL statement in the Query Window using the SQL Tuning Advisor. Perform the following steps:
|
. |
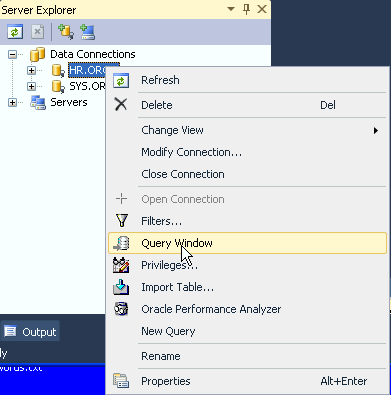
In order to execute SQL, you can use the Query Window. Right-click the HR.ORCL connection and select Query Window.
|
|---|---|
|
. |
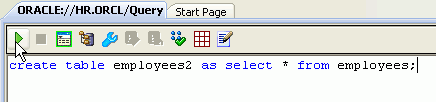
You will create a copy of the EMPLOYEES table. Enter the following
SQL statement and click the execute create table employees2 as select * from employees;
|
|
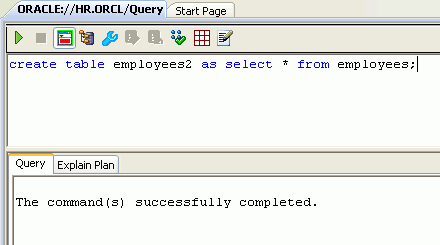
. | The table was created successfully.
|
|
. |
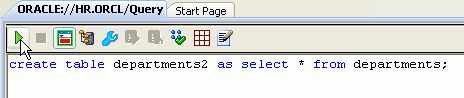
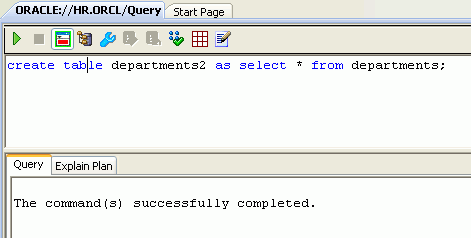
You will create a copy of the DEPARTMENTS table. Enter the following
SQL statement and click the execute create table departments2 as select * from departments;
|
|
. |
The table was created successfully.
|
|
. |
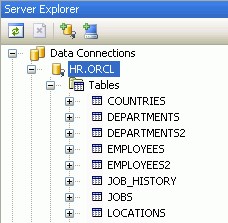
In Server Explorer, expand HR.ORCL > Tables to see the new tables in the list.
|
|
. |
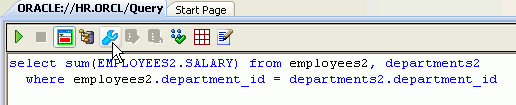
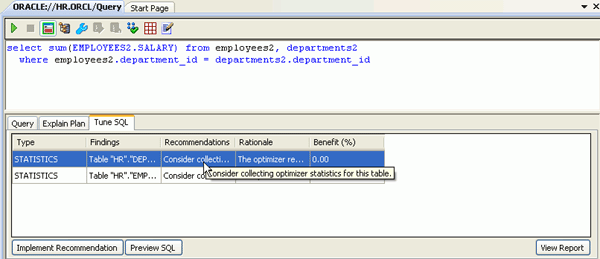
You are now ready to tune some SQL against the EMPLOYEES2 and DEPARTMENTS2
tables. Enter the following query and click the Tune select sum(EMPLOYEES2.SALARY) from employees2, departments2 where employees2.department_id = departments2.department_id;
|
|
. |
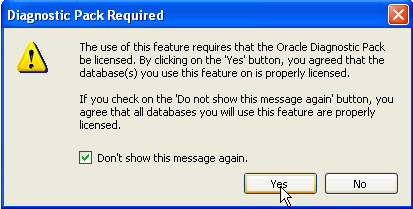
You receive a dialog box asking you if you have a license for the Tuning and Diagnostic Pack. Select the Don't Show this Message again check box and click Yes.
|
|
. |
A couple of findings are displayed asking you to collect optimizer statistics for the 2 tables in the query.
|
|
. |
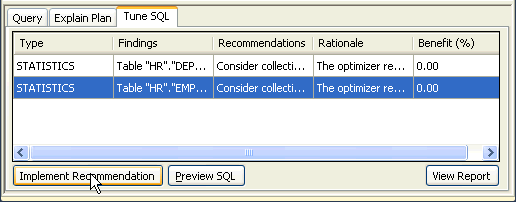
Select the first finding and click Implement Recommendation.
|
|
. |
Select the second finding and click Implement Recommendation.
|
|
. |
You want to try to tune the SQL again. Click the Tune
|
|
. |
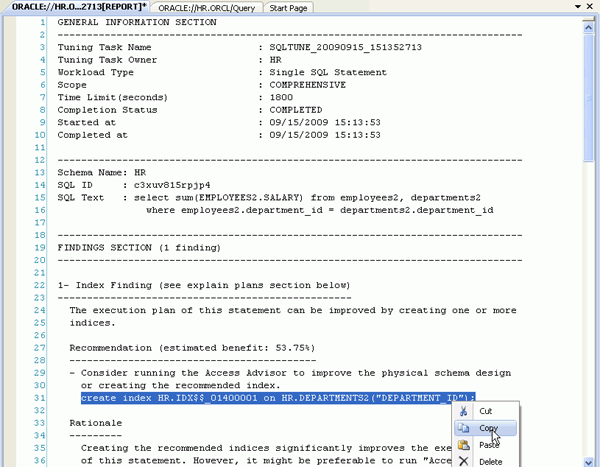
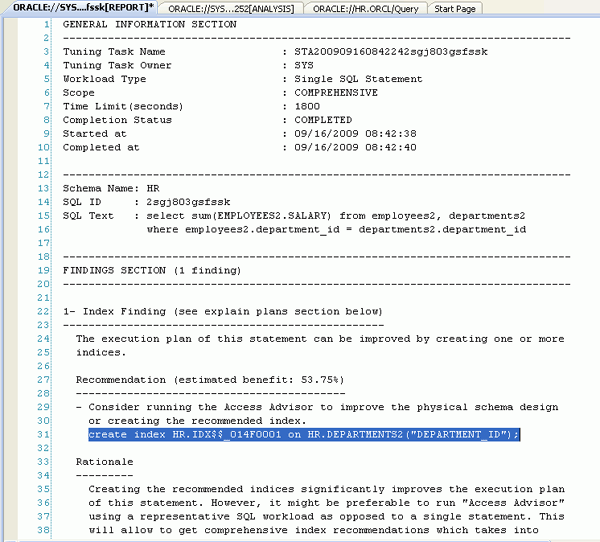
You now receive a recommendation indicating that creating an index on the table would improve the execution plan of the statement. Click View Report.
|
|
. |
The report is displayed. About half way down, you see the create index statement. Highlight the statement and right-click. Select Copy.
|
|
. |
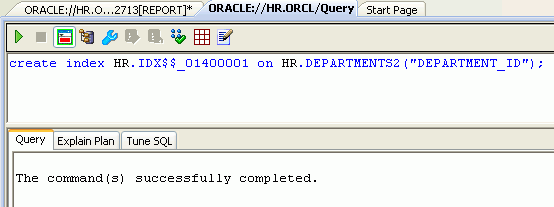
Paste the statement in the query window and click the Execute
|
|
. |
The index was created successfully.
|
|
. |
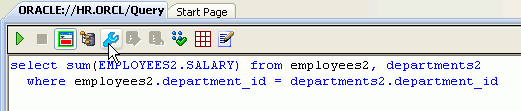
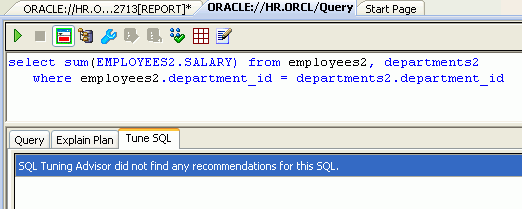
You can now tune the SQL statement to see if there are any more recommendations.
Enter the following SQL in the query window again and click the Tune
select sum(EMPLOYEES2.SALARY) from employees2, departments2 where employees2.department_id = departments2.department_id;
|
|
. |
This time the Tuning Advisor did not find any recommendations. In other words, the SQL is now tuned.
|
|
. |
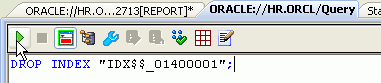
In the next section of this tutorial, you will use the Oracle Performance
Analyzer to evaluate the same SQL statement running within an application.
In order for the Performance Analyzer to identify some recommendations,
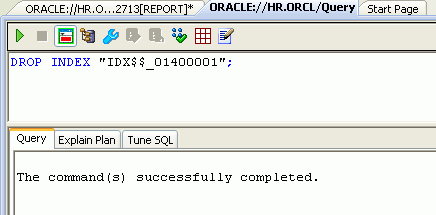
you want to delete the index you just created. Enter the following statement
in the query window and click the Execute drop index <name of the index you created earlier>;
|
|
. |
The index was dropped successfully.
|


Using Performance Analyzer to
Analyze Application Performance
In this section, you will use the Oracle Performance Analyzer to analyze the application and implement recommendations it finds. Perform the following steps:
|
. |
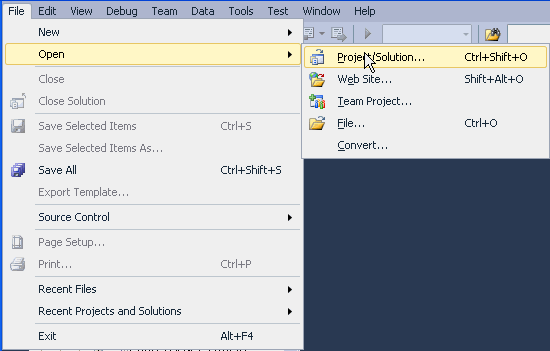
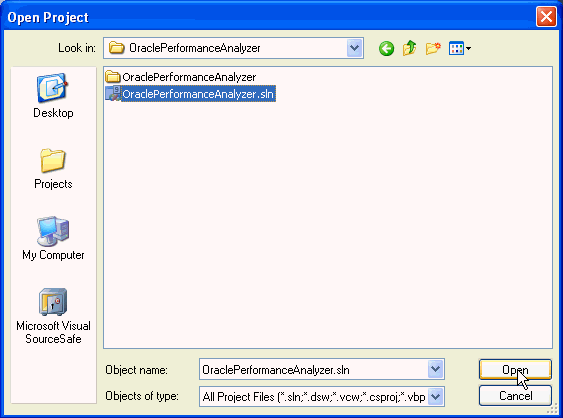
Select File > Open Project. Browse to the OraclePerformanceAnalyzer directory that you have downloaded onto your working directory. Select OraclePerformanceAnalyzer.sln file.
|
|---|---|
|
. |
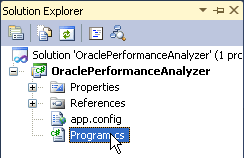
Double-click program.cs and review the code. Note that it is executing 2 sql statements repeatedly.
|
|
. |
From the Solutions Explorer window, right-click OraclePerformanceAnalyzer and select Rebuild.
|
|
. |
The project has been built successfully.
|
|
. |
You can now run the application. Select Debug > Start Without Debugging.
|
|
. |
An empty command window appears (the application does not output to the window). Leave this window and switch back to Visual Studio.
|
|
. |
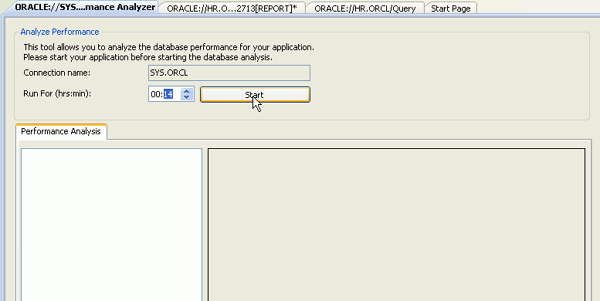
You run Oracle Performance Analyzer as the SYS user. Right-click SYS.ORCL connection and select Oracle Performance Analyzer.
|
|
. |
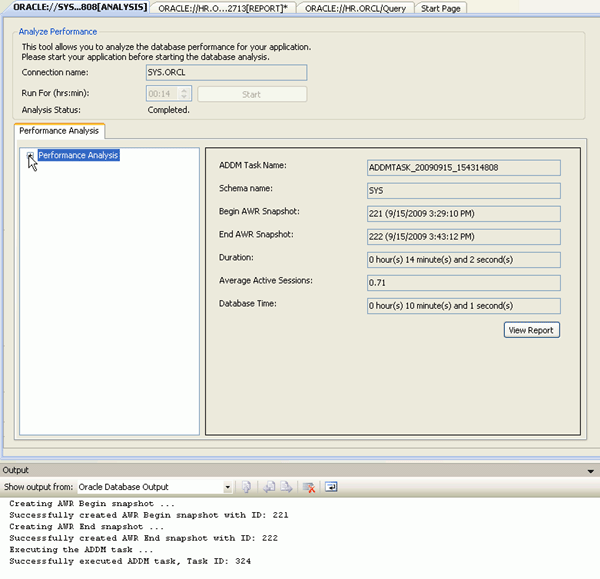
In order to get some recommendations, you need to run the Performance Analyzer for a significant period of time. Change the minutes to 14 and click Start.
|
|
. |
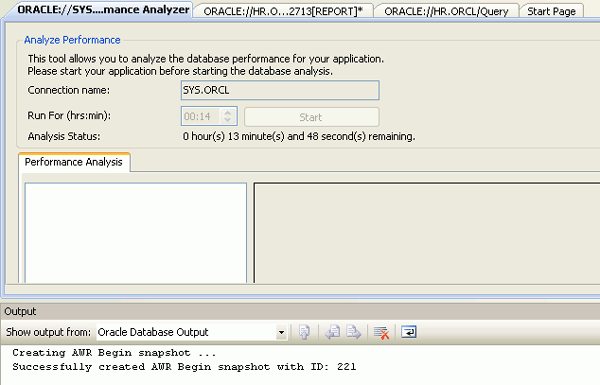
The timer starts. (While waiting for the timer to count down, you can work on another lesson)
|
|
. | When the time is up the results are displayed.
|
|
. |
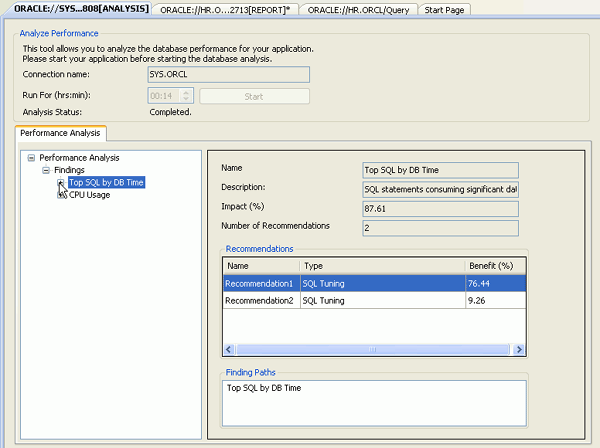
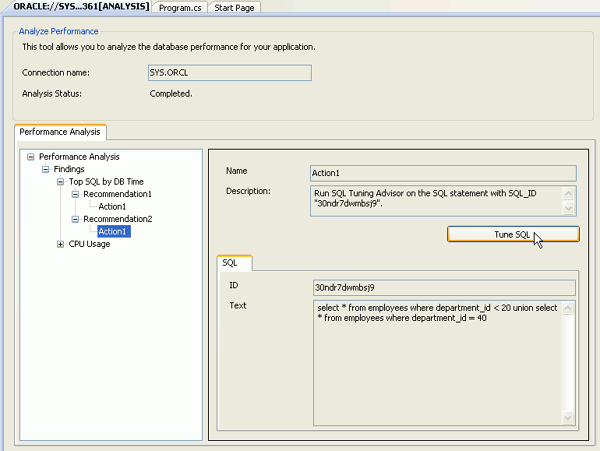
Expand Performance Analysis > Findings > Top SQL By DB Time.
|
|
. |
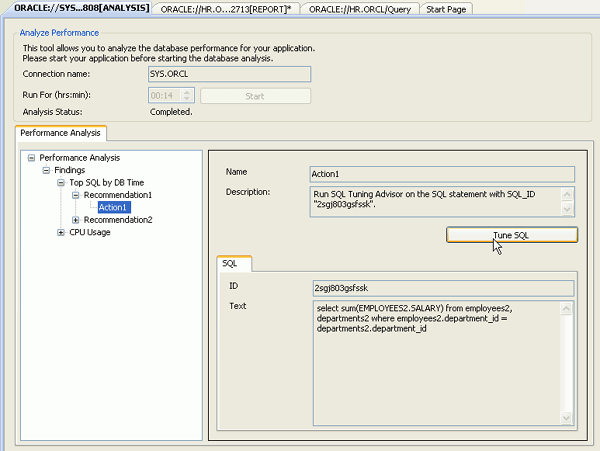
Expand Recommendation1 and select Action1. Notice that the SQL is one of the SQL statements used in the running application (and is the same SQL that you tuned in the previous section.) Click Tune SQL.
|
|
. |
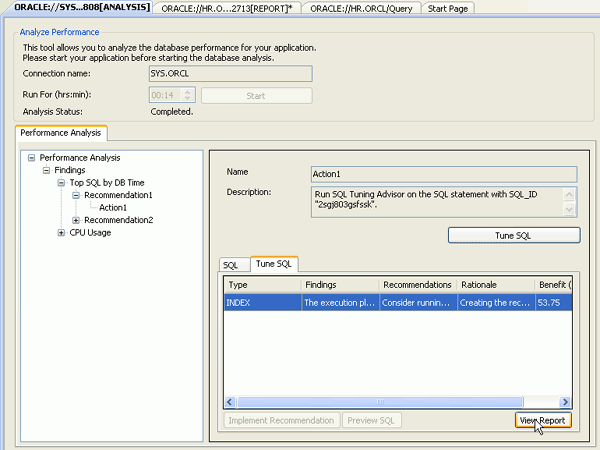
The recommendation is displayed. Click View Report.
|
|
. |
The report indicates that you should create an index. You would perform this in the same way as in the previous section of this tutorial and then run the Oracle Performance Analyzer again. Close the report.
|
|
. |
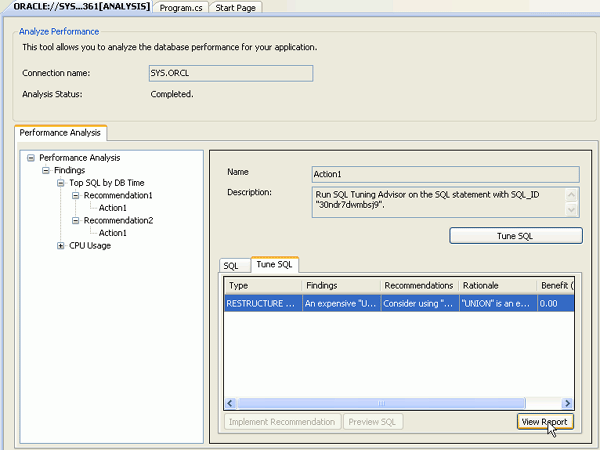
You see that there is another Recommendation. Expand Recommendation2 and select Action1. Notice that there is another poorly performing SQL Statement. You want to tune this one as well. Click Tune SQL.
|
|
. |
The recommendation is displayed. Click View Report.
|
|
. |
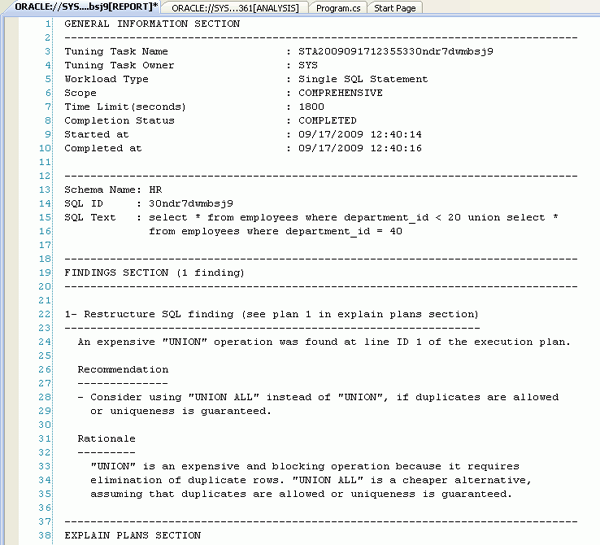
The report indicates that an expensive "UNION" operation was found in the execution plan and you should consider changing it to a UNION ALL. Close the Oracle Performance Analyzer window.
|
|
. |
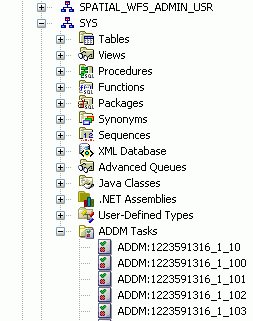
The Performance Analyzer results are stored in the database as ADDM Tasks. From the Server Explorer window, expand SYS.ORCL > Schemas > SYS > ADDM Tasks.
|
|
. |
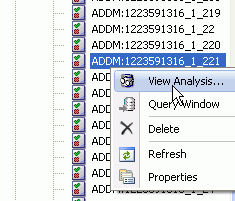
Select the ADDM task that was most recently created (at the bottom of the list). You can view the analysis you were just viewing by right-clicking the ADDM Task and select View Analysis.
|
|
. |
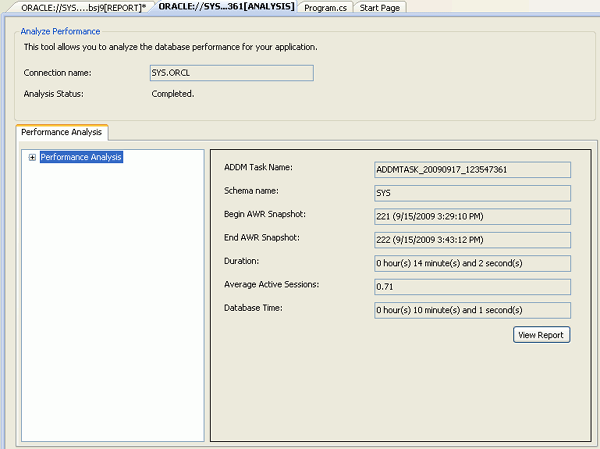
The analysis is displayed again.
|


Summary
In this tutorial, you have learned how to:
- Use SQL Tuning Advisor to tune adhoc SQL
- Use Performance Analyzer to analyze application performance
- Lead Curriculum Developer: Anupama Mandya, Pallavi Rajan
- Other Contributors: Marcie Young, Christian Shay
![]()

|
About
Oracle |Oracle and Sun | |