 Autonomous
Transaction Processing (ATP), SpringBoot and JDBC
Autonomous
Transaction Processing (ATP), SpringBoot and JDBC Before You Begin
This tutorial shows you how to connect to an ATP Database using JDBC and Spring.
Background
An ATP Database enables convenience and ease of use. It allows autonomous backups and patching, zero downtime scaling, and easy provisioning.
The following OBE provides step by step instructions on how to connect to an ATP using SpringBoot, which uses JDBC and UCP.
SpringBoot enables you to create standalone Spring based applications that are easy to set up and run.
Visit the SpringBoot website for more information: SpringBoot
This application accesses the EMP table in the database, and displays employee names in the table.
What Do You Need?
- An integrated development environment such as Eclipse, Netbeans, IntelliJ, or JDeveloper.
- Access to application code on Github.
- An Oracle Cloud account (or access to an ATP account).
- Download the wallet files using your Cloud credentials (or, client credentials to connect to ATP)
- An EMP table in the database, populated with data. If needed, use script on Github to create and populate this table.
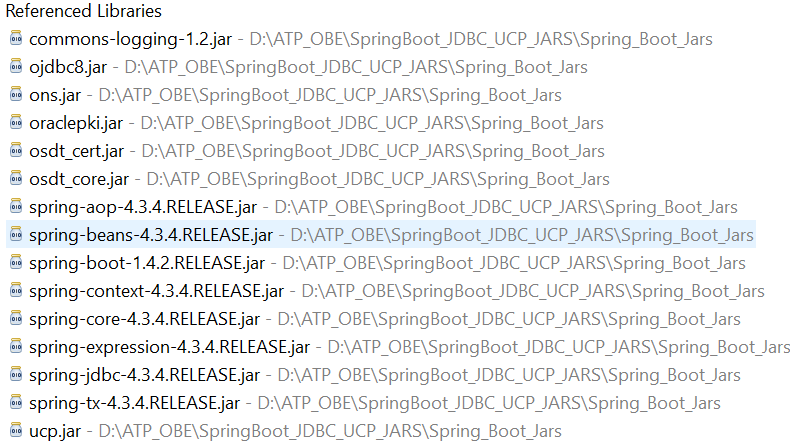
- spring-boot-1.4.2.jar files, and commons-logging-1.2.jar files:
- JDBC JAR Files (Release 18.3):
- Spring JAR Files (Release 4.3.4):
Note: Download the JAR files here: SpringBoot
-
ojdbc8.jar
ons.jar
oraclepki.jar
osdt_cert.jar
osdt_core.jar
ucp.jar
Note: Download the JAR files here: JDBC JAR Files
-
spring-aop-4.3.4.RELEASE.jar
spring-beans-4.3.4.RELEASE.jar
spring-boot-1.4.2.RELEASE.jar
spring-context-4.3.4.RELEASE.jar
spring-core-4.3.4.RELEASE.jar
spring-expression-4.3.4.RELEASE.jar
spring-jdbc-4.3.4.RELEASE.jar
spring-tx-4.3.4.RELEASE.jar
Note: Download the list of JAR files here: Spring JAR Files
Download application code from Github.
 Download
and install Application and IDE
Download
and install Application and IDE
- Ensure that you have an IDE running. In this example, we are using Eclipse.
- Install the application code that you downloaded from Github.
Note: You may also use NetBeans, IntelliJ, or JDeveloper.
 Open
the Java code in an IDE
Open
the Java code in an IDE
- Download the application code from Github.
- Open a new project in Eclipse. Go to File. Click New, and then select Project.
 Place
the JAR files in the appropriate directory
Place
the JAR files in the appropriate directory
- Ensure that the JDBC, Spring and commons-logging JAR files are present in the classpath/buildpath.
In this example, the JAR files are stored in the following location: D:\ATP_OBE\SpringBoot_JDBC_UCP_JARS\Spring_Boots_Jars\.
 Update
the URL and credentials
Update
the URL and credentials
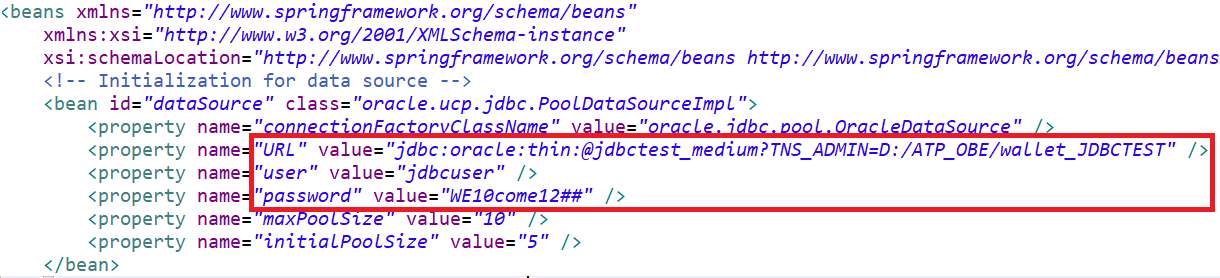
- Open the
HelloAppConfig.xmlfile. - Set the value of DB_URL to the destination on your local system, where you have downloaded the wallet.
- Set the DB_USER to
jdbcuser. - Enter the DB password.

DB_URL="jdbc:oracle:thin:@jdbctest_medium?TNS_ADMIN=D:/ATP_OBE/wallet_JDBCTEST"
Note: The wallet stores all information related to your database instance.
 Test
the code
Test
the code
- Once you have entered the credentials, go to Menu.
- Navigate to
HelloApplication.java. - Right click on the file. Select Run As. Then, select '1 Java Application'.
The code will compile and you will be able to view the output under the 'Console'.
Once the application is connected to the ATP Database, you will be able to view the data in the table.
