In this tutorial you will learn how to install,
configure and work with Oracle Coherence Persistence
12.2.1.
Time to Complete
Approximately 2-3 hours.
Background
The Oracle Coherence Persistence feature enables
Coherence to be a system-of-record and improves
time-to-recovery from planned or unplanned, partial
or total cluster outages. Persistence can be
configured to work in an on-line mode persisting
changes as they are made to the cluster, or to take
a snapshot of a data grid. Local disk configuration
maximizes scalability, while network-attached
storage maximizes availability. Both data and
metadata (indexes, listeners, expiry, locks, etc.)
are stored, and recovery is completely automatic.
Scenario
Oracle Coherence Persistence is a set of tools and
technologies that manage the persistence and
recovery of Coherence distributed caches. Cached
data is persisted so that it can be quickly
recovered after a catastrophic failure or after a
cluster restart due to planned maintenance.
Persistence and federated caching can be used
together as required.
Persistence-Modes
Persistence can operate in two persistence modes:
On-Demand persistence mode – a cache is manually
persisted and recovered upon request using the
snapshot manager. The snapshot manager is exposed
as an MBean interface that provides operations for
creating, archiving, and recovering snapshots of a
cache.
Active persistence mode – In this mode, cache
contents are automatically persisted on all
mutations and are automatically recovered on
cluster/service startup. The snapshot manager can
be used in active persistence mode to perform
on-demand snapshots of a cache.
Both the Coherence Query tool and the Oracle
Coherence plugin for JVisualVM are aware of and
expose the snapshot manager MBeans via various GUI
and command line operations.
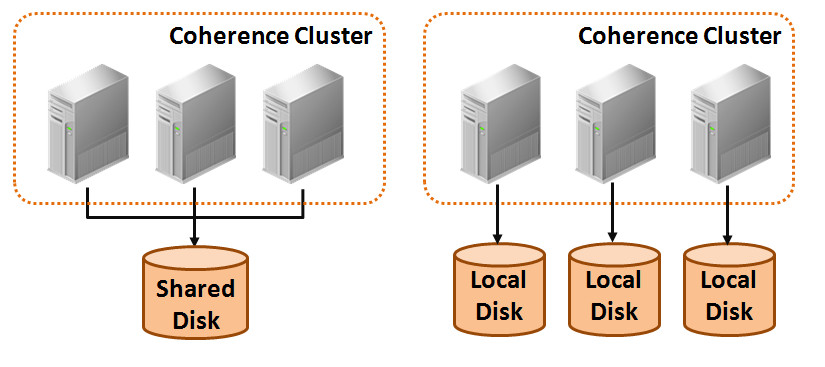
Disk-Based Persistence Storage
The persistence store is used to store the backing map
partitions of a partitioned service. The locations of
the database files can be stored on the local disk of
each cache server or on a shared disk on a storage
area network (SAN).
The local disk option allows each cluster member
to access persisted data for the service
partitions that it owns. Persistence is
coordinated across all storage members using a
list of cache server host addresses. The address
list ensures that all persisted partitions are
discovered during recovery. Local disk storage
provides a high throughput and low latency storage
mechanism; however, a partition service must still
rely on in-memory backup (backup-count value
greater than zero) to remain machine
safe.
The shared disk option, together with active
persistence mode, allows each cluster member to
access persisted data for all service partitions.
An advantage to using a shared disk is that
partitioned services do not require in-memory
backup (backup-count value can be equal to zero)
to remain machine-safe; because, all
storage-enabled members can recover partitions
from the shared storage.
Disabling in-memory backup increases the cache
capacity of the cluster at the cost of higher
latency recovery during node failure. In general,
the use of a SAN can potentially affect throughput
and latencies and should be tested and monitored
accordingly.
Both the local disk and shared disk approach can
rely on a quorum policy that controls how many
cluster members must be present to perform
persistence operations and before recovery can
begin. Quorum can ensure that you have enough memory
to load the cache contents on cluster startup.
Persistence Configuration
Persistence is declaratively specified using
Coherence configuration files and requires no
changes to application code. Operational overrides
are used to configure the underlying persistence
implementation if the default settings are not
appropriate. Cache configuration is used to set
persistence properties on a distributed cache.
Management and Monitoring
Persistence can be monitored and managed using MBean
attributes and operations. Persistence operations
such as creating and archiving snapshots are
performed using the Persistence MBean or a tool
such as the Coherence Query tool.
Persistence attributes are included as part of the
attributes of a service and can be viewed using the
Service MBean. Persistence attributes and
statistics are aggregated in the persistence and
persistence-details reports. Persistence statistics
are also aggregated in the Java VisualVM plug-in.
Both tools can help troubleshoot possible resource
and performance issues
What Do You Need?
Before starting this tutorial you will need the
following:
Requirement
More Information
Supported Operating System
Oracle Coherence runs in any of OS X,
Windows, Linux or Solaris. All example
commands are given using Windows syntax.
4 GB of diskspace
Coherence, the Java JDK and sample
applications require 3-4 GB of disk space.
4GM Memory
This tutorial runs multiple instances of
Oracle Coherence and requires an absolute
minimum of 4GB of memory. While its
possible to run the tutorial with less
memory, performance will suffer and out of
memory errors may occur.
Java SE Development kit 8, for your
operating system.
Oracle Coherence 12.2.1 requires the Java
JDK 1.8 or later. The Java JDK 1.8 can be
downloaded here.
For this tutorial we will assume the Java
JDK is installed and pointed to by the JAVA_HOME
variable. On Windows this is assumed to be
something similar to:
set JAVA_HOME=c:\"Program Files"\Java\jdk1.8.0_101
On Linux the variable assignment might
resemble:
export JAVA_HOME=/opt/jdk/jdk1.8.0_101
Oracle Coherence 12.2.1
Oracle Coherence, as a stand-alone product
can be downloaded here.
Coherence JVisualVM Plugin
The plugin may be installed from within
JVisualVM and is found in the coherence/plugins/jvisualvm
directory of the Coherence install.
Installing Coherence and the Coherence Plugin for
JVisualVM
The JVisualVM plug In the following two sections
you will install stand alone Coherence and update
JVisualVM to include the Coherence JVisualVM plugin.
Unpacking and installing Oracle Coherence
If required, download and install the Java
JDK 1.8.
Refer to the prior table for the location of
the download for your operating system.
Refer to the JDK installation instructions for
your operating system.
Open a command prompt or terminal as
required by your operating system.
Coherence is provided as a zipped Java jar
file. Unzip using a command similar to those
below unpack Coherence:
Note: For the remainder of
this tutorial Windows 7 style commands will be
shown.
Linux and OSX users will need to modify these
commands to match OS requirements.
In certain instances both Windows and Linux
style commands will be shown.
In the Welcome dialog click Next.
In the Auto Updates dialog click Next.
In the Installation Location dialog
enter a fully qualified path to install
Coherence into and click Next.
Coherence
Home
For the remainder of this tutorial will refer
to this location as COHERENCE_HOME.
Consider using an environment variable set to
the coherence directory for ease of use. For
example:
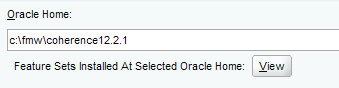
$ set COHERENCE_HOME=c:\fmw\coherence12.2.1\coherence
In the Installation Type dialog
select Coherence with Examples and
click Next.
In the Prerequisite Checks dialog
ignore any warnings and click Next.
In the Installation Summary dialog
click Install. Additionally
you may save the response file for later
review.
The Installation Progress dialog
will display and show each stage or the
installation. Click Next to
view a log of the install or Finish
to complete the install and exit the
installer.
Installing the Coherence and MBeans JVisualVM
Plugins
In this section of the tutorial we will install
the Coherence JVisualVM Plugin.
At the command line start JVisualVM using a
command similar to:
Note: The –J-Dcom.oracle.coherence.jvisualvm.refreshtime=10
property changes the data refresh interval
from the default 30 seconds to 10 seconds and
limits wait time when JVisualVM needs to
refresh a panel or pane.
Select Tools> Plugins
and then the Available Plugins
tab,
Select the VisualVM-MBeans
plugin.
Click Install. The Plugin
installer wizard will display.
Click Next. The
installer will download and install the latest
version of the plugin.
When complete click Finish.
Select the Downloaded
tab.
Click Add Plugins... and
navigate COHERENCE_HOME/coherence/plugins/jvisualvm
directory to and select the coherence-jvisualvm.nbm
file.
Click Install. The Plugin
installer wizard will display.
Click Next.
Read and then accept the terms of the
licensing agreement and click Install
If presented with a validation warning click
Continue.
The plugin will be installed. Click Finish
when complete.
Close the Plugins dialog. The Coherence
JVisualVM plug in is now installed.
Exit JVisualVM.
Getting Started with Coherence Persistence
By default all distributed and federated Coherence
services are automatically configured with
‘on-demand’ persistence.The objective of this
section is to use persistence commands from within
JVisualVM to create and recover snapshots using
Coherence standard defaults.
Starting Cache Servers and Populating Data
These next steps all require the use of COHERENCE_HOME
and JAVA_HOME variables.
As a convenience a sample script is provide here.
This script is shown in step 2 below and used to
set up the appropriate values for the Coherence
and Java home variables. Use of this script is
optional and is not shown through the remainder
of this tutorial.
If using the provided Windows script update the
script for the COHERENCE_HOME
and JAVA_HOME
locations in your environment.
Open four command windows, two will be used
for Coherence cache servers, one for JVisualVM
and one for CohQL commands.
Using two of the terminals, start two
Coherence cache-servers using a commands
similar to (Windows and Linux examples given):
                                    $ setup_env.cmd
$ cd %COHERENCE_HOME%
$ bin\cache-server.cmd -jmx
Linux/Unix users use a command similar
to:
$ cd $COHERENCE_HOME
$ bin\cache-server.sh -jmx
Note: The -jmx argument adds
several parameters to the cache server in
support of JMX system management.
In a third command window, start the
Coherence Query tool (CohQL) using a command
similar to:
$ bin\query.cmd
Insert data into a cache using commands
similar to:
CohQL> insert into 'test' key(1) value('value1')
CohQL> insert into 'test' key(2) value('value2')
. . .
CohQL> insert into 'test' key(10) value('value10')
verify that the data was added using a
select command.
CohQL> select key(),value() from 'test'
The command should return results similar to:
Results
[1, "value1"]
...
[10, "value10"]
In a command window start JVisualVM using a
command similar to:
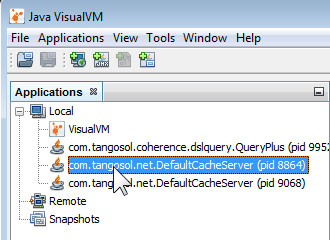
In the JVisualVM Applications pane
select one of the DefaultCacheServer
instances by clicking its name.
JVisualVM
Application Pane
The application's information will display in
the right hand pane.
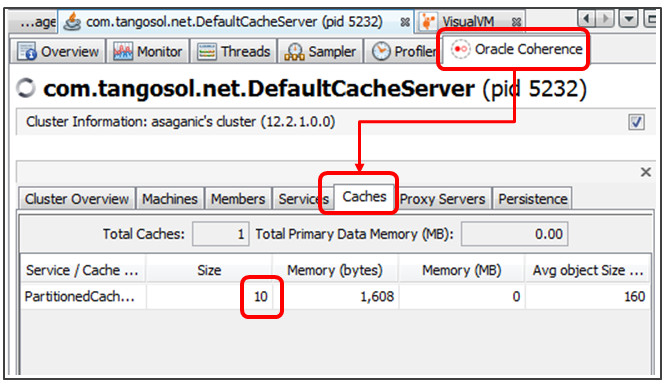
In right hand pane select the Oracle
Coherence > Caches tab.
Notice that the cache shows the entries
previously added using CohQL. JVisualVM
Caches subtab
In the previous section we populated a cache
using the Coherence query tool. In this section
we will
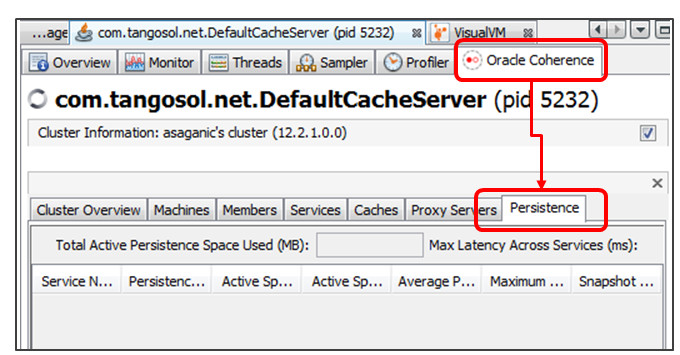
In right hand pane select the Oracle
Coherence > Persistence tab.
From the Persistence tab, select the
PartionedCache Service, right click
and select Create snapshot. Persistence
subtab snapshot menu
In the input dialog, enter the name "snapshot.test"
and click OK.
In the Please Confirm Operation dialog,
click Yes.
In the informational Result dialog,
click OK. Note: To preserve data
consistency Coherence will pause while the
snapshot is written.
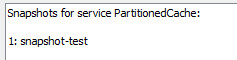
Select the PartionedCache Service,
right click and select List snapshots.
Click OK. The newly
created snapshot should be listed.
List of snapshots
Return to the terminal window running the
Coherence Query tool and delete the data in
the test cache using a command similar to:
CohQL> delete from 'test'
Confirm that the cache is now empty using a
command similar to:
CohQL> select count() from 'test'
Which should show a result:
Results
0
CohQL>
Return to JVisualVM and in the Persistence
tab, Right click the Partitioned
Cache Service and select
Recover Snapshot.
From the drop down list select the
previously created snapshot and click OK.
In the confirmation dialog click Yes.
In the results dialog click OK.
Return to the Query terminal and display the
restored data using a command similar to:
CohQL> select count() from 'test'
Which should show a result similar to:
Results
10
CohQL>
Exit the Coherence Query too using the byecommand.
CohQL> bye
$
Using [ctrl][c] or the
corner X close the terminal windows, shut down
both instance of Coherence, and exit
JVisualVM.
Consider keeping these windows open for reuse
in later tutorial sections. However the
instances themselves should be shut down as
described above.
You have now successfully used the default
Coherence persistence mechanisms to create and
restore simple snapshots. In the next section
you will explore using Coherence Active
Persistence.
Configuring and Using Coherence Active Persistence
In this section we will build the provided
examples and explore 'active' persistence. Active
persistence differs from the default persistence in
that when enabled all changes to data are persisted
automatically. In addition to data changes, metadata
on indices, triggers, listeners and locks is also
persisted.
For more information on configuring active
persistence see the Coherence documentation here.
In this section we will:
Build the Coherence examples
Configure and start cache servers enabled for
‘active’ persistence
Simulate Failure in the cluster and observe
Active Recovery
Guard Against Potential Data Loss
You will again need four terminal windows:
Two terminals for cache servers
And one each for JVisualVM and the Coherence
Query tool (CohQL)
Build Examples
There are two aspects to setting up active
persistence:
Defining the persistence-environment in the
operational override file
Associating a persistence-environment with a
service
Note:
Active persistence can be enabled for all services
and caches by specifying the persistence-mode=active
override for example:-Dcoherence.distributed.persistence-mode=active
The override uses the default persistence
directories unless otherwise configured.
The Coherence Persistence examples come
preconfigured and ready for using ‘active-default’
persistence.
Ensure that all cache servers from the
prior section are shutdown.
Also ensure that JVisualVM and the Coherence
query tool are shut down
Open a terminal window and change directory
to the COHERENCE_HOME\examples\java
directory
                                    $ cd %COHERENCE_HOME%
$ cd examples\java
Examine the override and cache configuration
files:
Using a command similar to:
$ type resource\persistence\tangosol-coherence-override.xml
Search for the persistence-environments
element
Notice that element is wrapped in comments
and resembles: <!--
<persistence-environments>
. . .
</persistence-environments>
-->
Using a command similar to:
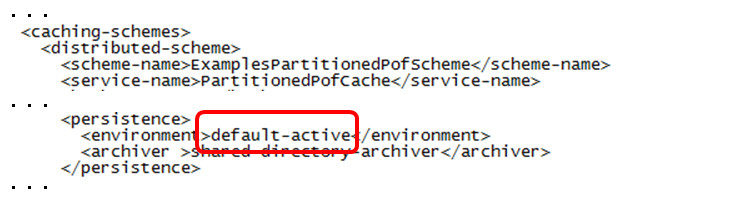
$ type resource\persistence\examples-cache-config.xml
Search for the persistenceelement
for the ExamplePartionedPofScheme.
Notice that the examples cache configuration
uses the default-active
persistence definition
Wait for each command to complete then proceed
to the next step.
Start a cache server instance using a
command similar to:
$ cd %COHERENCE_HOME%\examples\java
$ bin\run-cache-server.cmd persistence
Remember to ensure that the COHERENCE_HOME
and JAVA_HOME variables are
correctly set in each window.
Open a second terminal window and start a
second cache server instance.
$ cd %COHERENCE_HOME%\examples\java
$ bin\run-cache-server.cmd persistence
Open a third window and start JVisualVM.
Select either of the DefaultCacheServer
instances and in the right pane select Oracle
Coherence and then the Persistence
subtab. Note: that topmost pane was
expanded to show all services.
Start the Coherence Query tool using a
command similar to:
$ cd %COHERENCE_HOME%\examples\java
$ bin\run.cmd persistence cohql
Insert data into a cache using commands
similar to:
CohQL> insert into 'test' key(1) value('value1')
. . .
CohQL> insert into 'test' key(10) value('value10')
Return to JVisualVM and examine the examine
the Oracle Coherence > Caches
tab. Note that the cache now
contains entries.
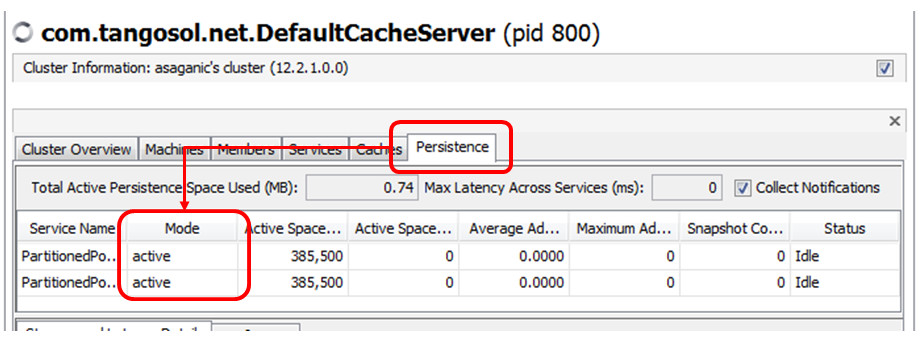
Examining the Oracle Coherence >
Persistence > Storage and Latency Details
tab will also show an increase in Total
Active Space Used.
Simulate failure and Observe Active Recovery
Kill all running cache servers and exit
JVisualVM.
Under Windows use the [x] in each terminal
window.
Under Linux use a command similar to ps
augx | grep DefaultCacheServer and
then capture the process ids and use
kill -9 %pid to kill each
process.
Open two terminal window and start two cache
server instances.
$ cd %COHERENCE_HOME%\examples\java
$ bin\run-cache-server.cmd persistence
As each cache server starts you may notice
messages indicating recovery is in progress.
Statements such as those shown below represent
Coherence recovering the cache: 2016-08-05 12:29:31.983/37.098 Oracle
Coherence GE 12.2.1.0.0
(thread=DistributedCache:PartitionedPofCache2,
member=1): Recovering 257
partitions
. . .
2016-08-05 12:30:47.278/112.372 Oracle
Coherence GE 12.2.1.0.0
(thread=DistributedCache:PartitionedPofCache2,
member=1): Recovered
PartitionSet{0..256}
from active persistence
. . .
Restart JVisualVM, connect to a default
cache server and examine the cache.
Notice that the original objects have been
restored.
Optionally, create and recover a
snapshot of an active persistence cache using
JVisualVM:
Within JVisualVM select a
DefaultCacheServer instance.
Open the Oracle Coherence >
Caches tab and note the name of
the Service associated with the test
cache, for example PartitionedPofCache.
Open the Oracle Coherence>
Persistence tab.
Select the matching Partitioned cache
row.
Right click and select Create
snapshot. Name and otherwise
complete the snapshot.
Using Coherence Query tool, drop all
entries in a cache.
For instance delete from 'test',
where testrepresents the
name of the originally created cache.
Use a command such as select
count() from 'test' to verify the
cache contains no data.
Returning to JVisualVM and using Recover
snapshot to restore the
snapshot.
Use a CohQL command such as select
key(),value() from 'test' to show
that the cache data was reloaded.
Leave both cache servers running but exit
JVisualVM and the CohQL tool.
Notes:
Persistent data is stored under the
directory COHERENCE_HOME/examples/java/persistence-data
in four sub-directories.
active – Contains active
persistence data.
snapshots – Contains
snapshot data.
trash –Contains incomplete
persistence data.
archives – Contains
archiving snapshots (covered in the next
section)
All of the above directories can be
configured in the operational override
file tangosol-coherence-override.xml.
The archive directory must be a shared
directory but the others may be local or
shared.
In this tutorial section we are using
the default-active
environment and relying on setting the coherence.distributed.persistence.base.dir
property (in function_set_env or
set_env.cmd) to a specific directory
rather than defaulting to users home
There are special considerations on
multi-machine environment using local
active directories.
Covered in a later section on recover
quorums.
Guarding Against Data Loss
By default, Coherence is configured with one
backup, which means Coherence can suffer the loss
of one instance without data loss. Where multiple
machines are involved, Coherence can also suffer a
single machine loss without data loss. Increasing
the number of backups guards against data loss
when multiple nodes or machines fail at the same
time, however each additional backup adds latency
for write operations. An alternative strategy is
to use Active Persistence, with a shared active
persistence directory. This alternative strategy
prevents data loss from the simultaneous failure
of multiple nodes or machines. In addition active
persistence can be configured to use zero backups
and not lose data.
In this section we will demonstrate active
persistence using three cache servers, and
simultaneously kill two of them and suffer no data
loss.
Open a third terminal window and start a
Coherence server using commands similar to:
$ cd %COHERENCE_HOME%\examples\java
$ bin\run-cache-server.cmd persistence
Start the Coherence Query tool using a
command similar to:
$ cd %COHERENCE_HOME%\examples\java
$ bin\run.cmd persistence cohql
At the CohQL command line examine the current
test cache to determine its count and/or
contents of objects using a command such as
those shown below:
CohQL> select count() from 'test'
Results
10
CohCQL>
Using [ctrl][c] stop any
running instances of the Coherence Query tool
and any running cache servers.
Consider keeping these windows open for reuse in
later tutorial sections.
Optional: As an additional
exercise consider:
Setting the backup count in resource\persistence\examples-cache-config.xml
to zero.
Start 3 cache server (as described above).
Start a Coherence Query tool instance (as
described above)and add data.
Kill two of the three servers.
Question: Does the result without backup
count of zero match the prior result with
backup count one?
Archiving and Validating Snapshots
Snapshots can be current, or archived.
Archived snapshots can be saved, retrieved and
restored. Both active and archived snapshots can be
validated to determine if they are corrupt.
The objective of this section is to exercise
archiving and validating snapshots.
In this section you will:
Populate the contacts cache with data.
Create and validate the snapshot.
Archive the snapshot and validate the archived
snapshot.
Retrieve and recover the archived snapshot.
Populating the Contacts Cache
To populate the Contacts cache with entries:
Open two terminal window and start two
Coherence server using commands similar to:
$ cd %COHERENCE_HOME%\examples\java
$ bin\run-cache-server.cmd persistence
Open a new terminal window and populate the
cache with data using commands similar to:
$ cd %COHERENCE_HOME%\examples\java
$ bin\run.cmd persistence populate
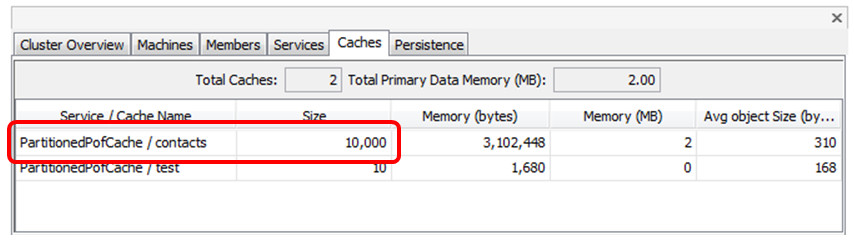
The populate operation will add 10,000 entries
to the contacts cache
Start JVisualVM and select one of the
DefaultCacheServer instances
In the right pane select the Oracle
Coherence > Caches tab.
Select the cache with the larger active
space used. Note:You may need to expand
the services portion of the Caches tab.
Right click and select Create
Snapshot. Complete the wizard to
finish creating the snapshot.
Alternatively you could use the create
snapshot command in Coherence Query tool. See
the Coherence
Query Tool documentation for more
information,
Start the Coherence Query tool using a
command similar to:
$ cd %COHERENCE_HOME%\examples\java
$ bin\run.cmd persistence cohql
Using a command similar to the one shown
below, list all snapshots. Note that two
snapshots are listed.
CohQL> list snapshots
Results
"PartitionedPofCache": ["contacts", "test-snapshot"]
"PartitionedPofCache2": []
Perform a verbose validation using a
command similar to
CohQL> validate snapshot 'contacts' 'PartitionedPofCache' verbose
Validating snapshot directory 'c:\. . . \contacts'
Results
Attribute                    Value
---------------------------- ---------------------------------------------------
Partition Count              257
Directory                    c:\. . .\PartitionedPofCache\contacts
Storage Format               BDB
Storage Version              0
Implementation Version       0
Number of Partitions Present 257
Is Complete?                 true
Is Archived Snapshot?        false
Service Version              14
Statistics                   contacts
                             Size=10000, Bytes=1627109, Indexes=0, Triggers=0, Listeners=0, Locks=0
test                         Size=10, Bytes=180, Indexes=0, Triggers=0, Listeners=0, Locks=0
Archiving and validating snapshots
An archived snapshot is a full copy of all
snapshot parts, from all members, stored in a
central location and in a storage-independent
format. To archive and validate a
snapshot:
Using JVisualVM archive the snapshot by:
Selecting the Persistence subtab
Select the cache with the larger active
space used. Note:You may need to
expand the services portion of the Caches
tab.
Right click and select Archive
Snapshot.
Select the contacts snapshot.
Complete the wizard to finalize the
archive process.Complete the wizard to
finish creating the snapshot.
Alternatively, you could use the archive
snapshot command in the Coherence
Query Tool.
For example:
CohQL> archive snapshot 'contacts' 'PartitionedPofCache'
Are you sure you want to archive a snapshot called 'contacts' for service 'Parti
tionedPofCache'? (y/n): y
Archiving snapshot 'contacts' for service 'PartitionedPofCache'
Results
"Success"
Snapshots are contained in the directory
defined by the <snapshot-archivers>
element of the tangosol-coherence-override.xml
file. Which for this tutorial is COHERENCE_HOME/examples/java
under the persistence-data/archives
directory.
Examine the COHERENCE_HOME/examples/java/persistence-data/archives
directory to find snapshot data.
Snapshot data is typically broken down into
individual files based on the number of
partitions specified for a cache which
defaults to 257. How many snapshot files
appear to exist for the contacts snapshot?
Retrieving and recovering archived snapshots
In this section we will use the Coherence Query
Tool to work with snapshots. All the operations
shown can also be completed within
JVisualVM. Note:
When retrieving an archived snapshot, the local
snapshot should first be removed.
You may also use the OVERWRITE option
of the RETRIEVE SNAPSHOT command
to to replace an in existing snapshot.
To retrieve and recover a snapshot:
Return to or open the Coherence Query Tool
in a terminal window.
Use command similar to those below if you need
to start an instance of the Coherence Query
Tool.
When prompted enter 'y' to confirm.
Note if the recover snapshot
command returns the error Error:
(Wrapped: Unable to complete operation
recoverSnapshot for service
PartitionedPofCache) sleep interrupted
the operation will continue in the background.
Use the command list services to
show the status of the PartitionedPofCache
service. When the service shows
idle continue with the
instructions below.
Examine the content of the cache to verify
the recover operation restored data:
CohQL> select count() from 'contacts'
Results
100000
Leave all processes running as they will be
used in the next section.
Monitoring Persistence
The objective of this section is to understand how
to manage and monitor a Persistence Environment.
In this section you will:
Identify the PersistenceCoordinator MBean
Work with JMX Notifications in JVisualVM
Run the NotificationWatcher example
View Service MBean attributes
Those interested in more information about
Coherence and JMX monitoring are encouraged to
review the documentation here.
The complete reference for Oracle Coherence MBeans
can be found here.
Identify the Persistence Coordinator MBean
The PersistenceCoordinator MBean
is a Coherence “Responsibility MBean”. What this
means there will only ever be a single instance
of this MBean. The singleton instance is
responsible for coordinating the Persistence
operations within the cluster.
To find the Persistence Coordinator MBean:
If required, Start JVisualVM and
select one of the running DefaultCacheServer
instances.
In the right pane select the MBeans
tab. Note: If the MBeans tab is
not displayed review the section on installing
the Coherence and MBeans JVisualVM plugins. Note:Only one of the
DefaultCacheServer instance is configured for
JMX. If you see the error Data not available because JMX
connection to the JMX agent could not be
established continue with the other
instance.
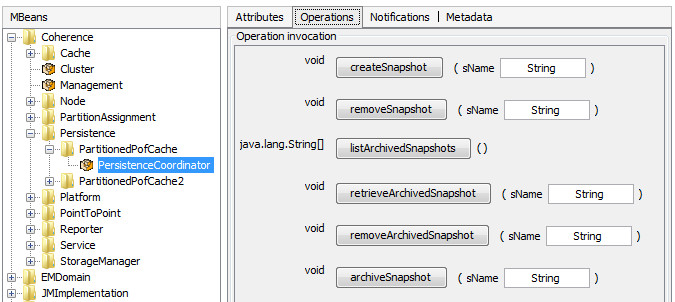
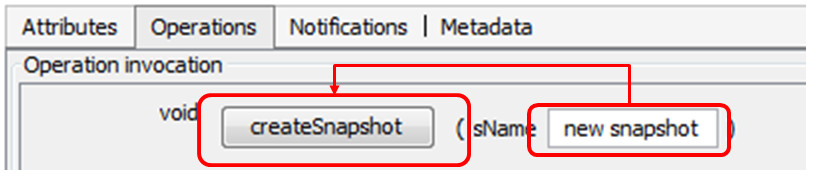
Using the createSnapshot
operation, create a new snapshot. Enter a
name, for example new snapshot and
click the createSnapshot
button:
Creating a new snapshot
Return to the Coherence Query tool, or use
the list snapshots operation in the JVisualVM
Persistence tab to list all known snapshots.
Does the newly created snapshot exist?
CohQL> list snapshots
Results
"PartitionedPofCache": ["contacts", "new-snapshot"]
"PartitionedPofCache2": ["test"]
Explore JMX Notifications with JVisualVM
JMX Clients can subscribe to Persistence JMX
notifications to obtain information about
operations that are executed for a particular
service. Notifications for operations exist for
start, stop, and a variety of failures. In this
section we will examine JMX notifications using
JVisualVM.
To enable JMX notifications:
Start or return to JVisualVM and select a
DefaultCacheServer instance. You
may reuse an existing instance if one is
already open.
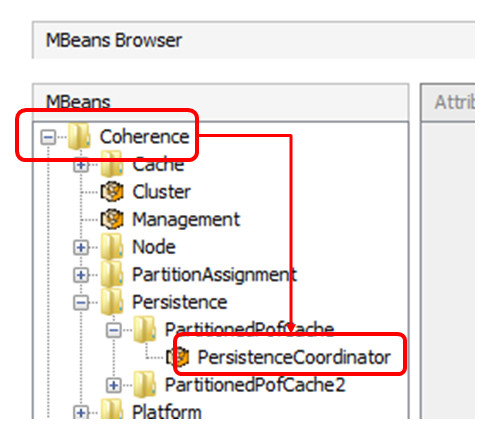
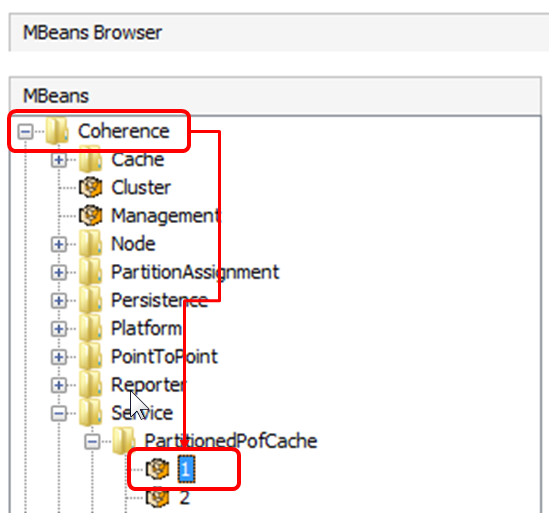
In the MBeans browser tab navigate to Coherence
> Persistence > PartionedPofCache >
PersistenceCoordinator.
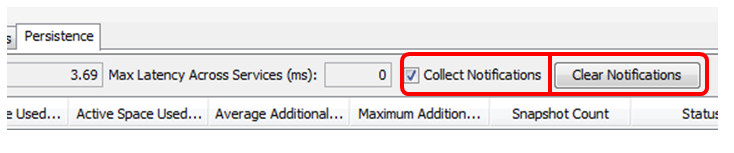
Select the Notifications tab. Note that the
Collect Notification checkbox is
checked by default. When checked,
Oracle Coherence will subscribe to
notifications and calculate operation duration
based on begin/end times. Note that you may need to
expand the window to see the Collect
Notifications check box and Clear
Notifications button.
Notifications tab highlighting
Collection Notifications
Click the Subscribe button.
(you may need to scroll to the bottom of the
window).
Perform several operation on a snapshot. For
example, remove, recreate, archive the
contacts snapshot:
CohQL> list snapshots
CohQL> remove snapshot 'contacts' 'PartitionedPofCache'
Are you sure you want to remove snapshot called 'contacts' for service 'PartitionedPofCache'? (y/n): y
CohQL> create snapshot 'contacts' 'PartitionedPofCache'
...
CohQL> remove archived snapshot 'contacts' 'PartitionedPofCache'
...
CohQL> archive snapshot 'contacts' 'PartitionedPofCache'
...
CohQL>
Return to the Notifications tab
and examine the result of the prior
operations. You should see something
resembling that below:
Notifications tab Note:Snapshot operations
typically generate two sets of notifications:
The begin/end pairing signifies the beginning
and end of the entire snapshot operation and
is used to calculate operation duration.
Select the Oracle Coherence >
Persistence tab.
You can clear existing notifications, or right
click the table and save as
a CVS file if desired.
The following section reuses the existing
Coherence instances and you can leave them
running.
Exercising the NotificationWatcher
Example
A notifications example is provided which
details how to programmatically determine the
durations of operations.
To run this notifications example:
Open a terminal window and start the
notifications example using commands similar
to:
$ cd %COHERENCE_HOME%\examples\java
$ bin\run.cmd persistence notifications
Which will produce output resembling:
redirecting Coherence logging to persistence.log...
. . .
------Getting MBeanServer...------
------Retrieving Registry...------
------Registering listener for PartitionedPofCache------
------Registering listener for PartitionedPofCache2------
------Waiting for notifications. CTRL-C to interrupt.------
Return to the Coherence Query tool and using
commands similar to those shown perform some
snapshot operations. Note:Confirmation requests
removed for clarity.
Return to the terminal where the
notifications application is running.
Examine the output which should show
notifications being generated for each of the
operations, one each for begin and end.
Return to the terminal window where the
notifications application example is running
and stop it using [ctrl][c].
Learners interested in how the notifications
examine registers for notifications are directed
to the NotificationWatcher.javaexample
found in: COHERENCE_HOME\examples\java\com\tangosol\examples\persistence\NotificationWatcher.java.
Exploring Service MBean Attributes
The information displayed on the Persistence
tab in JVisualVM is obtained from a number of
sources including:
PersitenceCoordinator MBean
ServiceMBean values aggregated
for all Coherence instances
In this section you will examine these areas and
explore the data provided by JVisualVM
Return to or restart JVisualVM
Select a DefaultCacheServer instance.
In the right pane select the MBeans
tab. Reminder: Only one of the
DefaultCacheServer instance is configured for
JMX. If you see the error Data not available because JMX
connection to the JMX agent could not be
established continue with the other
instance.
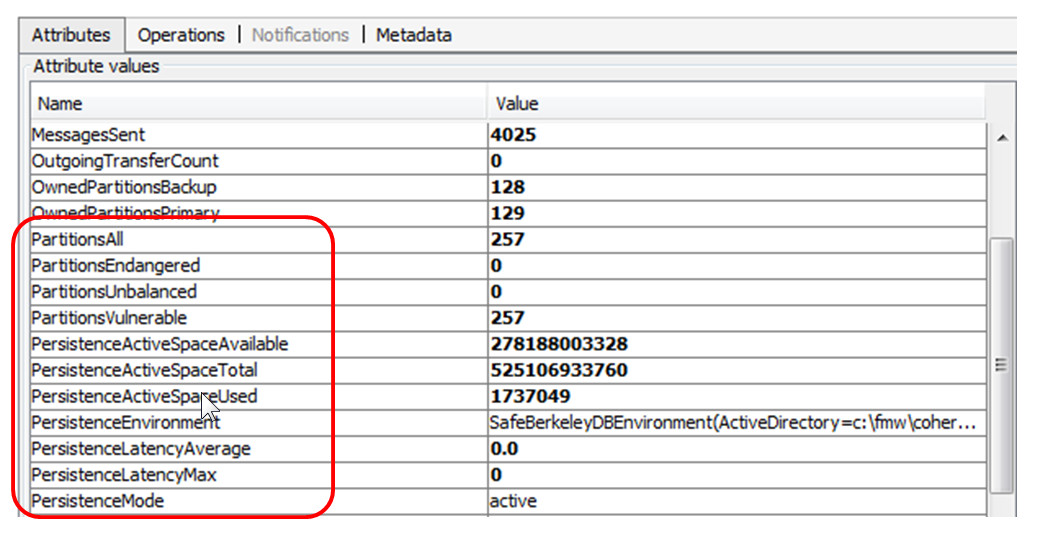
In the right pane examine the attributes tab
of the Service MBean. Persistence attribute
are prefixed with Persistence. Not
all are shown.
Given the image, can you answer determine the
persistence mode for this instance and service
combination?
Service MBean Attributes
All the attributes are explained in the
Coherence documentation, several outlined
below, the complete reference for Oracle
Coherence MBeans can be found here.
PersistenceActiveSpaceUsed – The total
space used be active persistence for this
node
PersistenceEnvironment – the details of
the active and snapshot directories
PersistenceLatencyAverage – the average
latency added by Persistence
PersistenceLatecyMax – the maximum
latency added by Persistence
PersistenceSnapshotArchiver – the
snapshot archiver used by the service
Shutdown any cache servers, Coherence Query
tool instances and JVisualVM
Using Recover Quorum
The partitioned cache recover quorum is used to
define the number of cluster storage members that
must be available before persistence recovery
starts. The use of the quorum allows time for a
cluster to start and ensures that partitions can be
recovered gracefully without overloading too few
storage members or without inadvertently deleting
orphaned partitions.
The objective of this section is to show how to use
the recover quorum to control when services begin
active recovery.
In this section you will:
Enable the recover-quorum
Execute he NotificationWatcher example
and view active recovery in progress
Enabling Recover Quorum for Services
The recover-quorum controls the number of
members that must be present before recovery can
begin. This is important for a number of
reasons:
When using ‘active’ mode, there must be
enough service members running to be able to
recover the data without running out of
memory.
If the recovery-hosts parameter is not set
correctly then there may be partitions that
are not recovered because not all persisted
data is not available. The recovery-hosts
parameter is shown below:
Since only a single machine is running all
instances the recover-hosts
element is left empty.
To configure Recover Quorum:
Ensure that all Coherence instances,
Coherence Query Tool instances and JVisualVM
are shut down.
Using notepad or gedit
or a similar editor, update the
file COHERENCE_HOME/examples/java/resource/persistence/examples-cache-config.xmland
un-comment out the following lines: (Note:
There is two entries,
ExamplesPartitionedPofScheme and
ExamplesPartitionedPofScheme2)
$ cd %COHERENCE_HOME%\examples\java
$ notepad resource\persistence\examples-cache-config.xml
In a new terminal window or a window
previously opened start a single Coherence
instance. Note:Consider redirecting the
output of the run-cache-server.cmd
command to a file to more easily search for
specific output.
$ cd %COHERENCE_HOME%\examples\java
$ bin\run-cache-server.cmd persistence
Examine the output of the window searching
for disallow messages.
For example:
When recover is complete an all
actions allowed message will be
generated similar to:
2016-08-12 11:05:12.935/511.789 Oracle Coherence GE 12.2.1.0.0 <Warning> (thread=DistributedCache:PartitionedPofCache, member=1): All actions allowed
2016-08-12 11:05:13.600/512.453 Oracle Coherence GE 12.2.1.0.0 <Warning> (thread=DistributedCache:PartitionedPofCache2, member=1): All actions allowed
Running the notification watcher and observing
active recovery
The notification example can be used to watch
for quorum based recovery notifications. In
order to be notified of such operations, the
notification recipient must be registered before
the notifications are sent.
To use the notfications example to watch for
recovery notifications perform the following
steps.
Shutdown/stop all running instances of
Coherence and Coherence clients.
In one of the existing Coherence terminal
windows execute:
$ bin\run-cache-server.cmd persistence
In a second Coherence terminal window start
the notifications example:
$ bin\run.cmd persistence notifications
When the window displays ------Waiting
for notifications. CTRL-C to
interrupt.------ continue to the next
step.
In a third Coherence terminal window
execute:
$ bin\run-cache-server.cmd persistence
Return to the window where the notifications
example is running and you should see messages
similar to:
Fri Aug 12 11:22:58 EDT 2016 : PartitionedPofCache (recover.begin) Active recovery in progress
Fri Aug 12 11:22:59 EDT 2016 : PartitionedPofCache2 (recover.begin) Active recovery in progress
Fri Aug 12 11:23:38 EDT 2016 : PartitionedPofCache2 (recover.end) Recovery Completed (Duration=38799ms)
Fri Aug 12 11:23:38 EDT 2016 : PartitionedPofCache2 (recover.begin) Active recovery in progress
Fri Aug 12 11:23:41 EDT 2016 : PartitionedPofCache (recover.end)  Recovery Completed (Duration=42924ms)
Fri Aug 12 11:23:41 EDT 2016 : PartitionedPofCache2 (recover.end)  Recovery Completed (Duration=3451ms)
Fri Aug 12 11:23:42 EDT 2016 : PartitionedPofCache (recover.begin) Active recovery in progress
Fri Aug 12 11:23:42 EDT 2016 : PartitionedPofCache (recover.end)  Recovery Completed (Duration=512ms)
You may notice that there are multiple
begin/end notifications for the recovery. This
occurs because recovery may require one or
more passes to recover all data.
Leave the two instances of Coherence
running, they will be reused in the next
section.
Using CohQL
The objective of this section is to provide more
detail on how to use CohQL to carry out Persistence
operations. In this section you will:
CohQL commands from a file.
Responding to errors.
Setting timeout for CohQL commands.
Running CohQL Commands from Files
To use Coherence Query tool, you can use the query[.sh|.cmd]
files located in the coherence/bin
directory. The examples come with a script to
run CohQL, which is the equivalent to running query.sh.
To run commands from a file you specify the -f
option followed by the file name to execute. You
can also use the -c option which
will exit CohQL once the commands have executed.
Ensure that you have two Coherence cache
servers running.
Create a file example.cohql
which contains the following commands, notice
the semi-colon ";" at the
end of each line. For this tutorial the script
name is assumed to be example.cohql.
list services;
create snapshot 'test' 'PartitionedPofCache';
list snapshots;
recover snapshot 'test' 'PartitionedPofCache';
remove snapshot 'test' 'PartitionedPofCache';
Run the Coherence Query tool, but using the
newly created command file using a command
similar to that shown below:
$ bin\run persistence cohql -f example.cohql
Note that if the file is not
in the same directory as where the command was
run, enter the fully qualified path name.
Which should produce results similar to:
. . .
redirecting Coherence logging to persistence.log...
Results
Service Name         Mode   Quorum Policy                                                       Current
-------------------- ------ ------------------------------------------------------------------- -------
PartitionedPofCache  active allowed-actions=distribution,restore,recover,cache-read,cache-write Idle
PartitionedPofCache2 active allowed-actions=distribution,restore,recover,cache-read,cache-write Idle
Creating snapshot 'test' for service 'PartitionedPofCache'
Results
"Success"
Results
"PartitionedPofCache": ["contacts", "test"]
"PartitionedPofCache2": ["test"]
Recovering snapshot 'test' for service 'PartitionedPofCache'
Results
"Success"
Removing snapshot 'test' for service 'PartitionedPofCache'
Results
"Success"
Coherence Command Line Tool
CohQL>
Using the byecommand exit
CohQL.
Responding to Errors
CohQL supports controlling error behavior
using: WHENEVER COHQLERROR THEN (CONTINUE |
EXIT);
When specified CohQL will either ignore the
error and CONTINUE or EXIT
without processing additional commands. EXIT is useful when you want to
validate a snapshot or archived snapshot before
you archive or retrieve.
To add error support to your script:
Open the previously created script in an
editor.
Add an exit command command on error and a
suffix to the create snapshot
command which should result in an error and
the termination of the script.
The updated script should resemble:
whenever cohqlerror then exit;
list services;
create snapshot 'test' 'PartitionedPofCacheXYZ';
list snapshots;
recover snapshot 'test' 'PartitionedPofCache';
remove snapshot 'test' 'PartitionedPofCache'
In the Coherence Query Tool window execute
the following. Note the addition of -c
which will cause the query tool to execute its
commands and then exit.
$ bin\run persistence cohql -f example.cohql
Which should produce results similar those
below.
redirecting Coherence logging to persistence.log...
Results
Service Name         Mode   Quorum Policy                                                       Current Operation
-------------------- ------ ------------------------------------------------------------------- -----------------
PartitionedPofCache  active allowed-actions=distribution,restore,recover,cache-read,cache-write Idle
PartitionedPofCache2 active allowed-actions=distribution,restore,recover,cache-read,cache-write Idle
Service 'PartitionedPofCacheXYZ' does not exist
Setting CohQL Timeounds
The default CohQL command timeout is 60s. Many
commands, such as archiving or validating a
snapshot, can take considerably longer to
complete. To specify a longer timeout use the alter
session command.
For example: ALTER SESSION SET TIMEOUT [timeout in MS]
To explore timeouts:
Start the Coherence Query tool using a
command similar to:
$ bin\run persistence cohql
Specify a very short timeout and then
executing a long query:
CohQL> alter session set timeout 300000
Which should result in:
Results
"CohQL statement timeout set to 5m"
Reset the timeout to 10ms:
CohQL> alter session set timeout 10
Which should result in:
Results
"CohQL statement timeout set to 10ms"
Rerun the select statement:
CohQL> select count() from "contacts"
Which should show results similar to:
Error: (Wrapped) null
Optionally, reset the session timeout to 60
seconds and re-run the query.
CohQL> alter session set timeout 60000
Results
"CohQL statement timeout set to 1m"
CohQL> select count() from "contacts"
Results
10000
Exit CohQL and the two Coherence cache
instances running, they will be used in the
next section.
Restoring and Recovering Indices and Listeners
The objective of this section is to showcase
metadata recovery and custom FTP archiving. In this
section you will:
Explore recovering listeners
Explore recovering indices
Recovering Cache Metadata
In the past sections we have seen how data is
recovered when using active mode. In this section
we will show how the following can be recovered:
Listeners
Index definitions
Locks
Triggers
To demonstrate how listeners are persisted
and recovered:
Ensure that you have two instances of
Coherence running. If need be, start the
instances using commands similar to:
$ cd COHERENCE_HOME\examples\java
$ bin\run-cache-server.cmd persistence
Return to CohQL and delete all data from the
contacts cache using a command similar to:
CohQL> delete from "contacts"
Start JVisualVM and select one of the DefaultCacheServer
instances.
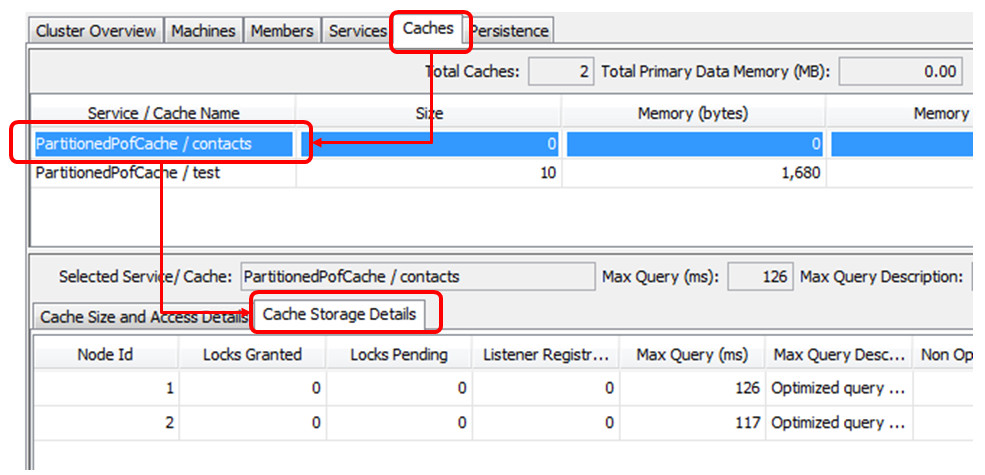
In the right pane select the Oracle
Coherence > Caches tab.
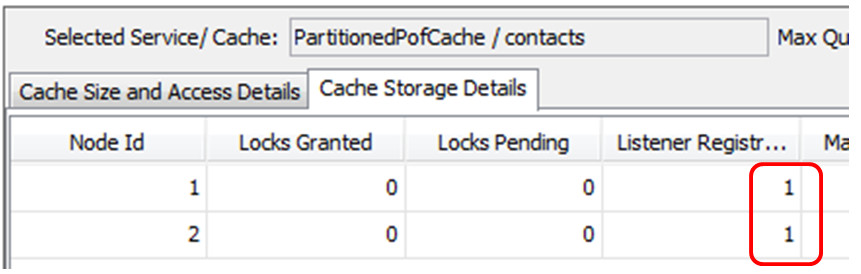
Within the Caches tab select the contacts PartionedPofCache/Contacts
row and then the Cache Storage Details
sub-tab for that how. Notice that the Listener
Registrations count is zero.
Contacts Cache Storage Details
Open a new terminal window and run the
following command to add a listener to the contacts
cache.
$ cd COHERENCE_HOME\examples\java
$ bin\run.cmd persistence add-listener
The following will be displayed.
------ObserverExample begins------
------ContactChangleListener added------
Press RETURN to continue
Do NOT press RETURN but
rather let the listener application continue to
run.
Run the following command to add content to
the contacts cache.
$ cd COHERENCE_HOME\examples\java
$ bin\run.cmd persistence populate 1
While leaving the listener process running,
shut down both of the Coherence cache servers
and JVisualVM.
Restart both Cache server instances.
Start JVisuaVM and re-connect to a DefaultCacheServer
instance.
In the right pane select the Oracle
Coherence > Caches tab.
Within the Caches tab select the contacts PartionedPofCache/Contacts
row and then the Cache Storage Details
sub-tab for that how. Notice that the Listener
Registrations count is greater then
zero, showing a listener was restored.
In a terminal window rerun the populate
command
$ cd COHERENCE_HOME\examples\java
$ bin\run.cmd persistence populate 1
Examine the window running the listener notice
that even though the two cache servers were
terminated the listener was recovered.
entry updated
old value:
John Smith-0
Addresses
. . .

new value:. . .
Press return in the listener window to exit
the listener.
To demonstrate how index definitions are
recovered, complete the following:
Ensure you have 2 cache servers started and
JvisualVM running.
In JVisualVM select a DefaultCacheServer
instance and then the MBeans tab.
Navigate to Coherence >
StorageManager > PartitionedPofCache >
contacts > any instance
In the right pan examine the indexInfo
attribute, note that it shows 0
entries.
Use CohQL to add an index to the contacts
cache using a command similar to:
CohQL> create index on 'contacts' lastName
Return to JVisualVM and double click the value
next to the indexInfo attribute is should now
some something similar to the image below.
IndexInfo attribute populated with an
index
Exit JVisualVM and shut down both cache server
instances.
Restart both instances and JVisualVM.
In JVisualVM select a DefaultCacheServer
instance and then the MBeans tab.
Navigate to Coherence >
StorageManager > PartitionedPofCache >
contacts > any instance.
In the right pan examine the indexInfo
attribute, note that it shows an
entry which was restored.
Shut down the JVisual VM, the Coherence cache
instances and any other terminal windows.
Congradulations you have completed the Coherence
tutorial on Persistence