This tutorial covers a broad range of topics. The objective of
this tutorial is to provide a hands-on experience with the Managed
Coherence Servers functionality available in WebLogic Server with
Coherence 12.1.2 and later. Managed Coherence Servers, or MCS,
allows the Coherence instances to be defined, controlled and
managed within the WebLogic Server framework. Coherence
effectively is now a subsystem of WebLogic Server rather than the
historic method of being deployed as separate class being called
by a script. Coherence clusters can now be defined within a
WebLogic Server domain and associated with WebLogic Server
clusters and managed servers. And a new artifact, a Grid ARchive,
or GAR file, is now deployable as a individual component, as part
of an Enterprise ARchive (EAR) file, or as a shared library, or
certain combinations. The GAR file contains the classes and
configuration to support both storage enabled and storage disabled
cluster resources.
This tutorial was created and uses Linux and Bash for the target
environment. However, readers can complete the entire
tutorial substituting the appropriate Windows commands in
supported Windows environments.
Time to Complete
Approximately 2 hours
Introduction
During this tutorial students will:
Install Coherence 12.1.3 and WebLogic Server.
Configure a WebLogic Server domain.
Configure a Coherence Cluster and a set of associated set of
Managed Coherence Server instances.
Manage application deployment using WebLogic Server clusters
to group Coherence into functional areas.
Deploy and test Coherence Grid ARchives (GARs) and Enterprise
applications including GARs.
Define and manage Coherence proxy servers.
Secure Coherence clusters.
Scenario
This tutorial uses WebLogic Server 12.1.3 software plus the
included samples to build the target environment.
The environment will be built in a staged approach over a number
of steps to showcase the different features available.
The scenarios is composed of three WebLogic Server Clusters or tiers
representing functional areas within the domain.
Cache Server cluster tier - this tier manages storage enabled
MCS instances providing cache capacity using deployed stand
along GAR archives.
Web Application cluster - this tier manages storage disabled
MCS instances using Enterprise applications, with embedded GARs,
to provide GUI access to cache data.
Proxy cluster tier- this tier manages storage disabled MCS
instances which use proxy overrides to expose the Coherence
cluster to the applications outside the WebLogic Server domain
itself.
Completed Scenario
The following elements make up the architecture:
WebLogic Server domain - Including an administration server
and node manager.
Coherence cluster - A single Coherence cluster which
encasulates all WebLogic Server clusters
Cache Tier WebLogic Server cluster - Containing two storage-enabled
managed servers holding Coherence Cluster data.
WebApp Tier WebLogic Server cluster – Containing two
storage-disabled managed servers, hosting a
web application contained in an EAR.
Proxy Tier WebLogic Server cluster – Containing two storage-disabled
managed servers running Coherence Extend proxy servers.
Java GUI – External java application that connects via
Coherence*Extend.
The following artifacts will be examined, built and deployed:
ExampleGAR.gar –
Grid ARchive (GAR) containing POJO’s, supporting classes, cache
and POF configuration, as required for Coherence applications
and cache servers.
ExampleEAR.ear –
Enterprise application, deployed to the Cache tier,
containing Web Archive (WAR) with the application code,
and GAR file with required cluster resources.
ExampleListenerEAR.ear
– Enterprise EJB application, deployed to an instance in the
Cache Tier, and containing EJB and GAR files.
Hardware and Software Requirements
The following is a list of hardware and software requirements:
Operating System: MAC
OS X, Windows 7 or later, Linux or Solaris. See the WebLogic
Server compatibility matrix, found here,
for a complete list of supported hardware and operating systems.
Disk Space: Have a
minimum of 20GB of available disk
Memory: Have a minimum
of 4GB and preferably 8GB for good performance
Prerequisites
Before starting this tutorial, you should:
Have access to or have Installed Java JDK 1.7 or later.
If required Java 1.7 JDK which can be found here.
Download the combined Coherence WebLogic Server 12.1.3 generic
installer which can be found here.
Note that you should download and have available the WebLogic
Server and Coherence install as shown below.
0. Concepts Overview
Introduction
Managed Coherence Servers provides tight integration between
WebLogic Server and Coherence. This integration allows for a
simplified and streamlined development and management
environments of distributed applications. The functionality
allows end users to build a new archive type (Grid Archive
orGAR), which can be deployed and managed via standard
WebLogic Server best practices. Developers can now streamline
their build processes to generate GARs. Operations departments
can now standardize deployment of Coherence and Coherence
applications in the test and production environments. This
feature requires both WLS 12.1.2 and Coherence 12.1.2 (or
above)
Traditionally, Coherence has been deployed as a jar
incorporated into a java application (e.g., WAR or standalone
Java application) along with a tier of standalone cache server
JVMs (often using the DefaultCacheServer
class). The embedded java usages (such as in a WAR)
are referred to as clients and the standalone cache servers
are referred to as servers. The lifecycles of the “clients”
and cache servers are managed separately, often manually, with
the cache servers managed by custom shell scripts. Application
development and deployment in this model is a complicated
process involving many parts that require custom management
processes
What is a Grid ARchive?
A Coherence application is defined by the artifacts required
for a Coherence node to serve a particular Coherence cache or
invocation request. A GAR contains:
A deployment descriptor, with required name coherence-application.xml.
A collection of Java classes required to serve the
request; typically these are implementations of EntryProcessors,
Filters, Aggregators, and backing-map business logic.
Classes are optional.
An optional collection of support JARs. Optional unless
required by some other class.
The deployment descriptor contains the following:
A pointer to a cache configuration xml document. This
document describes the Coherence services and caches.
An optional pointer to a POF configuration document. This
document describes the types serializable using the Portable
Object Format.
An optional class name of a class implementing the
LifeCycleListener interface.
An optional class name of a class implementing the
ConfigurableCacheFactory interface.
Example coherenece-application.xml
Deployment Descriptor
These artifacts are grouped in a jar called a Coherence Grid
Archive (GAR) that defines all the artifacts for a particular
Coherence Application. This mirrors to a large degree the
structure of other Java EE artifacts such as Web Archives
(WAR).
pof-config.xml
– Portable Object Format (POF) configuration document.
This document describe which objects and how they are
serialized using POF.
[optional class files in appropriate packages]
GAR Structure
Coherence Application Development Models
Coherence Applications are typically deployed in tiers. The
simplest model is a two-tiered deployment, and includes:
A data tier, used to host Coherence Server instances
responsible for storing the data related to the application.
An application tier that hosts the application consuming
data stored in the data tier.
Each tier is managed using standard WebLogic Server principles
combined with the new functionality integrated for the 12.1.2
release. The new Coherence Cluster definition represents the
operational (runtime) configuration of a Coherence cluster.
Coherence clusters are then associated with a WebLogic Server
cluster representing the data tier, and a separate WLS cluster
representing the application tier. In the data tier, the grid
archive is deployed to each managed server, which is configured
as a storage enabled coherence node. The application tier would
deploy the identical GAR, packaged in an EAR and the EAR is then
deployed to each storage disabled managed server representing
the application tier. Note thats it’s considered best practice
to have dedicated storage tiers, separate from the application
tier to ensure optimum cluster performance.
Configuration
There are two areas related to configuration with Managed
Coherence Servers:
Standard Cache Configuration
WLS Domain configuration
Standard Cache configuration is managed by the coherence-cache-config.xml
file that resides within the Grid ARchive. These
configuration concepts relate to cache configuration and
topologies (near caches) which are explained via the standard
coherence documentation, found here.
Configuring the WLS domain as described in the preceding
sections is new functionality made available in 12.1.2 and
above. It is possible to perform this configuration via both
WLST and the Administration console. The high-level steps
involved would be to:
Create a domain
Create a Coherence Cluster
Create a Data tier WLS cluster and associate it with the
Coherence Cluster
Associate the Data tier WLS cluster with the Coherence
Cluster
Deploy your GAR to the data tier
Create an Application WLS Cluster and associate it with
the Coherence Cluster
Deploy your EAR to the application tier.
1. Installing Java and WebLogic Server
The objective of this section is to install Java and WebLogic
Server, both required for the remainder of the tutorial.
1.1 Download and Install Java
The combined Coherence/WebLogic Server installed will run with
Java 1.6, however Managed Coherence Server instances require
version 1.7 or later to function property.
Determine installed Java version
Using a command similar to java -version
determine the java version on the target machine.
WebLogic/Coherence 12.1.3 requires Java 1.7 or later.
Install or upgrade Java
If the installed version of Java is not 1.7 or later.
Download Java SE Development Kit 7 for your operating
system from here
and follow the instructions to install.
If the java command is not in the class path note the
installation directory which will be referred to this as
JAVA_HOME.
Install the JDK per the instructions for your
operating system.
Set the value of the JAVA_HOME variable using a
command similar to: $
set JAVA_HOME=c:\jdk\jdk1.7.0_45 (Windows) or $
export JAVA_HOME=/softeware/jdk/jdk1.7.0_45
(Linux/Solaris)
1.2 Install WebLogic Server 12.1.3
Download and save the WebLogic Server/Coherence combined
installer which can be found here.
Be sure to select WebLogic Server and Coherence install as
shown below:
Unzip the downloaded installed using a command similar to:
$ unzip fmw...wls_Disk1_1of1.zip.
For example:
Execute the installer using a command similar to: $
java -jar {path to unzipped
installer}/fmw_12.1.3.0.0_wls.jar
For example.
If java was not pre-installed or a newer version was used
you may need to use a command similar to: ${JAVA_HOME}/bin/java
-jar fmw_12.1.3.0.0_wls.jar
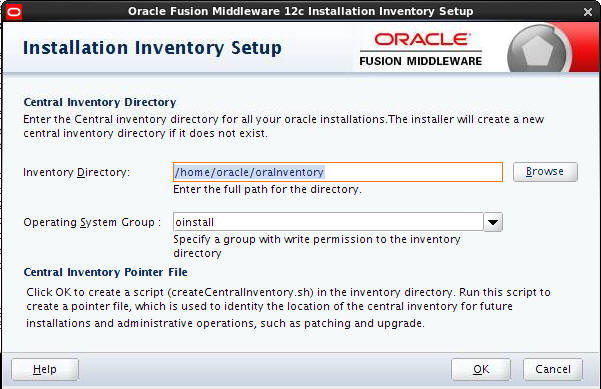
Enter a location for a new or existing Oracle Inventory
and click OK.
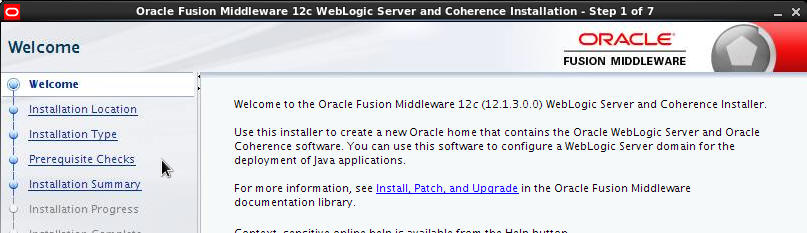
In the Welcome dialog click Next
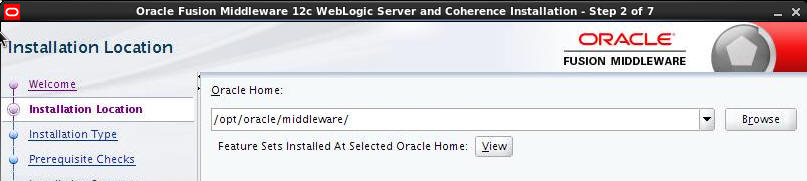
In the Installation Location Dialog choose an appropriate
location and click Next.
For this example the location /opt/oracle/middleware.
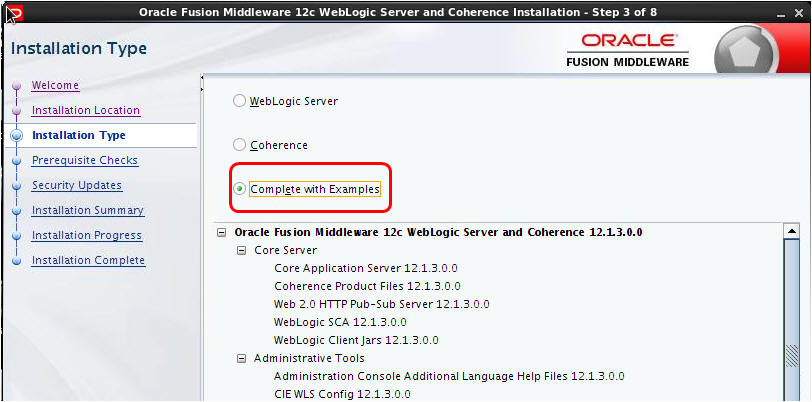
In the Installation Type dialog ensure that Complete
with Examples is selected and click Next.
In the Prerequisite Checks dialog click Next.
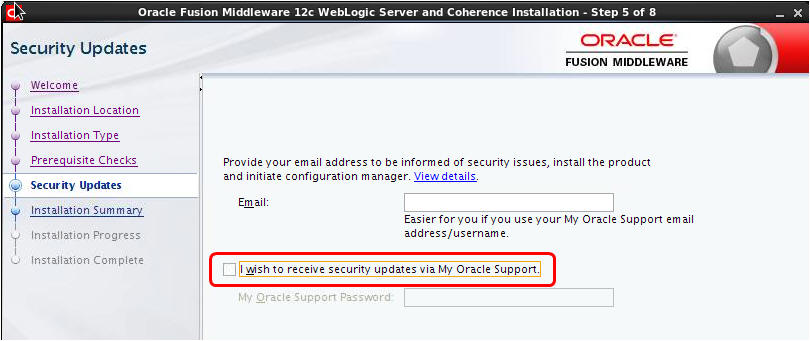
In the Security Updates dialog uncheck I wish to
receive security updates and click Next.
In the Email Address not specified dialog click Yes.
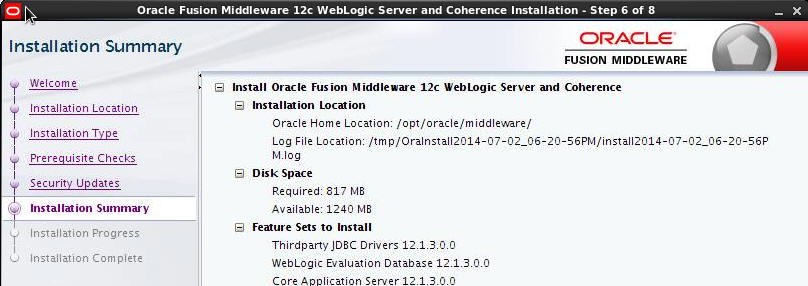
Examine the installation summary, return to a prior
dialog to correct any errors and then click Install.
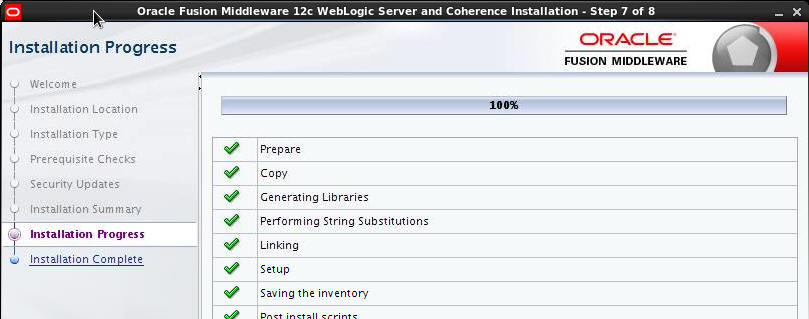
In the Installation progress dialog click Next.
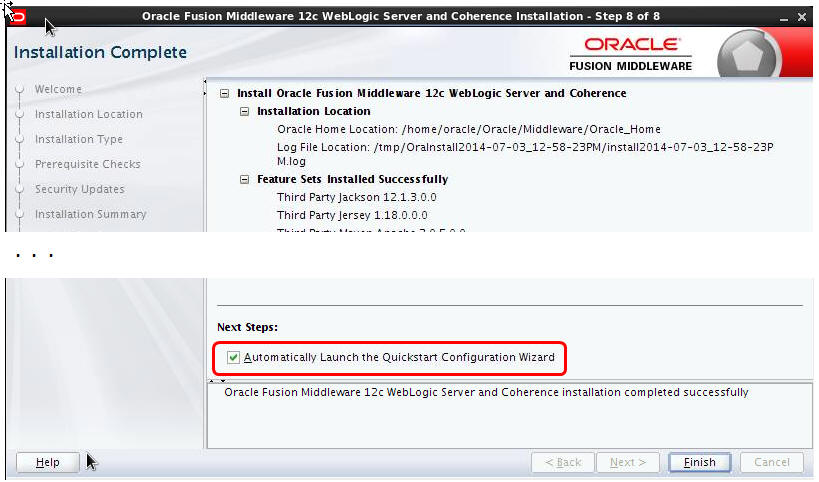
In the Install Complete dialog, ensure that Automatically
launch Quickstart is checked and click Finish.
The quick configuration wizard will start and display its
splash screen.
In the Quickstart wizard enter password Welcome1
in both Password and Confirm password
and then click Create.
Take care when entering these credentials. If alternate
credentials are used note them for later use when logging
into the WebLogic Server console.
On the Configuration Process step, click Next.
On the Configuration Details dialog click Finish.
Note, ensure that Start Domain is NOT
checked.
WebLogic Server 12.1.3 with all samples has now been
installed.
2. Configuring a Basic Coherence Cluster
The objective of this section is to configure a basic WebLogic
Server domain using the configuration wizard to setup the
following components:
Administration Server- Used to managed and configure
WebLogic Server and Coherence artifacts.
Node Manager- Used to track, start and stop managed
instances.
Coherence Cluster- Used to encapsulate Managed
Coherence Servers and WebLogic Server clusters into a Coherence
cluster.
Cache Server WebLogic Cluster- Used to house Managed
Coherence Servers,and Coherence GAR applications. Run storage enabled.
Web Application WebLogic Cluster- Used to house Managed
Coherence Servers, and Enterprise applications, with embedded
GARs. Run storage disabled.
Basic Architecture
The configuration of the Coherence cluster will be performed in two
steps:
Use the configuration wizard to configure the basic artifacts.
Including creating all WebLogic Server instance, WebLogic Server
clusters and the Coherence cluster.
Start the administration server and complete the configuration
using the WebLogic Server console. Including configuring
Coherence related aspects of WebLogic Server instance.
During the remainder of this tutorial the variable ORACLE_HOME
will be used. ORACLE_HOME is intended to represent the
root of the middleware installation which for this tutorial was /opt/oracle/middleware.
Readers may want to consider assigning ORACLE_HOME to the
directory where WebLogic Server was installed using a command
similar to:
$ export
ORACLE_HOME=/opt/oracle/middleware.
2.1 Configure a Basic Cluster
Open a command prompt and change directory to wlserver/common/bin
directory under the Middleware home directory.
$
cd ${ORACLE_HOME}/wlserver/common/bin
for example:
Start the configuration wizard with a command similar to: $
./config.sh
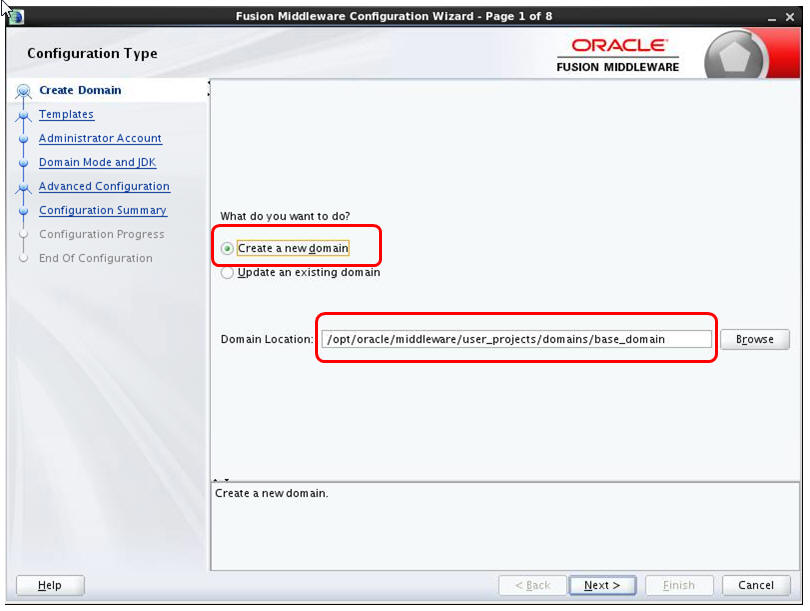
The Configuration Wizard splash screen will display.
Ensure that the Create a new domain radio button is
selected. If needed modify the domain location. Click Next.
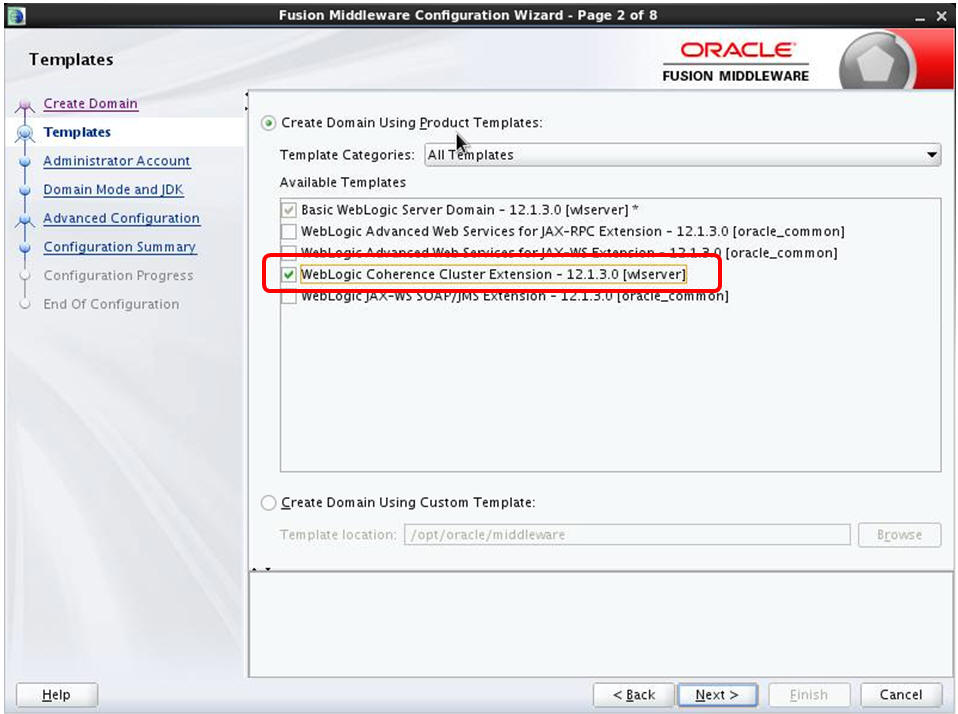
From the Templates dialog select the Coherence
Cluster extension and click Next.
In the Administrator account dialog enter password Welcome1
and click Next.
In the Domain Mode and JDK dialog, accept the defaults and
click Next.
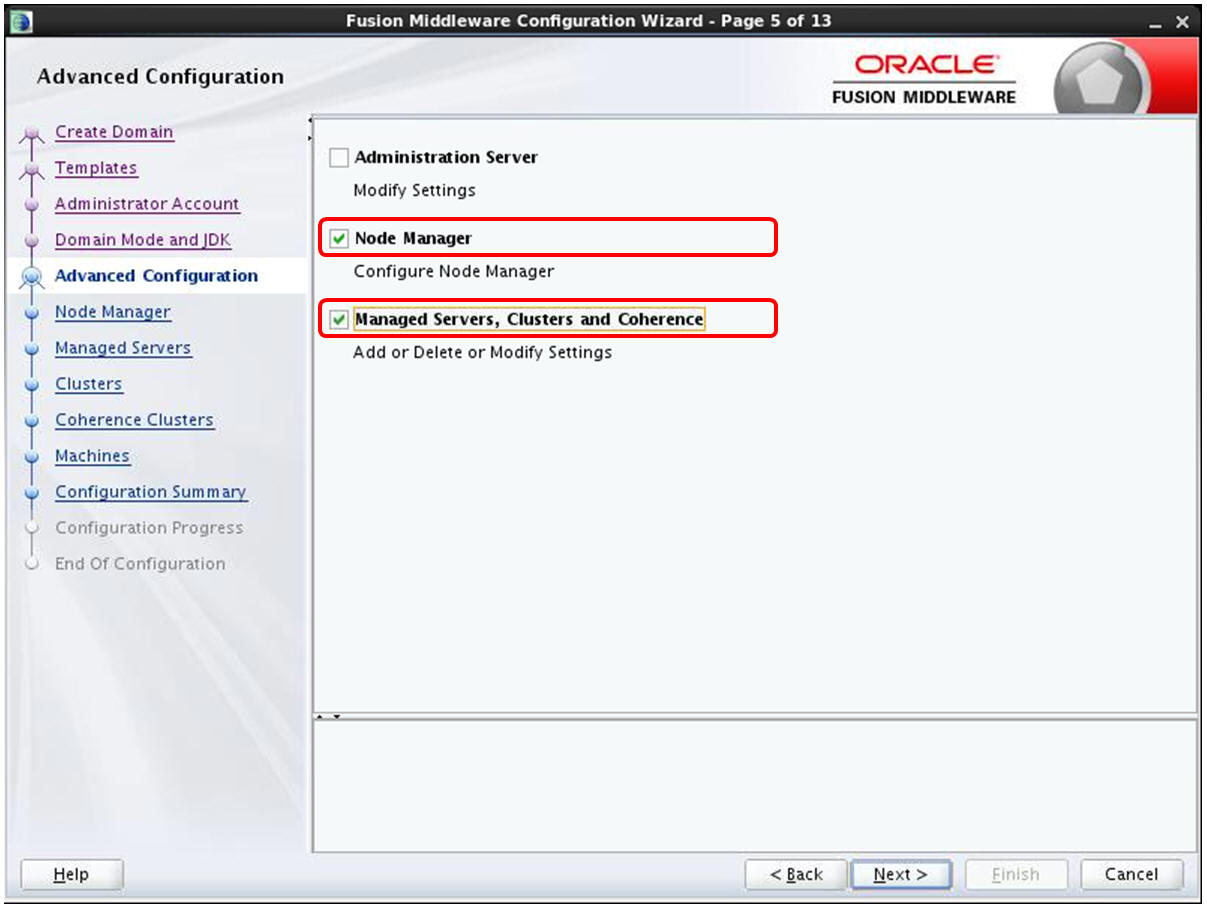
In the Advanced Configuration dialog select Node
Manager and Managed Servers, Clusters and Coherence.
Then click Next.
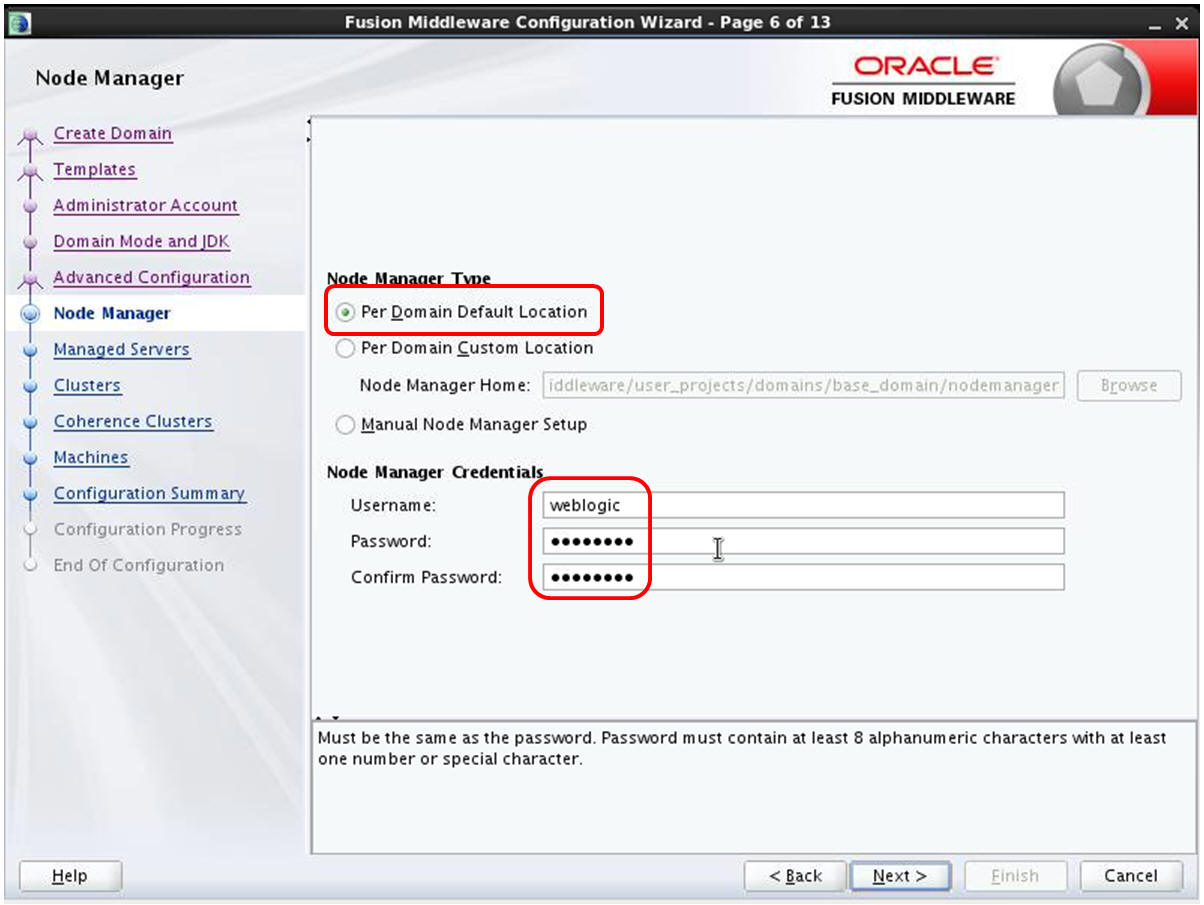
In the Node Manager dialog select Per
Domain Default Location and enter
credentials weblogic/Welcome1. Then click
Next.
On the Add dialog click add and add four servers with
names and ports as shown below.
Name
Port
cache_server1
7003
cache_server2
7005
webapp_server1
7007
webapp_server2
7009
When complete the results should resemble:
When complete, click Next.
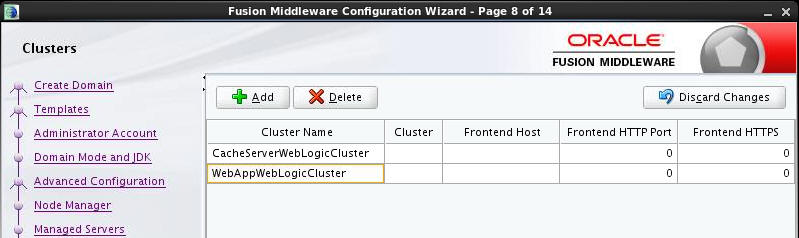
In the Clusters dialog click Add and add two
WebLogic Server clusters with names CacheServerWebLogicCluster
and WebAppServerWebLogicCluster.
When complete the dialog should resemble:
When complete, click Next.
Using the Assign Server dialog, assign servers by
selecting a server and using the arrow keys to assign that
server to a cluster. Assign the cache_server instances to
the CacheServerWebLogicCluster and the
webapp servers instances to the WebAppWebLogicCluster.
When complete the dialog should resemble:
When complete, click Next
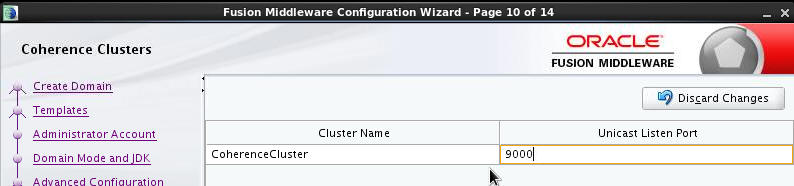
In the Coherence Clusters dialog change the cluster name
to CoherenceCluster and set the port to 9000,
then click Next.
In the Machines dialog use the add button to add a
single machine named machine, then click Next.
In the Assign Servers to Machines dialog assign all
servers to the newly created machine. When complete the
results should resemble those below.
Then click Next.
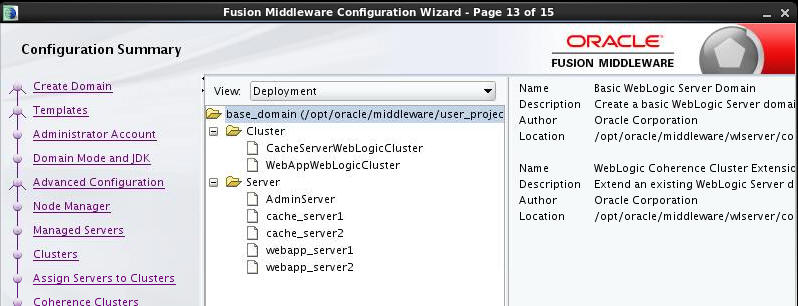
The Configuration Summary should resemble that shown
below. Click Create to create the domain.
Click Next.
On the Configuration Success dialog click Finish.
You have now successfully created a domain.
In the next section we will start the administration server
and complete the configuration of the domain.
2.2 Start Servers
Carry out the following steps to start an instance of Node
Manager and an administration server.
In the command window change directory to the location of
the new domain home.
$
cd ${ORACLE_HOME}/user_projects/domains/base_domain/bin
Replace base_domain with the appropriate name if
different.
Using a command similar to that shown below, start an
instance of node manager.
$
./startNodeManager.sh > ~/nodemanager.log 2>&1
&
Start an instance of tail using a command similar to tail
-f ~/nodemanager.log.
When node manager has started listening on its designated
port, exit the command and move to the next step.
For example:
Consider adding nohup to startNodeManager.sh
if you would like the server to continue running of the
command prompt is closed.
Using a command similar to that shown below, start an
instance of the administration server.
$ ./startWebLogic.sh > ~/admin.log 2>&1 &
Start an instance of tail using a command similar to tail
-f ~/admin.log.
The administration server is stared with the log shows a
state of RUNNING as shown below.
Consider adding nohup
to startWebLogic.sh is you
would like the server to continue running of the command
prompt is closed.
2.3 Complete the Configuration of the Coherence Cluster
Carry out the following steps to complete the configuration of
the Coherence cluster using the console.
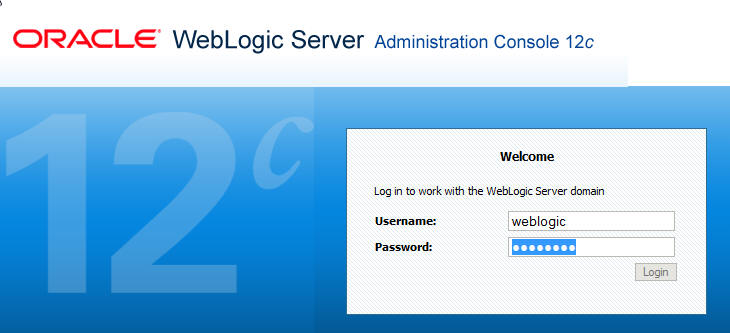
Using your browser of choice open a connection to
http://localhost:7001/console. Log in using the
previously entered credentials (weblogic/Welcome1).
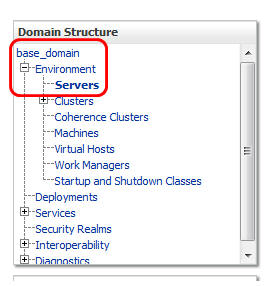
In the Domain Structure pane, expand Environment and
choose server.
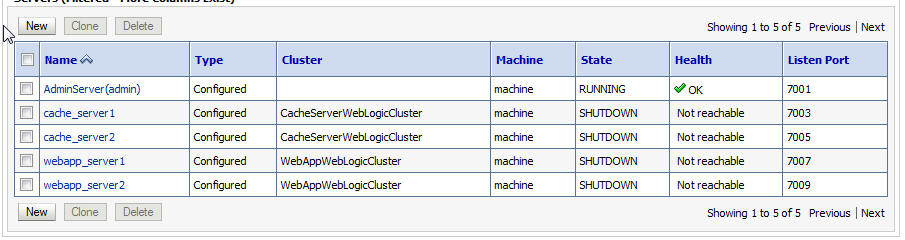
The right pane will change to display the previously created
servers which will resemble those shown below. Ensure all
servers exist and are stopped.
In the domain structure pane expand Environment
> Clusters.
The right pane will change to display all WebLogic Server
clusters.
In the right pane, select the WebAppWebLogicCluster.
Select the Coherence tab.
Notice that the default for a WebLogic Cluster which is a
member of a Coherence domain is storage enabled.
Uncheck the Local Storage Enabled flag (shown in its
original checked state).
Click Save.
In the Domain Structure pane navigate to Environment>Servers.
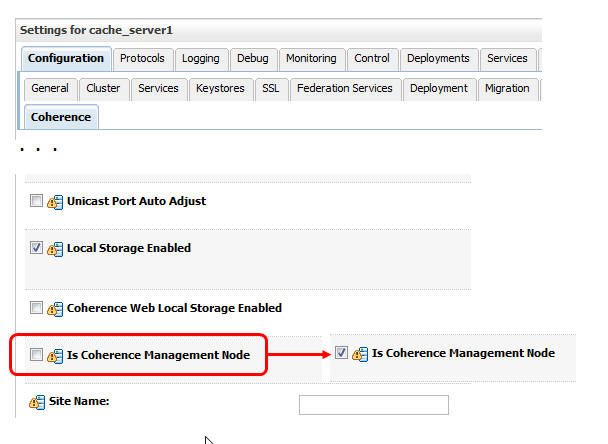
In the Servers page select cache_server1.
Select the Coherence tab of cache_server1.
Make cache_server1 a JMX enabled management node by
checking the field is Coherence Management Node.
Shown below in the default state of disabled.
Click Save.
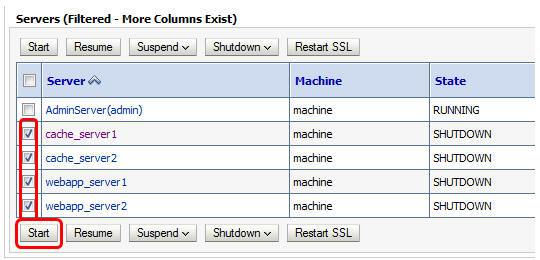
In the Domain Structures page navigate to Environment
> Servers.
Select the Control tab.
In the Control tab, select the four servers and click Start.
Depending on machine capacity it can take between 3 and 5
minutes to start all server instances.
Use the refresh icon() to refresh the display.
3. Deploy and Test Applications
WebLogic Server ships with a large number of examples in source
code form. Included in the example set are Coherence examples. The
Objective of this section is to build, deploy and test several of
the provided Coherence examples.
3.1 Build the Examples
The examples come in source form and must be built. WebLogic
Server ships with Apache Ant. The Coherence examples include
ant based build scripts which can be used to build the
provided examples.
To build the Coherence samples perform the following:
Open a command prompt.
Change to the bin directory under the newly created domain
directory. $
cd ${ORACLE_HOME}/user_projects/domains/base_domain/bin
Prepare the environment by executing the set domain
environment script. source
./setDomainEnv.sh
Change directory to the samples location cd
$
{ORACLE_HOME}/user_projects/applications/wl_server/examples/src/examples/coherence/managed-coherence-servers/common/prj
Using ant build the samples using a command
similar to:
ant package
Which will produce output similar to: $
ant package
to override old definition of task jspc
Trying to override old definition of task rmic
clean:
banner:
[echo]
[echo]
******************************************************************************
[echo] |
[echo] | Cleaning build environment for project:
managed-coherence-servers-examples
[echo] |
[echo]
******************************************************************************
[echo]
. . .
[jar] Building jar:
/opt/oracle/middleware/user_projects/applications/wl_server/examples/src/examples/coherence/managed-coherence-servers/common/build/gui/classes/ExampleGUI.jar
BUILD SUCCESSFUL Total time: 6 seconds
For brevity we will refer to the following directory as
EXAMPLES_HOME ${ORACLE_HOME}/user_projects/applications/wl_server/examples/src/examples/coherence/managed-coherence-servers
3.2 Deploy the Application
If the prior step was successful a set of artifacts was build
in:
${ORACLE_HOME}/user_projects/applications/wl_server/examples/src/examples/coherence/managed-coherence-servers/common/build.
The ExampleGAR.gar and ExampleEAR.ear will be
deployed and tested in the next sections.
Using a browser login to the console using URL
http://localhost:7001/console and credentials weblogic/Welcome1.
In the Domain Structure pane navigate to Environment
> Deployments.
In the Summary of Installments pane click Install.
Navigate to the directory
EXAMPLES_HOME/s/common/build/.
There are a number of directories, click open
directory next to the the gar directory.
Select ExampleGAR.gar and click Next.
On the Choose Targetting style step ensure that Install
this deployment as an application is checked and click
Next.
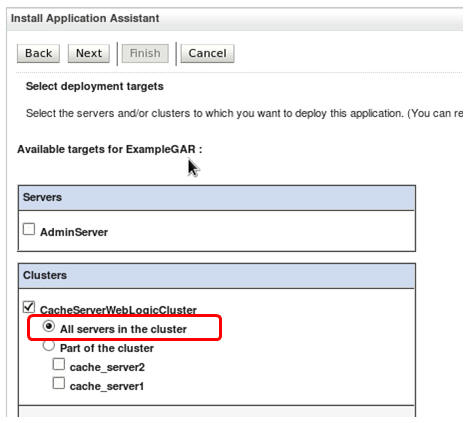
In the Select deployment targets step choose CacheServerWebLogicCluster
> All Servers in the Cluster.
And click Next.
In the Optional Settings step click Finish. The
Summary of Deployments pane will be displayed and should
resemble:
If you were successful the GAR will be deployed and in
state Active.
Now that the ExampleGAR.gar is deployed we will deploy
the associated web application.
Click Install.
Navigate to the EXAMPLE_HOME/common/build/ear
directory.
Select the file ExampleEAR.ear. The Install
Application Assistant pane should resemble:
Click Next.
On the Choose Targeting style step ensure that Install
this deployment as an application is checked and click
Next.
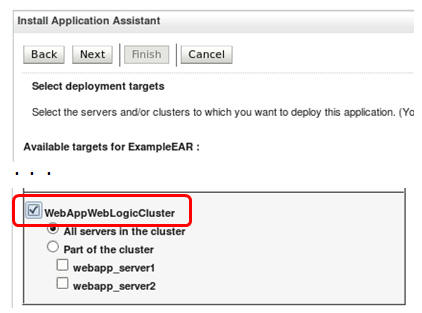
In the Select Deployment Targets step, ensure that WebAppWebLogicCluster
is checked and click Next.
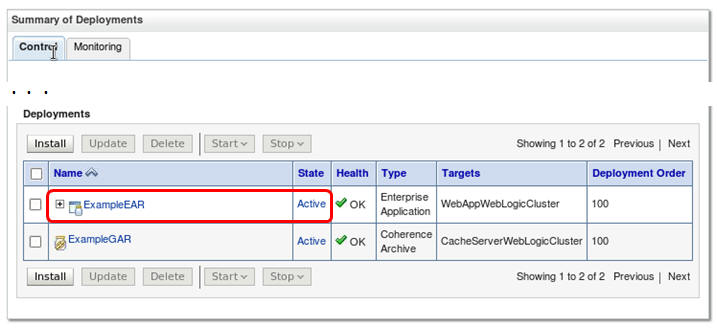
In the Optional Settings step click Finish.
When complete the summary of deployments should resemble:
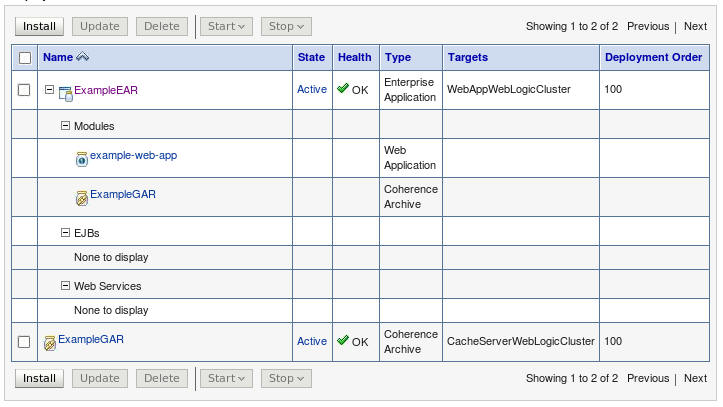
Expand ExampleEAR by clicking the plus (+) sign.
The application will expand and should resemble that shown
below.
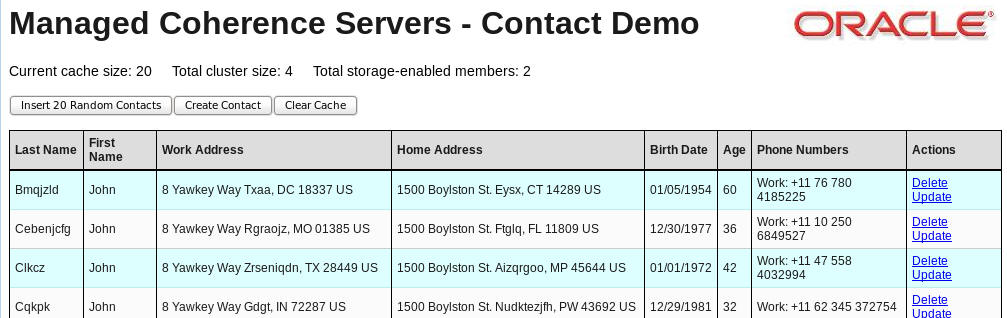
Run the application by entering URL http://localhost:port/example-web-app/faces/ContactList.jspwhere
port is either 7007 or 7009.
The application should display a page similar to:
4. Add a Proxy Tier and Test using a Coherence*Extend GUI
application
The objective of this section is to add an additional proxy tier
to the overall architecture. Specifically we will:
Proxy Server WebLogic Cluster
- Add a proxy server WebLogic cluster, which is a member of the
Coherence cluster. Run storage disabled.
Proxy MCS Instances -
Add two Coherence Managed Server instances, which will house the
Coherence ExampleGAR.gar and override its cache configuration.
Proxy Cache Configuration - Create a
Coherence Cluster cache configuration.
Coherence clusters can have zero or more Cache Configurations
which can be assigned to applications to override their internal
cache configuration.
Java GUI application -
Access the cluster via the proxy server using a Java GUI based
Coherence*Extend Client.
4.1 Add a Proxy Cluster
In this section we will use the WebLogic Server console
application to:
Create a new WebLogic Cluster for the proxy instances and
associate with the Coherence cluster.
Create two managed servers, which will be used as proxy
servers, and add them to the proxy cluster.
Create a cache configuration override using the proxy-cache-config.xml
cache configuration file and assign to the new WebLogic
Server cluster.
Start the new proxy managed servers.
Deploy ExampleGAR to the proxy cluster.
Override the cache configuration in the ExampleGAR.
Test that the cache configuration override was
successfully applied.
To add the proxy instances, perform the following steps:
Login to the WebLogic Server console at URL http://localhost:7001/console
using credentials Weblogic/welcome1.
In the Domain Structure expand Environment >
Clusters. The Summary of Clusters pane will display.
Click New > Cluster.
Name the cluster ProxyWebLogicCluster, leaving all
other fields unchanged, and click OK.
The newly created cluster will be displayed.
Open the newly created cluster by clicking its name in the
Summary of Clusters pane.
Select the Coherence tab.
From the drop down cluster list select the CoherenceCluster
and click Save.
Once associated with a Coherence cluster, other Coherence
configuration may be modified.
Uncheck ... and click Save.
We are now free to add Managed Coherence Instances to the
Proxy WebLogic Cluster.
In the Domain Structure pane expand Environment
> Servers.
In the Summary of Servers pane click New.
Enter Server Name: proxy_server1.
Enter Server Listen Port: 7011.
Select Yes, make this server a member of an
existing cluster and choose the newly created ProxyWebLogicCluster.
Click Finish to save the changes.
When complete the Summary of Servers pane will be
displayed.
In the Summary of Servers pane, click the new proxy_server1
name.
In the Setting for server pane, choose the Configuration
> General tab and then in the Machine drop
down choose machine and click Save.
We must now change the unicast port for the
proxy server so we can connect to a specific port from
Extend clients.
Select the Coherence tab
Change Unicast Listen Port to 9020.
Check Unicast Port Auto Adjust,
Un-check Local Storage Enabled.
Click Save.
Create the second instance by cloning proxy_server1.
In the Domain Structure pane select Environment
> Servers.
Check proxy_server1 and click Clone.
Change the Name to proxy_server2 and
server Listen Port to 7013.
Click Ok.
In the Domain Structure page select Environment
> Coherence Clusters.
Assuming the example install location the fully qualified
path to the configuration file is: /opt/oracle/middleware/user_projects/applications/wl_server/examples/src/examples/coherence/managed-coherence-servers/common/resource/config/proxy-cache-config.xml.
Click Next.
Target the cache configuration to the proxy server cluster
by checking ProxyWebLogicCluster. Click Finish.
In the Domain Structure pane expand Environment
> Deployments.
Open the ExamineGAR deployment by
clicking its name.
Select the Targets tab.
Check ProxyWebLogicCluster and then
Click Save.
The Coherence application is now deployed to both the cache
server and proxy clusters.
Start the new proxy servers by:
In the Domain Structure pane expand Environment
> Servers.
Choose the Control tab.
Check proxy_server1 and 2.
Click Start.
Validate that the override configuration has been used by:
Open a command prompt
Change directory to the ORACLE_HOME directory, for
example: $
cd /opt/oracle/middleware
Search the proxy server logs for a log statement
showing the loading of the proxy configuration file
using a command similar to: $
find . -name 'proxy_server*.log' | xargs grep
cache-config.xml
If the cache configuration override was successfully
loaded, log statements referencing the file should be
found. For example:
If you do not see a log event similar to that shown,
reexamine the proxy cache configuration steps and
confirm the correct location and JNDI name (ExamplesGAR).
4.2 Build and Run Proxy Application
In this section we will build a Coherence*Extend GUI
application and run it against the newly added proxy tier.
Open a command prompt.
Change directory to the base domain bin directory. $
cd ${ORACLE_HOME}/user_projects/domains/base_domain/bin
Setup the WebLogic Server environment. $
source ./setDomainEnv.sh
Change directory to the Coherence examples directory. $
cd
/opt/oracle/middleware/user_projects/applications/wl_server/examples/src/examples/coherence/managed-coherence-servers/common/prj/
Compile the examples to a directory of your choice, for
this tutorual we will use /home/oracle/gui. $
ant -Dinstall_dir=/home/oracle/gui installgui
You should see output similar to:
[mkdir] Created dir: /home/oracle/gui/config
[mkdir] Created dir: /home/oracle/gui/lib
[mkdir] Created dir: /home/oracle/gui/bin
[copy] Copying 1 file to /home/oracle/gui/config
[copy] Copying 1 file to /home/oracle/gui/config
[copy] Copying 1 file to /home/oracle/gui/lib
[copy] Copying 1 file to /home/oracle/gui/lib
[copy] Copying 1 file to /home/oracle/gui/bin
[copy] Copying 1 file to /home/oracle/gui/bin
BUILD SUCCESSFUL
Total time: 2 seconds
Change directory to the directory specified by the -D
parameter above. $
cd /home/oracle/gui
Inspect the config/extend-cache-config.xml
file. This file defines how to connect to the cluster.
Examine the address-provider element, which
removes the need to put any specific IP addresses in the
cache-configuration files.
For example: $
less config/extend-cache-config.xml. . .
<initiator-config>
<tcp-initiator>
<name-service-addresses>
<address-provider>extend-address-provider</address-provider>
</name-service-addresses>
</tcp-initiator>
</initiator-config>
The address-provider is defined in the tangosol-coherence-override.xml.
Using gedit or your favorite editor, open
config/tangosol-coherence-override.xml. $
gedit config/tangosol-coherence-override.xml
The extend-address-provider is defined
by a section of xml starting with address-provider.
Find the <address> element.
Replace the embedded 192.xxx IP address with localhost
or the IP address of the machine hosting the proxy
servers.
Save the changes and exit the editor.
For example:
Start the Coherence*Extend GUI client:
The client is a simple Java Swing client that listens for
events on the contact cache via a MapListener.
change to the bin directory cd
bin
Make the shell scripts executable chmod
+x *.sh
Run the client source
start_gui_client.sh
The Managed Coherence Servers Extend Example will then
start.
In a browser open the Contact List application at URL http://localhost:[7007|7009]/example-web-app/faces/ContastList.jsp.
Select a row and click update.
Make a change to any data element other then name,
which is used as a key, and click Save.
Examine the Coherence*Extend application which
reflects the change.
Exit the GUI client.
5. Deploy and Test and EJB Application
The objective of this section is to deploy an EJB application to
a managed server. The EJB Enterprise application demonstrates the
ability to use the resources within the GAR file embedded in the
EAR. The EJB application in this managed server will be a
full cluster member and will listen for any changes to the
“contacts” cache and writes these changes out to a file.
Specifically the application will:
Be deployed to the webapp_server1 server as
a full fledged cluster member.
Listen for changes to the contacts cache.
Output changes to a ContactFileListener.log
located in the base_domain directory.
The diagram below shows the specific components configured in
this section.
In general we will:
Deploy the EJB Enterprise application to the Managed Coherence
Server webapp_server1.
Exercise the application to cause changes
Examine the base_domain/ContactFileListener.log
for updates.
Perform the following steps:
Login to the WebLogic Server console at http://localhost:7001/console
using credentials weblogic/Welcome1.
In the Domain Structure pane expand expand Deployments.
In the Summary of Deployments pane click Install.
From the EXAMPLES_HOME/build/ear directory
select ExampleListenerEAR.ear and click Next.
On the Choose Targeting Style step, accept the defaults
(install as application) and click Next.
In the Select Deployment Targets step, select only webapp_server1
and click Next.
In the Optional Settings step click Finish.
In the Summary of Deployments pane confirm that the
application was successfully deployed and is active.
Confirm the application is excuting as expected by:
Open a command prompt and change directory to the base
domain root. cd
/opt/oracle/middleware/user_projects/domains/base_domain
In a browser open the Contact List application at URL http://localhost:[7007|7009]/example-web-app/faces/ContactList.jsp
Update or delete any entry.
Examine the ContactFileWriterListener.log
file using less or some other command.
Depending on the operation performed an update or delete
record will be added to the file, similar to that shown
below.
6. Managing the Coherence Environment
The Coherence environment can be explored using JVisualVM either
directly using the provided MBeans or via the Coherence JVisualVM
Plug-in.
The objectives of this section are:
Examine Coherence MBeans
Install and use the Coherence JVisualVM Plug-in.
6.1 Viewing Coherence MBeans in JVisualVM
When running Coherence outside of WebLogic Server,
individual instances can set
-Dtangosol.coherence.management=all which allows you to
connect to any DefaultCacheServer
node and see Coherence MBeans from all servers. Within WebLogic
Server, the administration server does this roll-up of the data
and which can be inspected by connecting to the the domain
runtime MBean server. In this section we connect to
and examine the running state of Coherence using JVisualVM
Readers interested in comprehensive coverage of JVisualVM and
the Coherence plug-in are directed to the Oracle Learning
Library (OLL). A
search of JVisualVM will return a self study and associated
OBE. However the following steps show the basics of using
JVisualVM to examine Coherence MBeans running within WebLogic
Server.
To use JVisualVM to monitor and manage the Coherence
environment.
Open a command prompt and change directory to the
base_domainbin directory.
$
cd
/opt/oracle/middleware/user_projects/domains/base_domain/bin
Execute the set domain environment script $
source setDomainEnv.sh
Change directory to
EXAMPLES_HOME/common/resource/bin cd
/opt/oracle/middleware/user_projects/applications/wl_server/examples/src/examples/coherence/managed-coherence-servers/common/resource/bin
Examine the jvisualvm script, which contains several
settings for connecting to the administration WebLogic
Server MBean server. $
cat jvisualvm.sh
#!/bin/bash
#
# Copyright (c) 2013,2014, Oracle and/or its affiliates.
All rights reserved.
#
# This script will connect to the domainRuntime() mbeans
on the admin server and
# allow you to view the coherence MBeans for the entire
coherence cluster.
#
if [ -z "$WL_HOME" ] ; then
echo "You must run setDomainEnv.sh"
exit 1
fi
$JAVA_HOME/bin/jvisualvm --cp:a $WLS_CP \
-J-Djmx.remote.protocol.provider.pkgs=weblogic.management.remote
\
-J-Dcom.oracle.coherence.jvisualvm.refreshtime=10 -J-Xmx1g
-J-Xms1g \
-J-Dcom.oracle.coherence.jvisualvm.disable.mbean.check=true
#
# Add a JMX connection in JVIsualVM using the following
service url and enter user/ password for the connection
#
# service:jmx:iiop://localhost:7001/jndi/weblogic.management.mbeanservers.domainruntime
Consider using copy/paste to save the service
description above and past it into JVisualVM.
Execute
the script $
source jvisualvm.sh
If an error dialog is presented, click Disable
Modules and Continue to continue.
Open a
connection to the Administration Servers MBean server by
choosing:
File > Add JMX Connection.
In the Add JMX Connection dialog enter connection
details and click OK.
Connection: service:jmx:iiop://localhost:7001/jndi/weblogic.management.mbeanservers.domainruntime
Credentials: weblogic/Welcome1.
If JVisualVM is connecting from a different host or
using a different port, adjust the connection details
accordingly
In the application pane select the new connection.
The right pane will change to display information
specific to the selected connection.
In the right pane one or more panes are displayed.
Typically including the MBeans pane.
If the MBeans pane is not displayed, then its likely the
MBeans plugin is not installed. Please see the
JVisualVM plugins page, available here,
for information on downloading and installing plugins
including the MBeans plug in.
Click Coherence to expand the Coherence
MBeans.
The set of available Coherence data should resemble:
Expand any MBean to see its values and operations.
Expanding Cache, ultimately results in:
6.2 Installing the Coherence JVisualVM PlugIn
Beginning with Coherence 12.1.3, the JVisualVM Coherence
plugin is included with the WebLogic Server install when
Coherence is also installed. WebLogic Server with Coherence
12.1.2 can use the JVisualVM Coherence plugin, however users
will need to download the plug in.
To install the Coherence plugin for JVisualVM
At the command line, start JVisualVM. You needn't
connect to any JVM instance at this time.
Choose Tools > Plugins.
Choose the Downloaded tab and select Add
Plugins.
Navigate to the location of the Coherence JVisualVM plugin
which should be ${ORACLE_HOME}/coherence/plugins/jvisualvm/coherence-jvisualvm.nbm.
The plugin will be loaded into JVisualVM.
Click Install.
In the install plugin wizard click Next.
Accept the terms of the license agreement and click Install.
In the validation warning dialog click Continue.
Then the plugin installation completes click Finish
Click Close.
Open a new connection using a process similar to that used
in the prior section.
In the right pane a new Oracle Coherence tab now exists.
Select the Oracle Coherence tab.
The plugin will be loaded into JVisualVM.
Explore the different sub-tabs representing different
areas of Coherence functionality.
6.3 Rolling Restart
A rolling restart is a common operation carried out against
a Coherence cluster where new or updated classes need to be
deployed to members without shutting down the entire cluster.
When updating classes on the storage-enabled members it is
important to ensure that you don't lose data while carrying out
this operation. Maintaining data is usually achieved by checking
the statusHA value of the services within the
cluster and ensuring that they are always in state MACHINE-SAFE
or NODE-SAFE after each deploy operation.
In a typical WebLogic Server cluster, when an application is
redeployed, it is redeployed on all cluster members at the same
time. Re-deployment to all cluster members is problematic for
GAR application as it would mean loss of all data in the
Coherence caches managed by that GAR.
In WebLogic Server 12.1.2, a new deployment feature was added to
allow selective deployment of a GAR to individual managed
servers of a WebLogic cluster, even if the GAR was originally
deployed to the WebLogic cluster. This is enabled by using the
specifiedtargetsonly option. It can be used in the following
ways:
This is enabled by using the specifiedtargetsonly option.
Rolling restart can be used in the following ways:
WLST: Use the WLST deploy function to
selectively re-deploy an updated application. deploy(appName,
appFile, currentServerName, specifiedTargetsOnly='true')
wldeploy ant task: Use the wldeploy
ant task to perform the redeploy.
<wldeploy
user="${admin.username}" password="${admin.password}"
adminurl="t3://${admin.host}:${admin.port}" debug="false"
action="deploy" name="Managed Coherence Servers GAR Test"
source="${gar.filename}" targets="ms3"
specifiedtargetsonly="true"
failonerror="true">
</wldeploy>
Using weblogic.deployer: specifying
option -specifiedtargetsonly
A sample WLST script to carry out a rolling redeployment is
included with WebLogic Server. To run this carry out the
following
Login to the WebLogic Server console at URL
http://localhost:7001/console using credentials Weblogic/welcome1.
In the Domain Structure pane expand Environment,
choose Servers.
Select cache_server2 and click Clone.
Change the name to cache_server3 and
the listen port to 7030 and click Ok.
Select the Control tab, select the
newly added server, and click Start.
Open a command prompt.
Change directory to /opt/oracle/middleware/user_projects/domains/base_domain/bin.
In the command prompt set the WebLogic environment using a
command similar to: source
./setDomainEnv.sh
Change directory to EXAMPLES_HOME /common/resource/wlst
and copy the file gar_common.py to the ${WL_HOME}/common/wlst
directory.
This file contains the garRedeploy function.
Change directory to a convinient location, in this OBE /home/oracle
was used, and create a script called test_redeploy.py
and add the following contents. Replace the second argument
with the full path of the deployed GAR. This can be found by
selecting the deployment from the Deployments option and
noting the Source Path. The garRedeploy
command and all its arguments should be on a
single line and resemble:
Run the script with the following command. java
weblogic.WLST test_redeploy.py
When prompted enter the credentials. The script
should produce results similar to:
Once the script has finished running, check the
application to ensure that all the data is present meaning
that the rolling restart/redeploy was successful.
7. Accessing Coherence Caches Securely
The objective of this section is to show several of the security
features available when using Managed Coherence Servers. By default,
the anonymous user can access Coherence services and caches. In this
section we will change the default policy and configure application
resources to be accessible only by a properly authenticated user. In
general we will:
Add access policies on the “contacts” cache.
Access the application as an anonymous user.
Configure the application for Basic Authentication.
Note: Adding access policies does not require the security framework
to be enabled. When you add an access policy this is enabled
immediately. By enabling the security framework then any
non-WebLogic Server JVM cannot access the Coherence cluster without
going through WebLogic Server authorization.
7.1 Enable Security on the contacts Cache
Login to the WebLogic Console at http://localhost:7001/console.
In the Domain Structure pane expand Environment and
select Coherence Clusters.
Click cluster name Coherence Cluster.
Select the Security tab, then the Cache
sub tab.
Click New to add a new cache configured
for security.
Enter contacts as the name of the cache
and click Finish.
The cache is now configured to support security but none
has been applied.
In the Coherence Caches list click the newly added cache
name contacts.
Roles and policies associated with the cache are displayed.
The cache is now configured to support security but none
has been applied.
Select the policies tab.
In the Settings for Contacts pane click Add
Conditions.
On the Predicates step, in the Predicate List drop down
choose User and click Next.
On the Edit Arguments step, add user weblogic,
click Add. When the user has been
added click Finish.
Click Save.
Restart all server instances by:
Expanding Environments in the
Domain Structure pane.
Selecting Servers.
Choose the Control tab.
Select all servers, except the AdminServer.
Choose Shutdown > Force Shutdown Now.
Pause as the servers shut down, this could take 1-3
minutes or more depending on computer performance.
Select all servers, except the Admin Server.
Click Start.
Pause 1-3 minutes or more depending on computer
performance.
Consider using the refresh button to track server start
up.
7.2 Access the Application as an Anonymous User
Access the application using URL
http://localhost:700[7|9]/example-web-app/faces/ContactList.jsp.
An insufficient rights error will be displayed due to the
newly added security requirement.
7.3 Configure the Application for Basic Authentication
Open a command prompt.
Change directory to ${ORACLE_HOME}/user_projects/domains/base_domain/bin.
Configure the environment using a command similar to: $
source setDomainEnv.sh
Change directory to EXAMPLES_HOME/common/resource/config/ $
cd
/opt/oracle/middleware/user_projects/applications/wl_server/examples/src/examples/coherence/managed-coherence-servers/common/resource/config
Copy the required files to enabled basic authentication
using a command similar to: $
cp –f web*.xml ../../war/WebContent/WEB-INF
Examination of the web.xml shows the
addition of a login-config element
defining BASIC security.
Examination of the weblogic.xml shows an
authorized principal (weblogic).
Confirm that both files were copied before continuing.
Change directory to EXAMPLES_HOME/common/prj
rebuild the examples using an ant command similar to:
$
ant package
Ant should produce output similar to:
.
. .
[echo]
[echo]
******************************************************************************
[echo] |
[echo] | Packaging files for project:
managed-coherence-servers-examples
[echo] |
[echo]
******************************************************************************
[echo]
[jar] Building jar:
/home/oracle/examples/managed-coherence-servers/common/build/gar/ExampleGAR.gar
[war] Building war:
/home/oracle/examples/managed-coherence-servers/common/build/war/ExampleWebApp.war
[ear] Building ear:
/home/oracle/examples/managed-coherence-servers/common/build/ear/ExampleEAR.ear
[jar] Building jar:
/home/oracle/examples/managed-coherence-servers/common/build/gar/ExampleListener.jar
[ear] Building ear:
/home/oracle/examples/managed-coherence-servers/common/build/ear/ExampleListenerEAR.ear
jar] Building jar:
/home/oracle/examples/managed-coherence-servers/common/build/gui/classes/ExampleGUI.jar
Return to the WebLogic Server Console.
In the Domain Structure Pane choose Deployments.
Select the ExampleEAR deployment and click Update.
On the Local new deployments file step, click Finish.
Access the updated application using URL Access the
application using URL
http://localhost:700[7|9]/example-web-app/faces/ContactList.jsp.
When prompted enter the weblogic users credentials and
click OK.
Assuming correctly entered credentials the application
will then display.
Congradulations, you have successfully completed the Managed
Coherence Server OBE Tutorial.
WLST Appendix
The objective of this appendix is to show how the entire
environment can be built from scratch using WLST
Prerequisites: You must have completed:
Complete section “Configure a Basic Coherence Cluster”.
The administration server and node manager must be up and
running.
Any existing configuration such as Clusters, Managed Servers,
Coherence Clusters, etc, should be removed.
A machine named machine should exist.
Once the prerequistes have been satisfied, perform the following:
Open a new command prompt.
Change directory to ${ORACLE_HOME}/user_projects/domains/base_domain/bin.
Configure the environment using: $
source ./setDomainEnv.sh
Change directory to: $ cd
EXAMPLES_HOME/common/resource/wlst
Run the following command to create the required domain
configuration, passing in the EXAMPLES_HOME directory. $ java
weblogic.WLST ./create_example.py
${EXAMPLES_HOME}/coherence/managed-coherence-servers/
When prompted enter credentials for the weblogic user.
7. Deploy the examples by running the following, passing in
the EXAMPLES_HOME directory. $ java
weblogic.WLST ./deploy_example.py ${EXAMPLES_HOME}
Using the WebLogic Server console, or the startManagedServer
scripts, start all servers.
You can now run the application.
To run the GUI, change directory to ${EXAMPLES_HOME}/managed-coherence-servers/prj
and install the GUI application using a command similar
to: ant
-Dinstall_dir=/home/oracle/gui installgui
Summary
In this tutorial we examined many facets of Managed Coherence
Servers including Coherence*Extend access and security.
In this tutorial, you learned to:
Enumerate the feature set of Managed Coherence Servers
including Grid ARchive concepts
Install WebLogic Server 12.1.3
Configure a basic Coherence Cluster
Create, deploy and run Coherence GAR based applications
Add and manage Coherence proxy servers
Access Coherence resources using Coherence*Extend
Deploy an EJB based Coherence applications
Manage the Coherence environment using JVisualVM and the
Coherence Plugin for JVisualVM
Secure an Coherence environment
Configure a Coherence environment using WLST
Resources
Oracle Coherence 12.1.3 documentation can be found here.
Oracle WebLogic Server 12.1.3 documentation can be found here.
The Oracle Coherence Interactive upgrade guide can be found here.
JVisualVM Introduction and OBE's can be found here.
To learn more about Coherence or any Oracle product please
visit the Oracle
Learning Library.
For your convenience a complete list of all OLL content
referencing Coherence can be found here.
Credits
This tutorial would not have been possible without the efforts of
Tim Middleton, who developed the original MCS workshop on which it
is based.
Lead Curriculum Developer: Al Saganich
Lead Coherence Developer: Tim Middleton
Other Contributors: Dave Felcey, Rebecca Sly, Noah Arliss,
Brian Oliver and others.
To navigate this Oracle by Example tutorial, note the
following:
Topic List:
Click a topic to navigate to that section.
Expand All Topics:
Click the button to show or hide the details for the
sections. By default, all topics are collapsed.
Hide All Images:
Click the button to show or hide the screenshots. By
default, all images are displayed.
Print:
Click the button to print the content. The content
that is currently displayed or hidden is printed.
To navigate to a particular section in this tutorial,
select the topic from the list.


 ) to refresh the display.
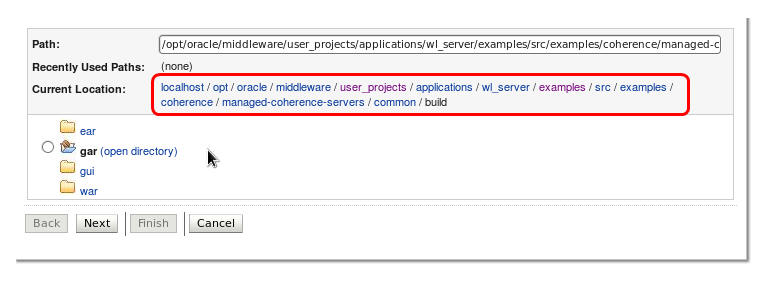
 Now that the ExampleGAR.gar is deployed we will deploy
the associated web application.
Now that the ExampleGAR.gar is deployed we will deploy
the associated web application.