This tutorial describes the process for extending
an Oracle WebLogic Server (WLS) domain on Oracle
Java Cloud Service (JCS) so that it includes Oracle
Enterprise Data Quality (EDQ).
Time to Complete
If you are creating the Cloud Storage, Database,
and Java Services, allow 3-4 hours for that.
For just the EDQ part, allow approximately 6
hours.
Background
Oracle Java Cloud Service (JCS) provides a
platform to develop and deploy business applications
in the cloud. JCS provides instant access to a cloud
environment with Oracle WebLogic Server, integrated
security, and database access. Oracle Enterprise
Data Quality (EDQ) provides a comprehensive data
quality management environment, used to understand,
improve, protect and govern data quality.
Scenario
By using Oracle Java Cloud Service, you can use an
Oracle WebLogic Server domain and set up your EDQ
environment without worrying about setting up any of
the infrastructure or platform components. All
Oracle Java Cloud Service instances that you create
are configured to use your Oracle Database Cloud
Service instance and an object storage container
that you create in Oracle Storage Cloud Service.
Context
This tutorial assumes a single node JCS
deployment.
What Do You Need?
The instructions in this tutorial assume that you
have a working Java Cloud Service Virtual Image
instance and that you have performed all of these
tasks:
Ensure that you have subscriptions for
Oracle Storage, Oracle Cloud Database, and
Oracle Java Cloud Service Virtual Image
environments.
The VM public key is used by the new
instance's VM for authentication when you
connect to it using an SSH client. When you
connect, you must provide the private key that
matches the public key.
When creating a Database Cloud Service (DBaaS)
instance and Java Cloud Service (JCS) Virtual
Image instance you need to specify the name of a
public key. You generate an SSH public/private
key pair using a standard SSH key generation
tool. For more information, see Creating
SSH Keys for Use with Oracle Cloud Services
in the Oracle Learning Library.
Configure an Oracle Cloud database
that meets the Java Cloud Service Virtual Image
deployment requirements.
For instructions, see Using Oracle Database
Cloud Service in the Oracle Help Center.
Note: When creating the Oracle
Database Cloud Service instance to use with
Oracle Java Cloud Service Virtual Image, make
sure you select Both Cloud Storage and Block
Storage as the backup option for the
database.
For instructions to create the DBaaS instance,
see the Appendix.
Make sure the ora_p2_dblistener network
access rule is enabled once the DBaaS
instance is created. See Enabling
Access to a Compute Node Port in Using
Oracle Database Cloud Service.
Create the Oracle Java Cloud Service
Virtual Image instance.
Oracle Java Cloud Service Virtual Image is a
part of the platform service offerings in Oracle
Public Cloud Services. You can quickly create
and configure an Oracle WebLogic Server domain
and set up your Java EE application environment
on Oracle Java Cloud Service, without worrying
about setting up any infrastructure or platform
details. All Oracle Java Cloud Service instances
that you create are preconfigured to use the
Oracle Database Cloud Service instance and an
object storage container.
Certified software release: Oracle WebLogic
Server 12c (12.1.3) Enterprise Edition with
Coherence.
Ensure that you have a Java Cloud Service
Virtual Image that is up and running.
For instructions to view all Oracle Java Cloud
Service Instances, see the Appendix.
Typographic Conventions
These are the conventions used throughout this
practice to indicate who types what.
Filename or /path/subdirectory/.
Often you can navigate to a destination without
having to type it.
Command or value that
you type, such as gedit .bashrc. Be
mindful of periods at the end of sentences that
are not part of the command.
Click this Button such as OK or
Next
Some variable or <variable>
as something you replace. Often prefixed with "my"
such as <myName> or <myHost>.
A Menu Item or dialog Field Prompt
or Tab name. For example, "click the Designer
tab and select Models > New Model".
Generally a red
rectangle in the graphics is not
part of the original image, but added to draw your
attention to an item.
Requirements
You should have already created a storage
container and the required Oracle Database Cloud
Service (DBCS) and JCS instances with the specified
configuration. For steps to complete these
prerequisites, see Appendix A – Setting Up Your
Environment.
Environment Assumptions
This tutorial assumes that your environment is
set up as per the following specifications:
SSH key: You need an SSH key to
create your DBCS and JCS instances. Ensure
that your SSH key has a bit size of 2048 or
higher. For steps to generate an SSH key
pair, see Generate an SSH Key Pair in
Appendix A – Setting Up Your Environment.
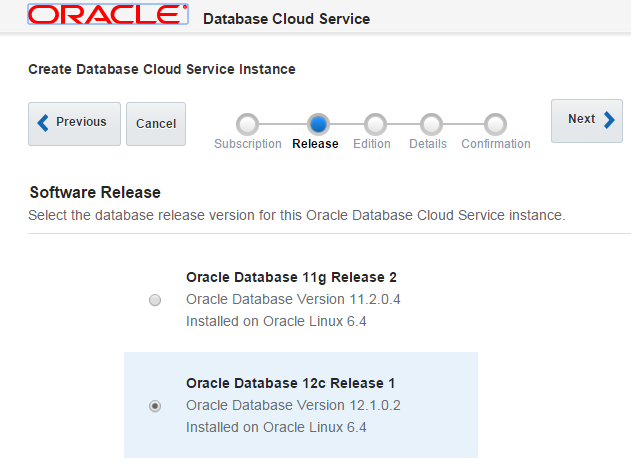
Oracle Database version: 12.1.0.2.
You select the database version when you
create your DBCS instance.
Oracle WebLogic Server version:
12.1.3.0.2. You select the Oracle WebLogic
Server version when you create your JCS
instance.
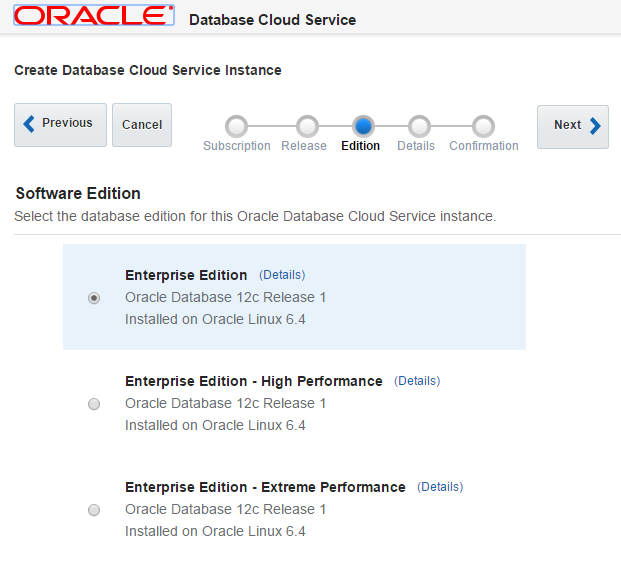
Oracle WebLogic Server edition:
Enterprise with Coherence. You select the
Oracle WebLogic edition when you create your
JCS instance.
JCS cluster size: 1 node. You
select the cluster size when you create your
JCS instance.
Compute shape: You select a
compute shape while creating DBCS and JCS
instances. Select the compute shape: OC3 – 1
OCPU, 7.5 GB RAM.
If your environment does not look like the one
described above, then the steps following will
not match exactly.
Naming Conventions
This tutorial refers to the two Oracle Compute
Units (OCPUs) as follows:
VM1: The Oracle Compute
Unit (OCPU) that hosts Oracle WebLogic
Server.
VM2: The OCPU that
hosts the Oracle Database.
Your OCPUs may be named something else.
Sizing and Versions
Please note the following critical points:
Only release 12.1.3 of Oracle Enterprise
Data Quality (EDQ) is supported on the Java
Cloud Service. The 12.1.3 instance of EDQ on
the Java Cloud Service can support 11.x
versions of Oracle Watchlist Screening and
the EDQ Customer Data Services Pack.
Oracle Enterprise Data Quality Address
Verification is not supported on the
Java Cloud Service.
For production purposes, the Oracle
Database Cloud Service (in other words, the
Oracle Compute Unit – or OCPU - that hosts
the Oracle Database) must have at least 500
GB storage.
For production purposes, the Oracle Java
Cloud Service (in other words, OCPU that
hosts the WebLogic Server), must have at
least 30 GB storage.
If you do not have the minimum versions and
sizes, the tutorial will not work properly.
These are the requirements to perform this OBE
tutorial.
Gather Important Information
Most, but not all, of this information, is
available from the Oracle Cloud console (some
information, such as user credentials, is not
available from the Oracle Cloud console -– you must
simply know these).
The following section provides an overview of how
to gather information about your JCS instance from
the Oracle Cloud console. In order to proceed with
this tutorial, you will need to gather the following
information about your JCS instance:
The Public IP address of VM1, the OCPU that
hosts Oracle WebLogic Server.
Scroll-down the page and click Oracle
Compute Cloud Service. The Oracle
Compute Cloud Service page will be
displayed, and you should be able to see
both VM1 (the OCPU that
hosts Oracle WebLogic Server) and VM2
(the OCPU that hosts the Oracle Database).
Note that in the screenshot above, among
the tags associated with the CSTest
db 1 OCPU are ORA.DCS
and ORA.DB. CSTest db 1
is the OCPU associated with the Oracle
Database Cloud Service. It contains the
Oracle Database. In this tutorial, this OCPU
is referred to as VM2.
Among the tags associated with the CSTestJCS
wls 1 OCPU are ORA.JCS
and ORA.WLS. CSTestJCS
wls 1 is the OCPU associated with
the Oracle Java Cloud Service. It contains
the WebLogic Server (WLS). In this tutorial,
this OCPU is referred to as VM1.
Click VM1 (in the
screenshot, this is CSTestJCS wls 1).
Information about VM1 is
displayed, including its Public IP Address.
Take a note of the Public IP address, as you
will need it later.
You have displayed the public IP address of
VM1, the OCPU that hosts WLS.
The Hostname of VM1.
VM1's hostname is also displayed. The
hostname is the first portion of the DNS
Name (the part before the first period). In
the screenshot below, VM1's hostname is cstestjcs-wls-1.
Take a note of the hostname, as you will
need it later.
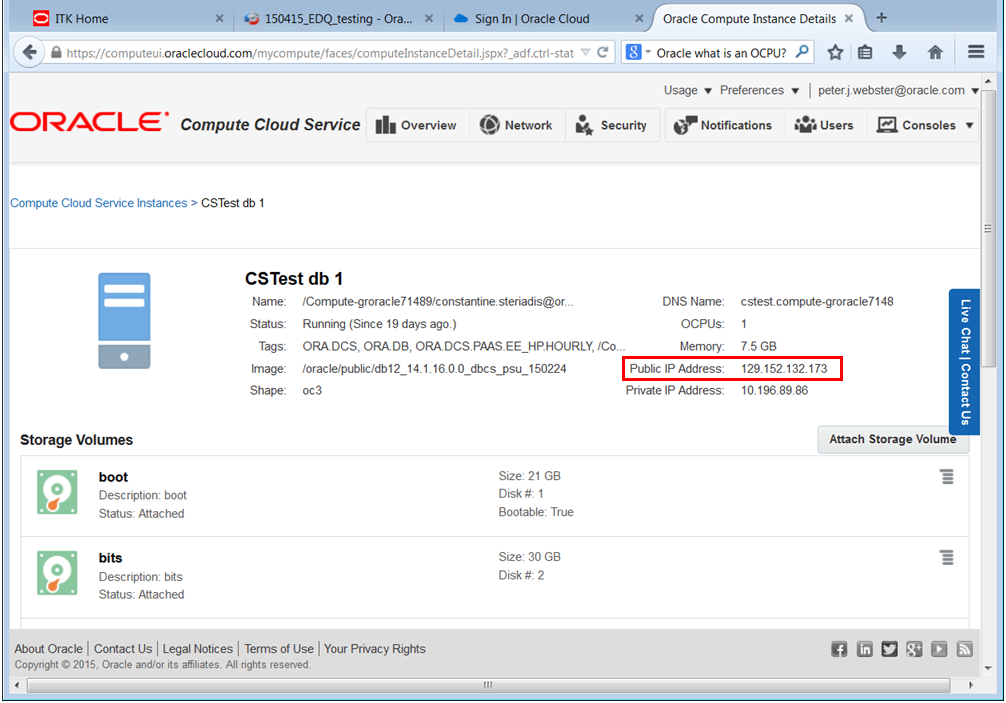
The Public IP address of VM2, the OCPU that
hosts the Oracle Database.
Click VM2 (in the
screenshot, this is CSTest db 1).
Information about VM2 is
displayed, including its Public IP Address.
Take a note of the Public IP address, as you
will need it later.
These keys are created as part of the SSH
tunneling.
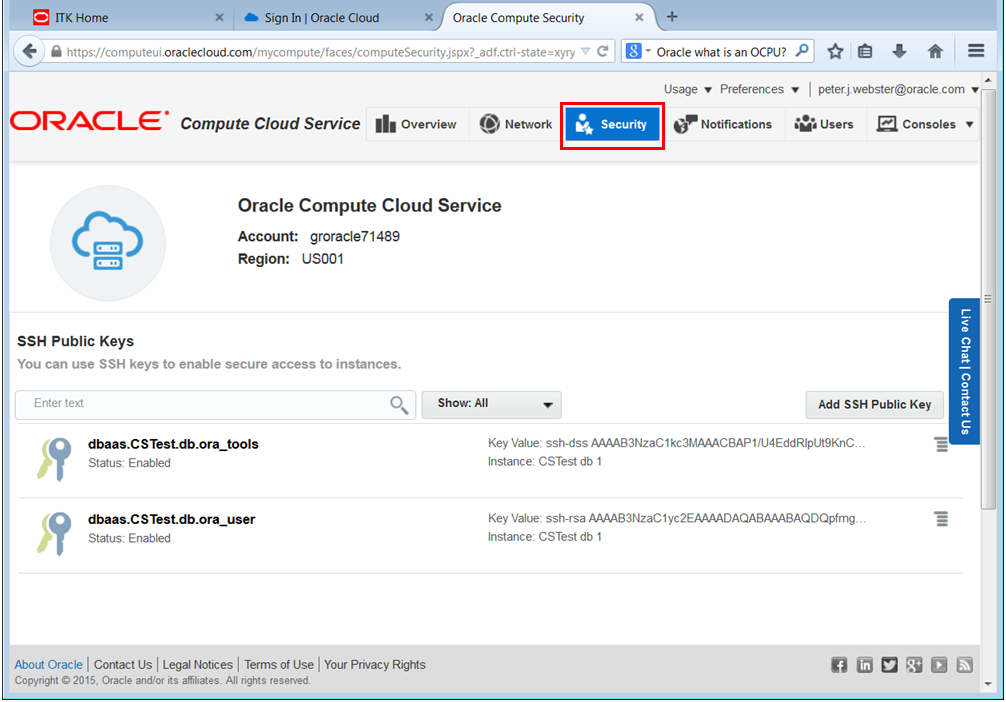
Click Security. You can view and
download the public keys associated with
your OCPUs. You will need the public keys
later in this process, so download them if
necessary (note that you will also need the
associated private keys that were deployed
during your installation of JCS – these are
not available from the console).
The WebLogic Server Administration Console
opens at the login page. You can see its URL
in your web browser's address bar. Take a
note of this URL, as you will need it later.
You have displayed (and should probably
bookmark) the WLS URL.
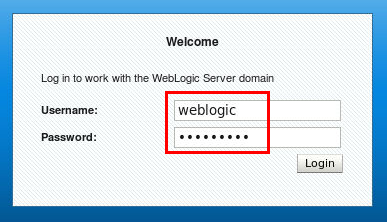
The WebLogic Username and Password.
Login to the WebLogic Server
Administration Console using your WebLogic
credentials (you should have kept a note of
these during your JCS installation).
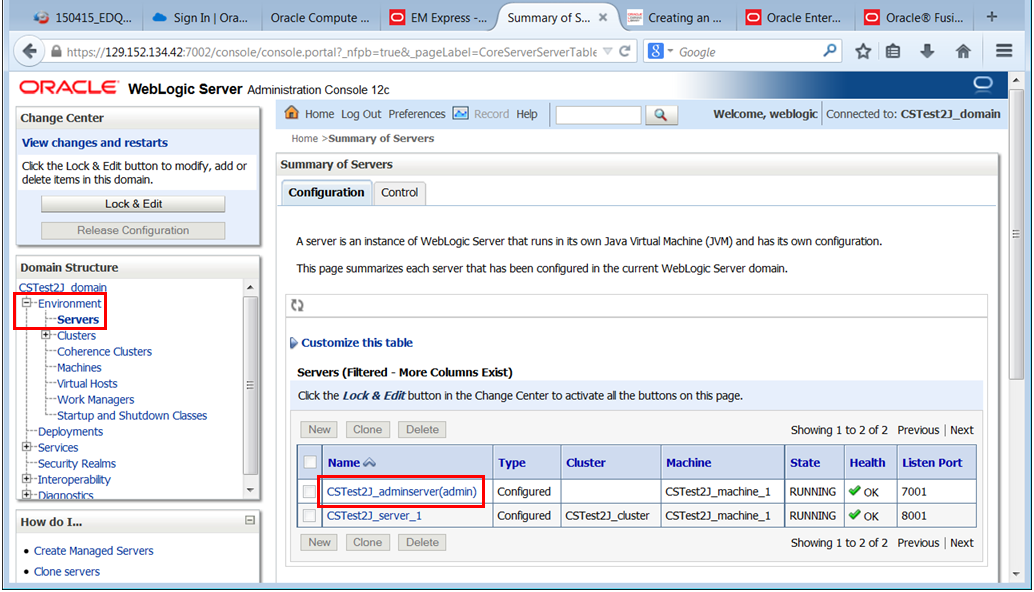
In the Domain Structure, on the left-side
of the screen, expand Environment
and click Servers. Take a note of
the name of the WebLogic Admin server, as
you will need it later (in the screenshot it
is CSTest2J_adminserver).
These keys may be the same as the public and
private keys for VM1.
Click Security. You can view and
download the public keys associated with
your OCPUs. You will need the public keys
later in this process, so download them if
necessary (note that you will also need the
associated private keys that were deployed
during your installation of DBCS – these are
not available from the console).
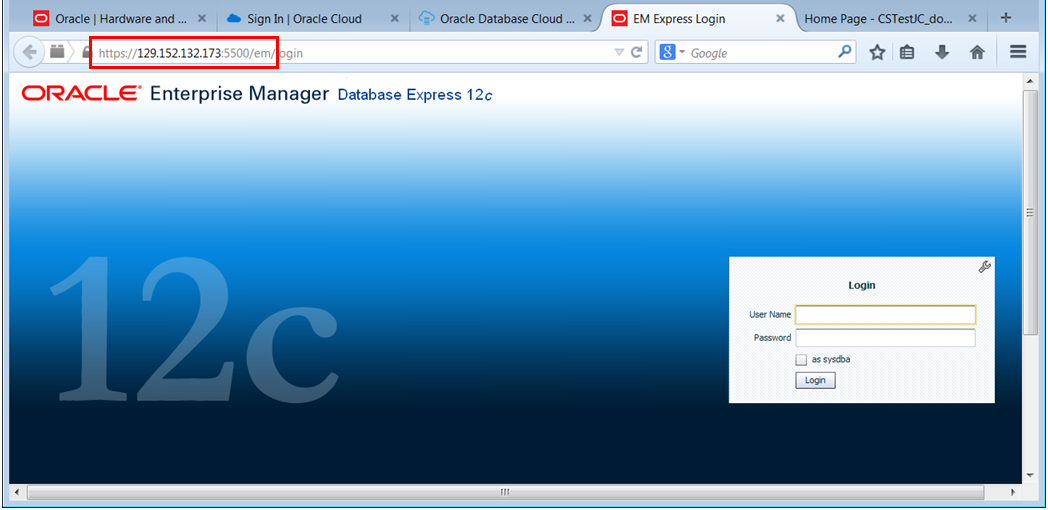
The Enterprise Manager console
login page is displayed. You can see its URL
in your web browser's address bar. Take a
note of this URL as you will need it later.
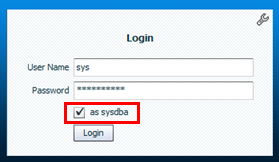
The Username and Password of an Oracle Database
User with System Privileges.
Ensuring that you select the as sysdba
check box, login to Enterprise Manager with
your Oracle Database credentials (you should
have taken a note of these during your
Oracle Database Cloud Service installation).
Make a note of all of this information as you will
need to enter it back in later.
Perform Pre-installation Tasks on Your JCS Instance
The Cloud services are designed for web browser
interfaces. In order to use non-browser based GUIs,
such as the Oracle Universal Installer, you need to
set up SSH, X Windows, and VNC.
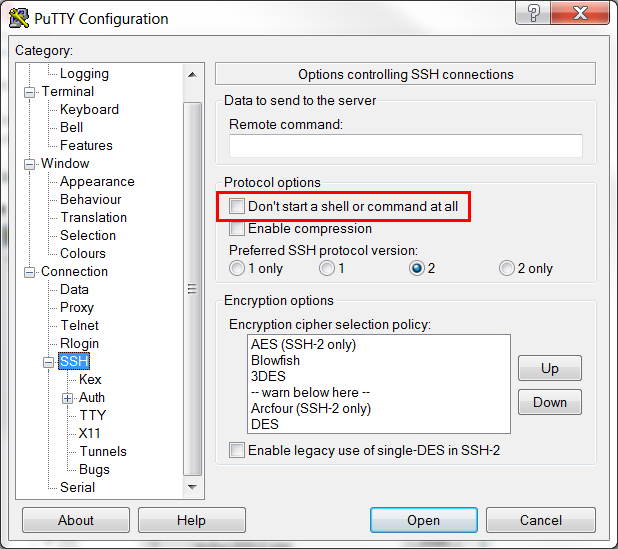
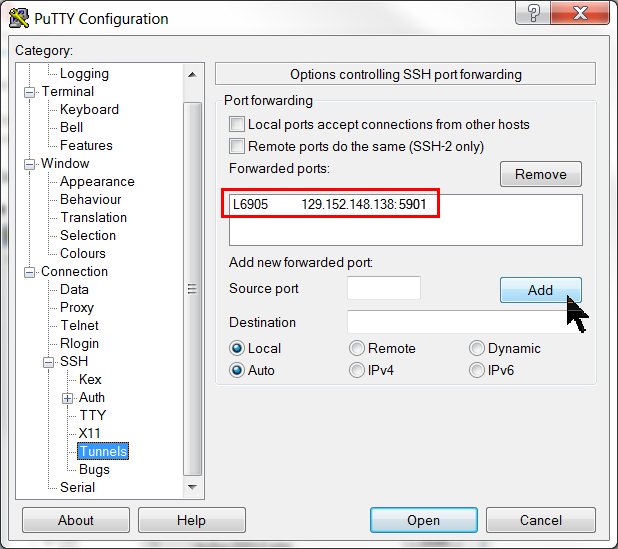
Create an SSH Tunnel
In order to log into the JCS OCPUs (or, in
other words, the VMs) remotely, you will need to
create an SSH tunnel from your local machine. If
your local machine uses a Windows operating
system, you can create your SSH tunnel using a
GUI client such as PuTTY. If you local machine
uses a UNIX or Linux operating system, then it
is likely that an SSH client is built into the
OS, and you should be able to create an SSH
tunnel from the command line. The following online
tutorial describes both of these methods.
Follow the tutorial above to create an SSH
tunnel and log in to VM1
(the OCPU that hosts the Oracle WebLogic
Server) remotely from your local machine
using your preferred method (either PuTTY or
via the command line).
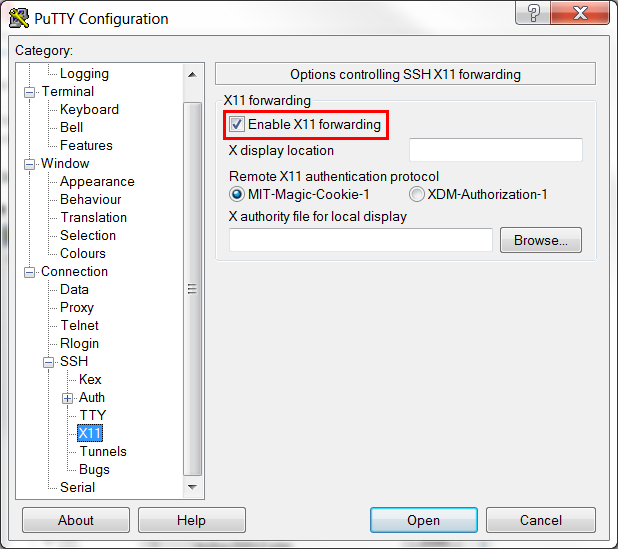
After step 15, in addition to the
steps outlined in the tutorial, In
the Category tree, click X11.
Select Enable X11 forwarding
and ensure that MIT-Magic-Cookie-1
is also selected.
Steps 20, 21 and 22 will not work
because you have used different
source and destination ports.
If you log on to the VM remotely using
the command line, take note of
the following key differences:
In step 2, use local port 6905
and destination port 5901.
Repeat step 1 to create an SSH tunnel to VM2
(the OCPU that hosts Oracle Database) and
log in remotely from your local machine
using your preferred method (either using
PuTTY or via the command line).
SSH is now enabled via either command line or
GUI.
Verify that the TMP Directory Exists and is
Writable
Log into VM1 remotely using either PuTTY or
the command line, and:
Edit the .bashrc file using
vi or equivalent: vi ~opc/.bashrc
Search for lines beginning with: export TMPDIR=
Change each matching line to: export TMPDIR=/tmp
Save the file and exit the editor: :wq
Source the updated config file: source ~opc/.bashrc
Check the permission of the /tmp
directory: cd / ls –l
If the permission is not currently 777,
change the permission of the /tmp
directory: sudo chmod 777 /tmp
The temporary directory is ready for the
installation process.
Forward the X Window System
The installation and configuration tools that
you use to install and configure EDQ require the
X Window system. The X Window system is already
installed on your JCS Admin server VM. You must
forward the X Window system to be able to view
and use an xterm or the
configuration wizard GUIs on your display.
To forward the X Window system, log into VM1
remotely using either PuTTY or the command line,
and:
Edit the sshd_config file: sudo vi /etc/ssh/sshd_config
Search for the following lines: X11Forwarding no
This line may occur more than once in this
file. Change all occurrences to: X11Forwarding yes
Save the file and exit the editor: :wq
Restart sshd: sudo /etc/init.d/sshd restart
X Window is now ready for forwarding.
Set the Display Environmental Variable
Log into VM1 remotely using either PuTTY or
the command line, and:
Set the DISPLAY environment
variable: export DISPLAY=IP_address_of_local_machine:1
Note: In this tutorial, italics
are used in commands to indicate
placeholders for variables. Substitute the
italicized text with your actual values. For
example, in the command above, substitute IP_address_of_local_machine
with the actual IP address of your local
machine in dotted decimal format, such as 192.168.100.1.
Download the EDQ Installation Zip File to Your
Local Machine
In the example below, EDQ is downloaded from
the Oracle Technology Network, where it is
available for evaluation purposes. However,
customers who have licensed EDQ should instead
download it from the Oracle Software Delivery
Cloud at https://edelivery.oracle.com/.
Click the Accept radio button to
accept the license agreement.
Download Oracle Enterprise Data
Quality 12.1.3 Generic to your local
machine. (You will not need the FMW
Infrastructure – this is preinstalled on
your JCS instance.)
You have downloaded the zip file containing
the EDQ binaries.
Copy the EDQ Installation Zip File to VM1
Ensure that the /u01 and /u01/zips
directories on VM1 have Write Permission before
copying.
If you logged out of VM1, log in as user opc
and run the following commands: sudo chmod 777 /u01 sudo chmod 777 /u01/zips
Use scp on your local
machine to copy the EDQ Installation zip
file to the /u01/zips
directory on VM1. If your local
machine runs a UNIX or Linux-based operating
system, you can do this from the command
line using the following command: scp –i path_to_SSH_private_key
edq_install_file.zip opc@IP_address_of_VM1:/u01/zips
Example (your IP address will be
different): scp -i ~/.ssh/id_rsa fmw*.zip
opc@192.168.100.1:/u01/zips
If your local machine runs a Windows
operating system, you can do this using a
GUI-based tool such as WinSCP.
The zip file is now on the JCS VM.
Set the EDQ Installation Zip File's
Permissions, and Extract its Contents
Log into VM1 remotely using either PuTTY or
the command line, and:
Set the following permissions for the EDQ
Installation zip file:
cd /u01/zips
sudo chown oracle:oracle edq_install_file.zip
sudo chmod 755 edq_install_file.zip
Confirm that the EDQ Installation zip file
has been copied: ls –l
This should list the EDQ Installation zip
file with the current timestamp.
As user oracle, unzip the
install file:
sudo su oracle
unzip edq_install_file.zip
Exit from PuTTY or your command line
session.
The zip file is extracted to a single jar
file.
Prepare to Run the Oracle Universal Installer
(OUI)
Log into VM1 remotely using either PuTTY or
the command line, and:
Enter hostname, and take a
note of your machine's hostname:
bash-4.1$ hostname
cstestjcs-wls-1
bash-4.1$
Enter echo $DISPLAY, and take
a note of the value in the DISPLAY
environmental variable.
bash-4.1$ echo $DISPLAY
localhost:10.0
Note: if the DISPLAY
variable has no value, you may need to start
the dbus system service. You can do this
with the following command: sudo
service messagebus start. Once the
dbus system service is started, try echo $DISPLAY
again.
Enter xauth list, and copy the
magic cookie associated with your host and
your display.
What you want is the last line associated
with display :10.
Swap user to the EDQ installation user
account: sudo su oracle
An operating system user account must be
used to install EDQ. EDQ requires several
directories to be created during its
installation, and the EDQ installation user
must have full permissions (read, write and
execute) to these directories. In this
guide, we will assume that oracle
is your EDQ installation user. Note that you
must not use the root
user as your EDQ installation user account.
Add the magic cookie (your cookie will be
different) to the EDQ installation user: xauth add magic_cookie
EDQ requires an installation directory.
This must be a sub-directory of the Oracle
Fusion Middleware home (installation)
directory. In this guide, we will assume
that the Oracle Fusion Middleware home
directory is /u01/app/oracle/middleware,
and that you call your EDQ installation
directory edq.
Create the EDQ installation directory:
cd oracle_fmw_home_directory
mkdir edq_install_directory
On your local machine, ensure that an
X-Server, such as Xming, is
running, and if not running then start one.
You are now ready to run the Oracle Universal
Installer gui.
The preinstallation steps related to ssh, GUIs,
zip files, and directories is completed.
Install Enterprise Data Quality
Log into VM1 remotely using either PuTTY or the
command line, and:
Installation Inventory Setup
A single jar file performs both the Inventory
and the Installer steps.
Move to the directory where you unzipped
the EDQ Installation zip file: cd /u01/zips
Start the EDQ Installer.
bash-4.1$  $JAVA_HOME/bin/java -jar fmw_12.1.3.0.0_edq.jar
Picked up _JAVA_OPTIONS: -Djava.io.tmpdir=/u01/app/oracle/tools/paas/tmpdir
Launcher log file is /u01/app/oracle/tools/paas/tmp/OraInstall2015-04-30_09-11-14AM/launcher2015-04-30_09-11-14AM.log.
Extracting files.....
Starting Oracle Universal Installer

Checking if CPU speed is above 300 MHz.  Actual 2992.874 MHz   Passed
Checking monitor: must be configured to display at least 256 colors. Actual 16777216    Passed
Checking swap space: must be greater than 512 MB.  Actual 4194300 MB   Passed
Checking if this platform requires a 64-bit JVM.  Actual 64   Passed (64-bit not required)
Checking temp space: must be greater than 300 MB.  Actual 8061 MB   Passed

Preparing to launch the Oracle Universal Installer from /u01/app/oracle/tools/paas/tmp/OraInstall2015-04-30_09-11-14AM/launcher2015-04-30_09-11-14AM
Picked up _JAVA_OPTIONS: -Djava.io.tmpdir=/u01/app/oracle/tools/paas/tmp
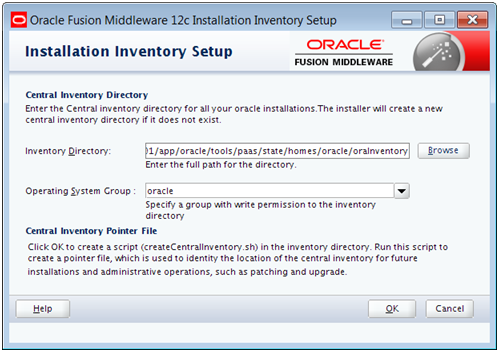
The Oracle Universal Installer (OUI) GUI
Installation Inventory will be displayed on
your local machine:
Click OK to accept the defaults
and start the installation.
On the Installation Location
screen, set the Oracle Home to your
JCS environment's existing Oracle Home. In
our case this is /u01/app/oracle/middleware.
Click View. This should confirm
that Oracle WebLogic Server for Fusion
Middleware is already installed, as
displayed in the screenshot:
On the Prerequisite Checks screen,
wait until both of the Prerequisite Checks
have been passed (the percentage at the top
of the screen should reach 100%).
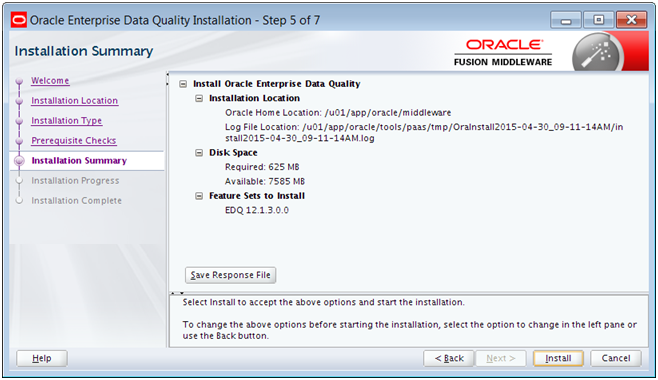
On the Installation Complete
screen, click Finish.
The software is installed but not configured.
The Inventory has been updated and the EDQ
software has been installed in the FMW Home.
Prepare the Oracle Database for EDQ
Oracle strongly recommends that you work
collaboratively with an experienced DBA in order to
make changes to the Oracle database, as outlined in
the following section.
Some of the tasks in this section can be
accomplished by either:
Executing sqlplus statements from
the command line, or
Using the Enterprise Manager GUI
Examples of both these approaches have been given.
Connect to the Oracle Database from a Remote
Machine
Log into VM2, the virtual machine that hosts
the Oracle Database, remotely, using either
PuTTY or the command line, and:
Switch to the EDQ Installation user and
set the database environment properties
(note the leading period+space):
-bash-4.1$ sudo su oracle
[oracle@CSTest opc]$ . oraenv
ORACLE_SID = [ORCL] ? [Enter]
The Oracle base has been set to /u01/app/oracle
[oracle@CSTest opc]$
Connect to the database as sysdba
[oracle@CSTest opc]$ sqlplus / as sysdba

SQL*Plus: Release 12.1.0.2.0 Production on Thu Apr 30 10:19:01 2015
Copyright (c) 1982, 2014, Oracle.  All rights reserved.

Connected to: Oracle Database 12c Enterprise Edition Release 12.1.0.2.0 - 64bit Production

SQL>
You are now connected as sys with DBA
privileges.
Configure Process and Session Limits for the
Oracle Database
Some of these values may already be okay.
Identify the processes and session limits.
SQL> SELECT resource_name, limit_value FROM v$resource_limit WHERE resource_name IN ('processes','sessions');

RESOURCE_NAME    LIMIT_VALUE
-------------    -----------
processes               300
sessions                472
If, as in the screenshot, the LIMIT_VALUE
of either processes or sessions is less than
500, then increase them to 500.
SQL> alter system set processes=500 scope=spfile;
System altered

SQL> alter system set sessions=500 scope=spfile;
System altered
If you had to increase either of the LIMIT_VALUEs,
you must restart the database for the new
values to take effect.
Check the size and configuration of the
Oracle database's USERS and UNDO
tablespaces. You can check these values with
a SQL statement similar to the one displayed
below:
SQL> select FILE_NAME, TABLESPACE_NAME, BYTES/1024/1024, MAXBYTES/1024/1024, AUTOEXTENSIBLE from dba_data_files where TABLESPACE_NAME like 'USER%' or TABLESPACE_NAME like 'UNDO%';

FILE_NAME                                   TABLESPACE_NAME  BYTES/1024  MAXBYTES/1024  AUT
------------------------------------------  ---------------  ----------  -------------  ---
/u02/app/oracle/oradata/ORCL/users01.dbf    USERS                     5     32767.9844  YES
/u02/app/oracle/oradata/ORCL/undotbs01.dbf  UNDOTBS1                395     32767.9844  YES
In the screenshot above, both tablespaces
are currently quite small, their maximum
sizes are in excess of 30GB and autoextend
is on. You can find the recommended sizes
for the user and undo tablespaces in the Installing
the Required External Software Components
section of the Oracle®
Fusion Middleware Installing and
Configuring Oracle Enterprise Data
Quality.
You may find that performance is improved
by setting autoextend to off,
and creating tablespace data files that have
an appropriate permanent size. Some example
SQL statements are given below (the actual
statements you use will depend upon the size
of your existing tablespaces, where the
available space on your environment is
located, and so on). In the examples, we
alter the size of a datafile and turn autoextend
off:
Note: Before resizing tablespace
datafiles, you must ensure that there is
sufficient free storage in your JCS
environment. Also note that, as well as
resizing the users tablespace (as
illustrated in the example below), you may
need to resize the undo tablespace.
SQL> ALTER DATABASE DATAFILE '/u02/app/oracle/oradata/ORCL/users01.dbf' RESIZE 2048M;
Database altered

SQL> ALTER DATABASE DATAFILE '/u02/app/oracle/oradata/ORCL/users01.dbf' AUTOEXTEND OFF;
Database altered
The database tablespaces for EDQ are set.
Configure the Oracle Database's PGA and SGA
Work with your DBA before changing these
values.
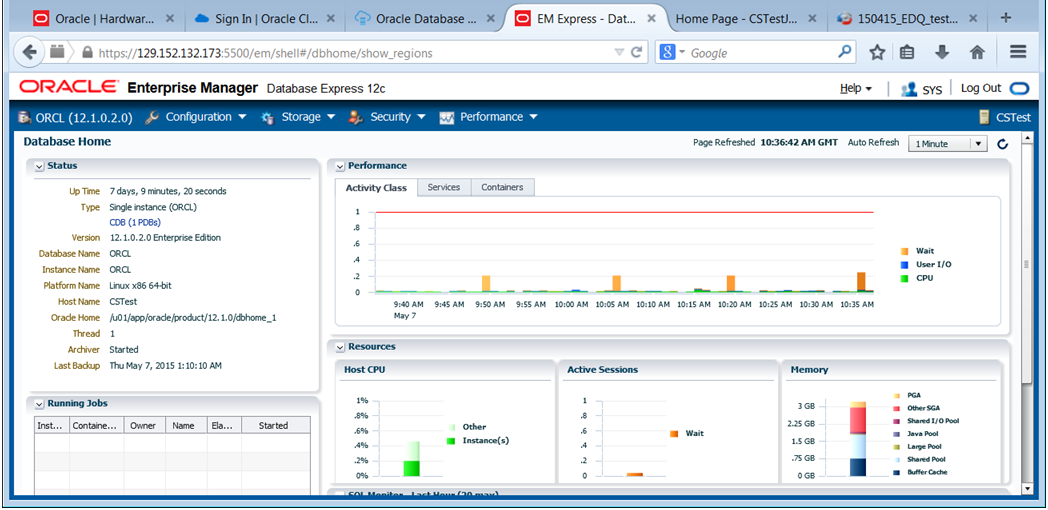
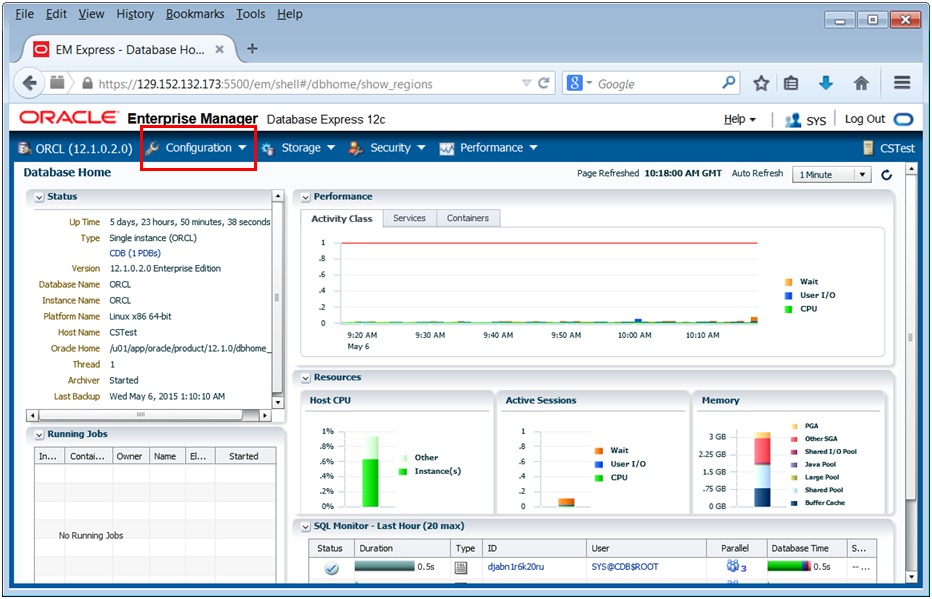
Using a web browser on your local machine
navigate to http://IP_address_of_VM2:5500/em.
The Oracle Enterprise Manager Database
Express 12c login screen is displayed.
Login using your credentials, ensuring
that you select as sysdba.
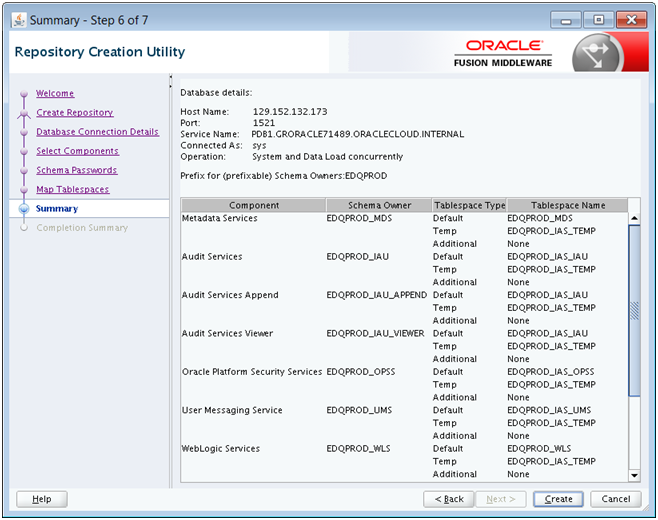
On the Select Components screen,
select Create new prefix and enter a
prefix name for the database schemas you are
creating. For example, EDQPROD
or the default of DEV.
Select Oracle AS Repository Components.
The Oracle EDQ check boxes that create the
EDQ configuration and results schemas in the
database repository are then all
automatically selected.
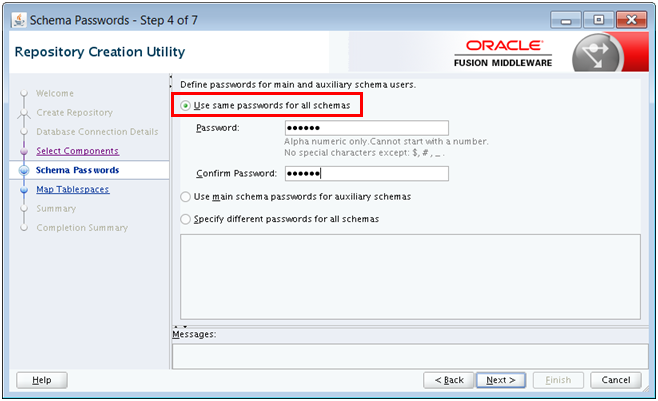
On the Schema Passwords screen,
ensure that Use same passwords for all
schemas is selected, and enter the
password that you want to use for all of the
EDQ database schemas in both password
fields.
On the Map Tablespaces screen,
take a note of the Default Tablespace
names for the following Components, as you
will need to know these later:
EDQ Config Repository
EDQ Results Repository
Note that in our case the Tablespace names
are EDQPROD_EDQ_CONF and EDQPROD_EDQ_RES
respectively. Do not change any of the
default tablespaces. Click Next.
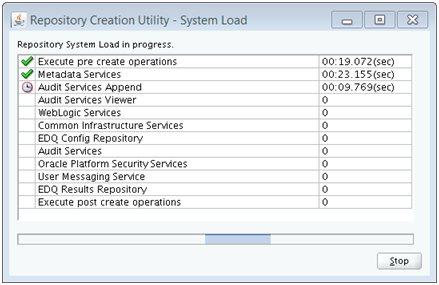
When repository creation is complete (in
this example it took just over 5 minutes),
the Completion Summary screen will
be displayed. Click Close to exit
from the Repository Creation Utility.
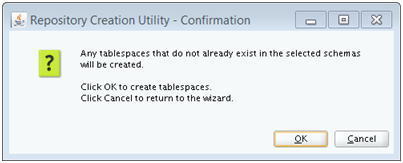
The schemas and tablespaces needed for EDQ are
now created in the database.
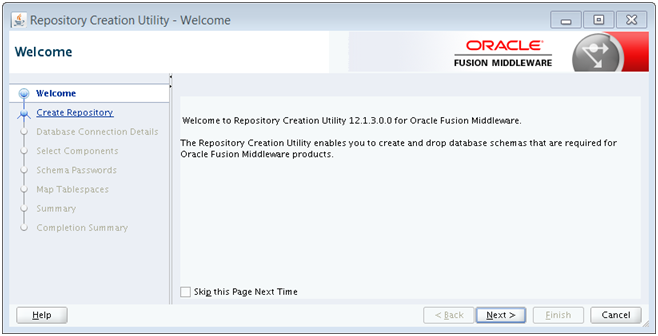
RCU is the tool to create and drop repositories in
the database.
Extend the Results and Config
Tablespaces
In order for EDQ to function efficiently and in
order for it to be able to process large volumes of
data, sufficient storage space must be allocated to
the tablespaces for the following components:
EDQ Config Repository
EDQ Results Repository
For production purposes, Oracle recommends the
following minimum tablespace configuration, which in
some cases may need to be extended:
30 GB total for the EDQ Config Repository, held
in a single file with autoextend
turned off.
120 GB total for the EDQ Results Repository,
made up of four 30GB files with autoextend
turned off.
Connect to the Oracle Database from a Remote
Machine
Log into VM2, the virtual machine that hosts
the Oracle Database, remotely, using either
PuTTY or the command line, and:
Switch to the EDQ Installation user and
set the database environment properties:
-bash-4.1$ sudo su oracle
[oracle@CSTest opc]$ . oraenv
ORACLE_SID = [ORCL] ? [Enter]
The Oracle base has been set to /u01/app/oracle
[oracle@CSTest opc]$
Connect to the database as sysdba:
[oracle@CSTest opc]$ sqlplus / as sysdba
SQL*Plus: Release 12.1.0.2.0 Production on Thu Apr 30 10:19:01 2015
Copyright (c) 1982, 2014, Oracle. All rights reserved.
Connected to: Oracle Database 12c Enterprise Edition Release 12.1.0.2.0 - 64bit Production
SQL>
Connect to the Pluggable database that
holds the EDQ repository.
SQL> ALTER SESSION SET CONTAINER = PDB1;
Session altered.
SQL>
Check the size and configuration of the
pluggable database's tablespaces for the EDQ
Config Repository and the EDQ Results
Repository.
Note: You should have kept a note
of the default tablespace names for the EDQ
Config Repository and the EDQ Results
Repository components when you created the
EDQ repository.
You can check these size and tablespace
values with a SQL statement similar to this
one:
SQL> select FILE_NAME, TABLESPACE_NAME, BYTES/1024/1024, MAXBYTES/1024/1024, AUTOEXTENSIBLE from dba_data_files where TABLESPACE_NAME like 'EDQPROD_EDQ_CONF' or TABLESPACE_NAME like 'EDQPROD_EDQ_RES';
FILE_NAME TABLESPACE_NAME BYTES/1024 MAXBYTES/1024 AUT
-------------------------------------------------- ---------------- ---------- ------------- ---
/u02/app/oracle/oradata/EDQPROD_edq_conf.dbf EDQPROD_EDQ_CONF 200 1000 YES
/u05/app/oracle/oradata/ORCL/EDQPROD_edq_res_3.dbf EDQPROD_EDQ_RES 10240 0 NO
/u05/app/oracle/oradata/ORCL/EDQPROD_edq_res_2.dbf EDQPROD_EDQ_RES 10240 0 NO
/u01/app/oracle/oradata/EDQPROD_edq_res.dbf EDQPROD_EDQ_RES 10240 0 NO
In the screenshot above, the EDQ Config
Repository tablespace consists of a single
file that has a maximum size of 1000 MB with
autoextend switched on, and the
EDQ Results Repository tablespace consists
of three files, each of which is 10 GB in
size with autoextend switched
off. Note that a new install of EDQ is
likely to have a single file for the EDQ
Config Repository and a single file for the
EDQ Results Repository.
Configure the tablespaces for the EDQ
Config Repository and the EDQ Results
Repository so that they meet or exceed the
minimum configuration suggested at the start
of this section. Before resizing a
tablespace, you must ensure that there is
sufficient free storage in your environment.
Some example SQL statements are given below
(the actual statements you use will depend
upon where you want to place your datafiles,
the name of your tablespaces, and so on):
SQL> ALTER DATABASE DATAFILE '/u02/app/oracle/oradata/EDQPROD_edq_conf.dbf' RESIZE 30G AUTOEXTEND OFF;
This statement resizes a
tablespace data file to 30GB and sets autoextend
off.
This statement creates a 30GB
datafile, adding it to a tablespace called
EDQPROD_EDQ_RES with autoextend
switched off.
The EDQ tablespaces are now the right size.
Extend the WebLogic Domain to Include EDQ
The creation of a JCS creates a default domain.
You can extend that existing domain (as this
tutorial will show), or create a new one.
Set Environmental Variables
Log into VM1 remotely using either PuTTY or
the command line, and:
Switch to the EDQ Installation user: sudo su oracle
Change to the proper directory: cd /u01/data/domains/CSTestJC_domain/bin/
Set the WebLogic environmental variables:
./setDomainEnv.sh
The WLS environment variables have ben set for
this session.
Shutdown Running WebLogic Servers
The Node Manager is a background process that
can be used to start and stop WLS servers via
the command line. As long as the Admin Server is
up, you can start and stop managed servers from
the browser Console.
Switch to the proper directory: cd
/u01/app/oracle/middleware/oracle_common/common/bin/
Start the WebLogic Scripting Tool (WLST):
./wlst.sh
bash-4.1$ ./wlst.sh
Picked up _JAVA_OPTIONS: -Djava.io.tmpdir=?u01/app/oracle/tools/paas/tmp
Initializing WebLogis Scripting Tool (WLST) ...
Welcome to WebLogic Server Administration Scripting Shell
Type help() for help on available commands
wls:/offline>
Connect to the WebLogic Node Manager using
the following syntax: nmConnect('user','password','nm_host','nm_port','domain_name','domain_directory','nm_type[plain|rsh|ssh|ssl]')
wls:/offline> nmConnect('weblogic','Test_00123','cstestjcs-wls-1','5556','CSTestJC_domain','/u01/data/domains/CSTestJC_domain','ssl')
Connecting to Node Manager...
<Apr 30, 2015 3:21:16 PM UTC> <Info> <Security> <BEA-090905> <Disabling the CryptoJ JCE Provider self-integrity check for better startup performance. To enable this check, specify -Dweblogic.security.allowCryptoJDefaultJCEVerification=true.>
<Apr 30, 2015 3:21:17 PM UTC> <Info> <Security> <BEA-090906> <Changing the default Random Number Generator in RSA CryptoJ from ECDRBG128 to FIPS186PRNG. To disable this change, specify -Dweblogic.security.allowCryptoJDefaultPRNG=true.>
<Apr 30, 2015 3:21:17 PM UTC> <Info> <Security> <BEA-090909> <Using the configured custom SSL Hostname Verifier implementation: weblogic.security.utils.SSLWLSHostnameVerifier$NullHostnameVerifier.>
Successfully connected to Node Manager.
wls:/nm/CSTestJC domain >
Stop the WebLogic Admin Server.
wls:/nm/CSTestJC domain > nmKill('CSTestJC_adminserver')
Killing server CSTestJC_adminserver ...
Successfully killed server CSTestJC_adminserver
wls:/nm/CSTestJC domain >
Enter exit to exit from the
WebLogic Scripting Tool and close the PuTTY
session.
Now that the Admin Server is stopped, it is
safe to extend the domain.
Prepare to Start the Fusion Middleware
Configuration Wizard
Log into VM1 remotely using either PuTTY or
the command line, and:
Enter hostname, and take a
note of your machine's hostname. In this
case the hostname is cstestjcs-wls-1,
yours may be different.
bash-4.1$ hostname
cstestjcs-wls-1
bash-4.1$
Enter echo $DISPLAY, and take
a note of the value in the DISPLAY
environmental variable.
bash-4.1$ echo $DISPLAY
localhost:10.0
Enter xauth list, and copy the
magic cookie associated with your host and
your display.
On your local machine, ensure that an
X-Server, such as Xming, is
running, and if not running then start one.
You are now ready to run the FMW Configuration
Wizard.
Start the Fusion Middleware Configuration
Wizard
Switch to the proper directory. Note that
in some cases, config.sh may
be located in /u01/app/oracle/middleware/oracle_common/bin.
cd
/u01/app/oracle/middleware/oracle_common/common/bin
Start the Fusion Middleware Configuration
Wizard: ./config.sh
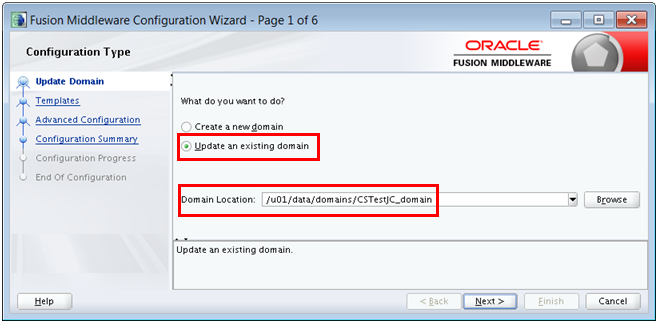
On Configuration Type, select Update
an existing domain, and ensure that
your Domain Location field holds the
location of your JCS environment's domain.
On the Database Configuration Type
screen, ensure that RCU Data is
selected. This populates the connection
information you supplied when you ran the
Repository Creation Utility.
Click Get RCU Configuration to
test the connection.
Once the connection has been successfully
tested, click Next.
On the JDBC Component Schema
screen, ensure that the configuration
details for the EDQ Configuration and EDQ
Results schemas are the same as those you
set up when you ran the Resource
Configuration Utility above. If they are
not, then edit them.
On the JDBC Test screen, the
connections to the EDQ Configuration schema
and the EDQ Results Schema should both be
automatically tested. If either connection
test fails, return to the previous screen to
edit the connection configuration.
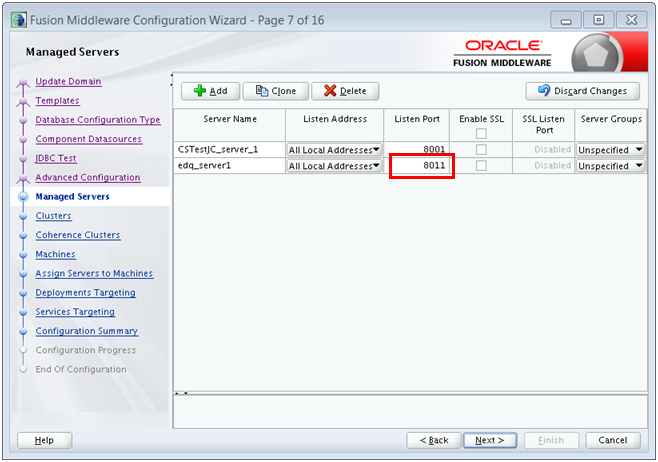
On the Managed Servers screen,
update the edq server's Listen Port
to a port number that is both unique and
unused by any other service (in the
screenshot, the Listen Port is set
to 8011).
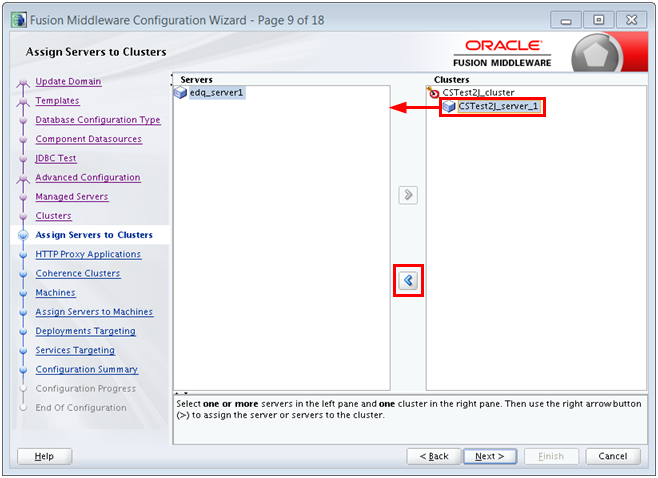
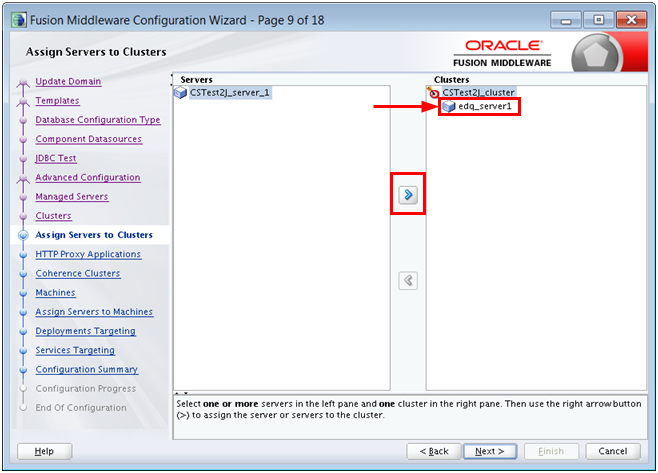
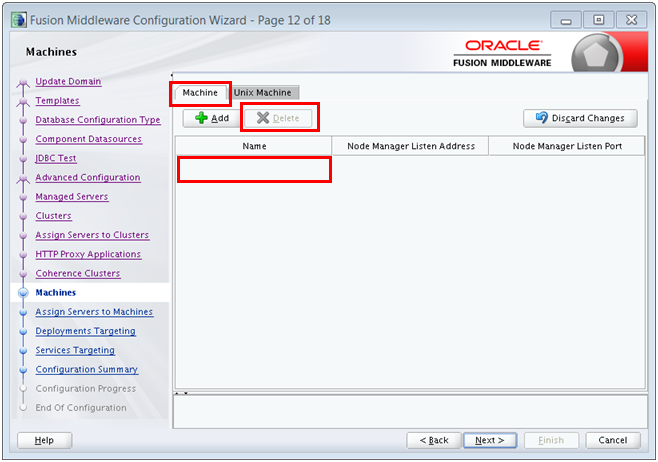
On the Assign Servers to Clusters
screen, select any server that is currently
assigned to the cluster (for example CSTest2jC_server_1),
and then click < to un-assign it.
Then select the EDQ server (edq_server1
in the screenshot), and click >
to assign it to the cluster. The resultant
configuration should be as displayed:
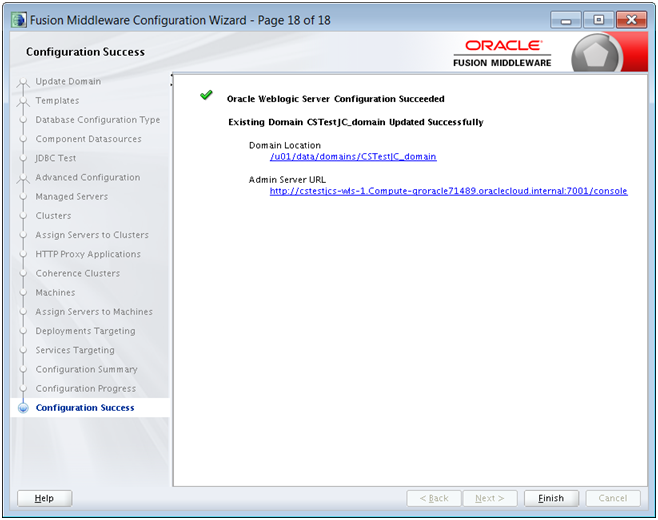
The domain has been extended and configured to
support EDQ.
Start the WebLogic Servers
Log into VM1 remotely using either PuTTY or
the command line, and:
Switch to the EDQ Installation user: sudo su oracle
Change to the proper directory for
domains: cd /u01/data/domains/CSTestJC_domain/bin/
Set the WebLogic environmental variables:
./setDomainEnv.sh
Change to the proper directory for WLST: cd
/u01/app/oracle/middleware/oracle_common/common/bin/
Start the WebLogic Scripting Tool (WLST):
./wlst.sh
bash-4.1$ ./wlst.sh
Picked up _JAVA_OPTIONS: -Djava.io.tmpdir=?u01/app/oracle/tools/paas/tmp

Initializing WebLogis Scripting Tool (WLST) ...
Welcome to WebLogic Server Administration Scripting Shell
Type help() for help on available commands

wls:/offline>
Connect to the WebLogic Node Manager using
the following syntax: nmConnect('user','password','nm_host','nm_port','domain_name','domain_directory','nm_type[plain|rsh|ssh|ssl]')
wls:/offline> nmConnect('weblogic','Test_00123','cstestjcs-wls-1','5556','CSTestJC_domain','/u01/data/domains/CSTestJC_domain','ssl')
Connecting to Node Manager...
<Apr 30, 2015 3:21:16 PM UTC> <Info> <Security> <BEA-090905> <Disabling the CryptoJ JCE Provider self-integrity check for better startup performance. To enable this check, specify -Dweblogic.security.allowCryptoJDefaultJCEVerification=true.>
<Apr 30, 2015 3:21:17 PM UTC> <Info> <Security> <BEA-090906> <Changing the default Random Number Generator in RSA CryptoJ from ECDRBG128 to FIPS186PRNG. To disable this change, specify -Dweblogic.security.allowCryptoJDefaultPRNG=true.>
<Apr 30, 2015 3:21:17 PM UTC> <Info> <Security> <BEA-090909> <Using the configured custom SSL Hostname Verifier implementation: weblogic.security.utils.SSLWLSHostnameVerifier$NullHostnameVerifier.>
Successfully connected to Node Manager.
wls:/nm/CSTestJC domain >
Start the WebLogic Admin Server.
wls:/nm/CSTestJC domain > nmStart('CSTestJC_adminserver')
Starting server CSTestJC_adminserver ...
Successfully started server CSTestJC_adminserver ...
wls:/nm/CSTestJC domain >
Enter exit to exit from the
WebLogic Scripting Tool and close the PuTTY
session.
The WLS Admin Server is started. Now most of
the rest of the work can be done from a browser
on the WLS Console.
Start the EDQ Application Server
Navigate to the WebLogic Server
Administration Console in a web browser on
your local machine: https://ip_address_of_VM1:7002/console
In the Domain Structure list, on the left
of the screen, expand Environment
and click Servers. In the list of
servers, click the edq server (in the
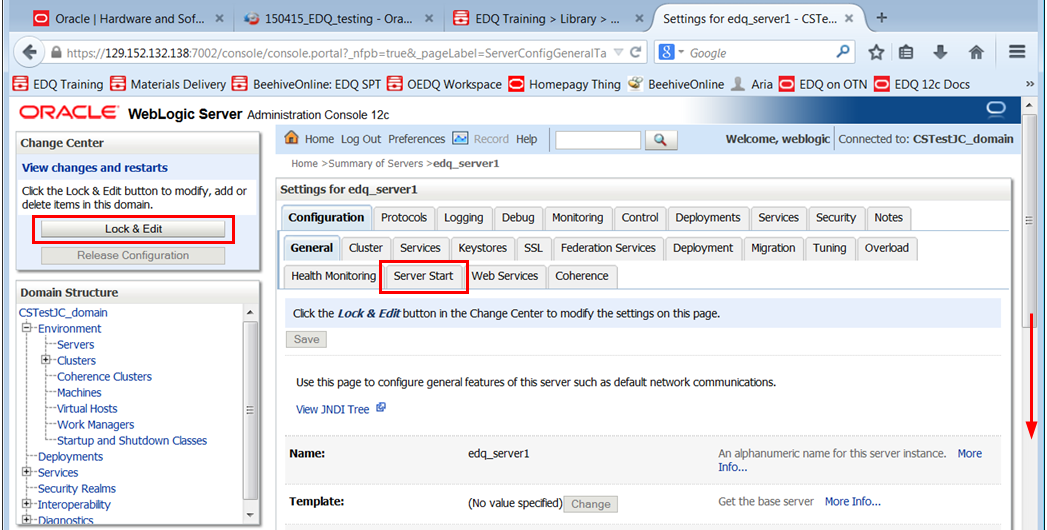
screenshot, this is edq_server1).
Scroll down to the Arguments
field, and enter the EDQ application
server's Java startup arguments. The values
that you enter will depend on the
configuration of your server, and the amount
of memory that you are able to allocate to
the java heap (the key variable in this
respect is -Xmx). Here is an
example:
See the Setting Server Parameters
to Support Enterprise Data Quality
section of the Oracle® Fusion
Middleware Installing and Configuring
Oracle Enterprise Data Quality
guide for more information about startup
parameters.
In the Domain Structure on the left-side
of the screen, navigate back to Servers
and click .
When the State of the edq server changes to
RUNNING, the EDQ server has
started.
All of the servers needed to support EDQ are
started.
The WLS domain has been extended to support EDQ.
Configure EDQ for High Availability
Configuring EDQ for high availability is an
optional step. Whether or not it is necessary
depends upon your requirements.
In order to configure EDQ to be highly available
on JCS you need to deploy a number of EDQ
application servers, each within its own WebLogic
managed server. Each EDQ application server must:
Listen on a different port.
Note that this is only necessary if the EDQ
application servers are on the same virtual
machine (if they are on different virtual
machines, we would recommend using the same listen
port.)
Have its own database repository (in other
words, its own pair of Config and Results
datasources; these can be in the same database
instance / RAC cluster).
To create multiple repositories, run the
Repository Creation Utility (RCU) multiple times.
Have its own config directory
Be able to access a base config directory that
is used by all of the application servers
Be able to access a config directory that is
shared with all of the other application servers
Use the server startup argument -Dedq.config.path
to set its config directory search sequence (base,
then shared, then server-specific)
Share the same EDQ installation directory as
all of the other EDQ application servers
Be deployed within the same WebLogic cluster as
all of the other EDQ application servers.
All of the deployments and shared data sources
(OPSS) must be deployed to this cluster rather
than to specific managed servers.
For more information about configuring EDQ for
High Availability, including how to configure it,
and examples of when it should be undertaken, see
the
EDQ High Availability Guide .
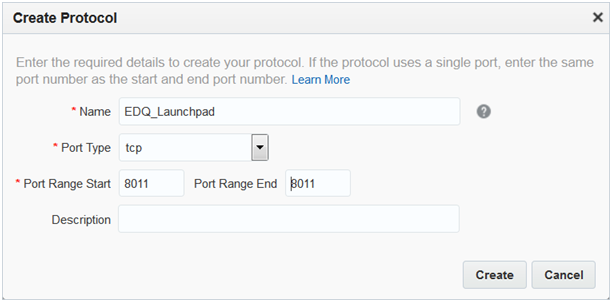
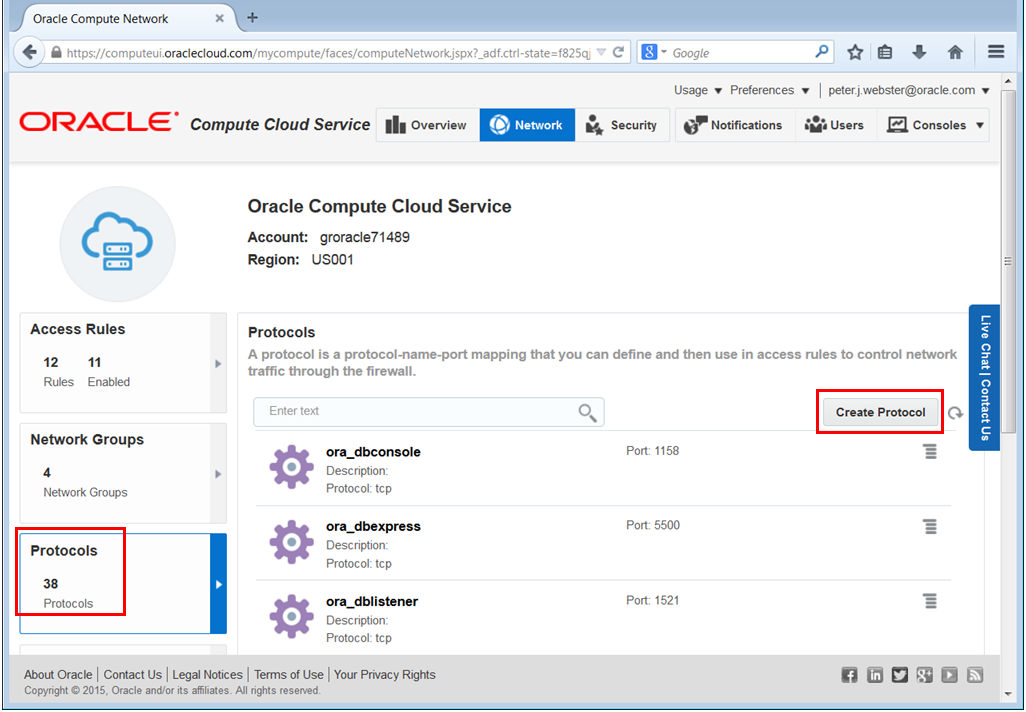
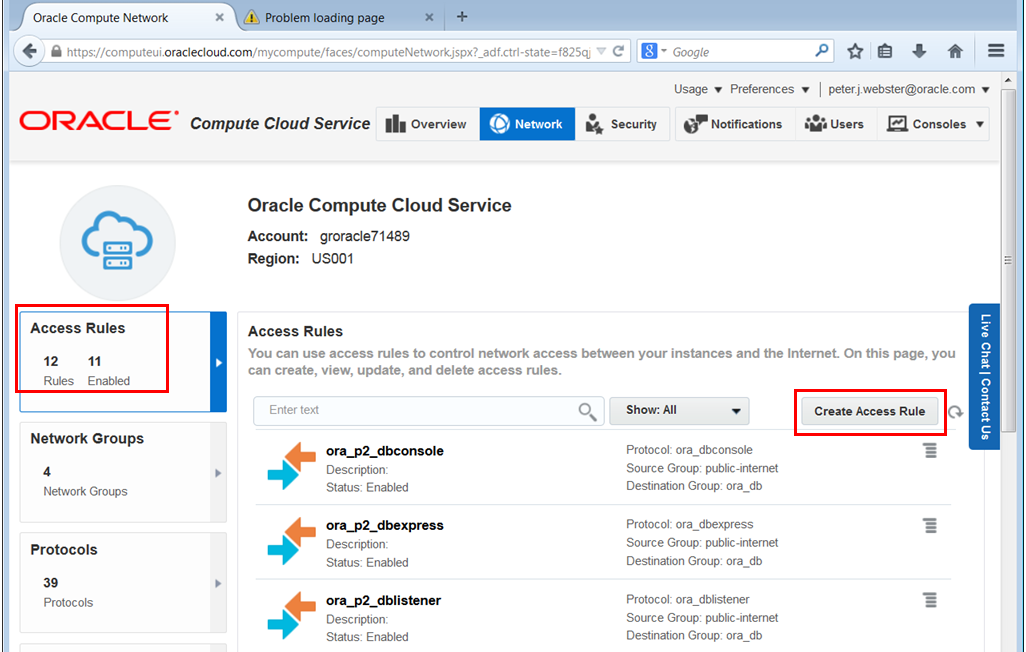
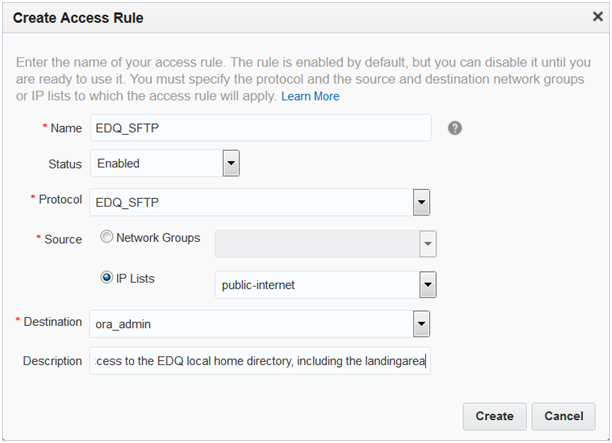
Open Ports for EDQ
Open a Port for the EDQ Launchpad
From a web browser on your local machine,
log into the Oracle Compute Cloud
Service.
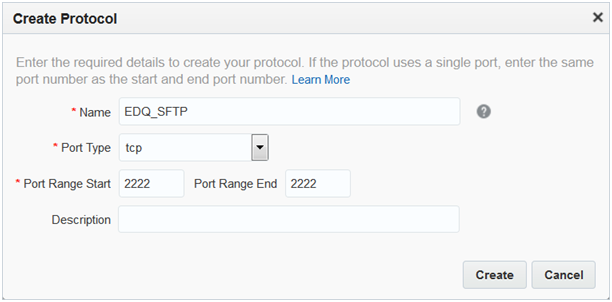
EDQ is supplied with an SFTP server. By
default the EDQ SFTP server uses port 2222,
which is now open. You should therefore be able
to transfer files to the oedq.local.home
directory, including its landingarea
sub-directory, using SFTP (You must connect as a
user with appropriate permissions. You can test
this using your WebLogic user, which, as an EDQ
administrator, will have permission to transfer
files using SFTP). For more information about
EDQ's SFTP server, see the
Accessing EDQ Files Remotely
section of the Oracle® Fusion Middleware
Administering Oracle Enterprise Data Quality
.
The necessary ports are now open.
Validate Your Installation
Navigate to the Launchpad
Using a web browser on your local machine,
navigate to http://IP_address_of_VM1:8011/edq.
The Oracle Enterprise Data Quality Launchpad
should be displayed. Click Director.
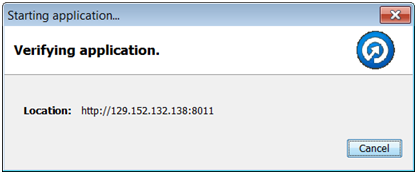
The Director Java Web Start client
will be downloaded from VM1 to your local
machine. The Starting application
dialog should be displayed. This will
sometimes say, Downloading application,
and sometimes say, Verifying application.
A Security Warning dialog may be
displayed. In order to access Director, you
will need to accept the risk and click Run.
(The actual verbiage varies by browser:
Chrome is different than Firefox, and so
on.)
The Login dialog should be displayed.
Enter the credentials of your WebLogic user,
and click OK.
Your WebLogic user will be an EDQ
administrator, with wide-ranging security
privileges. Typically you would want to
create other accounts with more restricted
access for your regular EDQ users. You can
find out more about how to do this in EDQ's
online help. To access the online help from
the Director UI, select Help from
the Help menu, and the online help
will open in a web browser. Click Open
topic with navigation, and then search
for and display the Overview of user
security topic. When installed in JCS, EDQ
users are managed externally. To find out
about this, scroll down the Overview of user
security topic and read the information
under the Users and Groups in External
User Management heading.
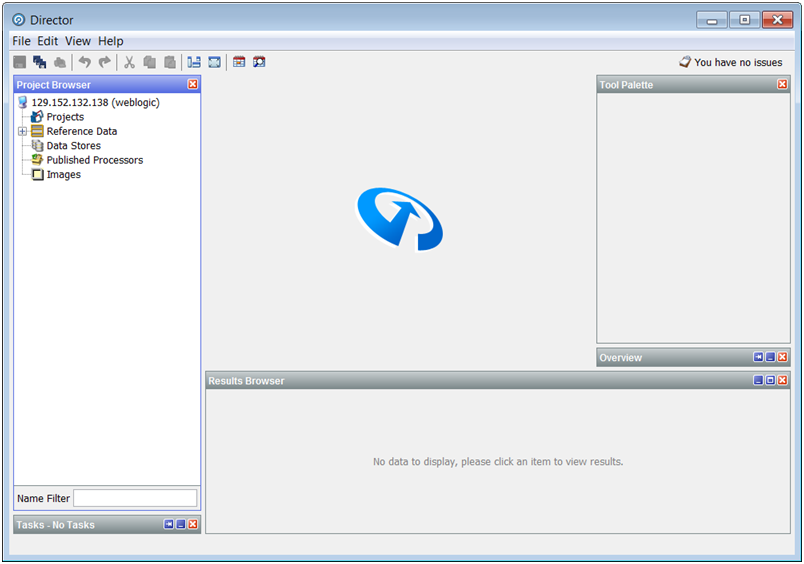
You should now be able to access the
Director user interface. This will be
running on your local machine, but will be
connected to the EDQ server that is running
on VM1.
Before you create a storage container and DBCS and
JCS instances, ensure that you have the following
subscriptions for:
JCS
DBCS
Oracle Storage Cloud Service
Create an Object Storage Container
Use the Oracle Storage Cloud Service to create
an object storage container. This container will
be used by the database when you create your
DBCS instance.
When you subscribe for an Oracle Public Cloud
account, you will receive an email with the
details for signing in to My Services. Follow
the link and use the credentials in that email
to access your My Services Dashboard.
Note: Remember to bookmark your My
Services page, so that you can access it
easily in future.
To create a container:
Find out your REST endpoint.
Go to the Oracle Storage Cloud Service
section of the dashboard, click the menu
icon and select View Details. The
Oracle Storage Cloud Service details screen
provides the REST endpoint.
Note: Alternatively, you can click
the Oracle Storage Cloud Service link on the
dashboard to go to the Oracle Storage Cloud
Service details screen.
The container is created. This is a
prerequisite for DCS.
Generate an SSH Key Pair
When you create a Database Cloud Service
(DBCS) instance and Java Cloud Service (JCS)
instance you will have to provide a Secure Shell
(SSH) public key that will be used for
authentication when you log in remotely to an
instance. You can either specify an SSH key that
was uploaded earlier or upload a new SSH public
key.
To generate an SSH key pair, using either
PuTTY or the command line:
Run the ssh-keygen command.
ssh-keygen -b 2048 -t rsa
The command prompts you to enter the path
to the file in which you want to save the
key. A default path and filename are
suggested in parenthesis. For example: /home/user_name/.ssh/id_rsa.
To accept the default path and filename,
press Enter. Otherwise, enter the required
path and filename, and then press Enter.
The command prompts you to enter a
passphrase. This passphrase is used for
encrypting your private key. A null entry is
strongly discouraged. Note that the
passphrase is not displayed when you type it
in. When prompted, type the passphrase again
to confirm it.
The command generates an SSH key pair
consisting of a public key and a private key,
and saves them in the specified path. The file
name of the public key is created automatically
by appending the string .pub to
the name of the private key file. For example,
if the filename of the SSH private key is id_rsa,
the filename of the public key would be id_rsa.pub.
Make a note of the passphrase and the path
where you have saved the SSH key pair. When you
create DBCS and JCS instances, you will have to
enter the SSH public key. When you log in to an
instance, you will have to provide the path to
the corresponding SSH private key and you will
have to enter the passphrase when prompted.
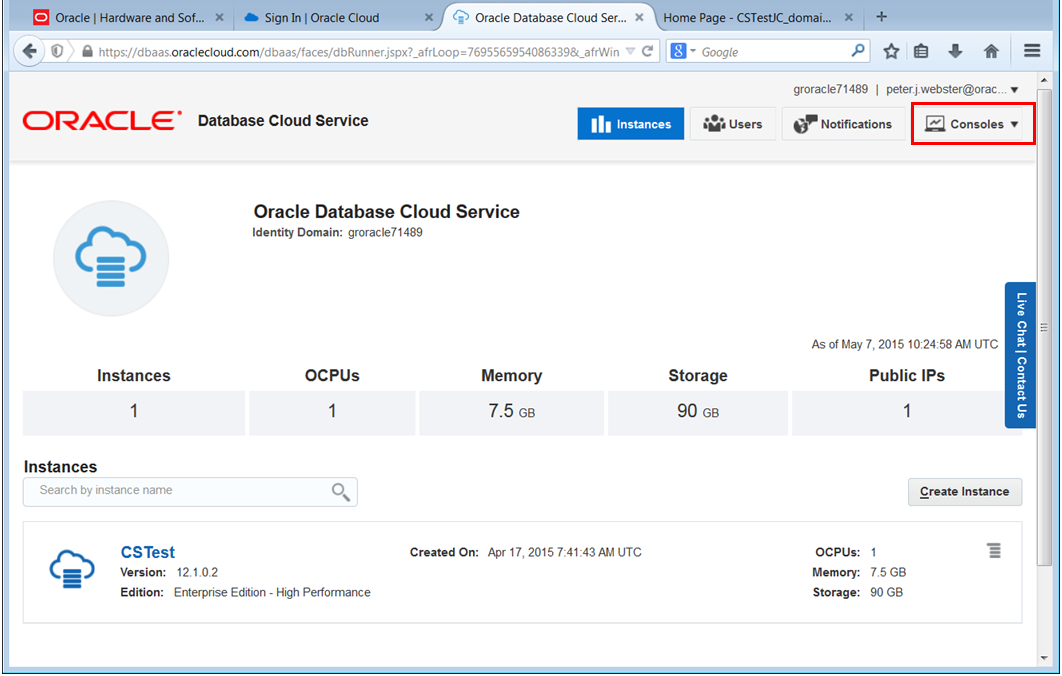
Create a DBCS Instance
A Storage Container is a prerequisite for DCS,
and DCS is a prerequisite for JCS.
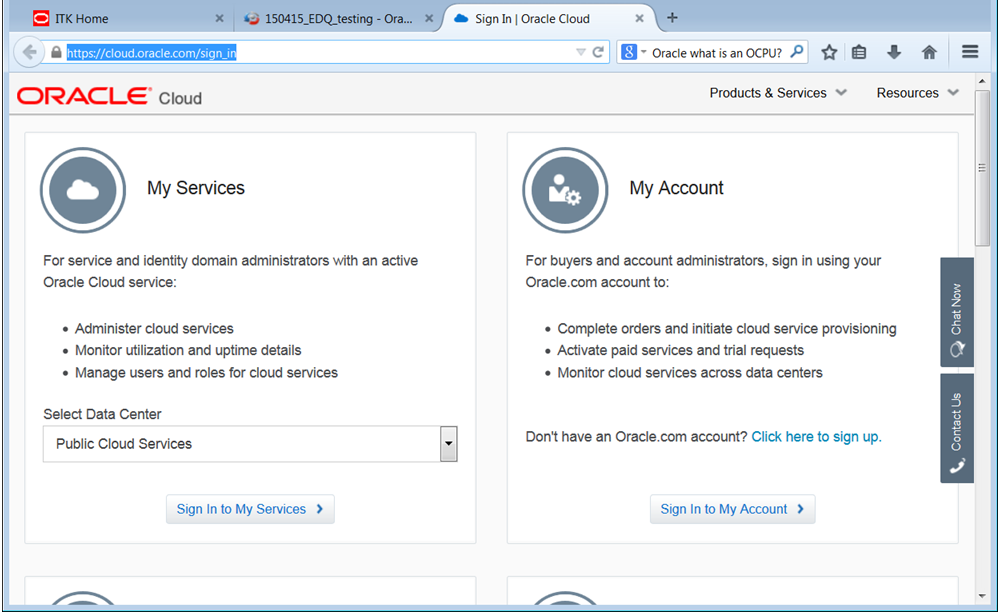
Sign in to the My Services
application and go to the My Services
Dashboard.
In the Oracle Database Cloud Service
section, click Open Service Console.
The Oracle Database Cloud Service console
appears. Click Create Instance.
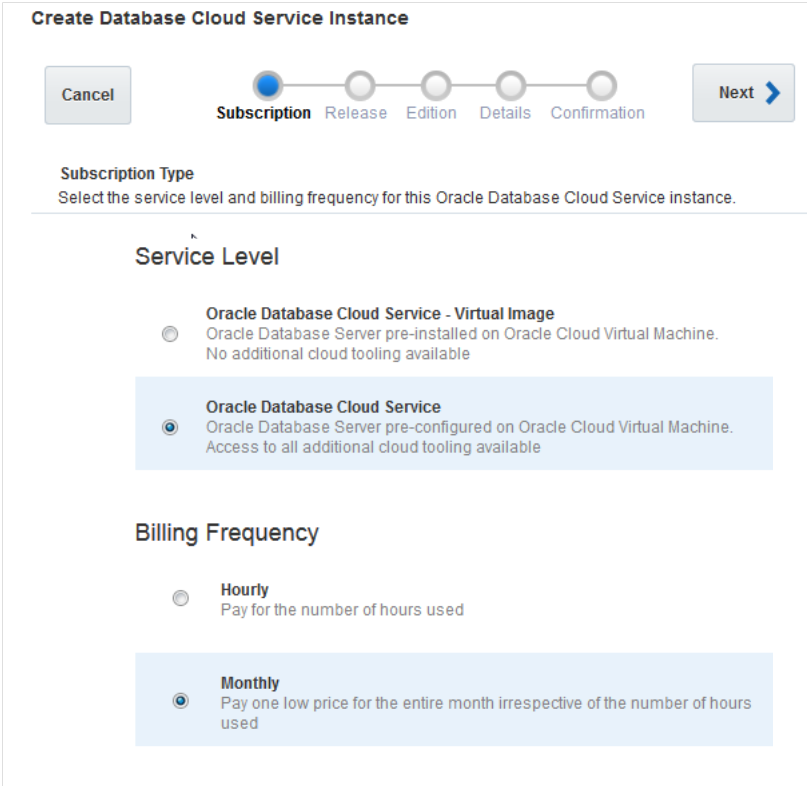
On the Create Database Cloud Service
Instance > Subscription Type,
select Oracle Database Cloud Service
and the Billing Frequency that you require
(even if it is a free trial). Click Next.
On the Service Details screen, in
the Instance Configuration section,
enter the following information:
Do not click Next yet, stay on this
screen.
Field
Description
Instance Name
(your choice, but write it down!)
Description
(optional)
Compute shape
This allows you to specify the
number of OCPUs and RAM that your
instance should have. Select OC3
– 1 OCPU, 7.5 GB RAM.
VM public key
To add the SSH key that you
generated earlier:
a) Click Edit and select the
Key file name option.
b) Click Browse to navigate to the
folder where you saved the SSH public
key.
c) Select the SSH public key and then
click Enter.
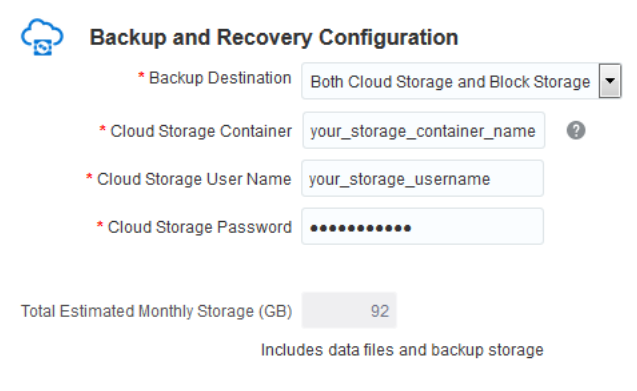
Still on the Service Details
screen, in the Backup and Recovery
Configuration section, enter the
following information:
Field
Description
Backup Destination
Select Both Cloud Storage and Block
Storage
Cloud Storage Container
The container name should be of the
format storageservicename-id_domain/container,
where storageservicename
is the name of the Oracle Storage
Cloud Service, id_domain
is the name of the identity domain,
and container is the name
of the container.
In the Oracle Java Cloud Service section,
click Open Service Console. The
Oracle Java Cloud Service Console screen
appears.
Click Create Instance.
The Create New Oracle Java Cloud Service
Instance wizard starts and the Subscription
Type screen appears. Select the Oracle
Java Cloud Service – Virtual Image and
the billing frequency that you require.
Click Next.
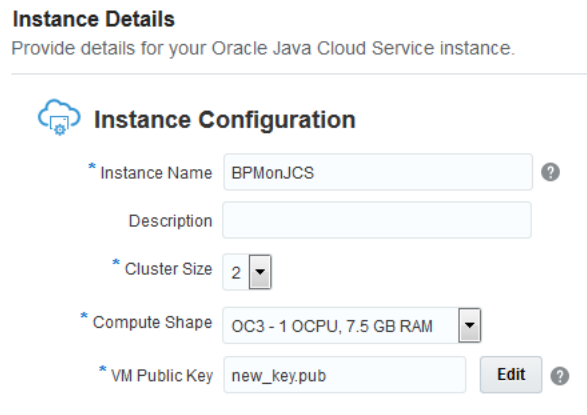
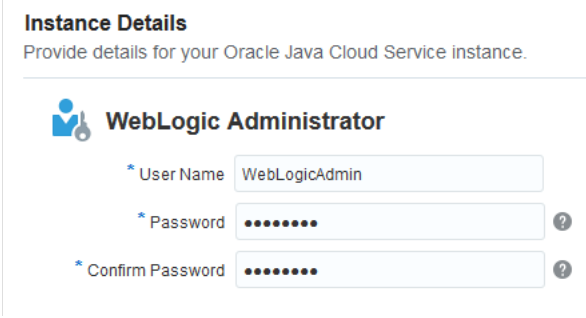
On the Instance Details screen, in
the Instance Configuration section,
enter the following information:
Do not click Next yet, stay on this
screen.
Field
Description
Instance Name
(your choice, but write it down!)
Description
(optional)
Cluster Size
Minimum of 2
Compute shape
This allows you to specify the
number of OCPUs and RAM that your
instance should have. Select OC3
– 1 OCPU, 7.5 GB RAM.
VM public key
To add the SSH key that you
generated earlier:
a) Click Edit and select the
Key file name option.
b) Click Browse to navigate to the
folder where you saved the SSH public
key.
c) Select the SSH public key and then
click Enter.
Oracle Enterprise Data Quality: Profile, Audit
and Operate [D75345GC10], available in both
Classroom and Live Virtual Class (LVC) training
formats, at Oracle University.
Oracle WebLogic Server 12c: Administration I,
the root of all WLS (and therefore JCS) training,
at Oracle University. Includes Training on Demand
(ToD), Instructor-Led Training (ILT), and Live
Virtual Class (LVC) formats.


 , and then select Open
WebLogic Server Console.
, and then select Open
WebLogic Server Console. 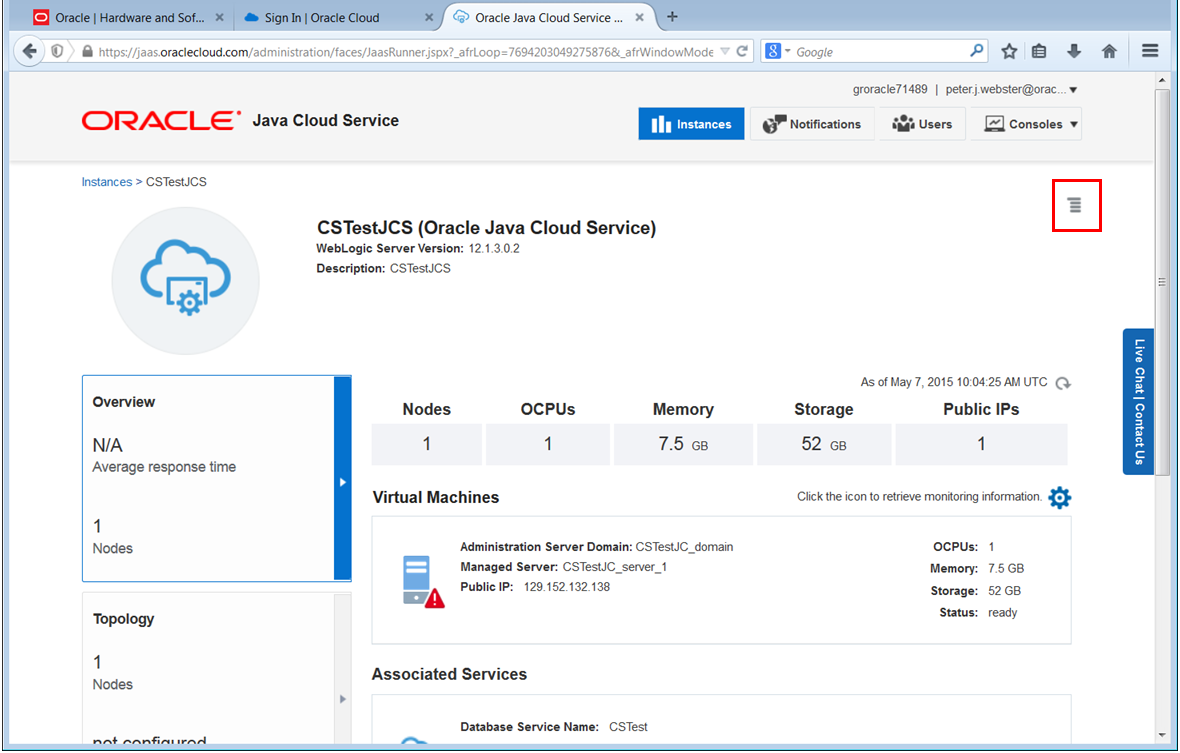


 .
. 


 .
When the State of the edq server changes to
.
When the State of the edq server changes to