Oracle Exalogic Elastic Cloud 2.x: Update an Existing vServer
Overview
Purpose
This tutorial shows you how to update the configuration of an existing Exalogic vServer by using the Exalogic A-Team Tools (EATT).
Time to Complete
Approximately 45 minutes
Introduction
The standard Exalogic Control administrative tools do not provide the ability to modify many vServer configuration settings after the vServer has been created. For example, you may need to increase a vServer's vCPU count or RAM, or add another network to a vServer, or add the vServer to a new distribution group.
The Oracle A-Team has developed supplemental tooling to help address your changing vServer requirements. These tools can capture a vServer as a template and an editable configuration file, and they can also create a vServer by using these same inputs. In this tutorial, you will use the A-Team Tools to capture another vServer and, after modifying the assembly file, recreate the vServer with the new configuration.
Important Note: The A-Team Tools are not officially supported components of the Exalogic Elastic Cloud Software. They are simply provided as samples. Use them at your own risk. Do not open support tickets regarding any problems you experience with the tools.
Hardware and Software Requirements (Optional)
The following is a list of hardware and software requirements:
- Access to a virtual data center (vDC) running Exalogic version 2.0.4 or 2.0.6.
Prerequisites
Before starting this tutorial, you should have:
- Completed the Exalogic tutorial Install the A-Team Tools and have the IP address of this tools vServer.
- Cloud user access to an existing vDC account with the vServer that you want to update.
- The IP address or host name of your storage appliance.
Capture a vServer and its Configuration
Use the A-Team Tools to identify a vServer and capture it as a template archive and corresponding assembly file.
Perform the following steps:
-
Log into your tools vServer as the root user:
This is the vServer on which the Exalogic A-Team Tools have been installed and that also has the required NFS mounts to the storage appliance.
-
Create a location on the storage appliance on which to place the generated template file. This storage location must be accessible via the HTTP protocol.
mkdir /common/general/templates -
Identify a cloud user that has access to a vServer that you want to modify. Later steps refer to this as your target vServer.
Your tools vServer and the target vServer do not have to be in the same account.
-
Create a file named att-password in the current directory. Add a single line to this file with the password for the cloud user.
-
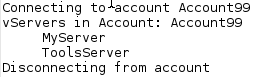
Run the ListAccounts.sh script. Provide the name of the cloud user:
ListAccounts.sh --url https://elcontrol -u clouduser99 -p att-password -
From the output identify the name of the Account and vServer that you want to modify.
-
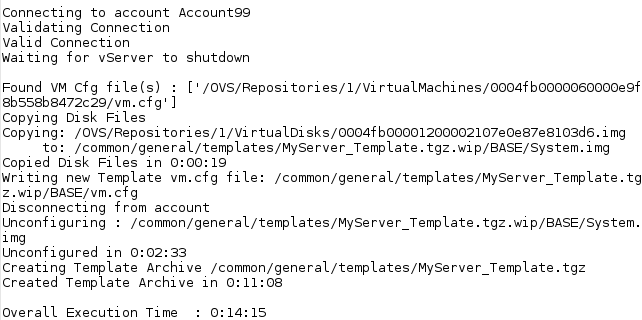
Run the ConvertVServerToTemplate.sh script to capture the target vServer. Provide these inputs:
- The target vServer
- The account in which the vServer is found
- The mount point for the vDC repository on the storage appliance
- The template file destination
- The assembly file to create
ConvertVServerToTemplate.sh --url https://elcontrol -u clouduser99 -p att-password -a Account99
-v MyServer -r /OVS/Repositories/GUID -t /common/general/templates -f att-vserver.json
If the target vServer is running, the script will automatically shut it down.
This script normally requires 15 to 20 minutes to complete, but the duration may vary depending on the size of your target vServer.
If you encounter any errors and need to troubleshoot, you can add the --debug argument to this script.
If you want to generate only the assembly file, use the CaptureVServer.sh script.
-
Verify that a template archive was created successfully at /common/general/templates.
In the remaining steps this file name will be referred to as VSERVER_Template.tgz.
-
Verify that the assembly file att-vserver-json was created at the current location.
Upload the New Template to Exalogic Control
Use the A-Team Tools to upload the template archive from the storage appliance to a vDC account.
Perform the following steps:
-
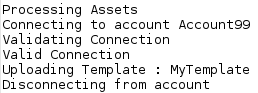
Run the UploadTemplate.sh script.
In the upload URL substitute the host name of your storage appliance (ZFS_IP) along with the file name of the new template:
UploadTemplate.sh --url https://elcontrol -u clouduser99 -p att-password -a Account99 -n MyTemplate -l http://ZFS_IP/shares/export/common/general/templates/VSERVER_Template.tgz -
Verify that a template upload job was created successfully:
-
Run the ListTemplates.sh script in verbose mode:
ListTemplates.sh --url https://elcontrol -u clouduser99 -p att-password --verbose -
Periodically run this command until the Status of the new template has transitioned from SCHEDULED to OK:

Update the Assembly File
Modify the original vServer's configuration by editing the generated assembly file.
Perform the following steps:
-
Back up the assembly file:
cp att-vserver.json att-vserver.json.orig -
Edit att-vserver.json.
-
Change the value of the template attribute to the name of the uploaded vServer template, MyTemplate:
"vservers": [ { ... "template": "MyTemplate", ... -
Based on your new vServer requirements, modify any of the other vServer attributes, or add/remove networks to/from the vServer. For example:
...
"vservers": [
{
  "name": "MyServer",
  "template": "MyTemplate",
  "type": "4CPU-10RAM",
  "distributiongroup": "Cluster1Group",
  "ha": "true",
  "description": "Generated from EATT assembly file",
  "networks": [
  {
    "name": "IPoIB-App1VNet",
    "ip": "auto"
  },
  {
    "name": "EoIB-App1",
    "ip": "10.20.30.40"
  }
  ]
}
]
...
The value auto indicates that the IP address should be automatically assigned from the pool of reserved addresses in the account.
-
Save your changes to the file.
Delete the Original vServer
Use Exalogic Control to delete the old version of the vServer.
Important: For mission-critical applications, Oracle recommends that you first create and test the new version of the vServer in a separate account before destroying the old version.
Perform the following steps:
-
Log into Exalogic Control as your cloud user.
-
Right-click the vServer and select Delete vServer. When prompted for confirmation click Delete again.

Allocate Static IP Addresses
Deleting a vServer returns its used IP addresses back to the account's reserved pool. If your assembly file includes specific IP addresses instead of the auto option, you must manually allocate those IP addresses before creating the vServer.
Perform the following steps:
-
Log into Exalogic Control as your cloud user.
-
Click the account name.
-
Click the Networks tab.

-
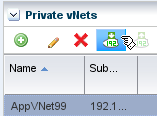
Select a private or public network that is listed in your assembly file. Then click the Allocate vIP button.
-
Verify that the Number of vIPs is set to 1 and click the Allocate vIP button.
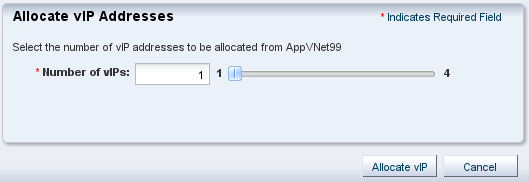
-
Click OK.
-
Repeat this procedure for any other networks in your assembly file that have been assigned specific IP addresses.
Create the Modified vServer
Use the A-Team Tools to create a new vServer based on the updated configuration in the assembly file.
Perform the following steps:
-
Return to the tools vServer.
-
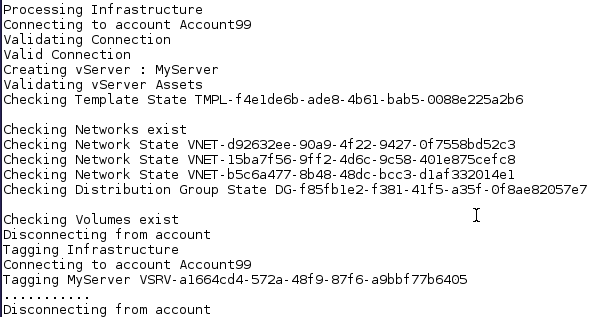
Run the CreateAssembly.sh script:
CreateAssembly.sh --url https://elcontrol -u clouduser99 -p att-password -f att-vserver.json -
Verify that the script ran successfully:
-
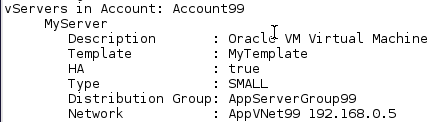
Run the ListVServers.sh script in verbose mode:
ListVServers.sh --url https://elcontrol -u clouduser99 -p att-password --verbose -
Verify that your new vServer is present:
Summary
With the help of the Exalogic A-Team Tools (EATT) and assembly files, you can quickly modify a vServer's type, networks, distribution group, and other characteristics by recreating the vServer.
In this tutorial, you learned to:
- Create a template and assembly file with the A-Team Tools
- Upload a template with the A-Team Tools
- Interpret and modify an assembly file
- Allocate a specific IP address from an account
- Create a vServer from an assembly file with the A-Team Tools
Resources
- Exalogic Cloud Administrator Guide
- Instructor-led Exalogic education at Oracle University
- More Exalogic tutorials, demos, and videos in the Oracle Learning Library
- A-Team Blog
- vServer Base Guest Template
Credits
- Lead Curriculum Developer: TJ Palazzolo
- Other Contributors: Albert Leigh, Andrew Hopkinson
To navigate this Oracle by Example tutorial, note the following:
- Topic List:
- Click a topic to navigate to that section.
- Expand All Topics:
- Click the button to show or hide the details for the sections. By default, all topics are collapsed.
- Hide All Images:
- Click the button to show or hide the screenshots. By default, all images are displayed.
- Print:
- Click the button to print the content. The content that is currently displayed or hidden is printed.
To navigate to a particular section in this tutorial, select the topic from the list.