Before You Begin
Purpose
This tutorial shows you how to install Oracle Goldengate Studio 12.2.1 and how to connect to the Studio repository.Time to Complete
Approximately twenty minutes.What Do You Need?
You need a Linux computer (or Virtual Machine) with at least 8GB RAM. It is assumed a Red Hat Linux or any of its variant (Oracle Linux, CentOS.)
You need a running Oracle RDBMS instance. You can refer to another OBE which covers creating an Oracle RDBMS instance suitable for Oracle GoldenGate Creating the Oracle Database Release 12c Instance for Data Synchronization Using Oracle GoldenGate 12c on Linux.. This OBE has been tested on Oracle Linux 6.x.The RDBMS instance can reside on a different computer available on your network. This OBE uses the oracle instance ogg12 to store the Fusion Middleware Oracle GoldenGate Studio repository. In your environment, you can use a different Oracle RDBMS instance, as long as it is accessible over the network from the computer where you are installing Oracle GoldenGate Studio.
You also must have the Oracle GoldenGate core
software release 12.2.0 installed on the computer
you plan to use for this OBE. The focus of this OBE
is on OGG Studio; Installing and setting up Oracle
GoldenGate core is not covered here. This OBE relies
on two Oracle GoldenGate instances configured and
running on the computer where Oracle GoldenGate
Studio will be installed. You can refer to the OBE
Installing
Oracle GoldenGate for Oracle 12.1.2 on Linux EL
6.x/RHEL 6.x/CentOS 6.x for an OBE which
teaches how to install Oracle GoldenGate core. The
Oracle GoldenGate core software release is
different, but the steps required to installed OGG
core 12.2.0 (required for this OBE) are very similar
to steps required to install the older OGG core
12.1.2 (covered by the OBE referenced above.) If you
opt to follow the OBE referenced above you will have
two Oracle Goldengate instances on your machine, one
running in /u01/app/oracle/product/ogg_src
and the other running in /u01/app/oracle/product/ogg_trg.
In order to install the Oracle GoldenGate Monitor
Server (and Agent) you need Oracle Fusion Middleware
Infrastructure, release 12.2.1.0.0. This OBE covers installing Oracle Fusion Middleware
Infrastructure. Please refer to the Oracle
Fusion Middleware Installing and Configuring the
Oracle Fusion Middleware Infrastructure
document if you like to have a more thorough understanding of the Oracle Fusion Middleware
Infrastructure software. In this OBE the
Oracle Home for Fusion Middleware Infrastructure is
located at /u01/app/oracle/ogg_mon.
You need Java installed on your computer. This OBE uses the JDK 1.8.0_77 - Java 8 is generally supported, you can use different versions as long as they are supported by the Oracle Fusion Middleware Supported Configurations Guide. If you choose a Java version which is incompatible with Oracle GoldenGate Studio, the installer will detect it and alert you during the compatibility checks.
Several environment variables must be defined so that your bash shell is able to interact with the Oracle RDBMS, Oracle GoldenGate, and the Fusion Middleware
Infrastrucure. At a minimum, the variables shown below must be defined:
- ORACLE_SID - in this OBE it is assumed to be
ogg12, replace that SID with yours if your emvironment runs a different SID. - ORACLE_HOME - in this OBE it is assumed to be
/u01/app/oracle/product/12.1.0.2/db_1- change it if necessary to accommodate your environment if the Oracle software location is different in your environment. - JAVA_HOME - in this OBE it is assumed to be pointing to
/usr/java/latest. - LD_LIBRARY_PATH - it must include the
libdirectory under$ORACLE_HOME. For example:LD_LIBRARY_PATH=${LD_LIBRARY_PATH}:${ORACLE_HOME}/lib - PATH - it must include the
bindirectory under$ORACLE_HOME. For example:PATH=${PATH}:${ORACLE_HOME}/bin
Downloading the Software
-
In your browser, enter the Oracle GoldenGate Downloads link. If necessary login using your credentials. The browser displays the Oracle GoldenGate Downloads page, accept the License Agreement and click Oracle GoldenGate Studio V12.2.1.1.0 (1.9 GB) to download the Oracle GoldenGate Studio software.

Description of this image -
Open a terminal shell and change directory to select your browser download directory. Unzip the file
fmw_12.2.1.1.0_oggstudio_Disk1_1of1.zip, which you just downloaded from Oracle. Unzipping the archive produces two files:fmw_12.2.1.1.0_oggstudio.jarfmw_12211_readme.htm
-
You must download the Oracle Fusion Middleware Infrastructure software. Enter the Oracle Software Delivery Cloud link into a web browser:
http://edelivery.oracle.com/
Click Sign-in/Register. You need release 12.2.1.0.0, which is compatible with Oracle GoldenGate Monitor Server and OGG Studio. In your browser, in the "Search By" field enter the string fusion middleware infrastructure and choose Oracle Fusion Middleware 12c Infrastructure 12.2.1.0.0. Pay attention to the release number, it must be 12.2.1.0.0. More recent versions won't work giving you incompatibility issues when you trying to install OGG Studio and OGG Monitor Server. Select the platform (Linux x86-64.)
Description of this image -
The Download Queue shows the selected software (Oracle Fusion Middleware 12c Infrastructure 12.2.1.0.0) and the selected platform (Linux x86-64.) Click Continue to proceed.

Description of this image -
Accept the "Oracle Standard Terms and Restrictions" select the check box "I have reviewed and accept the terms of the Commercial License, Special Programs License, and/or Trial License." Selecting that option makes the Continue button active. Click Continue to proceed with the "File Download" page.
-
Download the
V78156-01.zipfile. -
Open a terminal shell window (or reuse a previously created shell.) Change directory to your browser default download directory (in this OBE it is assumed to be
/home/oracle/Downloads.) Unzip theV78156-01.zipfile. The filefmw_12.2.1.0.0_infrastructure.jaris extracted.$ cd /home/oracle/Downloads $ unzip V78156-01.zip Archive: V78156-01.zip inflating: fmw_12.2.1.0.0_infrastructure.jar $
-
You must download now the Oracle GoldenGate Monitor Agent product from the Oracle Software Delivery Cloud website. Enter the Oracle Software Delivery Cloud link into a web browser:
http://edelivery.oracle.com/
Click Sign-in/Register.
-
In the Media Pack Search page, from the Select Product Pack drop-down list, enter Oracle Management Pack for Oracle Goldengate.

Description of this image -
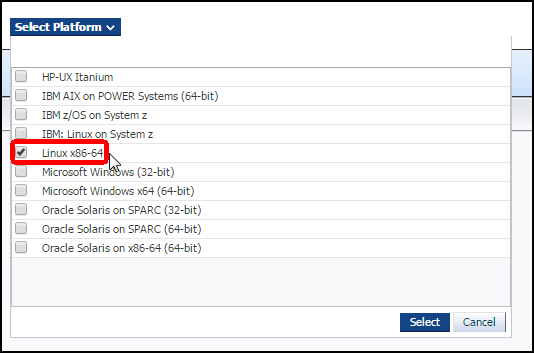
Select the platform (Linux x86_64) and click Select.
Description of this image Click Continue
Description of this image -
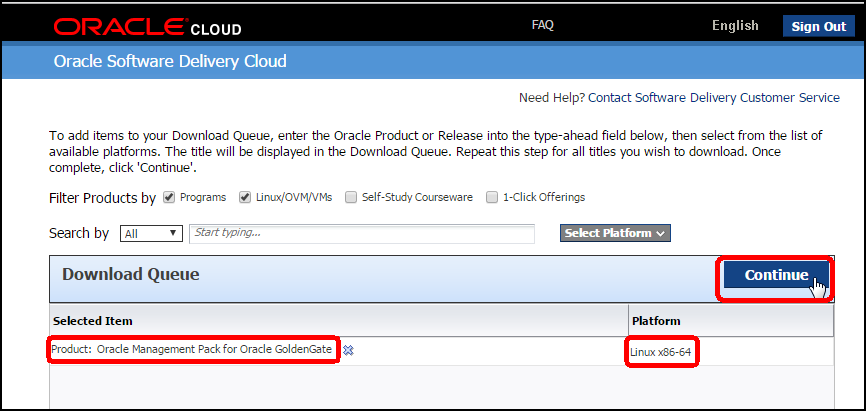
The Download Queue page shows the Oracle Management Pack for Oracle Goldengate bundle. Click Continue to proceed with the download.

Description of this image Accept the "Oracle Standard Terms and Restrictions" select the check box "I have reviewed and accept the terms of the Commercial License, Special Programs License, and/or Trial License." Selecting the options makes the Continue button active. Click Continue to proceed with the "File Download" page.
-
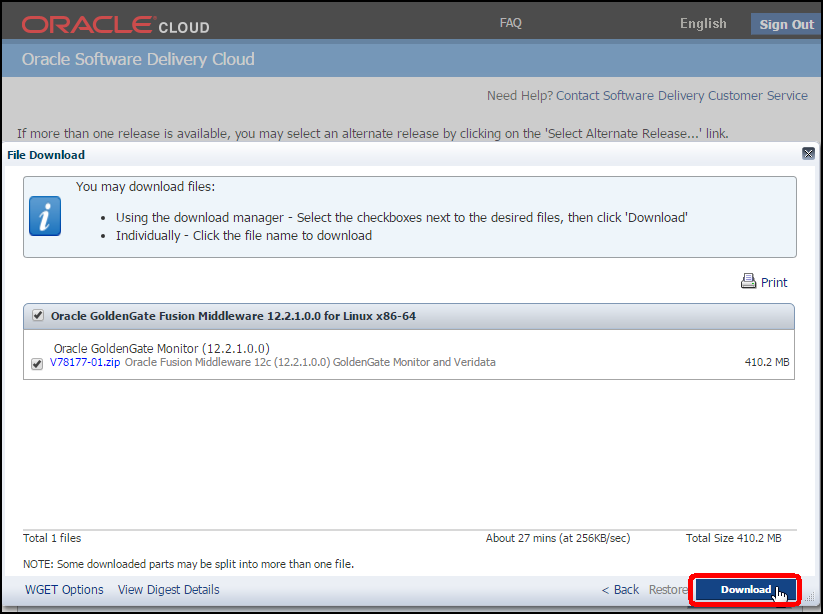
In the "File Download" page the Oracle GoldenGate Monitor software bundle (approximately 410 megabytes) is already pre-selected for you. Click Download to start the software download.
Description of this image
Installing the Software
Installing Oracle Fusion Middleware infrastructure software
-
Open a terminal shell window and create a directory for the Fusion Middleware Infrastructure software. It will be installed in
/u01/app/oracle/ogg_mon.$ mkdir -p /u01/app/oracle/ogg_mon $
-
Change directory to
/home/oracle/Downloadswhere you previously downloaded and unpacked the Fusion Middleware Infrastructure software. Invoke Java with the-jarand-Xmx1024Moptions to start the Oracle Fusion Middleware Infrastructure installer.$ cd /home/oracle/Downloads $ java -jar -Xmx1024M fmw_12.2.1.0.0_infrastructure.jar -
The installer GUI starts. Click Next when the Welcome page is displayed, to proceed with the installation.
-
The second step of the installation affects the way you want to manage auto updates. Accept the default, Skip Auto Updates and click Next.
- The third step of the installation asks you
to determine the installation location, or the
Oracle Home for Oracle GoldenGate Monitor
Server. Enter
/u01/app/oracle/ogg_monas the Oracle Home directory and click View to check weather other Fusion Middleware products may have been installed there. No products are expected to be found there. The installer should display "No Features are installed at selected Oracle home." Click Next to proceed with the installer.
Description of this image -
Step four is concerned with the installation type. Select "Fusion Middleware Infrastructure" (no examples) and click Next to continue the installation.
-
The installer performs the prerequisite checks. It verifies that the Operating System is in the compatibility matrix, and that the version of Java used to launch the installer is supported by the current version of Oracle Fusion Middleware Infrastructure. If both checks succeed, the installer displays two green ticks. Click Next to continue.
-
In step 6, the installer asks you to enter your email in case security updates are available and you should be informed. Unselect "I wish to receive security updates via My Oracle Support" and click Next.
-
The installer displays a pop-up window alerting you to the fact that you did not provide an email address. Click Yes to remain uninformed of security issues and proceed with the installation.

Description of this image -
The installer displays the installation summary in step seven. Verify the installation parameters and click Install.
-
The installation is performed and the installation progress page is displayed. There are eight steps:
- Prepare
- Copy
- Generating Libraries
- Performing String Substitutions
- Linking
- Setup
- Saving the inventory
- Post install scripts
The installer progresses and displays a green tick to the left of all steps as soon as they are performed. Eventually eight ticks are displayed when the installation completes successfully. Click Next to display the installation complete report.
Description of this image -
An installation summary is displayed by the installer, which shows the installation location and the feature set which was successfully installed. Examine the output and click Finish to terminate the installer.

Description of this image
Installing Oracle GoldenGate Monitor Server
-
Open a terminal shell window and change directory where you downloaded the Oracle GoldenGate Monitor Server. By default that directory is the default download directory for your broweser. If you are connected as the "oracle" user to your computer, and you are using either Oracle Linux or a Red Hat derivative, that directory is
/home/oracle/Downloads. Locate theV78177-01.zipfile and useunzipto decompress it.$ unzip V78177-01.zip Archive: V78177-01.zip inflating:: fmw_12.2.1.0.0_ogg.jar $
-
Launch the installer using the
java
                                      -jar
command. You must increase the maximum heap size allocated to the JVM to one gigabyte:$ java -jar -Xmx1024m fmw_12.2.1.0.0_ogg.jar $
The splash window for the Fusion Middleware 12c GG Monitor_Veridata installer is displayed.
Description of this image Click Next when the Welcome page appears. Accept the default (Skip Auto Updates) in the Auto Updates page and click Next.
-
Step 3 of the installation asks you to enter the Oracle Home directory for the Oracle Fusion Middleware Infrastructure software. Enter
/u01/app/oracle/ogg_mon(or the directory where and Fusion Middleware Infrastructure has been installed, if in your environment you installed the software elsewhere in the file system) click the View button to access the Feature Sets installed in the Oracle Home directory for Fusion Middleware. Verify that Fusion Middleware is found by the installer and click Next to proceed with the installation.
Description of this image -
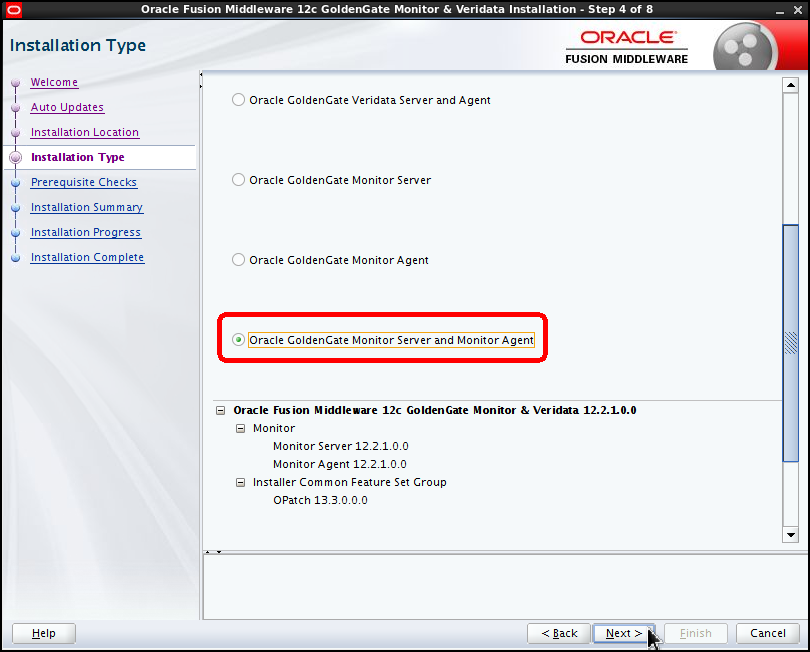
In step 4, the installer asks you to select what type of installation you want to perform. Choose Oracle GoldenGate Monitor Server and Monitor Agent and click Next to proceed to step 5.
Description of this image -
The installer performs some prerequisite checks. Two green tick signs are displayed to signify that the checks succeeded. Click Next to proceed.
-
An installation summary window is displayed by the installer. Verify the location and the feature sets (both Monitor Server and Monitor Agent must be installed) and click Install to start the installation.
-
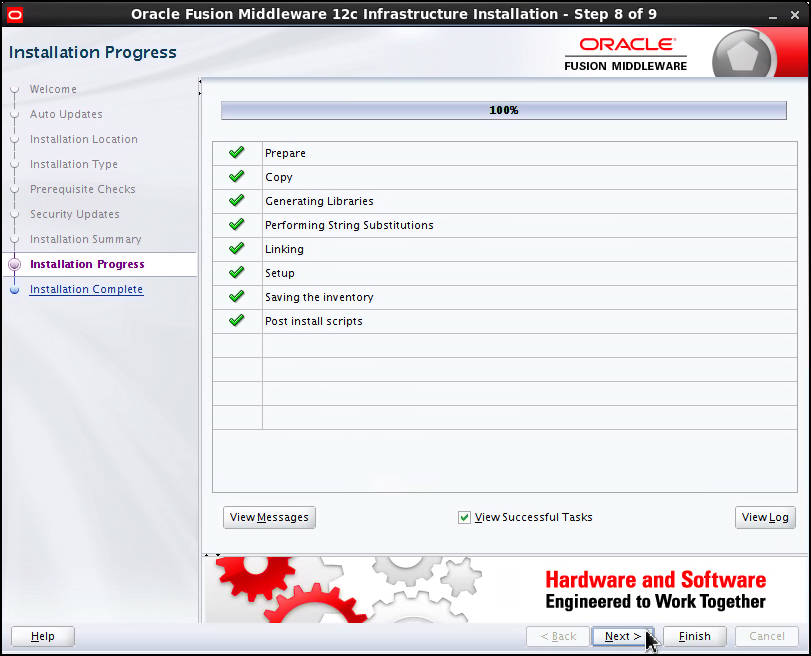
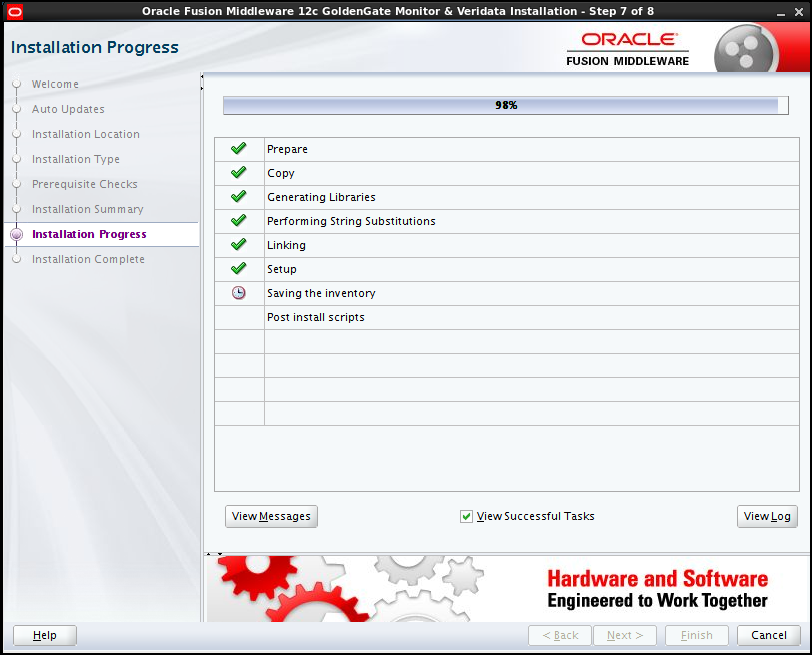
The installation progress window appears. There are 8 steps performed during the installation. A green tick appears beside each step as soon as that step completes successfully. Eventually all steps are perfomed and the next button becomes active. Click Next to proceed.
Description of this image -
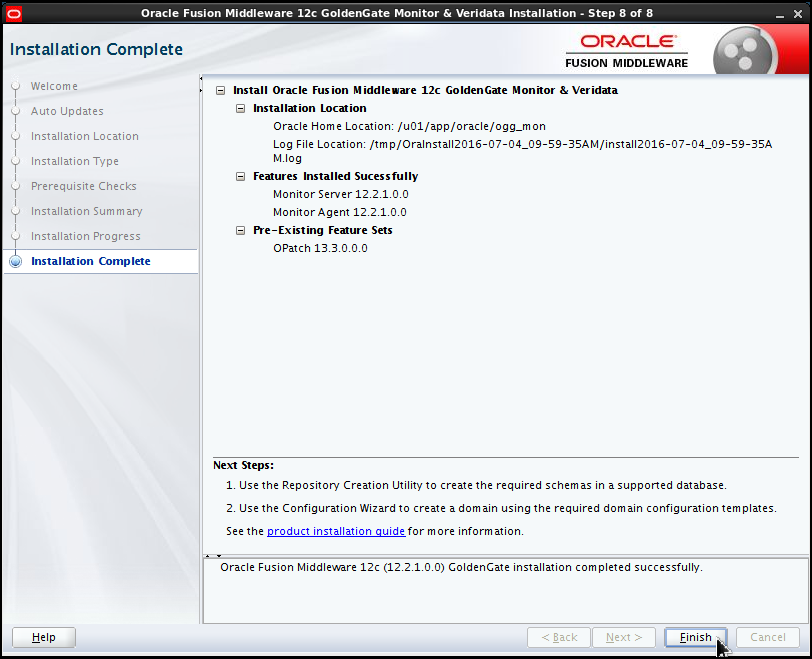
The installer displays the Installation Complete screen. Click Finish to close the installer.
Description of this image
Installing OGG Studio software
-
Open a terminal shell window and change directory where you downloaded the Oracle GoldenGate Monitor Agent. By default that directory is the default download directory for your browser (
/home/oracle/Downloads.) Locate thefmw_12.2.1.1.0_oggstudio.jarfile. Make sure you have the environment variableJAVA_HOMEset, pointing to an Oracle JDK release 8 supported by Oracle Fusion Middleware. If yourJAVA_HONMEvariable is not set, you can set it on-the-fly in your shell (simply type:export JAVA_HOME=/usr/java/latestand press Enter.) To make sure everything is fine, invokejavawith the-versionparameter. Invoke Java with the-jaroption to start the Oracle Goldengate Studio installer.$ cd /home/oracle/Downloads [Downloads]$ echo $JAVA_HOME /usr/java/latest [Downloads]$ java -version java version "1.8.0_77" Java(TM) SE Runtime Environment (build 1.8.0_77-b02) Java HotSpot(TM) 64-Bit Server VM (build 25.77-b02, mixed mode) [Downloads]$ java -jar fmw_12.2.1.1.0_oggstudio.jar -
The installer GUI starts. Click Next when the Welcome page is displayed, to proceed with the installation.
-
The second step of the installation affects the way you want to manage auto updates. Accept the default, Skip Auto Updates and click Next.
- The third step of the installation asks you
to determine the installation location, or the
Oracle Home for Oracle GoldenGate Studio. If
you already have installed other Fusion
Middleware components, select the common
Oracle Home directory and click View
to check the other Fusion Middleware products
you might have in the common Oracle Home
directory. In this example, the computer used
for this OBE already has a Fusion Middleware
Oracle Home with a few products installed (
/u01/app/oracle/Middleware/Oracle_Home)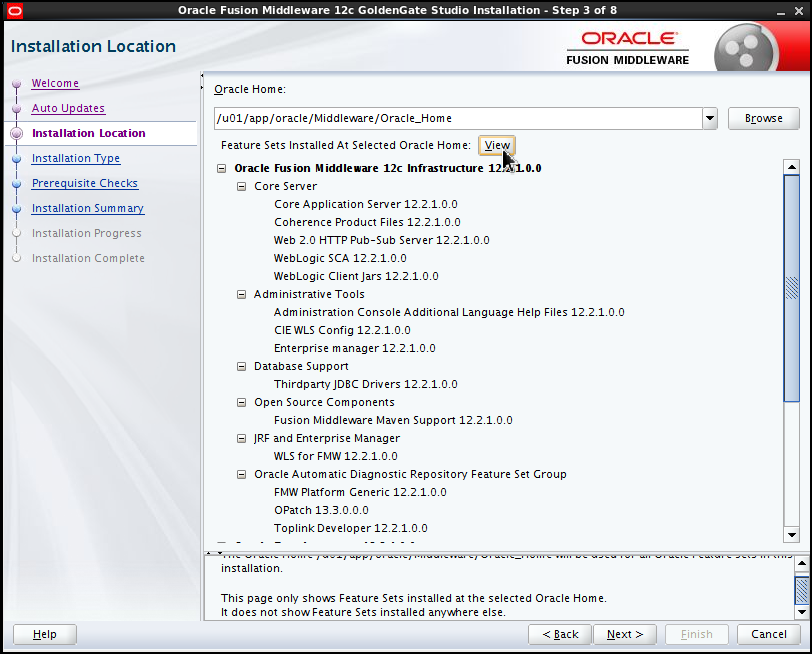
Description of this image If Oracle GoldenGate Studio is the only Oracle Fusion Middleware you are going to install, select a new, empty directory and click View. The installer will check the directory, verifying that no other Fusion Middleware products are present, and will display:
No
                                      Features are installed at selected Oracle
                                      Home
.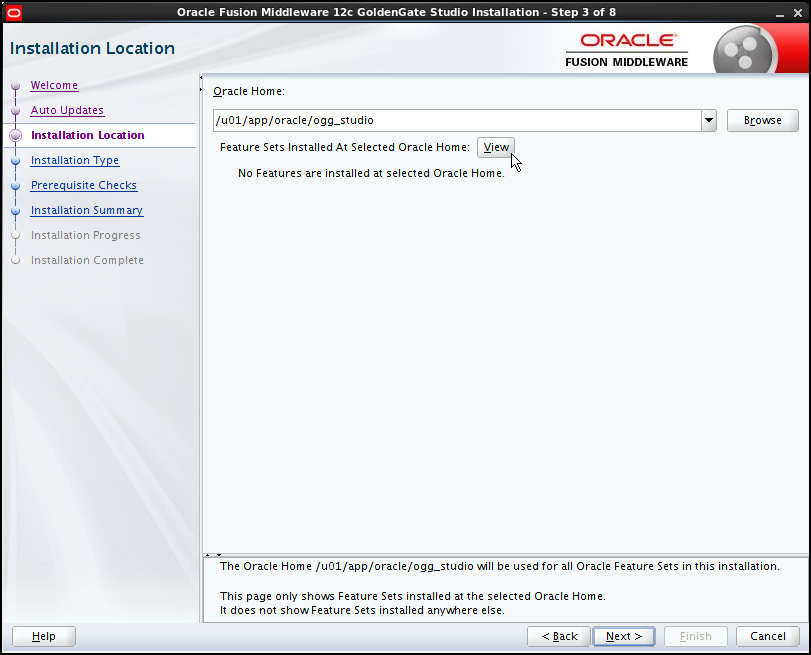
Description of this image Important:This release of Oracle GoldenGate Studio expects to be installed on a standalone, self contained Oracle Home directory. So, even if you already have other Fusion Middleware products already installed, create a completely new Oracle Home and install Oracle GoldenGate Studio there. In this OBE the chosen directory path is
/u01/app/oracle/ogg_studiobut you can chose a different path in your environment. Click Next to proceed with the installation. -
Step four is concerned with the installation type. At present, the installer only gives one option: Complete Install. Click Next to continue the installation.
-
The installer performs the prerequisite checks. It verifies that the Operating System is in the compatibility matrix, and that the version of Java used to launch the installer is supported by the current version of Oracle GoldenGate Studio. If both checks succeed, the installer displays two green ticks. Click Next to continue.

Description of this image -
The installer displays the installation summary in step six. Verify the installation parameters and click Install.
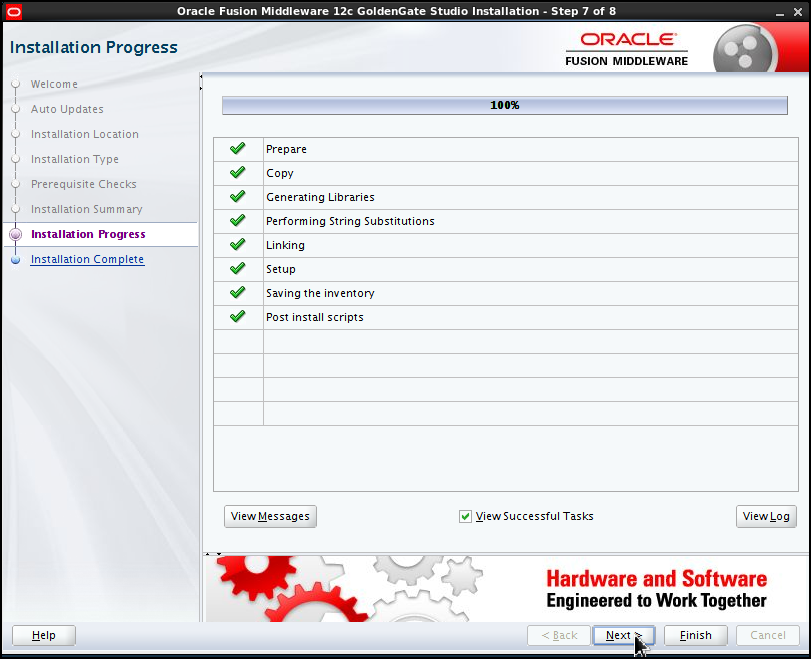
-
The installation is performed and the installation progress page is displayed. There are eight steps:
- Prepare
- Copy
- Generating Libraries
- Performing String Substitutions
- Linking
- Setup
- Saving the inventory
- Post install scripts
The installer progresses and displays a green tick to the left of all steps as soon as they are performed. Eventually eight ticks are displayed when the installation completes successfully. Click Next to display the installation complete report.
Description of this image -
An installation summary is displayed by the installer, which shows the installation location and the feature set which was successfully installed. Examine the output and click Finish to terminate the installer.
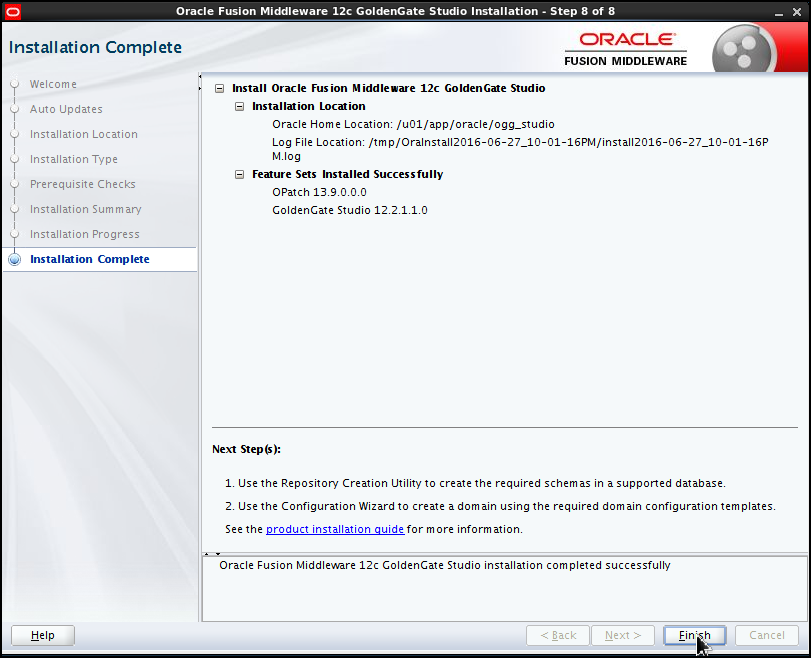
Description of this image -
Edit the
.bashrcfile in your home directory and set the FMW_HOME variable to point to the/u01/app/oracle/ogg_studiothe Oracle Home for Oracle GoldenGate Studio.Open a terminal shell window, use
viorgeditto edit the.bashrcfile and open a new line. Insert the variable definition commands shown below:FMW_HOME=/u01/app/oracle/ogg_studio export FMW_HOME
Repository Configuration Using the RCU utility
You must now configure the Fusion Middleware Repositories for OGG Studio and for OGG Monitor Server before you can start Oracle GoldenGate Studio
Creating the Repository for OGG Studio using the Repository Creation Utility (RCU)
-
Open a terminal shell window (or reuse an open shell window.) Make sure you source the
.bashrcfile. Change directory to your home directory usingcd ~and source.bashrc:$ cd ~ $ . .bashrc
- Change directory to
$FMW_HOME/oracle_common/binand startrcu.$ cd $FMW_HOME/oracle_common/bin $ ./rcu
RCU starts. Click Next to go past the initial welcome screen.
-
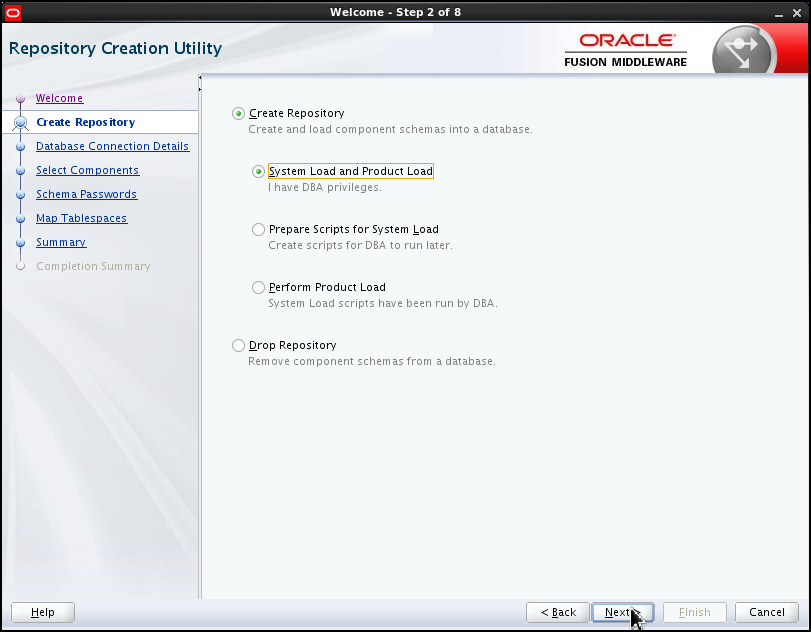
In step 2, accept the defaults ("Create Repository" and "System Load and Product Load") and click Next
Description of this image -
In step 3, you must enter the Oracle database connection parameters:
Database Parameter Value Database Type Oracle Database Host Name localhost Port 1521 Service Name ogg12 Username sys Password <Password for user SYS> Role SYSDBA Click Next to proceed.

Description of this image -
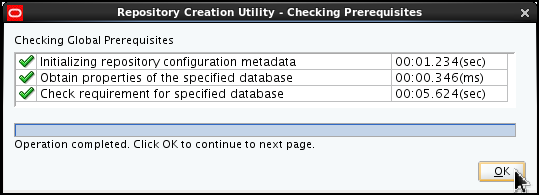
The RCU displays a window which shows the progress while the pre-requisites are checked. Eventually, three green tick signs appear beside the three prerequisites verified by RCU:
- Initializing repository configuration metadata
- Obtain properties of the specified database
- Check requirement for specified database
Click OK to dismiss the window and proceed to the next step.
Description of this image -
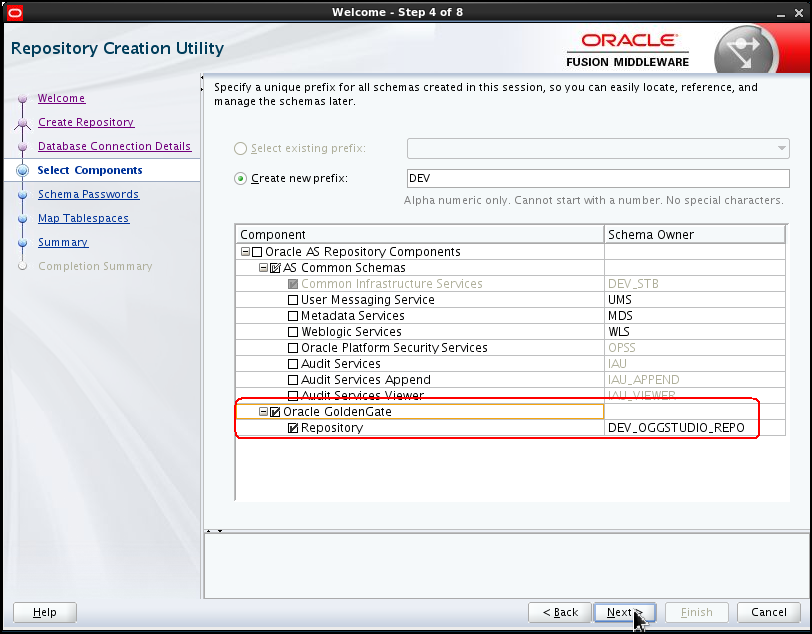
In RCU step 4, accept the default for "Crate new prefix" (DEV) and make sure you select "Oracle GoldenGate" and "Repository" at the bottom of the form. Accept the default for "Schema Owner" (DEV_OGGSTUDIO_REPO) - Click Next to proceed.
Description of this image -
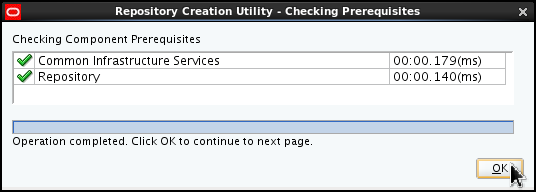
RCU displays another "Checking Prerequisites" window. When the prerequistes have been verified, click OK to dismiss the window and proceed to step 5.
Description of this image -
Step 5 of the installation asks you to define a password for main and auxiliary schema users. Accept the default ("Use same passwords for all schemas") and enter a password twice. Click Next to proceed.

Description of this image -
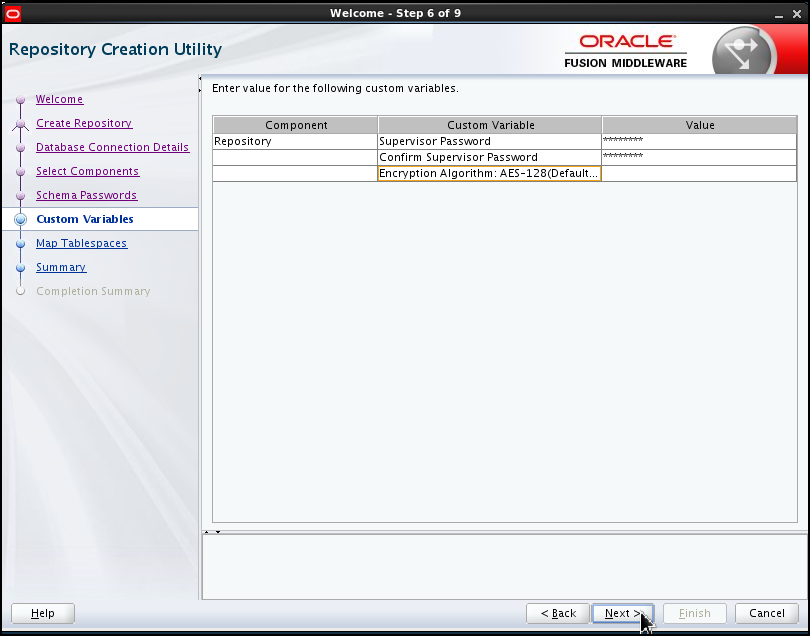
In step 6, you must set up the password for the Repository Supervisor user. Enter a password for the supervisor and confirm it (enter the same password twice) and accept the default for the Encryption Algorithm (do not enter a value, which defaults to AES-128 bit.) Click Next to proceed.
Description of this image -
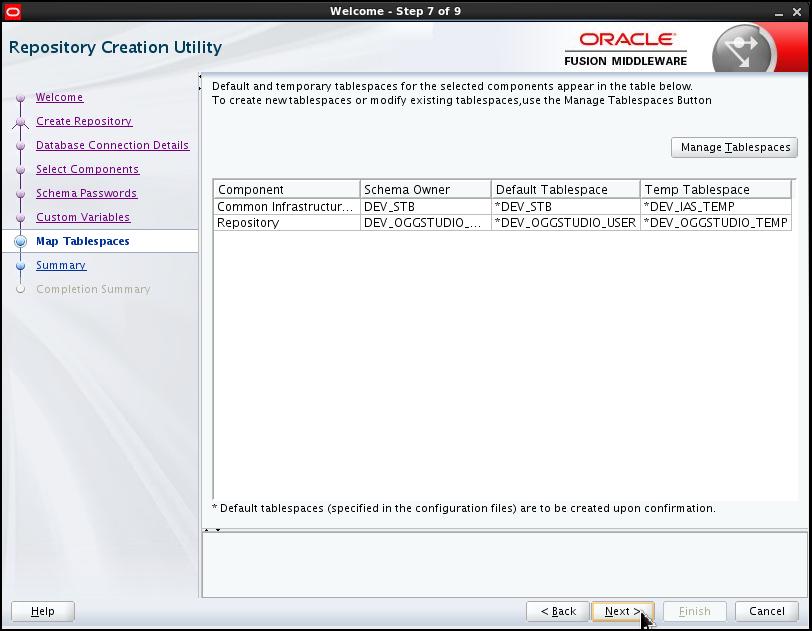
In step 7, accept all defaults (tablespace names to be created and assigned to repository schema owners) and click Next to proceed.
Description of this image -
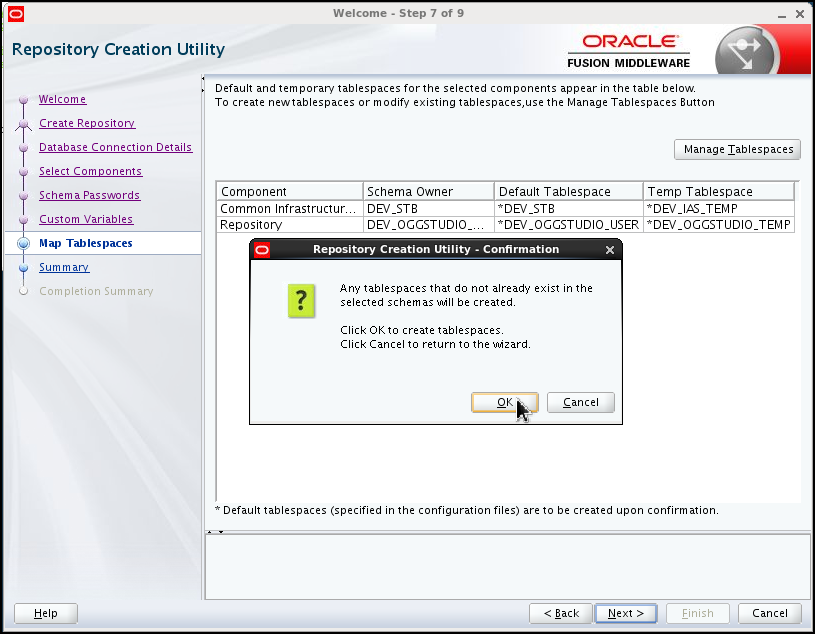
RCU displays a window to allow you to confirm the tablespace creation in Oracle. Click OK to confirm.
Description of this image -
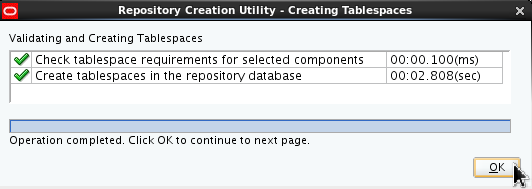
RCU displays a window which tracks the tablespace creation progress. Eventually two green ticks appears beside the tasks to mean that the tablespace requirements were checked and passed validation, and that the tablespace were successfully created. Click OK to dismiss the Creating Tablespaces window and to proceed to step 8.
Description of this image -
Step 8 displays a summary of the options chosen so far. Revise the options, then click Create to proceed with the creation of the tablespaces.

Description of this image -
RCU displays the progress window which shows the repository system load. There are four tasks being performed:
- Execute pre create operations
- Common Infrastructure Services
- Repository
- Execute post create operations
Eventually, a green tick appears beside each of the operations, signifying that the operation in question completed successfully.
Description of this image -
When all repository creation operations complete, the progress window disappears and the completion summary window (step 9) is displayed. If you wish, you can display the log file for the entire RCU repository creation session by clicking the rcu.log button. Click Close to dismiss the window.

Description of this image
Creating the Repository for OGG Monitor Server using the Repository Creation Utility (RCU)
-
Open a terminal shell window (or reuse an open shell window.) Change directory to
/u01/app/oracle/ogg_mon/oracle_common/binand startrcu.$ cd /u01/app/oracle/ogg_mon/oracle_common/bin $ ./rcu
RCU starts. Click Next to go past the initial welcome screen.
-
In step 2, accept the defaults ("Create Repository" and "System Load and Product Load") and click Next
Description of this image -
In step 3, you must enter the Oracle database connection parameters:
Database Parameter Value Database Type Oracle Database Host Name localhost Port 1521 Service Name ogg12 Username sys Password <Password for user SYS> Role SYSDBA Click Next to proceed.
Description of this image -
The RCU displays a window which shows the progress while the pre-requisites are checked. Eventually, three green tick signs appear beside the three prerequisites verified by RCU:
- Initializing repository configuration metadata
- Obtain properties of the specified database
- Check requirement for specified database
Click OK to dismiss the window and proceed to the next step.
Description of this image -
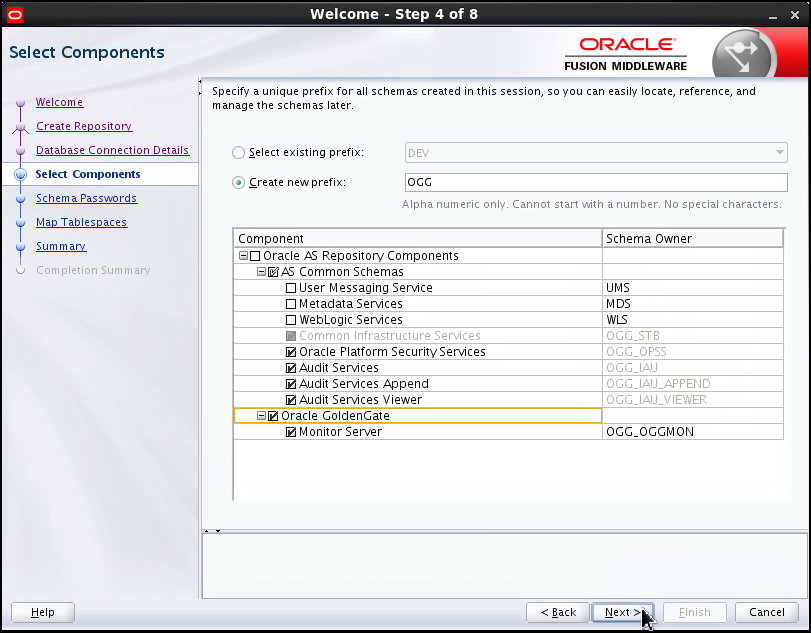
In RCU step 4, change the default for "Crate new prefix" (DEV1) to "OGG" and make sure you select "Oracle GoldenGate" and "Monitor Server" at the bottom of the form. Accept the default for "Schema Owner" (OGG_OGGMON) - Click Next to proceed.
Description of this image -
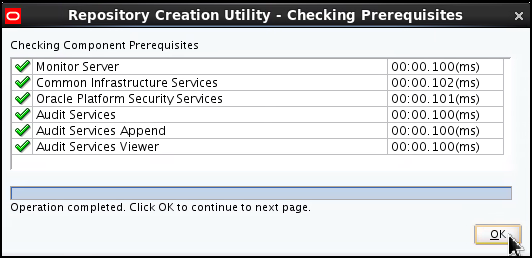
RCU displays another "Checking Prerequisites" window. When the prerequistes have been verified, click OK to dismiss the window and proceed to step 5.
Description of this image -
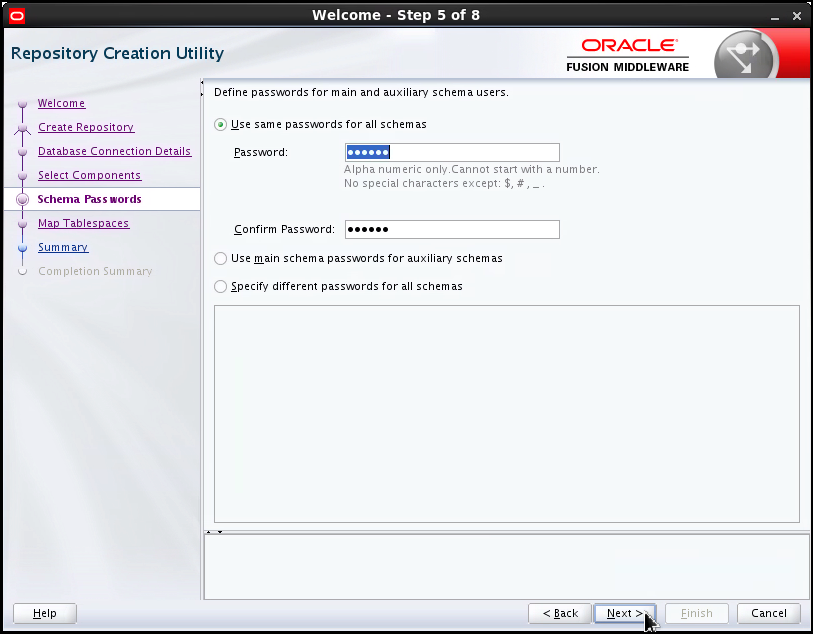
Step 5 of the installation asks you to define a password for main and auxiliary schema users. Accept the default ("Use same passwords for all schemas") and enter a password twice. Click Next to proceed.
Description of this image -
In step 6, accept all defaults for tablespace mapping and click Next to proceed.
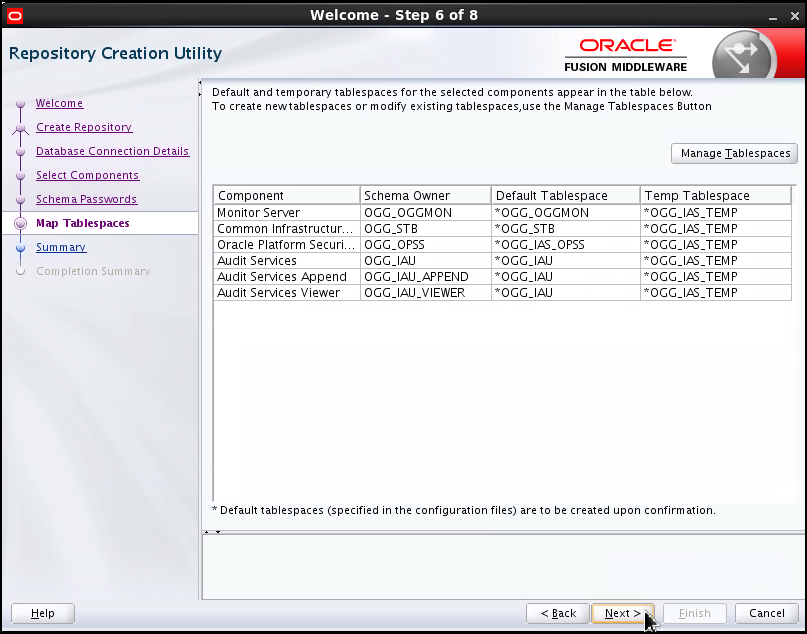
Description of this image -
RCU displays a window to allow you to confirm the tablespace creation in Oracle. Click OK to confirm.
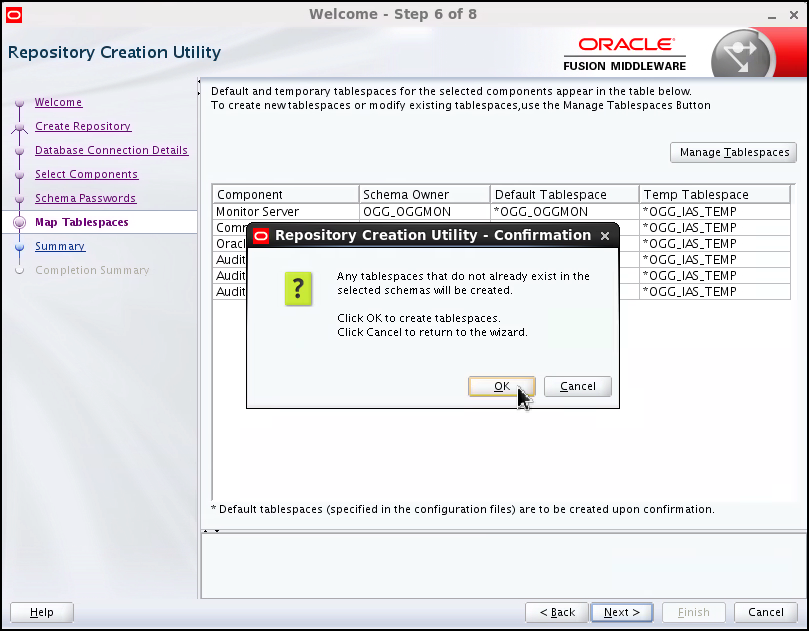
Description of this image -
RCU displays a window which tracks the tablespace creation progress. Eventually two green ticks appears beside the tasks to mean that the tablespace requirements were checked and passed validation, and that the tablespace were successfully created. Click OK to dismiss the Creating Tablespaces window and to proceed to step 7.
Description of this image -
Step 7 displays a summary of the options chosen so far. Revise the options, then click Create to proceed with the creation of the tablespaces.

Description of this image -
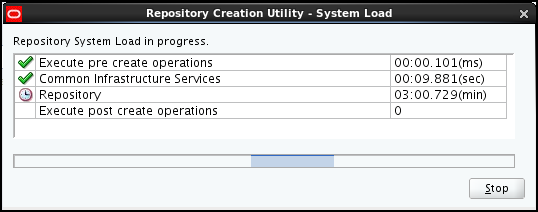
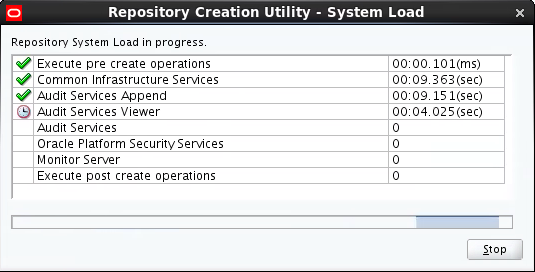
RCU displays the progress window which shows the repository system load. There are eight tasks being performed:
- Execute pre create operations
- Common Infrastructure Services
- Audit Services Append
- Audit Services Viewer
- Audit Services
- Oracle Platform Security Services
- Monitor Server
- Execute post create operations
Eventually, a green tick appears beside each of the operations, signifying that the operation in question completed successfully.
Description of this image -
When all repository creation operations complete, the progress window disappears and the completion summary window (step 8) is displayed. If you wish, you can display the log file for the entire RCU repository creation session by clicking the rcu.log button. Click Close to dismiss the window and terminate RCU.

Description of this image
Launch Oracle GoldenGate Studio and Connect to its Repository
Test the newly created repository by launching Oracle GoldenGate Studio and connect to it.
-
To launch Oracle GoldenGate Studio, invoke its executable image from the command line:
$ $FMW_HOME/oggstudio/bin/oggstudio -
The Oracle GoldenGate Studio splash window appears.

Description of this image -
After a few seconds, OGG Studio asks you if you want to import preferences from a previously installed release of OGG Studio. Click No to continue.
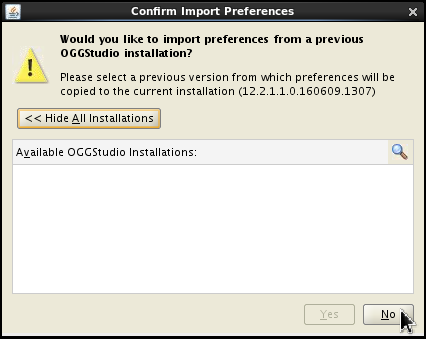
Description of this image -
The splash window resumes and after a few seconds the Oracle GoldenGate Studio main page is displayed. On the left pane you have the "Projects" tab with only one option available, Connect to Repository. The right pane shows the OGG Studio Start Page, with links to tutorials and documentation. Click Connect to Repository.

Description of this image -
OGG Studio displays the "Repository Connection" window. Click the green plus sign (+) to define a new set of connection parameters.
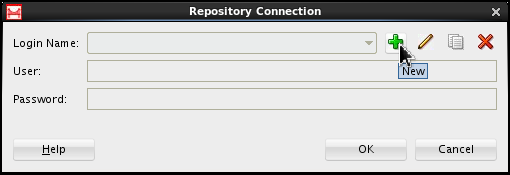
Description of this image -
In the "Repository Connection Information" window you must enter several parameters. The Studio Connection parameter are:
Studio Connection Parameter Value Login name MyStudio User SUPERVISOR Password <Password you set using RCU> The Database Connection parameters are:
Database Connection Parameter Value User DEV_OGGSTUDIO_REPO Password <Password you set using RCU> Driver Oracle JDBC Driver Driver Name oracle.jdbc.OracleDriver URL jdbc:oracle:thin:@localhost:1521:ogg12 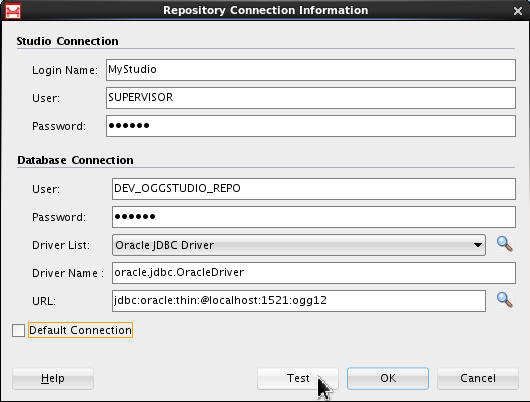
Description of this image -
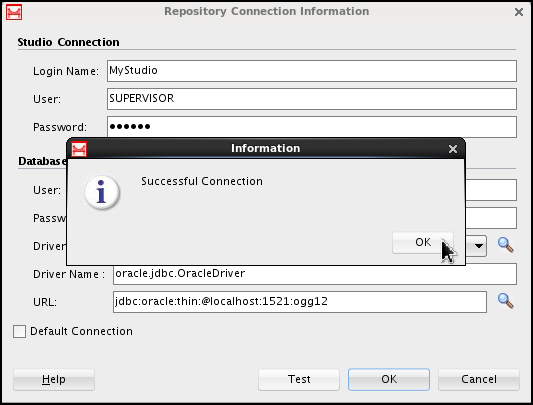
After you entered all parameters click Test to make sure OGG Studio can, in fact, connect to its repository. If an error occurs, check for typos and spelling mistakes, correct them and click Test again until the "Successful Connection" window appears.
Description of this image -
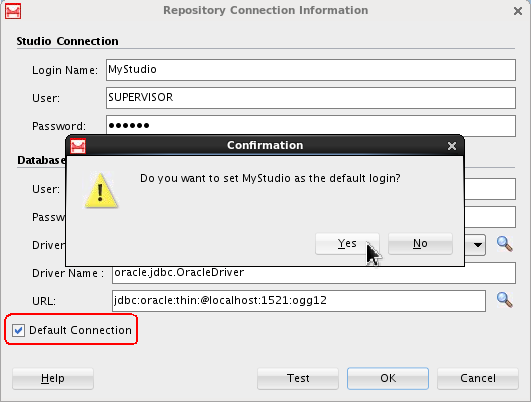
Before proceeding, you want to make the MyStudio connection your default login. Select the "Default Connection" check box, and a "Confirmation" dialog box appears. Click Yes to confirm.
Click OK on the "Repository Connection Information" window to connect to the repository.
Description of this image -
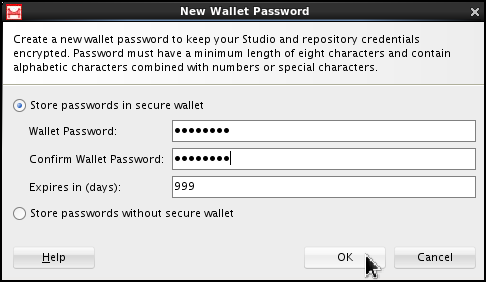
Since this is your first connection, OGG Studio asks you if you want to create a wallet password to keep both Studio and Repository connection credentials encrypted. Select Store passwords in secure wallet and enter the wallet password twice. The default expiration policy is 180 days. You can either accept the default or change it. In this example the expiration policy is set to 999 days.
Description of this image -
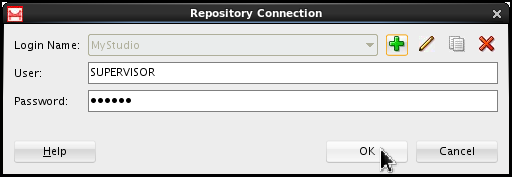
The "Repository Connection" window appears, the MyStudio login name already selected and both user and password automatically filled. Click OK to connect to the repository
Description of this image -
Oracle Goldengate Studio displays its main page, you can now star creating projects and solutions.

Description of this image Oracle GoldenGate Studio successfully connected to its repository, but in order to be proficiently used, OGG Studio needs the Oracle GoldenGate Monitor server and its agents configured and running. Please consult the OBE Creating and Configuring Oracle GoldenGate 12c Monitor Server and Agents to Work with Oracle GlodenGate Studio 12c to learn how to configure OGG monitor and how to deploy OGG Studio solutions to your replication infrastructure.
This last step concludes this OBE.