Oracle Identity Manager ADF Primer Part 1: Developing ADF Applications
Overview
Purpose
The Oracle Identity Manager ADF Primer aims to present you the ADF basics while helps you develop your first Oracle Identity Manager custom UI application, the Hello World app.
Time to Complete
Approximately 1 hour
Introduction
The Oracle Identity Manager 11gR2 PS2 web user interface is based on the Application Development Framework (ADF). The ADF framework permits you develop and deploy several customizations to the Oracle Identity Manager user interface (UI), such as:
- Change the User Interface look and feel;
- Change Oracle Identity Manager pages;
- Provide new functionality in Oracle Identity Manager Identity Self-Service Console.
The Oracle Identity Manager ADF Primer aims to present you the ADF basics while helps you develop your first Oracle Identity Manager advanced UI customization, the Hello World app.
To streamline your knowledge, the Oracle Identity Manager ADF Primer is divided in the following topics:

Mandatory Prerequisites
The following is a list of hardware and software required to run this Primer:
- JDeveloper Studio IDE installed and running
- OIM Server 11gR2PS2 installed (to copy the OIMLibraries)
Recommended Prerequisites
This tutorial is recommended for developers familiar with:
- Java and JDeveloper;
- MVC architectural pattern;
Meeting Requirements
In this topic you configure your environment to meet the requirements to build ADF applications for the Oracle Identity Manager.

Overview
Before start developing your ADF application for the Oracle Identity Manager, you must have a development environment meeting the following requirements:
-
IDE with ADF support available: to develop your application, you need an IDE with support to Oracle ADF. The options available for use are:
-
Oracle JDeveloper 11gR1: a free Oracle IDE that simplifies the development of Java-based SOA and Java EE applications. JDeveloper offers complete end-to-end development to Oracle Fusion Middleware and Oracle Fusion Applications with support for the full development life cycle.
-
Eclipse OEPE: The Oracle Enterprise Pack for Eclipse provides an unparalleled development experience for Eclipse developers looking to leverage Oracle's Middleware, Mobile, Database and Cloud Platforms.
Note: The activities reported in this primer are based on Oracle JDeveloper.
-
-
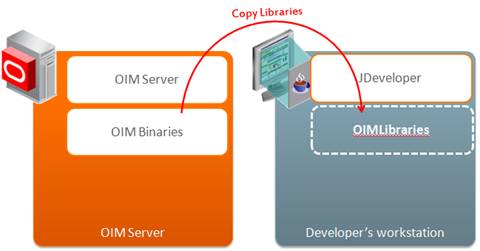
Copy Oracle Identity Manager libraries: after install your IDE, you need to import the following Oracle Identity Manager libraries to your development environment:
-
OIM Client Library: Contains objects to connect your application to Oracle Identity Manager Server as a client
-
OIM Model Shared Library: Contains Oracle Identity Manager APIs that allow your application to manipulate entities and data in Oracle Identity Manager (for example, creating a user or updating a user’s role membership)
-
OIM View Shared Library: Contains Oracle Identity Manager APIs to integrate your application with the Oracle Identity Manager UI.
-
Import Oracle Identity Manager libraries in your IDE: you import the Oracle Identity Manager libraries in your IDE, so custom applications can use the libraries provided.
Tutorial
In the next tasks, you copy the libraries from the Oracle Identity Manager server binaries to the development machine and import the libraries in Oracle JDeveloper.
-
To copy Oracle Identity Manager libraries:
-
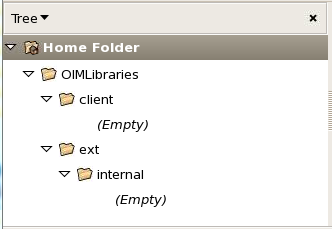
Access Oracle Identity Manager server and execute the following commands to create the OIMLibraries folder structure:
mkdir $HOME/OIMLibraries
cd $HOME/OIMLibraries
mkdir -p client
mkdir -p ext/internal
Note: this point you have an empty folder structure for the OIMLibraries:
-
Execute the following commands to copy the Oracle Identity Manager libraries from the product binary to the OIMLibraries folder:
cp -R $IDM_HOME/server/jdev.lib $HOME/OIMLibraries
cp $IDM_HOME/server/client/oimclient.jar $HOME/OIMLibraries/client
cp $IDM_HOME/server/ext/internal/orai18n-adf.jar $HOME/OIMLibraries/ext/internal
cp -R $IDM_HOME/server/modules $HOME/OIMLibraries
Note: The $IDM_HOME environment variable can be replaced by your IDM Home folder. For example: /u01/app/Oracle/Middleware/Oracle_IDM1
-
Copy the OIMLibraries folder from the Oracle Identity Manager server machine to the development machine:

Note: You can paste the OIMLibraries folder anywhere in the desktop workstation. For this tutorial, you paste the libraries under the folder in C:\ADFPrimer folder.
-
Import Oracle Identity Manager libraries in JDeveloper
-
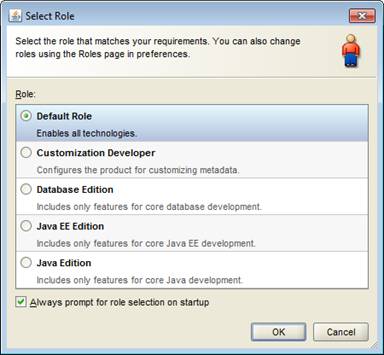
Launch JDeveloper.
Important: If the Select Role dialog box appears, make sure that the Default Role option button is selected. Click OK.
-
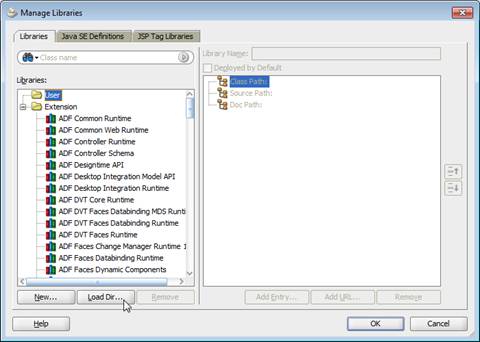
In JDeveloper, select Tools > Manage Libraries.

-
In the Manage Libraries window, click Load Dir.
-
In the Load Directory window, select the OIMLibraries > jdev.lib folder and click Select.

-
In the Manage Libraries window, observe the jdev.lib folder in the Libraries pane. Nested within the directory, you will find Oracle Identity Manager library files that you will use in this practice. Click OK to close the Manage Libraries window.

Checkpoint
At this point, your JDeveloper IDE is ready to develop custom ADF applications for the Oracle Identity Manager using the libraries provided by the product. In the next topic, you create an ADF application.
Creating your ADF Application
In this topic you create a blank ADF application in JDeveloper. This application will keep your source code in the next topics.

Overview
JDeveloper organizes the code you develop by applications and projects. Application is the main container in JDeveloper. Each application can have several projects. The project organizes the code per matter. Each project has its own meta configuration shared by the objects within the project, such as the deployment plan, the libraries and dependencies in the project and so on.

Tutorial
In the next task, you create the ExampleUI Application in JDeveloper. This application will contain your ADF projects.
In JDeveloper, click File > New.
In the New Gallery dialog box, select General > Applications under the categories section. Select Fusion Web Application (ADF) under the items section and click OK:
In the “Create Fusion Web Application” dialog box, “Application Name” step, enter the following values and click Next:
Attribute Value Application Name ExampleUI Directory C:\ADFPrimer\ExampleUI Application Package Prefix com.example 
-
In the “Project1 Name” step, enter ExampleModel as the Project Name and click Next:

In the “Project 1 Java Settings” step, click Next;
-
In the “Project 2 Name” step, enter ExampleViewController as the Project Name and click Finish:
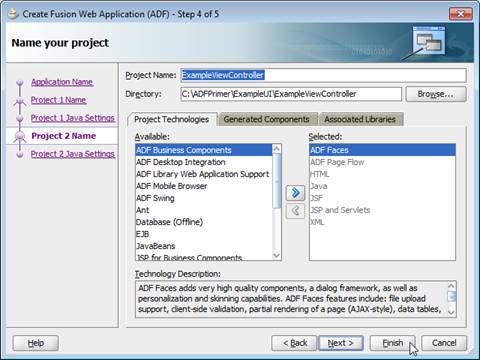
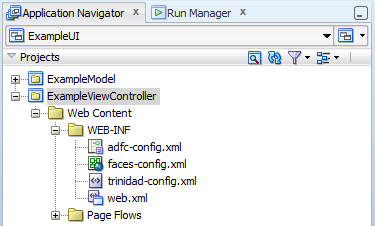
JDeveloper creates the ExampleUI application with the ExampleModel and ExampleViewController projects
JDeveloper also opens the ExampleUI Overview with a Quick Start Checklist to assist you build ADF applications:
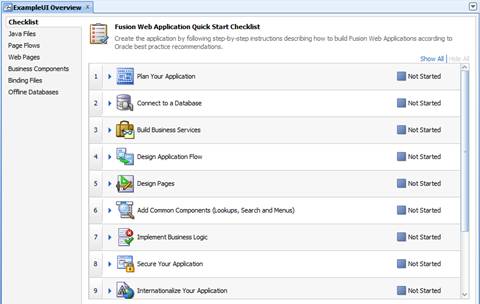
Note: For this primer, you do not use the Quick Start Checklist to develop your application. For a hands-on tutorial on how to use this feature, visit Oracle JDeveloper Tutorials – Developing Rich Web Applications with ADF
To import the Oracle Identity Manager Libraries in the ExampleModel project:
Right-click the ExampleModel project and select Project Properties
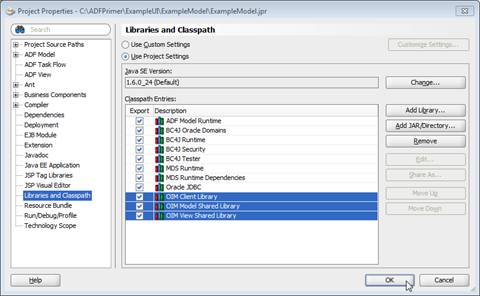
In the Project Properties dialog box, click Libraries and Classpath.
-
In Libraries and Classpath, click Add Library

-
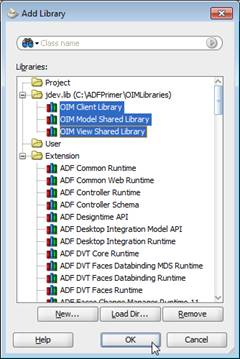
Select all the libraries under the jdev.lib folder and click OK:
-
In the Project Properties dialog box, click OK:
Click File > Save All to save your progress.
Using the preceding task as a reference, import the Oracle Identity Manager Libraries in the ExampleViewController project.
-
Configure the ExampleViewController project dependency:
Note: You configure the ExampleViewController project dependency because this project depends on the code provided by the ExampleModel project.
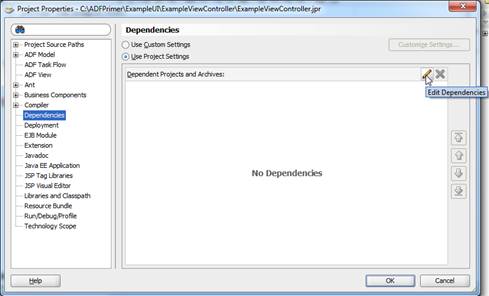
Right-click the ExampleViewController project and select Project Properties
In the Project Properties dialog box, click Dependencies.
-
In Dependencies, click Edit Dependencies.
-
In Edit Dependencies, expand the ExampleModel.jpr, select Build Output and click OK.
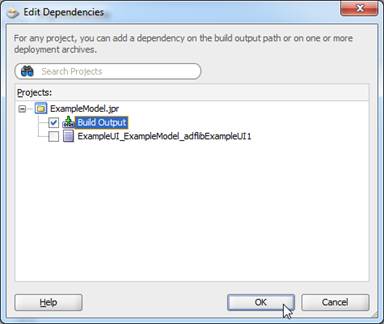
In Dependencies, click OK.
Click File > Save-All to save your progress.

Checkpoint
At this point, you have an ADF Application ready for development. In the next topic, you plan your ADF project based on the MVC architectural pattern.
The MVC Architecture
In this topic you have an overview of the MVC architecture and observe how your ADF application implements this concept.

Overview
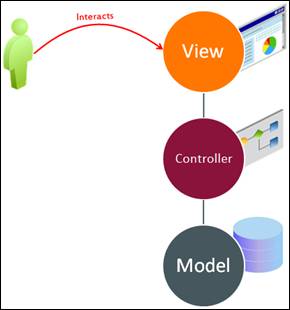
MVC is an architectural pattern widely adopted to implement web applications that divides the application code into three tiers:
-
Model: This tier interacts with storage and external API services to query and save information. This tier notifies its associated View and Controller tiers when there has been a change in its state. This notification allows the View tier to produce the updated output, and the Controller tier to change the available set of commands.
-
View: This tier requests information from the Model tier that it uses to generate the UI for the application, such as the page, the buttons, the layout, and the model.
-
Controller: Provides the Business Logic for the application and acts as a glue between the Model and View tiers. This tier is used to send commands to the Model tier to update the model's state (for example, editing a document). It can also send commands to the View tier to change the view's presentation of the model (for example, by scrolling through a document).
Benefits of using MVC include:
-
Modularity: The modularity in the MVC provides several benefits, such as provide segregation of concerns between developers for each layer, and enables the code maintenance without impacting other layers.
-
Organization: The MVC has the code organized in three responsibilities. This organization reduces the dependency between layers and simplifies the learning curve for those building and maintaining the code.
-
Reuse of code: The MVC pattern permits you to reuse the layers in other applications. For example, you can reuse the same Model layer code for several applications.
-
Support of multiple views: Because the View tier is separated from the Model tier and there is no direct dependency between the tiers, the UI can display multiple views of the same data at the same time. For example, multiple pages in a web application may use the same model objects. Another example is a web application that allows the user to change the appearance of the pages. These pages display the same data from the shared model, but show it in a different way.
-
Flexibility: UI requirements tend to change more rapidly than business rules. Users may prefer different colors, fonts, screen layouts, and levels of support for new devices such as cell phones or PDAs. Because the model does not depend on the views, adding new types of views to the system generally does not affect the model. As a result, the scope of change is confined to the view.
The Oracle ADF is adherent to the MVC architectural pattern and provides you frameworks for each MVC layer. You can mix and match ADF frameworks with other compatible frameworks or Java code to provide each layer. In the next topics, you are presented to some of those options.
Tutorial
In this tutorial, you observe how your custom ADF Application is presented in regards to the MVC pattern.
-
In JDeveloper, observe the projects under the ExampleUI application:
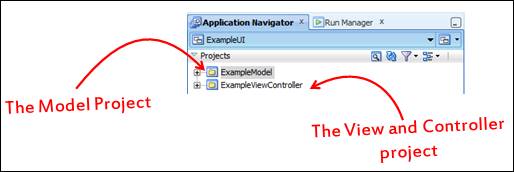
Note: The ExampleUI application has two distinct projects. The ExampleModel is to contain the code to integrate your application with external systems. The ExampleViewController is to contain code to provide the Business Logic and the View for your application.
-
Observe that the ADF application MVC code is divided in two projects. This way, you can create new ViewController projects to reuse the Model project already built, like in the illustration below:
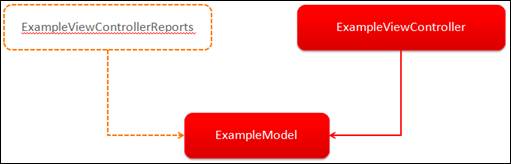
Note: The illustration presents a conceptual example on how you can leverage on ExampleModel project to create a new ViewController to collect reports.
Checkpoint
At this point, you understand how the ADF framework, and hence your project, adheres to the MVC architectural pattern. In the next tutorials, you start developing your ADF application starting from the Model Layer.
Developing the Model Layer
In this topic, you are presented to the options you have to develop the Model layer.

Overview
As mentioned in the previous topic, ADF is adherent to the MVC architectural pattern and provides you frameworks for each MVC layer. You can mix and match ADF with other compatible frameworks or Java code to provide each layer. To develop the model layer you can use:
-
ADF Business Components: ADF-BC is a Model API provided by the Oracle ADF to streamline the integration between your application with Database tables. ADF-BC lets you query a database and automatically create code to integrate with the tables you select, providing a declarative experience.
Note: In this primer you will not use ADF-BC. For a hands-on tutorial on how to use this feature, visit Oracle JDeveloper Tutorials – Developing Rich Web Applications with ADF
-
Java Code: You can create Java code to provide the Model. In this primer, you are to create a simple Java class to provide a Hello World.
-
Java API’s: You can leverage on Java API’s to integrate with third party applications if those API’s are compatible with your runtime environment.
Tutorial
In this tutorial, you create a HelloWorld class to implement the model services for your ADF application:
Create the HelloWorld class:
-
In JDeveloper Application Navigator right-click ExampleModel and select New.

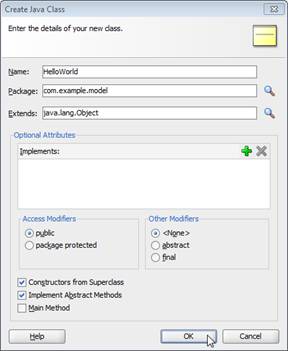
In the New Gallery tab, select Java under Categories section and Java Class under Items sections, them click OK.
-
In the Create Java Class dialog box, enter HelloWorld as Name and click OK:
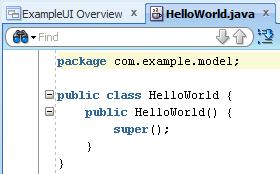
JDeveloper displays the HelloWorld java source:
Implement the HelloWorld code:
-
Enter the following method in the HelloWorld class to provide the Hello World:
public String helloWorld(String name){ //here you can integrate your model with data or service providers return "Hello world! My name is "+name; } -
Enter the following method in the Hello World class to test your code:
public static void main(String args[]){
  String name = "John Doe";
  HelloWorld hw = new HelloWorld();
  String returnedMessage = hw.helloWorld(name);
  System.out.println("Returned message: "+returnedMessage);
}
Note: The HelloWorld is a Plain Old Java Object (POJO), an ordinary, simple and easy to understand Java Object that does not carry any fancy feature.
Click File > Save to save your progress.
Test the Hello World:
Right-click the HelloWorld.java file in the Application Navigator, and click Run:
-
Observe the output under the “Running: ExampleModel.jpr – Log” section:
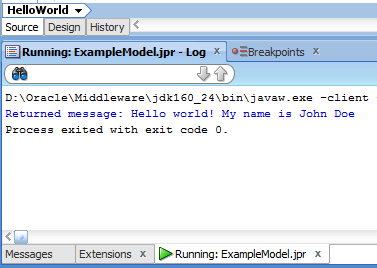
Note: To further proof the code, you can change the name variable in the main method and run the code again.
Click File > Save All to save your progress.

Checkpoint
At this point, you implemented and tested a Hello World class for your ExampleModel project. Although this is a fairly simple class, it showcases where you can integrate your model with any compatible code you want to provide model services for your ADF application. In the next steps, you draw the Controller layer for your ADF application. Your Controller layer will act as a broker between the View layer and the HelloWorld class.
Developing the Controller Layer
In this topic, you are presented to the ADF Controller layer components.

Overview
ADF leverages on the following components to deliver the Controller Layer:
-
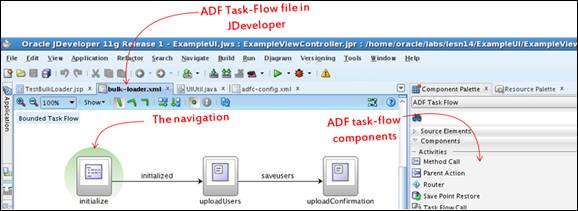
ADF Task-Flows: The task flow provides a modular approach to control the navigation in your ADF application:
-
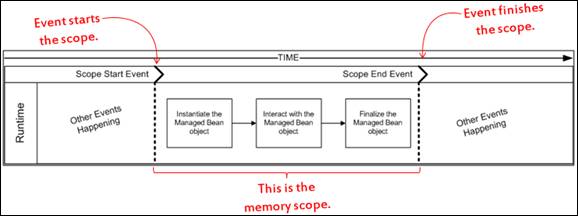
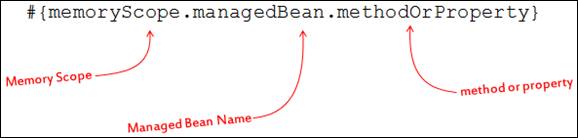
Managed Beans: Java classes that you register with your ADF application to provide the business logic and utility methods during run time. When available, managed bean properties and methods are accessed by the ADF application. The managed bean availability is determined by the memory scope.
-
Memory Scope: The memory scope determines the life cycle for the managed bean in the memory. During the memory scope, you can interact with the managed bean:
Important: In the remaining topics, you develop the Hello World Controller Layer using the components listed above. For a better understanding we recommend you to review the ADF components defined above during each of the remaining development steps. This measure keeps you in track of the ADF framework usage in the Controller Layer.
Note: This tutorial presents the ADF basics for the Oracle Identity Manager development. For complete detailed information and hands-on tutorials on ADF, refer to:
Tutorial
In this tutorial, you develop and configure the Controller layer for your application:
-
Create the HelloWorldBean managed bean:
Note:The HelloWorldBean managed bean will carry the business logic and integration with the Model Layer.
In JDeveloper Application Navigator right-click ExampleViewController and select New.
In the New Gallery tab, select Java under Categories section, Java Class under Items sections and click OK.
-
In the Create Java Class dialog box, enter the following information and click OK.
Attribute Value Name HelloWorldBean Implements java.io.Serializable 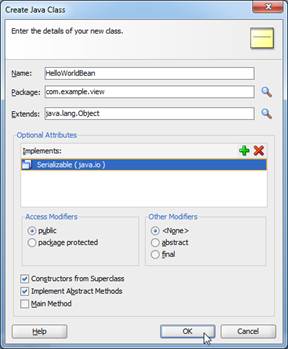
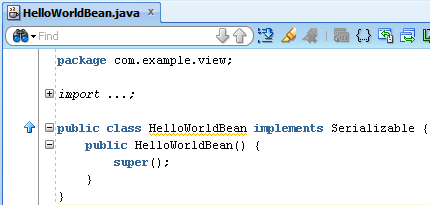
JDeveloper displays the HelloWorldBean java source:
Implement the HelloWorldBean managed bean code:
-
Implement the HelloWorldBean source code:
package com.example.view; import java.io.Serializable; import com.example.model.HelloWorld; import javax.faces.event.ActionEvent; public class HelloWorldBean implements Serializable { private String name; private String helloWorldMessage; private HelloWorld helloWolrdModel; public void setName(String name) { this.name = name; } public String getName() { return name; } public String getHelloWorldMessage() { return helloWorldMessage; } public void invokeHelloWorldModel(ActionEvent e){ helloWolrdModel = new HelloWorld(); this.helloWorldMessage = helloWolrdModel.helloWorld(this.name); } } -
Enter the following method in the HelloWorldBean class to test your code:
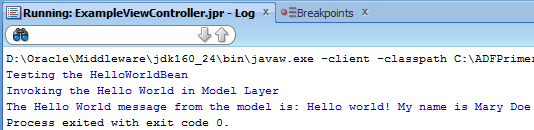
public static void main(String args[]){
  System.out.println("Testing the HelloWorldBean");
  HelloWorldBean hwb = new HelloWorldBean();
  hwb.setName("Mary Doe");
  System.out.println("Invoking the Hello World in Model Layer");
  hwb.invokeHelloWorldModel(null);
  System.out.println("The Hello World message from model is: " +hwb.getHelloWorldMessage());
}
Note: The HelloWorldBean is a POJO (Plain Old Java Object), an ordinary, simple and easy to understand Java Object that does not carry any fancy feature.
-
Click File > Save All to save your progress.
Test the HelloWorldBean managed bean code:
-
Right-click the HelloWorldBean.java file in the Application Navigator, and click Run.
-
Observe the output under the “Running: ExampleViewController.jpr – Log” section:
Note: To further proof the code, you can change the name variable in the main method and run the code again.
-
Click File > Save All to save your progress.
-
Create the hello-world task-flow:
Note: the hello-world task flow controls the navigation in your application.
In JDeveloper Application Navigator right-click ExampleViewController and select New.
-
In the New Gallery tab, select JSF under Categories section, ADF Task Flow under Items sections and click OK.
-
Use the following table to populate the Create Task Flow window, and click OK:
Attribute Value File Name hello-world.xml Directory add the following path appendix after the WEB-INF folder: \oracle\iam\ui\custom 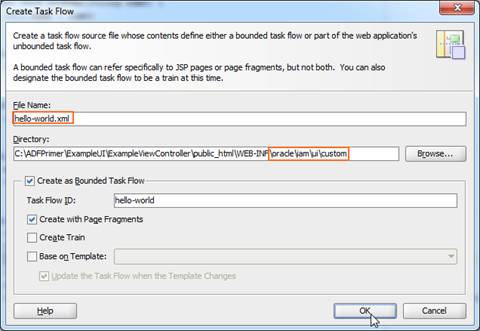
JDeveloper displays the hello-world.xml tab and the Component Palette to the right of the tab.
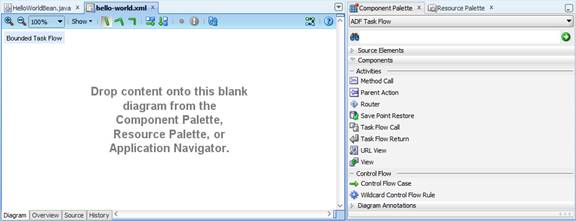
The Component Palette contains components that you can drag and drop onto the bulk-loader.xml tab to design your task flow.
-
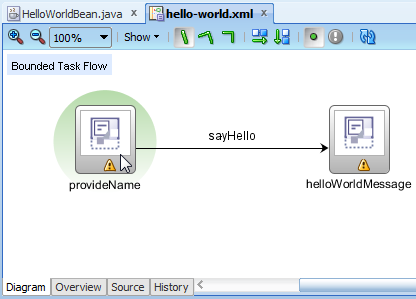
Draw the hello-world task-flow navigation:
-
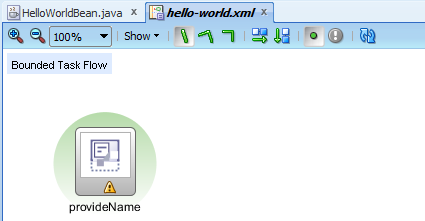
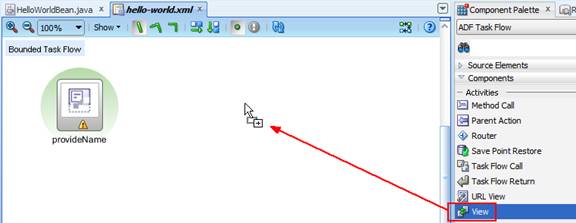
From the Component Palette, drag and drop a View onto the hello-world.xml tab:

-
Enter provideName as the View name:
-
From the Component Palette, drag and drop a View onto the hello-world.xml tab (to the right of the providerName
Enter helloWorldMessage as the View name.
-
From the Component Palette, drag a Control Flow Case onto the hello-world.xml tab and release the component over the providerName
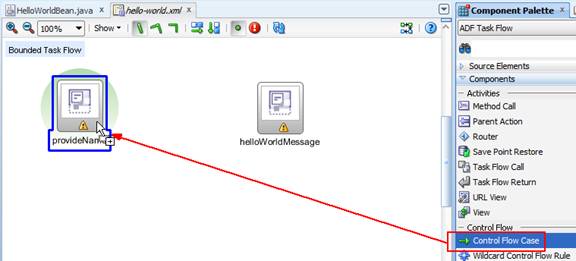
Click helloWorldMessage
-
Enter sayHello as the Control Flow Case name:
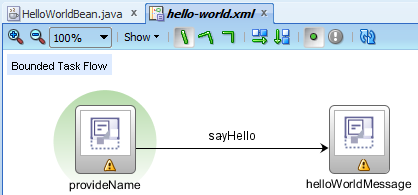
Click File > Save All to save your progress.
-
Integrate the HelloWorldBean managed bean and the hello-world task flow:
Note: In the ADF, the task flow combined with the managed bean provides the Controller Layer. Through the task flow, you can control what managed beans are integrated and when they are available (the memory scope).
-
In the hello-world.xml tab, click the Overview subtab.

-
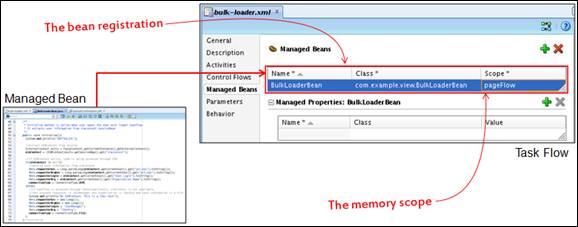
JDeveloper displays the Overview pane, where you can configure properties for your task flow. Click the Managed Beans tab.
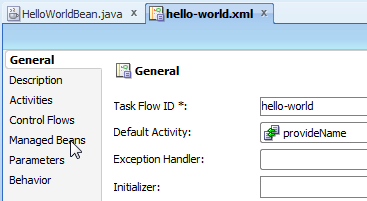
Note: The Managed Beans tab controls the beans that are bounded to the hello-world.xml task flow.
-
On the Managed Beans tab, click the plus icon to add a managed bean to your task flow.
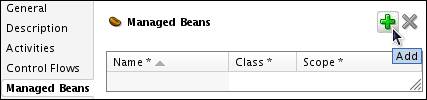
-
Add the following entry to the Managed Beans area of the tab:
Field Value Name HelloWorldBean Class com.example.view.HelloWorldBean Scope pageFlow 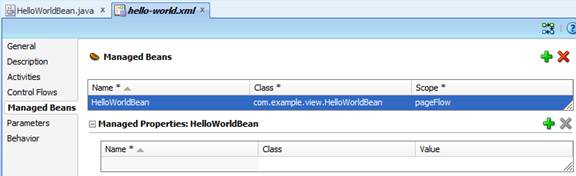
Note: The HelloWorldBean managed bean is integrated with the hello-world task flow using the pageFlow memory scope. This signifies the HelloWorldBean managed bean is instantiated once the hello-world task flow is executed and is kept in memory until the hello-world task flow is finished. For more information about the managed bean memory scope in ADF, refer to Oracle Fusion Middleware Fusion Developer’s Guide for Oracle Application Development Framework 11g Release 2.
Click File > Save All to save your progress.
Checkpoint
At this point, you implemented the Controller Layer for your custom ADF application. In the next steps, you implement the View Layer.
Developing the View Layer
In this topic, you are presented to the ADF View layer components.

Overview
ADF leverages the following components to deliver the View Layer:
-
ADF Page Fragments: As you build web pages for an application, some pages may quickly become large and unmanageable. The ADF Page fragment address this concern by providing a small page fragment connected and controlled by the task-flow. The ADF page fragment is easy to build, maintain and reuse in several different task-flows.
-
ADF Faces Components: ADF Faces consists of over 150 components you can drag and drop into your ADF Page Fragment to build the layout, provide functionality and interact with the user. The ADF Faces Components are presented in your IDE through a component palette for a simplified navigation, selection and configuration, so developers are able to work with the ADF Faces Components visually, minimizing the manual codification.
-
Expression Language: The Expression Language is a Java EE feature that permits developers invoke Managed Beans attributes and methods:
Important: In the this topic, you develop the Hello World View Layer using the components listed above. For a better understanding we recommend you to review this overview during each of the remaining development steps. This measure keeps you in track of the ADF framework usage in the View Layer.
Note: This tutorial presents the ADF basics for the Oracle Identity Manager development. For complete detailed information and hands-on tutorials on ADF, refer to:
Tutorial
In this tutorial, you develop the View layer for your application:
-
Create the provideName page fragment:
Note: The provideName page fragment will provide a form where users can inform their name and invoke the Hello World.
-
In the hello-world.xml tab, Design section, double-click provideName
-
In the “Create New JSF Page Fragment”, click OK.
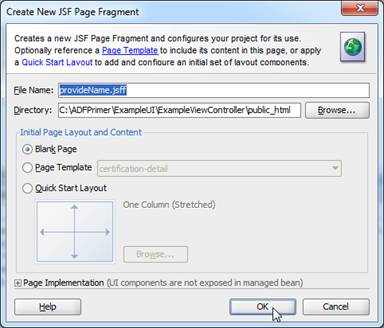
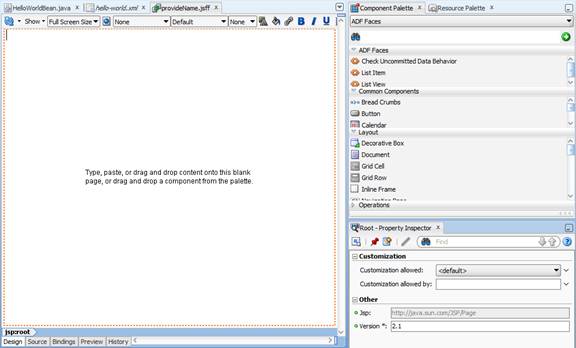
JDeveloper displays the provideName.jsff tab with the Page Fragment, the Component Palette to the right of the tab and the Property Inspector under the Component Pallete.
-
Design the provideName page fragment:
Note: In this task, you drag, drop and configure ADF components to design the provideName page fragment.
-
From the Component Palette, drag and drop the Output Text component onto provideName.jsff
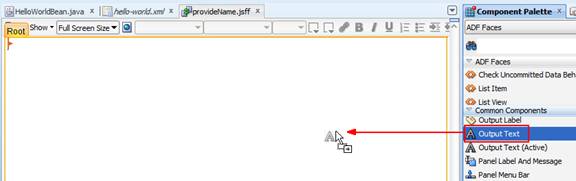
Note: The Output Text component displays output text in the page.
-
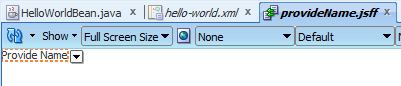
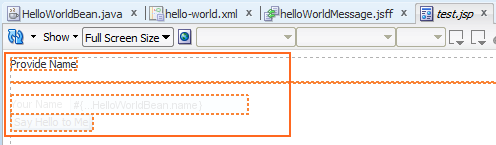
Select the outputText1 component under the provideName.jsff tab. In the Property Inspector, enter Provide Name as Value and press Enter.
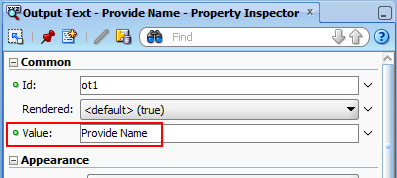
The provideName.jsff tab displays Provide Name
-
In the Component Palette, enter separator in the search field and then press Enter.
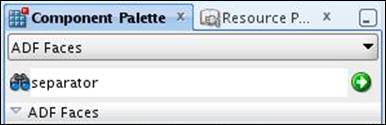
The Component Palette displays the Separator component in the Search Results section.
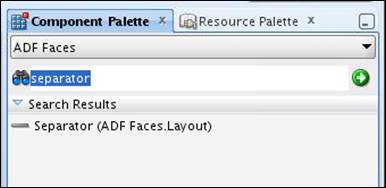
Note: Separator provides a bold line that organizes components in your page.
-
From the component palette results, drag the Separator component and drop it under the “Provide Name” output text.
-
From the Component Palette, drag and drop the Input Text component under the separator component:
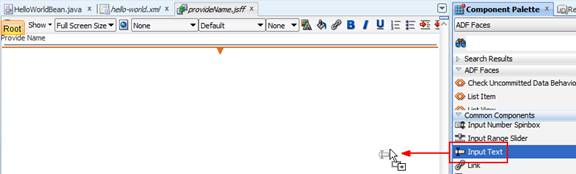
Note: The Input Text field will be used by users during the run time to provide their name.
-
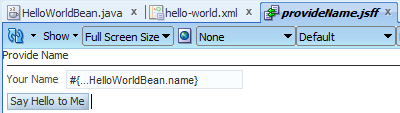
Select the “Input Text - Label 1”. In the Property Inspector, enter Your Name as Label and press Enter.
-
In the Property Inspector, click the down arrow next to Value > Expression Builder.
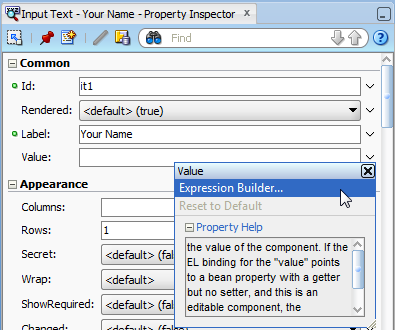
Note: You select Expression Builder because want to invoke a managed bean method or property to store the input text entered by users during the runtime.
-
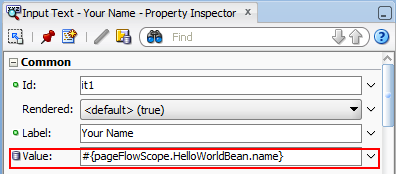
In the Expression Builder window, select ADF Managed Beans > pageFlowScope, > HelloWorldBean > name and click OK.

Note:Expression Builder window permits you browsing and selecting managed beans methods and automatically generates the Expression Language based on your selection.
JDeveloper displays the Expression Language you pick for the Value property.
-
From the Component Palette, drag and drop the Button component under the Input Text component.
Note: The button component will be used to invoke the Hello World with the name provided by the user during run time.
-
Select the “commandButton1”. In the Property Inspector, enter the information provided in the following table and press Enter
Attribute Value Text Say Hello to Me Action sayHello ActionListener #{pageFlowScope.HelloWorldBean.invokeHelloWorldModel} 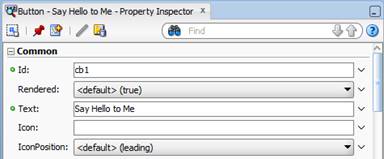
JDeveloper displays the “Say Hello to Me” button under the Your Name input text:
-
k. Click File > Save All.
-
Create the helloWorldMessage page fragment:
Note: The helloWorldMessage page fragment will display the personalized Hello World message for the users.
-
In the hello-world.xml tab, Design section, double-click helloWorldMessage
-
In the “Create New JSF Page Fragment”, click OK.
JDeveloper displays the helloWorldMessage.jsff tab with the Page Fragment, the Component Palette to the right of the tab and the Property Inspector under the Component Pallete.
-
Design the helloWorldMessage page fragment:
Note: In this task, you drag, drop and configure ADF components to design the helloWorldMessage page fragment.
-
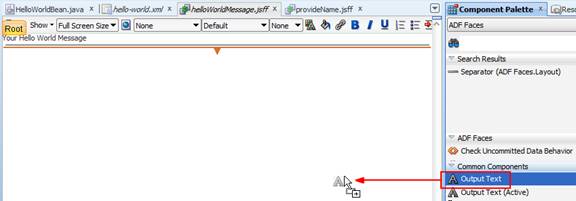
From the Component Palette, drag and drop the Output Text component onto helloWorldMessage.jsff
-
Select the outputText1 component under the helloWorldMessage.jsff tab. In the Property Inspector, enter Your Hello World Message as Value and press Enter.
-
In the Component Palette, enter separator in the search field and then press Enter.
-
From the component palette results, drag the Separator component and drop it under the “Your Hello World Message” output text.
-
From the Component Palette, drag and drop a Output Text component under the separator component:
Note: This Output Text field will print the Hello World message.
-
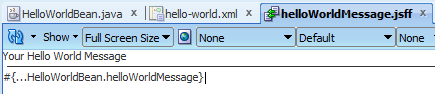
Select the outputText1 component. In the Property Inspector, enter the Expression Language #{pageFlowScope.HelloWorldBean.helloWorldMessage} as Label and press Enter.
-
Click File > Save All.
-
Observe the helloWorldMessage.jsff file after design:

Checkpoint
At this point, you implemented the View Layer for your custom ADF application. In the next steps, you test your ADF application in JDeveloper IDE.
Testing your ADF Application
In this topic, you are learn how to test your ADF Application.

Overview
Testing your ADF web application requires an Application Server with ADF framework libraries configured. The Oracle JDeveloper Studio comes with Oracle Fusion Middleware Infrastructure software, which includes the Oracle Application Development Framework and an embedded version of the Oracle WebLogic Server for developing and testing Java and Oracle ADF applications.

When developers start a test in JDeveloper, the IDE automatically runs the embedded WebLogic Server in developer’s desktop, deploys and provides a link for the ADF application. During the run time, JDeveloper IDE also monitors and displays the embedded WebLogic Server logs.
Tutorial
In this tutorial, you test your ADF application in JDeveloper embedded WebLogic Server:
Create a JSF Page to display the hello-world task flow:
Note: You create a JSF page to work as a mechanism to launch your ADF task flow.
-
In JDeveloper Application Navigator right-click
ExampleViewController and select New. -
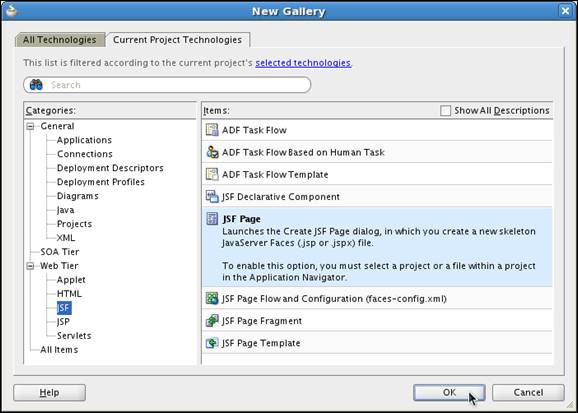
In the New Gallery window, select Web Tier > JSF from the Categories pane and “JSF Page” from the Items pane, and click OK.
-
In the Create JSF Page dialog box, enter test.jsp in the File Name field and click OK.
-
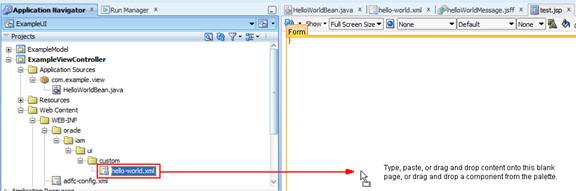
In the Application Navigator pane, navigate select the hello-world.xml file.

-
Drag and drop the hello-world.xml file onto the test.jsp tab.
-
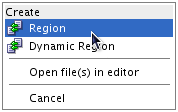
Select Region from the Create popup menu that appears in the test.jsp tab.
JDeveloper displays the hello-world task flow content in the test.jsp file:
-
Click File > Save All.
-
Run your custom ADF application in the embedded WebLogic Server:
-
In the Application Navigator, right-click the test.jsp page and click run:

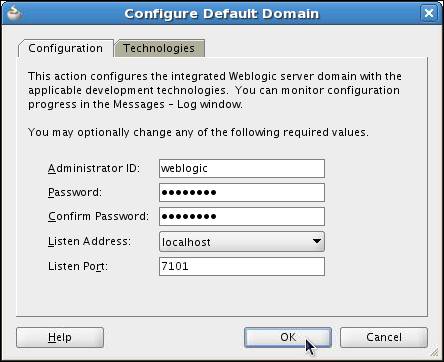
Note: If this is your first time using the JDeveloper embedded WebLogic Server, the Jdeveloper will display a dialog box to configure your server. Enter the values below as reference and click OK:
-
Wait until the WebLogic Server run and deploy your application.
Note: This step may take several minutes depending on your machine resources and if this is your first time using the embedded WebLogic Server.
After a successful deployment in the embedded WebLogic Server, JDeveloper displays the message:
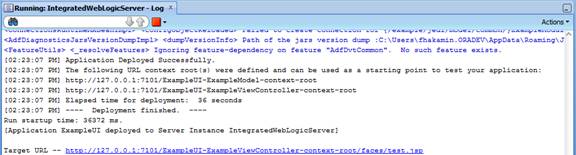
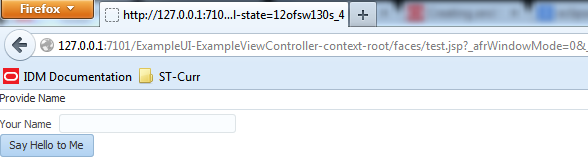
JDeveloper also launches a browser instance to display the test.jsp page with the hello-world task flow.
Note: If JDeveloper does not launch the browser, click in the hyperlink provided in the log.
-
Test your application:
-
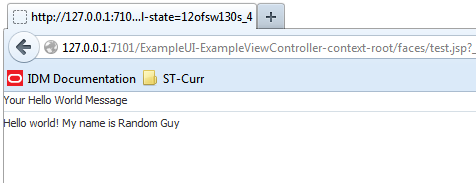
Enter a value as Your Name (for example:
Random Guy and click “Say Hello to Me”: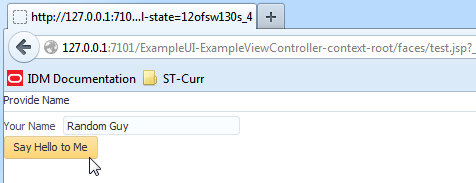
Observe the results.
Return to JDeveloper and click Stop > Integrated WebLogic Server:

Click File > Save All.
Checkpoint
At this point, you tested your ADF application using the embedded WebLogic Server. This signifies you know the ADF basics to develop web applications.
In the next topic, you are guided to the next steps.
Summary and Next Steps
Summary
In this tutorial, you learned:
- How to configure the JDeveloper to develop Oracle Identity Manager customizations
- How to create and develop a custom ADF Application
- The ADF components that you can leverage to build Oracle Identity Manager User Interface customizations
- How to test your application in the JDeveloper embedded WebLogic Server
Next Steps
These are the recommended next steps after you finish the ADF Primer 1:

- ADF Primer 2: in this tutorial, you experience deploying your custom ADF application in Oracle Identity Manager
- Oracle Identity Governance Essentials: in this course, you learn the Oracle Identity Manager main functionalities. This includes the not only the traditional Identity Management capabilites (such as reconciliation and provisioning), but also the newest features (such as the certification and risk aggregation).
- Oracle Identity Governance Develop Identity Provisioning: this course provides the ultimate development experience for the Oracle Identity Manager, including:
- Developing your own custom connector
- Customizing the identity life cycle
- Extending Oracle Identity Manager connectors
- Providing event based certification with closed-loop remediation
- Customizing the Oracle Identity Manager workflows
- Customizing the Oracle Identity Manager UI
During the course, you explore the Oracle Identity Manager API's and environment to deliver advanced configuration and customizations based on typical busincess case scenarios
In regards to the User Interface customization, the Develop Identity Provisioning course delivers the most advanced UI customization, involving not only the ADF customization, but the use of the product API's, the advanced authorization configuration, the advanced sandbox editing and so on.
Resources
Help topics relevant to the this primer.
- Oracle JDeveloper Installation Steps
- Introduction to JDeveloper IDE
- Eclipse OEPE Installation Steps
- Introduction to Eclipse OEPE
- Oracle JDeveloper Tutorials – Developing Rich Web Applications with ADF
- Oracle® Fusion Middleware Fusion Developer's Guide for Oracle Application Development Framework 11g Release 2 (11.1.2.0.0)
Credits
Put credits here
- Lead Curriculum Developer: Frederico Hakamine
To navigate this Oracle by Example tu, note the following:
- Topic List:
- Click a topic to navigate to that section.
- Expand All Topics:
- Click the button to show or hide the details for the sections. By default, all topics are collapsed.
- Hide All Images:
- Click the button to show or hide the screenshots. By default, all images are displayed.
- Print:
- Click the button to print the content. The content that is currently displayed or hidden is printed.
To navigate to a particular section in this tutorial, select the topic from the list.