General Administration and Policy Enforcement within MSAC
Overview
Purpose
In this tutorial, you learn how to perform general
administration and policy enforcement within Mobile Security
Access Console. You will
focus on creating a single custom policy and use this to explain
various policy properties in Oracle Mobile Security Suite.
Time to Complete
Approximately 21/2 hours
Introduction
Oracle Mobile Security Suite (OMSS) enhances employee
productivity by allowing secure access to corporate applications
and
data from mobile devices while preserving a rich user experience.
The Mobile Security Container creates an enterprise workspace
on any mobile device, corporate owned or personal, and for all
mobile platforms.
Employees get seamless access to intranet resources, corporate
data and mobile apps with enterprise-grade security and deep
integration with Oracle Access Manager and Microsoft Active
Directory authentication for true Single Sign-On.
Overview of Defining Policies
Policies enable Mobile Security Administrative Console (MSAC)
users and administrators to implement group-based
access and manage vApp availability. In real world, the best
practice to defining policies is as follows:
-
Create groups in LDAP to represent various user populations for eg. full time and part time employees group.
-
Assign users to each of these groups. In some cases, a user could be member of multiple groups.
-
There are certain OMSS specific groups (as discussed in the install OBE) that must be present in LDAP
(such as control group, system admin, company admin and helpdesk groups). -
All the users whose mobile devices need to be managed, must be members of the control group. All the employees
who are responsible for login into MSAC to resolve helpdesk tickets, must be members of the helpdesk group. All user(s)
who are administrators of OMSS for a particular company must be members of the company admin group. All the user(s)
who are ISP for various companies - i.e, who are responsible for managing various deployments for different companies
must be members of the system admin group. -
By default, in OMSS there is a default group which is assigned a default policy. You should not directly update the default
policy. Create new policies in MSAC and assign the policies to LDAP groups.For example,You create two policies: MyCompany_FullTimeEmp and MyCompany_PartTimeEmp. The groups assigned
to MyCompany_FullTimeEmp policy will be the control group and Full Time employees group. Similarly, groups assigned
to MyCompany_PartTimeEmp policy will be the control group and Part Time employees group.
Hardware and Software Requirements
The following is a list of software and hardware requirements:
- Windows 2008 R2 SP1 server
- Linux machine OL6
- Oracle Database 11g version 11.2.0.3
- Oracle Mobile Security Suite 3.0.1.0.0
- Active Directory Windows 2008 (Optional)
- Microsoft Exchange Server 2010 (Optional)
- Mobile device such as an iPhone or an iPad
For this OBE, you use Active Directory for storing user
information. Any other LDAP data store (like OUD)
can also be used instead to store user information. The use of
Microsoft Exchange Sever is required only for sending
emails and is optional.
Prerequisites
Before starting this tutorial, you should complete the following OBE
Setup tasks for Administration and Policy Enforcement
A new user will be provisioned in Active Directory. This user will be added to a group and will be used for policy enforcement tasks.
Create a new AD user and assign privileges
Create a new user Vishal Parashar in Active
Directory. Add this user to mobileuser and mobileadmin
groups.
-
Navigate to the AD machine (
windowserver1.idc.oracle.com). FromStart > Administrative tools >,
Active Directory Users and Computers
Right-click Users node, and Create a new user.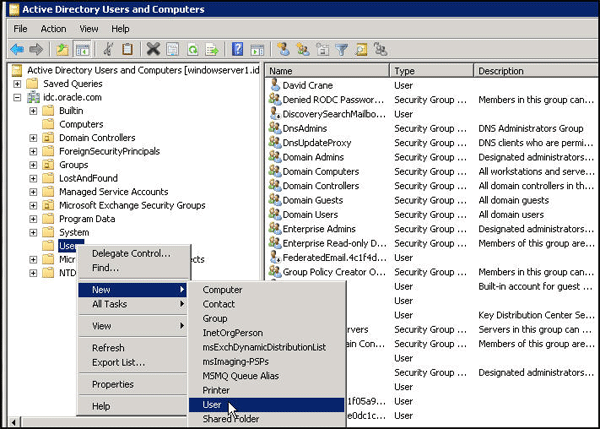
-
Specify the user details as shown below.

-
Specify the required password.

Click
Finish.
-
Double-click the user
Vishal
                        Parashar
. ClickGeneral and enterE-mail. ClickMember Of
and addmobileuserandmobileadmingroups to the user.
-
Click
OK.
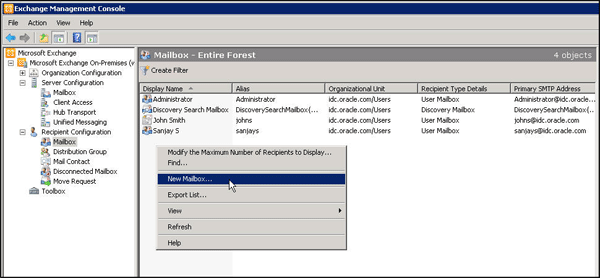
Configure Exchange server setup for new user
The user Vishal Parashar is now a member of mobileuser
and mobileadmin groups, therefore VishalP@idc.oracle.com
should be able to login to the mobile device and access the
mobile device/applications that is managed by OMSS.
-
Make sure the user
Vishal Parasharhas a mail box setup on the Exchange server (so that he can receive email invite
from OMSS to download secure workspace container). -
Open Exchange Management Console in the Windows machine (This assumes that you have Microsoft Exchange
Server setup pre configured). -
Create a new mail box as shown below.
Select
User Mailbox.
Select
Existing users. Select the userVishal Parashar.
Provide details for the Mailbox Settings.
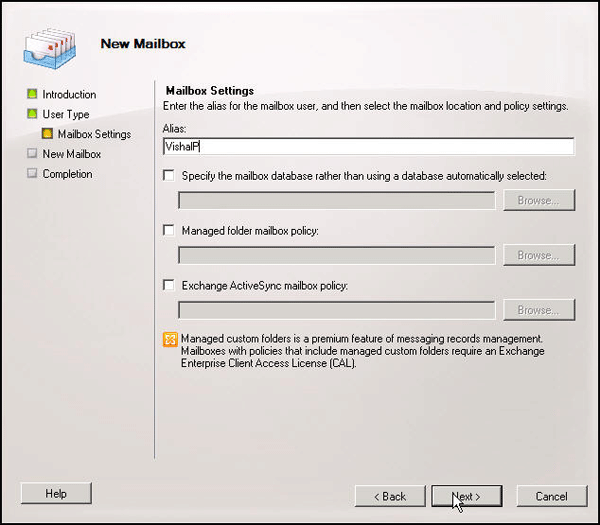
Verify Summary and Click
New.
The wizard completes successfully. Click
Finish.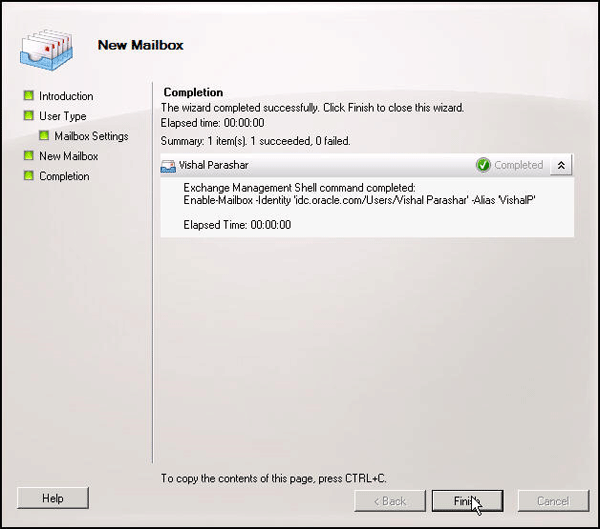
Verify that the user is added in the mailbox.

-
Navigate to the mobile device (iPad/iPhone) for the user (
Vishal Parashar).Create a new mail account for
Vishal Parasharas shown below: -
On the iPhone, Navigate to
Settings > Mail, Contacts, Calendars > Click Add Account > Choose Other >. Specify the following values.
Choose Add Mail Account
-
Click
Next. Specify the following values. ClickDone.
Note:
windowserver1.idc.oracle.comis the machine where Exchange Server is configured.
Validate user creation and mail box setup
You will validate the setup tasks done in the previous sections.
-
In the Linux machine (
idgovserver1.idc.oracle.com), where OMSS is installed, Login to MSAC as
admin@idc.oracle.comSettings > LDAP Settings.
-
Click
Incremental sync. This will pull in the newly created user within MSAC. From MSAC, you will be able to
manage the user, using policies for mobile device access.
-
Click
Users. You should be able to view the userVishal Parashar. Any newly created user who gets pulled into
MSAC, gets added automatically to theDefaultgroup.
-
Click
Invite. ClickSend, to send the email invite to download the secure workspace container.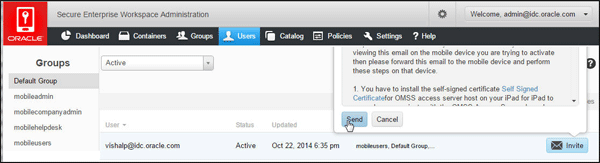
-
Go to the user's (
Vishal Parashar's) mobile device and check the email client to see if you receive the email.
-
Download and install SSL certificate (for MSAS host) followed by the secure workspace container.
Note: See previous OBE, Installing a Secured Workspace Container on an iOS device using an email process on how
to perform this step.
-
Click
MyCompanyon the user's mobile device to login to the secure workspace container. Enter the
required credentials.
Default settings in MSAC
-
Navigate back to MSAC and Click
Container. Observe that the secure workspace container record gets generated
for the userVishal Parashar'slogin to the workspace, from his mobile device.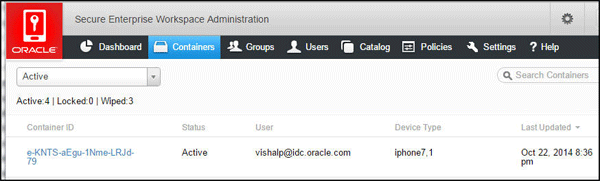
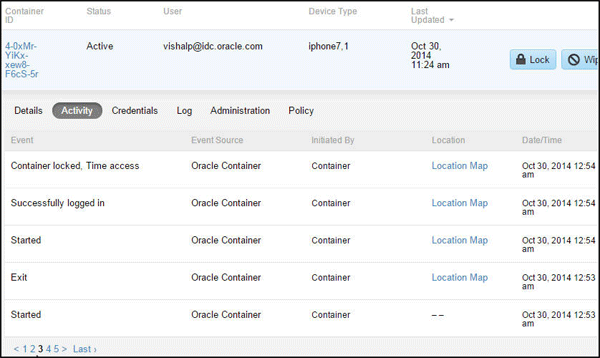
-
Click the container row and click
Details,ActivityandPolicy.
Detailsshows the information about the groups that the user is a member of, unique container id,
policy assigned to this container etc.Defaultpolicy is assigned by default. Device details show where
the container is running such as iOS 8.1 and iPhone 7,1.The bmax URL
https://idgovserver1.idc.oracle.com/bmax/bmconfig_kinit_kinit.jsonis the configuration URL
for the container. The final evc version is the container version. -
Activityshows all the activity log of events such as container creation, registration, container lock, wipe operation,
successful login/logout etc for that container.Policyshows the aggregate of all the specific policies for this container. If there
are multiple policies in the container, you will get the aggregate, that is the net result of all the policies for that container.

-
Observe the dashboard metrics:
Click
Dashboardand observe that you can filter the metrics based on Groups, Devices and Date Range. Observe
the active and new containers, any policy violations, active logins, top 5 users, apps and devices.
You have now completed the setup tasks required for Policy Enforcement and General Administration within MSAC.
Policy Enforcement within Mobile Security Access Console
In OMSS, you can define different access policies in order to control the access of mobile devices users.
Now, you will address different access control policies.
Creating a new Policy in MSAC
You will create a custom policy rather than using the default policy.
-
Login to MSAC. Select
Policies > Add Policy. Enter name asMyCompanyPolicyand select the groupmobileusers
to which this policy applies (The usersvishalp@idc.oracle.comandsanjays@idc.oracle.comare members of
mobileusersSave. By default, the new policy inherits the property values from the default policy.

Authentication Properties for Policy
-
Click
MyCompanyPolicy.Authenticationhas all the properties for PIN, pertain to certificate-based authentication (when
using Kerberos with Pkinit) and hence they do not apply to this OBE.Authentication onlyproperty inAuthentication,enables the ability to hide the contents of the container from the user
if container is purely being used as authentication client and not for any app UI. Selectenabled. ClickSave.
-
Test Authentication-only property:
Navigate to the mobile device and launch the secure workspace container. Login as
vishalp@idc.oracle.comand observe
the message displayed. You cannot directly login to the secure workspace container as it is purely for authentication and
not for application user-interface.
Click
MobileBIapp on the same screen as the secure workspace container icon, and observe that it redirects you to
the secure workspace container. Since you are already authenticated, it redirects you back to theMobileBIapp without
challenging you again for credentials. In this use-case secure workspace is purely being used for authentication. -
Authentication Frequency:
Login to MSAC as
admin@idc.oracle.com. Reset the authentication only property todisabledforMyCompanyPolicy.
Observe theauthentication frequencyis by default set toSession. Authentication Frequency specifies how often
users are forced to login.- A setting of
Alwaysmakes the mobile users authenticate every time they try to access the mobile security container
on their device. Idle Timeoutenforces authentication each time the Idle Timeout Period has been reached. The Timeout Period is the
duration(number of minutes) a container is allowed to remain inactive before prompting with the login screen. This has a
maximum value of two hours. This period continues to apply while the user is outside the container.- Session allows users to exit the mobile security
container to use other apps and does not require them to
log in upon return
until the session ends. A session expires when the Oracle's token expires (configurable with default of 10 hours) or the device
closes the app due to low memory or user manually closes the app (double-click home button and swipe the app up).
Change
authentication frequencytoAlways. ClickSave.
- A setting of
-
Test Authentication Frequency property:
Navigate back to the mobile device. Close the previously opened
MobileBIsecure workspace app, if open (double-click
home button and swipe the app up). Click the secure workspace container and login asvishalp@idc.oracle.com. Once
logged in, ClickHomeand then re-launch the secure workspace container.Observe that, since you set the Authentication frequency to
Always, It will prompt you to login again. Every time you
leave the secure workspace container to another app or back to the home page and then try to come back into the
secure workspace container, you would have to re-authenticate.
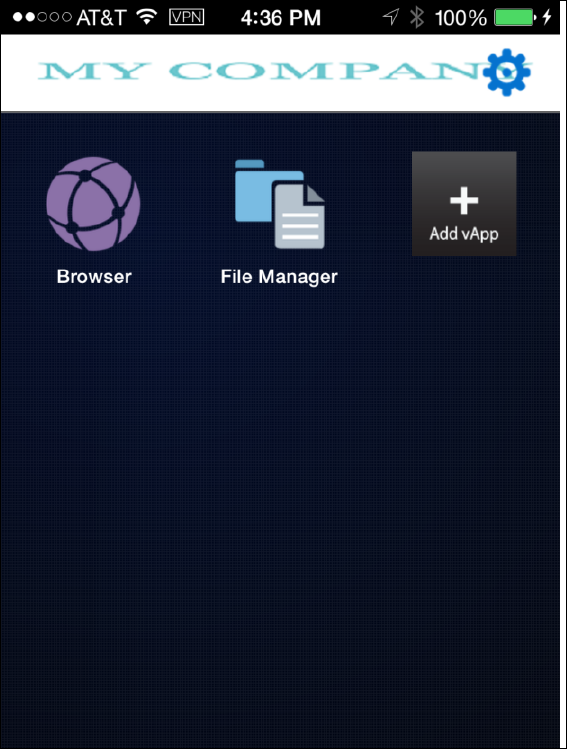
Install on Home page or Birth-Right Apps
-
Login to MSAC as
admin@idc.oracle.com. ClickPolicies. SelectMyCompanyPolicy. Navigate toCatalog, scroll and
see the enterprise applications available to the mobile users to add to their secure workspace.You can click
xon the top-left of any vApp icon to remove it from that policy's User Catalog. Any vApp removed from the
User Catalog is removed from the Groups where this policy applies.
-
Select
Install on HomepageforWorkBetter1.0app. This can be used to automatically installapp
on the home page of the mobile users (rather than mobile users having to add theWorkBetterapp explicitly from
+VApp icon within secure workspace container). This allows the administrator to configure "birth-right apps".Note:
Install on Homepage (checked) makes vApp appear on the user's main screen or homepage within the secure workspace container.
Install on Homepage (unchecked) makes the vApp available in the user's catalog, which can be accessed if they go to the Catalog
page on their secure workspace container. This selection does not automatically put the vApp on the container home page.Upgrade Alert (checked) alerts the user each time app is launched that an upgrade app is available, until such time it is installed.
Upgrade Alert (unchecked) displays a badge on the catalog app indicating that an update is available, but does not alert the user
at login.
WorkBetterClick
Save. -
Test Install on Home page property:
Navigate back to the mobile device. Close the previously opened
MobileBIsecure workspace app, if open. Login to secure
workspace container usingvishalp@idc.oracle.com. Observe thatWorkBetterapp is automatically installed within the
secure workspace container.WorkBetterapp does not appear on the home screen along withMobileBIyet).
-
Click
WorkBetterapp within secure workspace container. ClickInstallto install the app
next toMobileBIapp on the home page.
Click
Installagain.
The Installation is under progress.

The installation is complete.

Add WEB app to a policy
In this section, you will add the web application OMSS Doc
Library https://docs.oracle.com/en/ to the
secure workspace.
-
The WEB app has to be first added to the catalog. Login to MSAC as
admin@idc.oracle.com. ClickCatalog.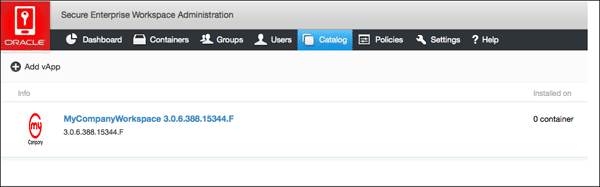
In the Catalog page, Click
+Add vAppand add the new app as shown below. ClickSave.
-
Once added to the catalog, these apps can be made available within the policies under
Catalog. ClickPolicies >. Add the new OMSS Doc Library using
MyCompanyPolicy > CatalogAdd vApp to user Catalogas shown below.
Click
Save.
-
Navigate to the mobile device and login to the secure workspace container. The new WEB app (OMSS Doc Library)
becomes available within the user catalog in the secure workspace container. Click+Add vAppicon within the
secure workspace container.
Search for
OMSS Doc Libraryapp in the Catalog. Select the app from the user catalog.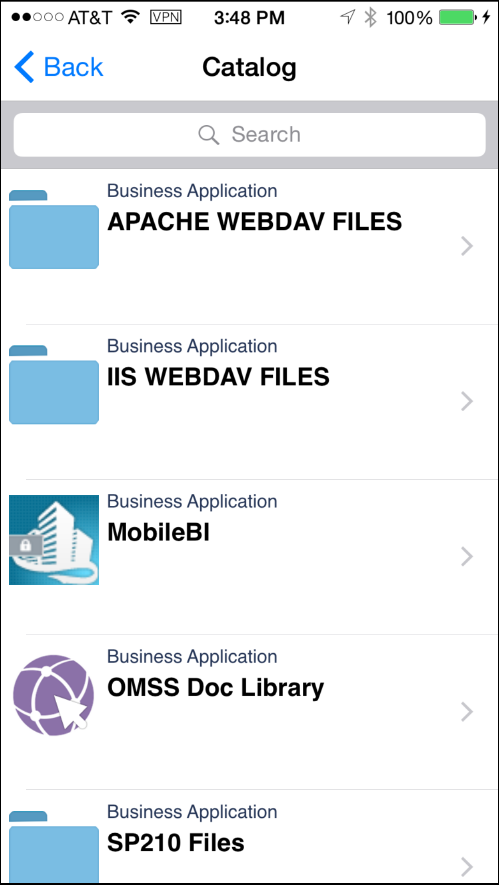
Click
Install. Install the app within the secure workspace.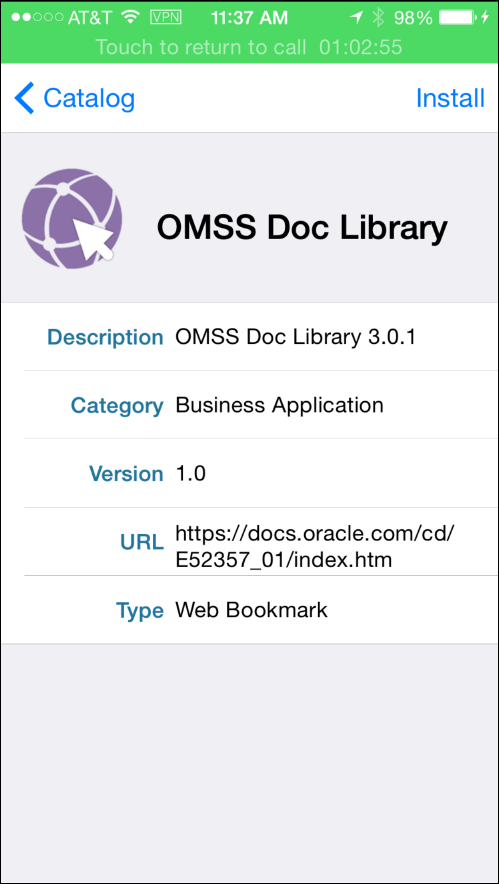
The app is installed and is now available in the secure workspace.

Click the app from the container and the following page is loaded in the browser.

Click the container icon to get back to the Home Page.
Data Leakage protection
-
Login to MSAC and view the DLP policies. Navigate to
Policies
                        > MyCompanyPolicy > Container/Apps
. Observe the actions
to be taken in case of compromised platform. Observe that currently this is set toLock. Whenever there is any policy violation,
the container will be locked. You will study these properties in the next step.Observe the DLP policies that restrict email, instant message, video chat, social share, print, file share, copy/paste, save to
media gallery, save to local contacts.

-
Test the print, email, video chat, instant message features (Data Leakage Protection):
Navigate to the mobile device and launch
WorkBetterapp (if not already logged in, login asvishalp@idc.oracle.com
when prompted). ClickMenuon the Dashboard.
-
Select
People.
-
On the People page, Click any person such as
Susan
                        Mavris.
Click the email address to send out
an email to her. Observe that the email is disabled.
-
Similarly, try to SMS an employee such as
Sundarby clicking the SMS icon. Observe that it is
disabled. ClickPhonewhich starts video chat, and observe that it is disabled as well.
Video Chat is disabled. Click
OK.
-
Go back to the Home page on the mobile device. Launch
MobileBIapp. SelectDemo.
On the Server Configuration window, ClickOK.
-
Select any of the recent reports. Click arrow icon at the bottom. This allows you to share this report. Try
Printoption. It should show you the message that Printing is disabled.
Details in the dashboard is shown below.

Click
Print.
Observe the message that printing is disabled.

-
From the MSAC home page, Click
Containers. On the containers page, you can view all the containers
which are in Active, Inactive, Locked or Wiped state by selecting from the drop down option.
-
Click the container corresponding to
vishalp@idc.oracle.com. OnPolicyyou can see all the properties that
apply to this container based on aggregate policies (if any) that are applicable.
Note: All the properties under
MSAC >Policiesare defined by the Default policy or any custom/user defined
policy or a mix of multiple policies that you might have created.However, if you want to see the policies that are specific to a particular container (that it inherits from the
aggregate policies defined above), you should view the container specific policy. (You can only view the
policies here, however to create or modify policies, you have to navigate toMSAC > Policies).If there are multiple policies being used, and you are not getting the desired result, this is a good place to
observe the aggregate of all the properties set by various policies on the container being used which might
give you a pointer as to why you are not seeing the desired results.
Time Access in MSAC
-
For
MyCompanyPolicy, ClickTime Accessand modify the Time Access interval from1:00 am – 1:00 amto
1:00 am - 2:00 am. ClickAdd.
Note: Choose such an hour which is different from your current time when doing this OBE.
Click
Save. -
Navigate to
Container/Apps > MyCompanyPolicy. Verify if the compromised platform property is set toLock.
That is in case of any policy violation, the container will be locked.
Click
Policy. You can see all the properties that apply to this container including the Time Access policy
you just modified.

-
From the mobile phone, close the secure workspace container and any of it's protected apps, if open. Try to re-open
Secure Workspace or one of the containerized apps that you installed on your device.Enter your credentials to login
(vishalp@idc.oracle.com). After authentication you will see the following message
that the container is locked.
-
Navigate back to MSAC. Click
Containers. Change the filter of containers(from drop down menu) from Active
to Locked. You should see the locked container.
This is because in case of policy violation, you had set the compromised platform to be locked.
-
To unlock the container, move the mouse cursor over the row which shows the container as locked. The
Unlock and Wipe buttons will appear to the right. ClickUnlock.
Observe the the status of the container. This is now changed from
LockedtoLocked/unlock pending.
-
In order to remove Time Access policy, Navigate to
Policies
                        > MyCompanyPolicy > Time Access.
ClickRemoveto remove the time access policy that caused the lock of the container. ClickSave.
-
From the mobile device, If secure workspace is already open, close it. Re-open the secure workspace. Enter your
credentials (for exampleVishalP@idc.oracle.com) to login. After authentication you will be able to
access the secure workspace container.To view the event activity on this container, Click
Containerswithin MSAC. Click the container corresponding to
the userVishalP@idc.oracle.com.Observe that the container is now in
Activestate (in the previous step it was Locked, which you had unlocked
after removing the policy violation).
-
Click the container row for
VishalP@idc.oracle.com. It expands below and you have access to several
information related to this specific container. ClickActivityand review the relevant events on creating,
registering, locking, unlocking, policy violation etc.
-
Click
Detailsand observe the panel sectionvApps, which shows all the apps installed on that container.
You can also see the device on which this container is installed (iphone7,1), the OS version of the device (iOS8.1), the
group membership of the uservishalp@idc.oracle.com(defaultgroup,mobileadminandmobileusers), the unique
container id, the policies applicable to this container (MyCompanyPolicy,Default Policy) and the Configuration URL
for the container (in case of Kereberos with password authentication)
https://idgovserver1.idc.oracle.com/bmax/bmconfig_kinit_kinit.json
Geo Access in MSAC
Geo-fencing is a way of controlling where a container (and
associated mobile apps) can be used. In this case, the “where”
is the location of the mobile device and secure enterprise
workspace. The setting for geo-fencing indicates where the
container
can be used, for example in this city, state or country.
The setting is multi-valued, so you can specify a number of
locations
and it’s the union of these settings, that determine where the
access is granted.
-
Login to MSAC. Navigate to
Policies >
                        MyCompanyPolicy > Geo Access
.
-
Enter
Redwood Cityinset geofence bytextbox. Select the recommendation as in the below screenshot. ClickSave.
-
Click
MyCompanyPolicy > Container/Apps. Verify iflocation servicesisenabled.
-
From the mobile phone, If your secure workspace is already open, close it. Reopen the secure workspace. Enter
your credentials to login (vishalp@idc.oracle.com). After authentication you will see the following message that
the container is locked. This is because you have set the Geo Access toRedwood City. If you try to login from
any other place, it will enforce the compromised platform policy value, which is to lock the container.
-
You can verify this in the mobile device. Navigate to
Settings
                        > Privacy > Location Services
. The
value forMyCompanyWorkspaceshould be set toAlways.Note: The Geo Access section would only work if location services was enabled on the container when it
was installed, as shown below.

-
Go back to MSAC. Select
Containers. Change the filter of containers from Active to Locked and observe
the locked container. Click the container row and properties panel will open below the container row. On this
new area you will find lot of details related to this container.Click
Activity. ClickLocation Map.
-
This shows you the exact location of the mobile device from where you tried to access the secure container. Since this
location is notRedwood City, the container got locked as per the compromised platform property.
-
To unlock the container, move the mouse cursor over the container row, the Unlock and Wipe buttons will appear.
ClickUnlock.
-
A pop-up will appear, Click
Unlock. To remove Geo Access policy, Navigate toPolicy > MyCompanyPolicy > Geo Access.
ClickRemoveto remove the geo access policy that caused the lock of the container. ClickSave.
Managing Devices
Another type of access control is based on the device types,
that is on the devices by types - ( Android or iOS) or
by OS version - ( Android OS version and iOS version), can the
secure workspace container be used.
In this case, the device indicates which devices are on the
white-listed set of devices (device type, OS level). If new
devices
come to the market, you can even add the list of devices in
the drop-down to include those devices.
-
Login to MSAC. Navigate to
Policies >
                        MyCompanyPolicy > Devices
.
-
Observe the listing of 11 iPhone types, 6 iPad types and 255 Android devices which are supported for container
deployment. If you want to restrict access only for the secure workspace container to be deployed on these
devices, Un select other devices.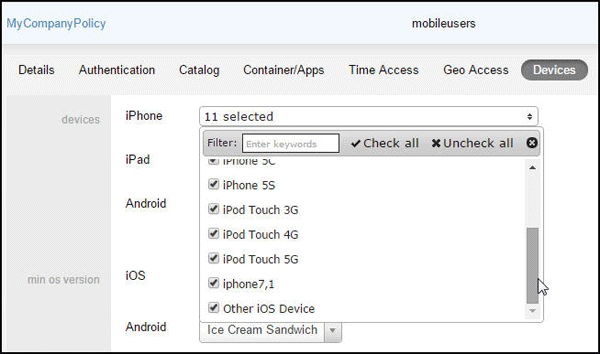
You can also see the minimum version of iOS and Android that is supported.
-
In this OBE, you will add iPhone 6 and 6 Plus as supported devices (which is currently not in the list). Observe that the
iPhone 6 Plus which is currently being used to build this OBE is shown as iPhone 7,1 (platform string for iOS device
iPhone 6 Plus). You will see how to update this, how to display a more traditional display name for the platform string,
iPhone 6 Plus, and also add iPhone 6 to the list of devices supported.From MSAC Home page, Click
Settings > Server
                        Settings >
Export Unmapped Devices.
-
Open the
unmapped_devices-<timestamp>.csvfile in MS Excel. This csv file is space and case sensitive.
Note: iphone7,1 is the platform string for iPhone 6 Plus. Similarly iPhone7,2 is the platform string for
iPhone 6. See Apple Documentation for more on Platform string for iOS devices. -
You will update the file as shown below with the display name for iPhone7,1 as iPhone 6 Plus and you will
add a new row for iPhone 6 as well.
-
Save the file as
CSVfile. If you get a warning as shown below, clickYes.
-
Log back into MSAC and Navigate to
Settings >
                        Server Settings
. ClickUpdate Device Details. Select the
csv file saved in the previous step and clickOpen.
-
It should display that the upload was successful.

-
Click
Containersand observe that the Device Type forvishalp@idc.oracle.comcontainer record got
updated toiPhone 6 Plus.
-
Click the container row to see more details. Observe that the iOS version and the Device Type in the Details
tab is iPhone 6 Plus and 8.1.
-
You can also see that in
MyCompanyPolicy>Devices, the iPhone7,1 device got updated to iPhone 6 Plus
and iPhone 6 device got added to the list.
Offline Access using MSAC
-
Login to MSAC. Select
Policies >
                        MyCompanyPolicy
. ClickContainer/Apps. Observeoffline accessoption is set to
allowedNo.
-
On the mobile device disable the network. On iPad/iPhone switch on the Airplane mode.

-
On the mobile device try to open the secure workspace, enter the credentials and tap on Login button,
you will get an error and you will not be able to login. ClickOK.
-
In order to change the offline access setting in OMSS server, access MSAC console. Select
Policies >, and set
MyCompanyPolicy > Container/Appsoffline access allowedoption toYes. ClickSave.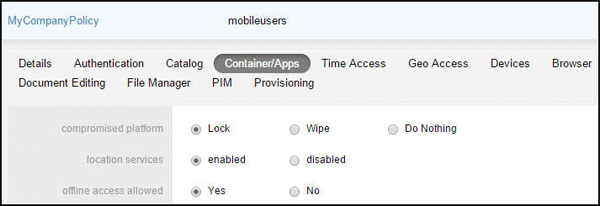
-
On the mobile device enable the network (i.e, turn AirPlane mode off), to allow for the secure workspace client to
communicate with the OMSS server in order to push the policies to propagate to the client.
-
After the device is connected again to the network (ie., Airplane mode is off) try to access the secure workspace. You
will be required to authenticate and the secure workspace will open.Disable the network on the mobile device again (i.e, turn Airplane mode on). Close the previously opened secure
workspace container. Now try to access the secure workspace. You will be required to authenticate and the secure
workspace will open, even as your device is offline (Airplane mode is on).You will now revert back the changes made for this OBE. Login to MSAC, Select
Policies > MyContainerPolicy >, and set
Container/Appsoffline access allowedoption toNo. On the mobile device, turn the Airplane mode off
and close the secure workspace container.
Browser Setting using MSAC
Publish http://www.oracle.com/technetwork as a
secure web site within workspace container.
-
Login to MSAC. Click
Catalog. Click+Add vApp. Add a new application of the typeWebwith the name
OTN Portaland the URL ashttp://www.oracle.com/technetwork/index.html. Specify the Version as 1.
ClickSave.
The
OTN Portalapp is added.
Note: If you want to give your own custom icon for this OTN Portal icon, which will appear within the secure workspace container,
you could change the default icon URL fromhttps://idgovserver1.idc.oracle.com:443/acp/images/default_mvl.pngto
your own custom icon URL such ashttps://idgovserver1.idc.oracle.com:443/acp/images/<my_image_name>.png. Make
sure to add your custom<my_image_name>.pngfile to the following location:/opt/oracle/omss/msac/lattice/images. -
Navigate to
Policies > MyCompanyPolicy > Browser. Observe that the address bar and download are both enabled for
the browser within secure workspace container.
-
Click
CatalogforMyCompanyPolicyand addOTN Portalto be visible within the user catalog. EnterOTN Portal
in theAdd vApp to User Catalogtext field and pressEnter.
-
OTN Portalshould now be visible in the list of user catalog. ClickSave.
-
Navigate to the mobile device. Login to the secure workspace container as
vishalp@idc.oracle.com. Observe
the secure browser icon. Click the browser icon. You should be able to see address bar where you can type in a URL.
You should also be able to Click the "Share" icon (at the bottom horizontal bar - a rectangular box with up arrow) and
observe that Download page option is enabled.

-
Click
+Add
                        vApp
. Search and addOTN Portalfrom the user catalog to your secure workspace.
Click
Installto installOTN Portalweb app to the secure workspace.
-
Click
OTN Portalicon and observe the browser address bar is enabled. Similar to the secure browser
exercise before, "download this page" option is also enabled.
Now you will disable the address bar and disable the download option. Login to MSAC. Click
Policies >. Select
MyCompanyPolicy > BrowserNoforaddress baranddownload enabledoptions. ClickSave.
-
Navigate back to the mobile device. Close the secure workspace if already open. Relaunch the workspace
and login asvishalp@idc.oracle.com.Observe that the Secure browser is no longer visible. Launch the OTN Portal and observe that the address bar
is no longer visible. Click the share icon at the bottom of the page and observe that the Download
this page option is no longer visible.


-
Reset the properties back to the default values. Login to MSAC and Navigate to
Policies > MyCompanyPolicy >. Enable browser address bar and download option. Click
BrowserSave.
You have now completed configuring and validating various policy settings within MSAC.
General Administration within Mobile Security Access Console
Client Settings
The Client Settings tab has the following fields:
Shows Save Check Box in Login Page controls whether users
must enter their username and password each time they log in.
An
option to remember the username appears on the login screen if
the client is configured as the KINIT or OTP authentication
type
and this field is set to True.
Open URL in Secure Browser, controls whether a URL is opened
in the Secure Browser. When users click a protected URL,
your company's SharePoint for example, the following steps are
executed. If this value is set to True, the URL then opens in
the
Secure Browser inside the container. If it set to False, then
the website opens in the default browser of the device.
Poll Interval displays the frequency, in seconds, at which
the client polls the server for new policies and commands.
Enable Add
vApp controls whether the Catalog app (Add vApp) is present on
the users' home screen.
Advance Certificate Expiration Warning Time (days) provides a
menu that can be set to 1 to 30 days. This causes the
container
to warn users about upcoming certificate expiration, that many
days in advance.
-
Shows Save Check Box in Login Page:
On the mobile device, close the secure workspace app. Relaunch secure workspace container. Observe that there is a
checkbox on the login page to remember username.
-
Login to MSAC as
admin@idc.oracle.com. Navigate toSettings > Client Settings. SetShows Save Check Box in Loginto
PageFalse. ClickSave.
-
On the mobile device, Re-launch the secure workspace container. Observe the checkbox on the login page to remember
username. (This is because policy hasn't been pushed to the client unless you first login). Login asvishalp@idc.oracle.com.
Now close the secure workspace container.Open the container again and observe that
Remember
                        Username
checkbox is no longer present in the login page.
-
Login to MSAC as
admin@idc.oracle.com. Navigate toSettings > Client Settings. Setshowto True. Click
save checkbox in login pageSave. -
Enable Add vApp button:
When you login to secure workspace container, you observe the
+Add vAppicon which gives users access
to the user catalog from where they can add apps to use within the secure workspace container
-
If you want to disable access to the user catalog, you can set the property
enable add vAppbutton to false from
Settings > Client Settingson MSAC. ClickSave.
-
On the mobile device, Re-launch the secure workspace container. Login as
vishalp@idc.oracle.com. Observe that the vApp icon
is not there anymore.
Note: The use-case for this is that the administrator wants to take control of the workspace. The only way
an app can be added to the container is the administrator publishes the app to the policy and makes it a birth-right app.
The app can only be installed from the Home page as a birth-right app as shown below.
-
Login to MSAC as
admin@idc.oracle.com. Navigate toSettings > Client Settings. Resetenable add vAppbutton
back to true. ClickSave.
Web Settings
The Web settings tab controls which web sites are proxied
through MSAS, which web sites are blacklisted/blocked and
which web sites
bypass MSAS and go directly to the internet.
Access Type are:
-
Proxy which causes matching URLs to proxy requests through Mobile Security Access Server.
-
Direct which causes matching URLs to go direct to the Internet.
-
Block causes matching URLs not be accessed, that is, it puts those URLs on a blacklist.
-
Any website not explicitly set to proxy or blocked is by default set to direct.
On a fresh installation, the default configuration is that,
all URLs are allowed, and all URLs are proxied
by the client devices through their associated Oracle Mobile
Security Access Server. The web settings configured
in Mobile Security Administrative Console become active as
soon as a single edit is made to the web settings.
The web settings configuration is retrieved by each Oracle
Mobile Security Access Server every 15 minutes, and
is used to update the bmaxaccess.conf(/opt/oracle/omss/msas/conf)
and bmax.pac (/opt/oracle/omss/msas/htdocs/bmax)files.
The .pac file controls which URLs are
proxied by the client devices through the Oracle Mobile
Security Access Server.
Note: There is a corresponding SSL port (443 instead of 80)
pac file corresponding to bmax.pac named stunnel.pac
found in the same location as bmax.pac. You
don't have to explicitly modify or add entries to this file.
Internally
the changes made to bmax.pac file get
automatically reflected in stunnel.pac.
The URLs listed in all lines are matched against the requested URLs, as follows:
- Simple string matching is performed.
- Each entry can include any portion of the requested URL,
including the scheme, host, path, or query string,
or any parts of those. - All requested URLs and entries in the access list are converted to lowercase before matching.
Each entry in the access list is comprised of the URL part to
match against and a directive on whether the
requested URL should be allowed or denied.
- Requested URLs can match multiple entries in the access list.
- Block overrides Direct which overrides Proxy, such that requested URLs matching all three are blocked.
In this OBE, you will create four rules, two for
blocked/denied and other two for proxied. The other sites
would by default be set to direct access.
-
Login to MSAC. Click
Settings > WebSettings. Click+Access URL match. Inaccess url,
enter.oracle.comand setaccess typetoProxy. ClickSave.
-
Add another record to proxy traffic coming from
oraclecorp.comdomain site. Inaccess url,
enter.oraclecorp.comand setaccess typetoProxy. ClickSave.
-
Add another record to block facebook site. In
access url,enterfacebook.comand set
access typetoBlock. ClickSave.
-
Finally, add another record to block twitter site. In
access url,entertwitter.comand setaccess typetoBlock. ClickSave.
-
If there are any other records, delete them using the delete button to the right of the record (hover your mouse on the row). In effect the
Access URL matchrules should look like the following.
-
MSAS needs to know how to route every request that it receives. In any organization, to do this, MSAS needs to know the
proxy rules configured by the Corporate IT. Correspondingly the entries in MSAS config file has to be changed. A sample of the
configuration file (bmaxhttps.conf) is shown below. This file is available in the directory/opt/oracle/omss/msas/conf. This file
will be edited to configure MSAS to send back-end requests through an intermediate proxy.
In any organization, this file needs to be edited and the two lines that describe
ProxyRemoteMatchshould be un-commented. You
need to specify the proxy rules for the organization.An example of a proxy rule is given below.
ProxyRemoteMatch
^http://(?!.+[.]us[.]example[.]com|.+[.]idc[.]example[.]com|.+[.]examplecorp[.].com|

                        login[.]example[.]com|.+[.]examplemobile[.].+|.+[.]exampleqa[.]com|.+[.]exampleqa1[.]com).*

 http://148.87.19.20:80

                        ProxyRemoteMatch
^https://(?!.+[.]us[.]example[.]com|.+[.]idc[.]example[.]com|.+[.]examplecorp[.].com

|login[.]example[.]com|.+[.]examplemobile[.].+|.+[.]exampleqa[.]com|.+[.]exampleqa1[.]com).*

                        https://148.87.19.20:80
This causes the internal traffic to stay internal, but sends the external traffic through the proxy. You have to use the IP address
of the proxy server instead of the hostname due to intermittent problems with the proxy IP address lookup. -
Give approximately 15 minutes for the changes to be reflected in
bmax.pacfile under/opt/oracle/omss/msas/htdocs/bmax
directory. Validate this by checking thebmax.pacfile under/opt/oracle/omss/msas/htdocs/bmaxdirectory. You can find below the
proxy rules being applied. That is you can see facebook or twitter being blocked and oraclecorp.com redirected to Proxy and so on.
Note: Under the covers,
stunnel.pacfile is automatically updated.
-
Now open the
access.<timestamp>.logfile for msas under/opt/oracle/omss/msas/logsdirectory.
su

                        pwd for root: <pwd>

                        cd /opt/oracle/omss/msas/logs

                        tail -f access.<timestamp>.log
-
Navigate to the mobile device and login to the secure container as
vishalp@idc.oracle.com. Open the secure browser
(Click browser icon) and entertwitter.comfollowed byfacebook.com.
Observe the log file terminal window. Note the Forbidden 403 error message.
-
On the secure browser make sure you can access proxied website, For example,
bug.oraclecorp.com
As seen in the screenshot above, the request to the website is proxied through MSAS. The initial response is
302, MSAS then redirects it to mobile URL which results in the response code of 200. -
On the secure browser, Verify if you can access some direct website For example,
cnn.comsuccessfully.
As seen in the screenshot above, the request to the website does not go through MSAS. It is bypassed
and is directly redirected to thecnn.comwebsite. -
Important Note:
Accessing secure URLs from outside workspace usingbmax.pcon the secure workspace:
If you want to allow accessing the secure URLs from outside the workspace either as embedded links in an email
from Apple's native email client, and not the secure email client within the workspace, or directly accessing secure
URLs from safari browser, not the secure browser within the workspace, or a third party non-containerized app trying
to invoke internal secure URL, then you have to specify the location ofbmax.pacfile.Depending on your use-case and corporate policies, here are some possible options:
-
Using Wi-Fi:
Set the location ofbmax.pacfile under Wi-Fi settings of the mobile device under HTTP Proxy (Auto) URL setting.
-
Using Cellular Connection:
The above approach doesn't work for cellular conection. In which case, you have to use VPN
and in the VPN profile under Proxy Auto settings, you will have to set the location of
bmax.pacSettings > VPN
Click
Add VPN Configuration.
Specify the VPN properties. Observe that the
bmax.paclocation is specified under Proxy Auto settings.
-
Using Apple Configurator:
If you want to avoid the use of VPN, run the mobile device in Supervision mode using Apple Configurator and
set thebmax.pacin global proxy settings in Apple configurator.More information on Apple Configurator can be found here. Apple Configurator makes it easy for anyone to
mass configure and deploy iPhone, iPad, and iPod touch in a school, business, or institution.

In summary:
-
If the mobile device is configured for Wi-Fi, ensure that the proxy with the URL of the
bmax.pacfile is specified. -
If the mobile device is configured for VPN, ensure that the proxy with the URL of bmax.pac file is specified on the
VPN and is not needed in the WIFI configuration. -
If you want to avoid use of VPN, ensure that the proxy with the URL of
bmax.pacfile is specified in global
proxy setting when mobile devices are running in supervised role using apple configurator. -
These are some of the possible solutions to be able to access secure protected corporate resource URLs (for
eg. sharepoint webdav URL) from outside the secure workspace container.
-
Container wiping using MSAC
Locking the device keeps the corporate files and data ,along
with any cached data/preferences encrypted and inaccessible
from the
device. Lock button disables a container from operating and
stops user access to vApps or information. Lock presents a
default
message window, where administrators can add a message to the
lock alert for users to see. In contrast, a wipe command
returns
apps to their “factory installed state”, where all downloaded
files, data, and cache within the container is wiped from the
device.
Note: This wipe operation is only applicable to the secure
workspace container unlike a Wipe/Erase command issued from
Find my
iPhone from iOS devices or icloud.com which
wipes out the entire data on the device.
In the Oracle Mobile Security solution, a device wipe will
restore the container and containerized apps to their “factory
installed” state
by deleting all files, data, user preferences and cache from
the mobile device. This is done without any impact whatsoever
to the user’s
personal files and information, such as contacts, photos,
music, email, downloaded books, etc.The container wipe is a
key advantage
over MDM (mobile device management) solutions, which will wipe
the entire device, including both personal and business
information.
There are scenarios where an automated device wipe may be warranted. These may include:
-
Compromised device: When you detect that the device has been tampered with, placing it in a high-risk category e.g. jailbroken
(iOS) or has been rooted (Android). -
Account Lockout: When the configured number of failed login attempts has been exceeded, thus possibly indicating a stolen device.
-
Inactivity Period exceeded: When a device hasn’t been online and connected to the Mobile Security solution in the specified period.
This may indicate the user no longer needs access to the corporate services.
When the user leaves the company, if the de-provisioning
process is automated (e.g. Oracle Identity Manager, etc.),
then the terminated
user may be automatically de-provisioned from the corporate
directory security groups, thereby disabling his/her access to
the Mobile
Security solution. However, the admin console also provides an
interface to immediately wipe the terminated user’s device if
this action
needs to happen immediately. This use case will demonstrate
the device wipe.
-
In some cases, a wipe is being initiated due to a lost/stolen device. In that case, the wipe should be only for the container
installed on that specific device.
-
In other cases, the wipe should be directed at all users of a security group. The Oracle Mobile Security solution includes
not only fine-grained wipe (e.g.individual container on an individual device), but also coarse-grained wipe for all containers
of all users in a specified security group.
-
The wipe command deletes the files and data within downloaded container apps, but does not delete the apps themselves. It
essentially returns the apps to their “factory installed” state, eliminating all corporate data in the process.The wipe deletes all corporate data from the device. However, it doesn’t by itself prevent the user from going through the process
of reconfiguring the secure Enterprise Workspace. Presumably, other security measures have been put in place when it warrants
a device wipe due to any employee leaving the organization. These might include disabling the user’s login ability in the corporate
directory, de-provisioning the user from any security groups in the corporate directory, etc.If the device has been stolen and you want to wipe the secure workspace data, Login to MSAC as
admin@idc.oracle.com
and ClickContainers. Select the row corresponding to container forvishalp@idc.oracle.com. ClickWipe.
Note: Do not press the Wipe button. This is shown for demonstration only.
-
To see the list of all Wiped containers, select
Wipedfrom the Drop down list.
-
If you were already logged into the secure workspace container, when the wiped command was issued by the
administrator, on your mobile device you will see the following message.
-
Observe that you are still able to login to a container that has been wiped, except all the personal data would be
removed and content goes back to the default or factory settings. On the mobile device, login to the secure container
asvishalp@idc.oracle.comand observe that you are able to login.
-
Click
MobileBIapp. Observe that you have to accept the license terms again even though you had accepted the
terms before. This shows the state of the secure container.All the app data goes back to the "factory settings"
or default configutation.
-
Login to MSAC and Click
Containers.Observe that the container is now inActivestate.
You have completed the general administration tasks within Mobile Security Access Console.
Summary
The setup tasks required for Policy Enforcement and General
Administration within MSAC is completed. Configuring and
validating
various policy settings and the general administration tasks
within Mobile Security Access Console is also completed.
In this tutorial you learned to:
- Create a new policy in MSAC
- Install apps on Home page
- Perform Data Leakage Protection
- Configure Time Access in MSAC
- Configure Geo Access in MSAC
- Configure Offline Access in MSAC
- Manage Devices using MSAC
- Configure Browser settings, Web settings and client settings in MSAC
- Wipe container using MSAC
Resources
-
For additional OBEs, please refer to the Oracle Mobile Security Series
Credits
- Lead Curriculum Developers: Vishal Parashar, Vandana Rajamani
- Product Manager: Sanjay Sadarangani
- Other Contributors: Pradeep Bishnoi, Ali Ahmed, Ashish Singh, Mukesh Singh, Satishkumar Venkatasamy
To navigate this Oracle by Example tutorial, note the following:
- Topic List:
- Click a topic to navigate to that section.
- Expand All Topics:
- Click the button to show or hide the details for the sections. By default, all topics are collapsed.
- Hide All Images:
- Click the button to show or hide the screenshots. By default, all images are displayed.
- Print:
- Click the button to print the content. The content that is currently displayed or hidden is printed.
To navigate to a particular section in this tutorial, select the topic from the list.