Installing a Secured Workspace Container on an iOS device using an email process
Overview
Purpose
In this tutorial, you learn how to install the secured workspace container on an iOS device using an email process.
Time to Complete
Approximately 60 minutes
Introduction
Oracle Mobile Security Suite (OMSS) enhances employee
productivity by allowing secure access to corporate applications
and
data from mobile devices while preserving a rich user experience.
The Mobile Security Container creates an enterprise workspace
on any mobile device, corporate owned or personal, and for all
mobile platforms.
Employees get seamless access to intranet resources, corporate
data and mobile applications with enterprise-grade security and
deep integration with Oracle Access Manager and Microsoft Active
Directory authentication for true Single Sign-On.
Overview of Mobile Security Container
The Oracle Mobile Security Container is designed to secure
“containerized” apps, i.e., apps that have been securely linked to
their
specific container (Apple iOS or Google Android). Many Oracle
applications such as Oracle Business Intelligence (BI), Oracle
Fusion
Tap, Oracle Social Network, Oracle Enterprise Manager Cloud
Control, Oracle WebCenter Spaces etc., and a broad range of
third-party
enterprise applications have been containerized and verified for
compatibility with the Oracle Mobile Security Container. Oracle
Mobile
Security Containers use a key hierarchy to protect data. All keys
are derived from user credentials. The user credentials are never
stored.
In this OBE, you send out a corporate wide email to all employees
of an organization. The employee will install the secure workspace
container on their mobile devices.
Hardware and Software Requirements
The following is a list of software and hardware requirements:
- Linux machine OL6
- Oracle Database 11g version 11.2.0.3
- Oracle Mobile Security Suite 3.0.1.0.0
- Active Directory Windows 2008 (Optional)
- iMac or Macbook Pro laptop
- Mobile device such as an iPhone or an iPad
For this OBE, you use Active Directory for storing user
information. Any other LDAP data store (like OUD)
can also be used instead to store user information.
Prerequisites
Before starting this tutorial, you should complete the following OBEs
Install Secured Workspace container on an iPad
Transfer the container application
In an earlier OBE, Sign
and Generate Secure Workspace Application Container you
created an "ipa" file for the
secure workspace container called Bitzer.ipa
-
Transfer the secure workspace container application
Bitzer.ipafrom the iMac or Macbook Pro laptop (where XCode
was running and where the file was archived and exported) to the OMSS machine (idgovserver1.idc.oracle.com)
using theftpcommand. Move the file to the directory/opt/oracle/omss/msas/htdocs/bmax -
Login to MSAC using
admin@idc.oracle.com -
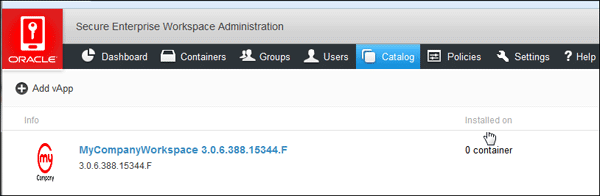
Click
Catalog. ClickAdd vApp.
-
Select
ORACLE CONTAINER APP. ClickBrowseand upload theBitzer.ipafile.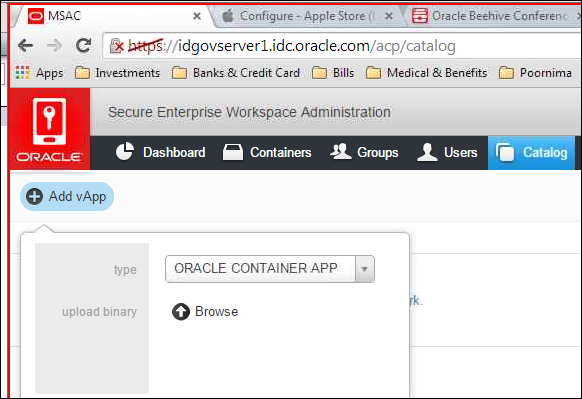
Create a Template
From MSAC Console Settings click invite templates. From here,
you can create new templates, edit an existing
template and define custom email templates for sending
provisioning e-mails to end users.
-
Navigate to
Settings > invite templates. ClickCreate New Template.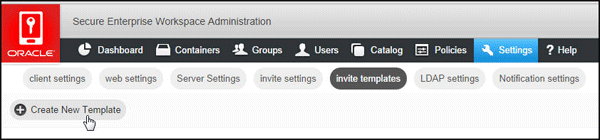
-
Observe that
Access Server Hostnameis specified as idgovserver1.idc.oracle.com,Template Nameis
MyCompany container provisioning,Subjectline for the email is Secure Container Activation for
MyCompany Inc. Confirm that theInclude TLP optionis not selected andInclude UPN optionis selected.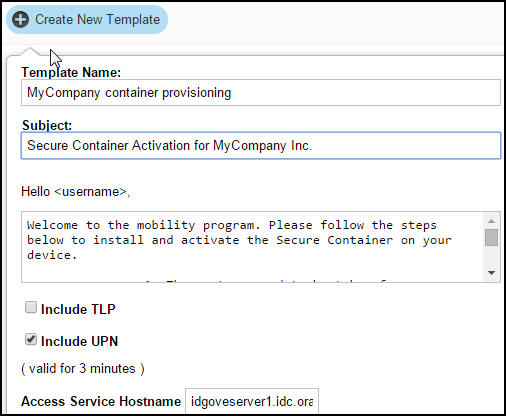
Note: Generally, you would want the enterprise employees to login to the secure workspace using their enterprise
SSO credentials (AD in this OBE). However, OMSS also gives the option to setup first time login to secure the
workspace container using a TLP (Time Limited Password) . This feature is only applicable for Pkinit use-case. You
will explore this use-case later in a different OBE using Kerberos with Pkinit.UPN is Universal Principal Name. If this option is selected, you will be given the option to input the user name
in an e-mail address format as shown below.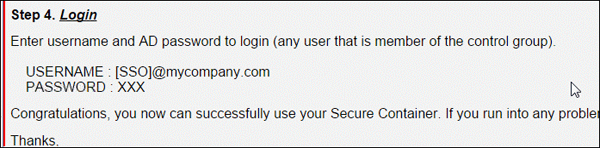
-
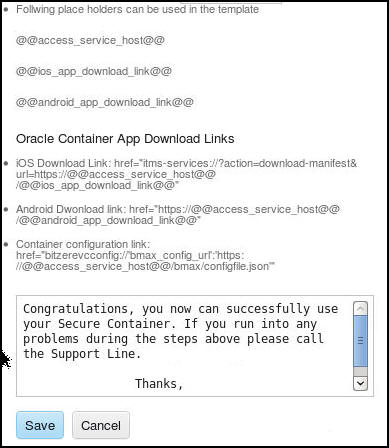
Change the body of the email to:
Welcome to the mobility program. Please follow the steps below to install and activate the Secure Container on your device.
These steps need to be taken from your mobile device. If you are not viewing this email on the mobile device you are trying to
activate then please forward it to the mobile device and perform these steps on that device.-
Download and Install the container application iOS Oracle Secure Container on your iOS device.
-
You have to install the self-signed certificate for OMSS Access server host on your iOS device. This is required for
mobile device to securely communicate with MSAS. In a real world environment, you would not have to perform this
step as you will be using trusted CA certificates instead of self-signed certificates.
-
Configure SMTP Server Settings
-
Login to MSAC as
admin@idc.oracle.com. -
Click
Settings > invite settingsto specify the SMTP exchange server properties.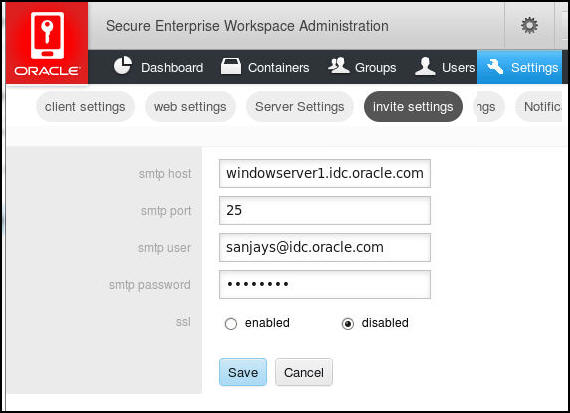
Click
Save.Note: Exchange Server has already been configured on the machine
windowserver1.idc.oracle.com. For this OBE,
SSL has been disabled. However in production environments, SSL must be enabled.
Configure policies to use Custom Templates
-
Click
Policies > Default Policy.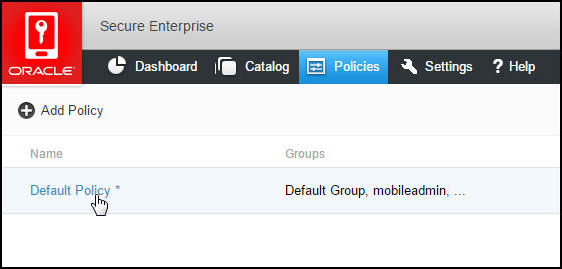
-
Click
Provisioning. Frominvite template, Select the newly created invite template. ClickSave.
-
Next, identify the users or groups to whom the email should be sent. This email will be used to download the
secure workspace container on their mobile device.Navigate to
Groups. Selectmobileusers(this is the control group in your environment i.e, all the users of the
secure mobile devices must be members of this group). ClickInvite.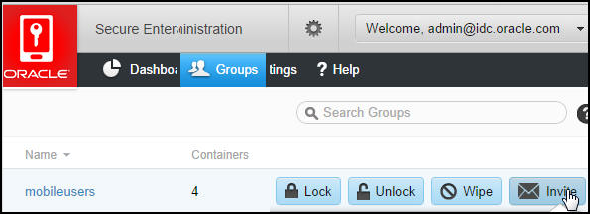
If you want the email to be sent to registered users, Select
Yes. By defaultNois selected. ClickInviteagain.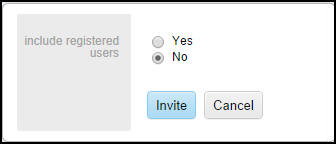
Download the Workspace container
-
Navigate to your mobile device and open the email on your email client. Login as any user
who is a member of themobileuserscontrol group for eg.sanjays@idc.oracle.com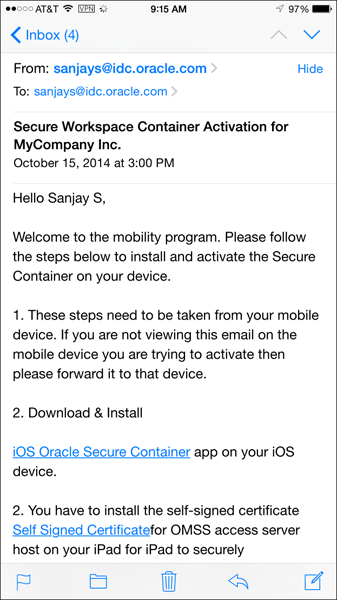
-
Click
Self Signed Certificatelink in your email, to install the SSL certificate.-
On the
Install Profilewindow, ClickInstall.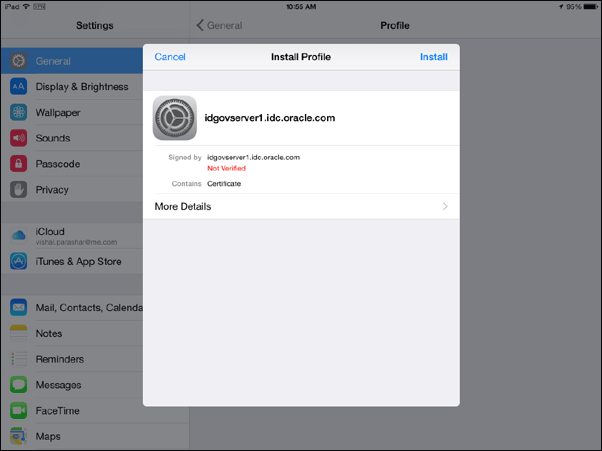
-
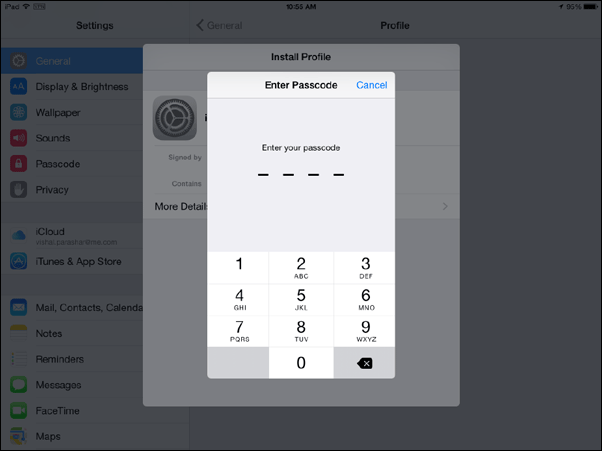
If your iPad is protected using a Security passcode, Enter it now.
-
Ignore the warning and click
Install.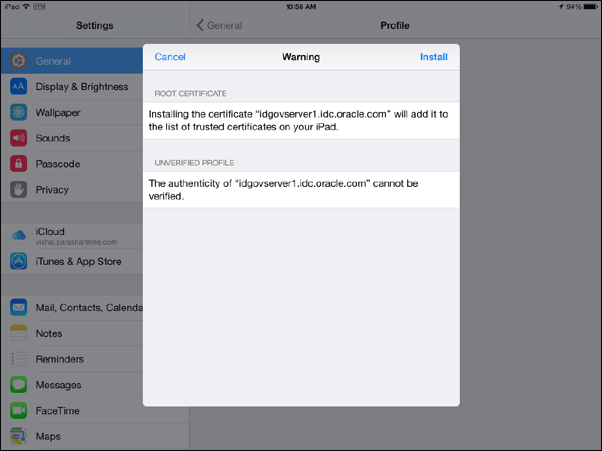
-
Click
Installagain.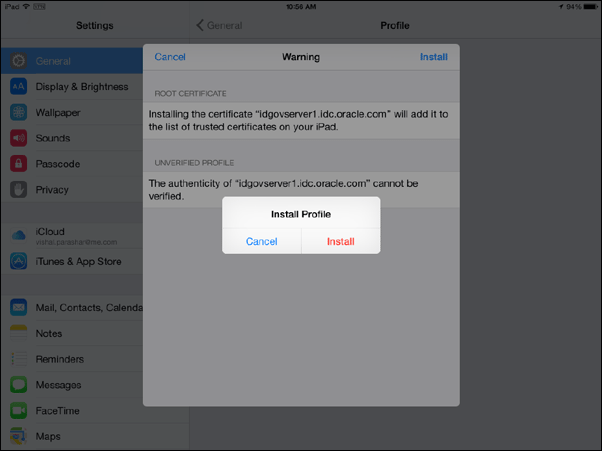
-
In the
Profile Installedwindow, clickDone.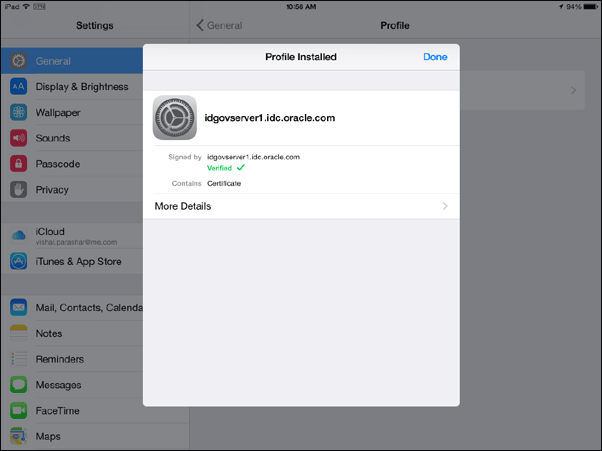
-
Navigate to
Settings > General >
                            Profiles
. Verify that the profile is installed successfully.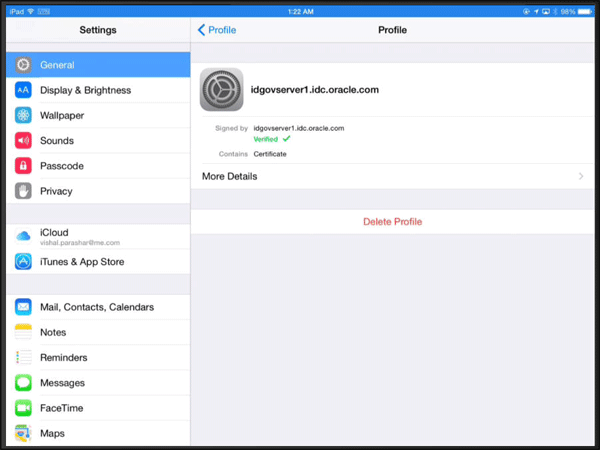
-
-
Install the secure workspace container using the following steps.
-
From the email, Click the link (
iOS Oracle
                            Secure Container
) to download the iOS secure workspace container
on your iPad. This will invokesecureworkspace.plistwhere the location of the workspace app is specified. -
Click
Install. This installs the custom secure workspace container on your iPad.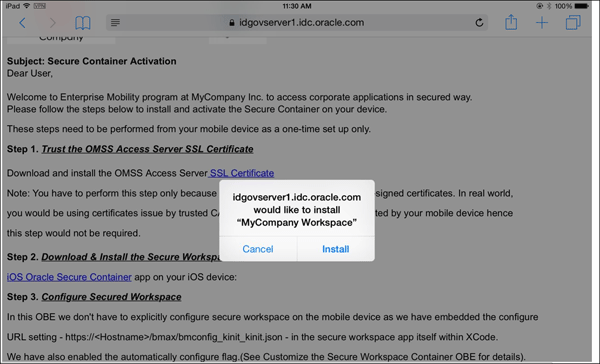
-
Secure Login to the workspace container
-
On the mobile device, tap
MyCompanySecureWorkspaceapp and open it. ClickTrust.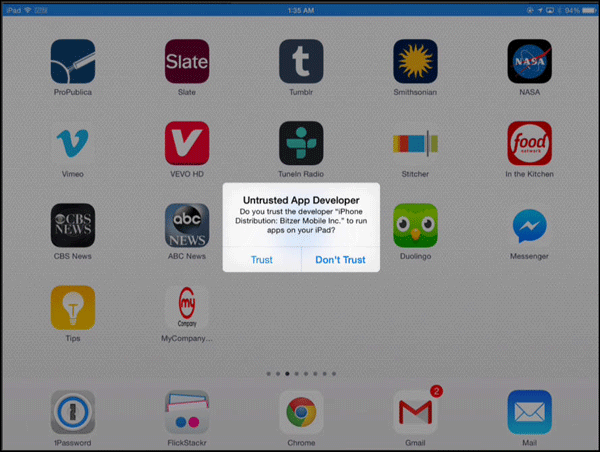
-
Notice that the Configuration URL page appears for a few seconds before re-directing to the secure login page.
In an earlier OBE, Customizing Secure Workspace Application Container, you have already configured
the URL in the secure workspace container app and set auto configure to true.Also notice that the secure container app is fully customized and branded as MyCompany Secure Container, it
doesn't have the Oracle default branding.The option to receive notification can be set as shown below. These settings appear for the first time the
container app is installed on the mobile device. ClickOK.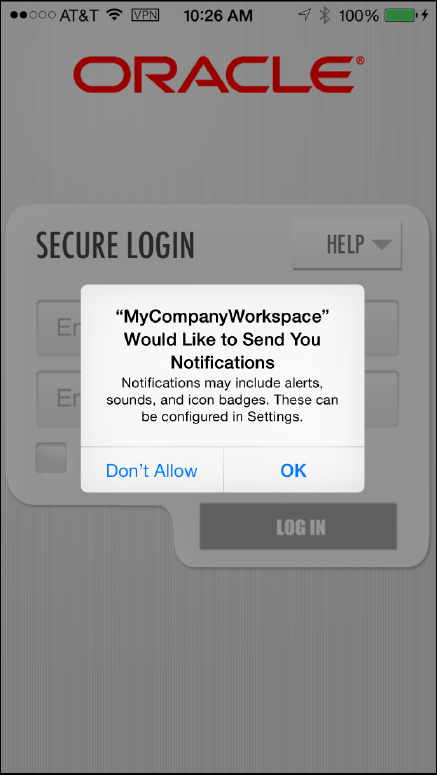
-
In the Secure Login page, login as an AD user who belongs to the
mobileuserscontrol group for example,
sanjays@idc.oracle.com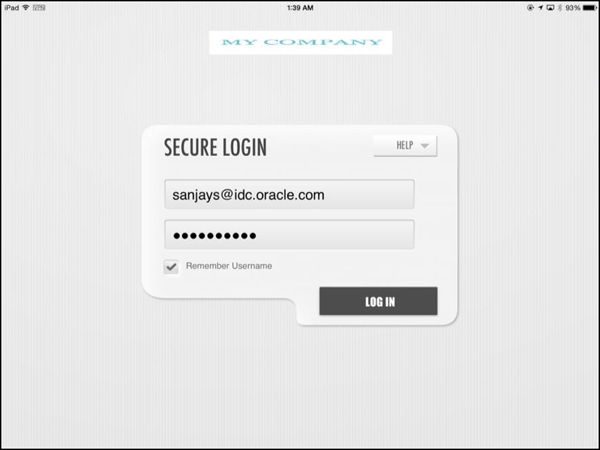
-
You get the option to choose if the workspace app should access your location even when the application is not used. Click
Allow.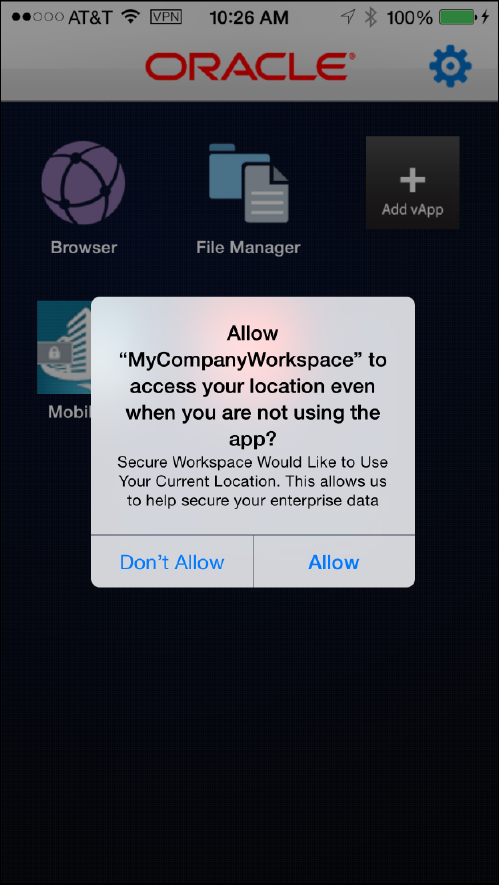
-
If you see the following error, navigate to the OMSS machine (
idgovserver1.idc.oracle.com). Edit the
krb5.conffile under/opt/oracle/omss/msas/confdirectory as the root user.

Replace the AD server hostname with the IP address of the AD machine.
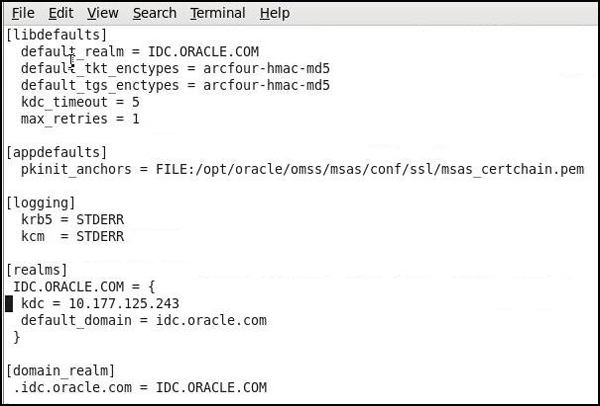
Save the file. Restart Mobile Security Access Server.

You have now completed installing the workspace container application on the mobile device (iPad) using an email process.
Summary
The Workspace container application was installed using an email process on an iPad.
In this tutorial, you learned to:
-
Transfer a container application from an iMac to the MSAS machine
-
Create an email template
-
Configure SMTP Exchange Server settings
- Configure policies to use custom template
-
Open an email on a mobile device and install the workspace application
Resources
-
For additional OBEs, please refer to the Oracle Mobile Security Series
Credits
- Lead Curriculum Developers: Vishal Parashar, Vandana Rajamani
- Product Manager: Sanjay Sadarangani
- Other Contributors: Pradeep Bishnoi,Ali Ahmed, Ashish Singh, Mukesh Singh, Satishkumar Venkatasamy
To navigate this Oracle by Example tutorial, note the following:
- Topic List:
- Click a topic to navigate to that section.
- Expand All Topics:
- Click the button to show or hide the details for the sections. By default, all topics are collapsed.
- Hide All Images:
- Click the button to show or hide the screenshots. By default, all images are displayed.
- Print:
- Click the button to print the content. The content that is currently displayed or hidden is printed.
To navigate to a particular section in this tutorial, select the topic from the list.