Before You Begin
Purpose
In this tutorial, you learn how to configure a secure email within Oracle Mobile Security Suite (OMSS) using Oracle Mobile Secure Mail Manager (OMSMM) on iOS device.
Time to Complete
Approximately 1 hour
Introduction
Oracle Mobile Security Suite (OMSS) enhances employee productivity by allowing secure access to corporate applications and data from mobile devices while preserving a rich user experience. The Mobile Security Container creates an enterprise workspace on any mobile device, corporate owned or personal, and for all mobile platforms.
Employees get seamless access to intranet resources, corporate data and mobile apps with enterprise-grade security and deep integration with Oracle Access Manager and Microsoft Active Directory authentication for true Single Sign-On.
Overview of Oracle Mobile Secure Mail Manager
The Oracle Mobile Security Container includes an
optional Secure Mobile Mail Manager provided
separately. The Secure Mobile Mail Manager includes
personal information management (PIM) apps such as a
mail client, calendar, contacts, tasks, and notes
synchronizing with corporate mail servers via the
Microsoft Exchange
ActiveSync (EAS) protocol.
Note: You need a separate license for Oracle Mobile
Security Mail Manager.
What Do You Need?
Prerequisites
- Oracle Mobile Security Suite 11g R2 PS3 installed and configured with Active Directory
- Refer to one of the following Installation and Configure OBEs
- Install and Configure OAM-OMSS Topology using IDM LCM Tool with Active Directory
- Install and Configure OAM-OMSS topology with AD as LDAP Directory (Manual Steps)
- iMac or Macbook Pro laptop
- Microsoft Exchange Server 2010
- The per-requisite for this OBE to work
correctly, is that MS Exchange server should be
configured correctly and work with the Active
Directory where the user population resides
- Makes sure you have completed APNS and User
Notification settings configuration from
Installation and sign generate, deploy secure
workspace container as shown in
Sign,
Generate, Deploy, and Log in to Secure Workspace
Container on iOS OBE
- Make sure you have completed the provisioning profile and certificate as shown in Obtaining Signing Certificate and Provisioning Profile from Apple OBE.
Note: For this OBE, you use Active Directory for storing user information. Any other LDAP data store (like OUD) can also be used instead to store user information.
Setup Tasks for Configuring Secure Email
Validating Exchange Server Setup
All the set up for MS Exchange server required
for this OBE to work, is the default
configuration for Exchange Server
except that Authentication in IIS Manager should
be set to Windows Authentication for MS
ActiveSync.
ActiveSync is required for the SecureMail to work correctly. This is configured by default, when you install MS Exchange Server.
-
You can see the ActiveSync configuration in the Exchange Management Console as shown below.

-
Open IIS Manager on the Exchange Server windows machine. On the left panel, Navigate to
<machine name> > Sites >.
Default Web Site > Microsoft-Server-ActiveSync
On the right panel, Double-clickAuthenticationunderIISsection.
-
Notice that
Windows Authenticationis enabled. SelectWindows Authenticationand ClickProviders
in the right pane. It should be configured for the following providers in this particular order.

Obtaining OMSMM and OMSS Client
OMSS comes with a set of enterprise ready productivity apps like secure browser, file browser, and document viewer/editor that ensures corporate data is always protected.
Download Oracle Mobile Security Suite
11.1.2.3.2 from support.oracle.com
using patch # 21870612 -
p21870612_111232_Generic.zip.
Refer to Install the Containerization
Tool section in the Securing
Oracle BI Mobile HD Application using Oracle
Business Intelligence Mobile Security Tool
OBE to install c14n
containerization tool
on the Mac machine.
Core apps for Email, Calendar, Contacts, Tasks, Notes are offered as part of the Oracle Mobile Security Mail Manager that should be downloaded and licensed separately as an add-on to the Oracle Mobile Security Suite.
Note: You need a separate license for Oracle Mobile Security Mail Manager.
If you have the additional license for OMSMM,
you can download it from support.oracle.com
using patch # 21870622 - p21870622_330_Generic.zip
You have now completed the setup tasks required for configuring secure email access within OMSS.
Generating Certificate to Authenticate with Apple Push Notification Service (APNS)
Registering the Application
For each application that you want to have a push notification enabled, you must have an App id created for that application.
-
On the Mac machine, Navigate to
https://developer.apple.com. SelectCertificates,Identifiers & Profiles.
-
Click
Identifiers.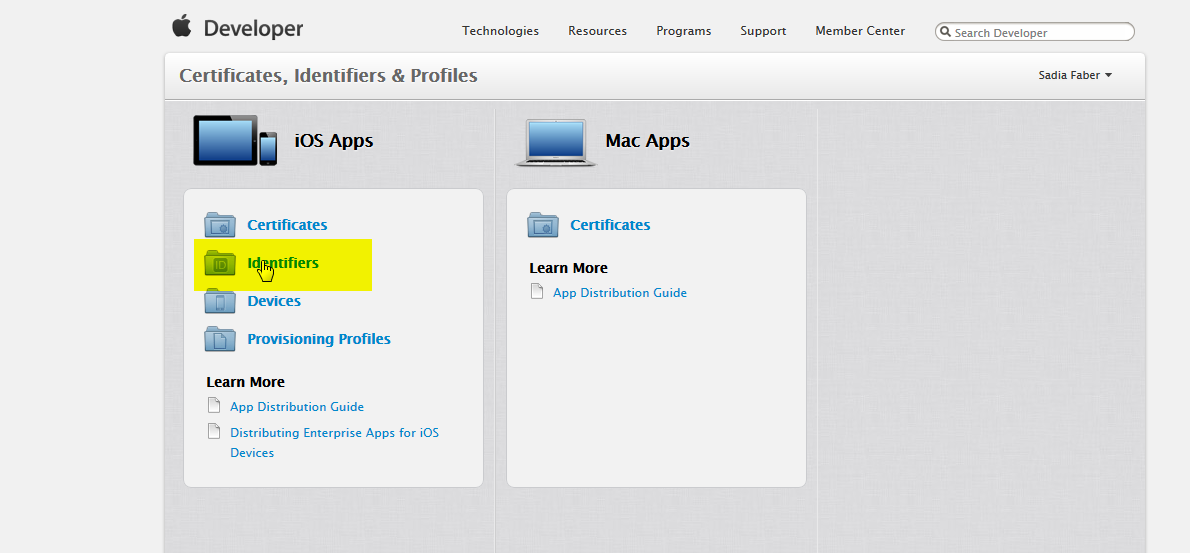
-
Register the Secure Mail app(
TouchDown) under App ID. Click+on the App ID page to register a new app id.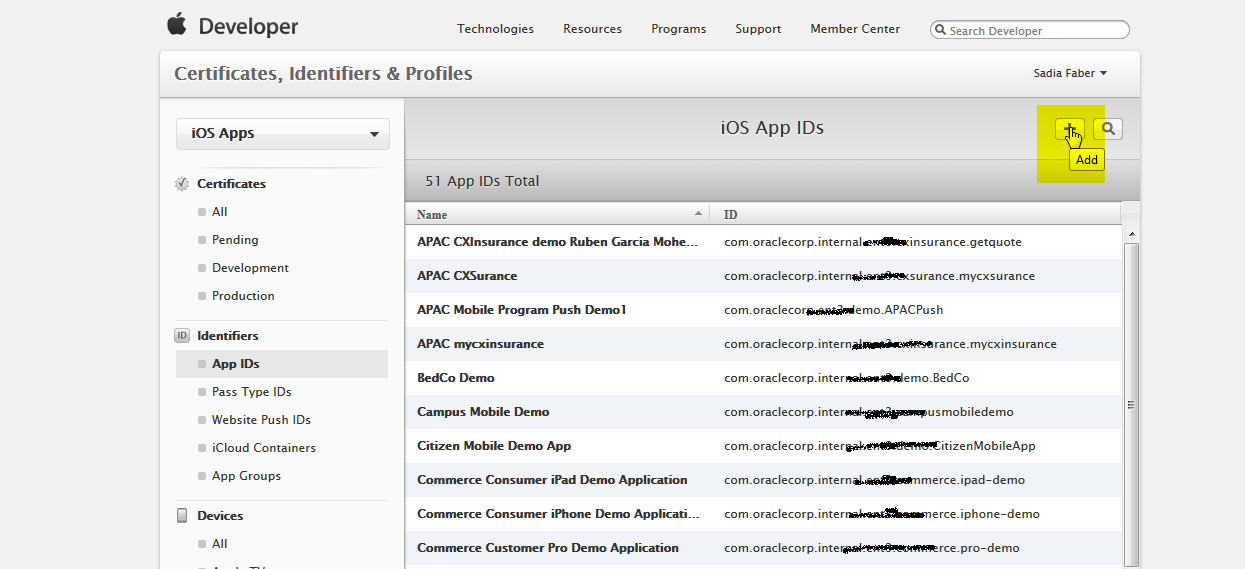
-
Provide a unique bundle id for the
TouchDownapp (you cannot use wildcard bundle id for notifications)
-
Make sure
Push Notificationsis Enabled. ClickContinue.
-
Click
Submit.
-
Click
Done.
Generating a Certificate to Authenticate with APNS
-
Click
Editat the bottom of the iOS App IDs. ClickCreate CertificateUnderProduction SSL certificate sectionof the Push Notifications service for Touchdown app.

-
Click
Continue.
-
You have to upload an existing CSR file on the
Generate
                                      your certificate
screen. To create a CSR,
openKeyChain Access applicationfromApplications > Utilities > KeyChain Access.
-
From
KeyChain Accessmenu, SelectKeyChain Access > Certificate Assistant >. Enter certificate information as shown below. Click
Request a certificate from a Certificate AuthorityContinue.
-
Specify name and location to save the CSR file. Click
Save.
-
Click
Done.
-
Navigate back to
developer.oracle.comand upload the CSR file onGenerate your certificatescreen.
ClickGenerate.
-
From
Your certificate is readyscreen, download the certificate (aps_production.cer) on your Mac desktop.
-
Open
KeyChain Access. SelectFile > Import Items.Import theaps_production.cercertificate into the
keychain access. Once the import is successful, you should be able to view the certificate and the corresponding
private key in KeyChain Access.
-
Finally, you will export the certificate and the corresponding key as a
.p12file and save it on your Mac desktop. You will
use this file later.
-
Select certificate and the corresponding private key within the KeyChain Access. Select
File > Export items. On the
Savewindow, specify Save as nameAPNSCertificateand save the.p12file to the Desktop.
-
When prompted, set a password to protect the certificate (Remember this password as you will need this later to set the
APNS properties in MSAC). When prompted to enter the login keychain password, enter the password for the Mac OS
user you are logged in as.You will use this file later.
You have now completed generating certificate from Apple to authenticate with Apple Push Notification Service.
You cannot use the MDM push notification certificate for APNS push notification for secure mail app because that is a star distributed certificate.
Creating a Provisioning Profile
Steps to Create a Provisioning Profile
You cannot use star distribution profile for push notification apps. You must have a unique enterprise distribution profile for the secure mail app.
-
Under
Provisioning profiles, clickDistribution node. Click+to create a new provisioning
profile. SelectIn-House distribution profile. ClickContinue.
-
From
Select App ID, Select the touchdown app that was previously registered underIdentifiers > App ID.
ClickContinue.
-
From the
Select certificates, pick one of the certificates to include with this provisioning profile. Note, this
is an iOS distribution certificate used to sign the app (and not APNS production iOS certificate type). You have already
created an iOS distribution certificate which you will be using as shown below: The certificate shown has already been deposited in the KeyChain Access. -

-
Use the above certificate to include in the provisioning profile for the app.

-
On
Name this profile and generate, Provide a provisioning profile name and clickGenerate.
-
From
Your provisioning profile is
                                      ready
, you should be able to download the provisioning profile. ClickDownload
and save it on your Mac desktop.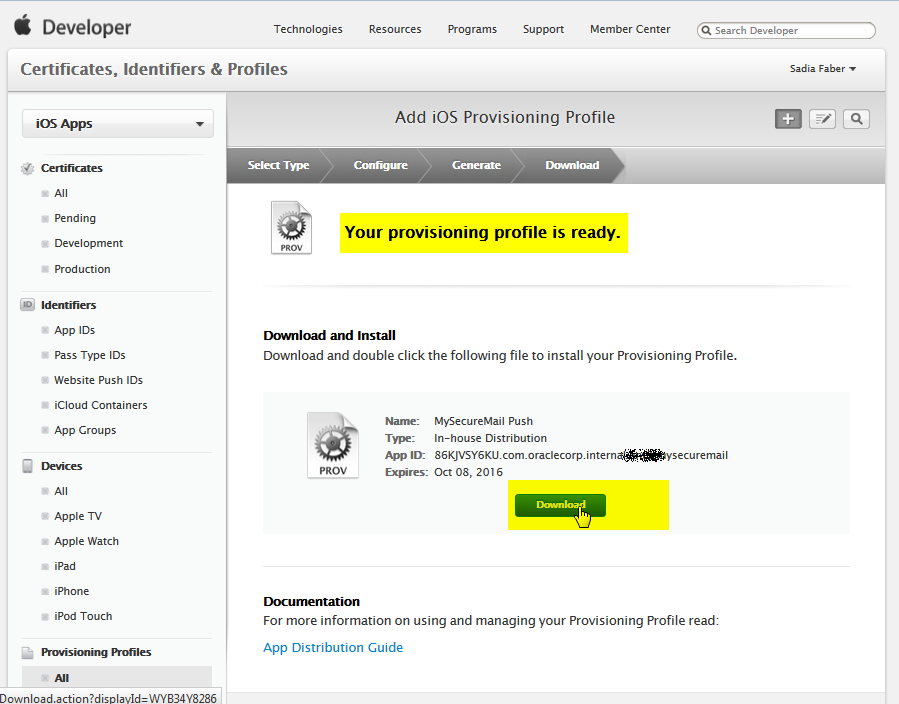
You have now created a Provisioning Profile.
Containerizing and Publishing App
Generating Signature for App
-
Unzip the file,
p21870622_330_Generic.zip,downloaded above, and observe the containerized, but unsigned app named
iOS-TD-bmtouchdown_c14n_3_6_2-1150_16817-unsigned.ipa.This is the OMSMM app that you will use to sign using your own enterprise certificate and provisioning profile.
-
Move to your Mac machine where you installed the containerization tool. Run the c14n tool to observe that this
app has already been containerized but hasn't been signed using the following command.
c14n -c info -i
                                      iOS-TD-bmtouchdown_c14n_3_6_2-1150_16817
                                      -unsigned.ipa
-
Now you will run the command to sign this app using your enterprise certificate and provisioning profile.
Note: The enterprise certificate must be the same as the one which was used to sign the secure workspace container. You must also change the bundle identifier for the app based on your provisioning profile.
c14n -c signonly -i
                                      iOS-TD-bmtouchdown_c14n_3_6_2-1150_16817-unsigned.ipa
                                      -o
                                      iOS-TD-bmtouchdown_c14n_3_6_2-1150_16817-signed.ipa
                                      -id <bundle id> -cert
                                      "<enterprise_cert_name>" -p
                                      <enterprise_prov_profile_name> -v
Note: Since the OMSMM has already been containerized, you do not need to run
-c
                                      inject
option. You simply need to
sign the app, hence run it with-c signonlyoption. -
Run the c14n command to verify that the app has been successfully signed using the following command.
c14n -c info -iiOS-TD-bmtouchdown_c14n_3_6_2-1150_16817-
Publishing Application to the Catalog
Publish the app to the catalog.
-
Login to Access console as oamadmin@idc.oracle.com/Oracle123. Navigate to
Mobile Security tab > Mobile
                                      Security Manager > Mobile App Catalog
.
Click onAddto add OMSMM app to the catalog.
-
Specify the properties as shown below and click
Add.
Containerized: Yes

                                      Name: SecureMail

                                      Platform: iOS

                                      Specify File:
                                      iOS-TD-bmtouchdown_c14n_3_6_2_1150_168217-signed.ipa
-
Navigate to
Mobile Securitytab> Mobile Security Manager > Mobile Security Policiesoption. Click onMDM MAM Policyrow
-
Under
Apps and Configurationtab, add Secure Mail app to the policy. SelectInstall on Homepageoption. ClickApply.
-
Click on
Workspacetab and underApplication Settingssection, set thePIMtoAllowand specify theEmail Server URL. Set theConfiguration TypetoAuto. ClickApply.
Click
Save.
The PIM (personal information manager) app covers e-mail, calendar, contacts, and notes. It indicates personal information manager settings as follows:
Allow: A check mark indicates that the user can access the Workspace personal information manager app.E-mail Server URL: Provide the e-mail server URL for the ActiveSync server as it applies to users assigned to this policy. Mobile Security Manager supports different mail servers for different user groups.Basic ActiveSync Authentication: Select to configure basic authentication for Microsoft Exchange ActiveSync.Configuration Type: Choose one of the following ActiveSync authentication options:Auto- The e-mail server URL is automatically retrieved from the policy and authentication to the e-mail server occurs automatically when it is enabled for one of the single sign-on mechanisms supported by the Secure Workspace app.Basic- The e-mail server URL is automatically retrieved from the policy but basic authentication credentials must be entered by the user during configuration of their PIM client.Manual- Both the e-mail server URL and basic authentication credentials must be entered by the user during configuration of their PIM client.
Adding Email Server as a Non-Proxy Host
-
Click on Mobile Security tab. Select Environments under Mobile Security Access Server section.
- Click MSAS or Instances in the MSAS tile to open the MSAS Instances Summary page.
- Click
Configureand navigate toSystem Settingstab. - Click
Proxy Server Settingsand add the mail server toHostnames without proxy.
Click
Apply.
-
Navigate to
Configurationtab >Settings > Mobile Security Manager Settings > Exchange Server Settingssub-tab. Specify your exchange server properties. These settings are essential for getting push notifications for new emails.
-
Domain Name: Enter the name of the Windows domain to which the Exchange server belongs. Server URL: Enter the Exchange Web Service URL exposed by the Exchange server for the Mobile Security Notification Server to connect to. For example. https://windowserver1.idc.oracle.com/ews/exchange.asmx-
Service User;Enter the Exchange service account that you created to establish a connection between Oracle Mobile Security Suite and Microsoft Exchange.for example. ewsproxy@idc.oracle.com -
Service Password: Enter the service account password. -
Server Version: Enter the version of the Exchange server, for example: 2010_SP1. -
Heartbeat Frequency: Enter a value in seconds that specifies how frequently Exchange server should ping the Mobile Security Notification Server, for example: 5. -
Listener URL: Enter the URL where the Mobile Security Manager is listening for Exchange notifications. By default this is http://<msm_hostname>:<msm_port>/msm/exchange for example. http://slc06coi.us.oracle.com:14180/msm/exchange
ClickApply.
-
-
Make sure you have
Device Notifications
                                  Settings
(new email, calendar, event messages) set as appropriate.
-
Makes sure you have completed APNS and
User
                                  Notification Settings
configuration from Sign, Generate, Deploy, and Log in to Secure Workspace Container on iOS OBEs.(Setting Mobile Security Manager Settings section).
- Click
APNS Settingstab. Click+Addto add a new row to enter your secure mail server settings as shown below. Enter theCertificate Passwordyou created in Generate a certificate to authenticate with APNS section of this OBE.

Configuring and Accessing Secure Mail App from Mobile Device
-
Login to the secure workspace from your mobile device. In our case, using credentials vishalp@idc.oracle.com/Oracle123.
Notice the secure mail app is automatically visible on the home page of the secure workspace container (since we had selected the option install on homepage in the MDM MAM policy). Notice the Lock icon on top of the secure mail app which represent it is containerized app which is protected by OMSS within secure workspace container.
-
Tap on the secure mail icon and select install. On the alert window, select Install. Click on the home button and notice the secure mail app being installed.


-
Once the secure mail is successfully installed. Tap on the app icon to launch it.Tap
OKon "Secure Mail " Would like to Send You Notification and ClickAllowto allow Secure Mail to access your location event.

-
It should automatically populate the user id from the authenticated secure workspace login and server from the app settings section on workspace tab of the MDM MAM Policy. Enter your email and password and Click on continue to start auto configuration of the secure mail app (email, calendar, notes, tasks, contacts).


-
Wait for the secure mail configuration to complete.

-
You should now see the secure mail app with email, calendar, contacts and tasks. Tap on
Mailto open theInbox.

Test Push Notifications for Secure Mail App
-
On your mobile device, make sure Notifications are enabled for Secure Mail app. Go to
Settings > Notificationsand make sure all notifications settings are enabled as shown.
> Secure Mail
-
Note: For notifications to work for Secure Mail app, it is not required for the Secure Mail app or even the secure workspace
container to be up and running or for the user to be logged into either. Even when the workspace app or the secure mail app are
closed, you should still be able to receive mail notifications.To test this out, close both secure mail app and secure workspace app.
Lock your iOS device (to test lock notifications). Press the power switch button on the iOS device to lock your iOS device screen. Press the volume
button on the iOS device and increase the sound volume such that sound notifications are audible (to test sound notification).
Send an email tovishalp@idc.oracle.comfromsanjays@idc.oracle.com. Login to Exchange server windows machine
windowserver1.idc.oracle.com. Login to Outlook Web Apphttps://windowserver1.idc.oracle.com/owaas
Sanjays@idc.oracle.comVishalp@idc.oracle.com.

-
Navigate to the mobile device. You should see Lock notification on your iOS device with the mail from
sanjays@idc.oracle.com.
You should also hear a ping sound (or whatever sound tone you have configured for new mail underSettings > Sounds) when a new email arrives on your iOS device.
> New Mail
-
Unlock your iOS device and note that on the Secure Mail you have an App badge with one unread message.

You have now completed deploying the app and tested the notification in the mobile device.