In this tutorial, you learn how to sign, generate,
deploy and login to secure workspace container on
iOS device.
Time to Complete
2 hours
Introduction
Oracle Mobile Security Suite (OMSS) securely
extends identity services and policies to mobile
devices through authentication, policy
enforcement, and single sign-on between
applications. It delivers a secure container for
application security and control in order to
separate, protect, and wipe corporate applications
and data. OMSS provides a trusted and independent
mobile workspace for
enterprise applications, email, and data.
What Do You Need?
Before starting this tutorial, you should have
completed one of the following OBEs on Installing
and configuring OAM-OMSS topology.
In this OBE we shall assume that you have already
provisioned signing certificate and provisioning
profile from developer.app.com. If you want to learn
how to perform these tasks, review the OBE titled -
Provision Signing Certificate and Provisioning
Profile from Apple.
Note: It is required that the organization or
developer be a member of the Apple iOS Developer
Program(https://developer.apple.com)
and have an understanding of the Apple iOS
development process.
Hardware and Software Requirements
The following is a list of software and hardware
requirements:
Working OAM-OMSS Installation
Active Directory Windows 2008(Optional - email
notification)
iMac or Mac-book Pro laptop (Mac Operating
system should be Version 10.9.4 or up)
XCode Version 6.0.0 or up
Prerequisites
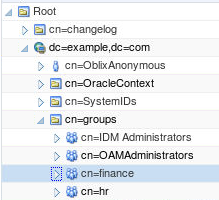
Create the following users and groups in Finance
and HR
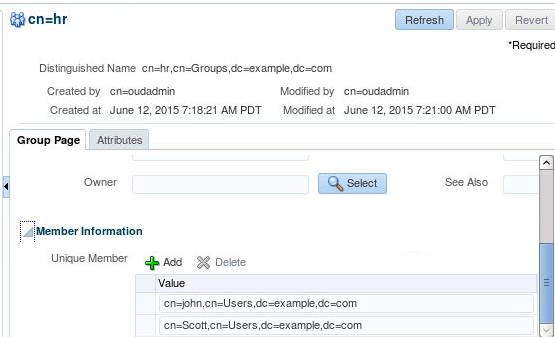
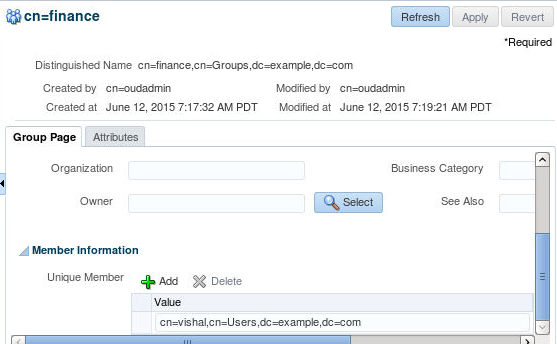
Create two groups in OUD - Finance and HR.
Make sure two users, for example john (user
id: jdoe) and scott (user id: stiger) are
members of HR.
Make sure a user, for example Vishal (user
id : vparashar) is member of Finance
Make sure all users have a valid email address,
which will be used to send email invites to the
users for deploying secure workspace on the mobile
device.
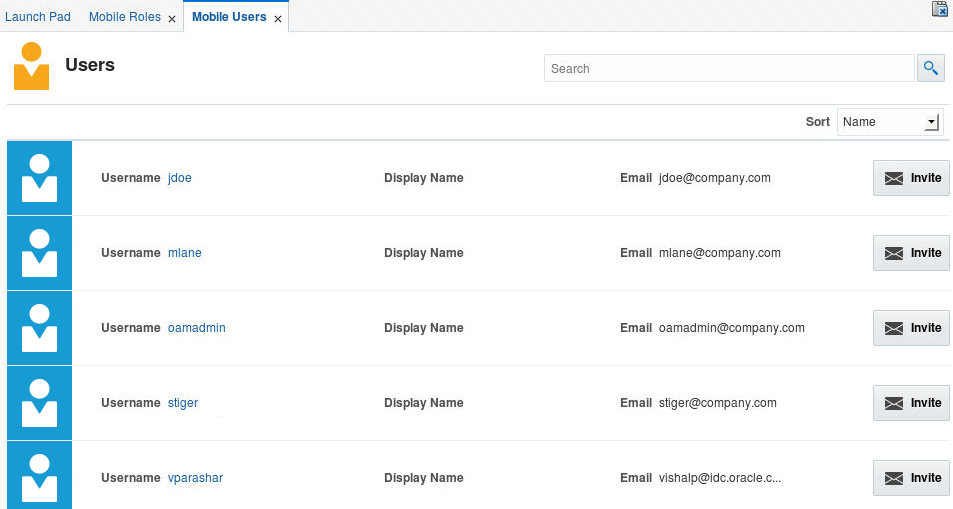
Login to access console
(http://<hostname>:7777/access and click on
mobile security tab. Select Mobile role and mobile
user and makes sure you can see the users and
groups/roles from OUD.
Make sure you have email server (exchange, in
our case) configured with ability to receive
emails for users (stinger, jdoe, vparashar).
Sign and Generate Secure Workspace App
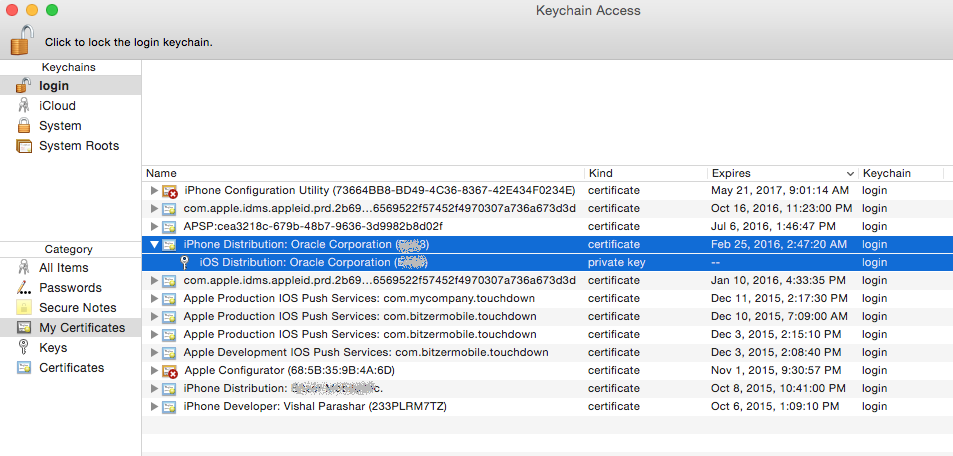
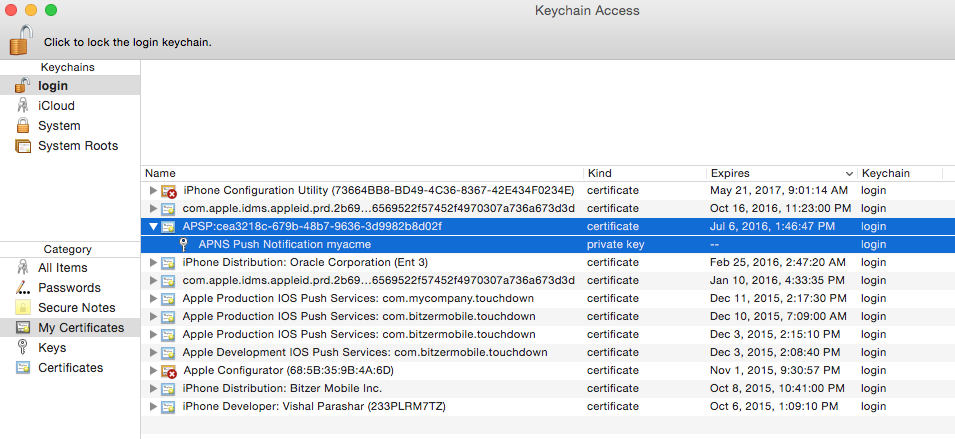
Deposit the certificate into Keychain Access:
Double click on the certificate file to
deposit the certificate into the keychain
access application on the Mac machine. Notice
the Certificate along with it's private key in
the keychain access.
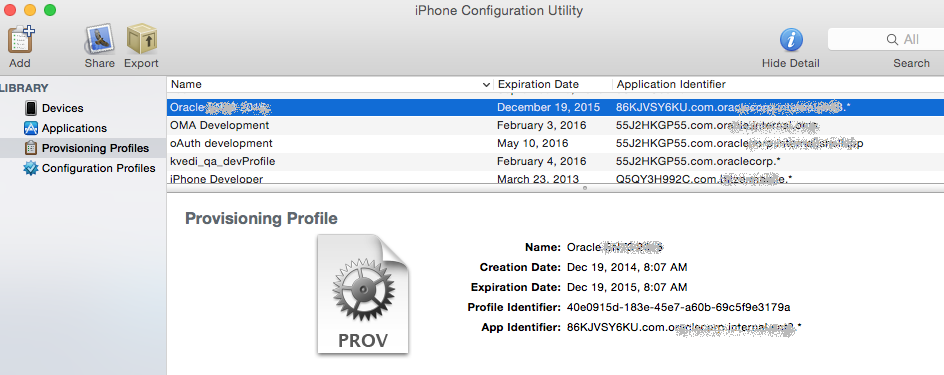
Download a third party application - iPhone
Configuration Utility. It is a handy
application to see all the provisioning
profiles. Double click on the provisioning
profile to deposit it in the utility.
Sign and generate the secure workspace
application.
You will use the artifacts generated in the
above sections to sign and generate the secure
workspace application.
Open XCode on your Mac. Download Oracle
Mobile Security Suite Clients from OTN or
edelivery.oracle.com -
ofm_omss_clients_generic_11.1.2.3.0.zip -
Unzip the file and expand folder
ofm_omss_clients_generic_11/ofm_omss_clients_11.1.2.3.0.
Unzip
SecureWorkspace.FIPS-11_1_2_3_0_321_16065.zip
file. Navigate to
SecureWorkspace.FIPS-11_1_2_3_0_321_16065
folder and Open
BitzerSecureContainer.xcodeproj file within
XCode.
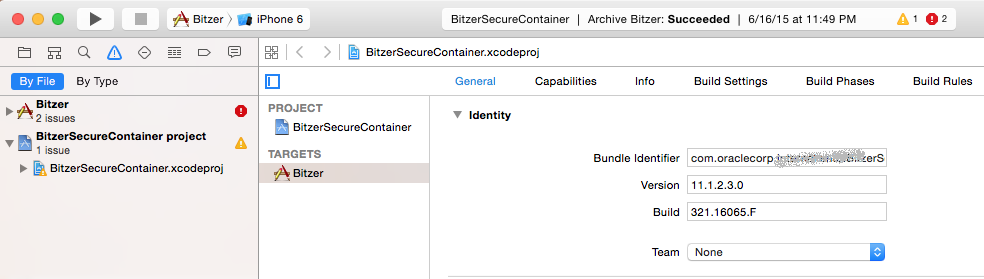
Click on the General tab and under Identity
section specify the Bundle Identifier as
<provisioning_profile_app_identifier>.BlitzerSecureContainer
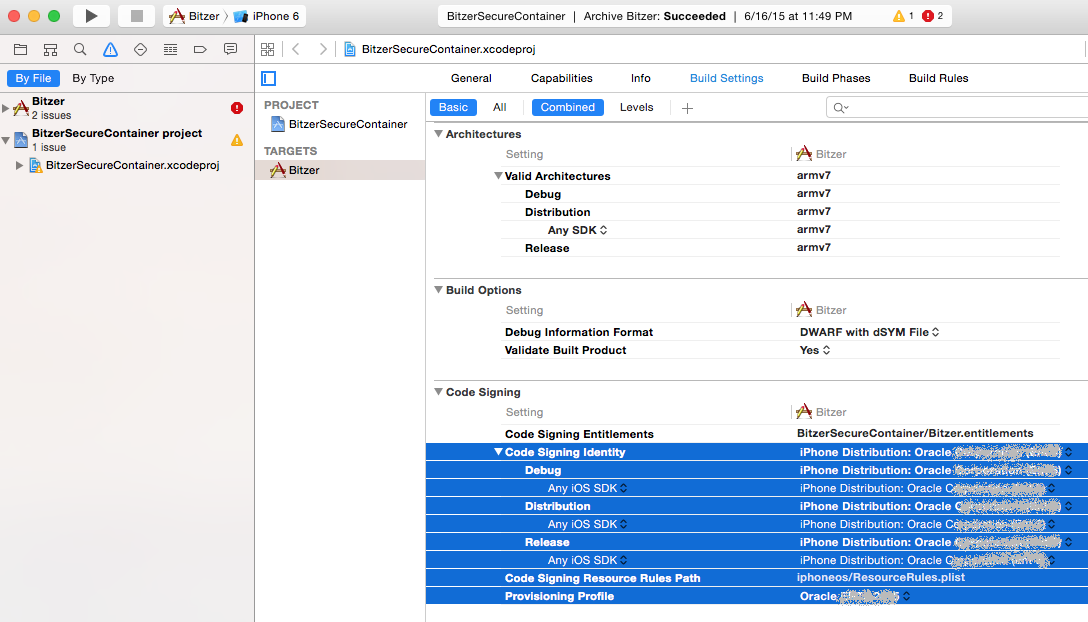
Click on Build Settings tab. Under Code
Signing section specify the signing
certificate and provisioning profile.
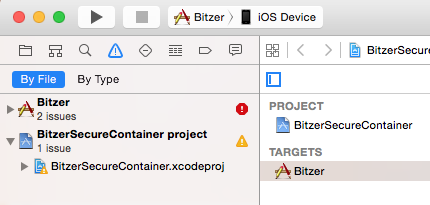
Make sure iOS Device is selected next to
Bitzer.
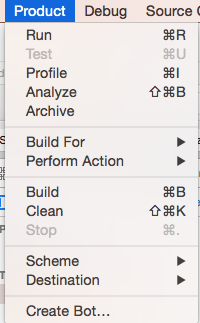
Build the Xcode project using Product >
Build menu option
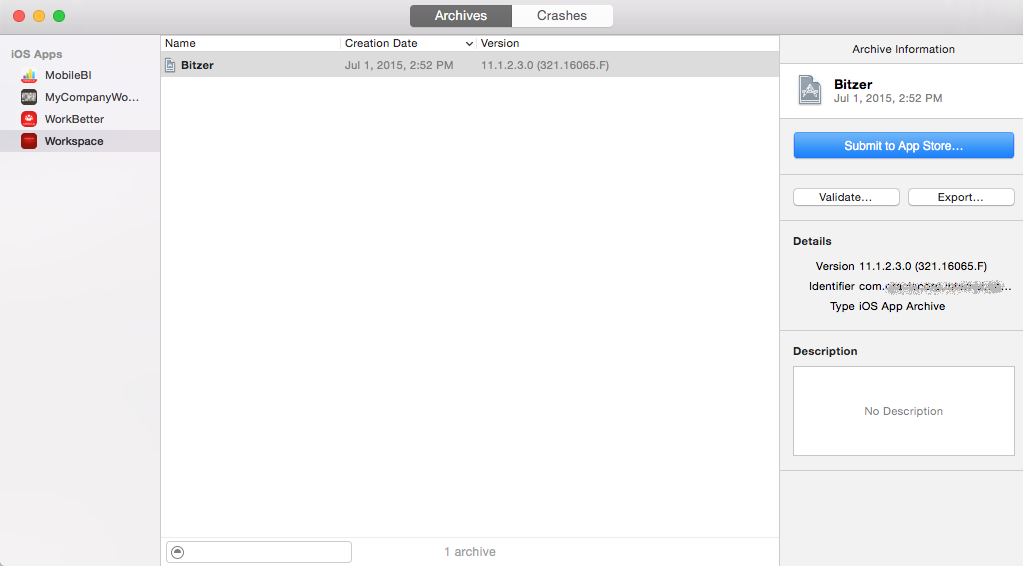
Once the project is successfully build, we
are ready to archive and export the ipa file.
Select Product > Archive menu option.
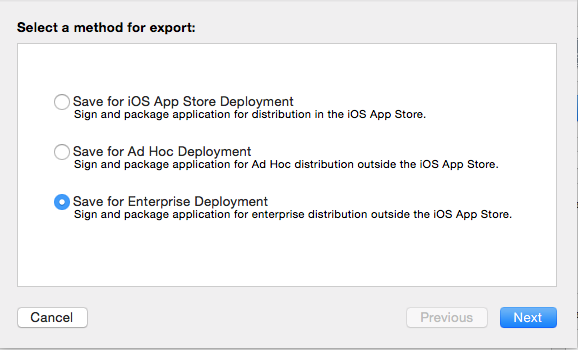
Click on Export button. Under select a
method for export option.
Select Save for Enterprise Deployment.
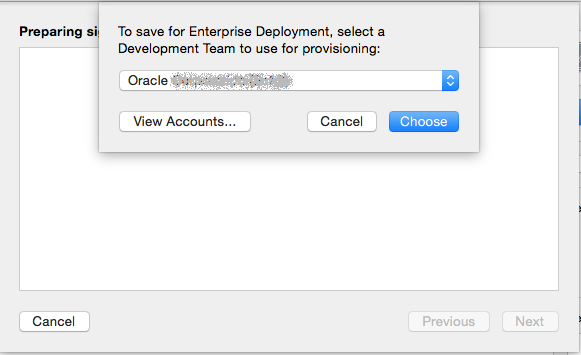
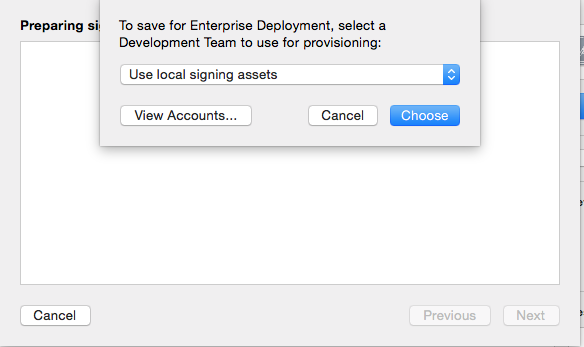
Click Next. Your apple development team
should display on the pop up box, either
select your development profile or select
local assets. Click choose.
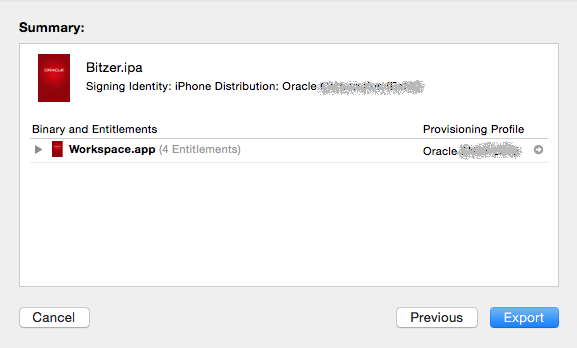
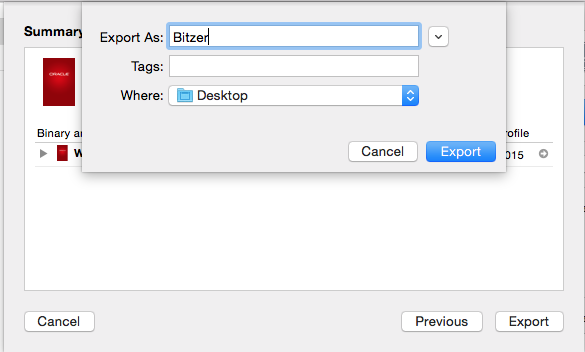
Click Export.
It should export out the bitzer.ipa file.
Upload the secure workspace container
(bitzer.ipa) to the Mobile Security App
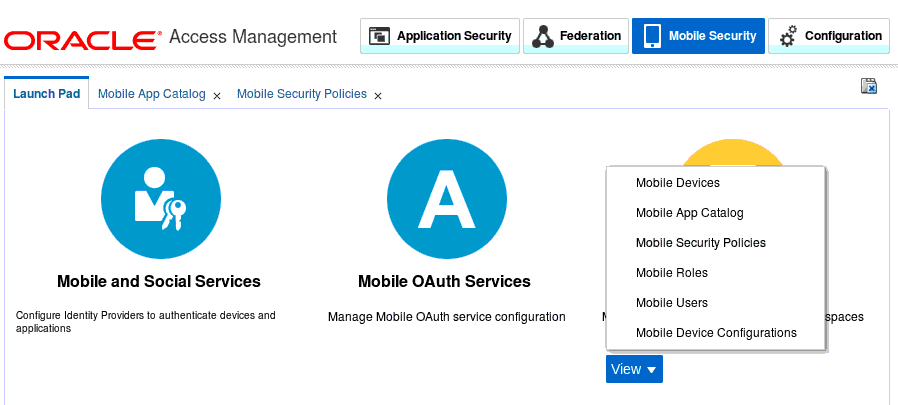
Catalog. Login to Access Console
(http://<hostname>:7777/access - if you
have used IDM LCM to install and configure
omss. Click on Mobile Security tab. Select
Mobile App Catalog under Mobile Security
Manager.
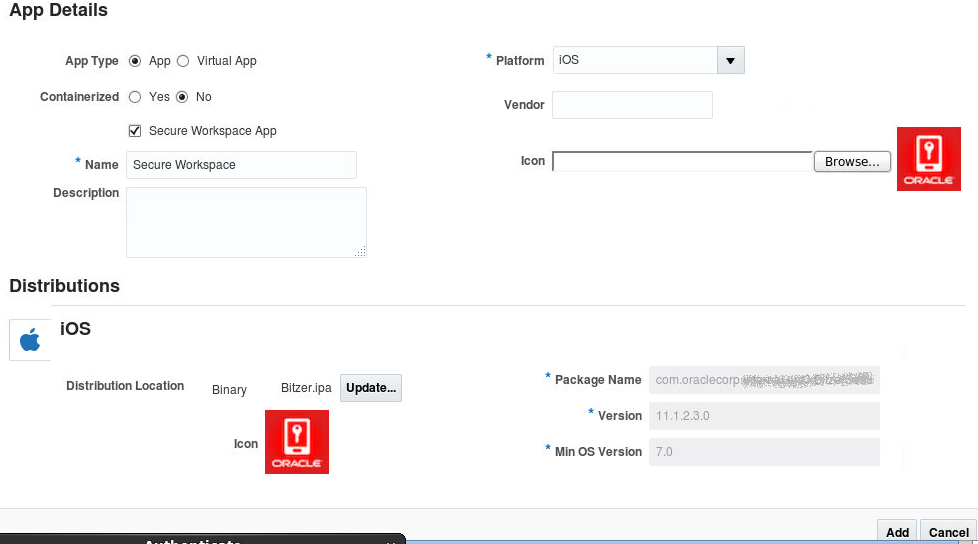
Click Add. In the App detail specify
containerized as No (Secure Workspace is not
containerized). Select Secure Workspace App
checkbox. Specify the Name as Secure
Workspace. For Platform specify iOS.
Under Distribution section, specify the
location of bitzer.ipa file under Binary
field.
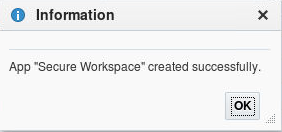
Click Add.
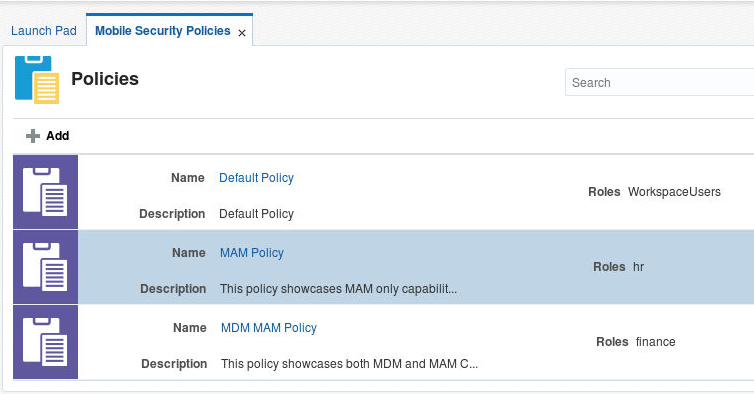
Creating Two Polices - MDM MAM Policy and MAM Policy
Now we will create two different policies - one to
illustrate capabilities of Mobile Device Management
and Mobile Application Management (MDM and MAM) and
another to illustrate Mobile Application Management
only (MAM Only).
Click on the Launchpad tab for Mobile Security.
Under mobile Security Manager select Mobile
Security Policies.
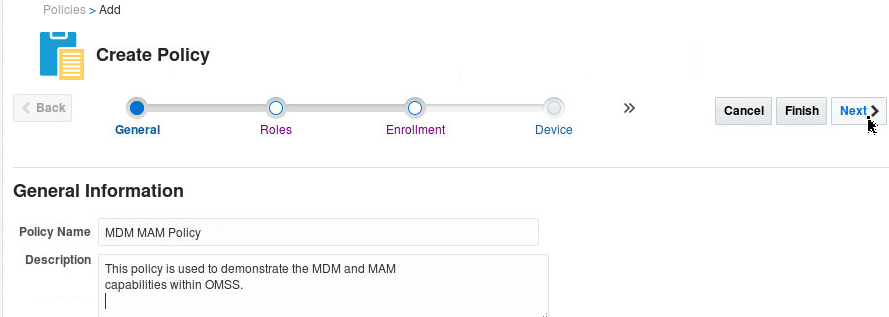
Click Add. Create a MDM and MAM policy with
the following settings:
Policy Name - MDM MAM Policy
Description - This policy is used to
demonstrate the MDM and MAM capabilities
within OMSS.
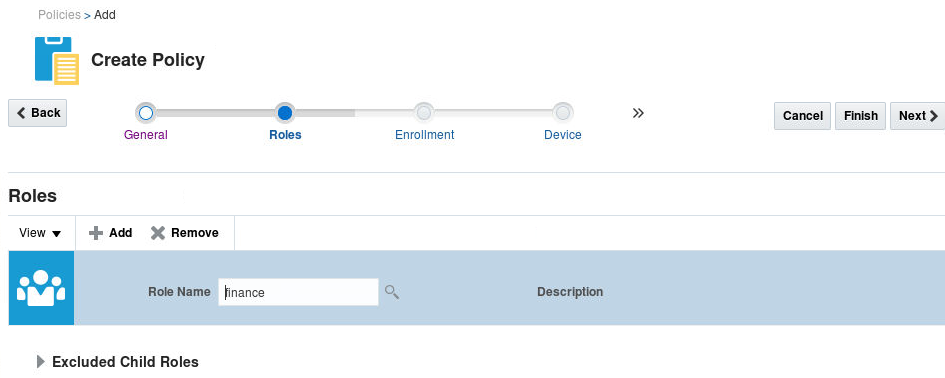
Roles - Add Finance role.
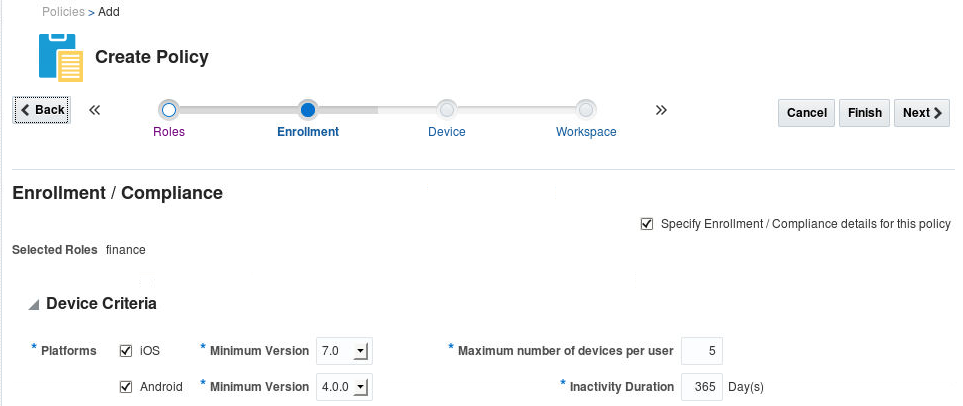
Enrollment/Compliance - Select the Specify
Enrollment/Compliance details for this policy
check box.
Under platforms select IOS, minimum
version 7.0. Then select Android, minimum
version 4.0.0
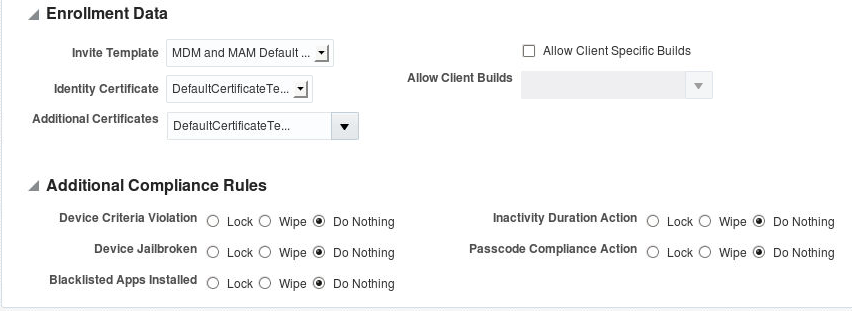
Invite template, select “MDM and MAM default
invite”
Select “DefaultCertificateTemplate” for Identity
and Additional certificates.
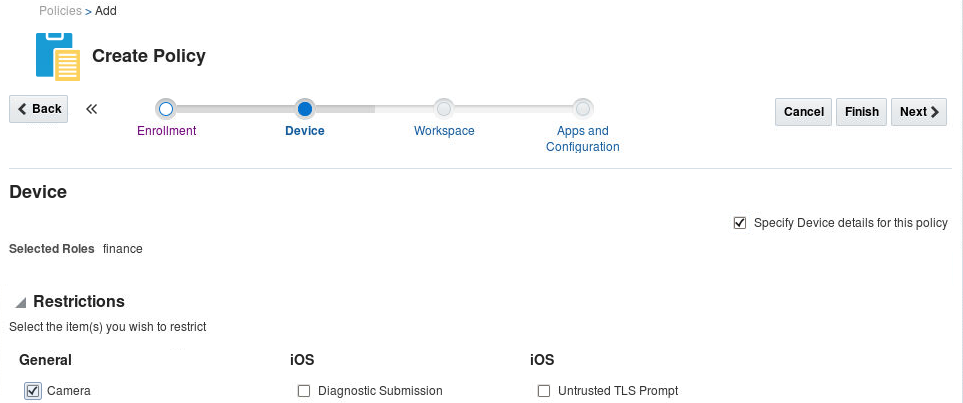
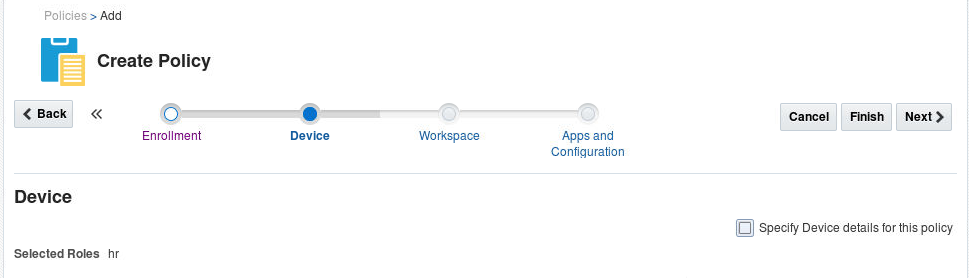
Device: Enable MDM settings by Selecting
Specify Device details for this policy.
Under restrictions, restrict camera by checking
on camera check box.
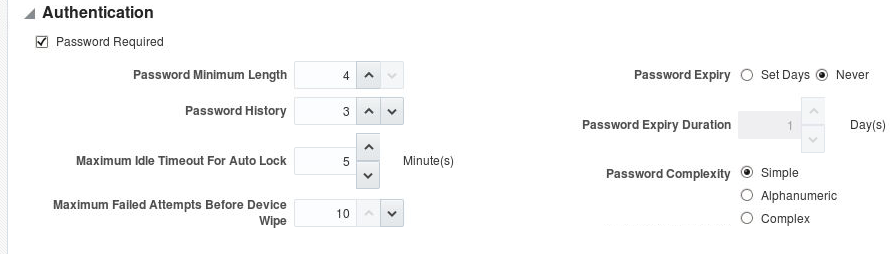
Note that passcode is enabled by default since
“Password required” is selected under
authentication section.
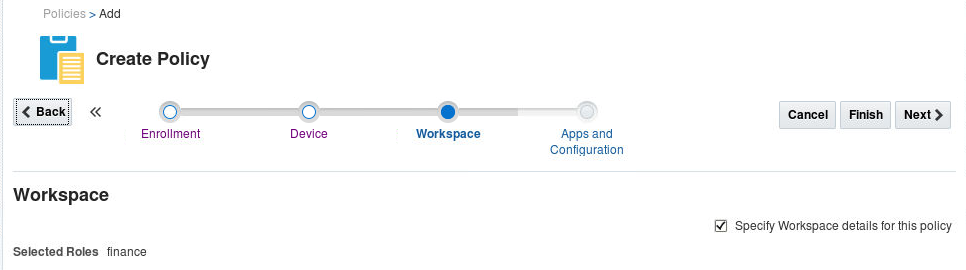
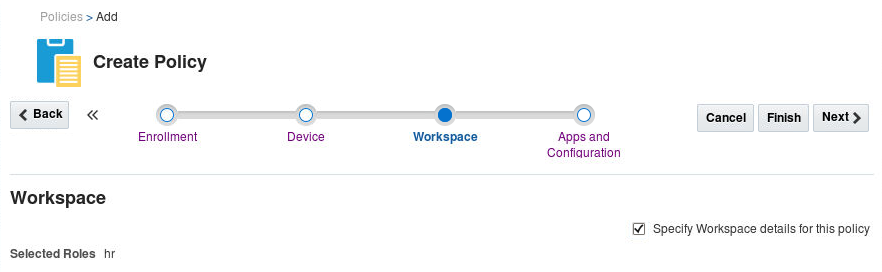
Enable MAM settings by selecting Specify
workspace details for this policy.
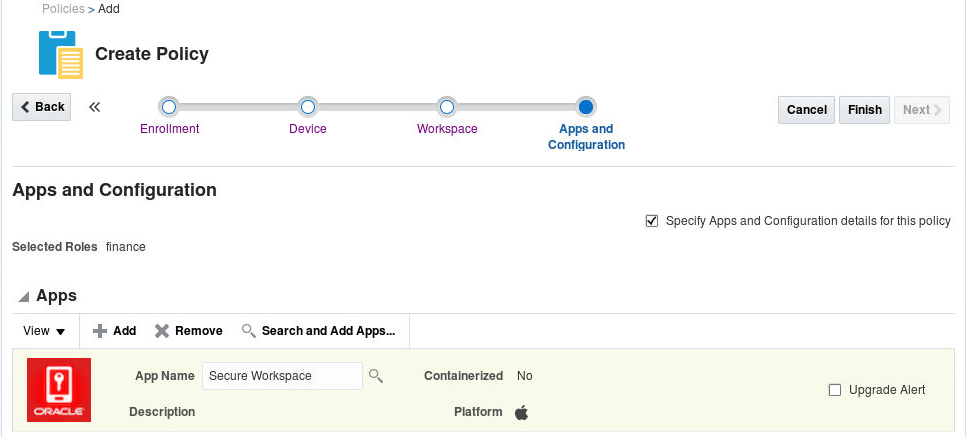
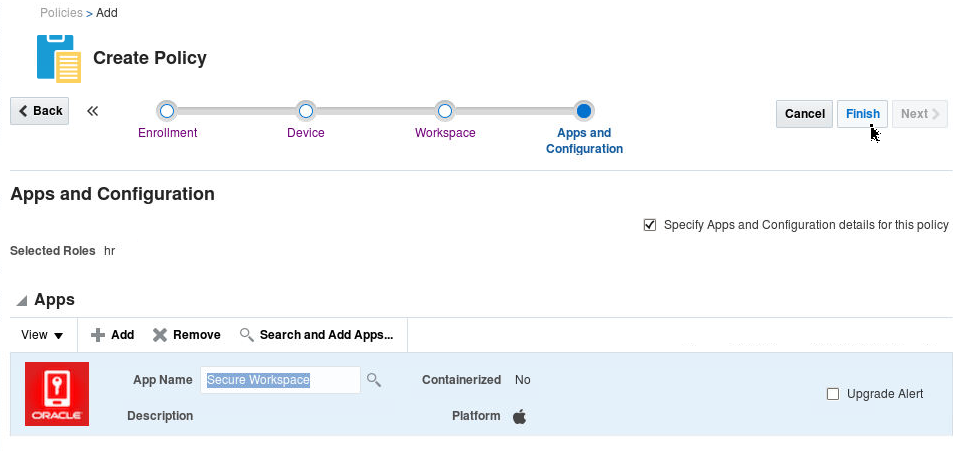
On Apps and Configuration section make sure
“Specify Apps & Configuration details for
this policy” check box is enabled.
In the apps table click Add button on the
toolbar
Now you will see a new row, where there is an
input field for app name.
Type in the name “Secure Workspace” app.
Click Finish
Click Add on the Mobile Security Policy
page.Create a MAM only policy with the following
settings:
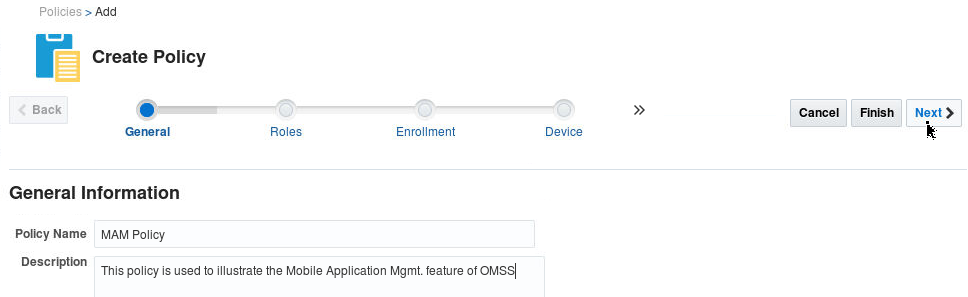
Policy Name: MAM Policy
Description: This policy is used to
illustrate mobile application management
features of OMSS.
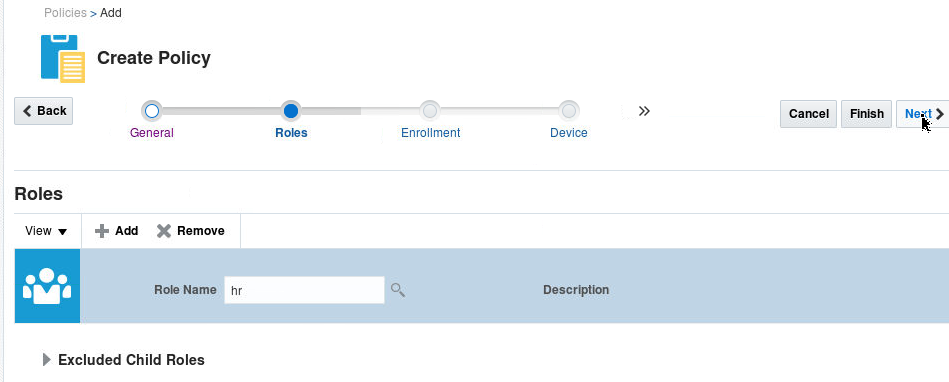
Roles - Add HR role.
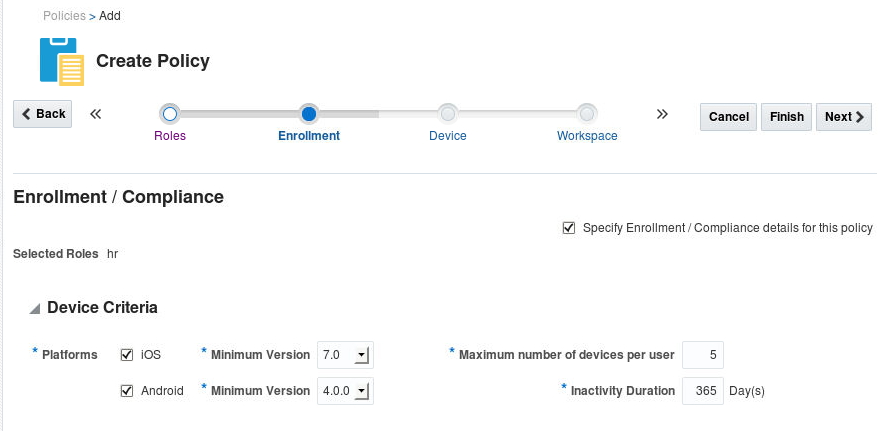
Enrollment/Compliance - Select the Specify
Enrollment/Compliance details for this policy
check box.
Under platforms select IOS, minimum
version 7.0. Then select Android, minimum
version 4.0.0
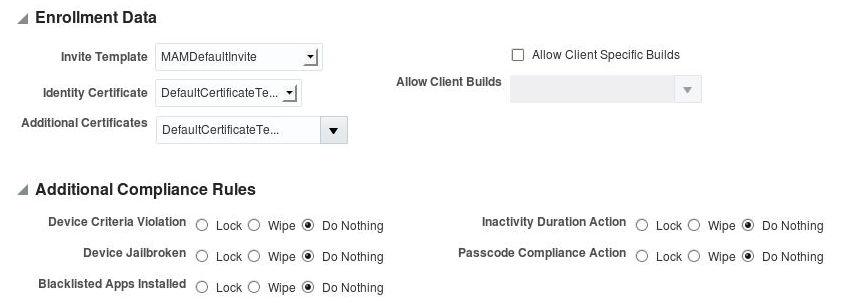
Invite template, select “MAM default
invite”
Select “DefaultCertificateTemplate” for
Identity and Additional certificates.
Device: Disable MDM settings by making
sure Specify Device details for this policy
remains unchecked.
Enable MAM settings by selecting Specify
workspace details for this policy.
On Apps and Configuration section make
sure “Specify Apps & Configuration details
for this policy” check box is enabled.
In the apps table click Add button on the
toolbar
Now you will see a new row, where there is an
input field for app name.
Type in the name “Secure Workspace” app.
Click Finish
You should see the two new policies defined
Setting Mobile Security Manager Settings
Make sure Server Settings, APNS settings, GCM
settings, User Notification Settings, Device
Notification settings, MDM Agent Settings are
set correctly.
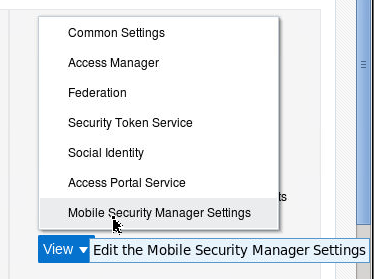
Navigate to Configuration tab on the Access
Console. Select Settings > Mobile Security
Manager Settings
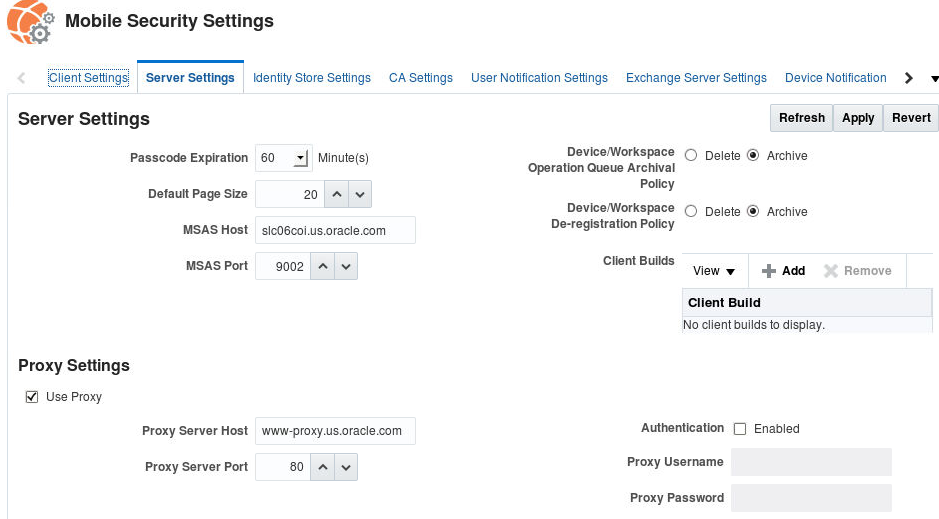
Click on Server Settings tab. If you are behind
a proxy server, make sure Proxy Settings are set
appropriate to your environment.
This is required for APNS to work correctly.
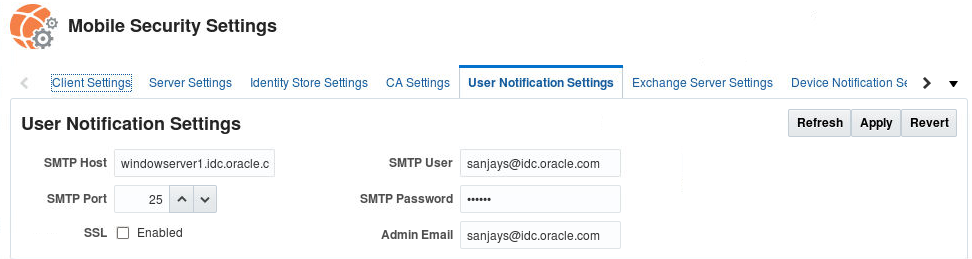
Click on User Notification Settings. Make sure
you set the correct values for SMTP Email server
through which email notifications/invites will
be routed. This is required for email invites to
work correctly.
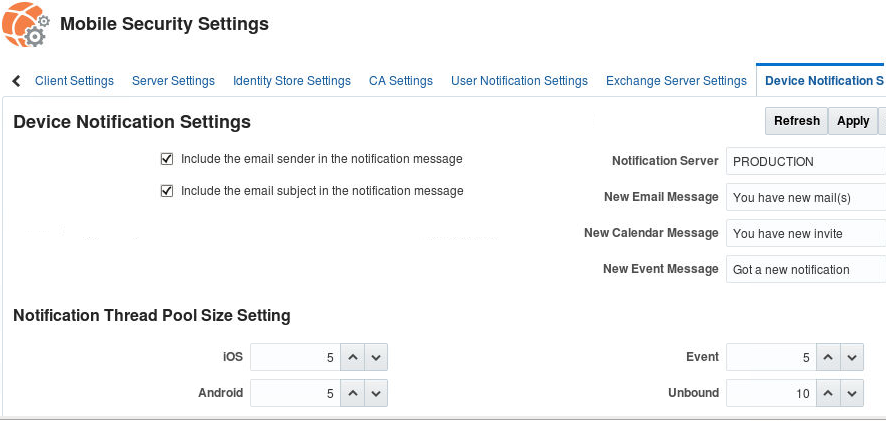
Click on Device Notification Settings tab. Make
sure you set the appropriate settings are
notifications for your environment. We will
leave these as the default.
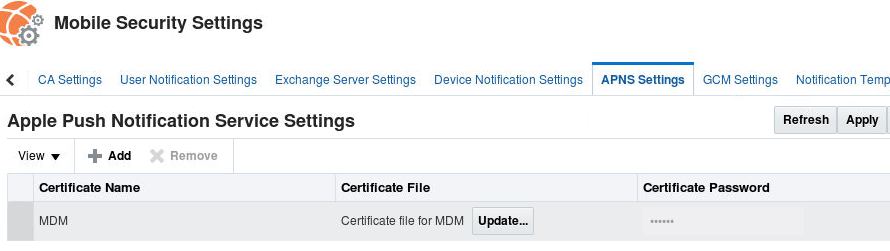
Click on the APNS Settings tab. You must
retrieve an APNS certificate from Apple for push
notifications to work correctly for iOS devices.
You need to upload the APNS certificate on this
tab.
iOS Devices require an Apple Push Notification
Services certificate from Apple.
Following are the steps to get an APNS
certificate:
MSM requires an Apple MDM certificate
to manage iOS devices. This certificate
enables secure communication using Apple Push
Notification Services (APNS). (If you are only
supporting unmanaged iOS devices, Mobile
Security Manager does not need an MDM
certificate.)
On a computer running Mac OS X create a
Certificate Signing Request (CSR).
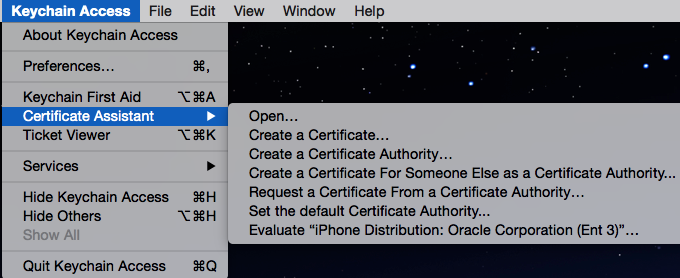
Open the Keychain Access application by
opening the Finder and opening Applications
> Utilities > Keychain Access.
From the menu choose Keychain Access >
Certificate Assistant > Request a
Certificate From a Certificate Authority...
The Certificate Assistant opens.
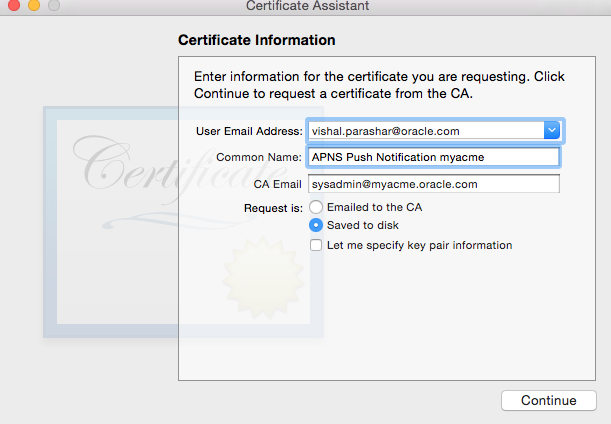
Complete the form by providing an e-mail
address and a common name, then select Saved
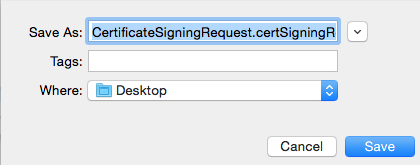
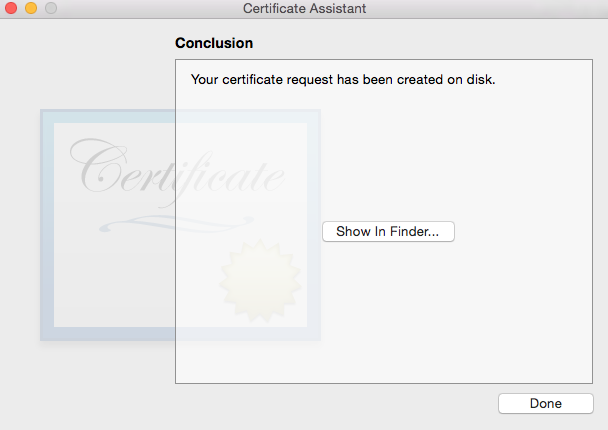
to Disk. Click Continue.
click Save.
click Done.
If you have an Apple Enterprise
account then sign this with your Apple
Enterprise Account.
If you do not have an Apple Enterprise
account then file a SR in the oracle support
portal and attach the CSR to the SR.
Oracle will sign this CSR and make it
available to you through the SR.
Upload the signed CSR to Apple Push
Notification Portal
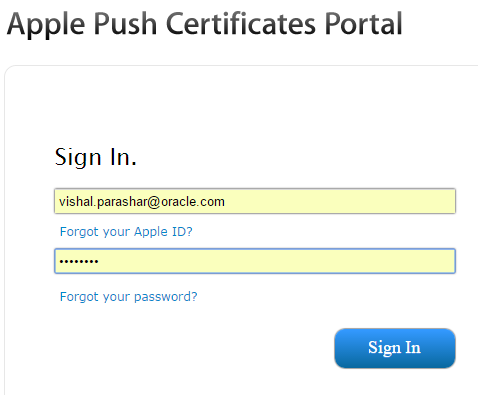
Using an Apple ID and password, sign in to the
Apple Push Certificate Portal located here: https://identity.apple.com/pushcert/
Opens a new window
The Apple ID does not need to be
associated with an Apple Developer /
Enterprise Account. It can be any Apple
ID.
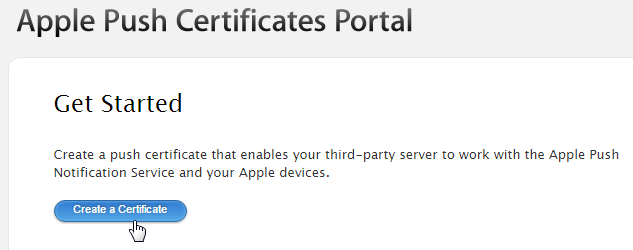
Accept the EULA and continue.
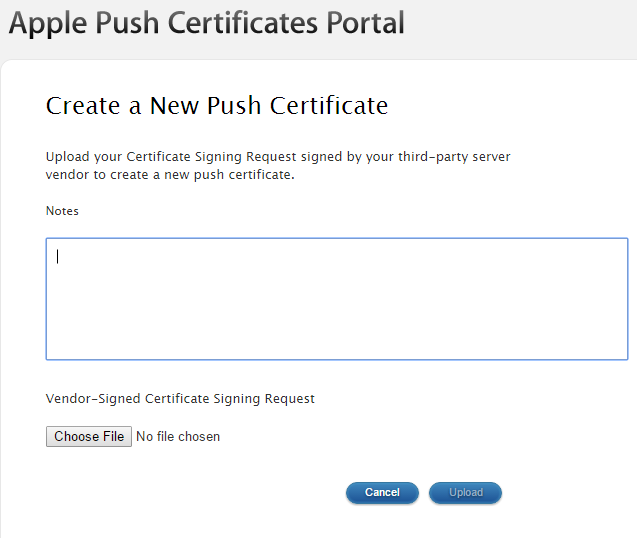
Click Create a Certificate, then click
Browse.
Select the Oracle-signed CSR and click
Upload.
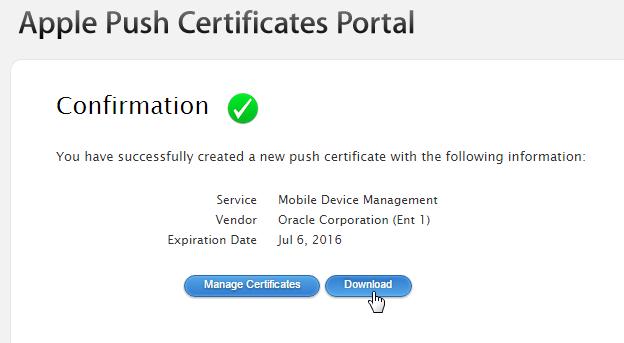
A new certificate for ”Oracle” Mobile
Device Management opens. Click Download
and download the Apple signed
certificate.
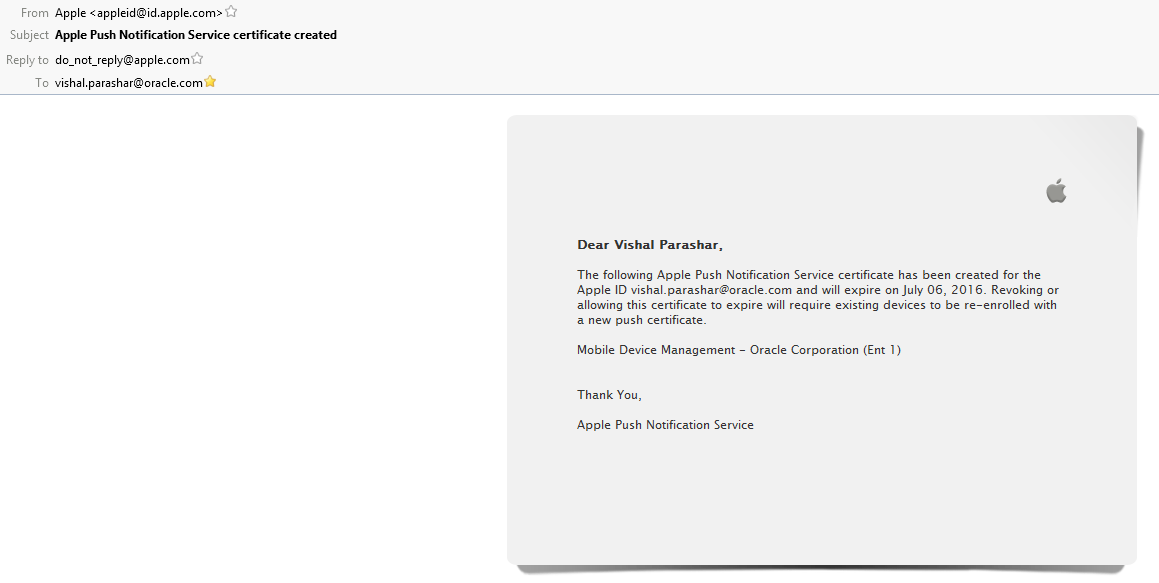
Move the cert (<name>.pem file) to Mac
machine. Double click the pem file to upload it
to the Keychain Access application.
Verify that it contains APSP: <UUID>
(Apple Production Services) and that it has an
associated private key. UUID is a randomly
generated number.
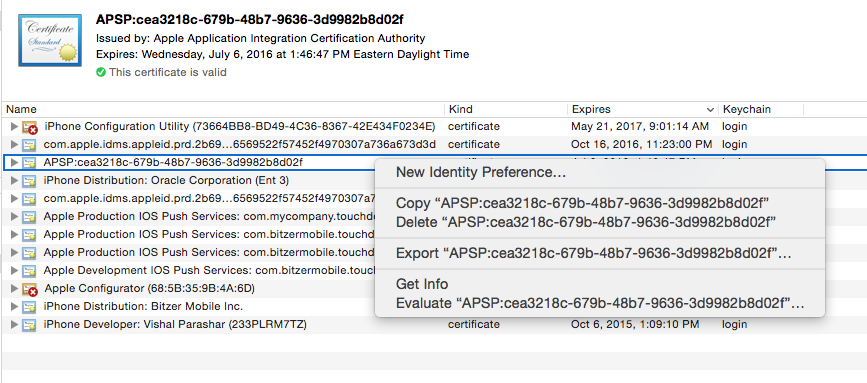
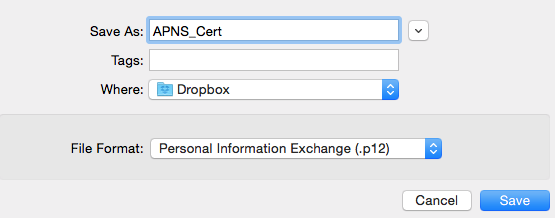
Right-click the certificate and click
Export.
Save the certificate in .p12 format.
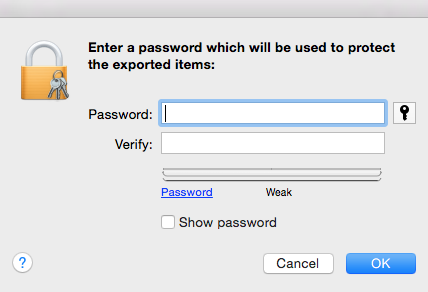
Enter a password to protect the exported
.p12 file. Record the password and use this
to enter password need you upload the APNS
certificate on the APNS Settings tab in the
Access Console.
Enter the MDM as name and upload the .p12 file
along with the password on APNS settings tab
You need to specify the sender id and api key
for push notifications to work for android
devices.
Mobile Security Manager requires GCM (Google
Cloud Messaging) credentials to connect to GCM
and send push notifications to Android devices.
Follow these steps to create a GCM key.
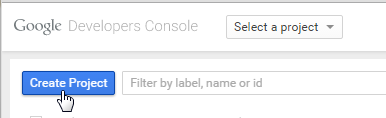
Create a Google API project and enable the
GCM service.
Sign in with Google credentials to the
Google Developers Console:
https://cloud.google.com/console
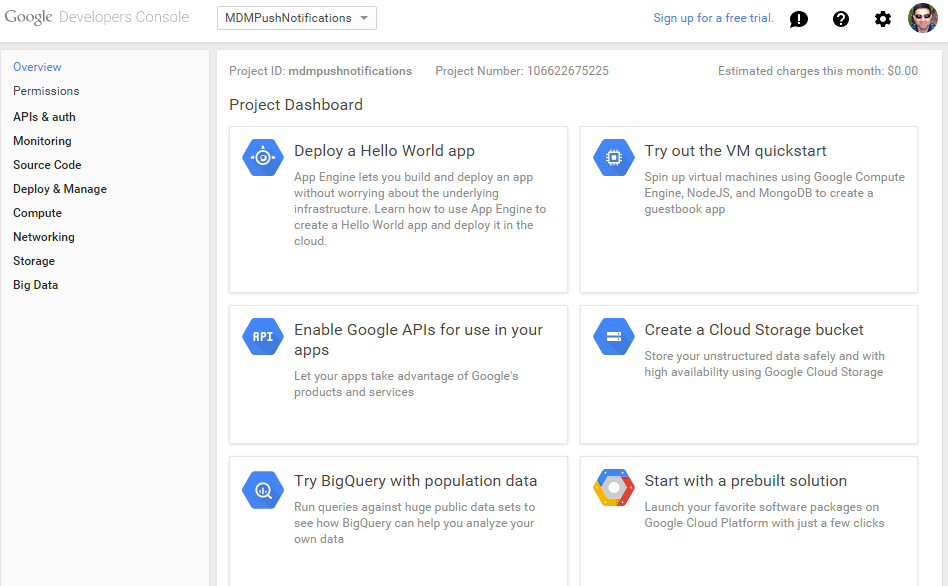
If you have an API Project, click it to open
the Project Dashboard.
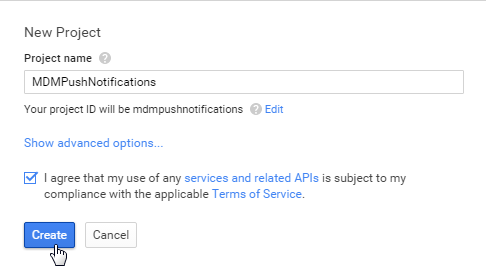
If you do not have an API project yet, click
Create Project. Specify a Project Name and
click Create.
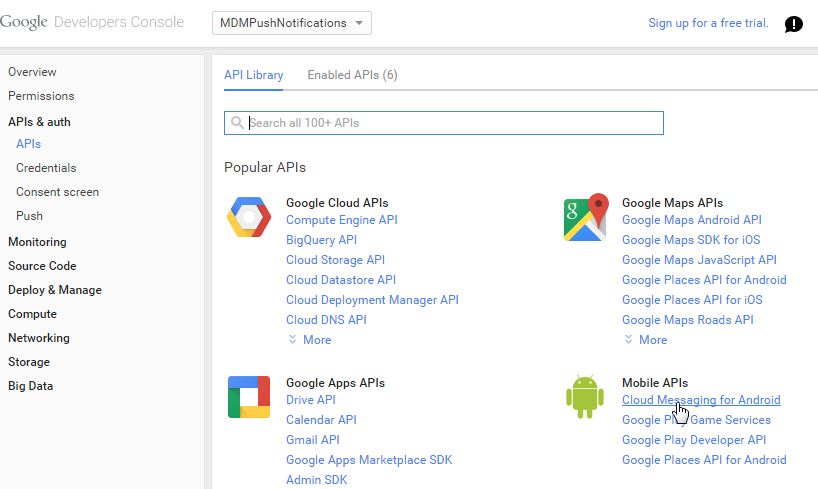
A page opens and displays your project
number—for example, Project Number:
106622675225.
Copy the project number. You will need it
when you upload the API key to Mobile
Security Manager.
Choose APIs & auth > APIs from the
sidebar, then, under Mobile APIs, click
Cloud Messaging for Android.
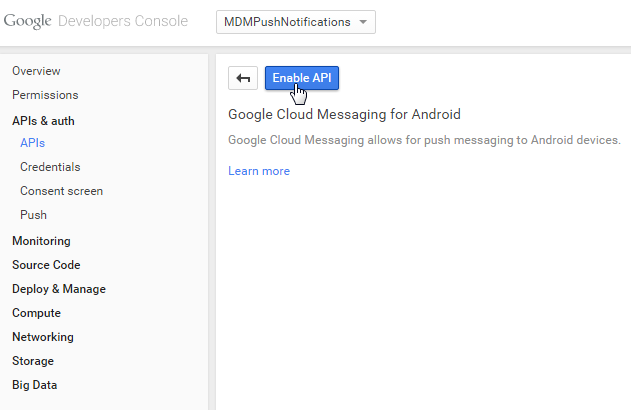
Click Enable API.
Google Cloud Messaging is enabled.
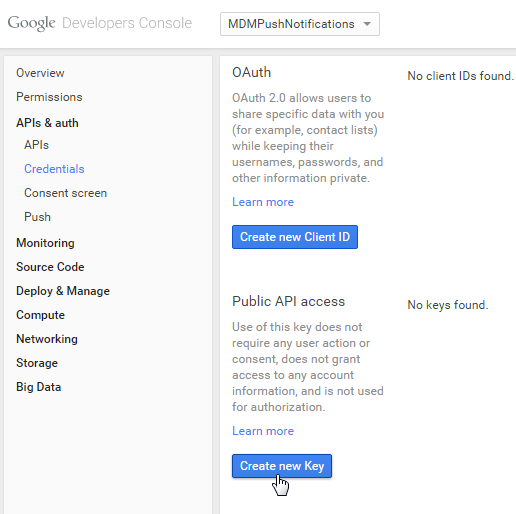
Obtain an API key.
Choose APIs & auth > Credentials from
the sidebar.
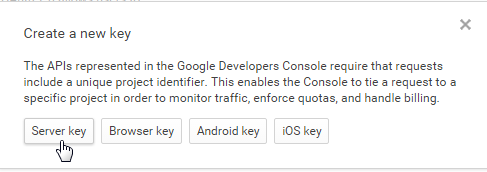
In the Public API access section, click
Create new Key.
then click Server key in the Create a new
key dialog.
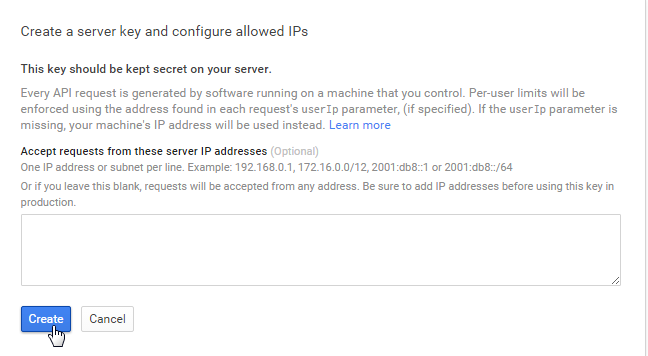
The Create a server key and configure
allowed IPs dialog box opens.
Enter your server's IP address and click
Create.
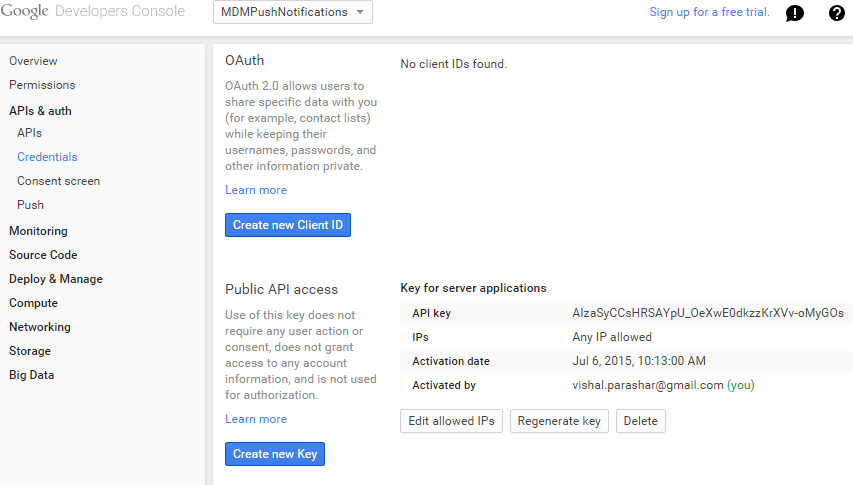
The API key is created.
Copy the API key, in our case,
AIzaSyCCsHRSAYpU_OeXwE0dkzzKrXVv-oMyGOs
Upload the API key to Mobile Security Manager.
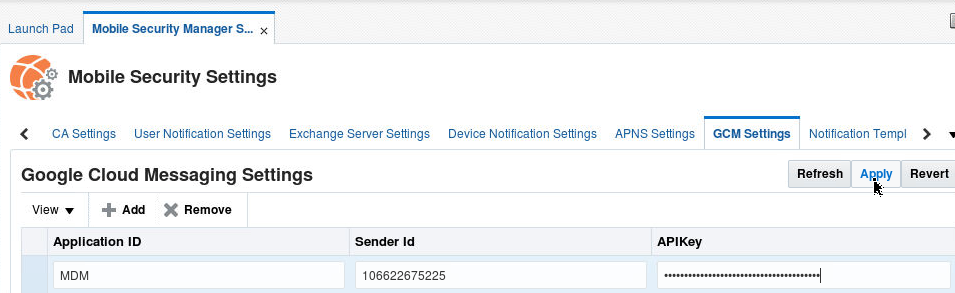
Click on the GCM settings tab.
Click Add to create a new row in the GCM
settings table.
For Application ID, type MDM.
For Sender ID, enter the project number from
first step, in our case - 106622675225
For API key, paste the API key from previous
step, in our case -
AIzaSyCCsHRSAYpU_OeXwE0dkzzKrXVv-oMyGOs.
Click Apply to save the GCM settings to the
GCM settings to Mobile Security Manager.
On Mobile Security Settings page, click on MDM
Agent settings tab on the access console. Set the
display name, description and organization name
for MDM Agent profile which will appear on the
customers iOS devices. We will leave the default
settings.
You can change the invite email that will be
sent out to the employees for MDM & MAM or
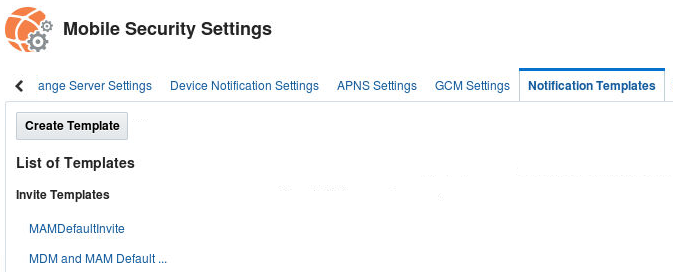
MAM only registration. Click on Notification
Templates tab.
Notice the two default templates. Click on
MDM and MAM Default Invite template to read it's
content.
You can click the edit icon to customize the
default notification templates.
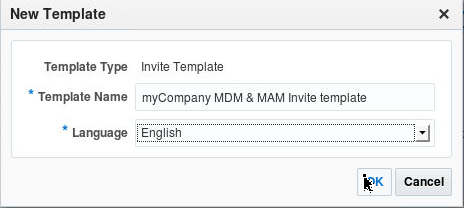
You can also create your own template, if you
want, by clicking on Create Template.
Notice you can use the following placeholders
in the template which will be dynamically
substituted with values at run time:
Deploying Secure Workspace on iOS Device Using MDM
Profile
Send an invite email to a specific user(s) or all
users in a role to install secure workspace on the
mobile device.
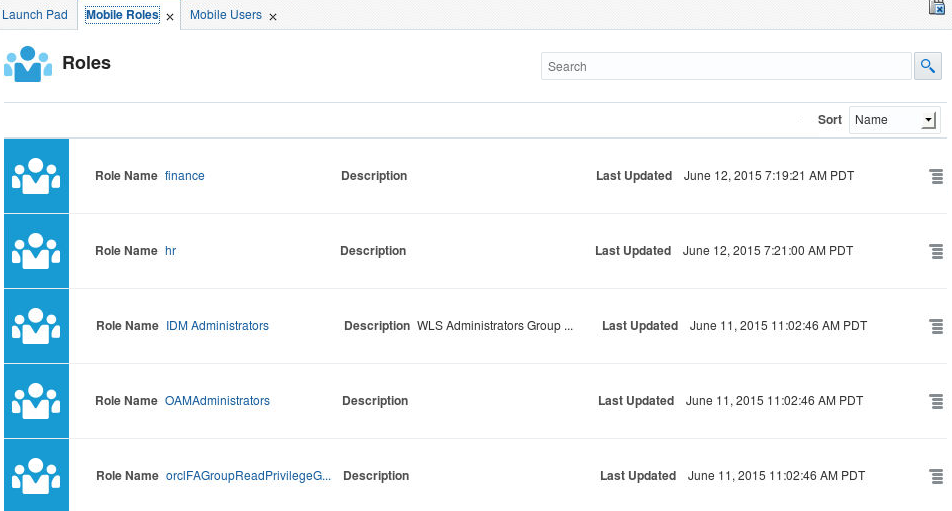
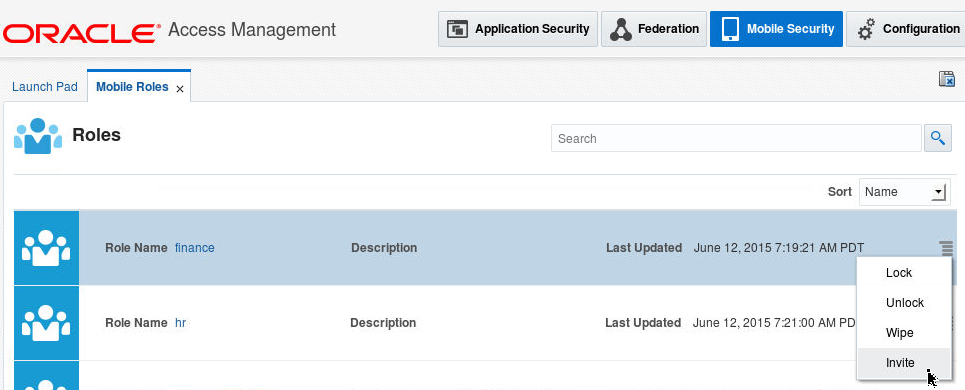
Click on Mobile Security tab. Navigate to
Mobile Security Manager > Mobile Roles. Click
the menu icon to the right of finance role and
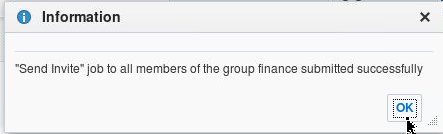
select Invite.
Click OK on the information window.
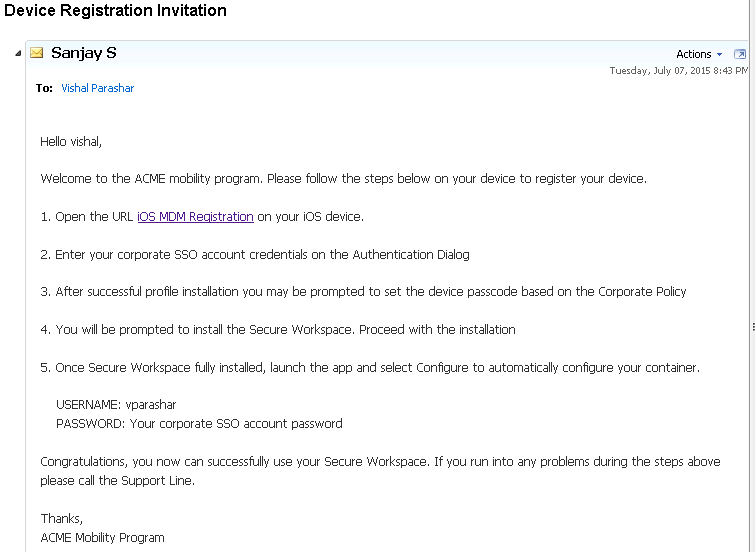
Vishal Parashar who is member of finance group
will receive the email to install secure
workspace. Since the policy associated with
finance group is MDM MAM Policy hence vparashar
user's mobile device will be a managed device
(both device and application management).
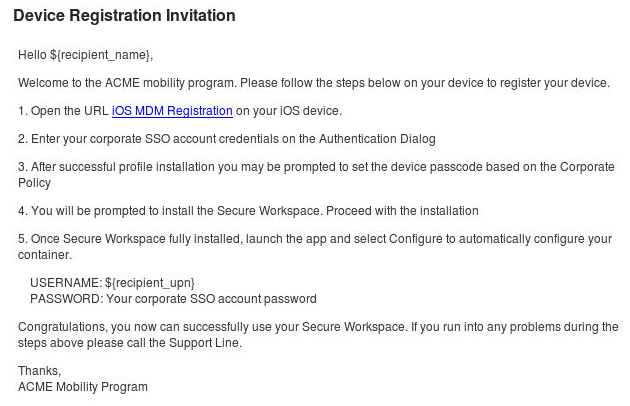
The email notification should look as follows:
If we were to send the invite for HR role, all
users belonging to HR - jdoe and Stinger,
will receive an email invite to download and
install secure workspace on their mobile device.
Since policy associated with HR group is MAM
Policy hence jdoe and stinger's mobile device
will be an unmanaged device (only application
management).
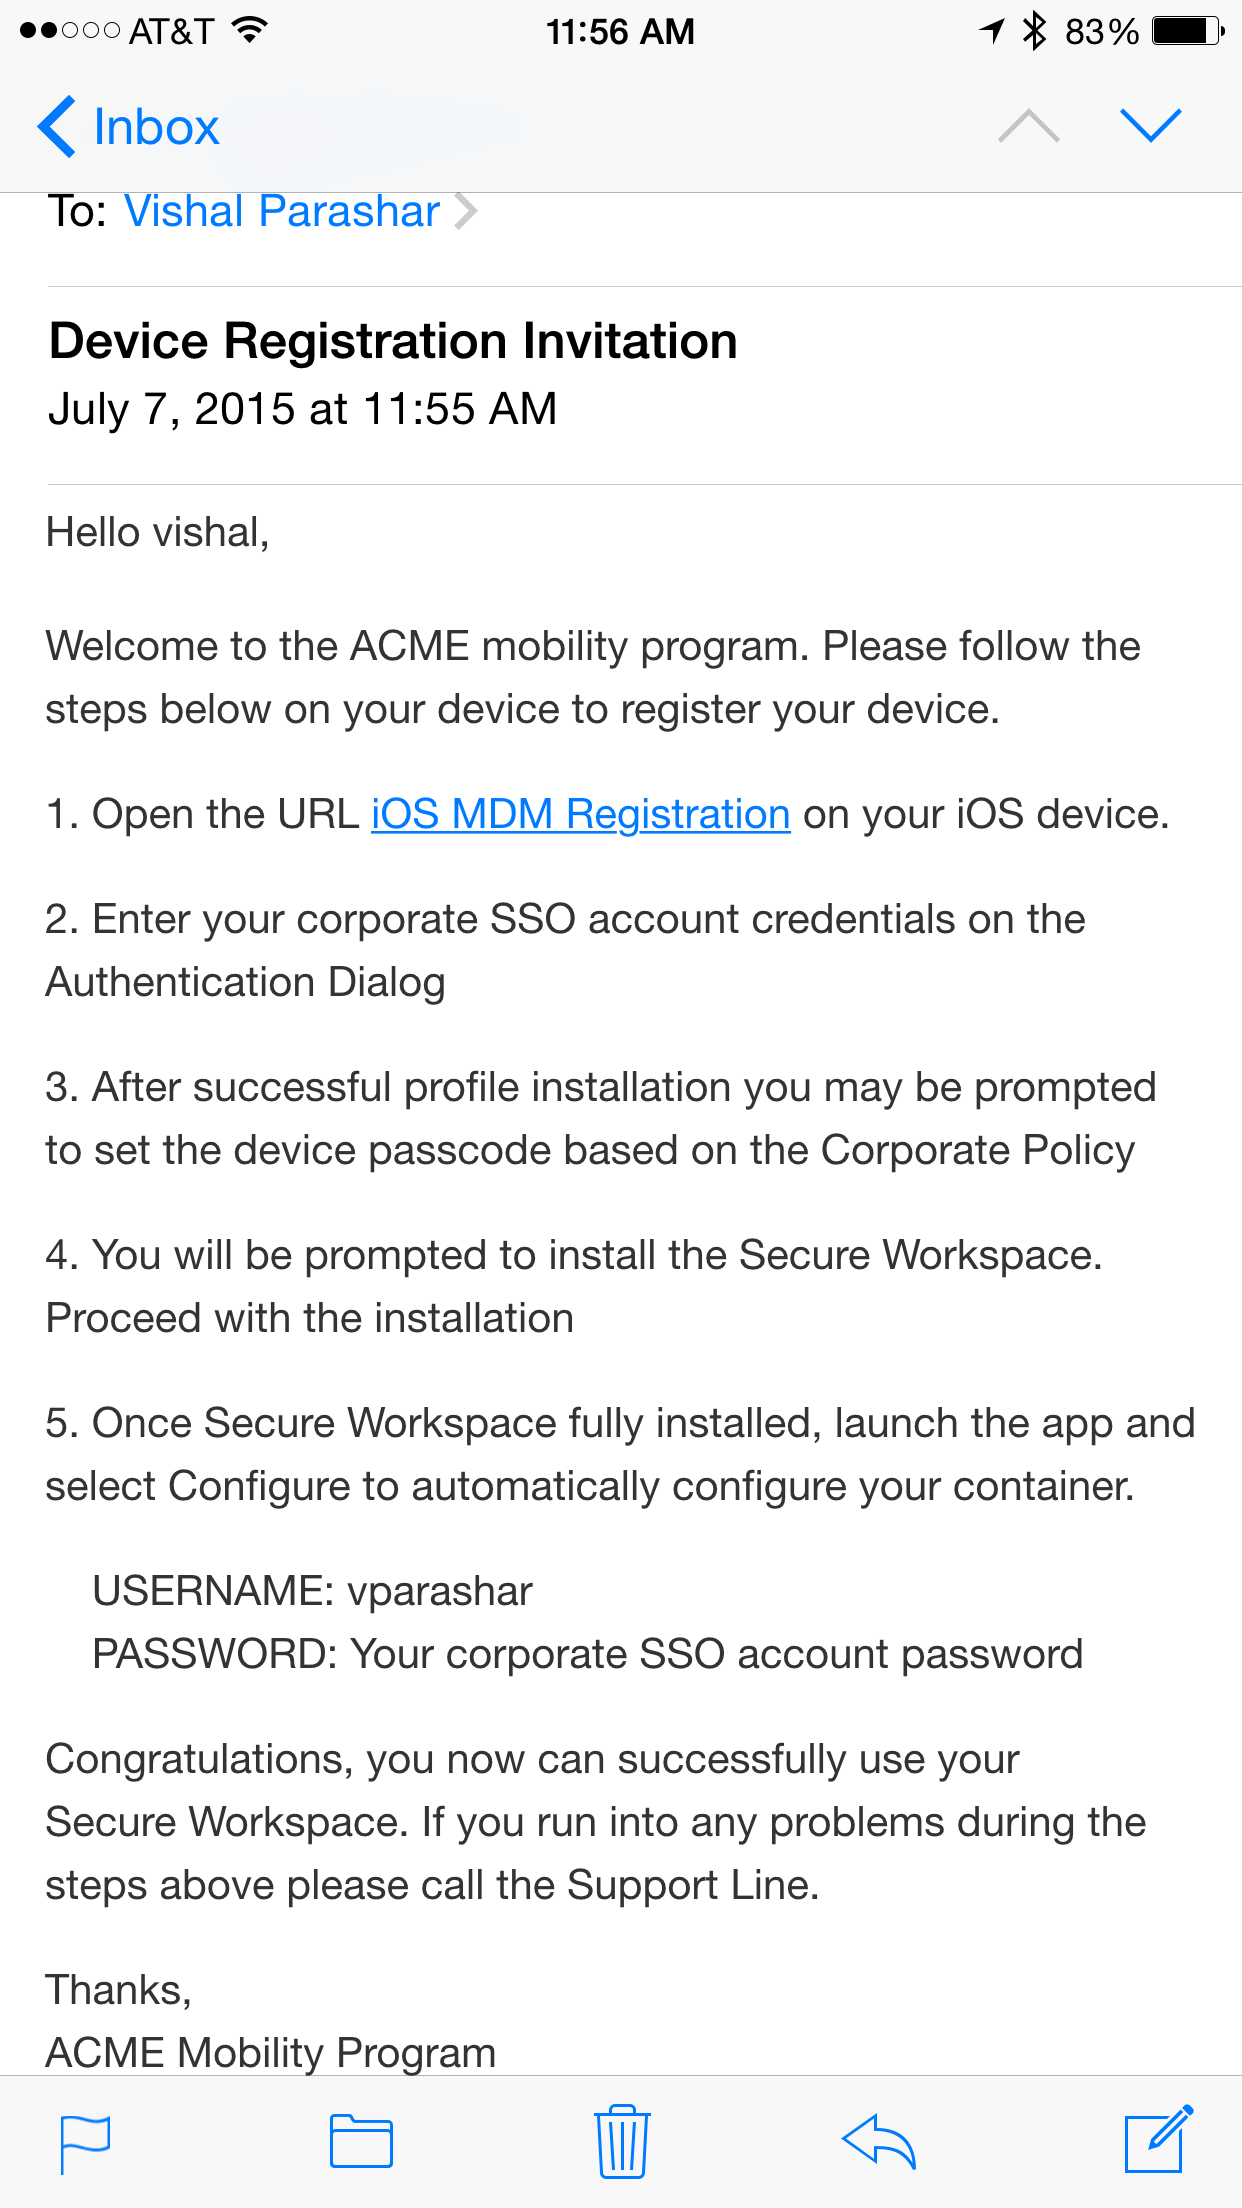
If you have this email configured on the mobile
device, you can tap on the link to iOS MDM
Registration, if not, forward this email to an
email account on your mobile device.
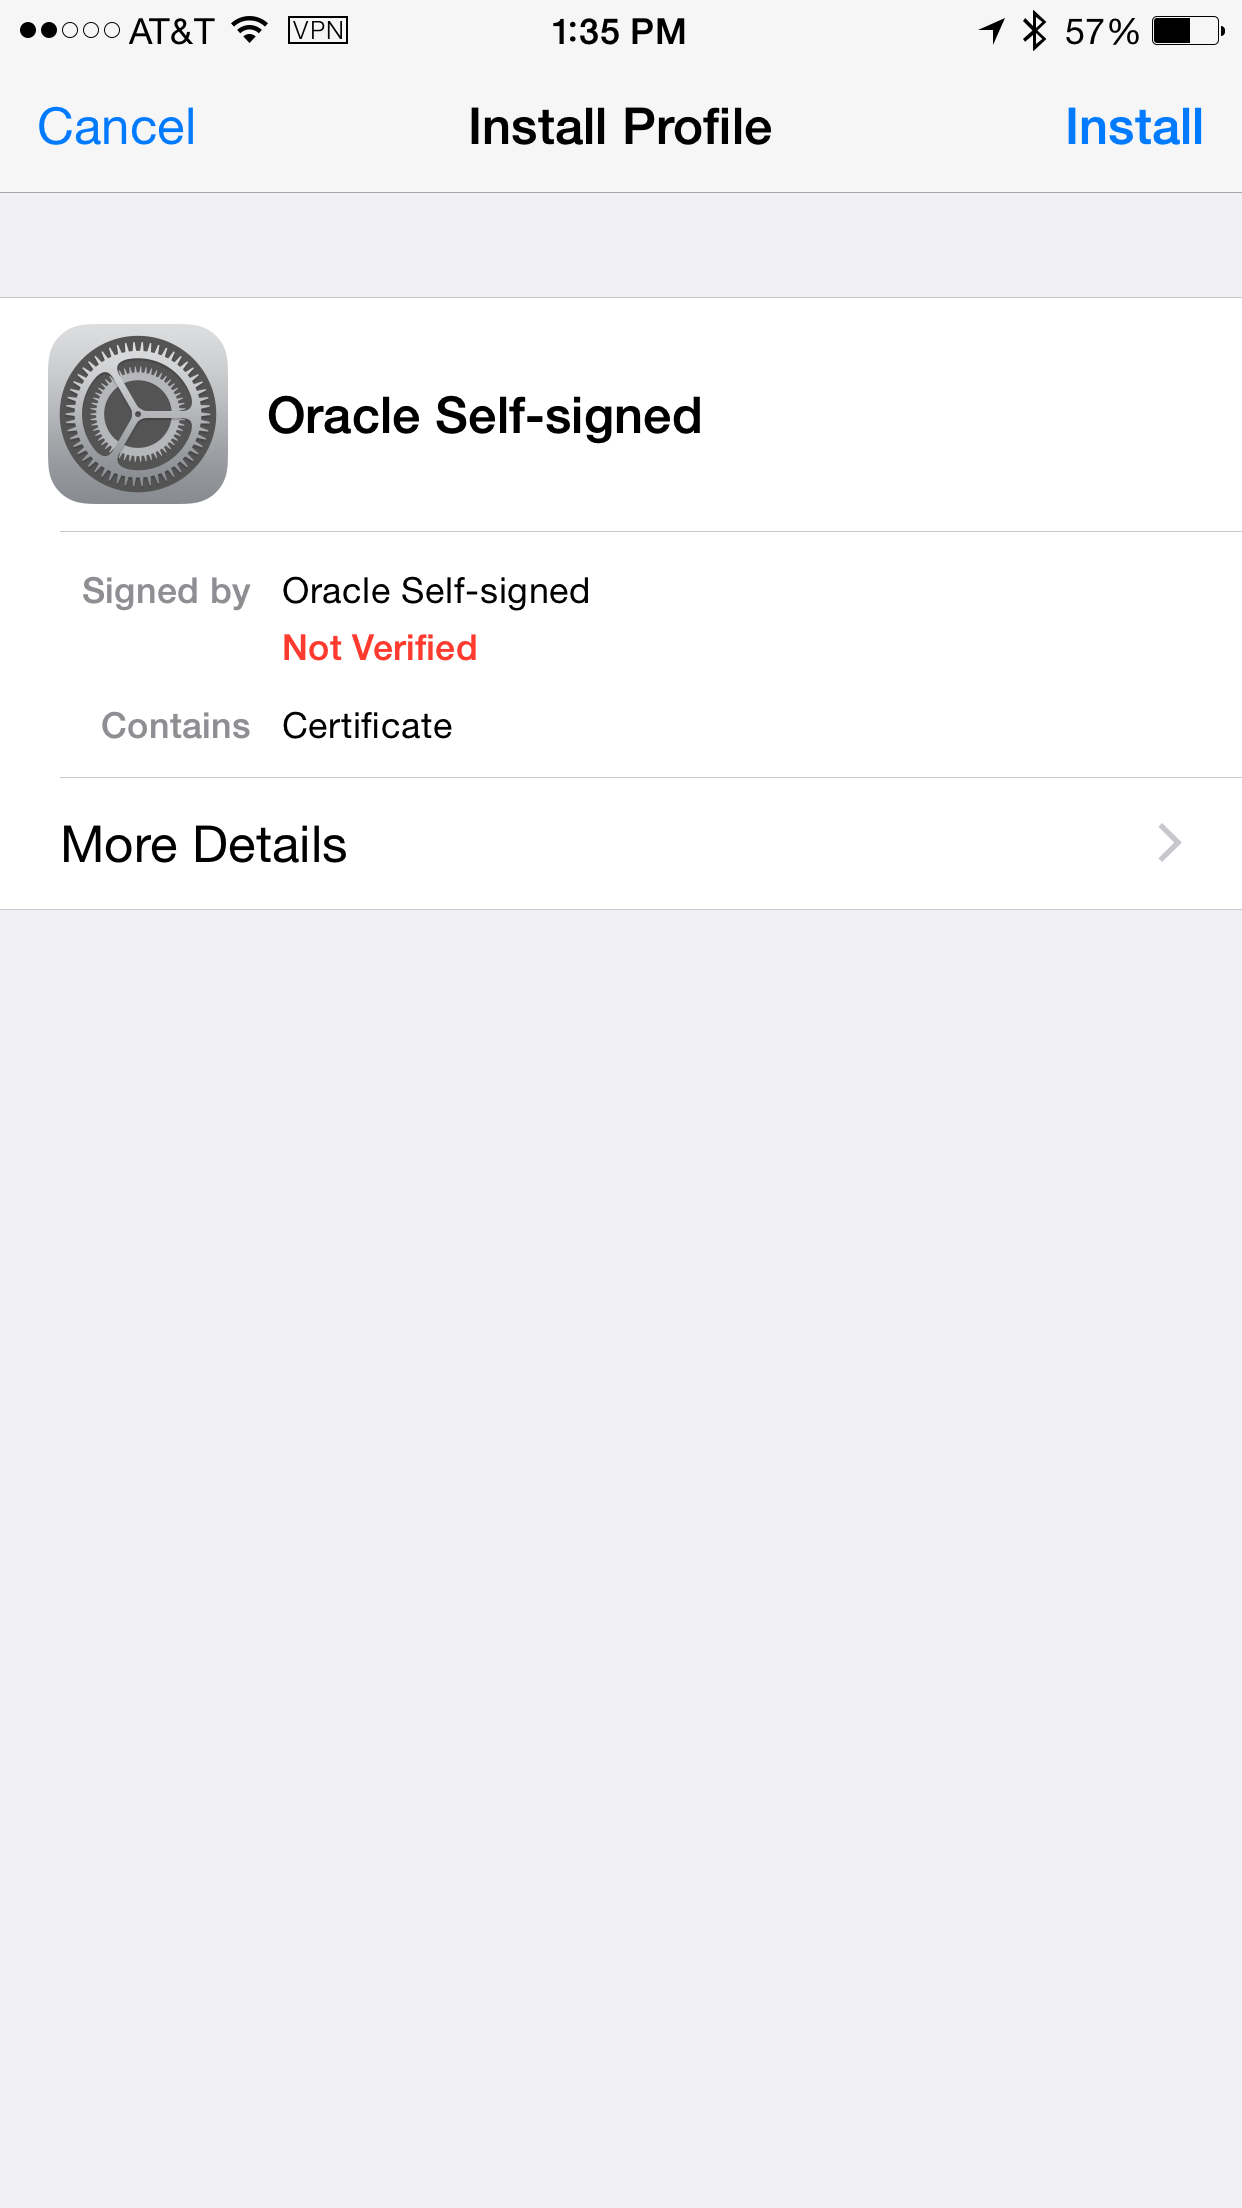
Before you tap on MDM Registration link to
install MDM Agent profile on your device, you
must first install the self signed cert for MSAS
server. Note: In real production environments,
there will be no need for this step as the MSAS
SSL server certificate would be provisioned by a
trusted CA (Verisign or RSA etc). However, since
in this environment, we are working with Oracle
Self Signed certificates, you must first install
this self signed certificate on your mobile
device before performing MDM device
registration.
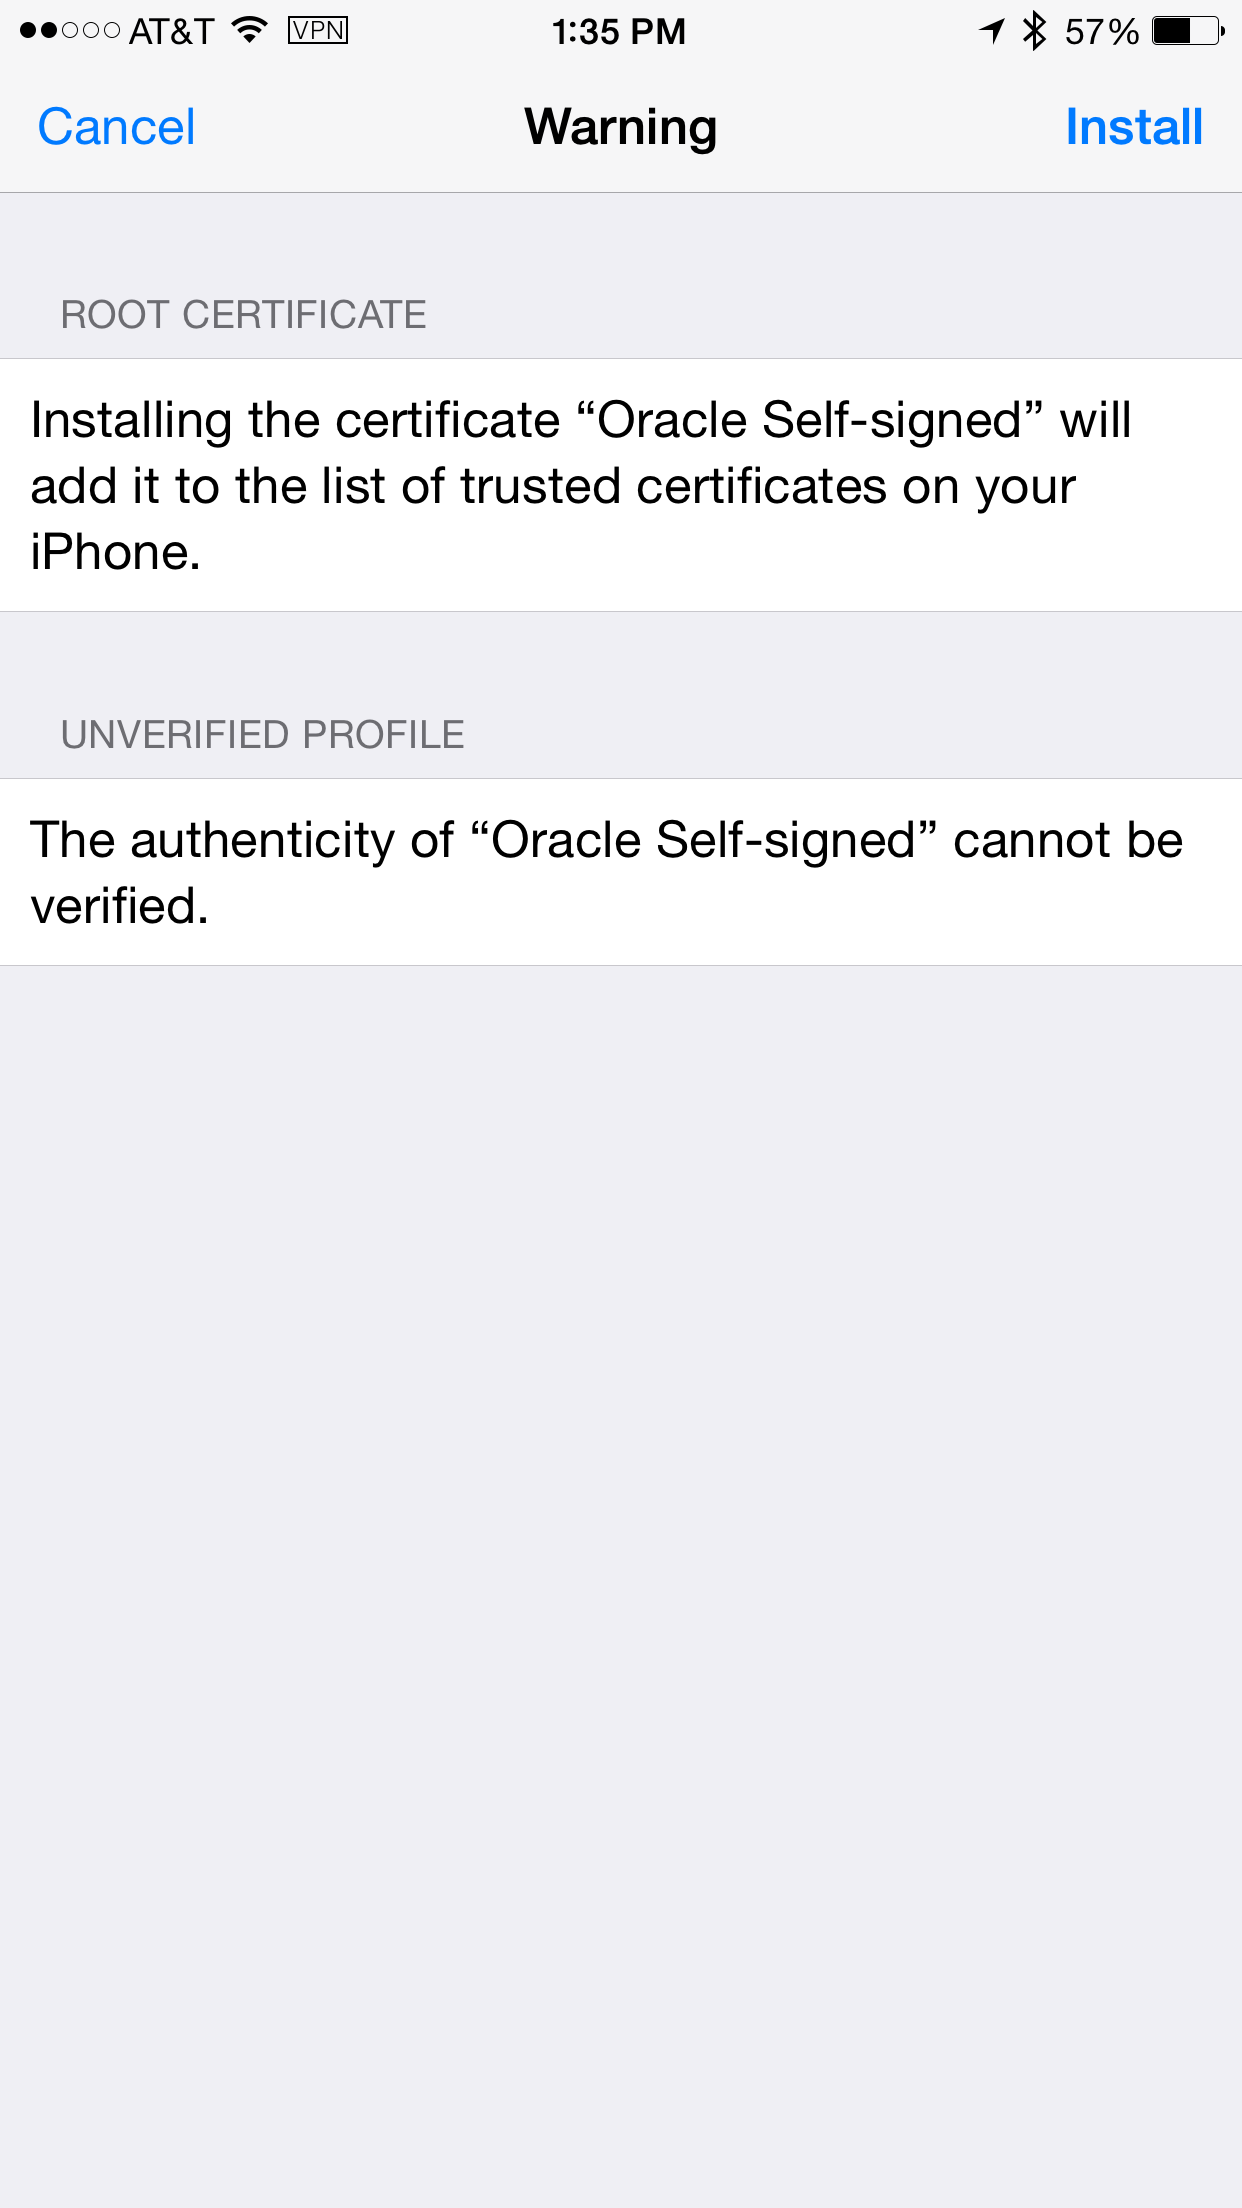
To install MSAS's Oracle Self Signed SSL
certificate, navigate to the following URL on
safari :
https://<msas_hostname>:9002/bmax/msas_cert0.pem
Where 9002 is MSAS SSL Port
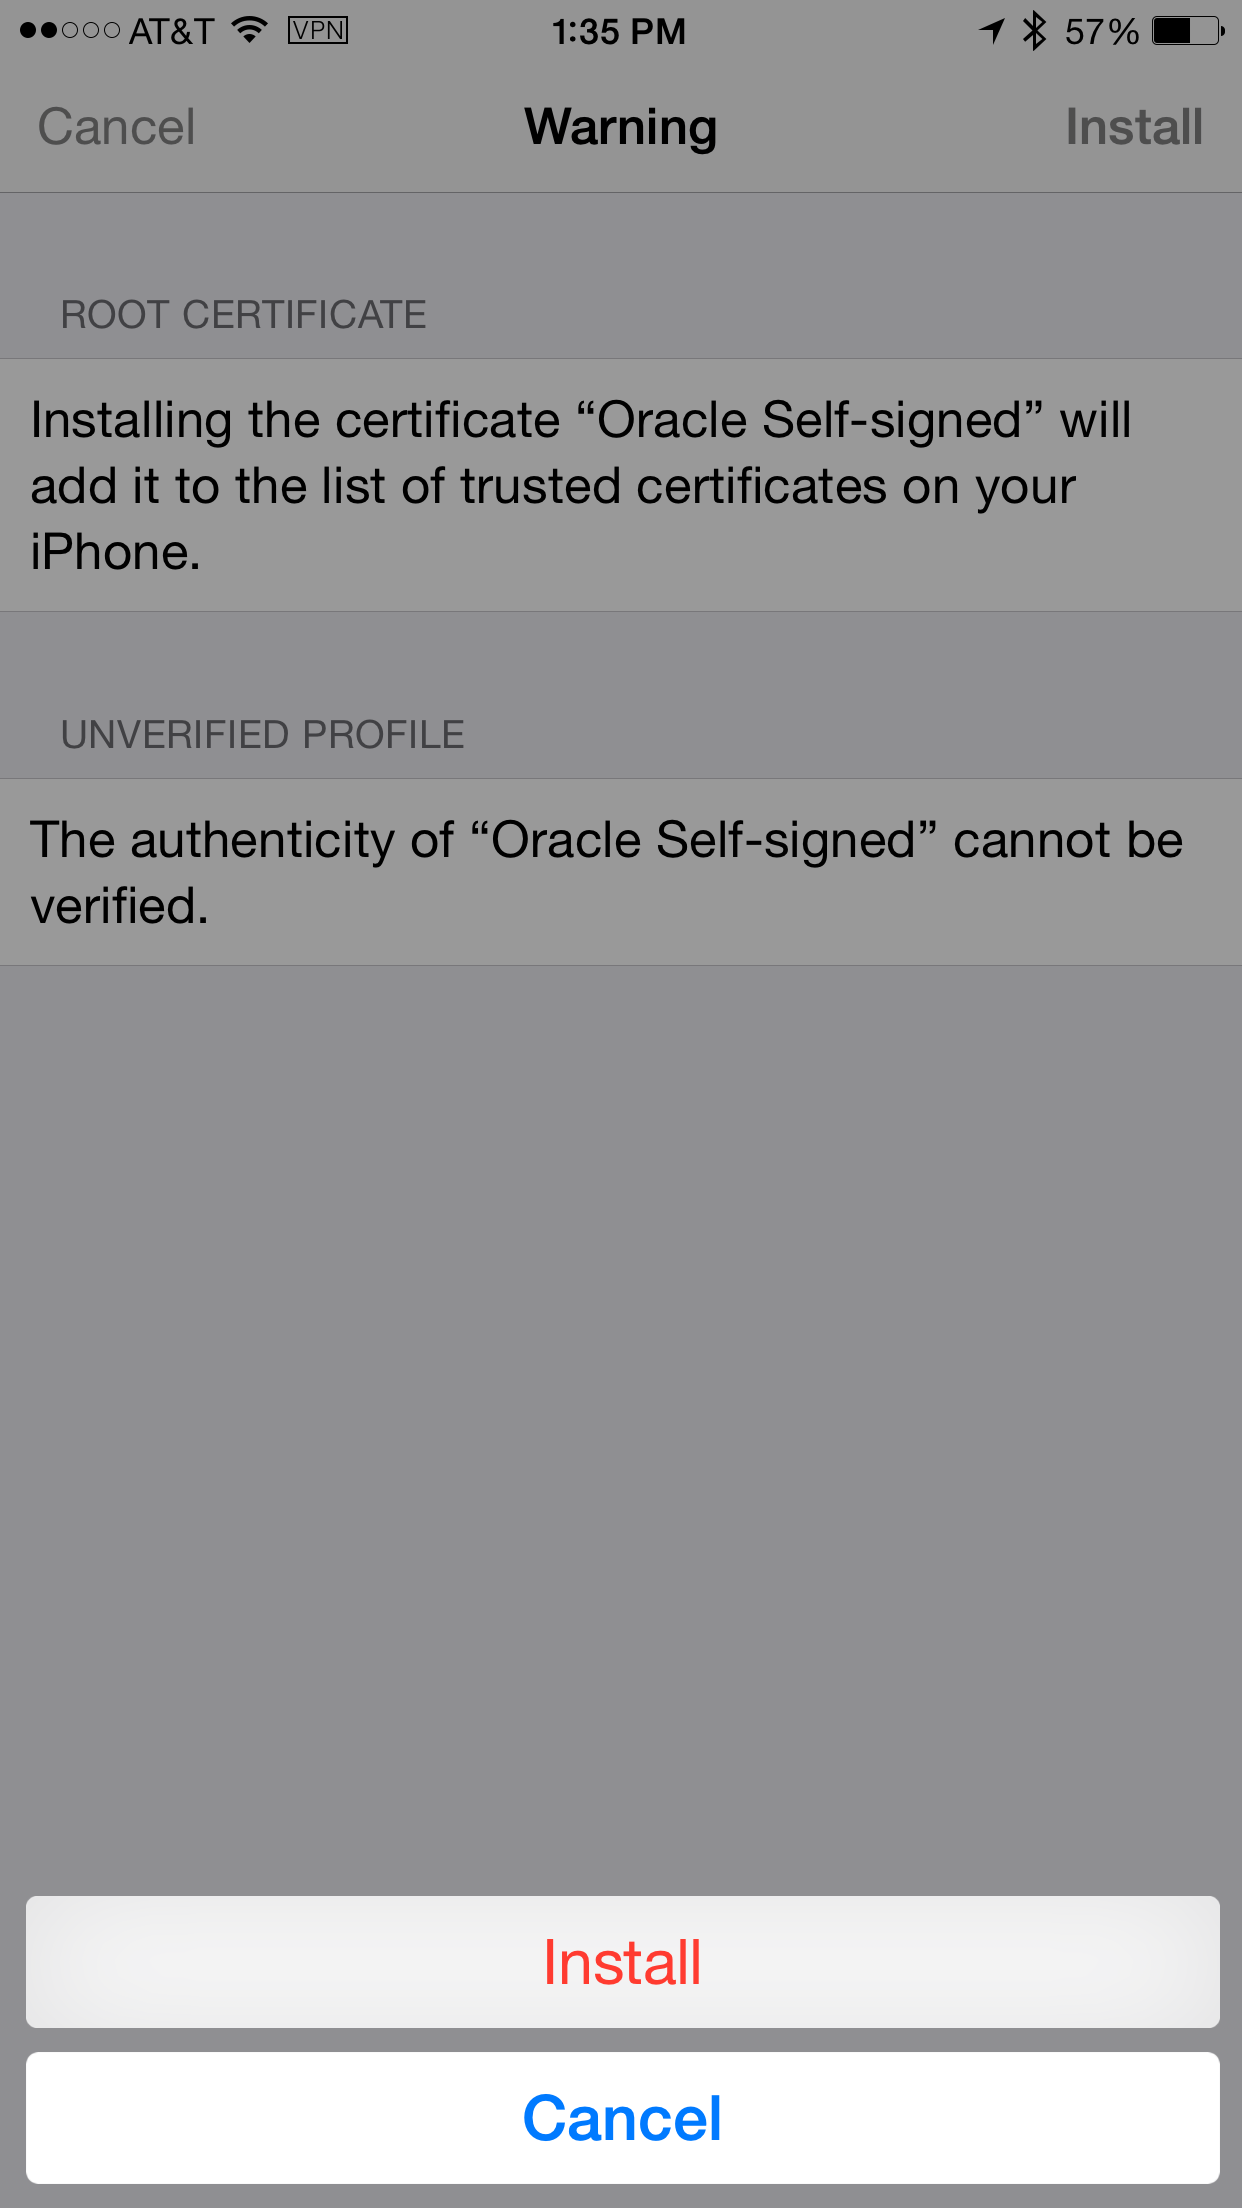
Click on Install
Enter you iOS device passcode
On the Warning page, click on Install.
Click Install
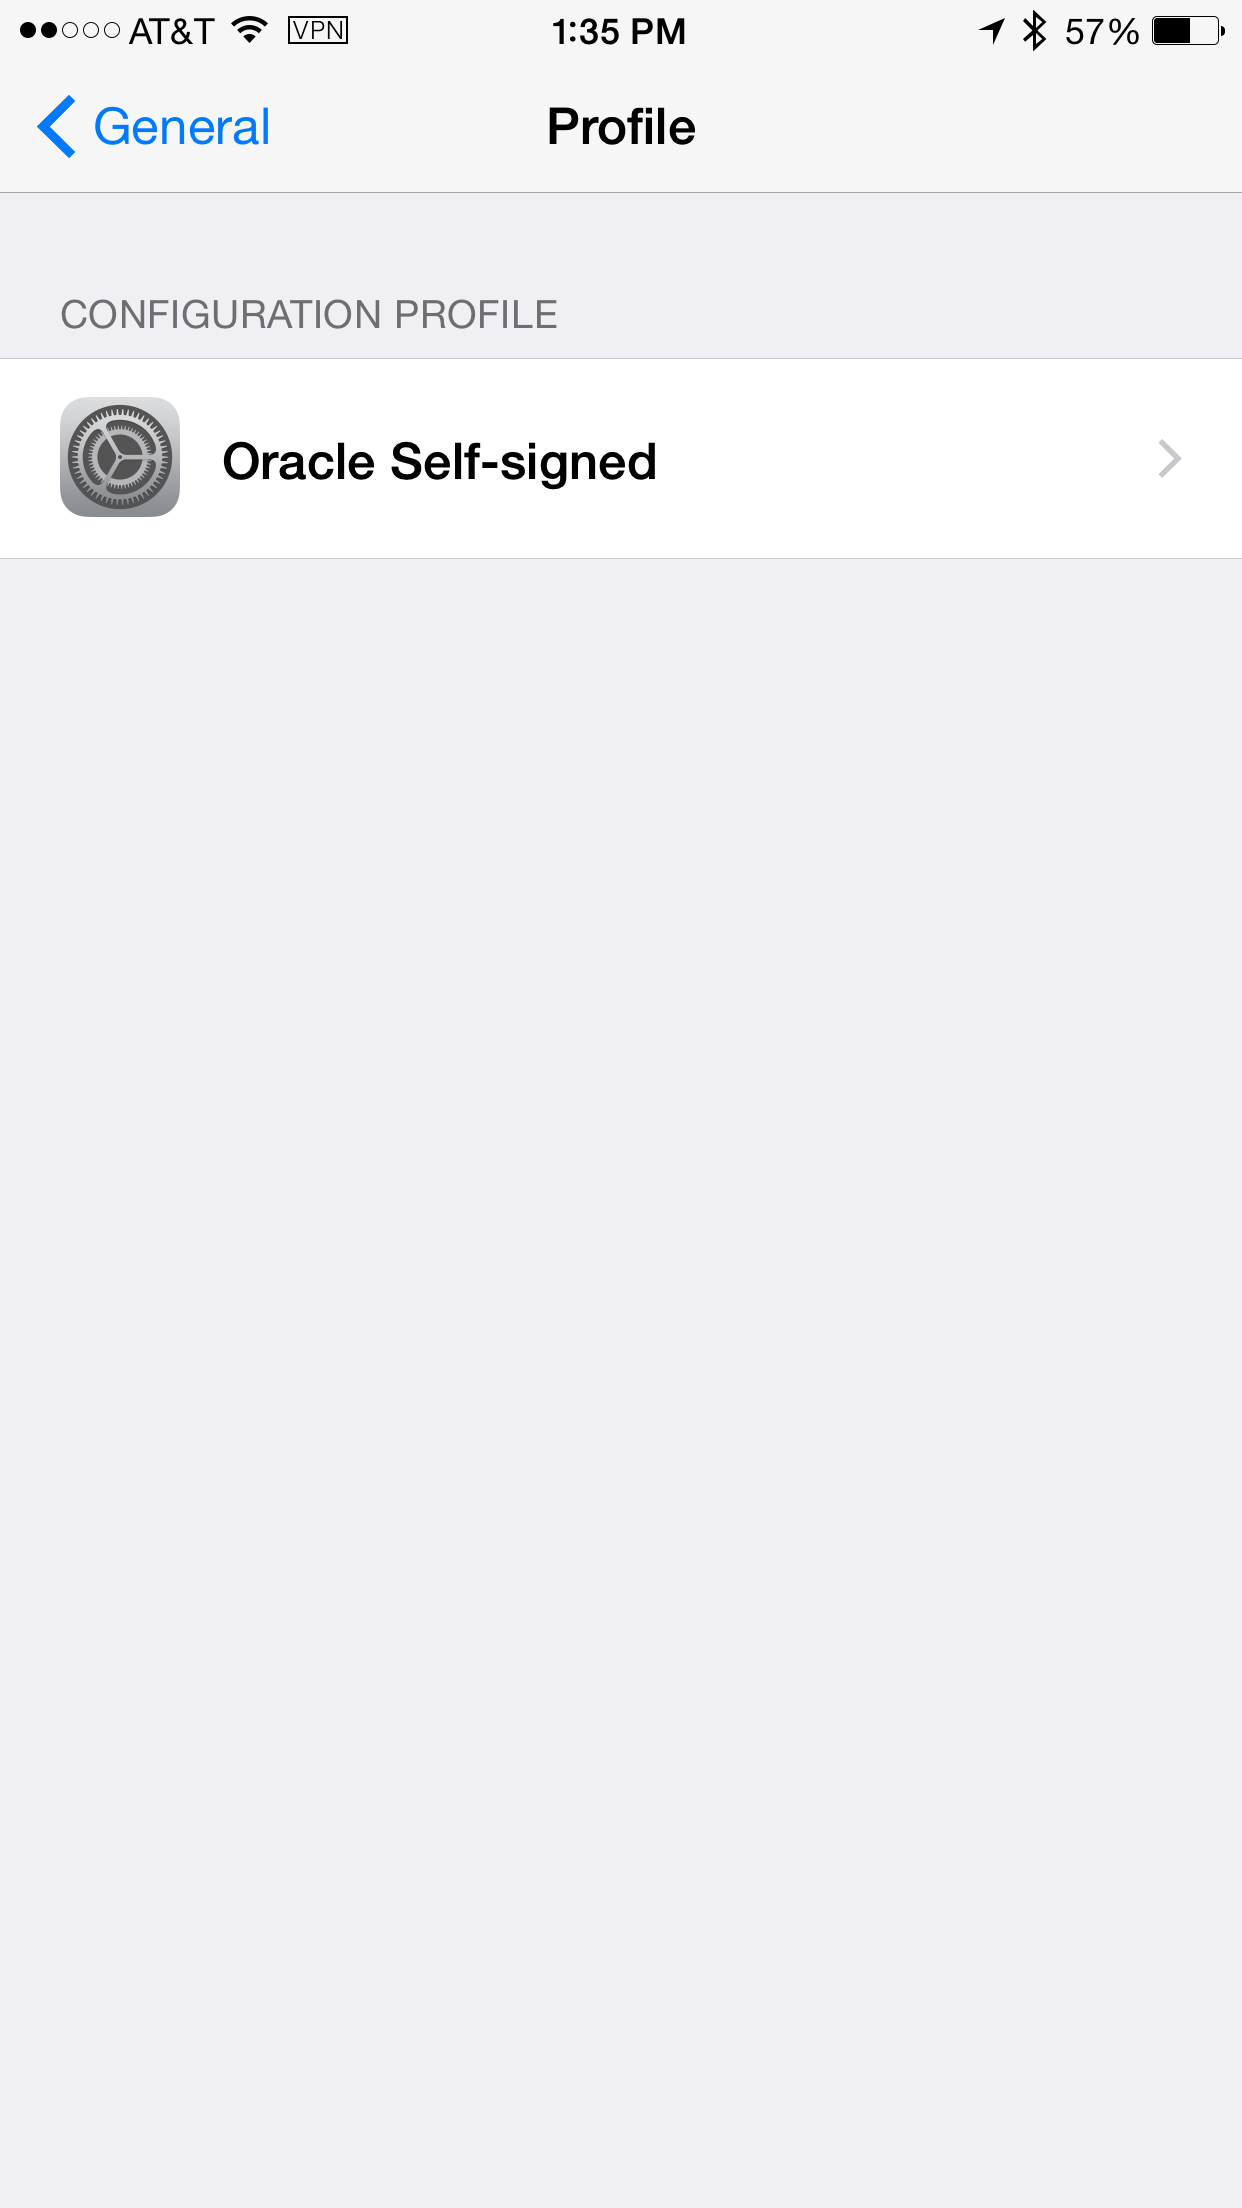
Once the install is complete , it should show
you Profile installed page. Makes sure Verified
is checked. Click Done.
You can see all the profiles on iOS device by
navigating to settings > general >
Profile.
Now tap on the iOS MDM Registration link on the
device registration invitation email.
The iOS MDM Registration link should open up in
safari as
https://<msas_hostname>:9002/msm/register/ios/login.html.
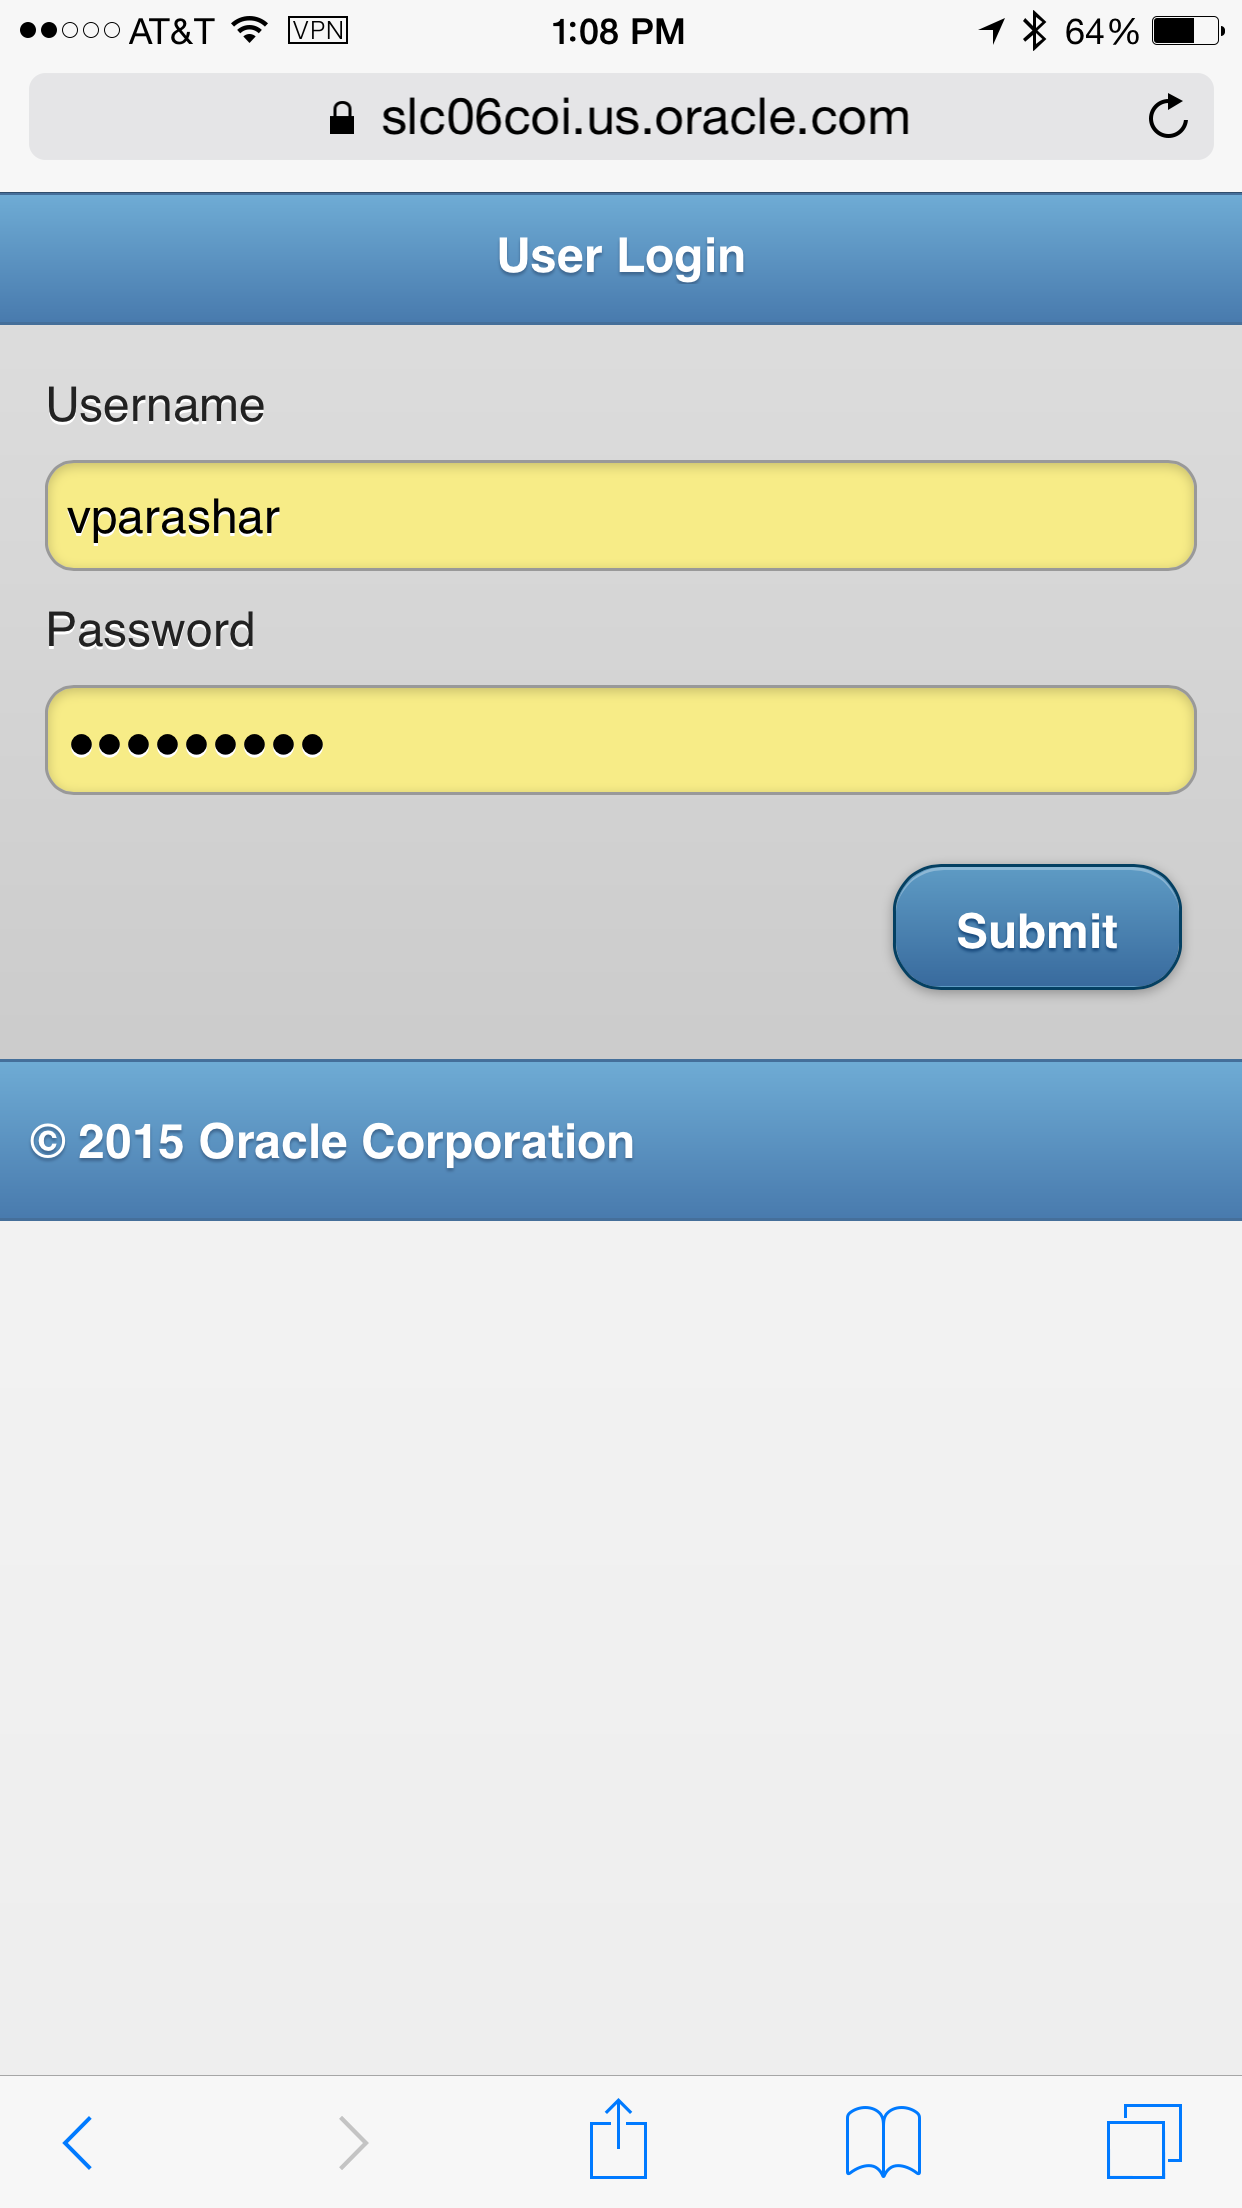
Login as vparashar/Oracle123 (user of finance
group).
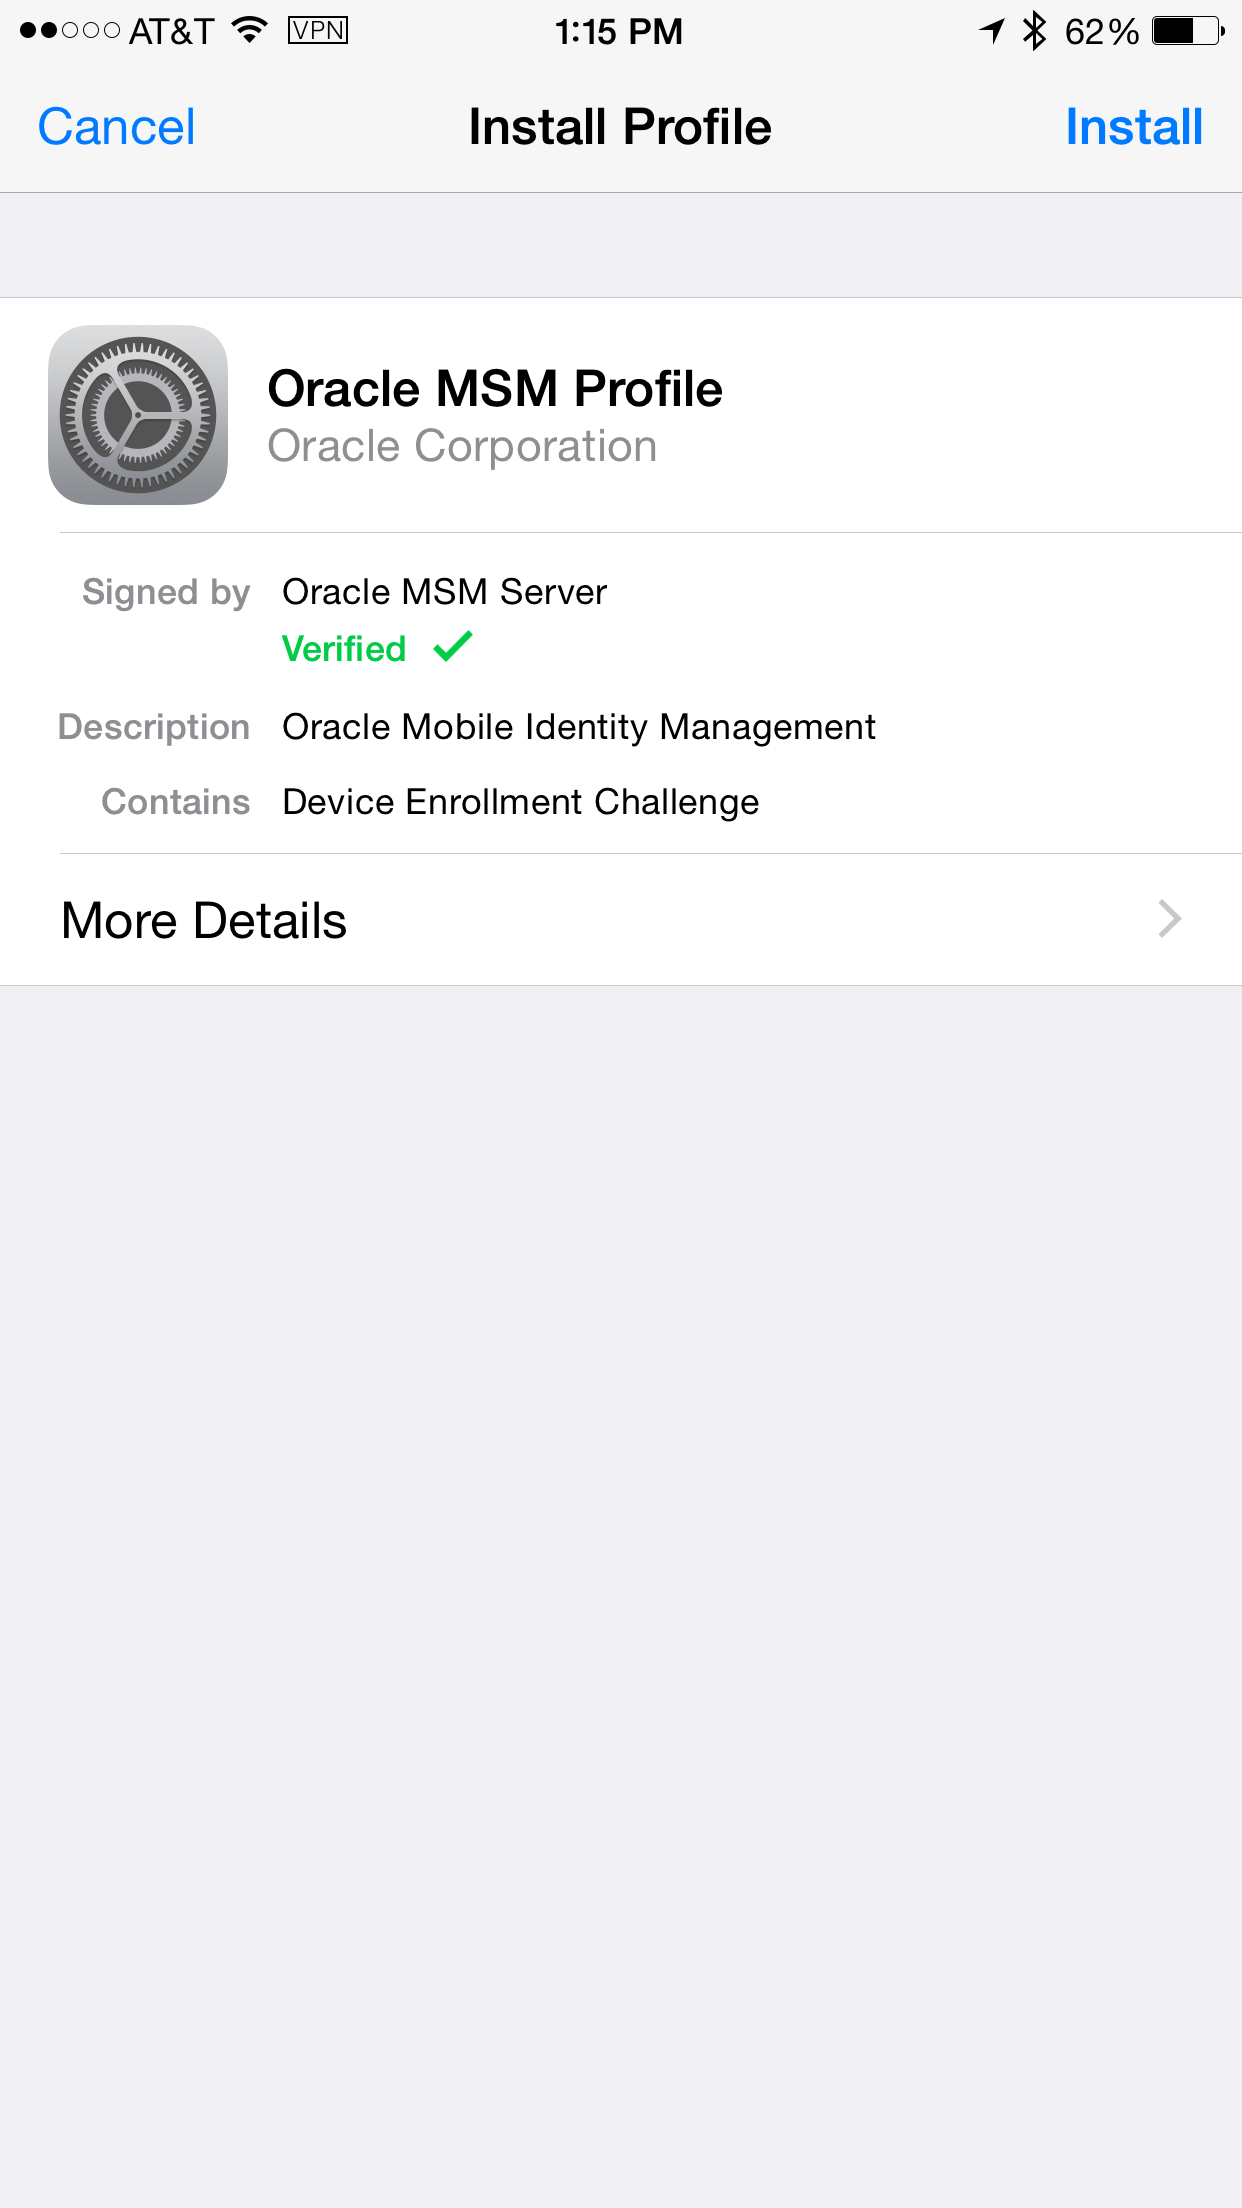
It should open up a screen to install Oracle
MSM Profile. Click Install.
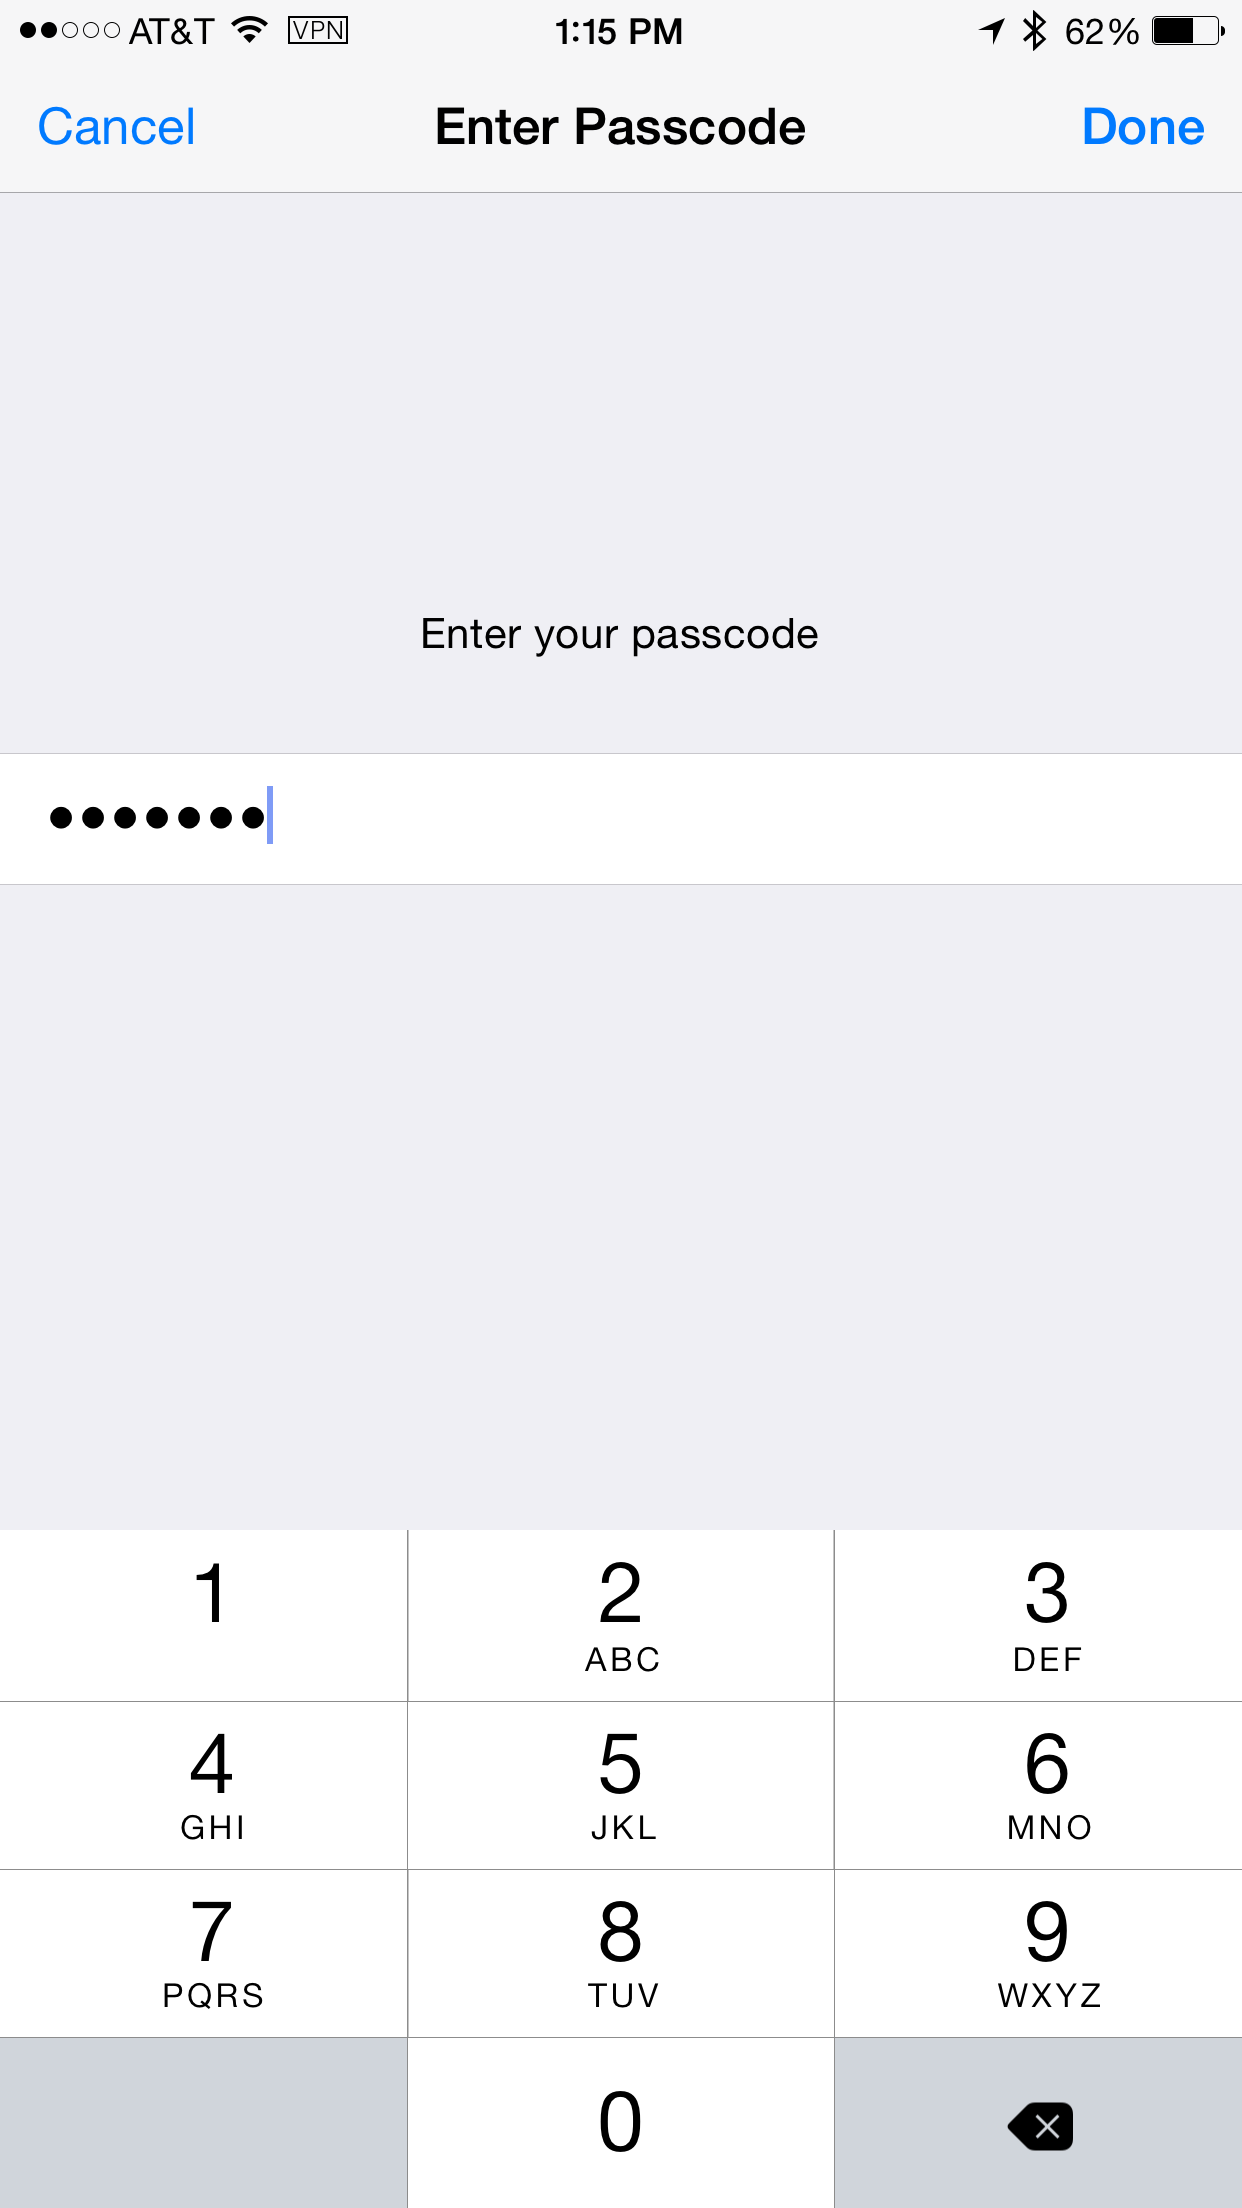
It should prompt you to enter the iOS
device password.
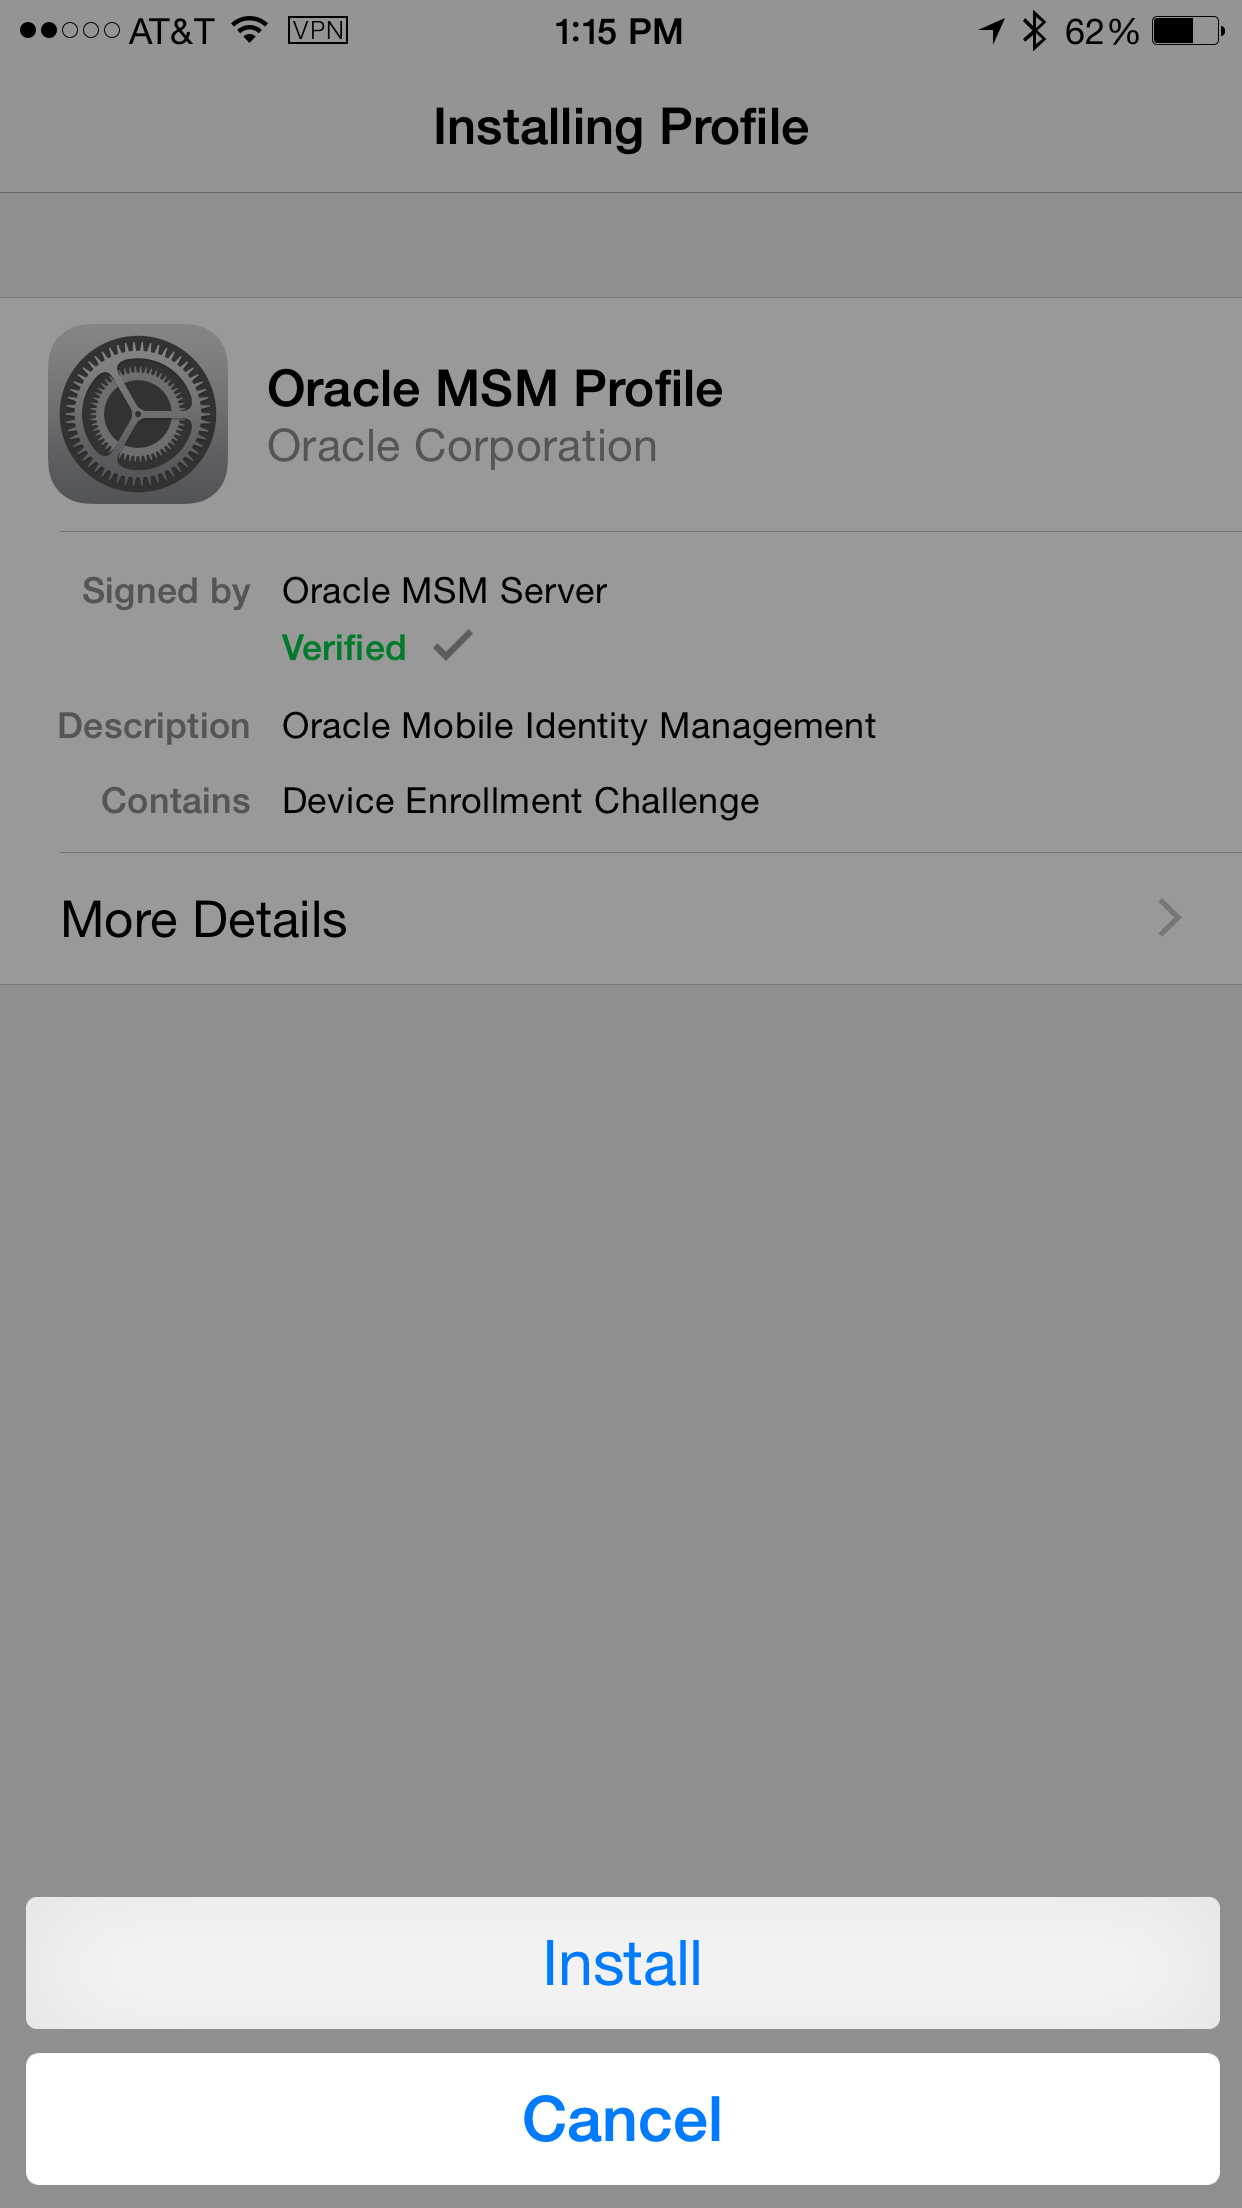
Click Install.
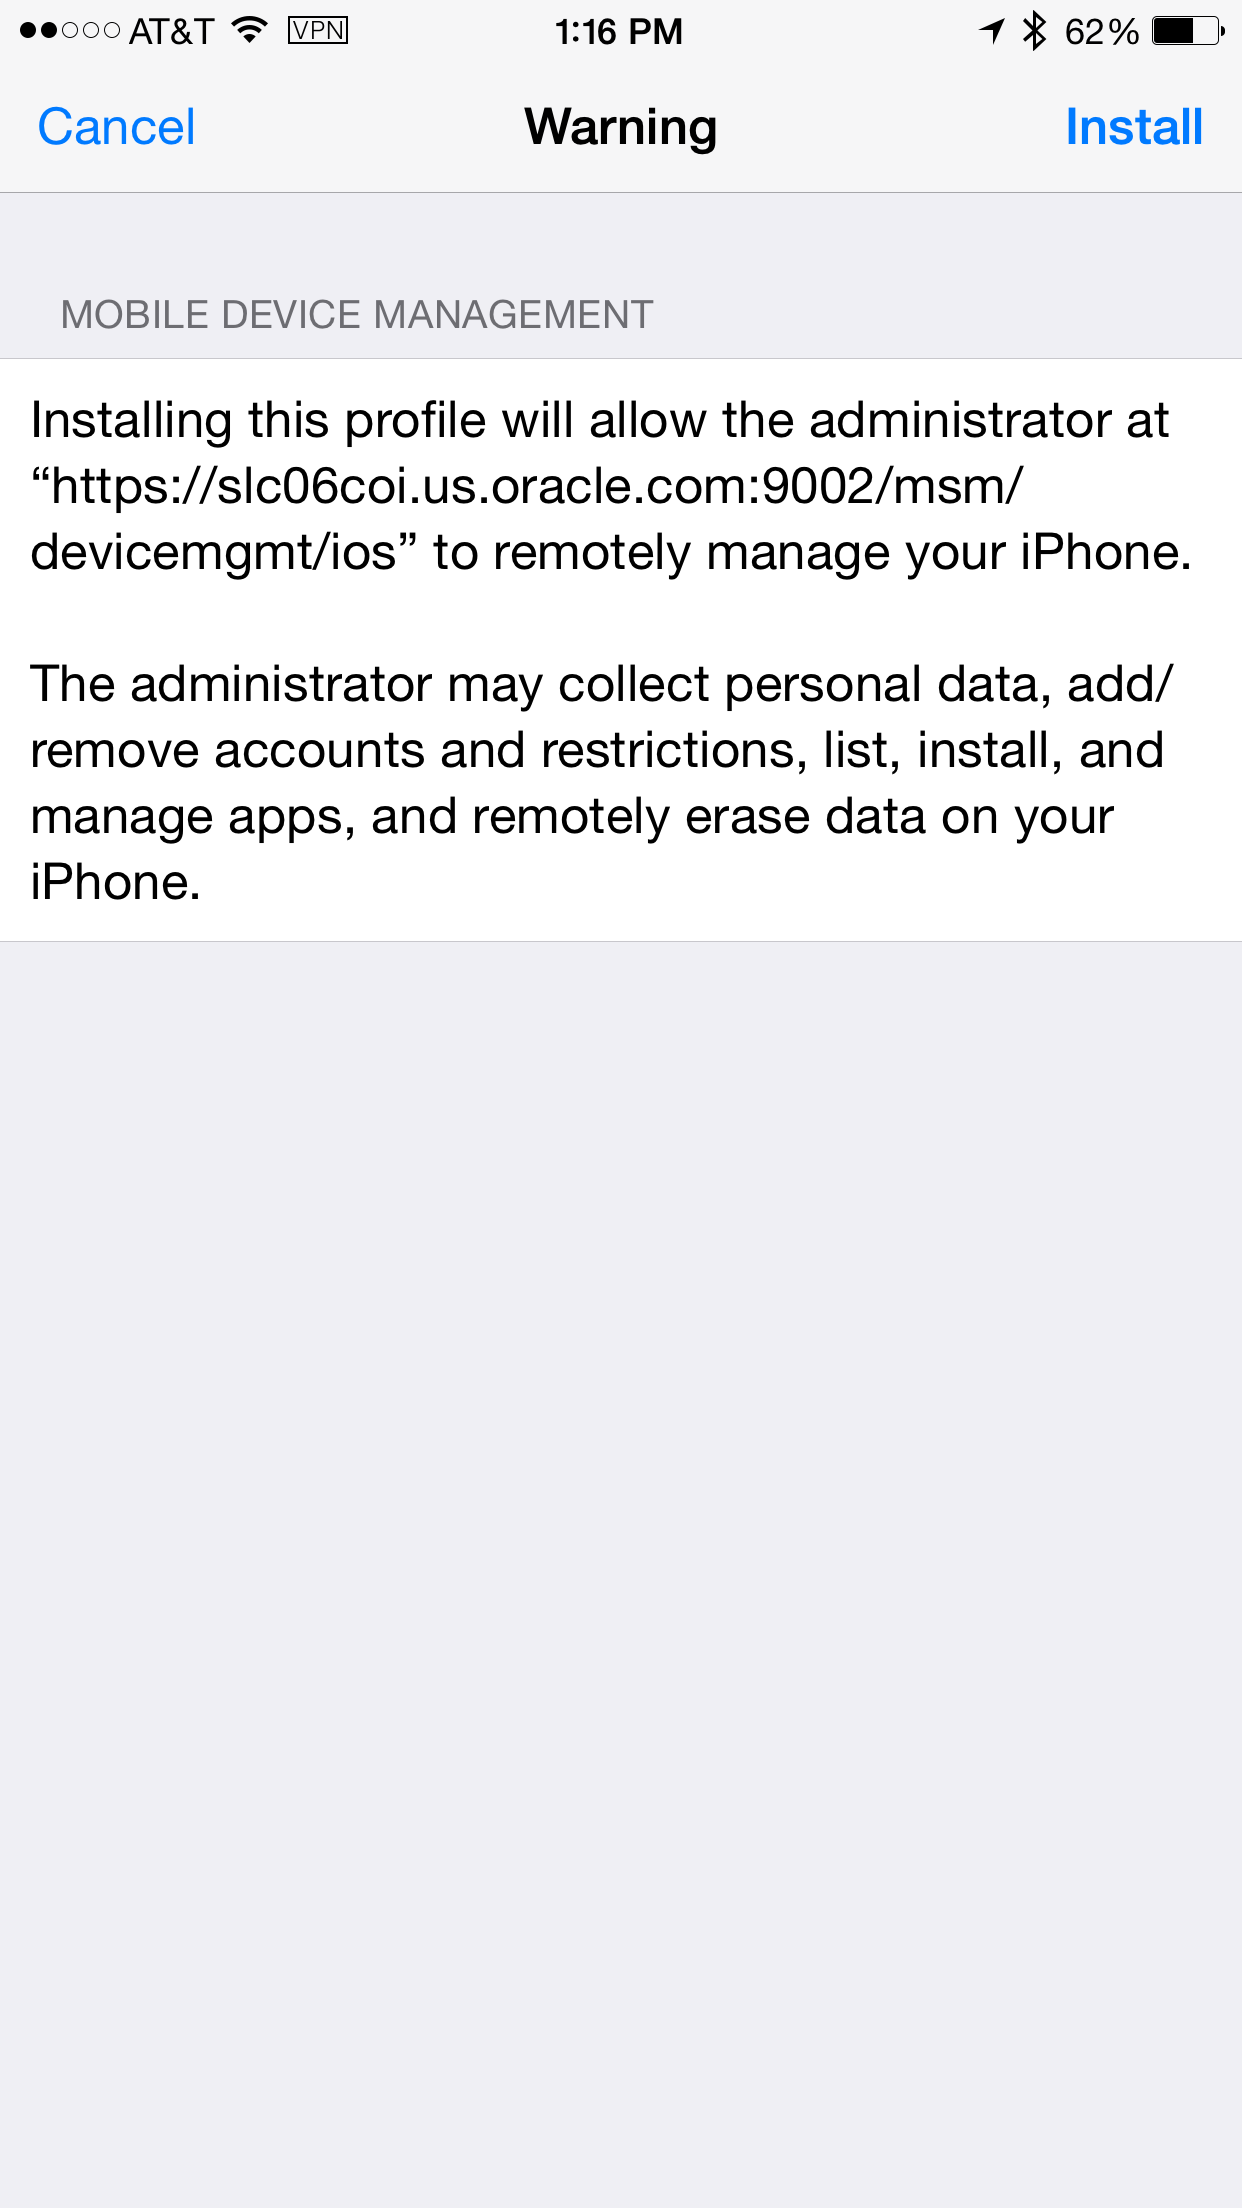
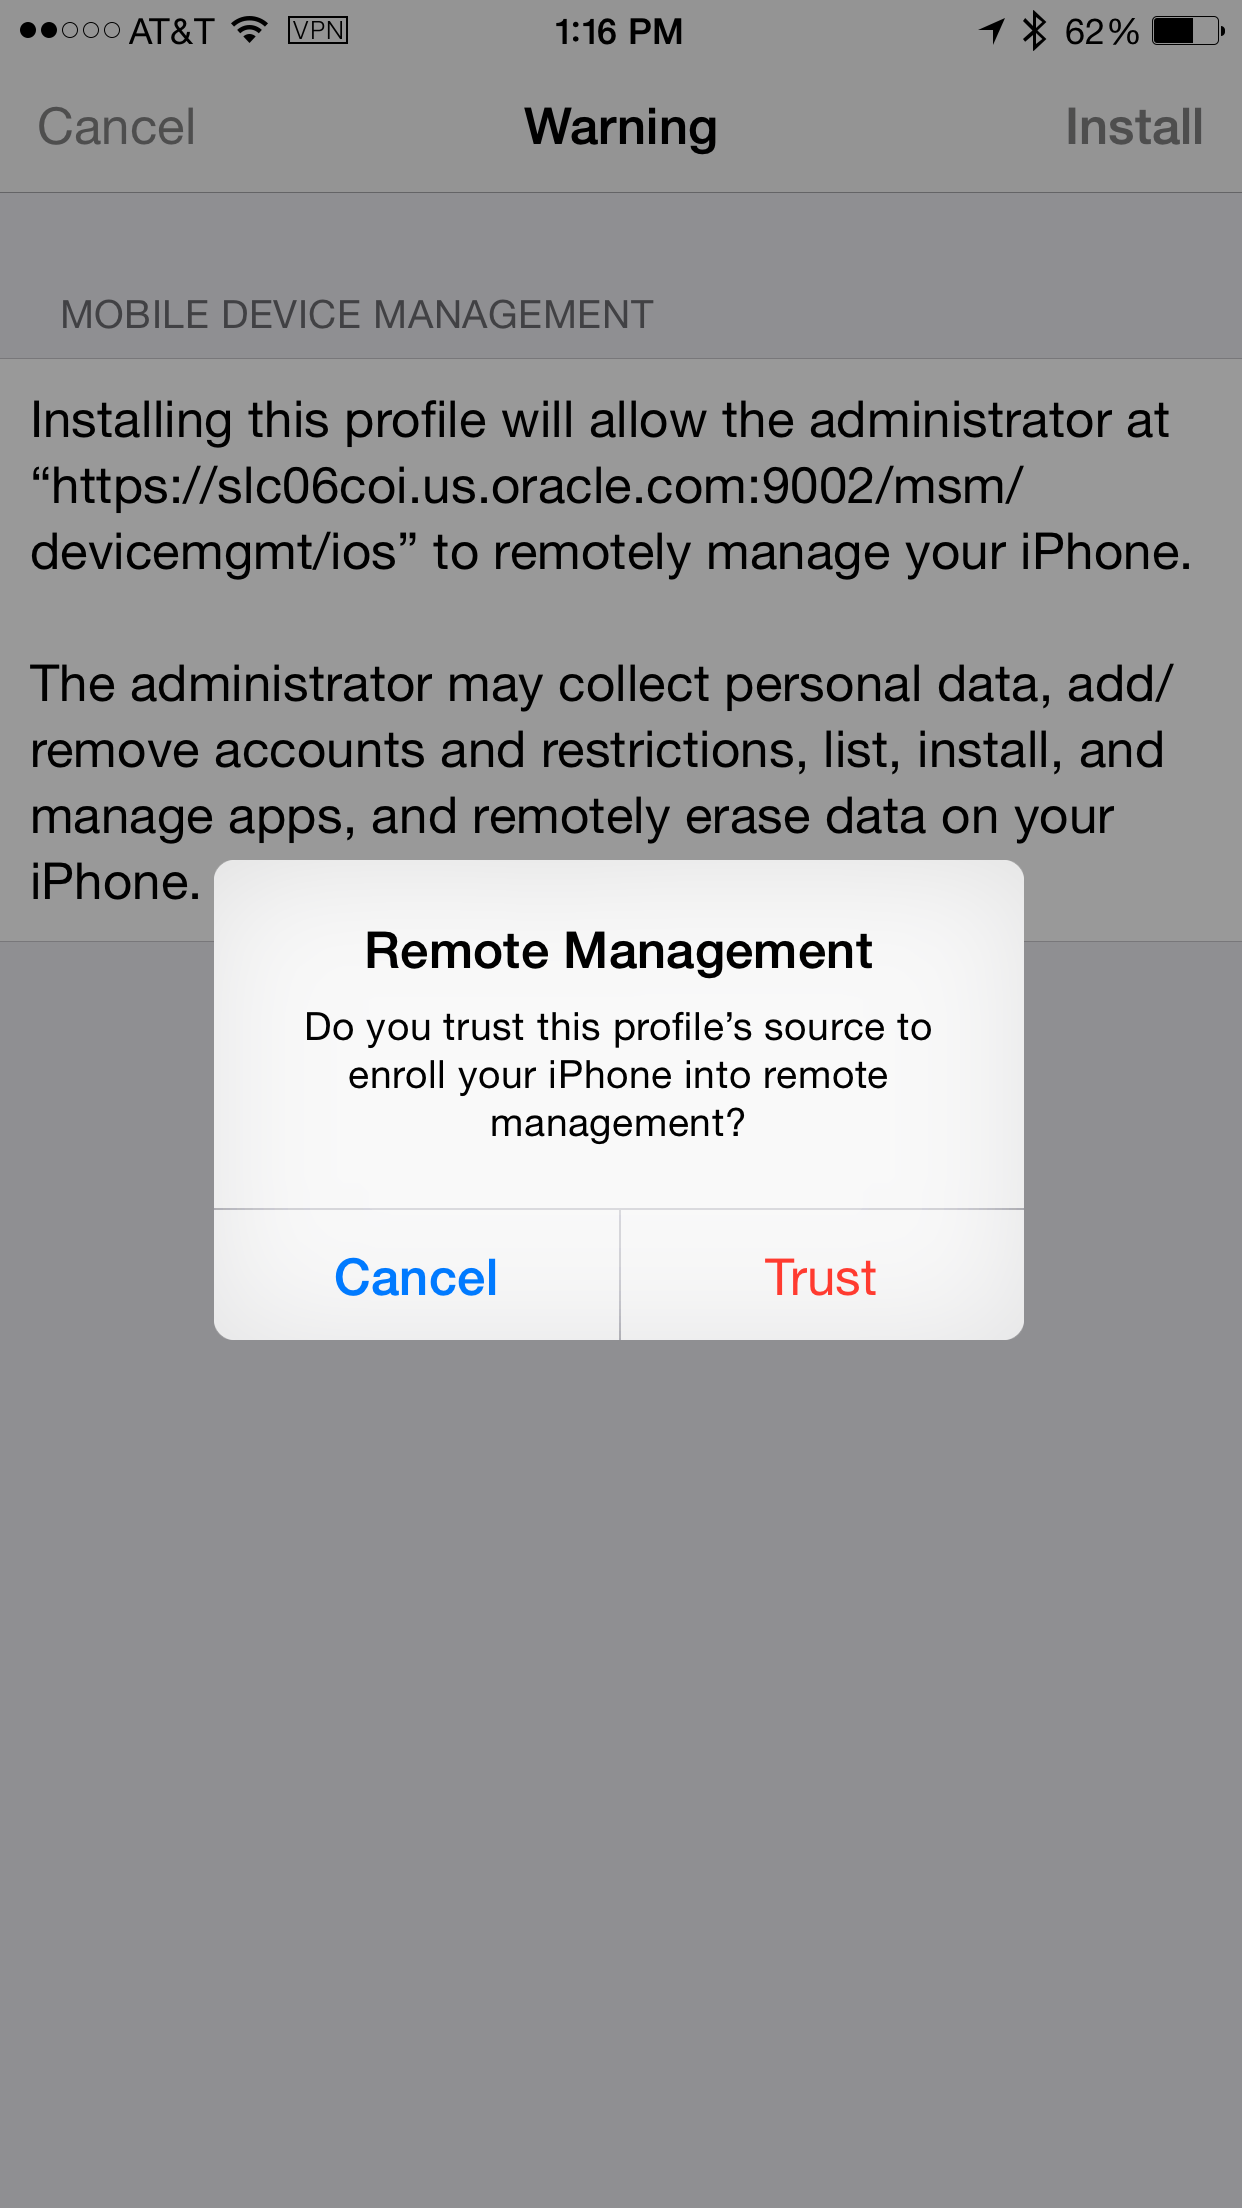
On the Warning screen, click Install.
On the Remote Management pop up window, read
the message and click Trust
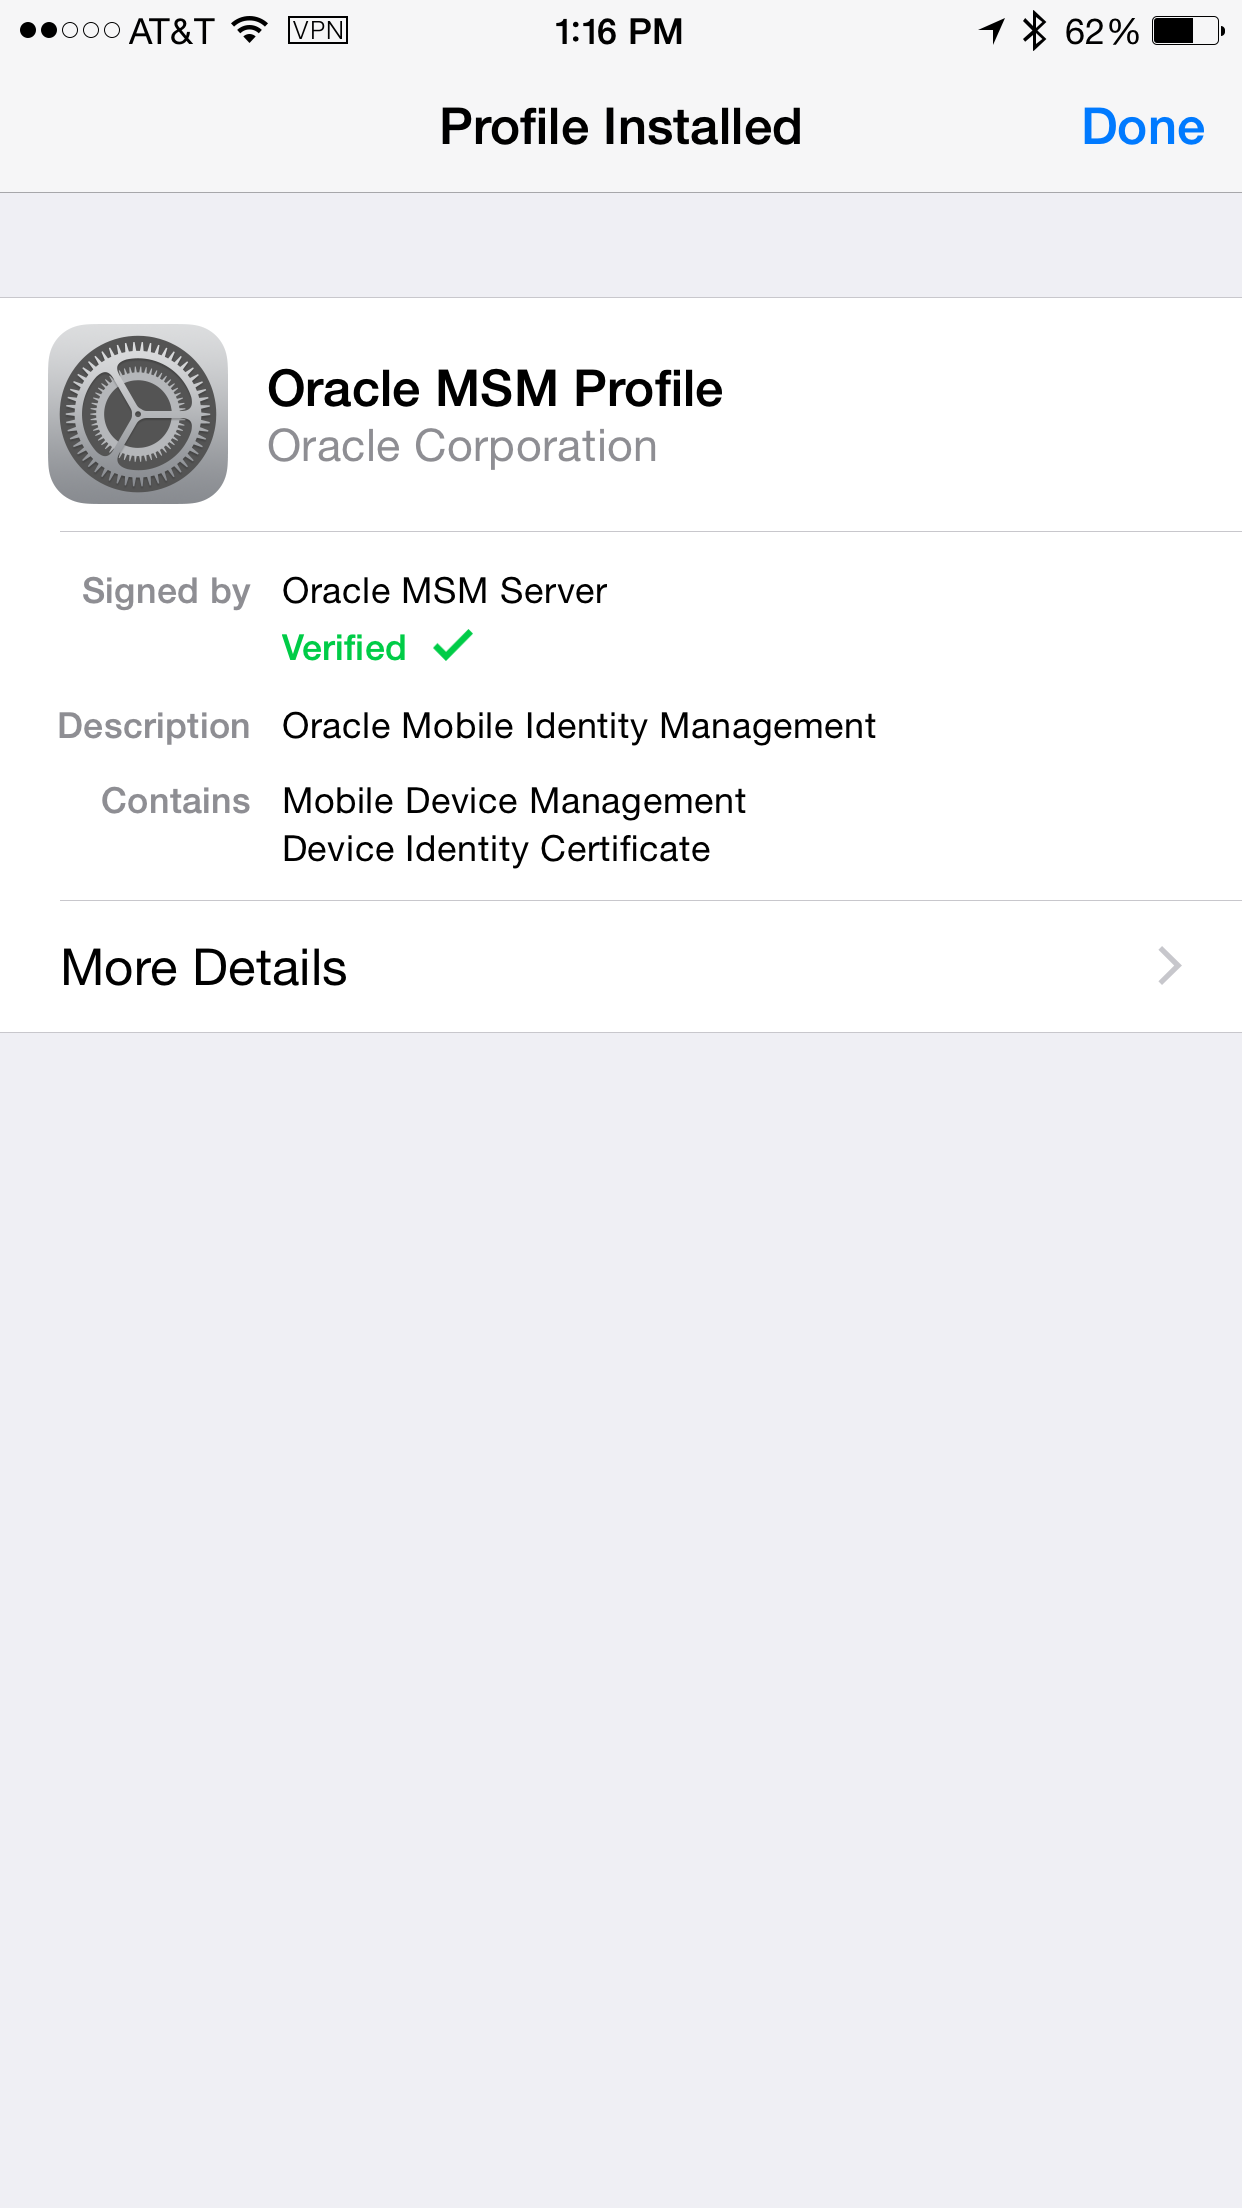
Click Done on the Profile Installed screen.
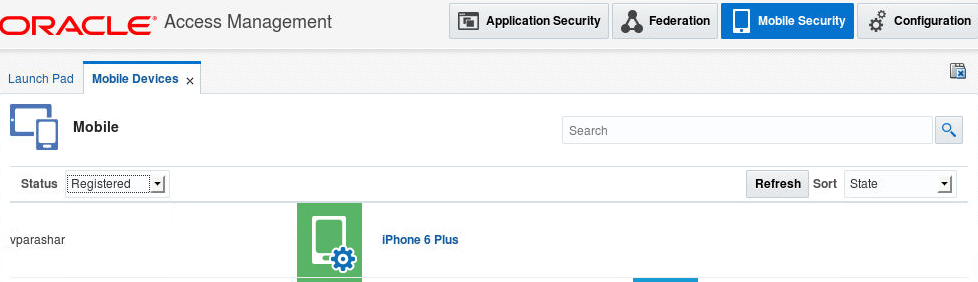
Login to access console. Click on Mobile
Security tab and navigate to Mobile
Security Manager > Mobile Devices.
You should see your iOS device with a status of
registered (from the Status drop down select
registered). Notice the wheel icon on the mobile
device. This is a symbol of managed device (MDM
use-case).
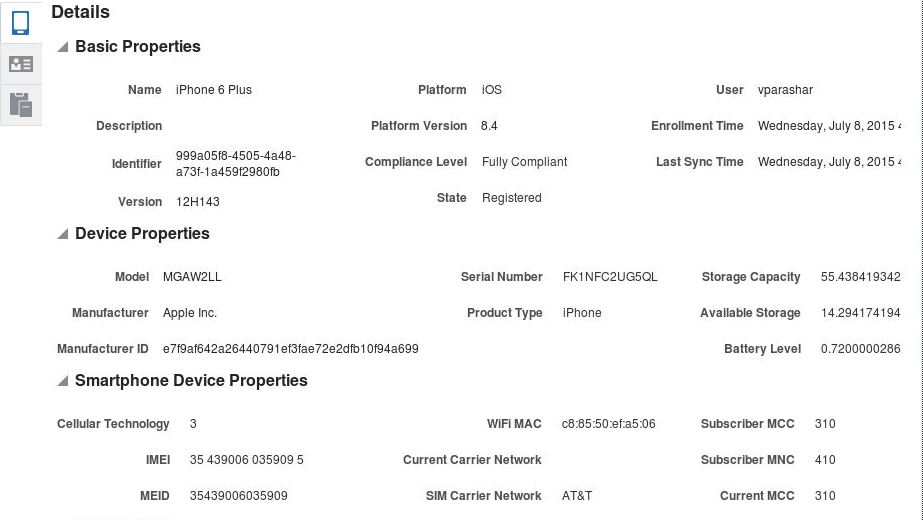
Click on the Device icon to see the details at
the bottom. You can see the operations that can
be performed on the device - such as lock, wipe,
de-register, clear passcode or sync (which would
send out the sync command on the device to
enforce the policy associated with the device
immediately).
Below this device operations you will notice
the Device details/properties, credentials and
policies.
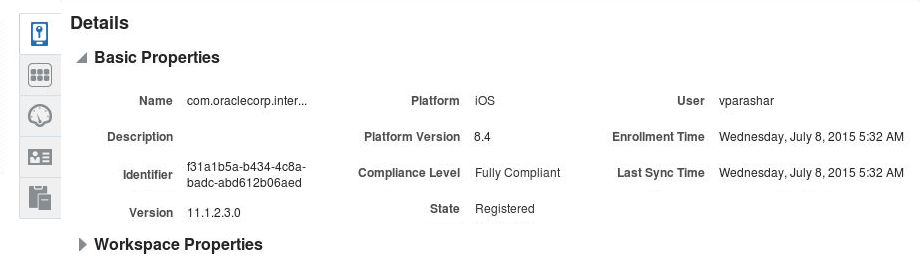
Click on the details icon and review the basic,
device and smartphone device sections to view
all the properties for the device.
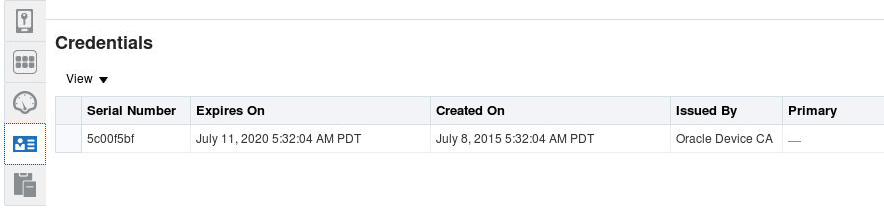
Click on Credentials icon to see the details of
Oracle self signed cert issues by the Oracle
Device CA.
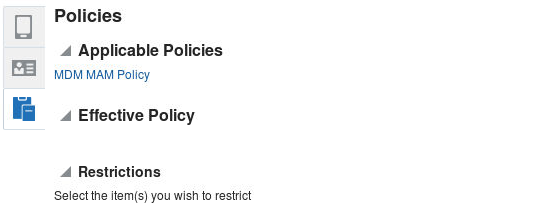
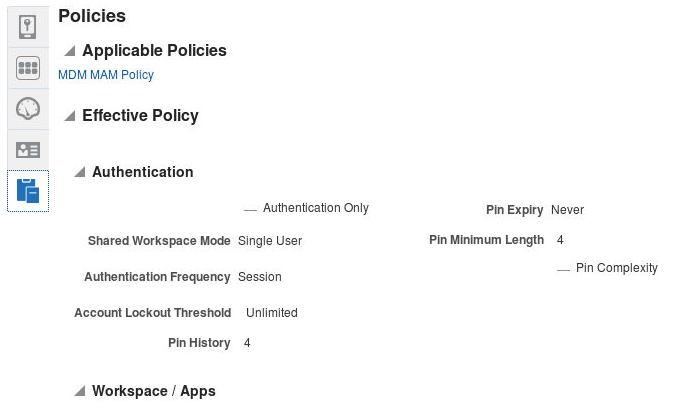
Click on the Policies icon to see the
applicable and effective policy.If there are
multiple policies associated with the device, it
will show under Applicable polices. In that
case, effective policy will show the net result
of the policy settings from multiple policies.
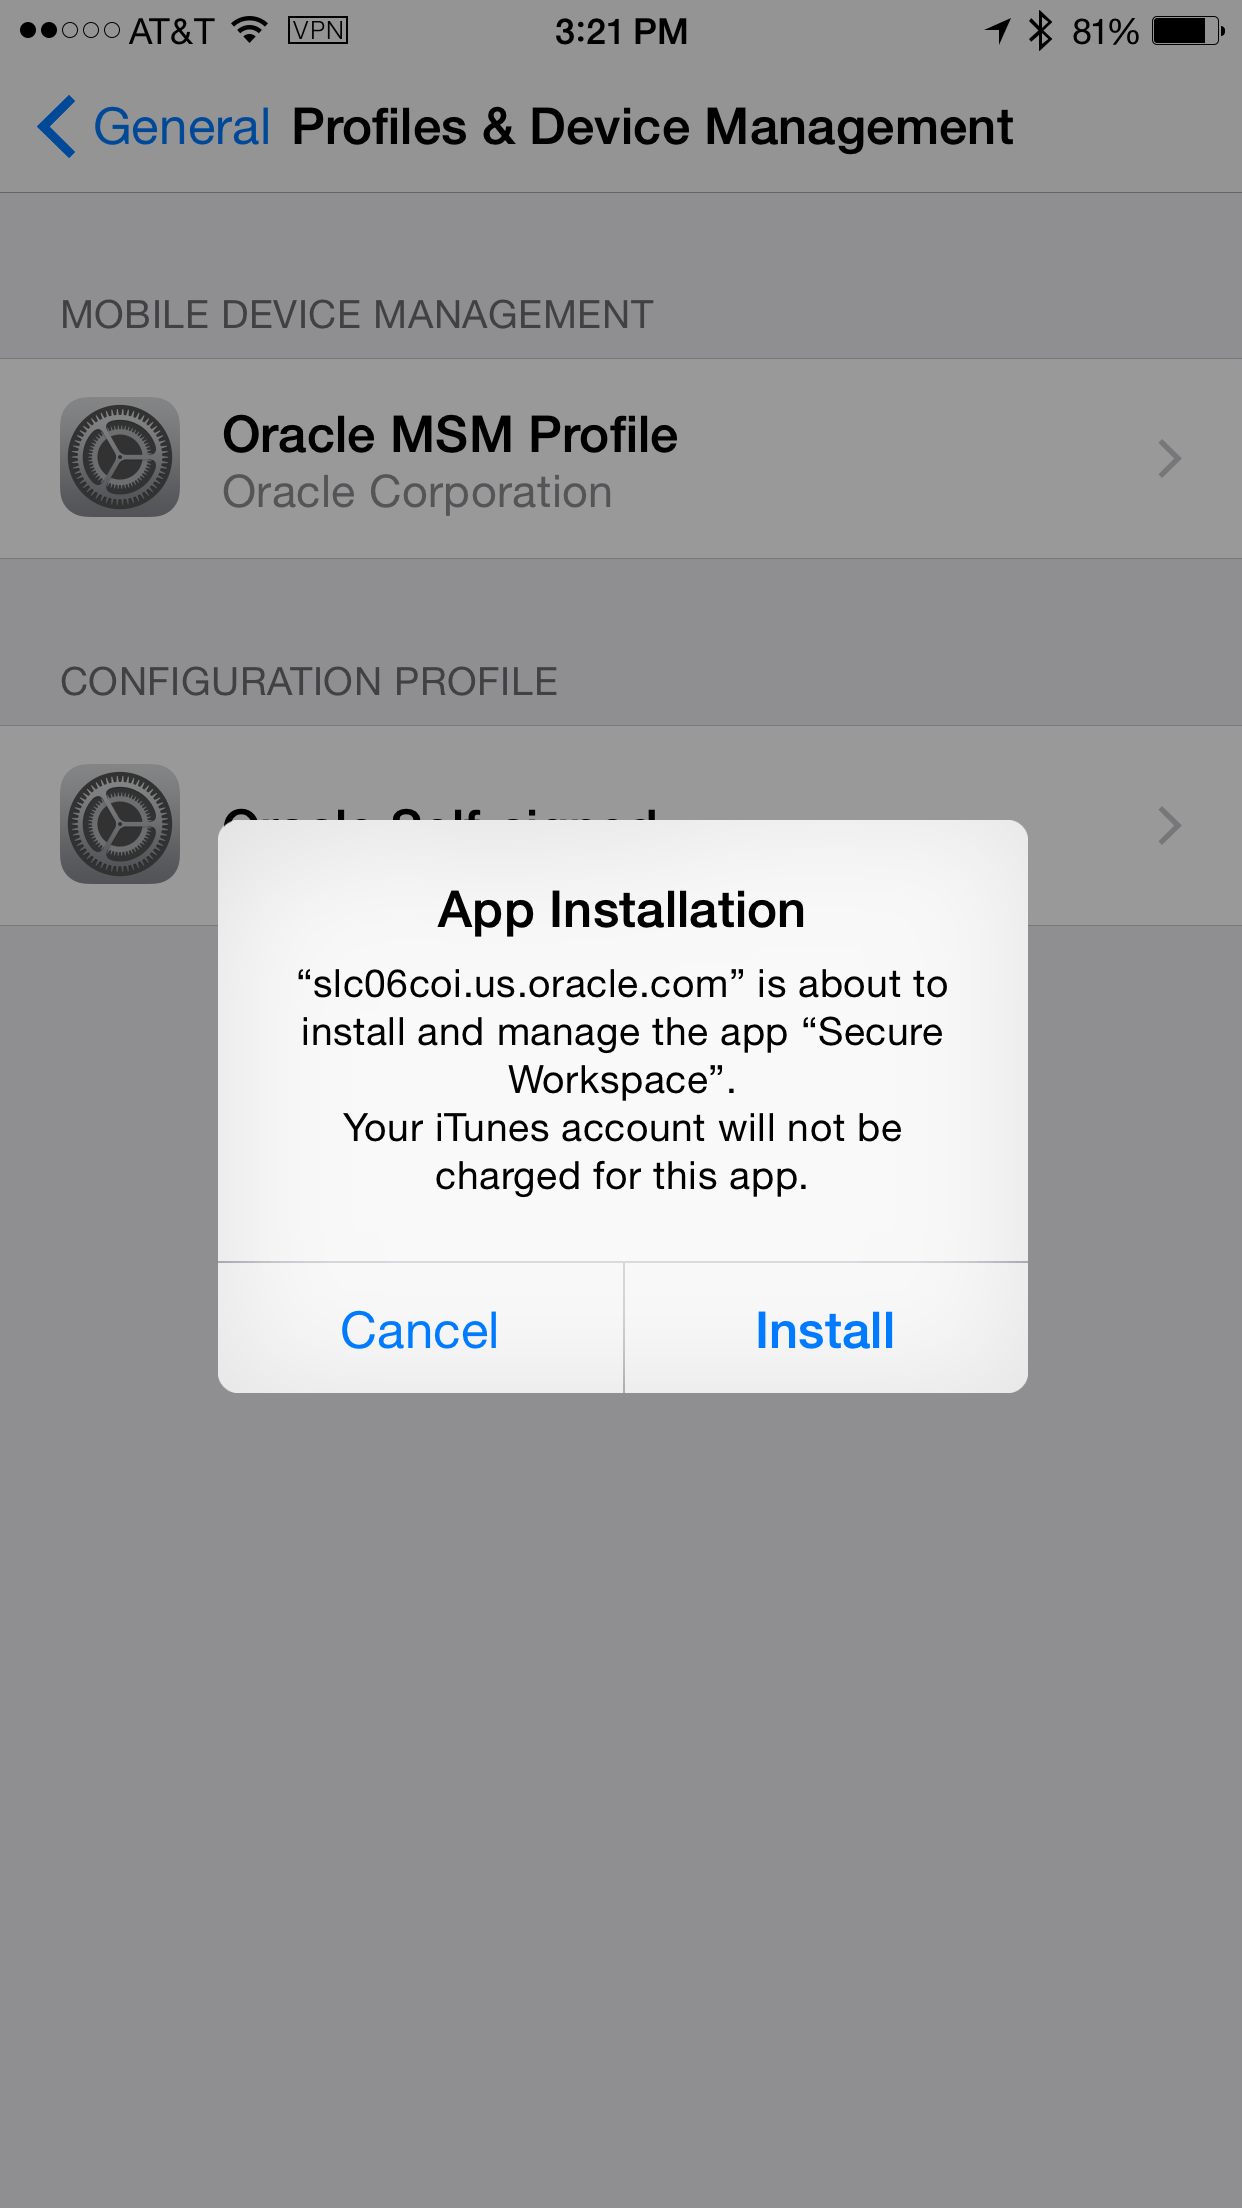
Navigate back to the mobile device. With MDM
the secure workspace is automatically pushed out
on the mobile device. On the App Installation
screen, read the message, and click Install.
Validate that the secure workspace installation
has started on the iOS device
While secure workspace is being installed on
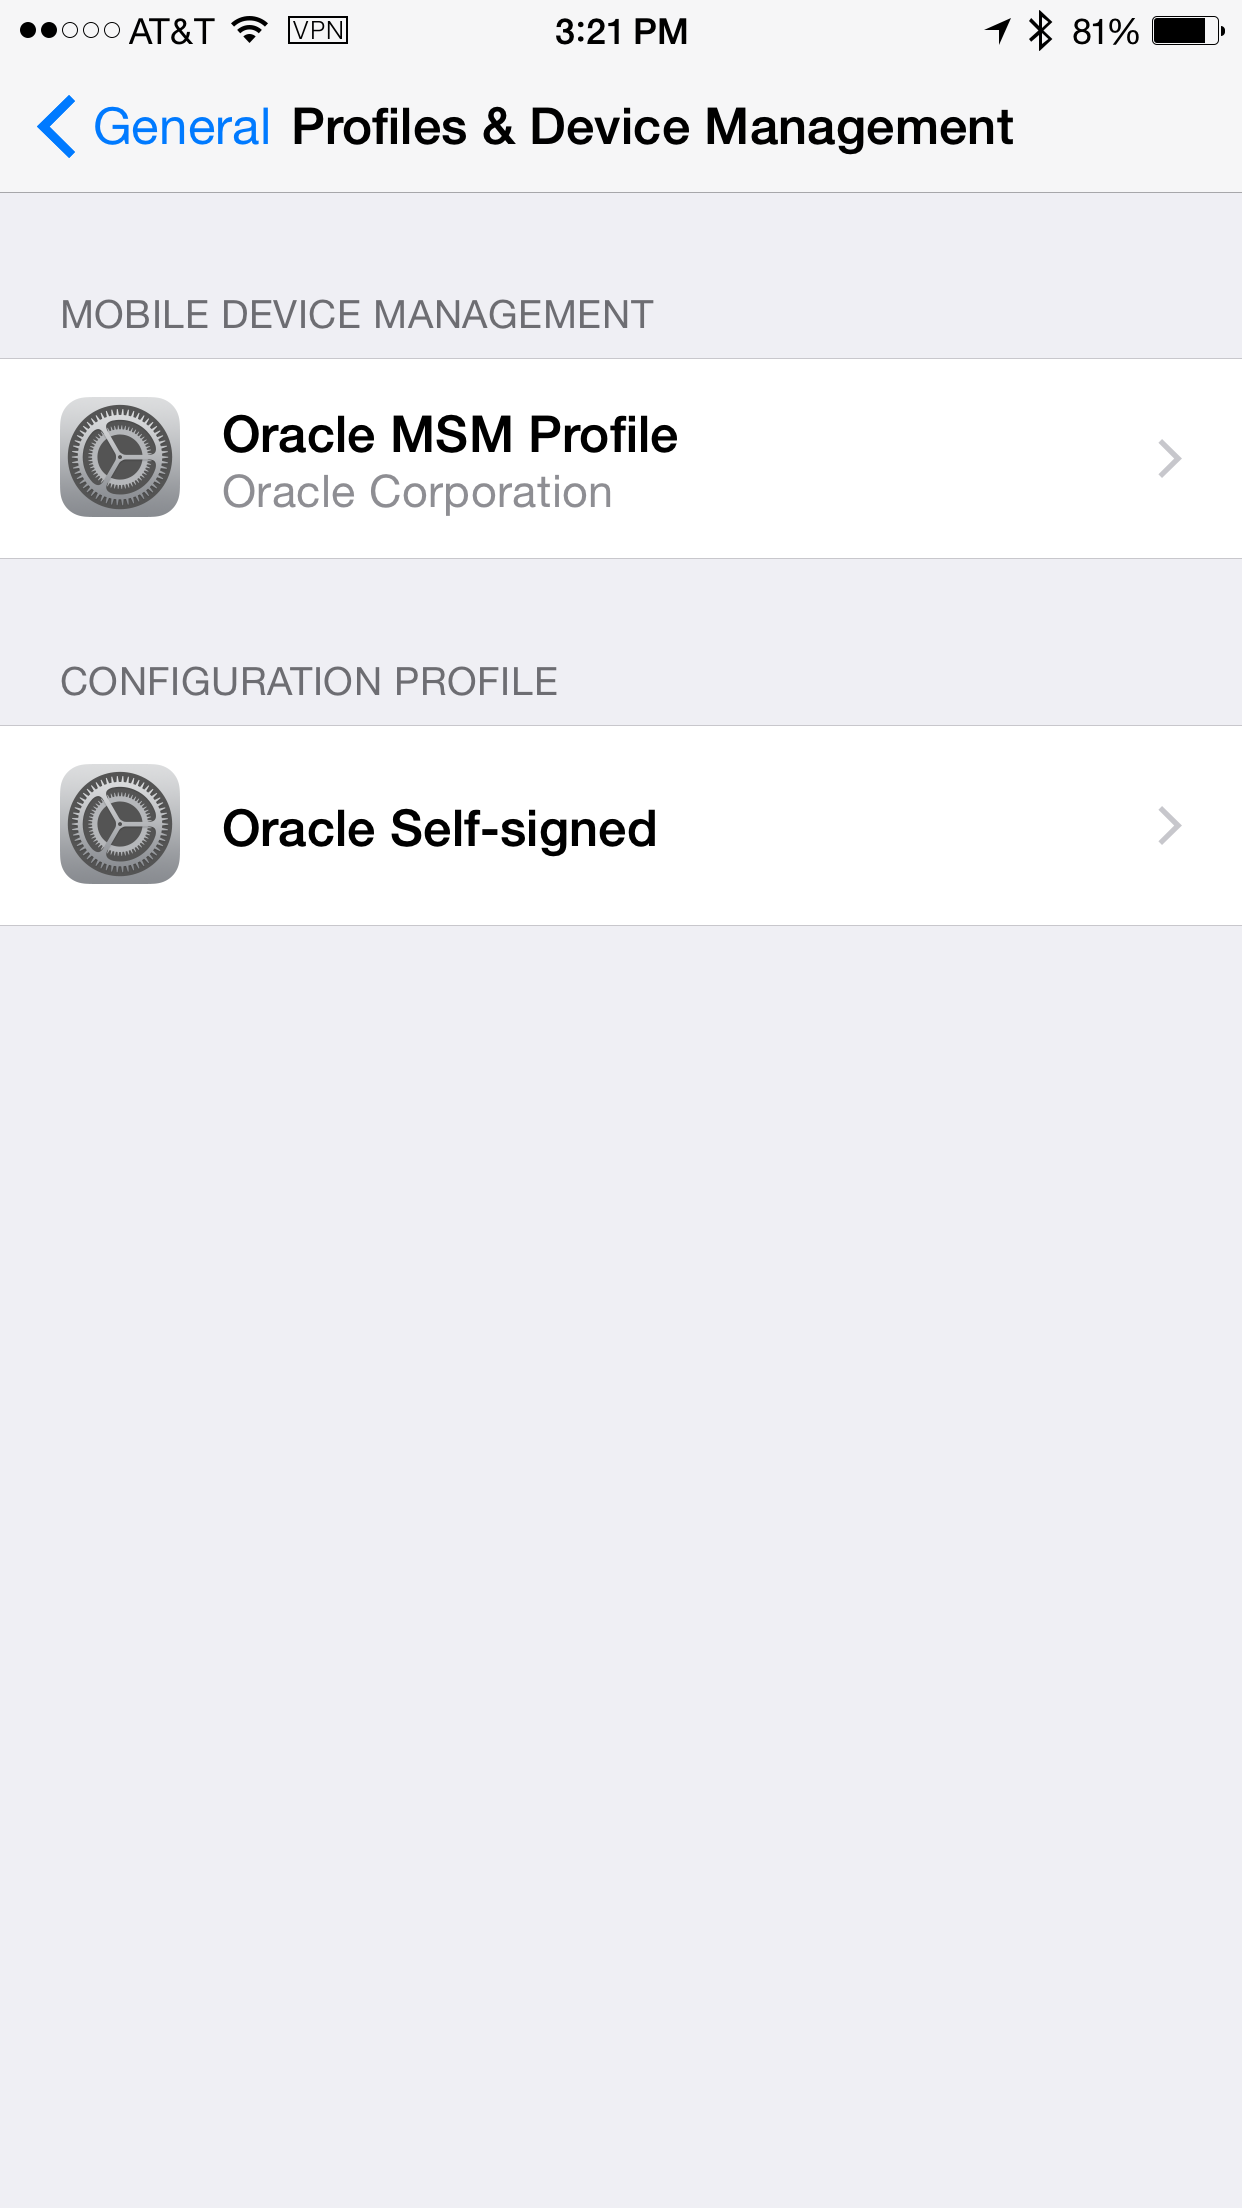
your iOS device, navigate to settings >
general > Profile & Device Management
Notice the MDM Profile along with the MSAS Self
signed cert.
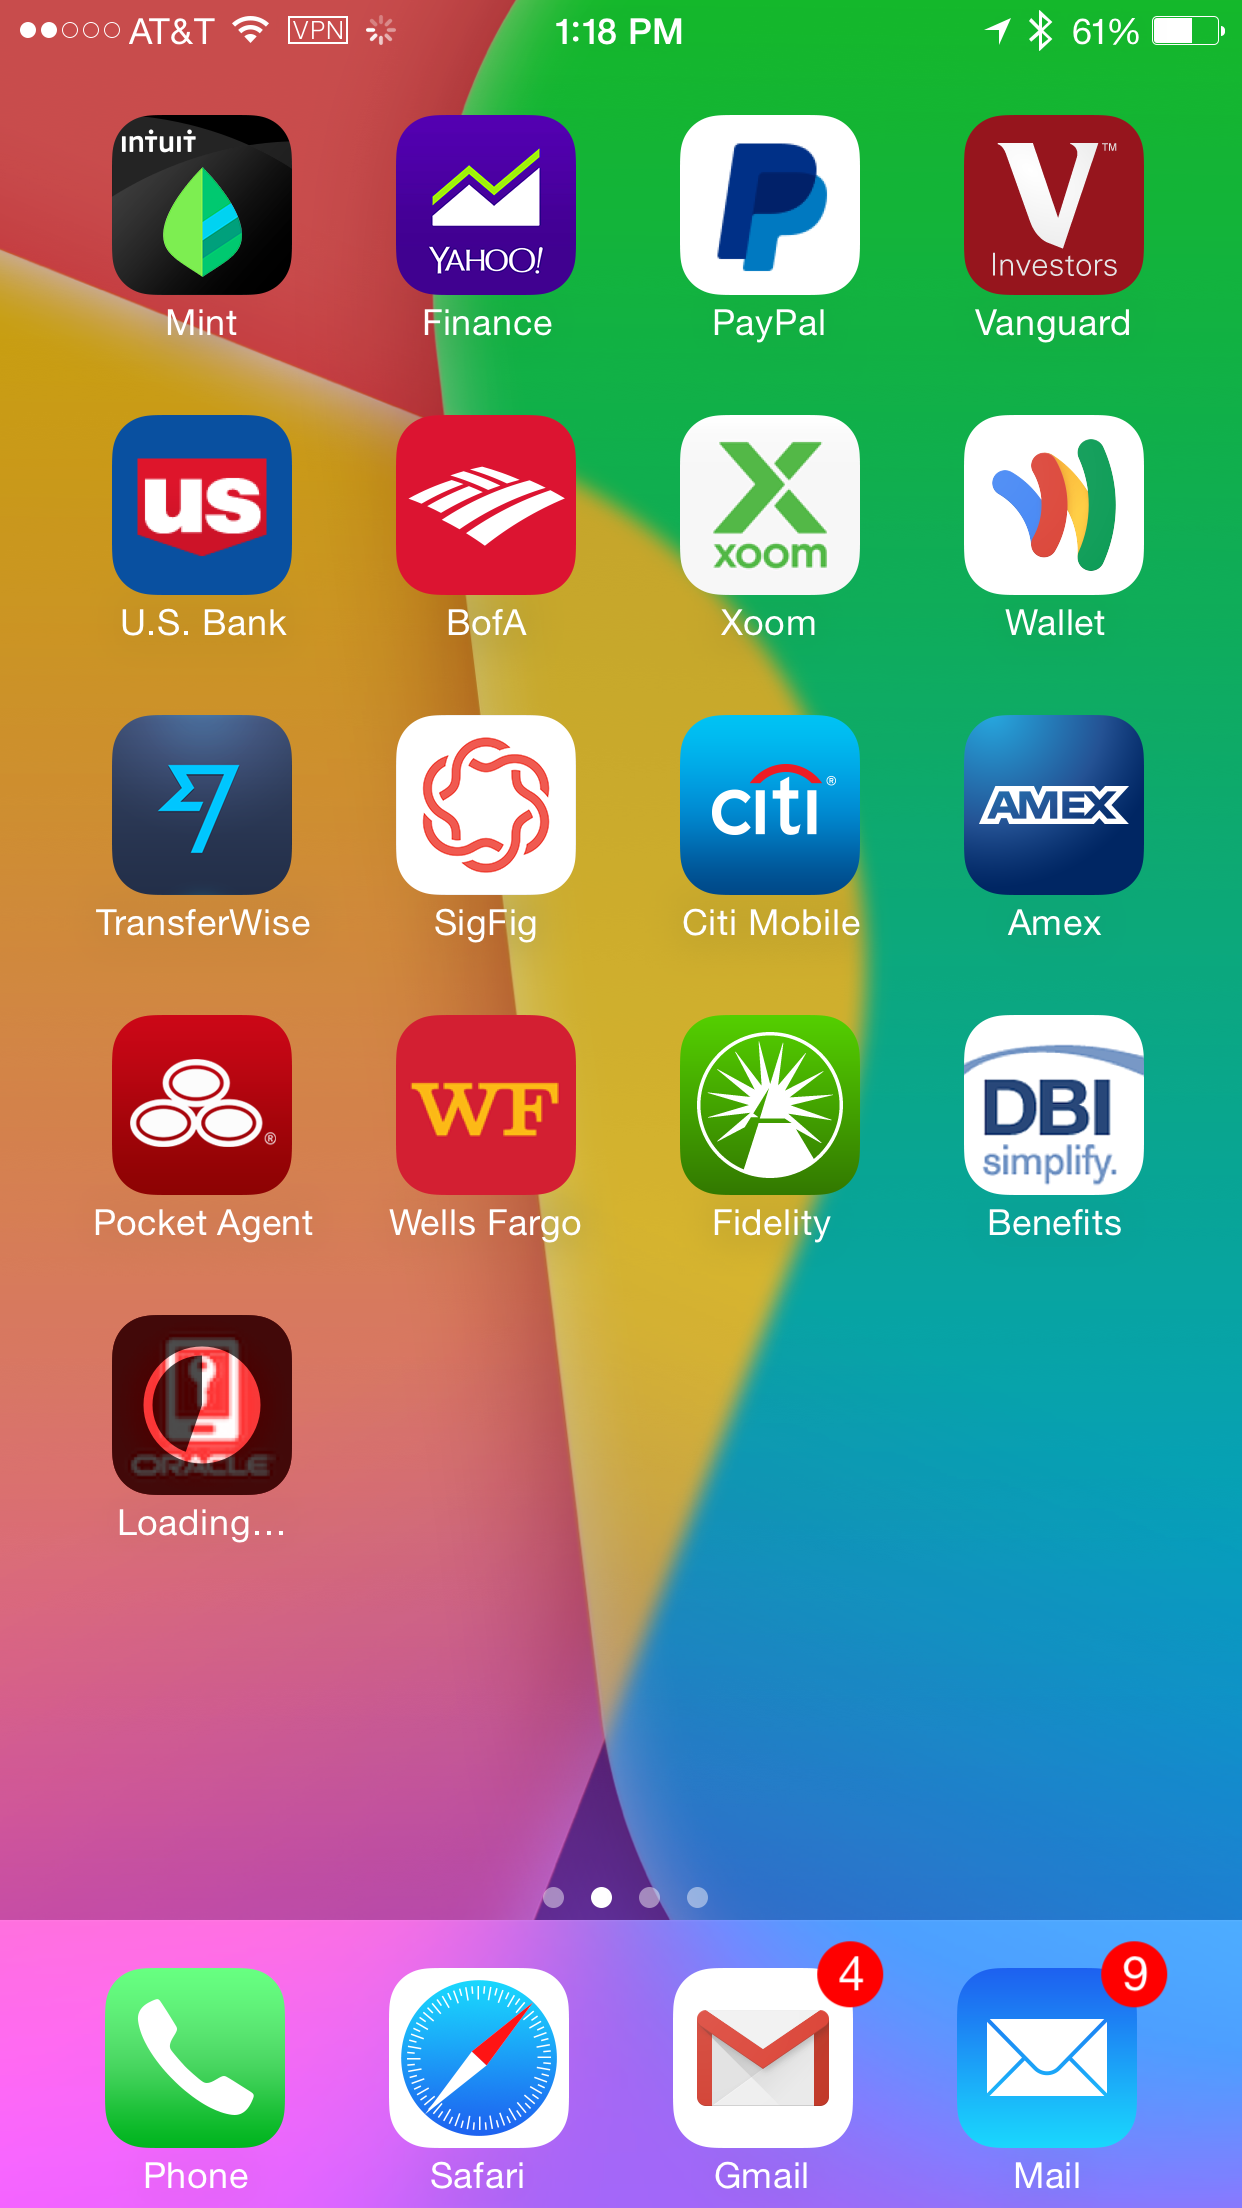
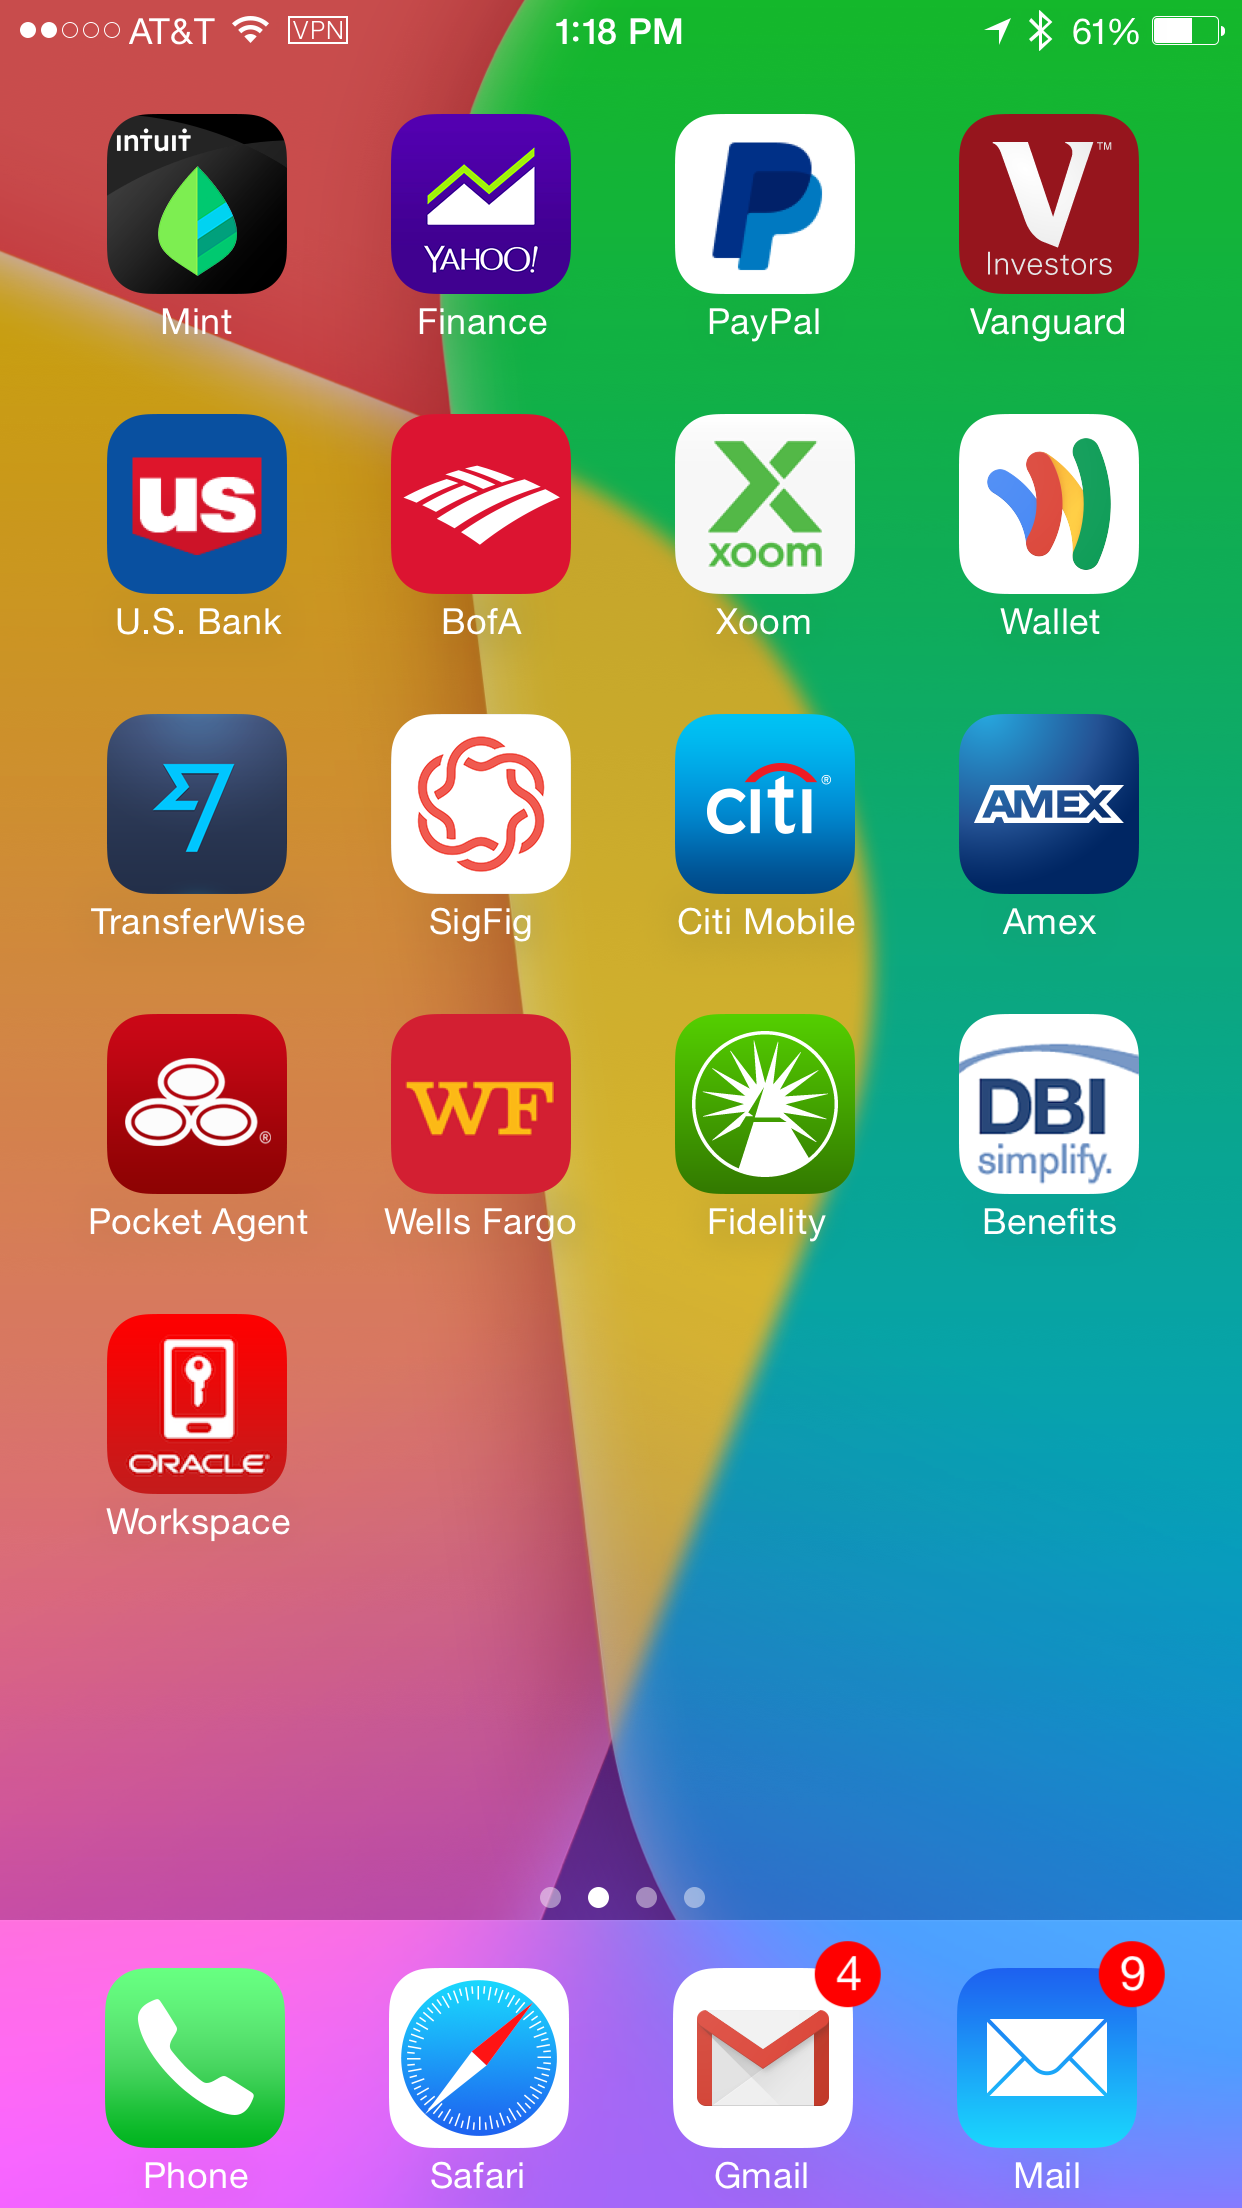
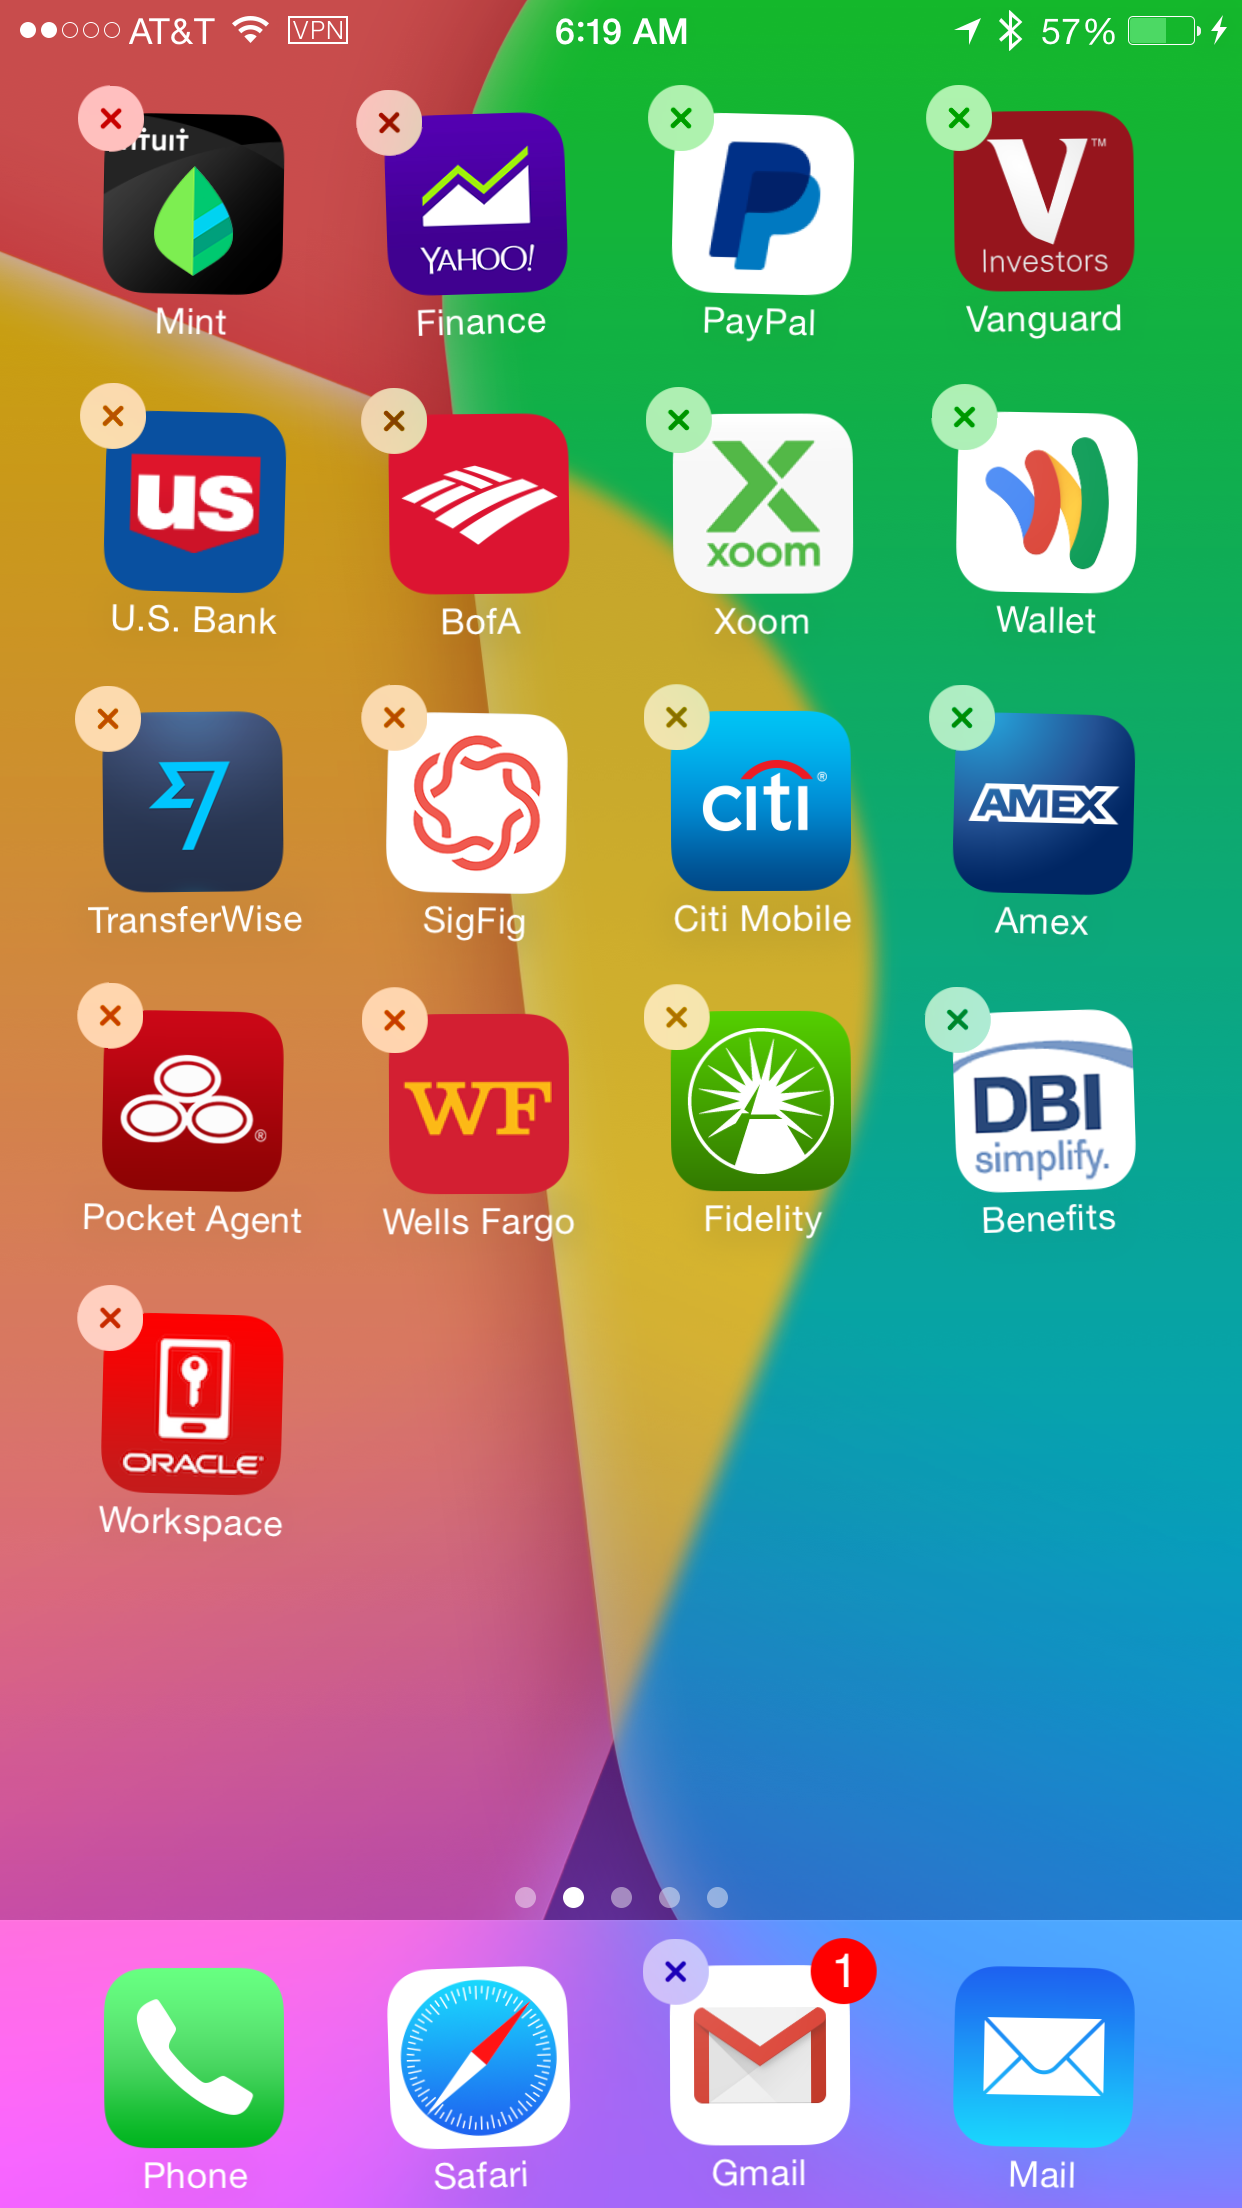
Navigate to the home page on the iOS device and
notice the Workspace app is now installed.
Also, notice that the Camera and Facetime apps
have been removed due to the MDM policy on
Camera restriction within the MDM MAM Policy.
You will also observer that in the phone app the
favorite contacts with the Facetime associated
with them have been removed . Finally in the
contacts app, the facetime icon next to the
contact details is removed. Therefore, the
device is locked down against the use of camera
and facetime features.
You can see the device and workspace app
restrictions within the MDM MAM Policy. You can
also see these restrictions in the MDM Profile.
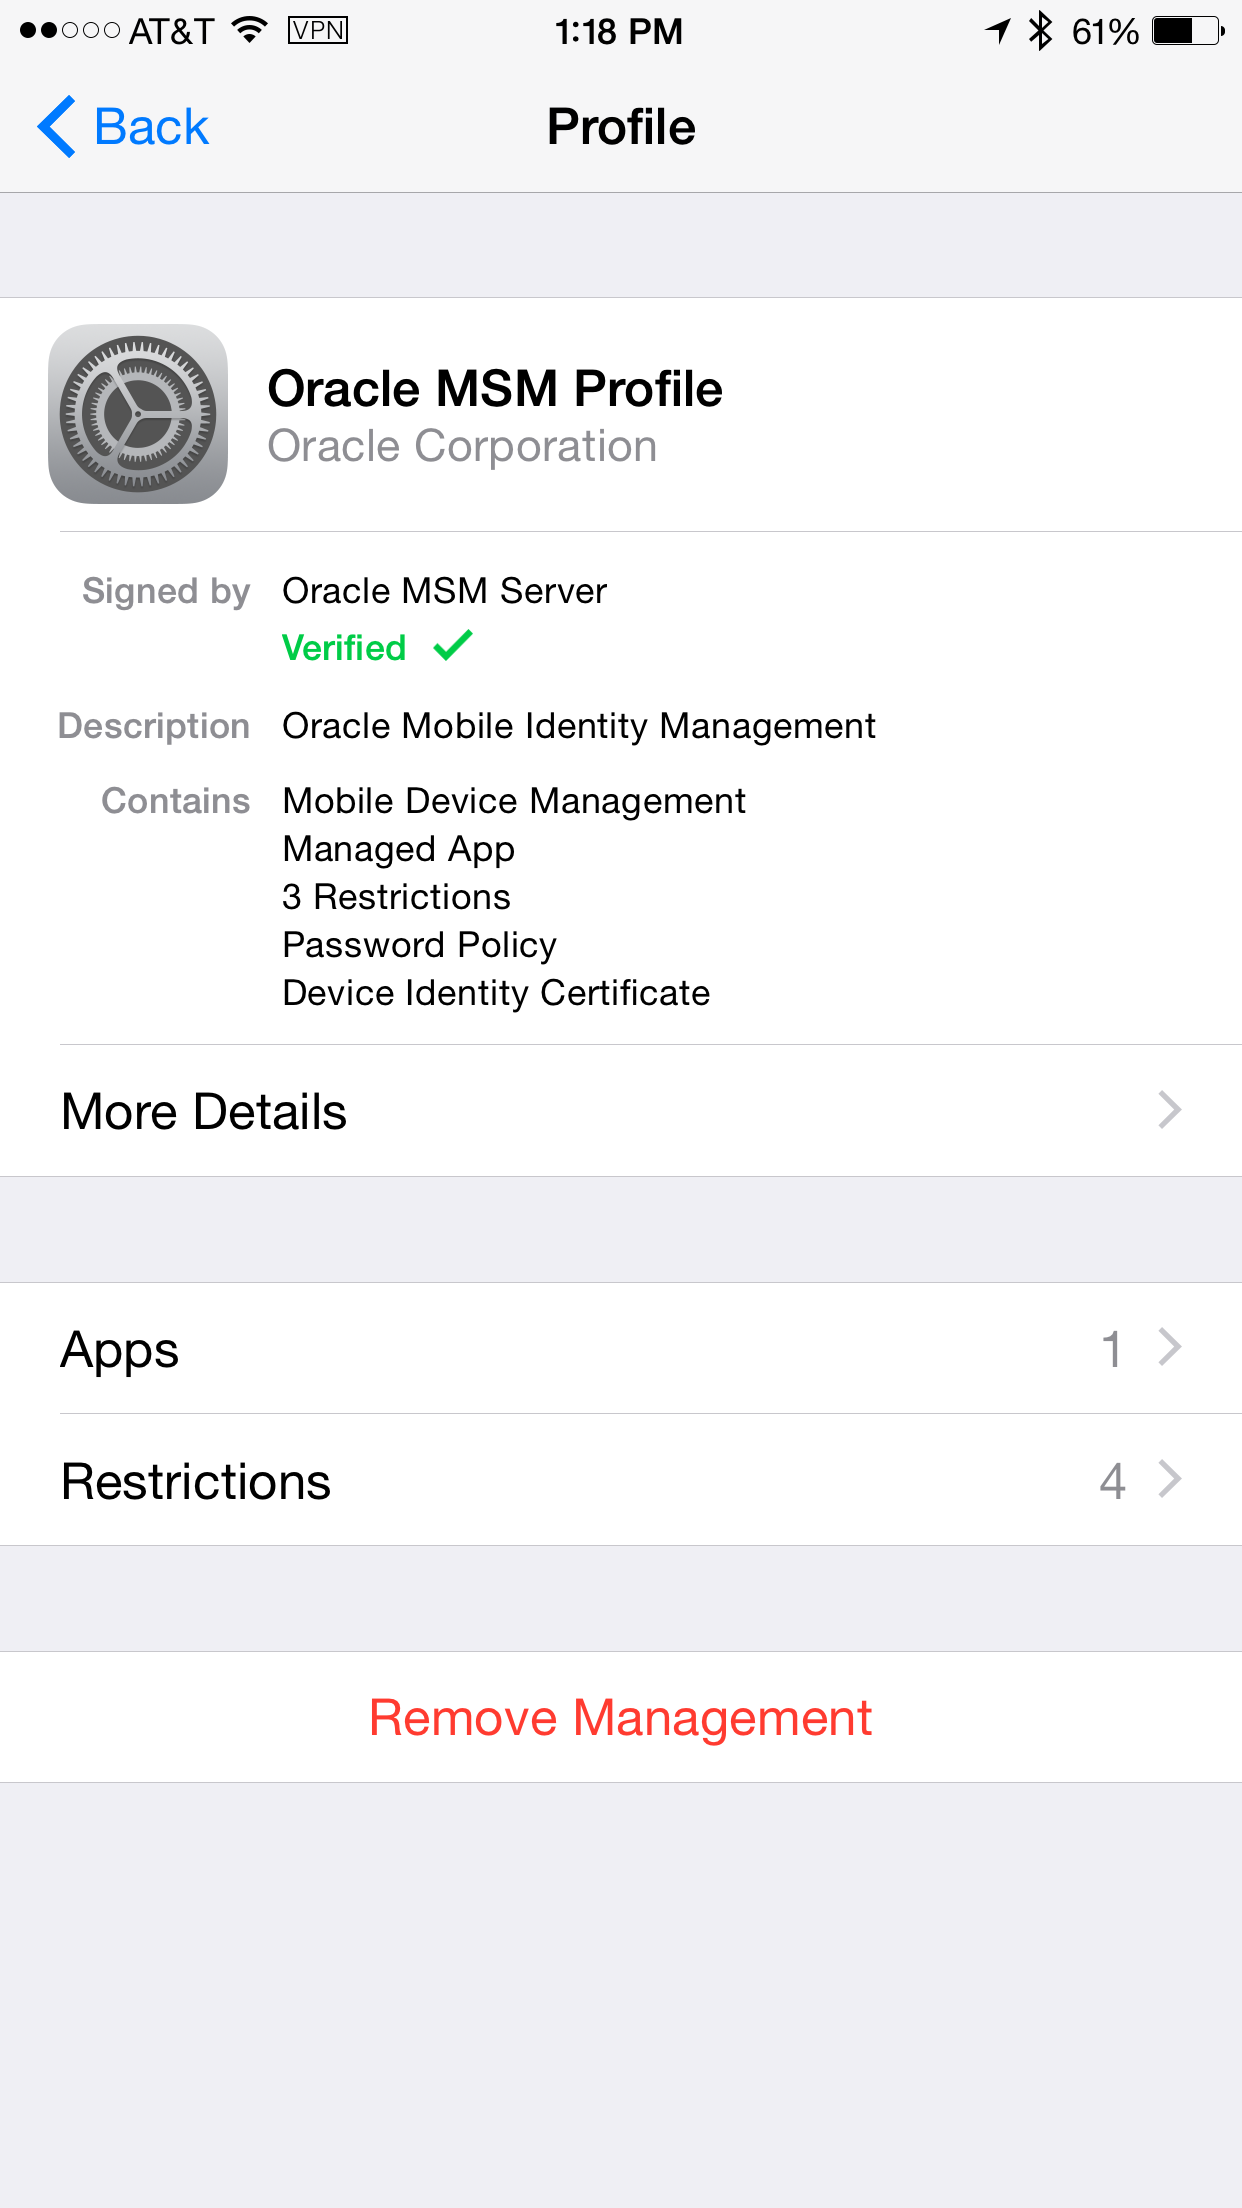
Under Oracle MSM Profile, notice the Apps (1)
and Restrictions (4).
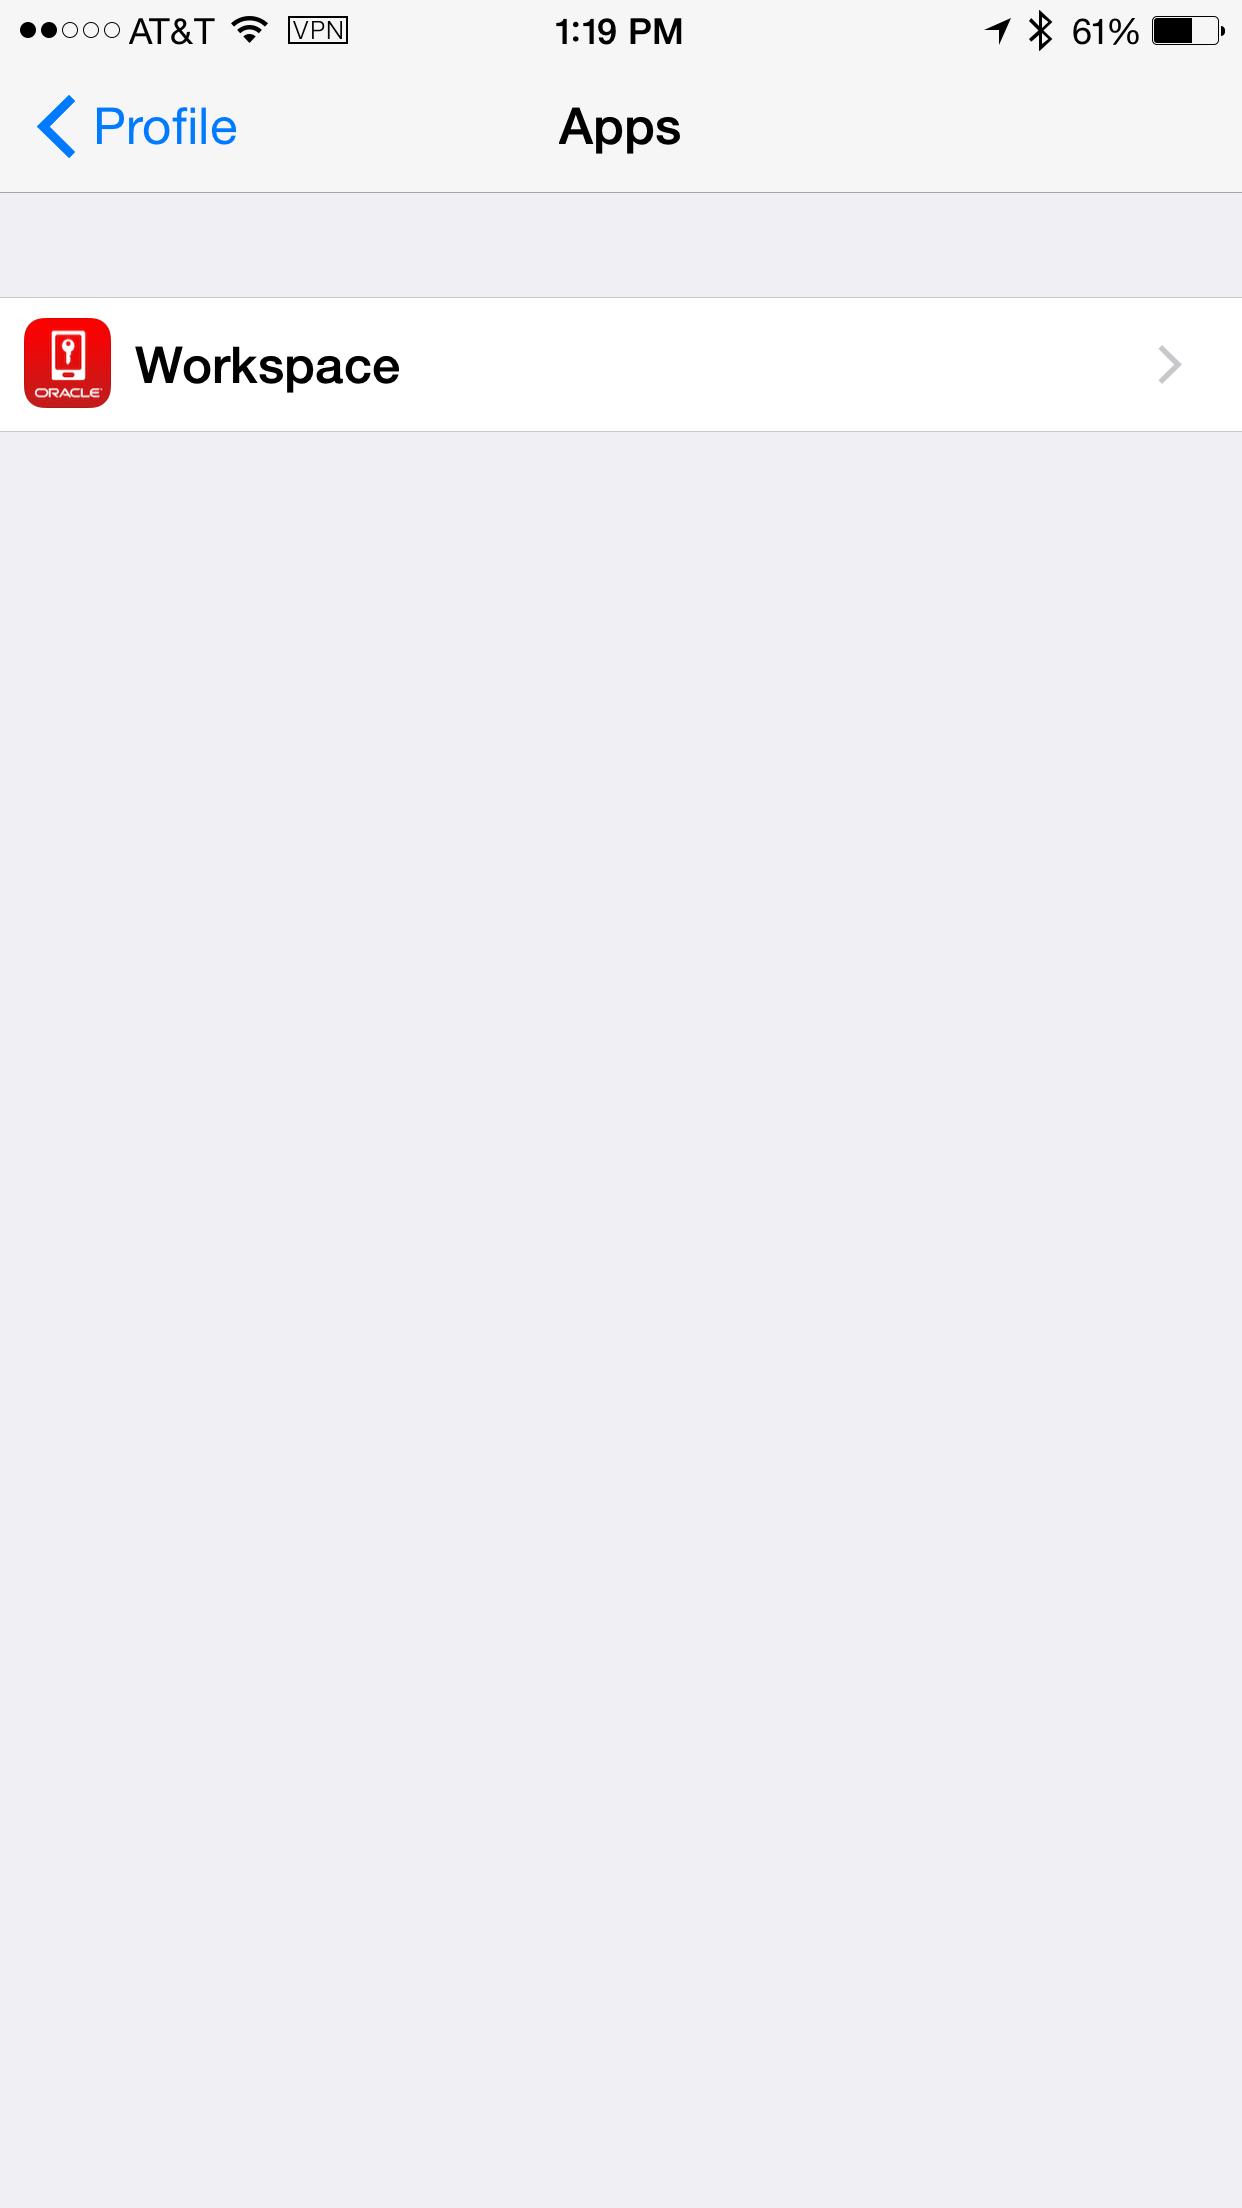
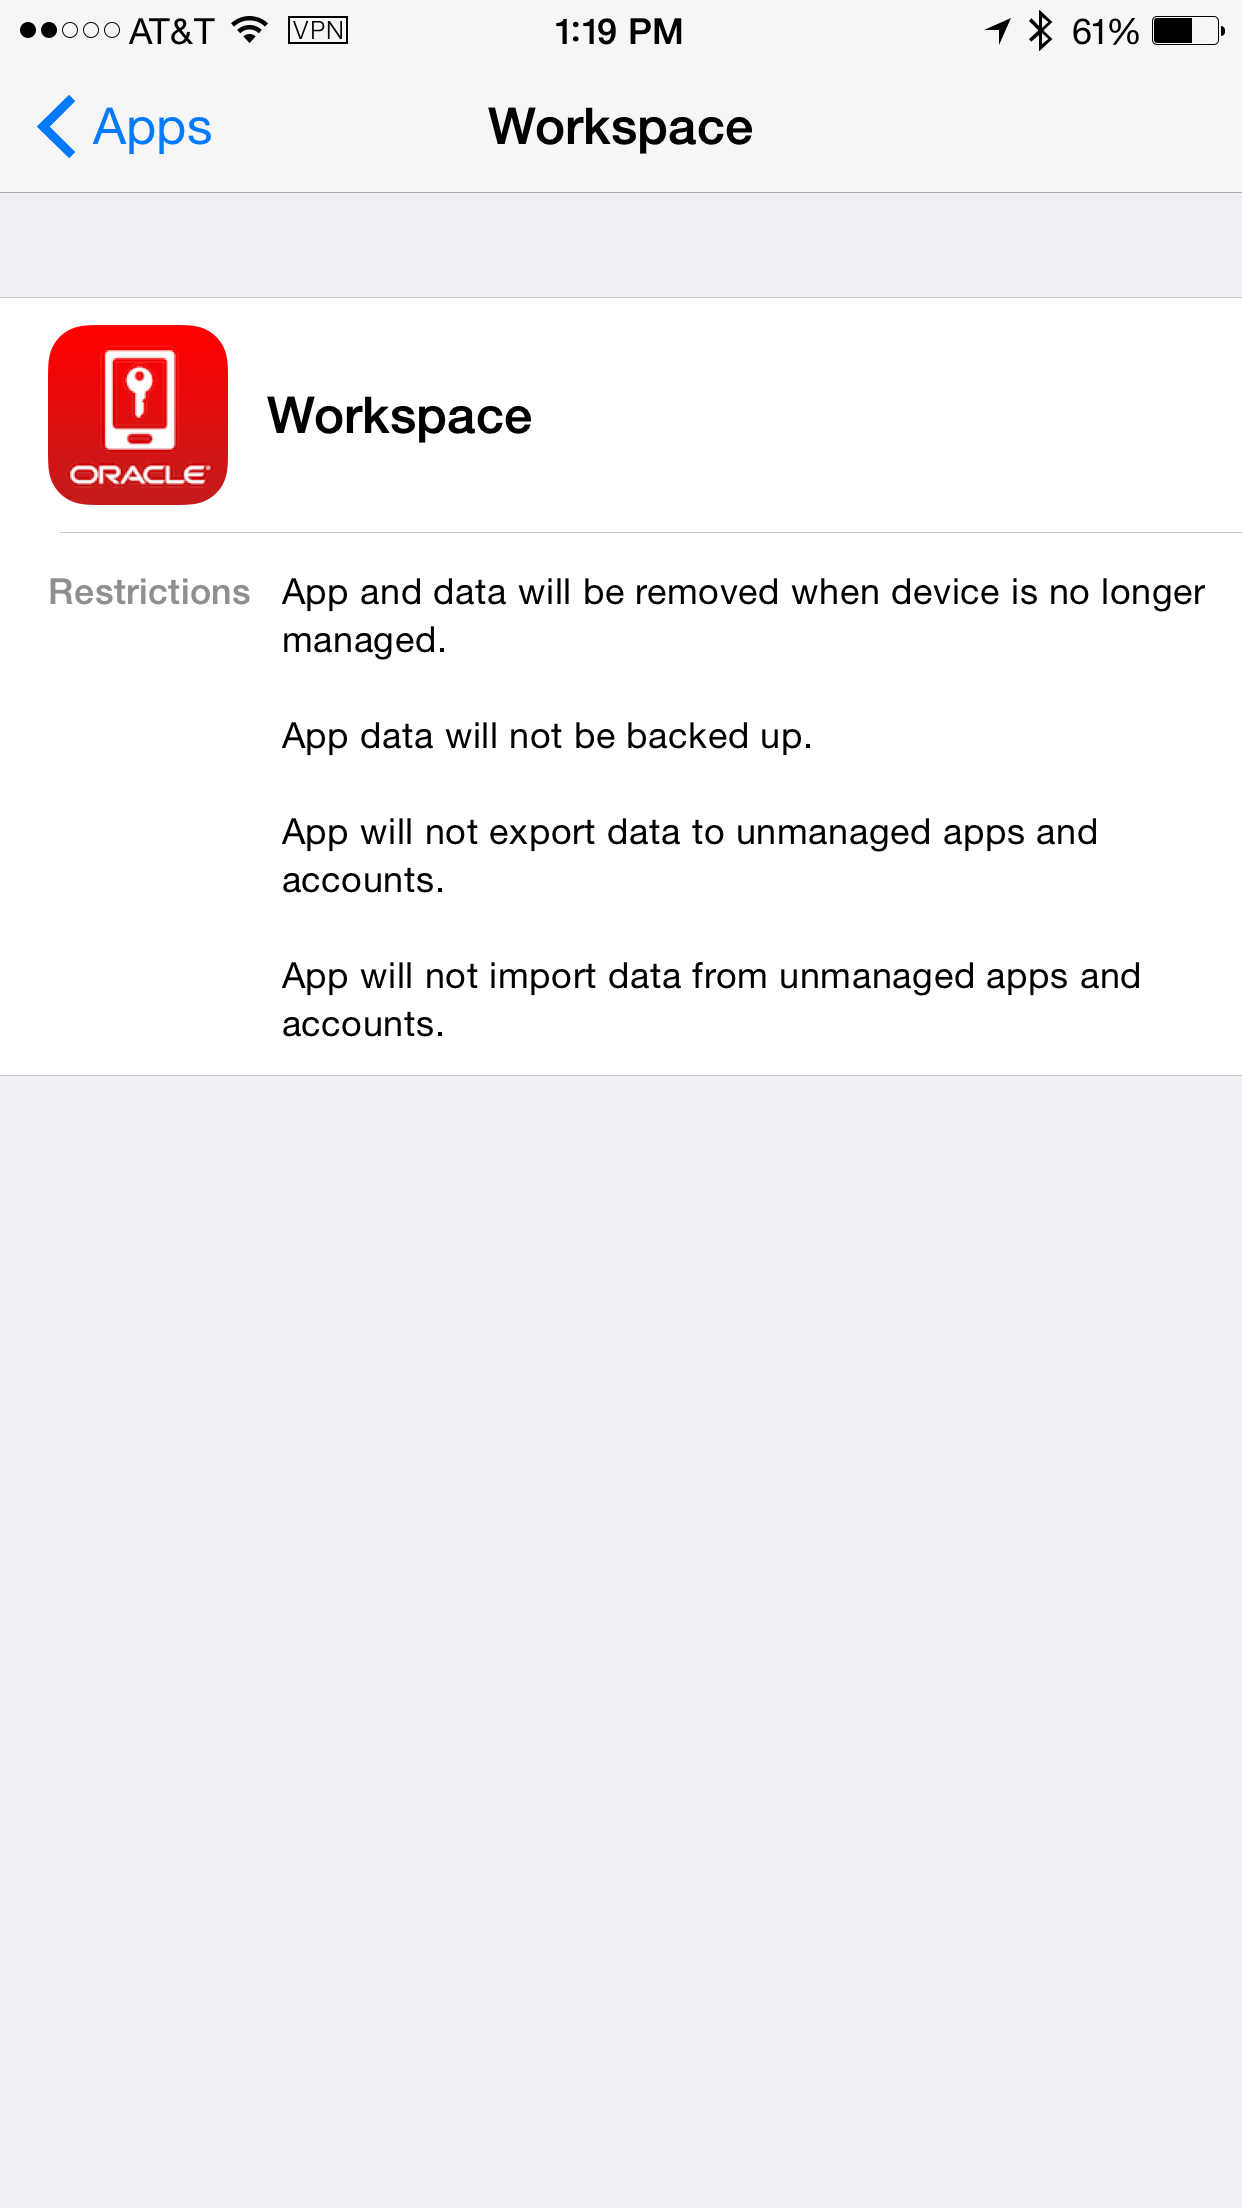
Click on Apps > Workspace.
And read the restrictions on the Secure
workspace app.
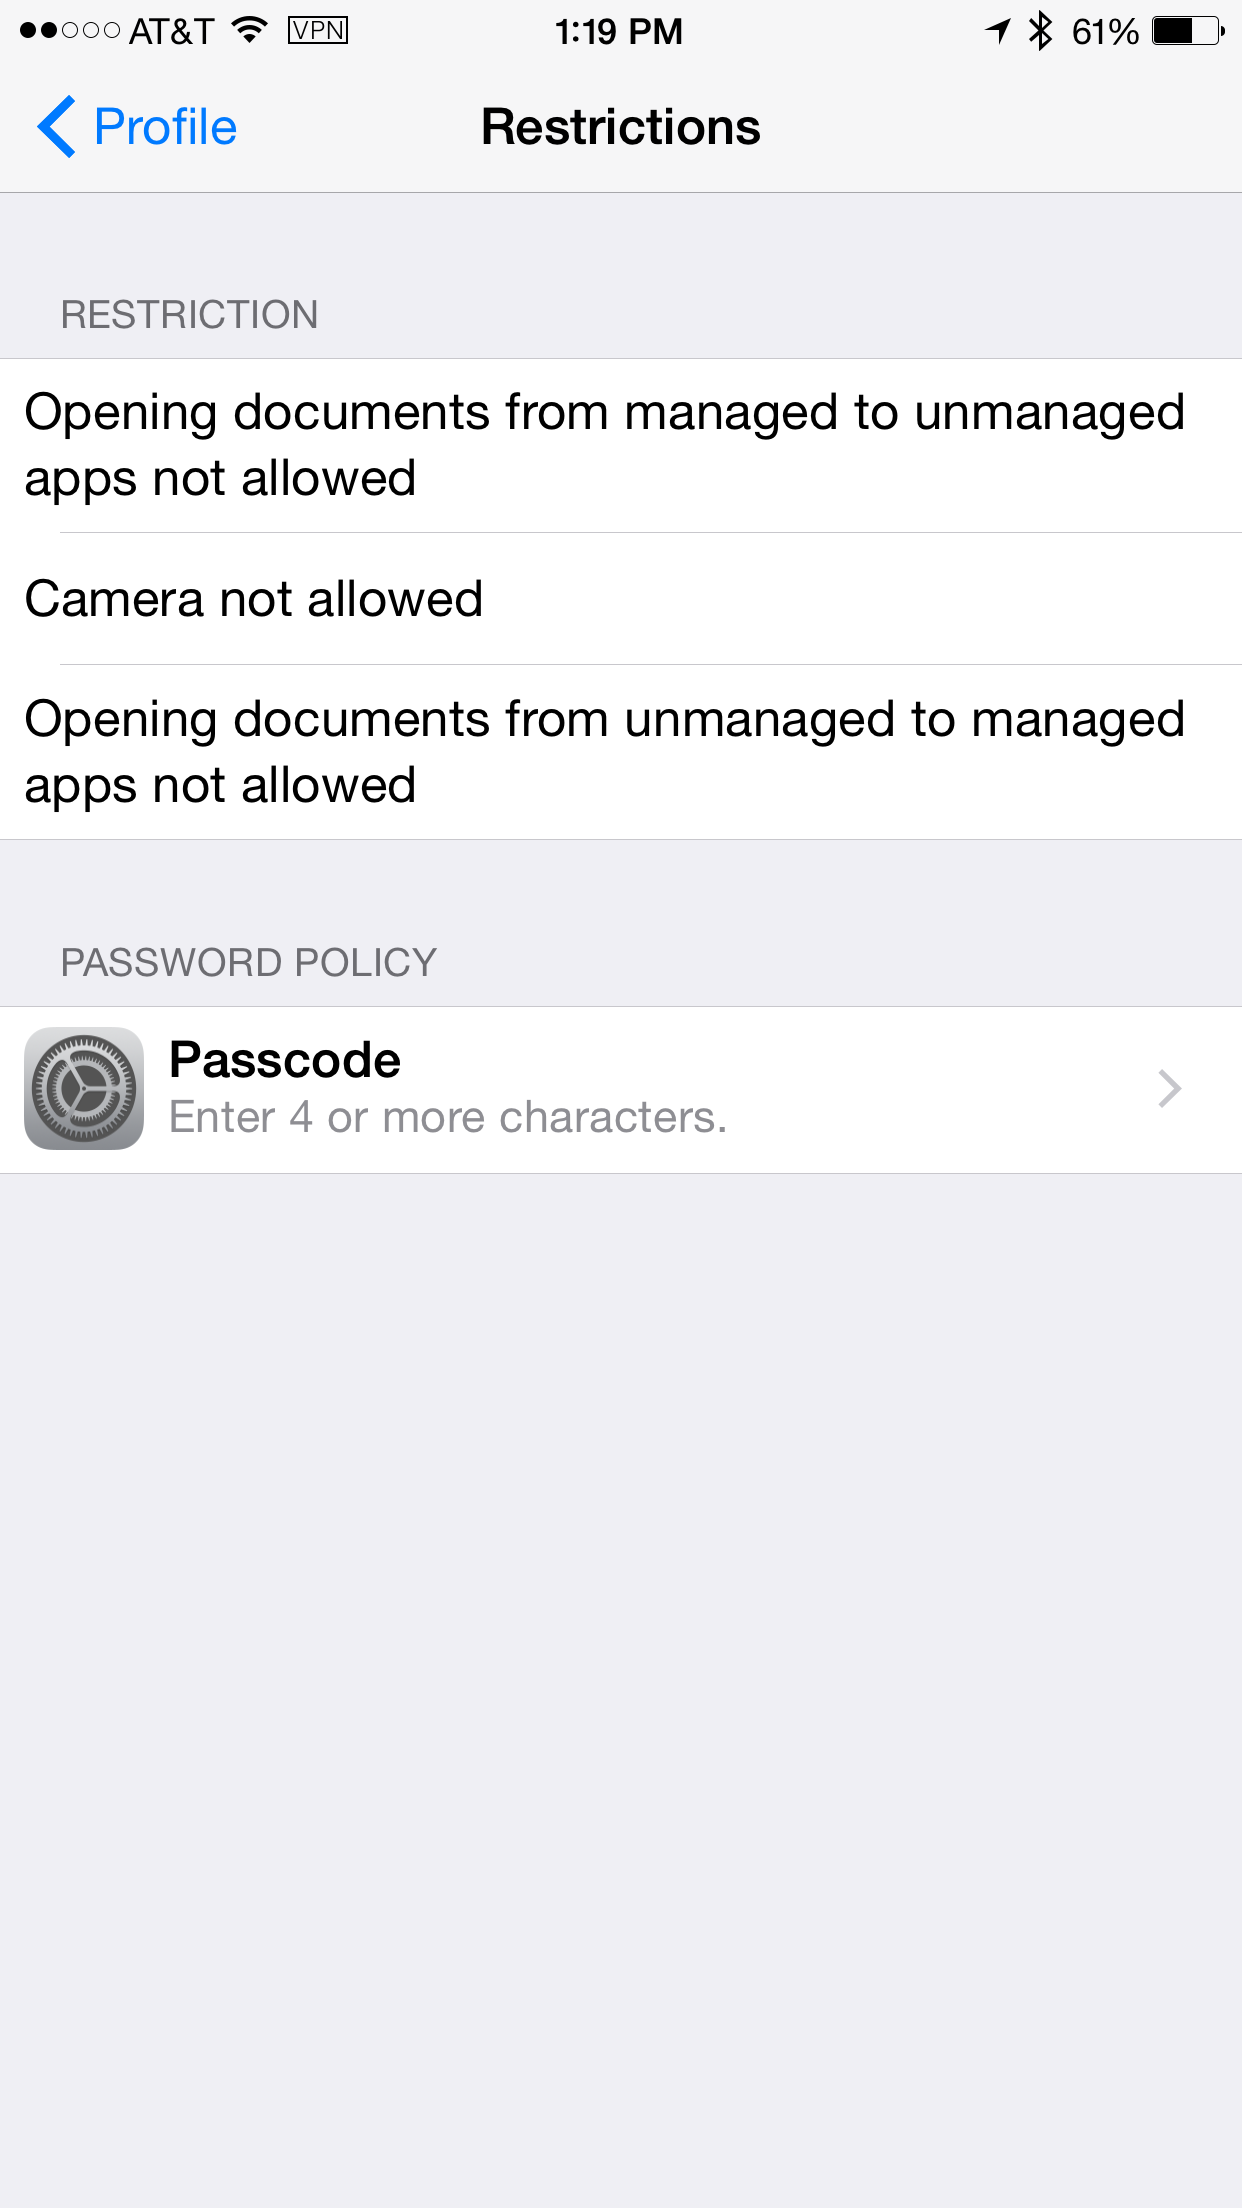
Navigate back to Oracle MSM Profile and click
on Restrictions. Notice the 3 restrictions and
password policy.
Note one of the restrictions is Camera not
allowed.
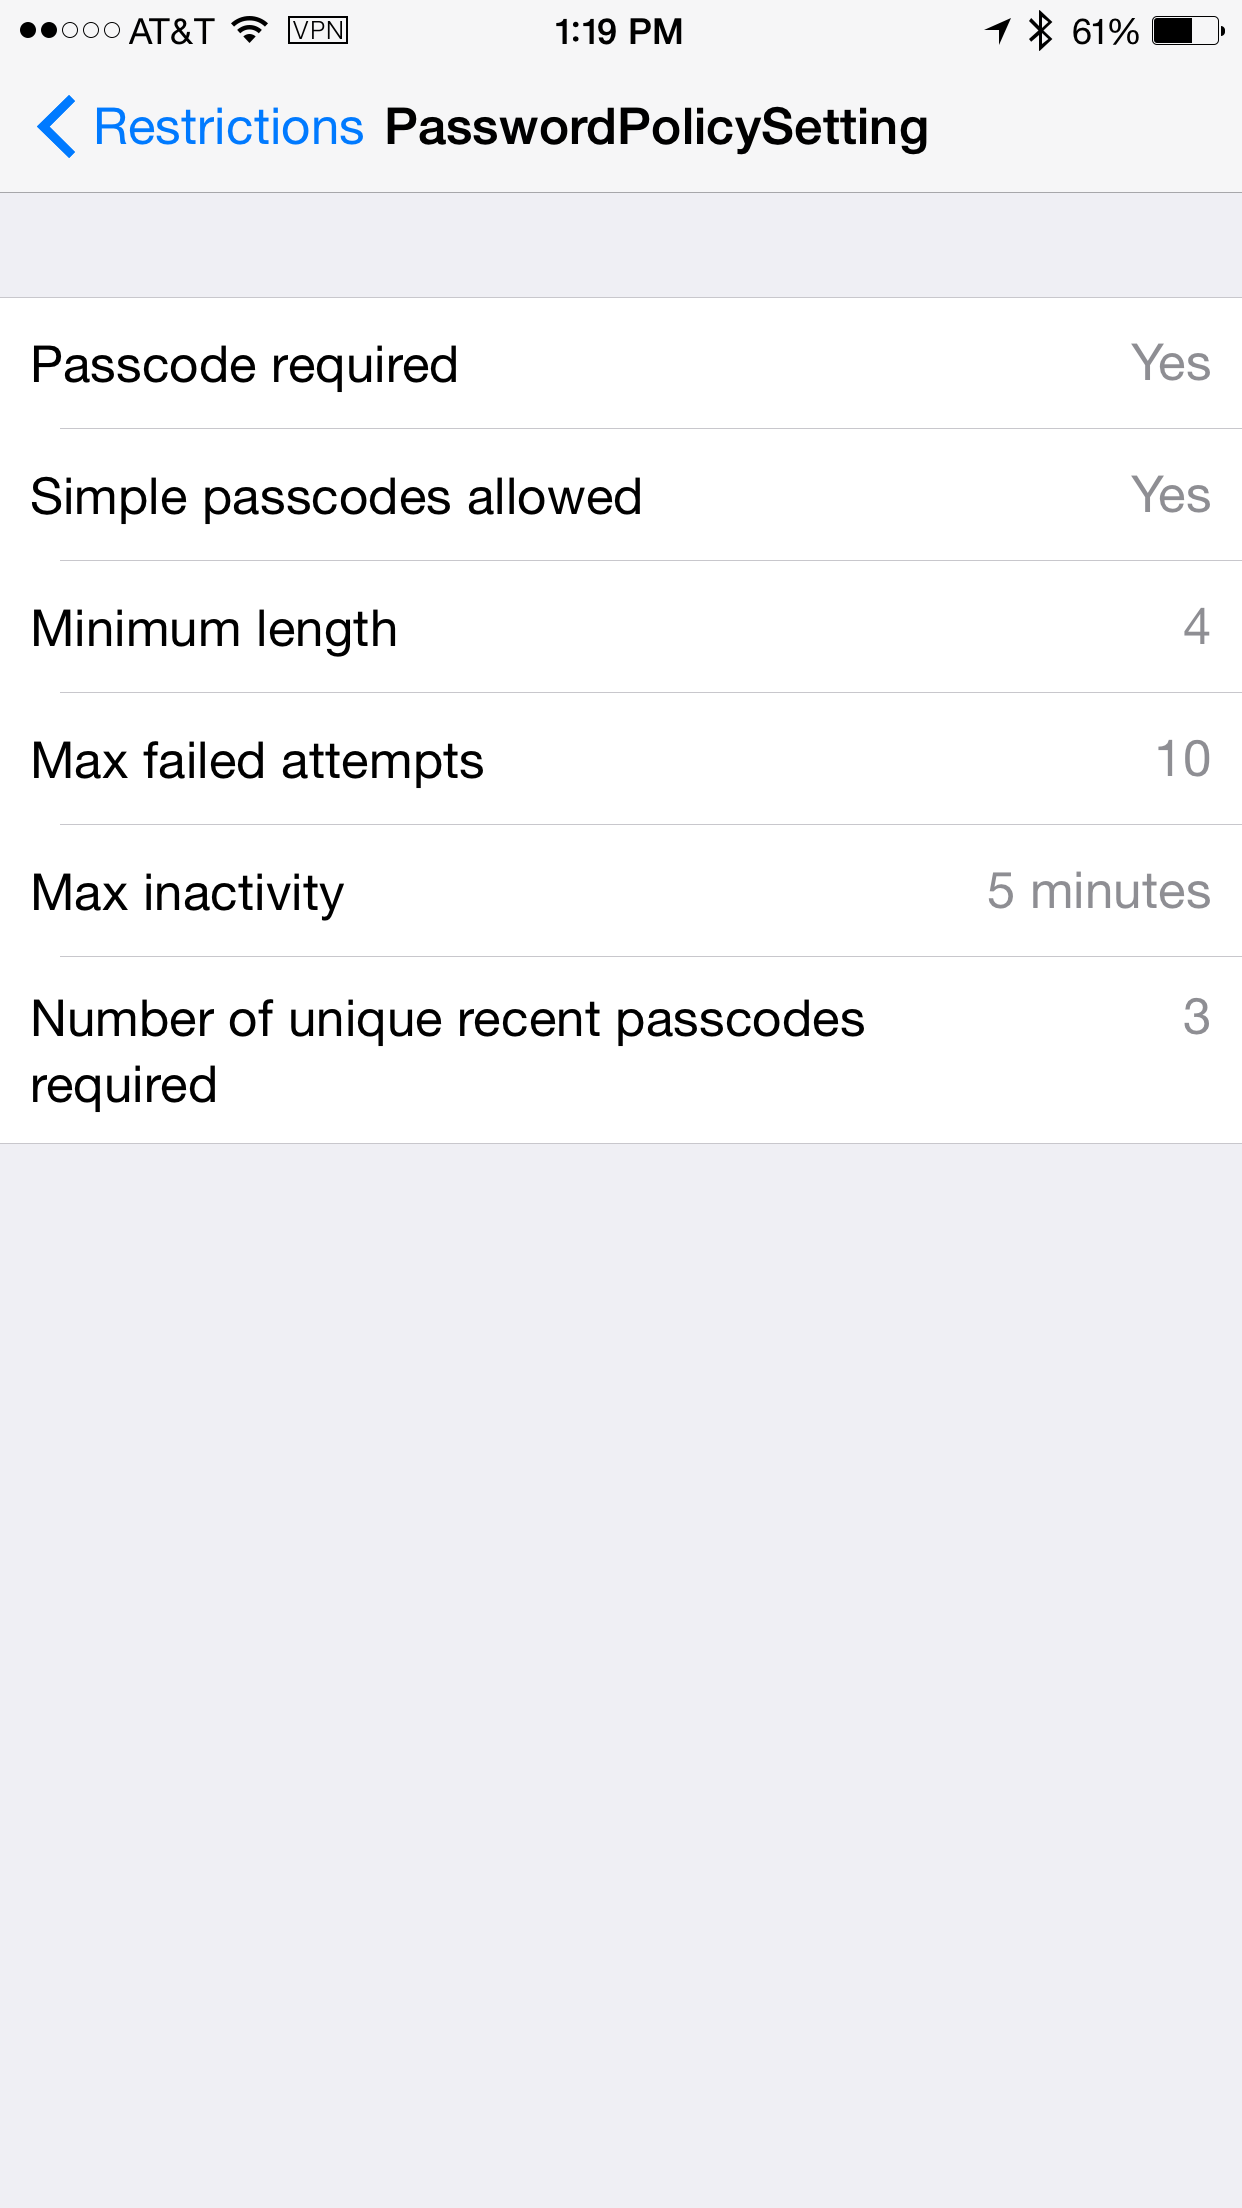
Tap on the Password policy restriction on
Passcode. You can see the passcode policy rules
enforced by MDM profile on the iOS device.
Login to access console. Click on Mobile
Security tab and navigate to Mobile
Security Manager > Mobile Devices.
You can also see the effective policy rules
enforced on the device by clicking on the device
and then clicking on the policies icon.
Login to Secure Workspace using OAuth Confidential
Client AuthN
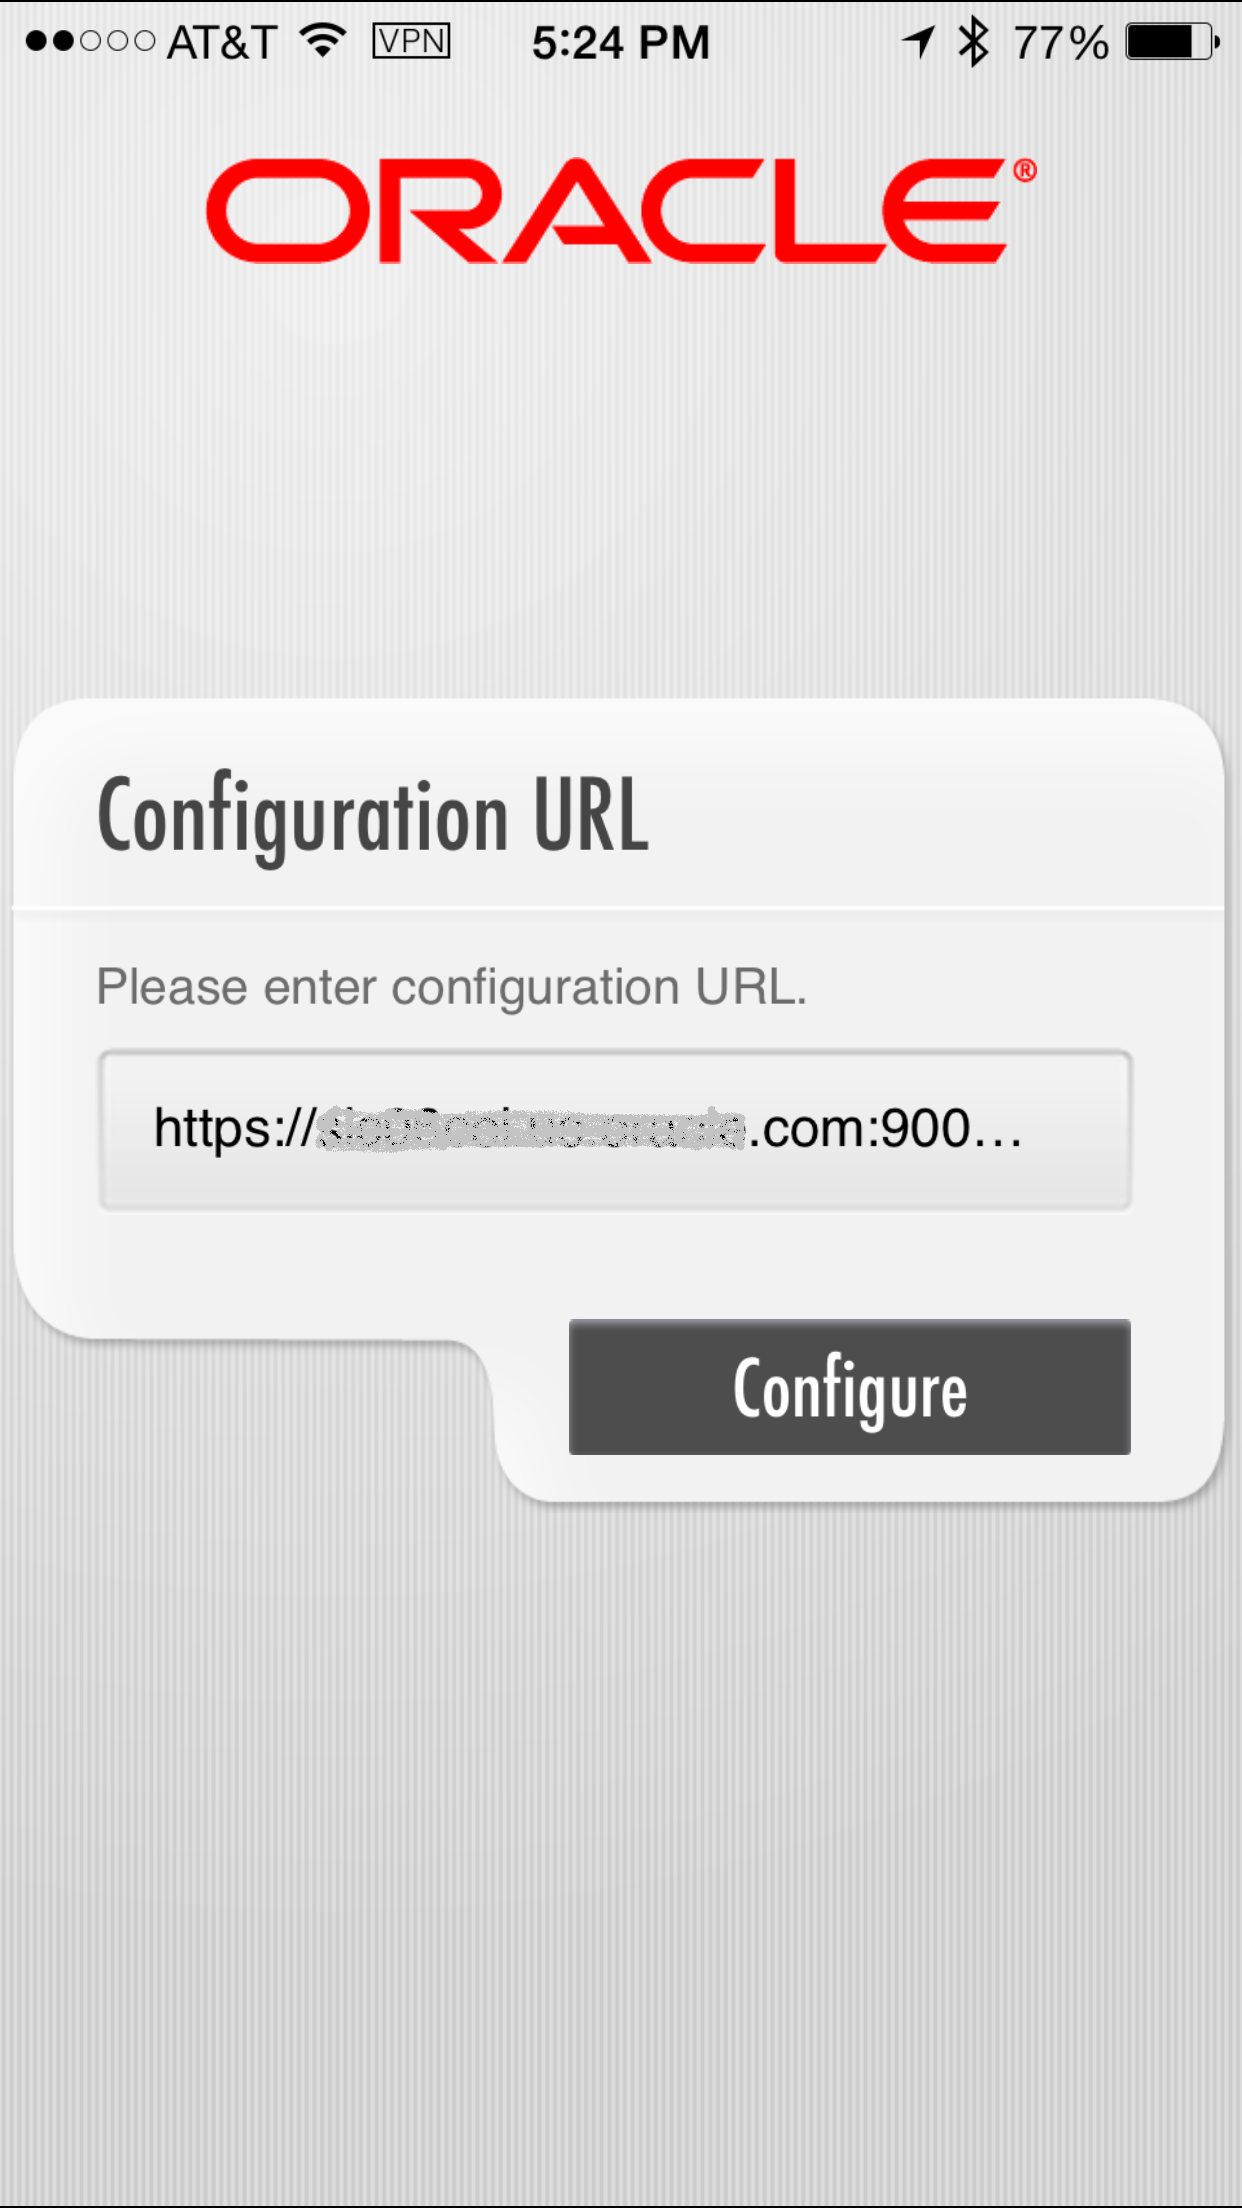
Navigate to the home page and tap on Workspace
app. The first time you launch workspace app,
you would need to enter the Configuration URL
(unless this has been preconfigured for you in
the customized secure workspace, which we will
study in another OBE).
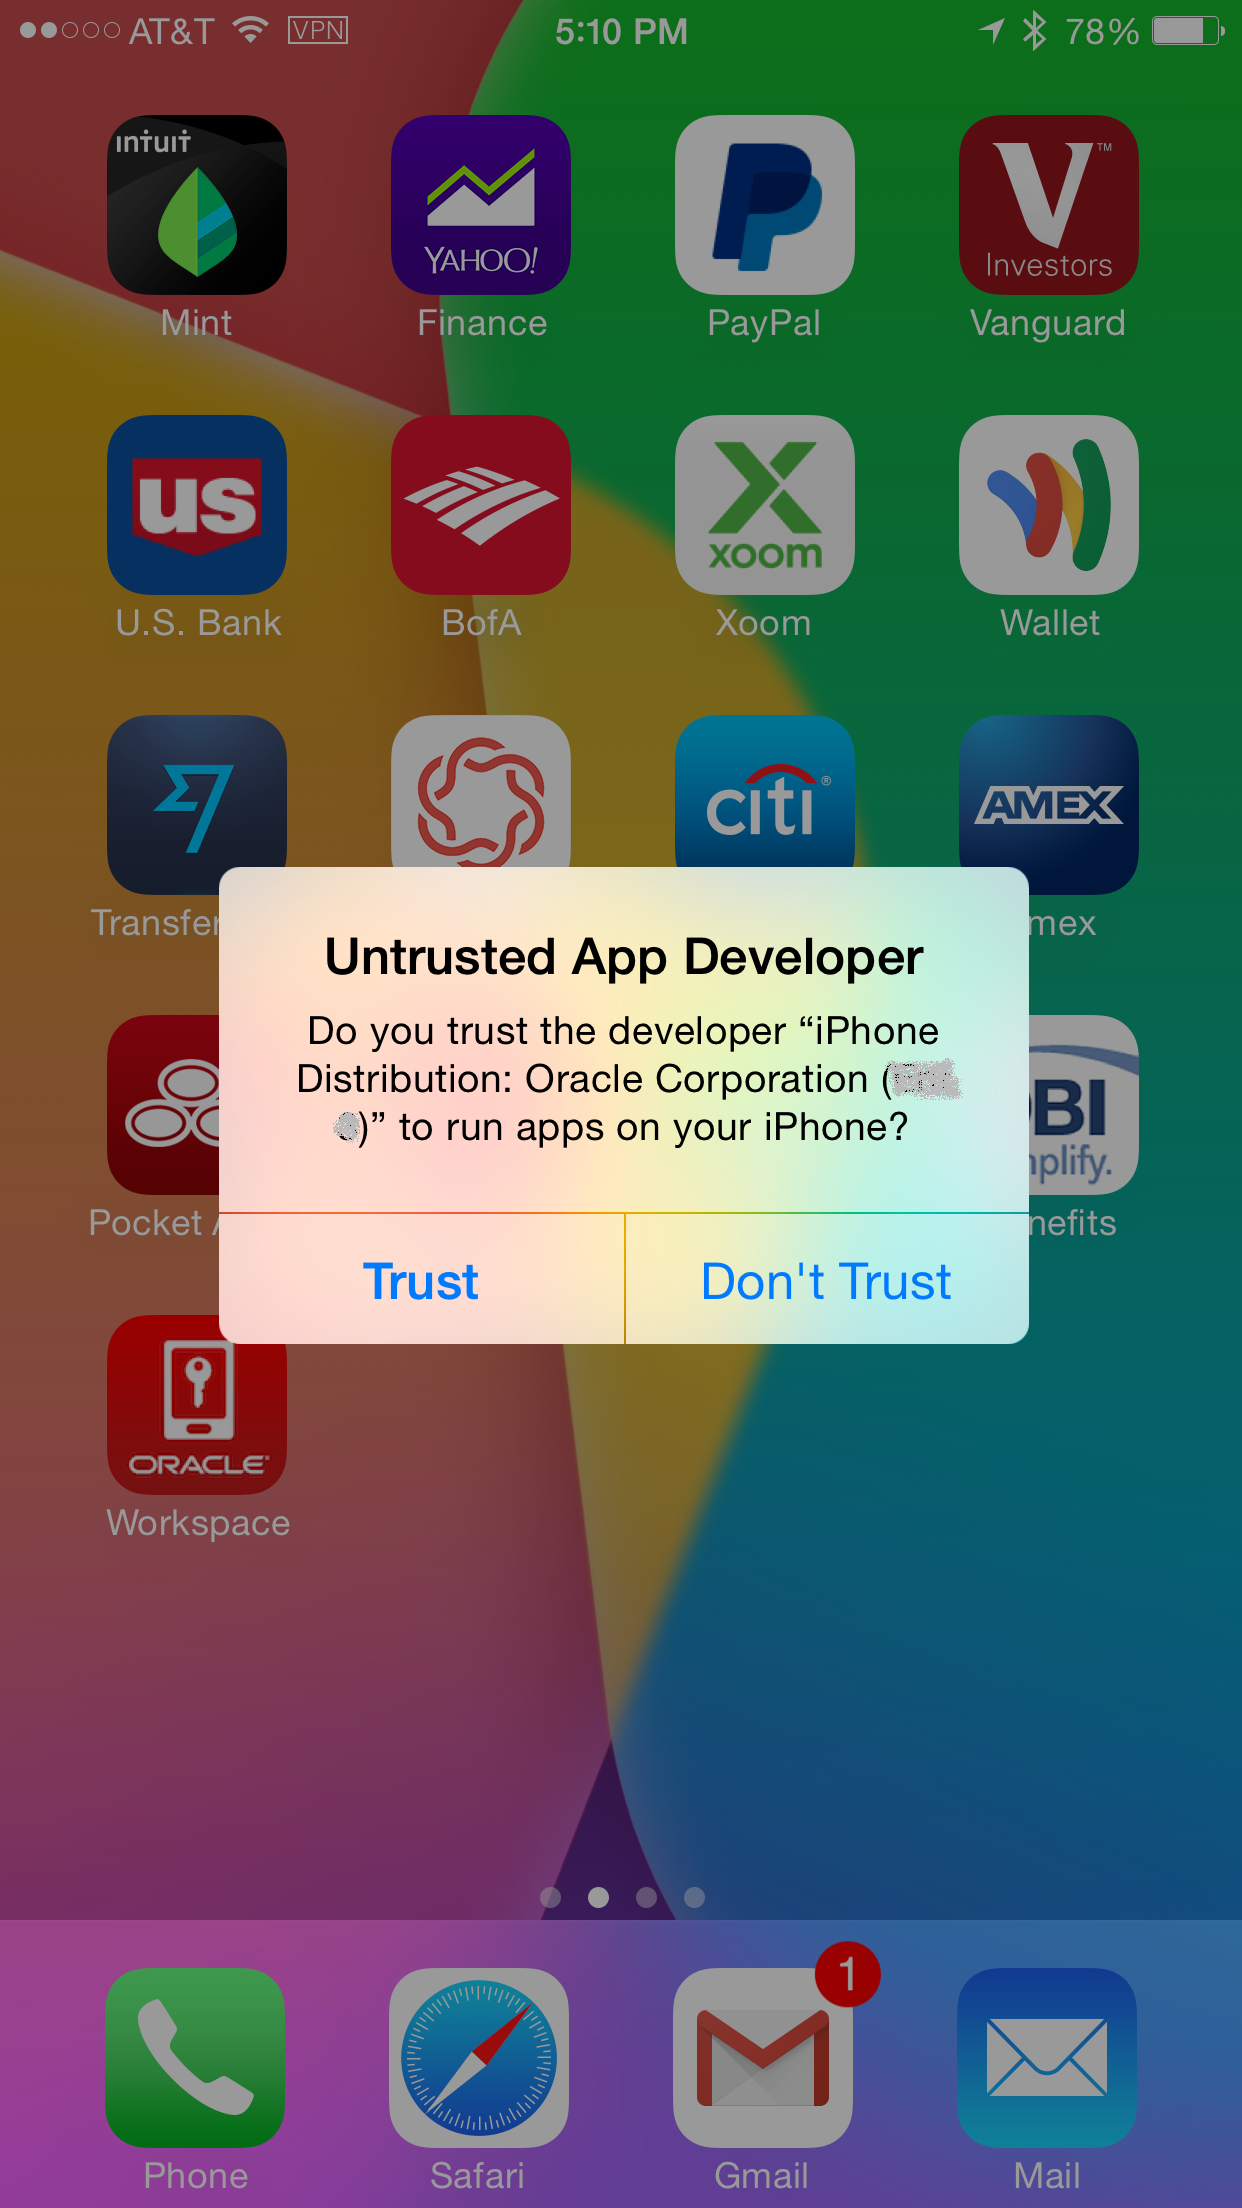
When you launch the secure workspace app for the
first time, it should prompt you if you Trust
the workspace app which is signed by the iPhone
distribution: Oracle Corporation (xxx)
certificate (in our case).
Specify the
https://<msashost>:<msasport>/bmax/bmconfig_oam_pwd.json
for example
https://msashost:9002/bmax/bmconfig_oam_pwd.json
Tap Configure
If the configuration was successful, you should
see the Login screen.
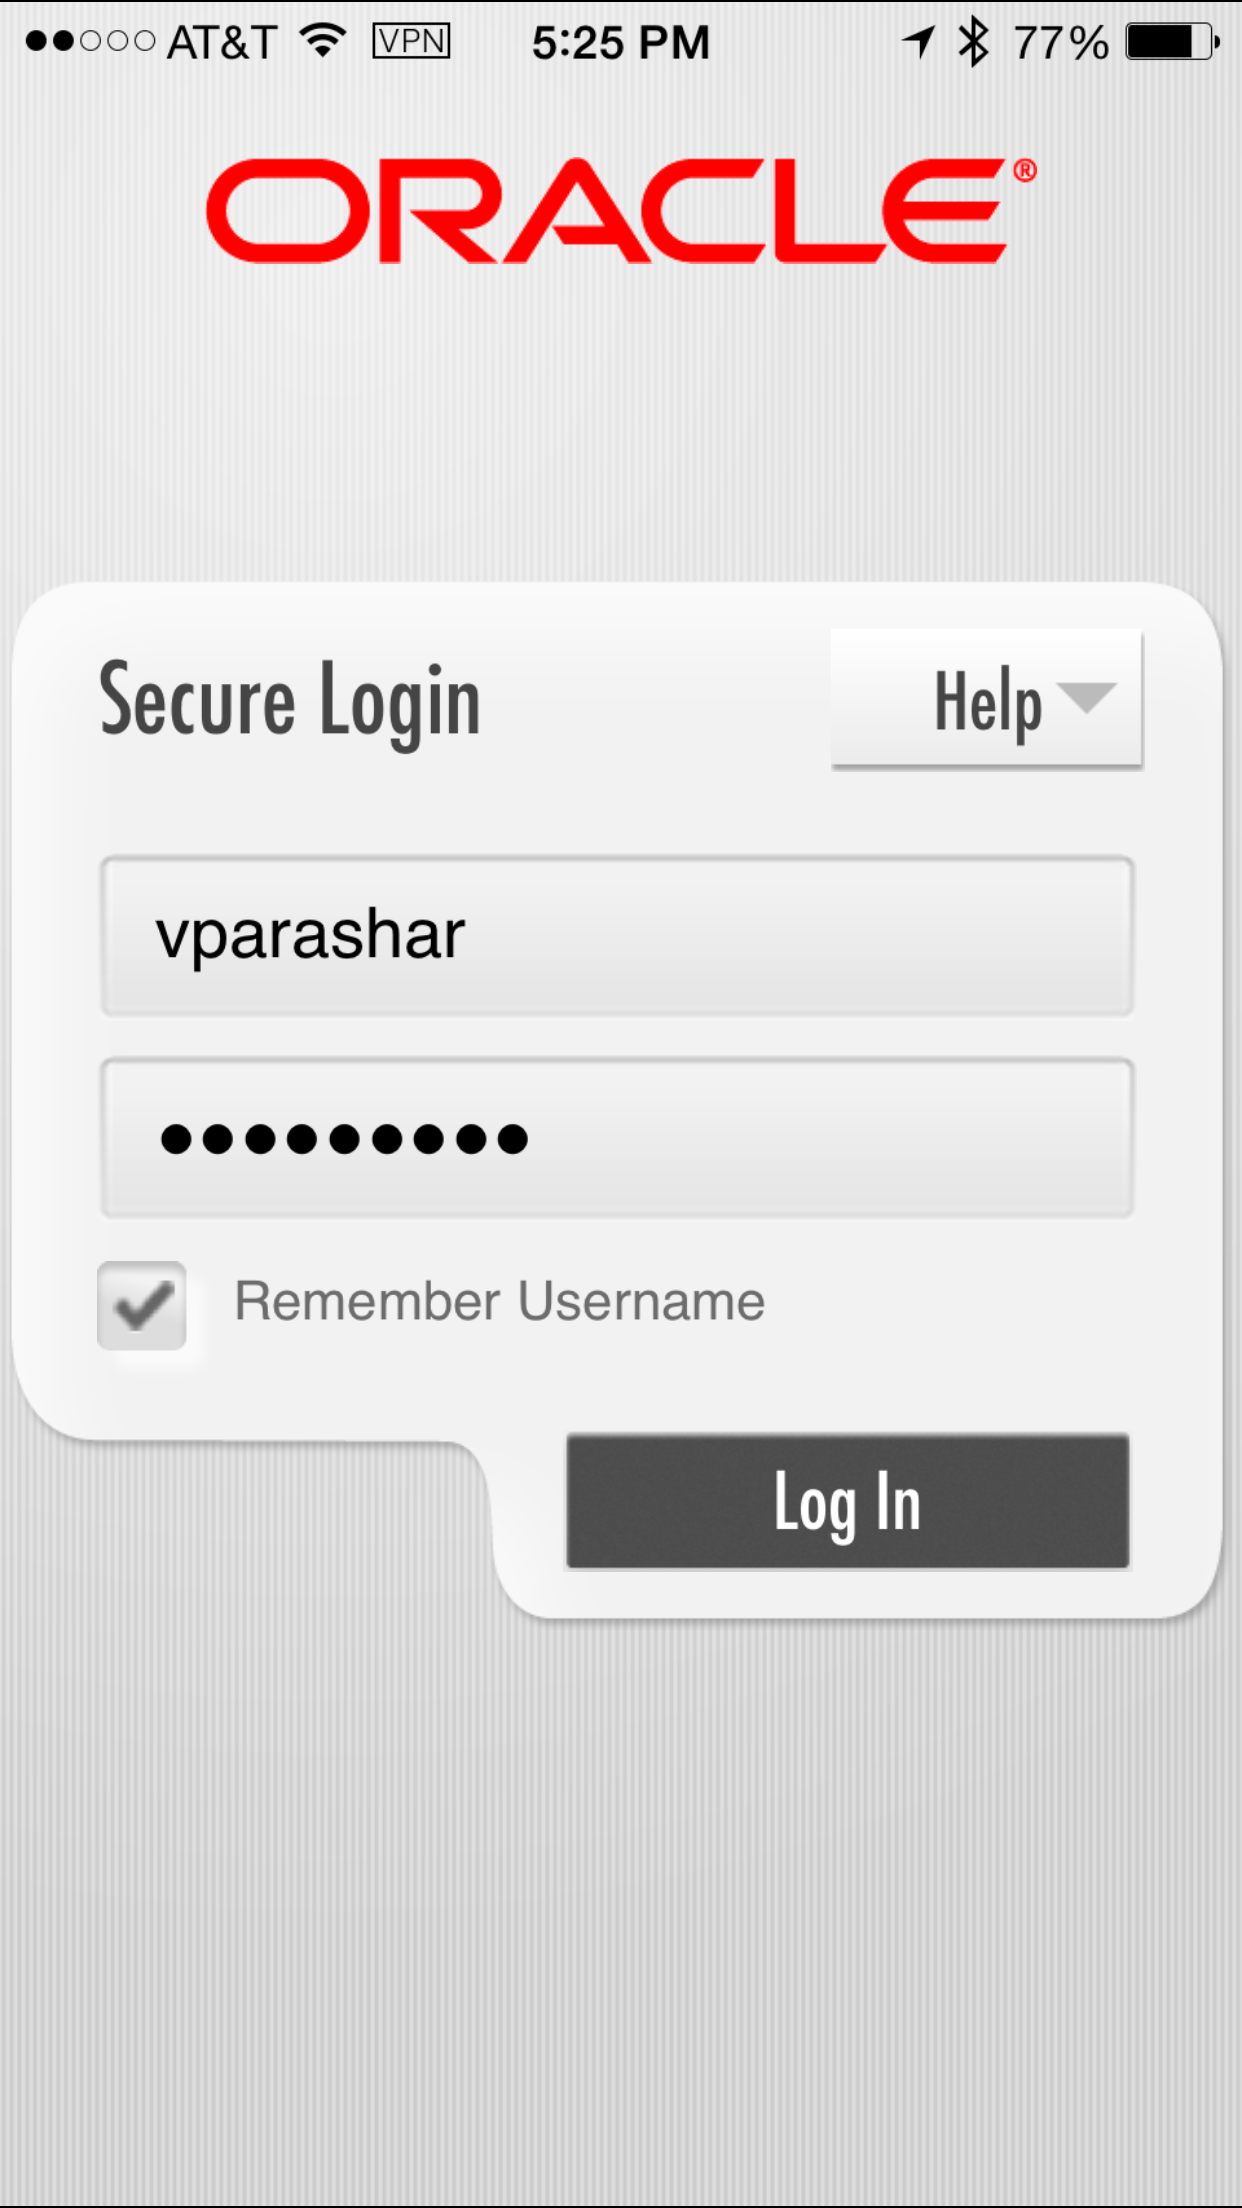
Enter a valid user/password ( For example:
vparashar/Oracle123) and select Remember
Username.
If MSAS Authentication is successful, it will
apply the workspace polices on the secure
workspace app based on the MDM MAM Policy (in
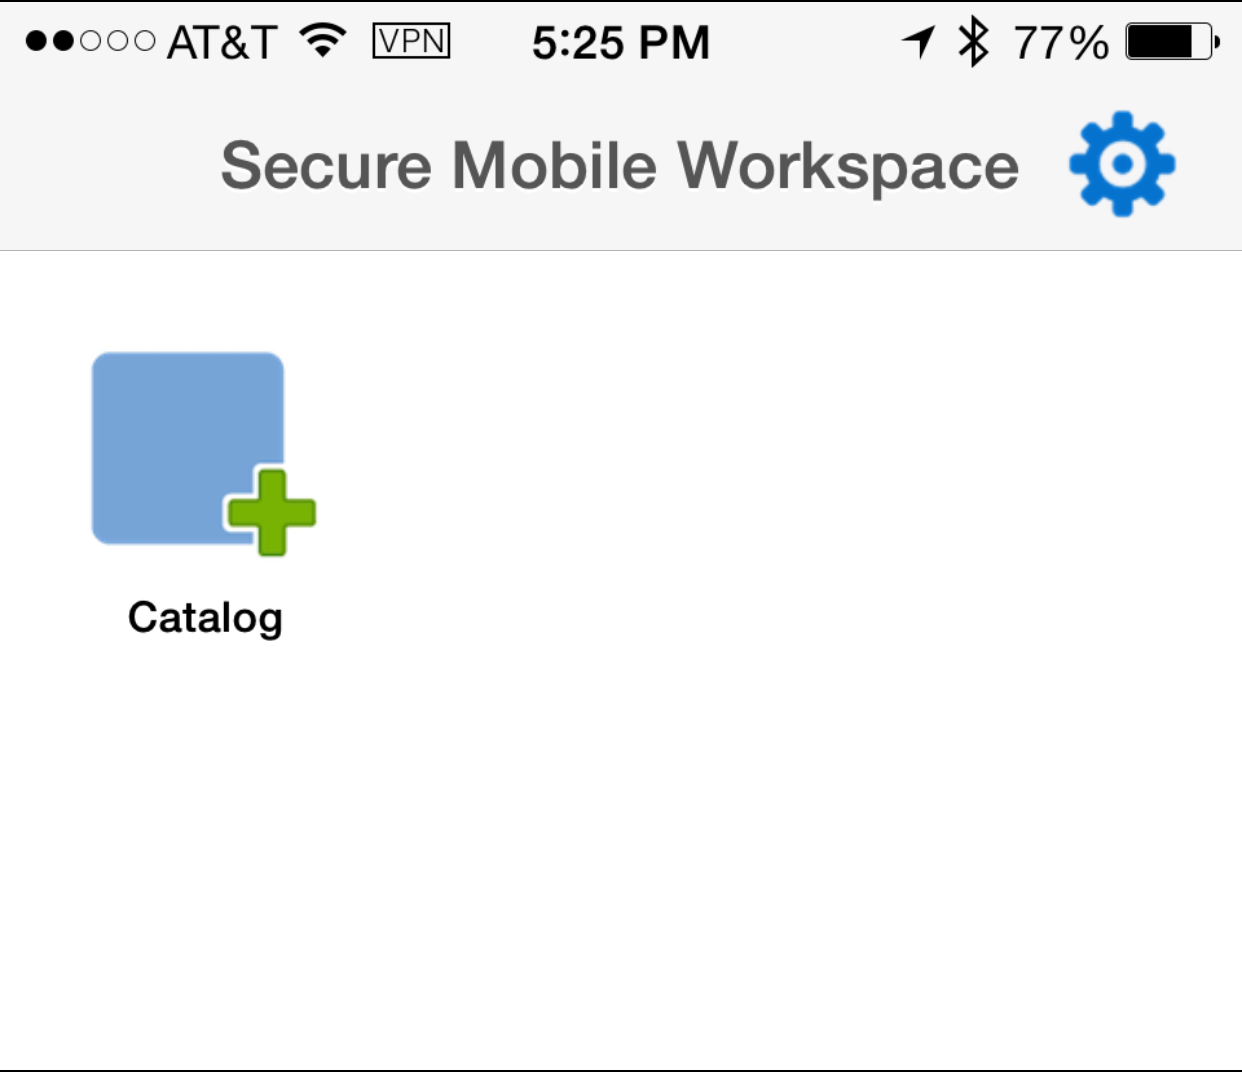
our case). Finally, You should be able to view
the secure workspace container and the managed
apps along with the vApp catalog to add apps
from the catalog to the secure workspace
container.
Login to access console. Click on Mobile
Security tab and navigate to Mobile
Security Manager > Mobile Devices.
Notice the secure workspace icon (and a unique
identifier) appears next to the managed device
icon. This means now both device and workspace
are registered.
Click on the Workspace icon and you should see
the operations that are permissible on the
workspace - Lock and Wipe.
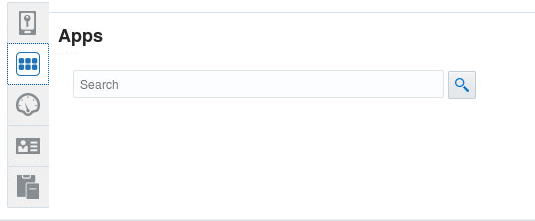
Click on the icons to the left - Details, Apps,
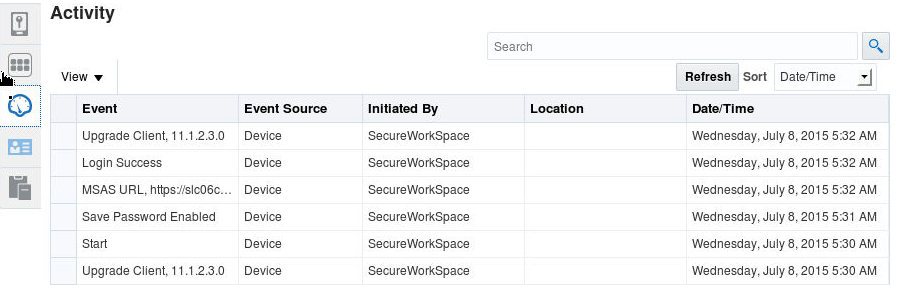
Activity, Credentials and Policies to review the
workspace properties, apps installed within the
workspace, activity logs on the workspace,
workspace credentials, listing of all the
policies on the workspace and effective
workspace policies on the secure workspace if
there are more than 1 policies assigned.
Apps
Activity
Credentials
Policies
Login to Secure Workspace using OAuth Mobile Client
Authentication
Now you will enter a new JSON URL to test the OAuth
mobile client authentication to secure workspace
container.
You can do this in two ways:
Synchronizing the workspace
Delete the secure workspace app from mobile
device.
Go to mobile device and hard tap on the
workspace app icon till the icons start to
jiggle. Use the x icon on the app to delete
the workspace app. Click on Home button.
Now login to access console Navigate to
Mobile security > mobile security
manager > mobile devices > select the
record for your mobile service. Click on
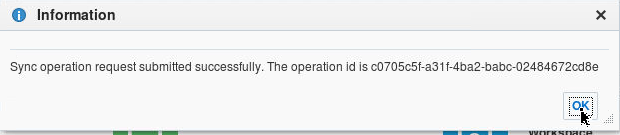
device icon. Click Sync. On the confirmation
window click OK.
This will push the secure workspace on your
mobile device again, based on the MDM MAM
Policy and you can tap on the install window
for the secure workspace on your mobile
device to reinstall the app.
Once the app is reinstalled, tap the app to
launch it. When you launch the secure
workspace app for the first time, it should
prompt you if you Trust the workspace app
which is signed by the iPhone distribution:
Oracle Corporation (xxx) certificate (in our
case).
Re-enter a new JSON Config URL for
OAuth Mobile Client AuthN:
Specify the
https://<msashost>:<msasport>/bmax/bmconfig_oauth2_oam.json
for example:
https://msashost:9002/bmax/bmconfig_oauth2_oam.json
Tap Configure
If the configuration was successful, you
should see the Login screen. Enter a valid
user/password (vparashar/Oracle123) and
select Remember Username.
Tap Login.
If MSAS Authentication is successful, it
will apply the workspace polices on the
secure workspace app based on the MDM MAM
Policy (in our case). Finally, You should be
able to view the secure workspace container
and the managed apps along with the vApp
catalog to add apps from the catalog to the
secure workspace container.
Wiping the workspace
Login to access console. Navigate to Mobile
security > mobile security manager
> mobile devices > select the record for
your mobile service. Click on workspace icon.
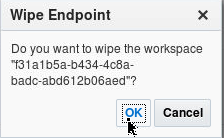
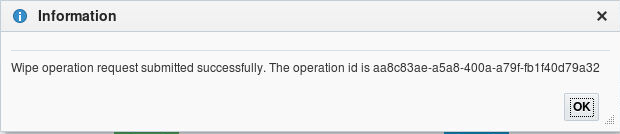
Click Wipe.
On the confirmation window click OK.
Go to your mobile device. Close the secure
workspace app (double click the home button,
swipe up the secure workspace app to close
it).
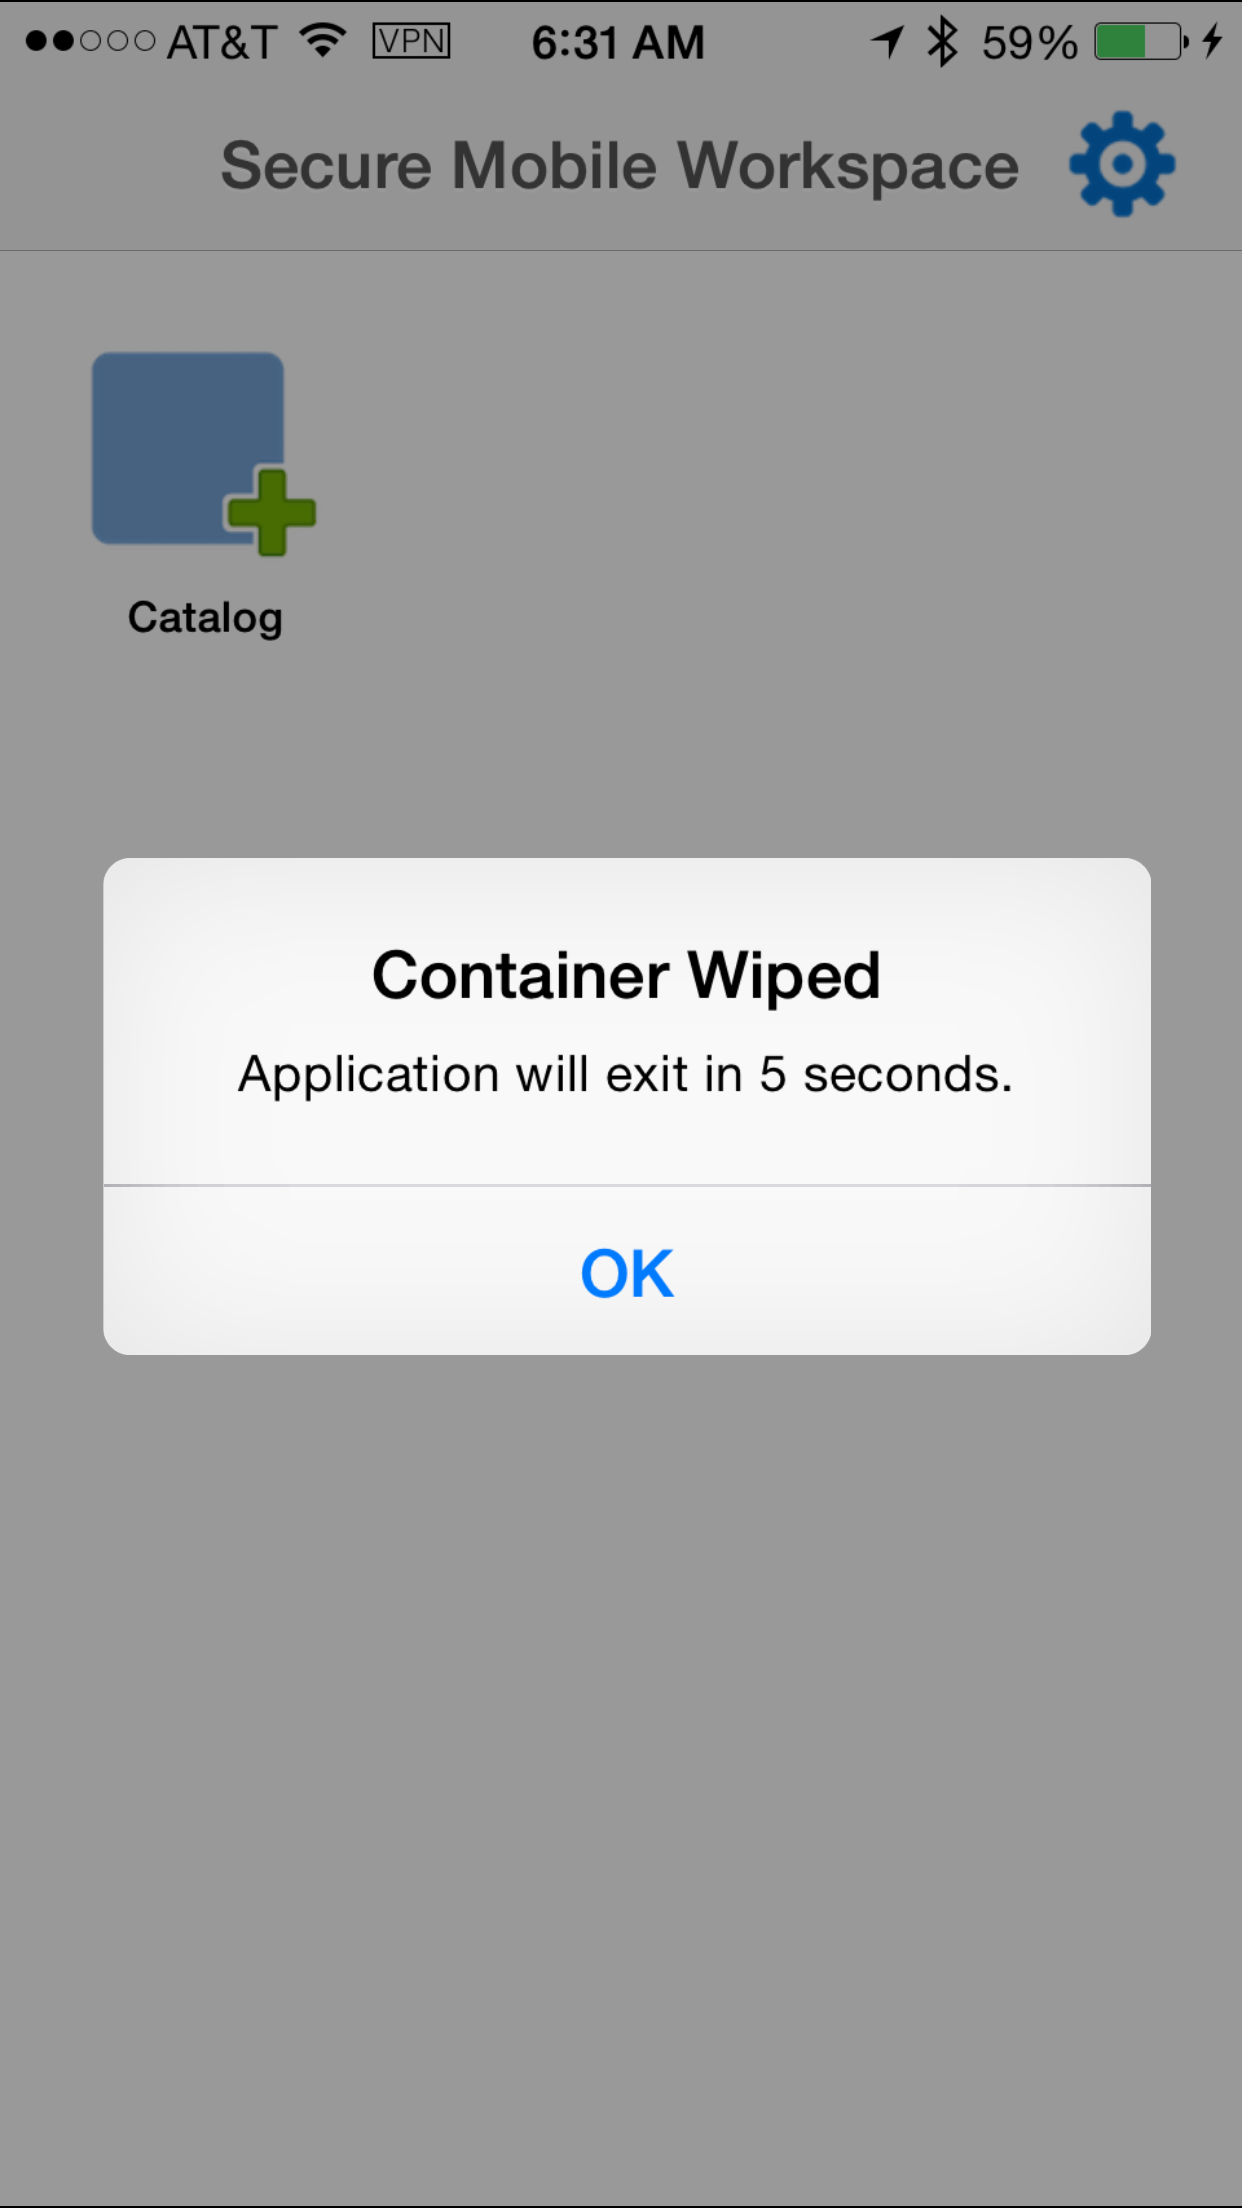
Tap the workspace app icon to launch it. Enter
your credentials on the login screen. After
successful login, it will display a message
that the container will close in 5 sec.
Relaunch the workspace app by tapping on it's
icon and now you should see the screen to
renter the config URL. Re-enter a new JSON URL
for OAuth Mobile Client AuthN:
Specify the
https://<msashost>:<msasport>/bmax/bmconfig_oauth2_oam.json
for example
https://msashost:9002/bmax/bmconfig_oauth2_oam.json
Tap Configure
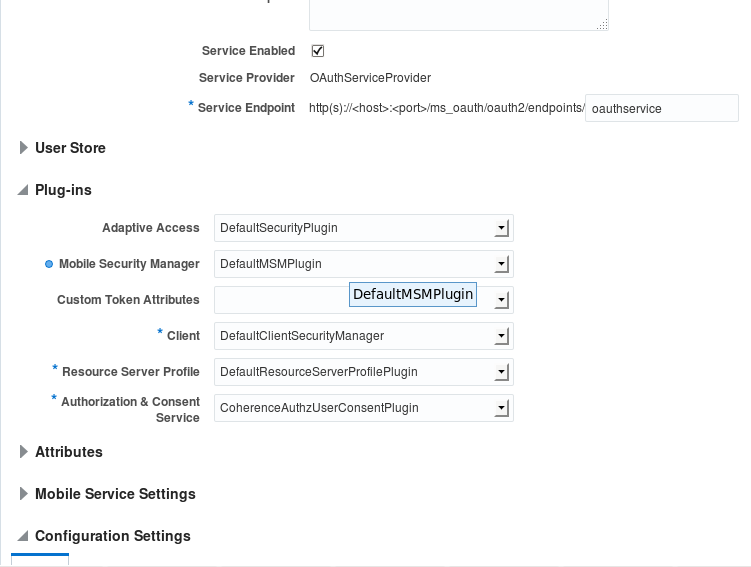
Note:If you get an error, make sure
"DefaultMSMPlugin" is de-selected in OAM OAuth
Service profile. This plug-in requires access
to MSM DB. However, omsm-ds is not trageted on
oam_cluster. Therefore, default OAuth Mobile
Client AuthN JSON URL config might fail with
the error: "unable to resolve 'jdbc.omsm-ds'.
Login to
Access Console. Click on Mobile Security.
Click
Mobile OAuth Services. Navigate to default
domains > Service Profile > OAuth
Service Profile.
Deselect
DefaultMSMPlugins.
If the configuration was successful, you
should see the Login screen. Enter a valid
user/password (For example:
vparashar/Oracle123) and select Remember
Username.
Tap Login.
If MSAS Authentication is successful, it will
apply the workspace policies on the secure
workspace app based on the MDM MAM Policy (in
our case). Finally, You should be able to view
the secure workspace container and the managed
apps along with the vApp catalog to add apps
from the catalog to the secure workspace
container.