Securing Oracle BI Mobile HD application using Oracle Business Intelligence Mobile Security Tool Kit and OMSS
Overview
Purpose
In this tutorial, you learn how to containerize and publish
custom enterprise secure applications on the catalog along with
the Out Of The
Box (OOTB) native secure applications.
Time to Complete
Approximately 2 hours
Introduction
Oracle Mobile Security Suite (OMSS) enhances employee
productivity by allowing secure access to corporate applications
and data from
mobile devices while preserving a rich user experience.
The Mobile Security Container creates an enterprise workspace on
any mobile device, corporate owned or personal, and for all mobile
platforms.
Oracle
BI Mobile Security Toolkit provides a
solution for OBIEE mobile customers, who require higher levels of
mobile device security than what
is provided by the mobile operating systems (iOS) or through the
Oracle BI mobile application.
Oracle BI Mobile Security Toolkit supplies a set of libraries,
header files and the instructions required to build a version of
the Oracle BI Mobile
HD application. Once the application has been built, it will be a
fully functional version of the BI Mobile HD application. This
application will now
be certified for distribution outside of the Apple App Store.
Working of Oracle BI Mobile Security ToolKit
A user of the Oracle BI Mobile Security Toolkit must be licensed
to use the OBIEE server and the BI Mobile HD application. The BI
Mobile
Security Toolkit will be updated on a regular basis in order to
synchronize with the Oracle BI Mobile HD application available on
the Apple
App store.
In order to guarantee the authenticity of the Apple iOS
application that is built as part of the Apple development
process, a signing certificate
is associated with the application during the build. For
distribution through the Apple App Store, the Oracle BI Mobile HD
Application has an
Oracle signing certificate associated with it. By shipping the
component parts in the BI Mobile Security Toolkit, a corporation
has the opportunity
to build and sign the application with their own certificate. This
allows for traced distribution through internal application stores
and the ability to
apply application wrapping technology through third party vendors
for security purposes.
The additional step in the Apple iOS certification process is the
assignment of the provisioning profile to the assembled
application. The
provisioning profile defines how the application can be
distributed. In the case of the BI Mobile Security Toolkit, the
ad-hoc method should be
used. Apple does not permit the distribution of unsigned
applications; however they do allow the distribution of libraries
where a
new valid Apple iOS signing certificate has been applied. This is
the approach that has been taken with the BI Mobile Security
Toolkit.
Hardware and Software Requirements
The following is a list of software and hardware requirements:
- Windows 2008 R2 SP1 server
- Linux machine OL6
- Oracle Database 11g version 11.2.0.3
- Oracle Mobile Security Suite 3.0.1.0.0
- Active Directory Windows 2008 (Optional)
- iMac or Macbook Pro laptop
- Xcode Version 5.1.1 or up
For this OBE, you use Active Directory for storing user
information. Any other LDAP data store (like OUD) can also be used
instead to
store user information.
Prerequisites
Before starting this tutorial, you should complete the following OBE:
Note: It is required that the organization or a developer be a
member of the Apple iOS Developer Program(https://developer.apple.com)
and have an understanding of the Apple iOS development process.
Secure the custom enterprise application
Install the Containerization tool
Download and install c14n containerization tool on the Mac
machine where Jdeveloper and XCode are running. Skip this
section if you
already have the containerization tool.
-
Download patch
19982462fromsupport.oracle.com(p19982462_30100_Generic.zip). Extract the file and you will
see a package file underOMSS-v3.0.6\C14N-Tool-v3.0.6.109.15344. Double-click to start the installer.
If you get an error about Xquartz, download and install the latest XQuartz fromhttp://xquartz.macosforge.orgfor example.
XQuartz-2.7.7.dmg
-
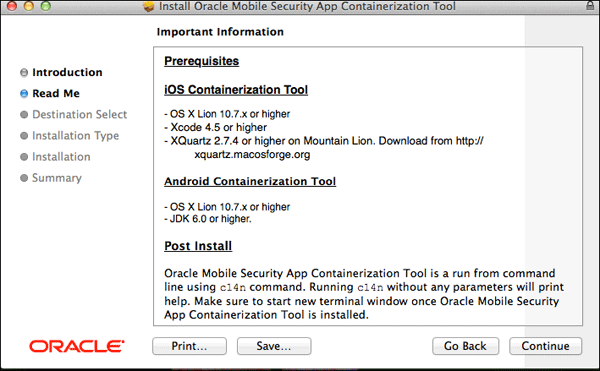
Run the installer of c14n as shown below.
-
Open a terminal window and enter the following commands.
c14n -version

                        which c14n
Make sure the output is correct.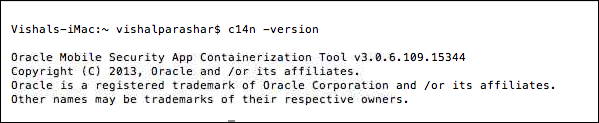
Build a new project
-
Download Oracle BI Mobile Security Toolkit 11.1.1.7.2420 from
http://www.oracle.com/technetwork/middleware/bi-enterprise-edition/downloads/

                          bi-mobile-security-toolkit-1872818.html
on your Mac OS. Accept the license agreement and then download the file. Extract the file. -
Open XCode 6.0.1. From the XCode menu, Select
File
                        > New > Project
to create a new XCode project or
when you open XCode, select the option to create a new XCode project from the Launch Pad.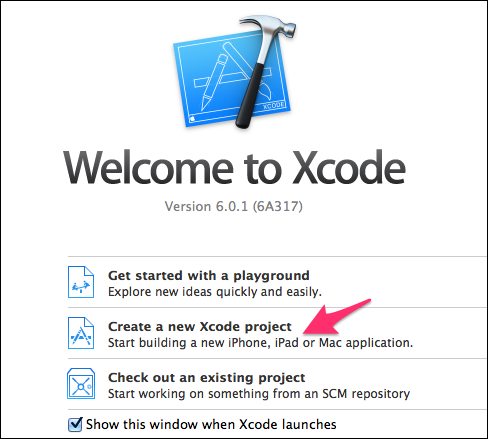
-
When asked to select a template, Select
Single
                        View Application
. ClickNext.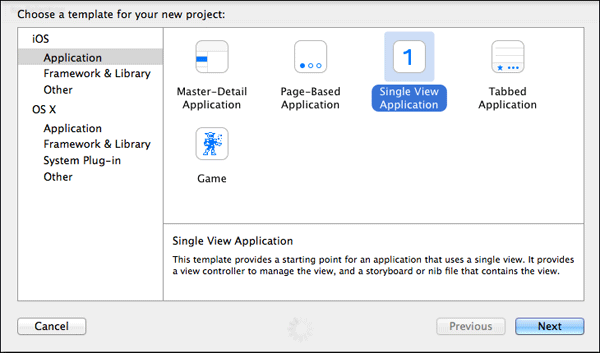
-
Enter Product Name as MobileBI, Organization Name as MyCompanyOrg, Organization Identifier as MyCompany. Observe the
Bundle Identifier that gets automatically constructed based on<organization_identifier>.<product_name>.In the Devices drop-down, specify the devices you are targeting. The Oracle BI Mobile HD application is a universal application
that supports iPhone and iPad clients, so make sure to select Universal.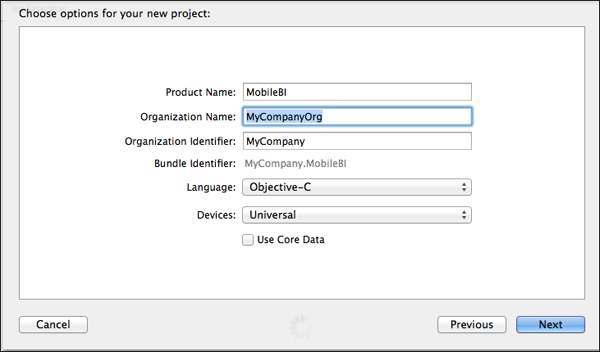
-
Click
Nextand specify the destination to save your new project. ClickCreate.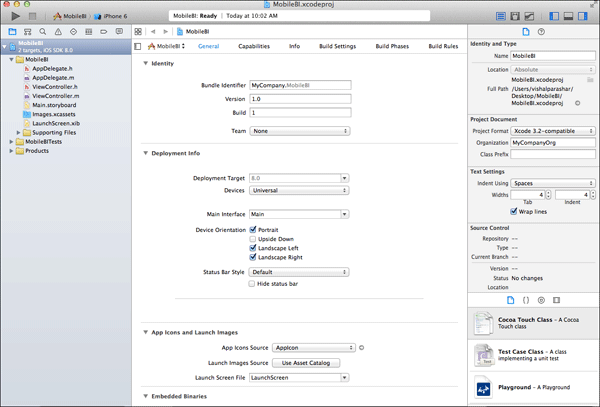
-
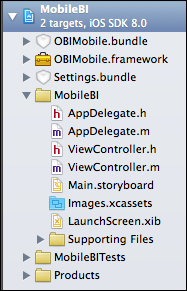
Drag the
OBIMobile.framework,Settings.bundleandOBIMobile.bundlefiles from the unzipped location of
Oracle_BI_Mobile_Security_Toolkit.11.1.1to the project. Be sure to drop them on the Project icon and not
above the icon.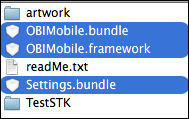
-
Select
MobileBIinAdd to targets. SelectCreate groupsinAdded Folders. Leave other options
unselected and clickFinish.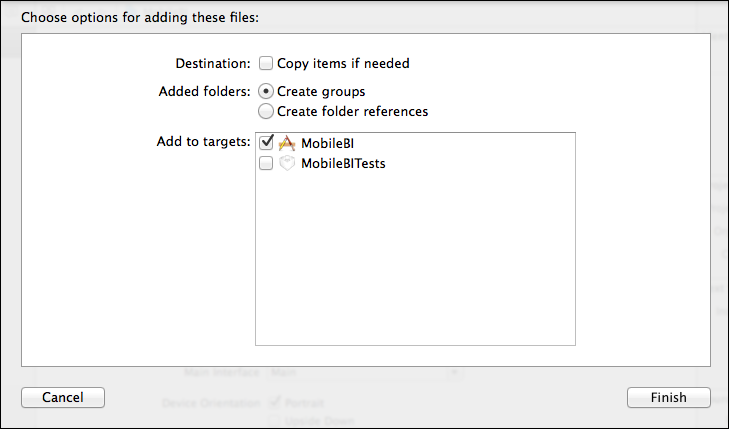
Modify project properties
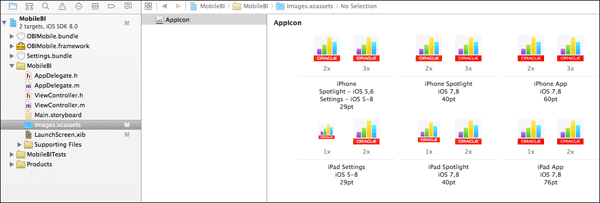
Add the icons for the application. Be sure to add them for
both the iPhone and iPad. You can do
this by dragging and dropping icons into their appropriate
image set's (AppIcon) corresponding asset catalog.
-
In the Project Navigator, select the asset catalog (for example,
images.xcassets).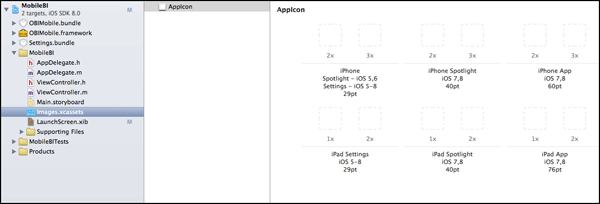
-
Drag and Drop the images to the Image Set. Drag and drop the icons from
unzip_location/artworkinto the
placeholders.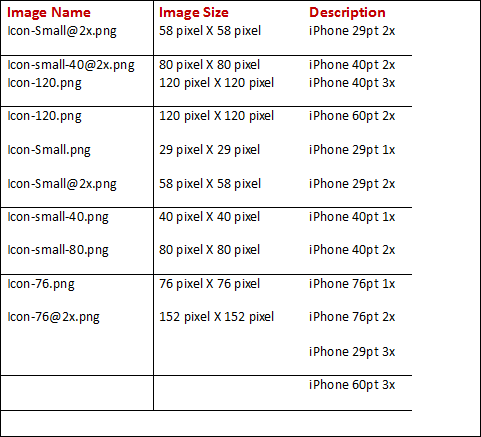
-
For the last two entries above, for which there is no icon out of the box, create your own icons.
OpenIcon-Small@2x.pngin MS Paint (on windows machine). ClickResize. SelectPixelradio button
and specify the size as 87 x 87. ClickOK.Note: On a MAC machine, you could use the Paint Brush tool to edit images.
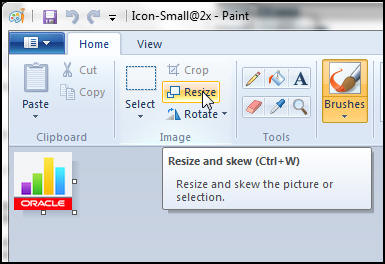
Save the image in the
artworkfolder asIcon-Small@3x.png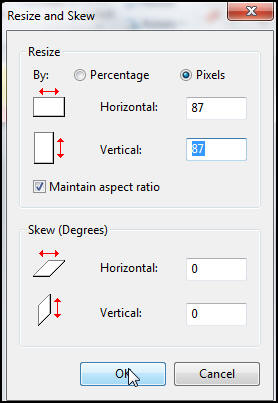
-
Similarly, Open
Icon-120.pngin MS Paint (on windows machine) or Paint Brush in Mac. ClickResize. Select
Pixelradio button and specify the size as 180 x 180. ClickOK. Save the image in theartworkfolder asIcon-180.png.
Use these two images to populate the placeholdersiPhone 29pt 3xandiPhone 60pt 3x.Note: You will find the icons for the iPad and the iPhone in the zip file (downloaded earlier), but you can
use any icon you want as long as it complies with Apple sizes and specifications. You can also apply some
custom branding to the icons (rather than using Oracle branded icons).This is what the end result of placing the icons in the placeholders should look like.
Note: If you place an incorrect size icon on the placeholder, it would show an error(!) on the menu bar as
shown below.
Edit Build Settings
-
Click
MobileBIin the project navigator. ClickGeneral. UnderDeployment Info, Observe the orientations for both the
iPad and the iPhone. Also, verify thatDeployment Targetis set to 8.0, a version of iOS that the Oracle BI Mobile HD
application supports. Do not select a Target lower than 6.1.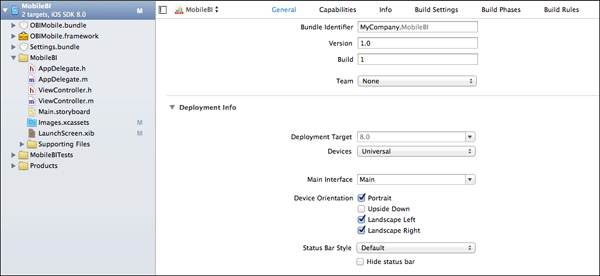
Note: Supported iOS versions can be found by checking the requirements list for the Oracle BI Mobile HD application
on the Apple App Storehttps://itunes.apple.com/us/app/oracle-businessintelligence/id534035015?mt=8 -
Click
Info. ExpandURL Types. Click + to add a new URL Type. Fill in the following fields
with the corresponding values:
Identifier : com.oracle.obimobile
URL Schemes : oraclebimobile
Leave the rest of the options for the new URL type blank or as defaults.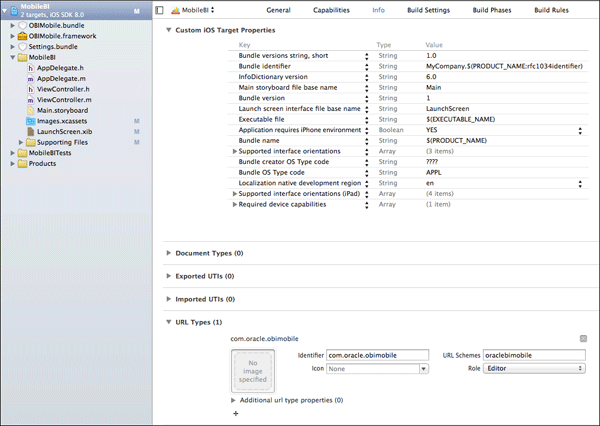
-
Click
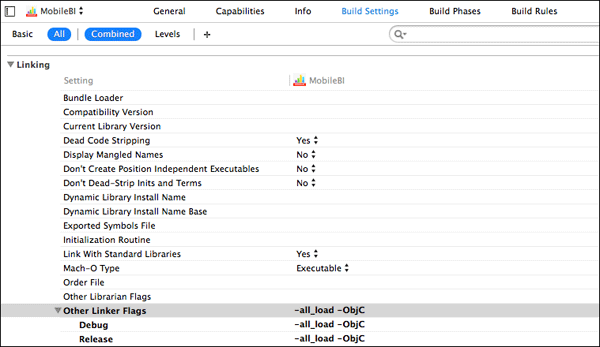
Build Settings > All. Search for "Other Linker Flags" underLinking. Add the follow parameter:
-all_load -ObjCTo add this parameter you must double-click in the blank space next to the property. Then in the dialog
(shown below), add
the new parameter.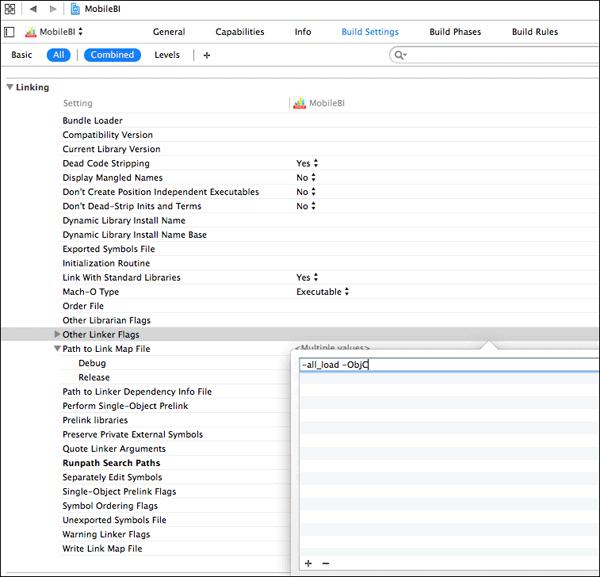
The Linker Flag is successfully added as shown below.
-
Under
Build Settings, remove the arm64 from the valid architectures property under the Architectures section.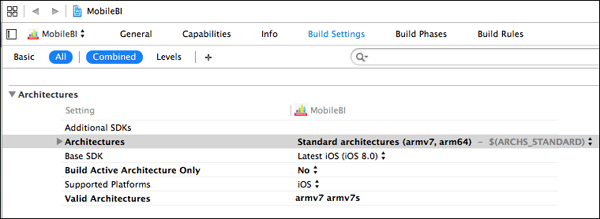
-
Click
Build Phases. FromLink Binary, Click the + sign to add the following libraries. Verify if each has Status
markedRequired.
MessageUI.frameworkSecurity.frameworkQuartzCore.frameworkCoreData.frameworkUIKit.frameworkFoundation.frameworkCoreGraphics.frameworklibsqllite3.dylib
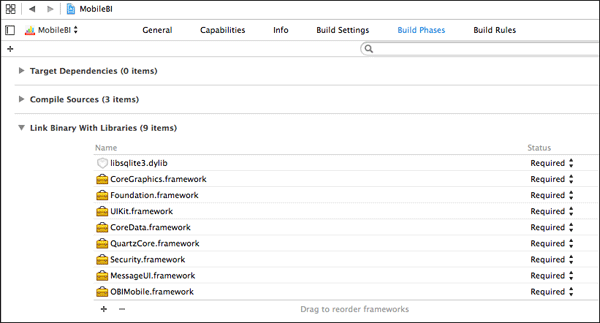
Note:
OBIMobile.frameworkis already present by default.
Modify Application Code
-
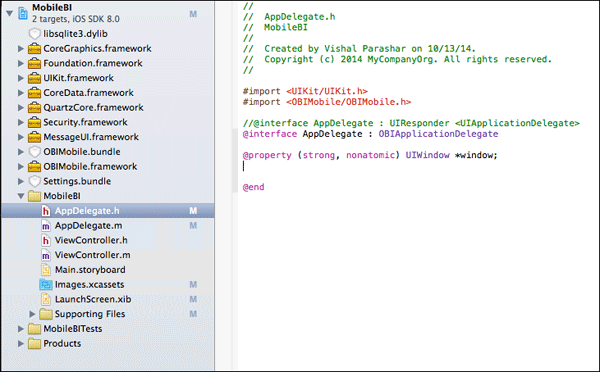
Select the file
<classprefix>AppDelegate.hin the project and add or modify the following lines of code:
Add#import <OBIMobile/OBIMobile.h>
MakeAppDelegateinherit fromOBIApplicationDelegateNote: In our example, as seen from the screenshot below, you are not using
Class Prefix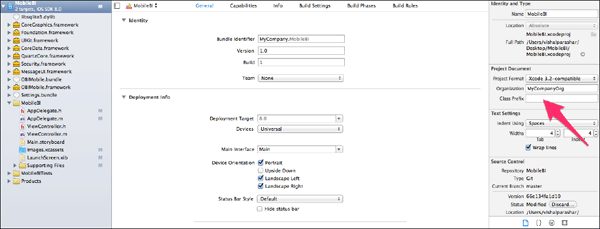
-
The final modified
AppDelegate.hshould have the following lines of code :
 #import <UIKit/UIKit.h>

                        #import <obimobile obimobile.h="">

                        @interface
                        <classprefix<AppDelegate:OBIApplicationDelegate

                        @property(strong,nonatomic)UIWindow*window;

                        @end
NOTE: The
<classprefix>represents the name of the Class Prefix. Since you did not specify a class prefix, the
file will simply be calledAppDelegate.hand any reference in the code will beAppDelegate. -
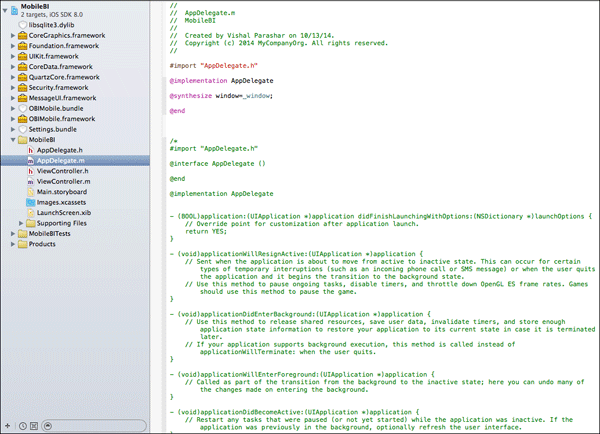
Comment out all the code in
<classprefix>AppDelegate.mand replace it with the following code:
 #import "<classprefix>AppDelegate.h"

                        @implementation <classprefix>AppDelegate

                        @synthesize window=_window;

                        @end

                        /*CODE COMMENTED OUT*/
You have completed downloading the Oracle BI Mobile Security Toolkit, added icons for the application and edited the build settings.
Build the custom enterprise application with Xcode
There are two different methods to build the application.The
first approach is to build the application within XCode. The
second approach
is using XCodebuild command line tool. Either of these approaches
can be used.
If you want to use the same enterprise distribution profile and
certificate to build that app, that you will later use to
containerize the app
using c14n tool, you can build the app within XCode using this
real enterprise distribution provisioning profile and certificate.
Once you
build this app (app file), you can run the c14n tool to
containerize the app to generate the .ipa file. You
can publish the file to the
OMSS catalog. Mobile users can download the app to their secure
workspace container from vapp catalog. In this section, you will
build the application within XCode.
Build the application
-
Navigate to
Build settings > Code Signing. Assign the enterprise distribution provisioning profile such as
Bitzer Enterprise Distribution Starand assign the certificate mapped to that profile,
iPhone Distribution: Bitzer Mobile Inc.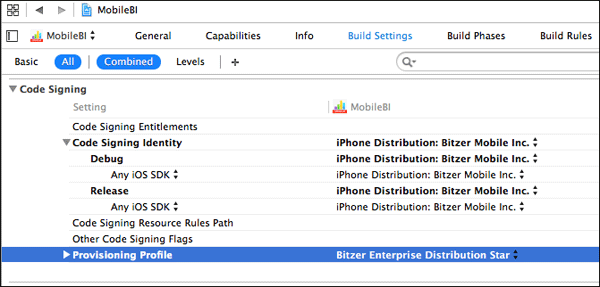
-
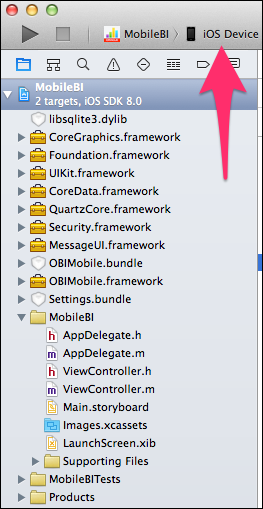
Verify if the device is set to iOS Device (not a simulator).
-
Click
Product > Build. Observe the error: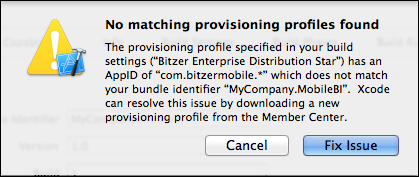
-
To fix this error, Click
General. ChangeBundle IdentifierunderIdentitysection fromMyCompany.MobileBIto
<App id of the provisioning profile>.MobileBIcom.bitzerMobile.MobileBI.In our case the App id
of the provisioning profile iscom.bitzerMobile.*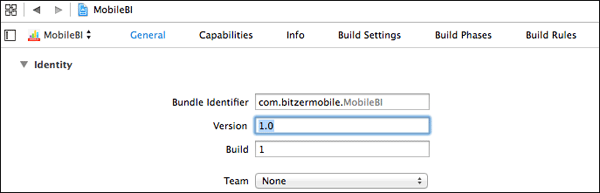
Observe that you used a provisioning profile with a wildcard * at the end so it can be used with multiple applications. If you
used a non-star (wildcard) suffixed provisioning profile such asBitzer Enterprise Distributionwith APNS or similar
certificate, then you would have to use the exact same App ID of the provisioning profile in the Bundle Identifier for the app.
Therefore theMyCompany.MobileBIbundle identifier would have to be changed to the App ID of the provisioning profile.Note: The reason you are able to see all the provisioning profiles in the drop down under Code Signing section is because
you are logged into XCode as the Apple developer(XCode > Preference > Accounts). Based on your account profile as
an apple developer, you will see the provisioning profiles and certificates in XCode.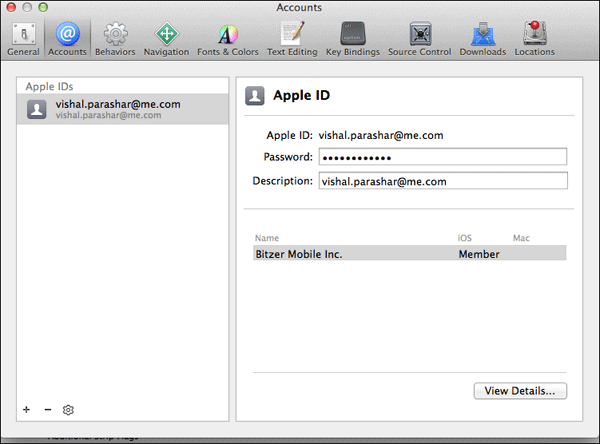
-
Select
Product > Build. Build should now be successful.
Archive and export the file
-
To create an .ipa application archive file, select
Product
                        > Archives
. ClickExport.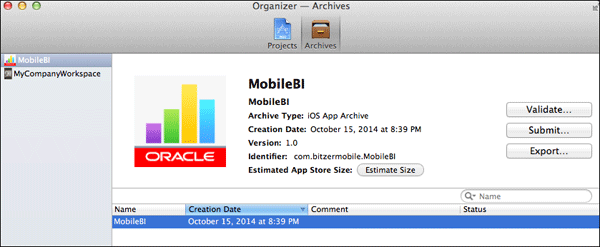
-
On
Select a method for exportwindow, SelectSave for Enterprise Deployment option.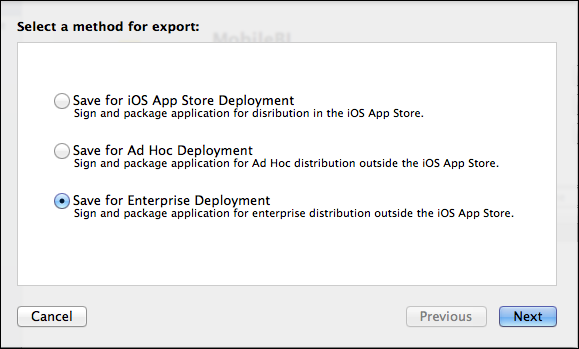
-
Select a development team to use for provisioning.

-
On
Summarywindow, ClickExport.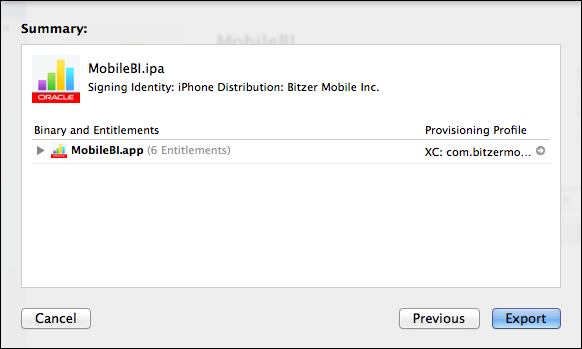
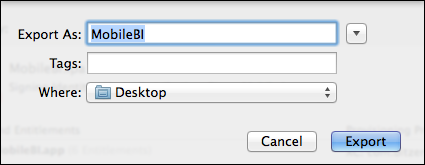
-
Specify the destination to save the .ipa file.
Containerize application
-
You can check information about the ipa file for eg, app bundle name, signature used to sign the ipa file,
bundle identifier using c14n command. Invoke a terminal window. Issue the commands given below.
cd <location of ipa file>(in our case it is saved on Desktop)
c14n -c info -i MobileBI.ipa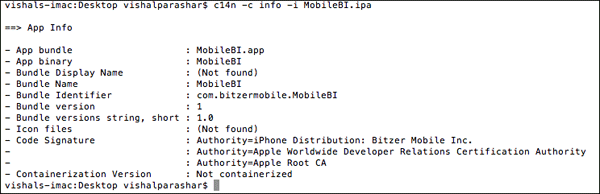
-
To containerize the app, you need to run the following command:
c14n -c inject -i MobileBI.ipa -o
                        MobileBI_Containerized.ipa -cert
                        "<name_of_the_cert>"

                        -p <name_of_the_prov_profile>
After the command runs successfully, you can verify if it was containerized properly by running the
following command:
c14n -c info -i MobileBI_Containerized.ipa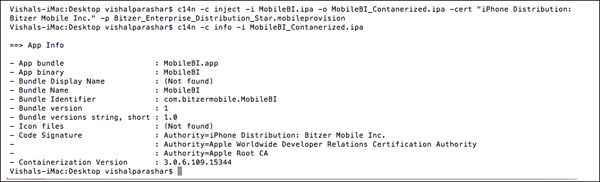
Publish application
Publish the containerized app to the catalog.
-
Login to MSAC
https://idgovserver1.idc.oracle.com/acpasadmin@idc.oracle.com. ClickCatalog.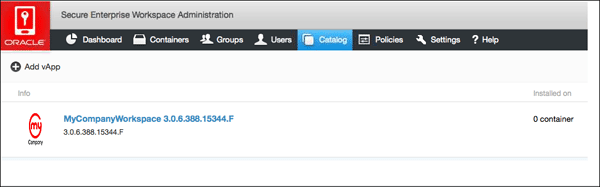
-
Click
+Add vApp. SelectCONTAINERIZED APP.Browse and upload theMobileBI_Containerized.ipafile.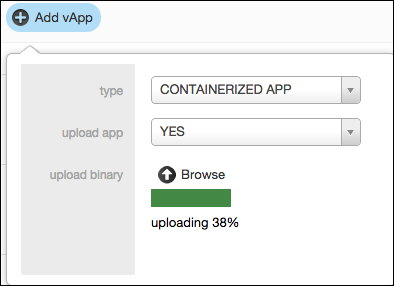
-
The page should refresh automatically when the upload completes and you should see the
MobileBIapp.
Observe the containerization version in the screen below.
-
Click
MobileBIapp and it should display detailed properties.
-
Click
Policies. The app is now in the catalog and you will add it to a policy to make it available.
SelectDefault Policy.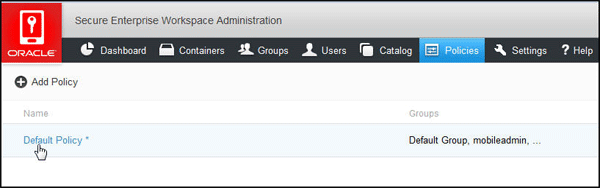
-
Navigate to
Default Policy > Catalog. Enter the Application Name inAdd vApp to User Catalog, Select the app.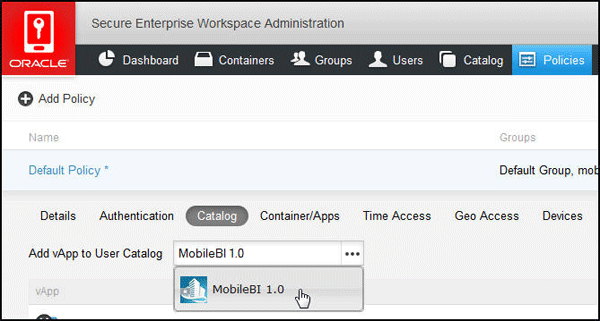
-
Select
Save.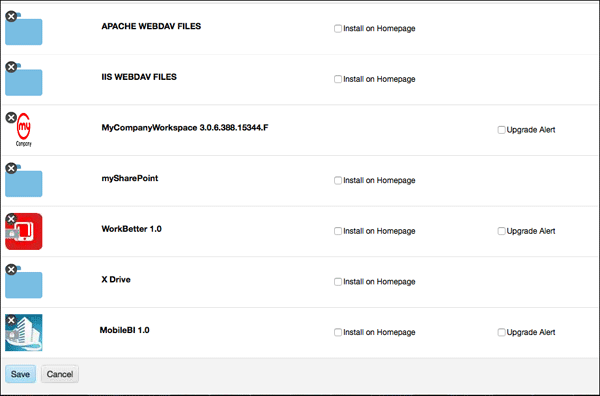
-
If you want to make it a birth-right app, that is, an app that is automatically installed on the home page of iPad for
the users, ClickInstall on Homepage.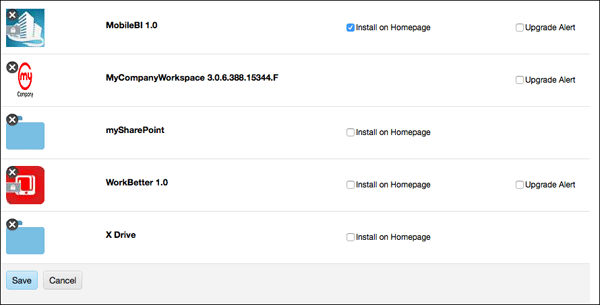
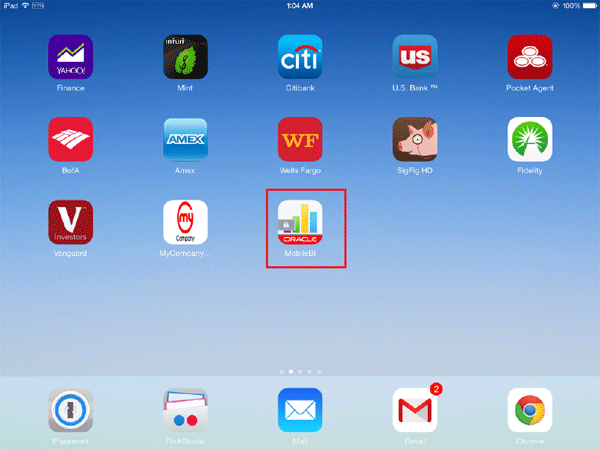
Access secure app from an iPad
Open your iPad. Tap on MyCompany Icon (Secure Workspace Container).
-
Login as any user who is member of the control group (in our example
sanjays@idc.oracle.com). You should see
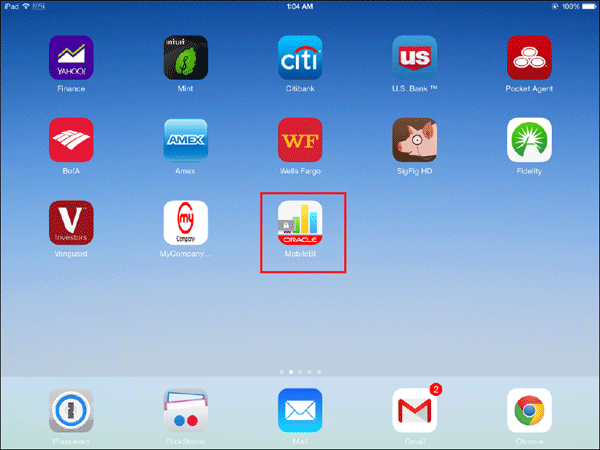
theMobileBIapp on the home page automatically as you had made it a birth-right app.Observe that the app appears in two places, within the secure workspace and outside the workspace (with the lock on it,
meaning even though it is placed outside the secure workspace, it is protected by the secure workspace container).
-
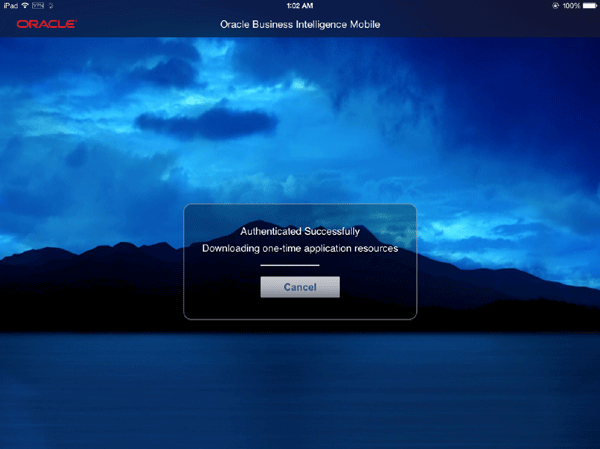
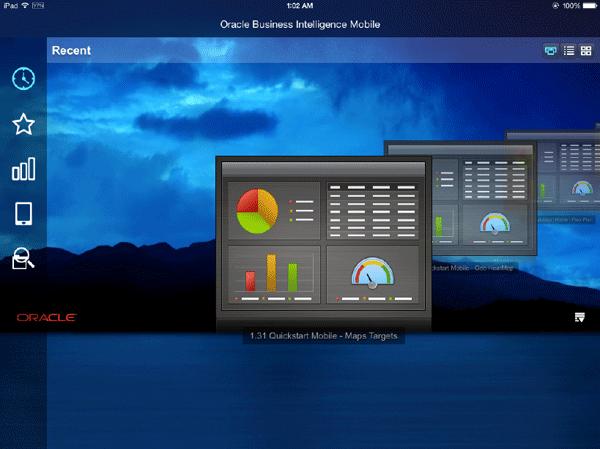
Click and Launch it, Observe that
MobileBIapp doesn't challenge you to authenticate since you are already authenticated
to secure container (it redirects to secure workspace container). It then redirects back to theMobileBIapp and you login
transparently using the same credentials as secure workspace app login.Click
Acceptto theEnd User License Agreement. You can now access the secure app.
-
On the
Add Serverpage, mobile users have to specify the server settings by clickingAdd Server.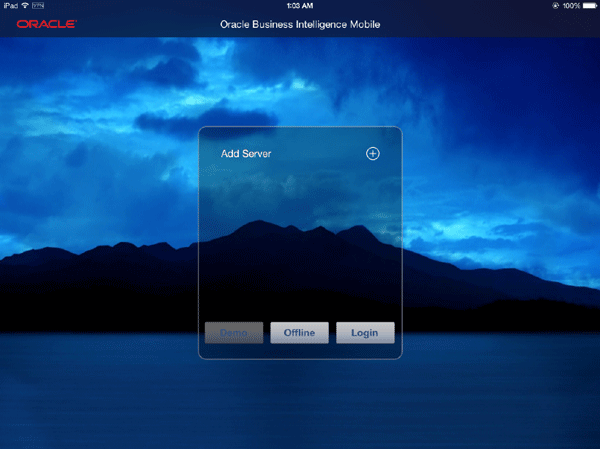

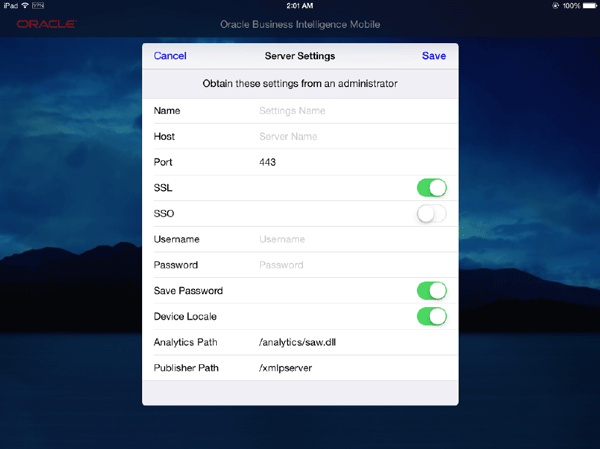
If you want to avoid this for the end users and embed this information in the application itself, you could do
the following section. The section below is for information only, you don't have to perform these steps.
Configure server while deploying application
-
Many organizations do not want their end users to have to bother with server configuration. One of the benefits of
creating a “wrapped” application that is deployed in an enterprise application store, is the ability to modify the code
and avoid this problem of server configuration having to be done by end users. -
Select the file
<classprefix>AppDelegate.min theMobileBIproject within Xcode and add the following method:
(BOOL)application:(UIApplication*)application

didFinishLaunchingWithOptions:(NSDictionary*)launchOptions
{
//To add a server you can do the following:
[super createServer:@"<Provide server name>"
host:@"<Provide host>"
port:<9704>
enableSSL:FALSE
enableSSO:FALSE
username:@"<Provide username or blank(user will be prompted)>"
password:@"<Provide password or blank (user will be prompted>"
setAsDefaultServer:NO];
//Override point for customization after application launch.
return [super application:application
didFinishLaunchingWithOptions:launchOptions];
}NOTE: Replace any strings above in <> or italics with actual values based on your configuration.
You have now completed building and publishing the application using XCode.
Build the custom enterprise application with XCodebuild tool
The second approach is to customize the app in XCode as needed,
however do not build the app in XCode. Use XCodebuild command
line tool to build the unsigned-app. Hand over the unsigned-app to
the security admin team. Security team containerizes the app using
enterprise distribution provisioning profile and certificate and
finally publishes it to the OMSS catalog.
You could follow either this approach or the previous one to
build the enterprise application. In this section you will follow
this approach
of using XCodebuild tool.
Customize application
-
Open XCode with
MobileBIproject. After you have made all the changes to the application (as explained in the above sections)
, Navigate toBuild Settings > Code Signing. Set the Provisioning Profile toAutomaticand Code Signing Identity to
Don't Code Sign.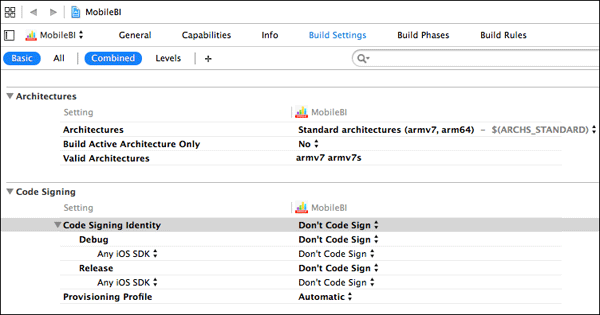
Build application
-
Save the project (if not saved already using
File
                        > Save
). Open a terminal window. Navigate to the location of
MobileBI.xcodeproj(in our case underMobileBIfolder on the desktop).
Run the following command to build the application.
$
                        /Applications/Xcode.app/Contents/Developer/usr/bin/xcodebuild
                        clean build

                        -project MobileBI.xcodeproj -target MobileBI
                        CODE_SIGN_IDENTITY=""

                        CODE_SIGNING_REQUIRED=NO -configuration Release
                        PROVISIONING_PRPFILE=""

Note: Using command line we can build a XCode application without signing the app or attaching a
provisioning profile. -
After the application builds successfully, the following message is displayed.
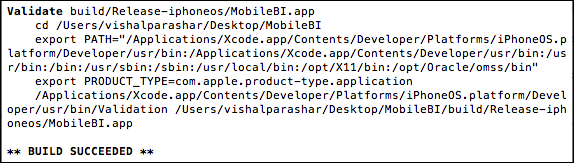
-
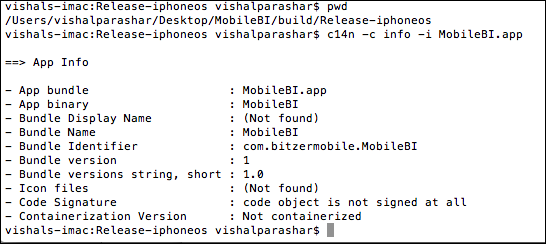
Observe that the
MobileBI.appfile got generated underMobileBI/build/Release-iphoneosdirectory. This is
an unsigned app. You can get more information on this app by navigating toMobileBI/build/Release-iphoneos
directory on the terminal window and running the following command.
c14n -c info -i MobileBI.app
Containerize the application
-
Containerize the app, using c14n command line specifying enterprise distribution provisioning
profile and certificate as shown below.
c14n -c inject -i MobileBI.app -o
                        MobileBI_Secured.ipa -cert "iPhone Distribution: Bitzer
                        Mobile Inc."

                        -p
/Users/vishalparashar/Desktop/Bitzer_Enterprise_Distribution_Star.mobileprovision

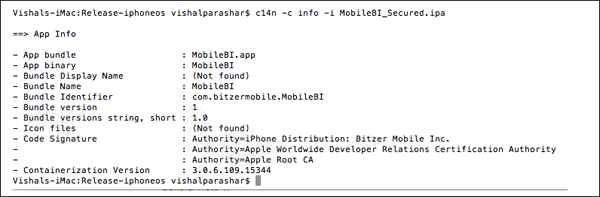
-
Once the command runs successfully, you can get more information on the containerized app
MobileBI_Secured.ipafile, by
running the following tool.
c14n -c info -i MobileBI_Secured.ipa
General Note 1:
If you get an XCode project from ISV then you can open it in
XCode, customize it(to some extent) as
needed. You can generate an ipa file after attaching your
enterprise distribution provisioning profile and enterprise
certificate
in the Code Signing section. Now, you have to inject OMSS
libraries in the .ipa file to containerize it.
Hence there are two options:
-
Run c14n with inject only option which containerizes the app. Then hand it over to the security team who
will run c14n with sign-only option and sign the app (using the same certificate that was used in Xcode). You have
to sign the app after injecting it with OMSS libraries (i.e, after containerization) as the code signature
for the binary has changed. -
Run c14n with inject option where you specify both the enterprise distribution provisioning profile and enterprise
certificate together.
Note: Choosing either of the above option depends on how
your team is structured. If the team handling
containerization
of the app is the same team responsible for enterprise
certificates then you can choose the second option. However
if these
are two separate teams, choose the first option.
General Note 2:
If you are creating/updating the app in XCode, you have to
code sign it (attach a provisioning profile and certificate)
to generate the
app or ipa file. There is no way to create an unsigned app
through XCode. So if you are using XCode to create or update
the app,
you have two options:
-
Generate the .app or .ipa file from XCode. In this case, you must code sign it using the same provisioning profile and certificate
which will be later used to containerize the app and sign it using c14n, otherwise c14n will fail. -
Save the project in XCode after creating/updating it however build the app using command line tool, xcodebuild. The advantage
of this option is that using xcodebuild, you can generate unsigned app (which you cannot using xcode). Once you have the .app
or .ipa file generated using xcodebuild which is unsigned, then you can simply run c14n to containerize and sign it using
the enterprise distribution provisioning profile and an enterprise certificate.
Generally speaking, in most situations, you will not get an
xcode project file from ISV. Instead you will get an unsigned
app
or ipa file from the ISV. Hence to containerize it, you simply
run c14n using either of the options mentioned above in
General Note 1.
Publish application
Publish this containerized app to the catalog as you did in the previous approach.
-
Login to MSAC
https://idgovserver1.idc.oracle.com/acpasadmin@idc.oracle.com. ClickCatalog.
-
Before you add this app, Make sure to delete the existing
MobileBIapp, as these two are the same app. Click
MobileBIDelete.Click the
Add vAppicon. SelectCONTAINERIZED APPand browse and upload theMobileBI_Secured.ipafile.
-
The page should refresh automatically when the upload completes and you should see the
MobileBIapp.
Observe the containerization version in the screen below.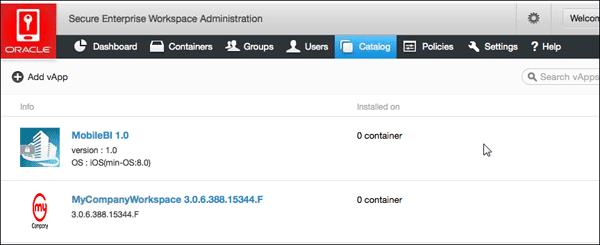
-
Click
MobileBIapp and it should display detailed properties.
-
Click
Policies. The app is now in the catalog and you will add it to a policy to make it available.
SelectDefault Policy.
-
Select
Catalogon theDefault Policy. Enter the Application Name inAdd vAppto User Catalog, Select the app.
-
Select
Save.
-
If you want to make it a birth-right app that is, an app that is automatically installed on the
home page of iPad for the users, ClickInstall on Homepage.
Access secure app from an iPad
Open iPad. Tap on MyCompany Icon.(Secure
Workspace Container).
-
Login as any user who is member of the control group (for example
sanjays@idc.oracle.com). You should see
theMobileBIapp on the home page automatically as you had made it a birth-right app.Observe that the app appears in two places - within the secure workspace and outside the workspace (with the lock on it -
meaning even though it is placed outside the secure workspace, it is protected by the secure workspace container).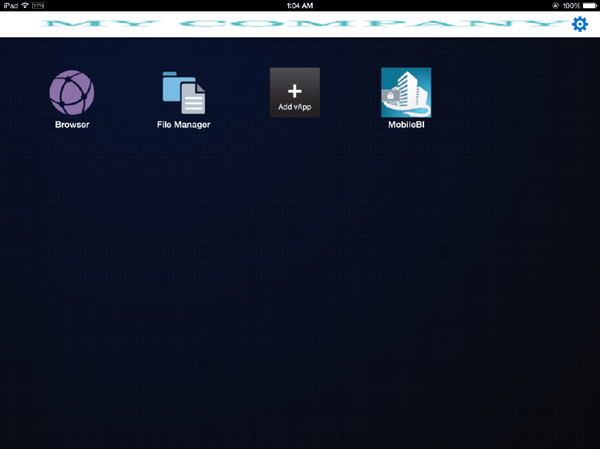
-
Click and launch it, Observe that the
MobileBIapp doesn't challenge you to authenticate since you are already
authenticated to secure container (it redirects to the secure workspace container and then redirects back to the
MobileBIClick
Accepton the End User License Agreement.You can now access the secure app.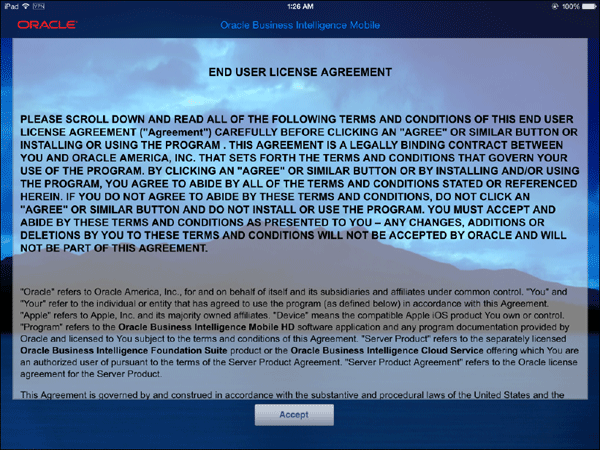
-
On the
Add Serverpage, mobile users have to specify the server settings by clickingAdd Server.


You have now completed building and publishing the app using Xcodebuild command line tool.
Summary
In this OBE you learnt, how to containerize Oracle BI Mobile HD
application. You used two approaches to build the application,
one using XCode and the second using a command line tool called
Xcodebuild.
In this tutorial you learned to:
- Secure the custom enterprise application
- Build the application using either XCode or Xcodebuild tool
- Containerize the application using c14n tool
- Publish the containerized application
- Access secure application from an iPad
Resources
-
For additional OBEs, please refer to the Oracle Mobile Security Series
Credits
- Lead Curriculum Developers: Vishal Parashar, Vandana Rajamani
- Product Manager: Sanjay Sadarangani
- Other Contributors: Pradeep Bishnoi, Ali Ahmed, Ashish Singh, Mukesh Singh, Satishkumar Venkatasamy
To navigate this Oracle by Example tutorial, note the following:
- Topic List:
- Click a topic to navigate to that section.
- Expand All Topics:
- Click the button to show or hide the details for the sections. By default, all topics are collapsed.
- Hide All Images:
- Click the button to show or hide the screenshots. By default, all images are displayed.
- Print:
- Click the button to print the content. The content that is currently displayed or hidden is printed.
To navigate to a particular section in this tutorial, select the topic from the list.