Building Your First Process with Oracle BPM
Overview
Purpose
This tutorial shows you how to build a simple Hello World
application using Oracle BPM Suite 11g R1. It also shows
you how to deploy the process to the BPM server and test it in
the BPM Workspace.
Time to Complete
Approximately 2 hours
Introduction
In this tutorial, you use Studio, the JDeveloper based IDE, to create a simple Hello World process. This process demonstrates the use of a file service (implemented by a file adapter), user tasks (implemented by the Human Workflow engine), and conditional branching. The conditions for the branching are determined through the use of a business object and a business rule (which is implemented by the business rules engine). You also use a script task to initialize a variable. After building the process, you deploy it to the BPM engine and test it in the runtime environment.
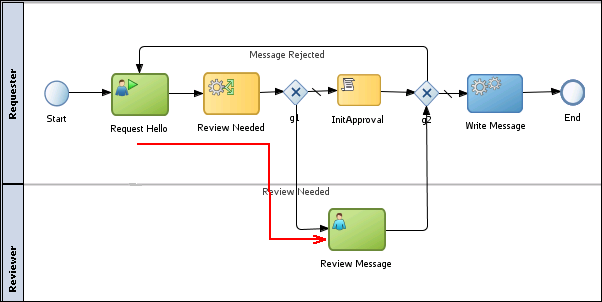
Scenario
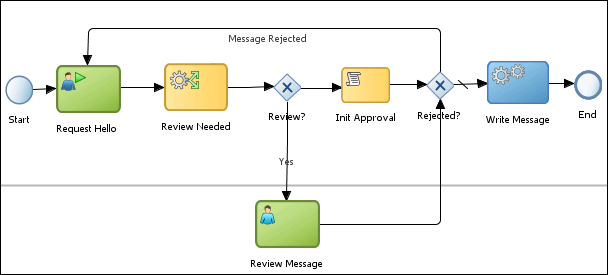
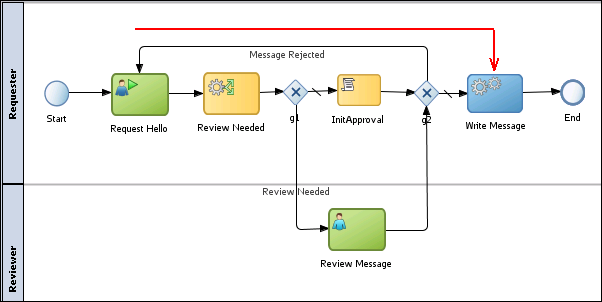
There are two roles involved in the Hello World process, the sender of the message (in the Requester role), and a reviewer (in the Reviewer role). The requester is prompted, through the Request Hello user task, to enter a Hello message, greeting, and a date for the message. After the form is submitted, a business rule is applied to the message content to determine whether the message requires a review, based on the length of the greeting and message fields.
If the message does not require review, the process flows to a script task, which initializes a variable needed by the next task, then the message is sent to the Write Message user task to be written to the file system. If the message requires review, the reviewer is prompted to review the message and either accept or reject it. If the message is rejected, it returns to the Request Hello user task so that the requester can correct the message. If it is accepted, it goes directly to the Write Message user task for file processing.
- Install Oracle BPM Suite 11g Release 1 (11.1.1.7)
- Install Oracle JDeveloper Studio Edition 11g release 1 (11.1.1.7). You should have also installed the SOA Suite Extension for JDeveloper.
- Have added the Demo Community users to the WebLogic server's internal LDAP database. You will map these users to the Hello World application roles.
- If you have not done this, Download and extract the SeedDemoCommunity.zip file containing the ANT files that will perform this task. You will need to modify some parameters in the ANT build file to match your particular installation. Use this ReadMe file to assist you.
Hardware and Software Requirements
The following is a list of hardware and software requirements:
Prerequisites
Before starting this tutorial, you should:
Creating the Basic Hello World Application
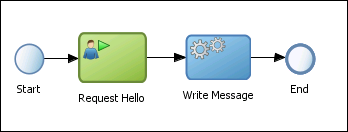
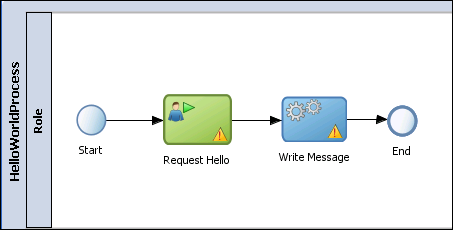
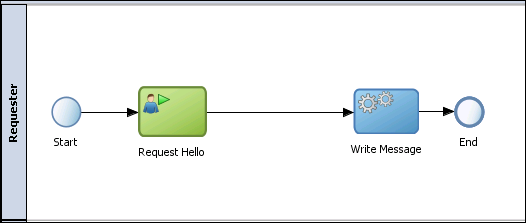
In this section you create the basic starting point for the Hello World process using the JDeveloper Studio. This simple process contains just four flow objects: a start event, a user task ("Request Hello"), a service activity ("Write Message"), and an end event. The end user will be able to enter a Hello message, using the BPM Workspace. The message will be captured in a business object and passed to a file service, which, in turn will write the message to a disk file. Later, you expand upon this to add more complexity to the process.
You create several process elements throughout this section of the tutorial. The following naming convention will be used throughout this section:
| Name | Description |
|---|---|
| HelloWorld_OBE | Application name |
| HelloWorldProject | Main project name |
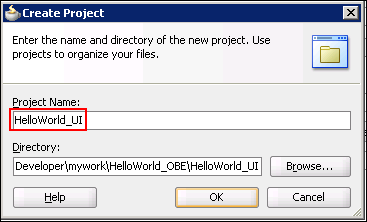
| HelloWorld_UI | Project containing user task web form(s) |
| HelloWorldProcess | Process name |
Creating the Process Model
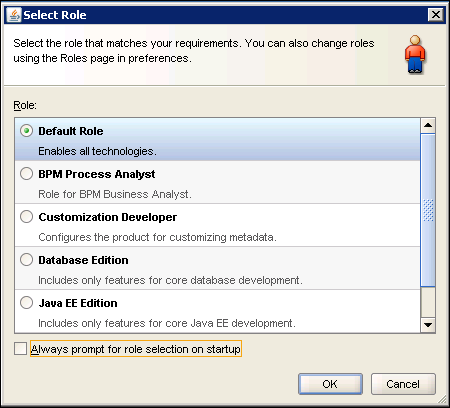
Open JDeveloper Studio 11.1.1.7 from the Windows Start menu. If prompted to select a role, choose the Default Role. Click OK
Close the Daily tips window if it appears.
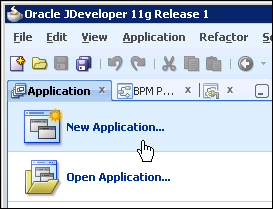
Create a new application. Click the New Application bar in the left panel.

Click Next.
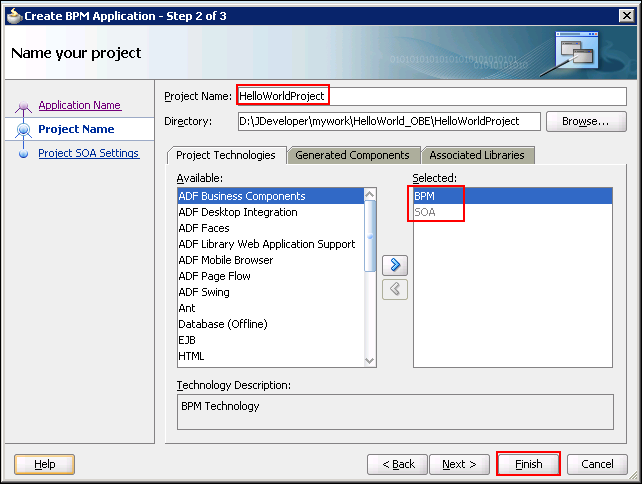
In Step 2 of the Create BPM Application wizard, you create a project for the application. Enter "HelloWorldProject" as the Project Name. Notice that BPM and SOA are automatically selected for you as Project Technologies. Click Finish
Click Save All in the main toolbar.
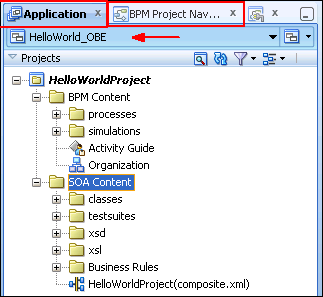
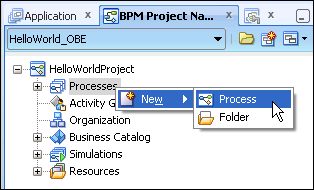
To create a new process in this project, first click the BPM Project Navigator tab. Then right-click on Processes and select New > Process.

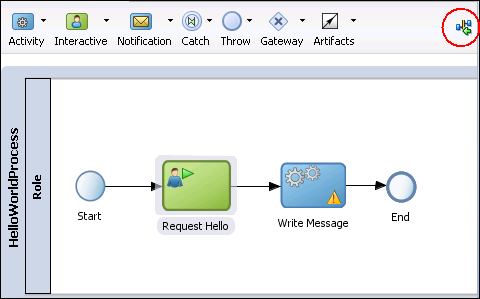
The process model appears in the design editor panel in the middle of the Studio window. The tab name will be the same as the name of your new process.
Click Save All.
You may wish to close the other tabs as you will not be using these. Click the X at the corner of the tab to close the tabbed pane. All of these can be easily reopened later from either the menu or one of the navigator panels.
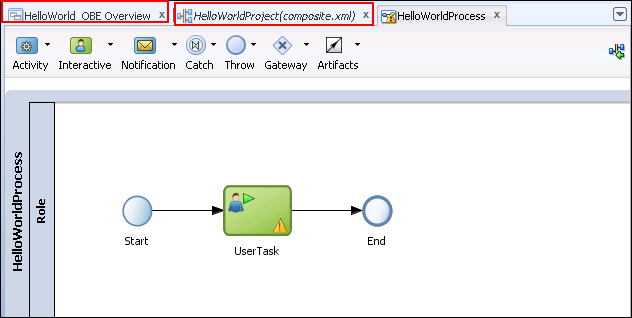
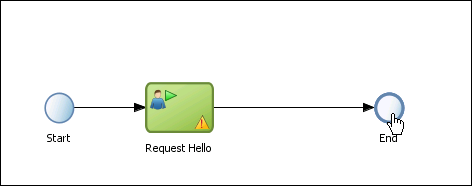
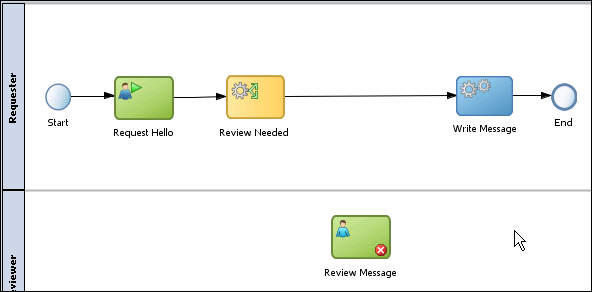
Notice that the model already contains three default flow objects. The process begins and ends with two circular icons. The circle on the left is a Start event and the circle on the right is an End event. Connecting the two circles is a line that represents the flow of activities through the process. This is called the sequence flow and sometimes is referred to as the "transition line". Between the Start and End events is a User Task type activity.
Change the name of the user task in the process model. Right click on it and select Properties.
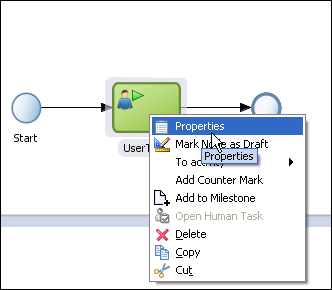
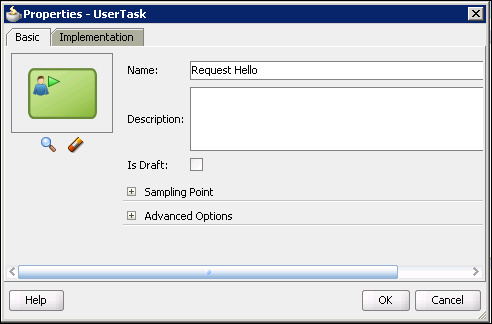
When the properties dialog box appears, on the Basic tab, change the name of the user task to "Request Hello". Click OK.
Do not worry about the warning icon indicating that no implementation has been defined. You will define this later.
Click Save All.
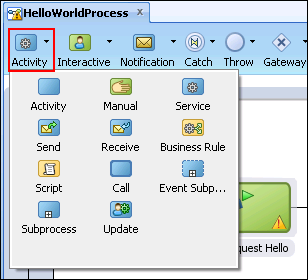
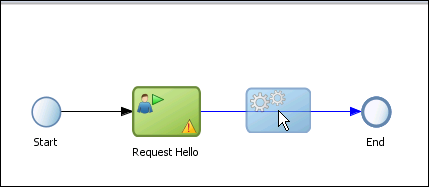
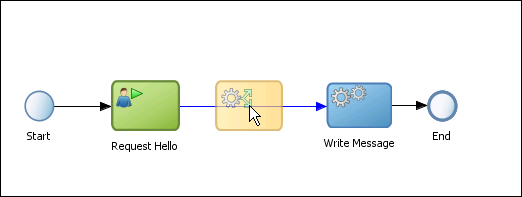
Add a service activity to the process. First you will need to make room for another flow object on the sequence flow. Click on the End event and drag it to the right, dropping it on the right side of the design panel, allowing enough room for the service activity to fit between the Request Hello user task and the End event.
Important: The transition line must be blue when you drop the object in order for the transition line to be connected to the flow object.
Creating the Business Object
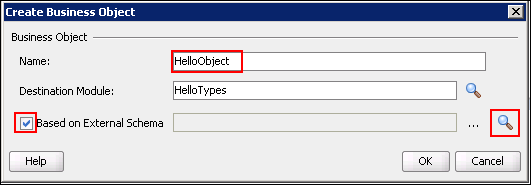
While it is possible to create a simple business object without using a schema file, it is less common. Therefore you will create the business object from a provided xsd schema file. After creating the business object, you declare a process data object (like a variable) of that type.
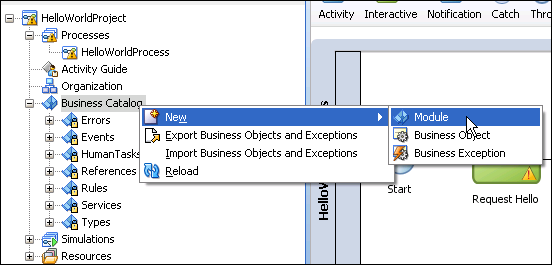
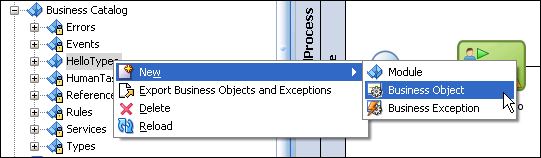
Business objects are stored in modules within the Business Catalog. In the BPM Project Navigator, expand the HelloWorldProject node. Right-click on Business Catalog and select New > Module.
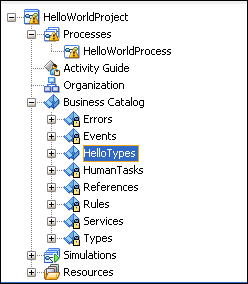
The HelloTypes module now appears beneath the Business Catalog node.
Select the Based on External Schema checkbox and click the Browse button to choose the external schema.
Select the Copy to Project checkbox and then browse to select the HelloObject.xsd file you just saved to your local file system.
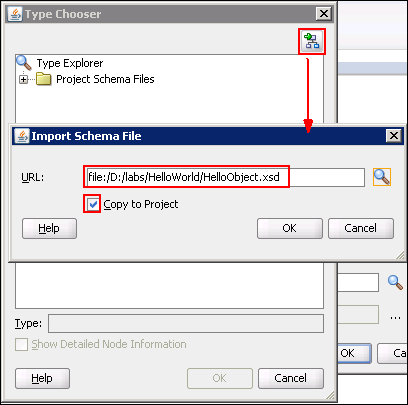
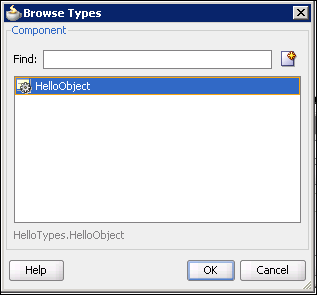
In the Type Chooser window, you can now see the structure of the HelloObject schema file. Select HelloObject and click OK.


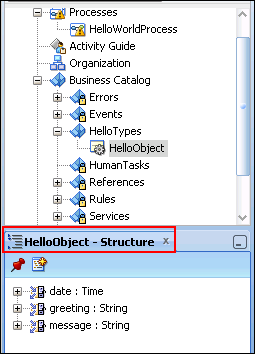
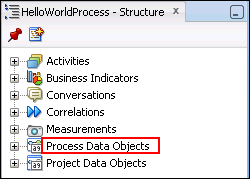
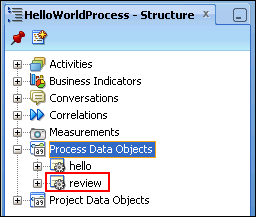
A detailed outline of the process structure now appears in the Structure panel.
Right-click on Process Data Objects and select New.
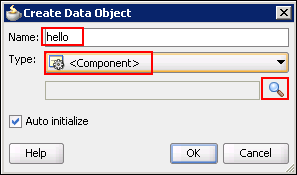
In the Create Data Object popup window, enter hello as the Name. In the Type field, select <Component>. Then click the Browse button to select the component type.
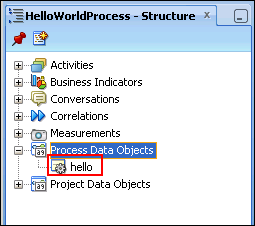
The hello data object now appears in the Structure panel.
Implementing the User Task
Every user task must be bound to a human task service that provides its implementation. In this section, you create a human task for the Request Hello user task. Then you create a web form for the user to enter the hello message and greeting.
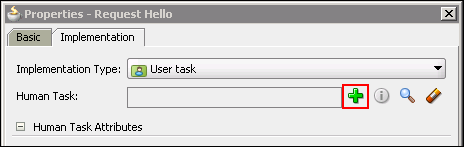
Right-click the Request Hello user task and select Properties.
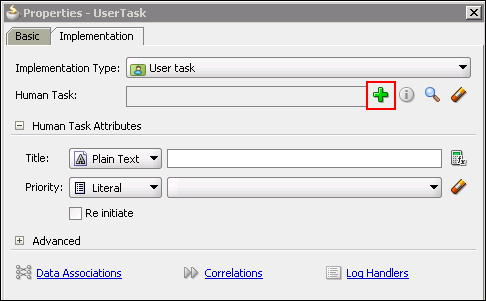
Click the Implementation tab. Next to the Human Task field, click the plus sign button to create a new human task.
| Field | Value |
|---|---|
| Name | SayHello |
| Title | Please Enter a Hello Message |
| Outcomes | Submit |
| Pattern | Initiator |
Add a parameter by clicking the plus icon above and to the right of the Parameters panel as shown below.
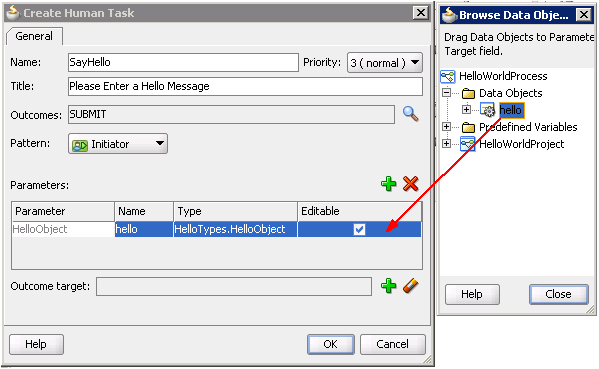
Notice that the parameter has been named HelloObject. The scope of this parameter is the human task. Its value does not persist beyond the completion of the human task.
We want the data that the user enters in the hello message to be accessible from the Write Message activity.
Studio mapped the HelloObject parameter to the hello process data object (whose scope is the entire process) when you added this parameter.
Click the Data Associations link in the Properties window to view this automatic mapping.
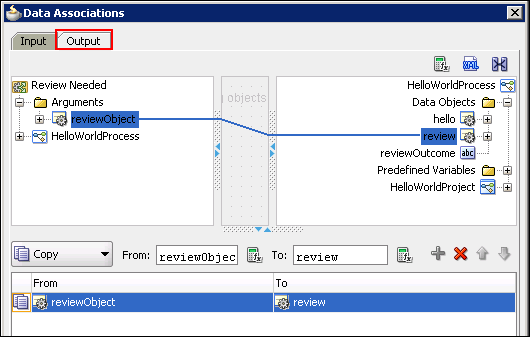
Select the Output tab. You can see that the helloObject from the Request Hello human task on the left has been mapped to the hello data object in the HelloWorldProcess on the right.

Click Save All.
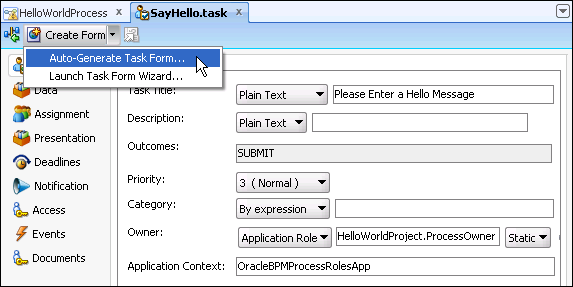
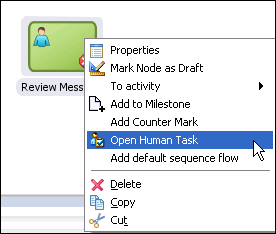
Right-click the Request Hello user task and select Open Human Task.
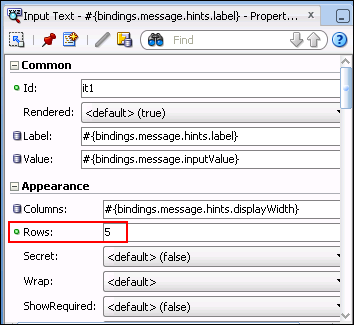
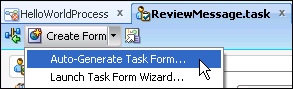
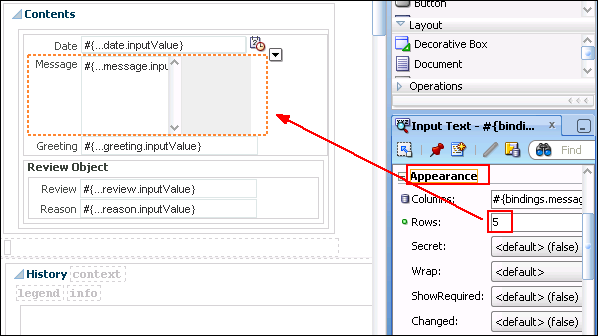
When the human task editor opens, click the Create Form drop-down list in the editor toolbar and select Auto-Generate Task Form.
Expand the Appearance accordion panel within this panel and change the value of the property to 5.
Implementing the File Service
Here you create the implementation for the Write Message service activity using the SOA Composite editor.
"wired into" the process. This is because the SayHello component is associated with a user task on the process flow. It implements the user task.

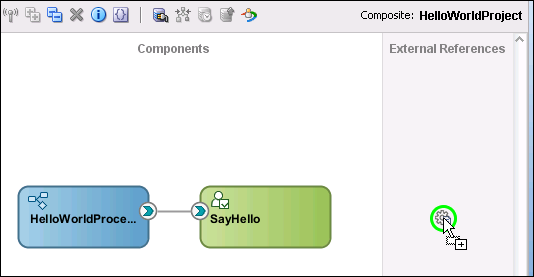
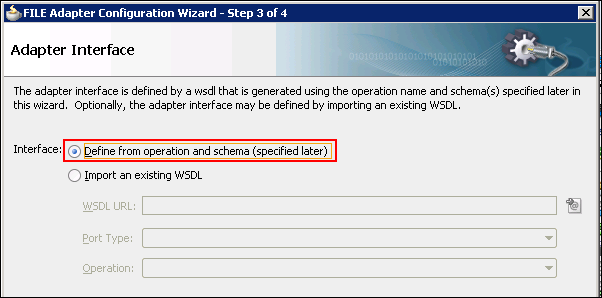
The Adapter wizard opens when you drop it.
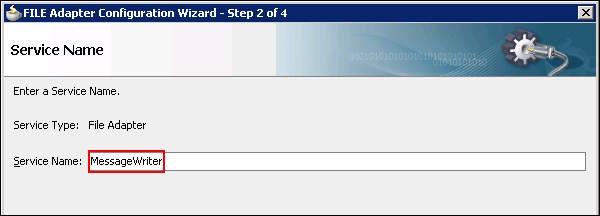
On the Service Name page of the wizard, name the service MessageWriter. Click Next.
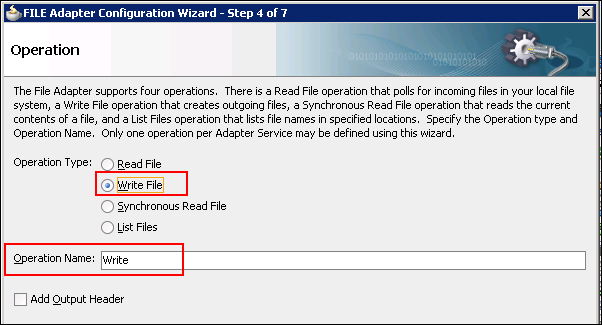
Also enter a File Naming Convention of:
Hello_%SEQ%.xml
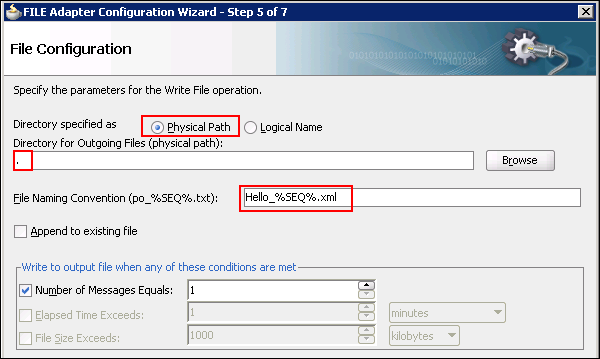
Click Next.
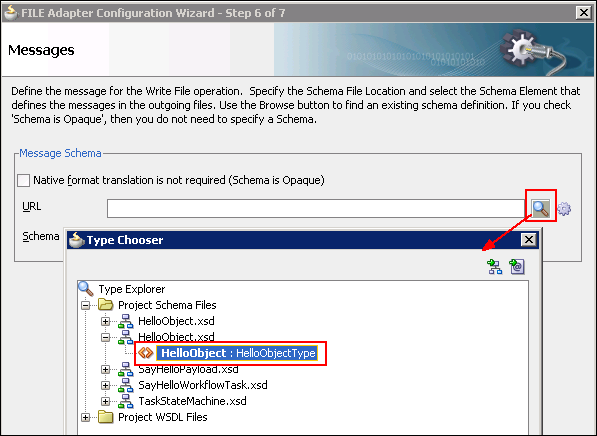
In the Messages page, you determine what should be written to the file. Click the magnifying glass icon next to the URL field to open the Type Chooser popup.
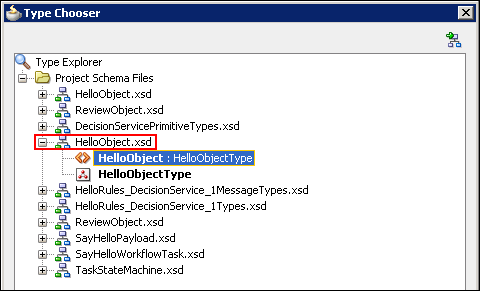
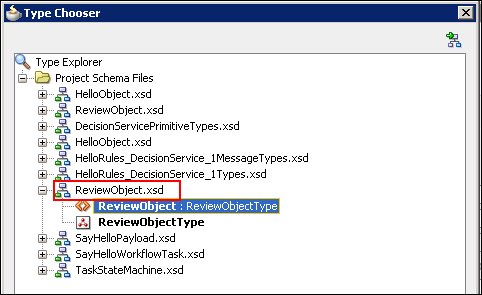
Expand Project Schema Files > HelloObject.xsd to find and select HelloObject as shown below. Click OK to accept the selection and return to the Messages page of the wizard.
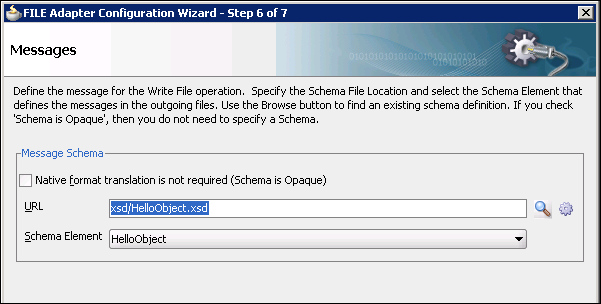
Click Finish in the final page of the wizard and then click Save All.
The service is created and appears in the SOA Composite editor. At this point, it does not appear, however, in the Business Catalog.
Close and reopen the HelloWorld_OBE application to
allow Studio to incorporate the new MessageWriter
service into the Business Catalog.
From the Application Navigator drop-down menu, select
Close
Application. When the application has
close, click Open
Application and browse to
\JDeveloper\mywork\HelloWorld_OBE.
Double-click the helloworld_obe.jws
file. The application reopens.
In this step, you wire the MessageWriter service to the Write Message activity in the process. Open the HelloWorldProcess in the design editor by double-clicking the item in the BPM Project Navigator.
Right-click the Write Message activity and select Properties. Click the Implementation tab.
In the Message Exchange section, select Service Call as the Type. The window changes to include a Service Call section.
Click the Browse button (magnifying glass icon) next to the Service field to browse for a service. The Service popup window appears, displaying the MessageWriter service you just created. Select it and click OK in the Service popup.
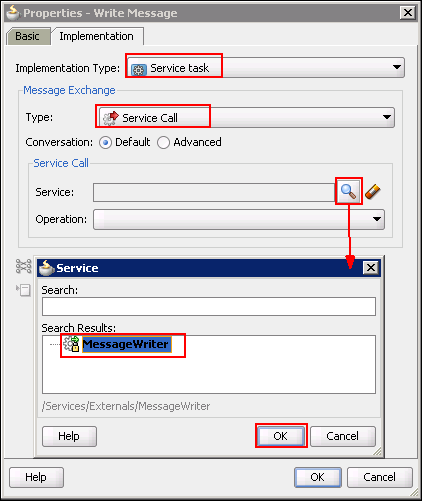
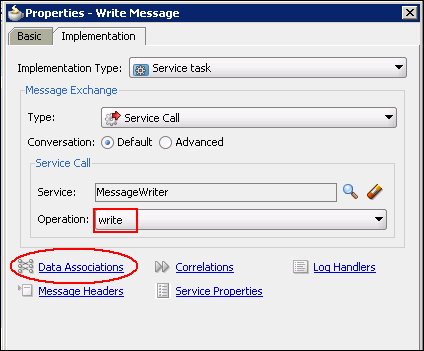
Back in the Properties window, notice that the Operation field has been automatically set to write.
Click the Data Associations link to map data into the MessageWriter service.
In the Data Associations window, select the Input tab. Click the hello data object from the HelloWorldProcess panel and drag a line to the right, to connect it to the helloObject argument in the Write Message panel. Beneath the two panels, you can see that the value from hello will be copied to the helloObject argument.
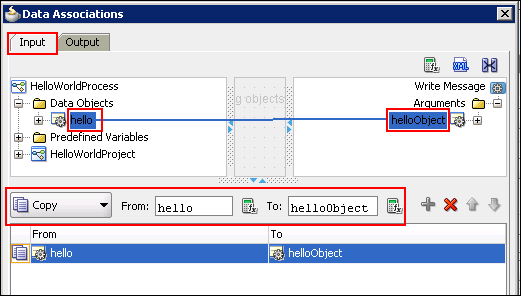
Click OK in the Data Associations window to save the mapping and return to the Properties window.
Click OK in the Properties window. Click Save All.
Enhancing the Basic Hello World Process
- A set of Conditions: In this case, each condition is the length of either the greeting or the message string variable.
- A Range of Values, called a bucketset : For example, a variable might be <5 characters in length, or 5-50 characters in length, and so on. These are ranges within a bucketset.
- An Action: This is the act that should occur when a rule is evaluated. For example, the review property might be set to "true".
- A Rule: This is a specific mapping of condition > range > action. Each of the last four columns in the table above represents a rule.
- Define the conditions (Step 2 below)
- Define a bucketset (Step 3)
- Assign the bucketset to each condition (Step 4)
- Define the action (Step 5)
- Define the rules (Steps 6-9)
- The length of helloObject.greeting
- The length of helloObject.message
- reason = null
- review = "false"
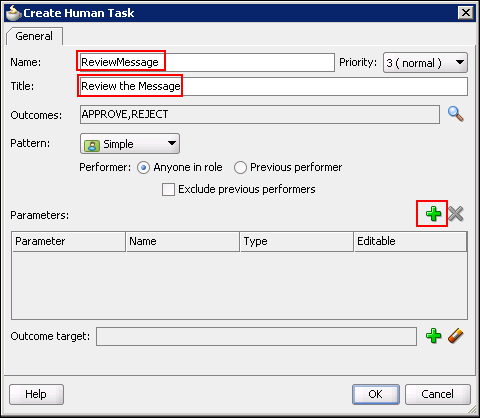
- Name: ReviewMessage
- Title: Review the Message
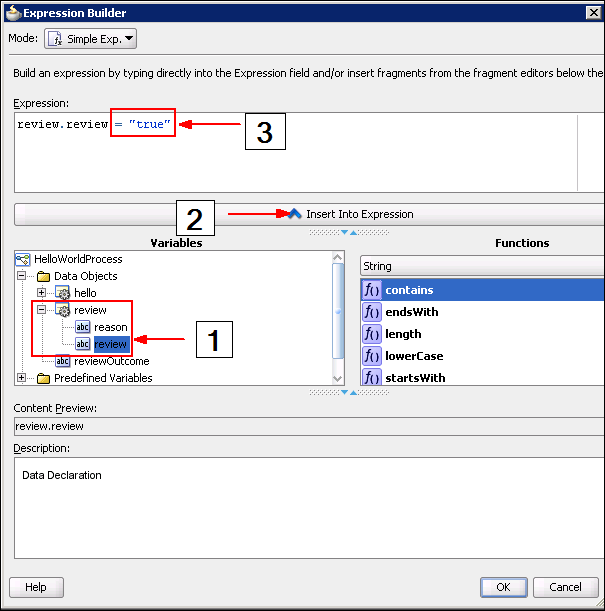
- In the Variables panel, expand review and select the review attribute.
- Click the Insert Into Expression button. This puts review.review into the Expression panel at the top.
- In the Expression panel, add:
In this section, you enhance the basic process you just built by adding a review capability for the message entered by the user. You add another business object to hold review-related data and use this business object in conjunction with a business rule that tests the length of the greeting and message. You also add another human interaction that allows the user with the Reviewer role to review the entered message and accept or reject the message.
After adding the new flow object, you change the process flow so that it conditionally branches to the Review Message activity and potentially back to the Request Hello activity if the message was rejected. A script task will also be needed in order to initialize a variable used in the conditional branching logic.
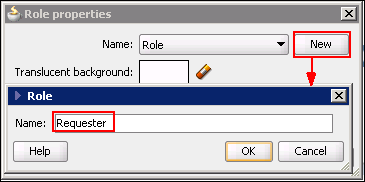
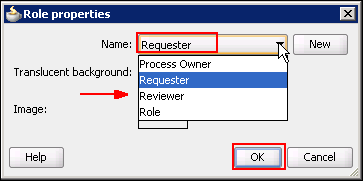
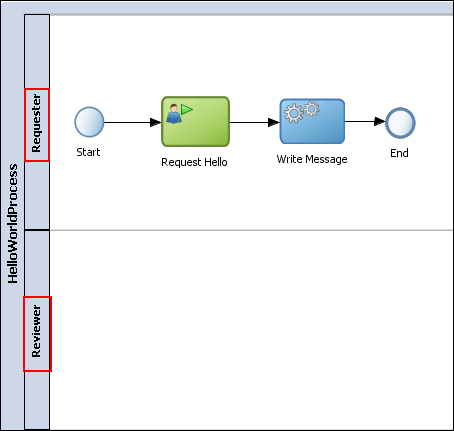
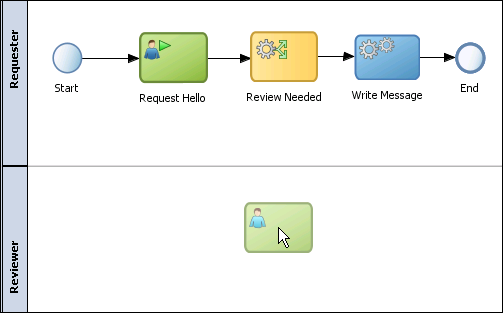
You begin the enhancement by changing the name of the role assigned to the user who executes the Request Hello activity to something more meaningful. Then you add a new role for the user who reviews the message.
Adding the ReviewObject Business Object
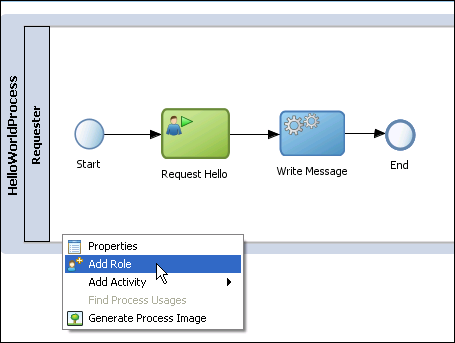
In the process design editor, right-click on Role at the left edge of the swim lane and select Properties.
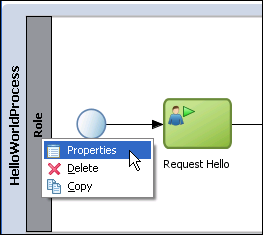
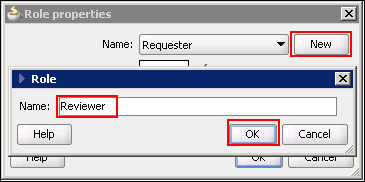
Add another swim lane beneath the Requester swim lane. Right-click the bottom portion of the swim lane and select Add Role.
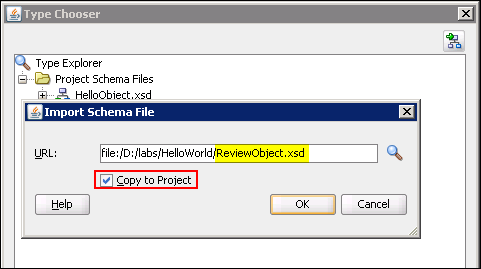
Download the ReviewObject.xsd file and save it to a folder on your local machine.
Follow Step 3 of that section, placing the new business object in the HelloTypes module.
Name the object ReviewObject and, in the Import Schema window, select ReviewObject.xsd from the file system, making sure to copy it to the project.

Adding a Business Rule
Begin by making more room on the sequence flow between Request Hello and Write Message.
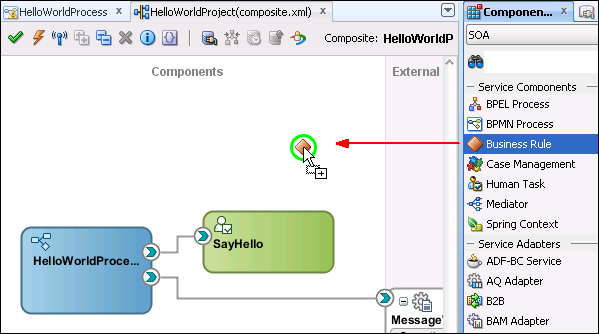
Click the Business rule activity icon in the palette and drop it on the sequence flow between Request Hello and Write Message. Be sure that the transition line is blue when you drop business rule.
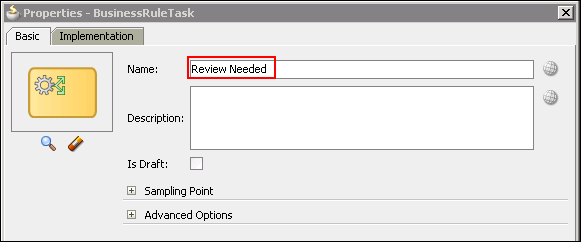

Right click ReviewNeeded to open its properties window. Click the Implementation tab.
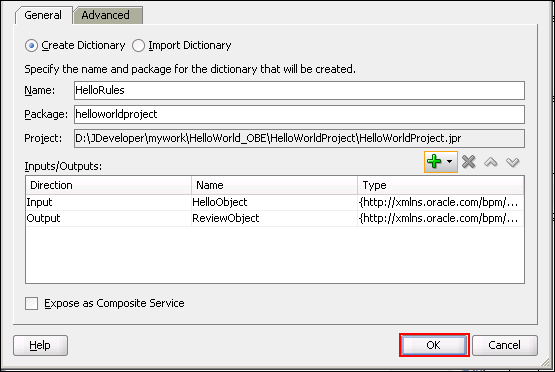
Click the browse button to the right of the Business Rule field. In the Browse Business Rules popup window, select HelloRules and click OK.
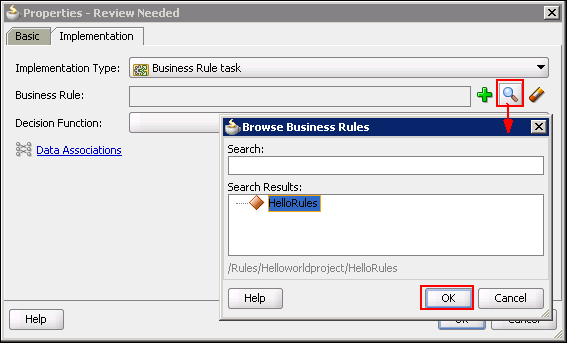
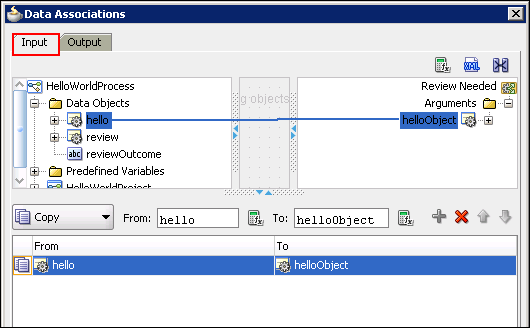
Click the Input tab. In the left column, click the hello process data object and drag it to the helloObject argument of the Review Needed business rule in the right column.
Defining a Decision Table for the Business Rule
In this section, you define a set of rules that will be applied when the user enters a hello message and greeting. The following table illustrates what those rules are and how they will be applied.
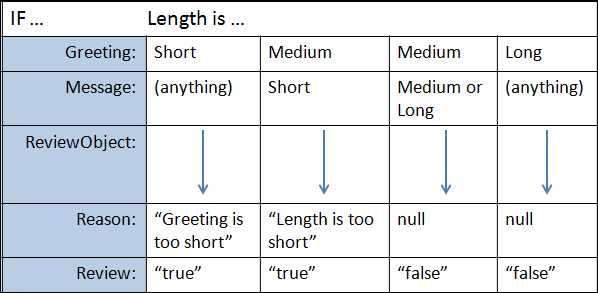
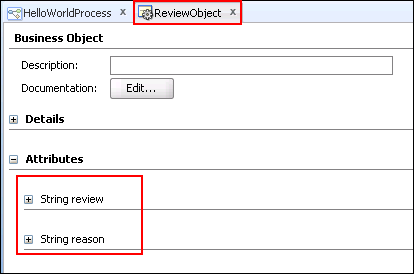
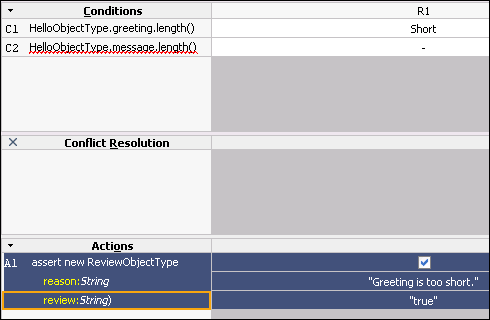
The lengths of the HelloObject.greeting and HelloObject.message strings will be evaluated. You will define four rules that determine the combination of greeting and message lengths and then set the appropriate values to the ReviewObject properties: reason and review.
For example, if the greeting length is medium and message length is short, reviewObject.reason would be set to "Length is too short" and reviewObject.reason would be set to "true". Consequently, the process would flow to a Review Needed activity and could be accepted or rejected by the reviewer.
A decision table can be designed in many different ways. In our scenario, the decision table consists of four elements as described below.
A decision table is created in five high-level steps:
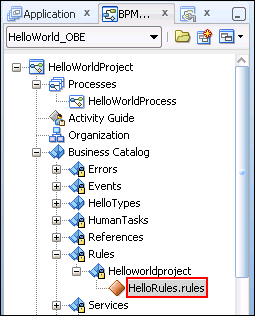
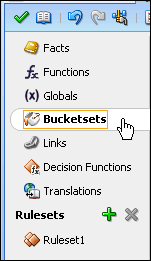
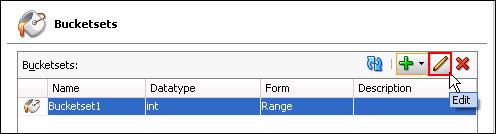
In the BPM Navigator, expand Business Catalog > Rules > Helloworldproject. Double click on HelloRules.rules.
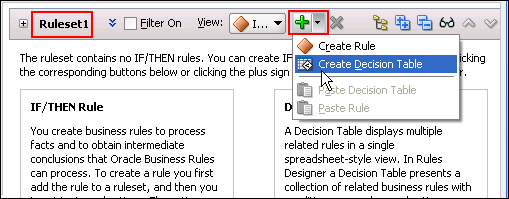
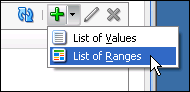
Create a decision table. Click the down arrow next to the green plus sign button on the toolbar and select Create Decision Table from the drop-down menu.
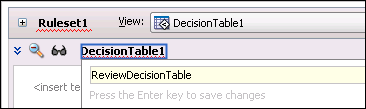
Change the default name of the decision table from DecisionTable_1 to ReviewDecisionTable. Click on the field containing the default name. A text field appears below it. Enter the new name and click Enter to accept the value.
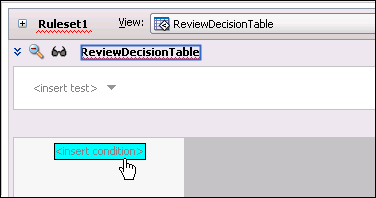
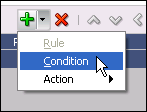
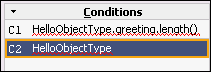
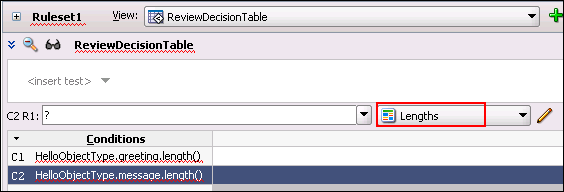
Add the first condition by clicking on the <insert condition> field in the table as shown below. This will automatically add the C1 condition.
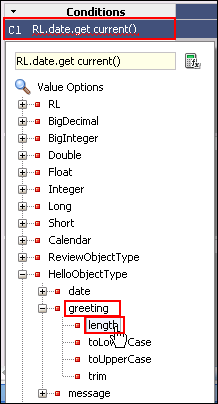
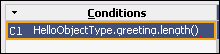
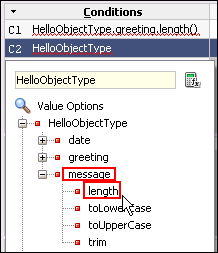
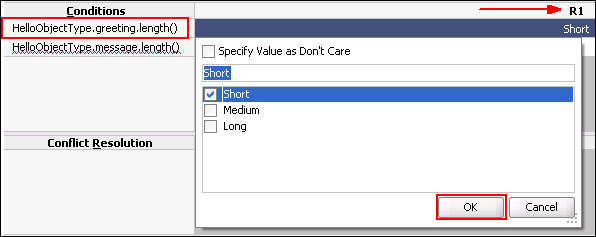
Expand HelloObjectType > greeting and click the length function.
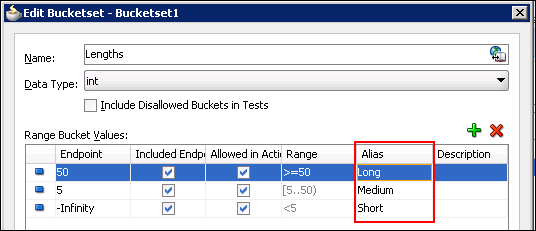
The Range Bucket Values table has an initial default row in which the Endpoint is set to -Infinity. Click the green plus sign button twice more to add two more rows.
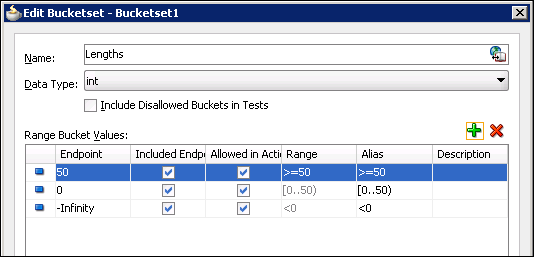
Change the Alias for each row to Short, Medium, and Long as shown below. Double clicking on the default Alias value makes it editable.
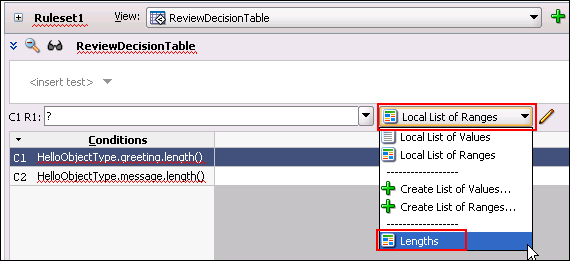
Click the C1 condition to select it and then click the Local List of Ranges drop-down list above the Conditions table and select Lengths.
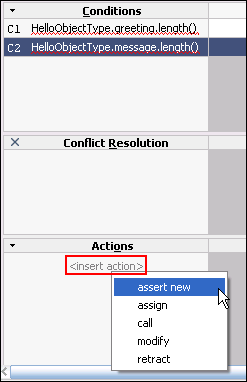
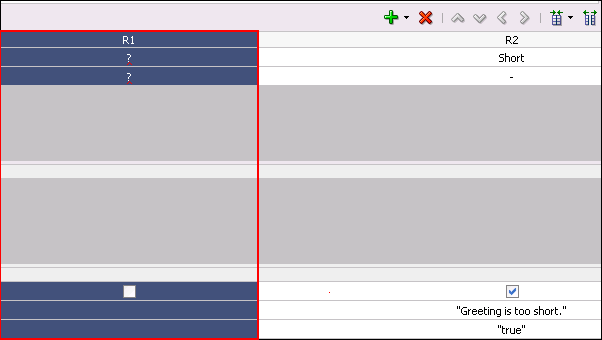
Create a new Action. In the Actions panel, click the <insert_action> field and select Assert New.
The Action Editor window opens. Select ReviewObjectType from the Facts panel. The properties of this object type now appear in the Properties panel in the lower portion of the window. Select the Parameterized and Constant checkboxes for both the reason and the review properties.
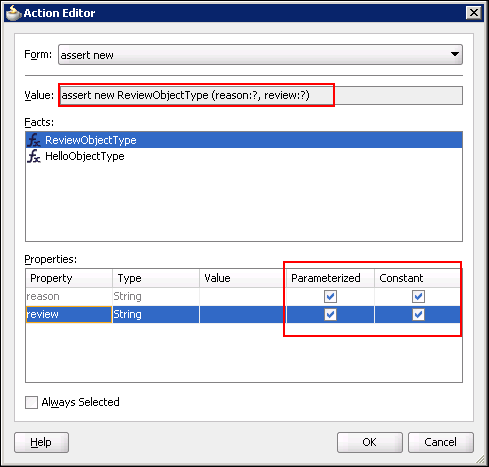
Click OK, then Save.
Click OK.

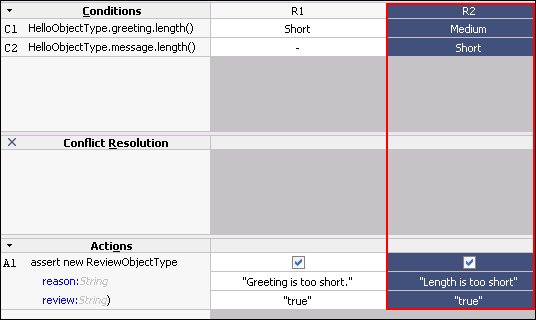
Make edits to the new rule, just as you did with the previous rule, using the following table to guide you:
| Section of Decision Table | Property | Value to Set |
|---|---|---|
|
Condition
|
HelloObject.greeting.length( ) | Medium |
|
Condition
|
HelloObject.message.length( ) | Short |
|
Action
|
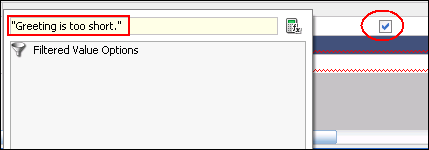
ReviewObject.reason | "Length is too short" |
|
Action
|
ReviewObject.review | "true" |
| Section of Decision Table | Property | Value to Set |
|---|---|---|
|
Condition
|
HelloObject.greeting.length( ) | Long |
|
Condition
|
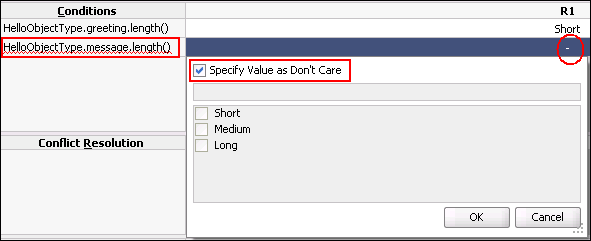
HelloObject.message.length( ) | - |
|
Action
|
ReviewObject.reason | null |
|
Action
|
ReviewObject.review | "false" |
Note that you must select the null from the drop-down list, rather than type it into the text field.
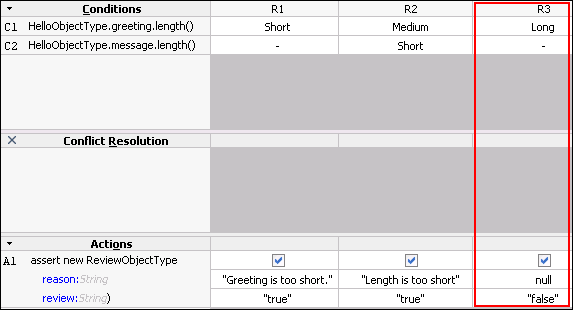
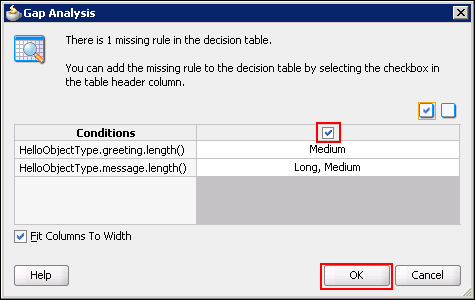
Assert the action for Rule 3 (Column R3) and add the following action values:

Adding the Review Message User Task
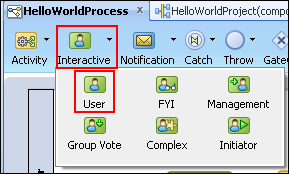
From the design editor toolbar, expand the Interactive drop-down palette and click the User icon.

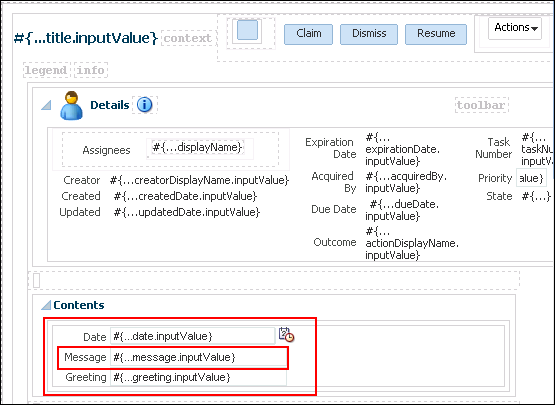
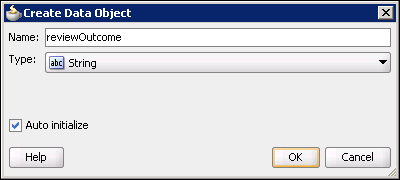
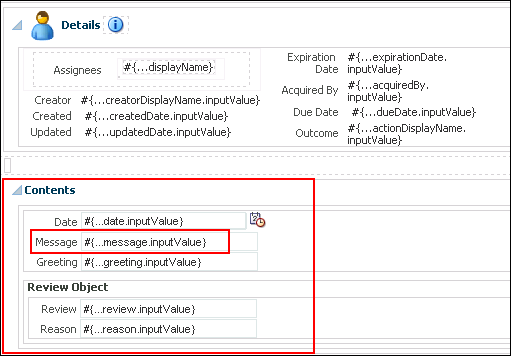
The Data Object popup window appears next to the Create HumanTask window. Drag the hello and review process data objects into the Parameters panel. Select the Editable checkbox for the hello object only. Also drag the reviewOutcome data object into the Outcome target field.
Note: When a parameter is marked "editable", you are able to map the parameter as output from the human task. Since the reviewer will not edit the review object, it does not need to be mapped out of the human task. Recall that the review object contains the outcome of the business rule. The outcome of the task (in this case, either "APPROVE" or "REJECT") is now mapped to the reviewOutcome data object.

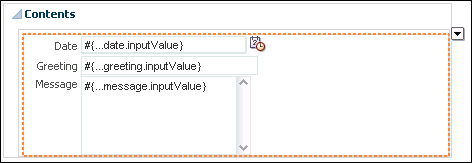
The payload can be seen in the Contents panel of the web page. Notice that both the hello and review objects are included.
Adding Conditional Branching
Begin by moving the End event and the Write Message activity to the right to make room for the exclusive gateway.
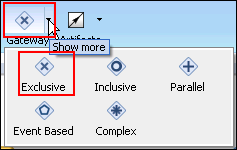
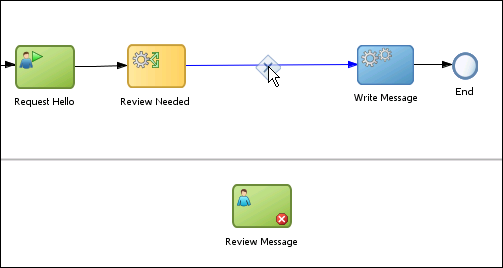
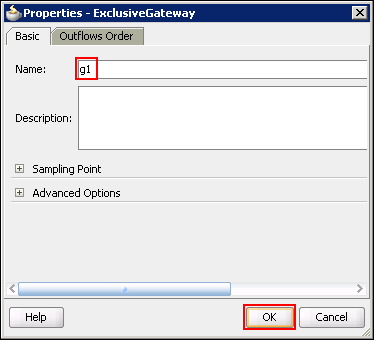
When you drop it, the Properties window opens. Change the name of the gateway to g1 and click OK.
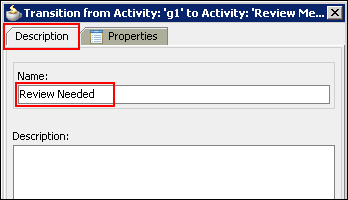
On the Description tab, name the transition Review Needed.
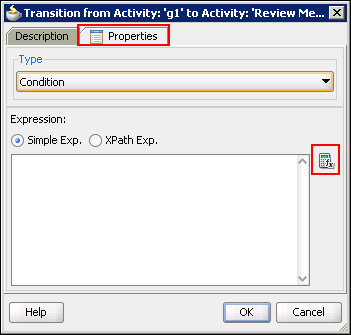
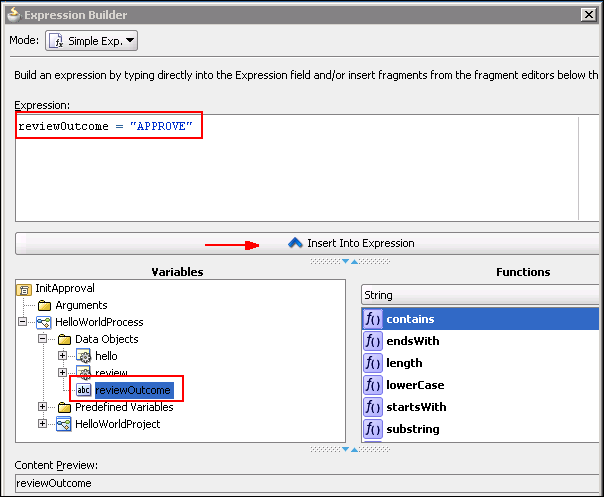
= "true"
to the existing variable reference.
Click OK to close the transition properties window.
On the Description tab, name the transition Message Rejected.
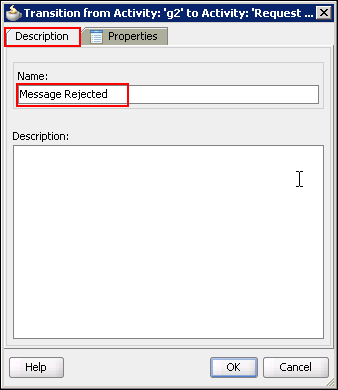
reviewOutcome = "REJECT"

Click OK to close the transition properties window.
Click Save All.
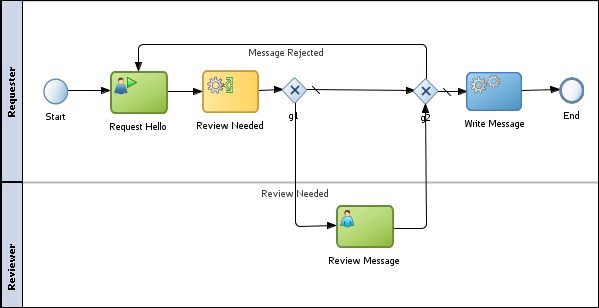
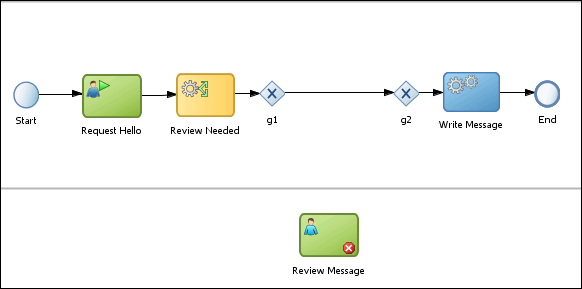
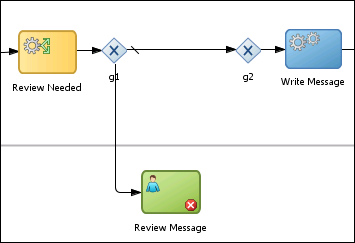
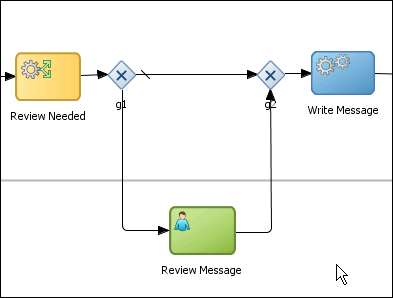
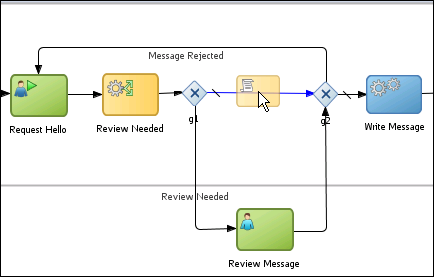
Adding a Script Task
When the process flow reaches the second gateway (g2), it checks the value of the reviewOutcome data object. There must be a value in the reviewOutcome data object in order for the process to move on to the Write Message activity. If the value is REJECT, the process returns to Request Hello.
When a message is flagged for review, the reviewer clicks either REJECT or APPROVE, thereby populating the reviewOutcome data object.
If the process skips the review branch and moves from the g1 gateway directly to the g2 gateway, the reviewOutcome data object has no value.
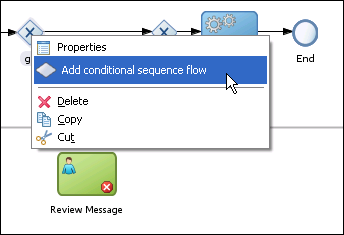
In this section, you add a script task to initialize reviewOutcome between g1 and g2.

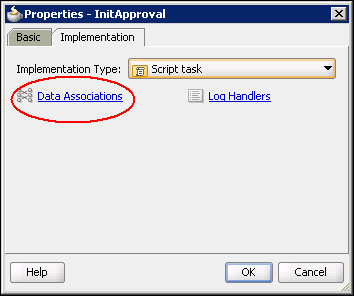
When the Properties window opens, click the Implementations tab, then click the Data Associations link.
an expression to be copied to the reviewOutcome data object.
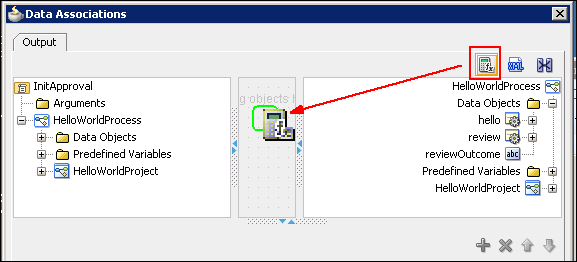
In the Data Associations window, drag a line from the fx icon (which represents the expression you just defined) to the reviewOutcome data object in the right panel.
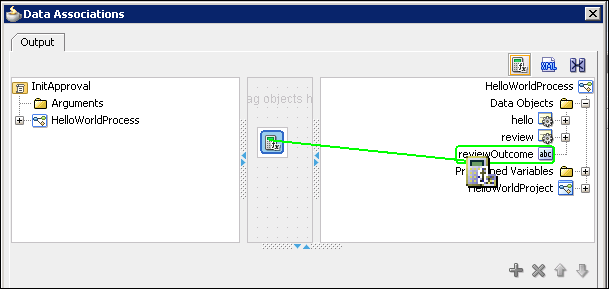
Click OK to close the Data Associations window.
Click OK to close the InitApproval task properties window.
Click Save All. The Hello World process is now complete!
Deploying and Testing the Application
- The WebLogic domain in which SOA is running
- The username and password for the WebLogic administrative user
- The name of the WebLogic server instance to which you will deploy. This tutorial assumes a single server configuration (i.e. not managed instances), and will deploy to the Admin Server
In this section, you deploy the Hello World application to the BPM engine running in the WebLogic server that is part of your SOA installation. This tutorial assumes that your server is running on your local machine (localhost). If it is running on a remote machine, you need to know the server hostname and port.
In either case, you also need to know:
Before deploying the application, you connect to the internal LDAP realm within the WebLogic server and map the Reviewer and Requester roles to a user in the LDAP directory. When you seeded the DemoDB as a prerequisite to this tutorial, you populated the LDAP realm. We will map one of those users to the roles.
After deployment, you run the Oracle BPM Workspace to test the Hello World application.
Mapping Application Roles to an LDAP User
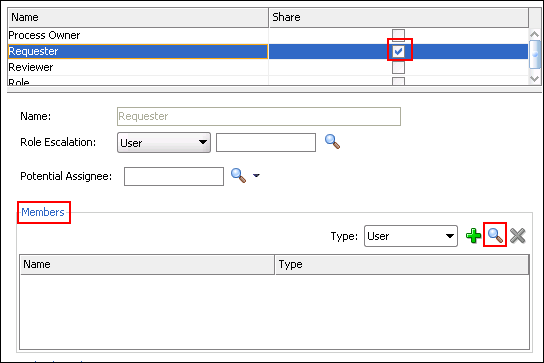
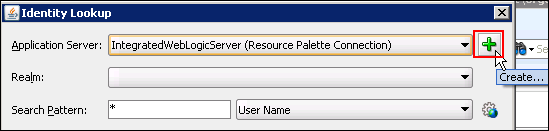
Click the Browse button (magnifying glass icon) to the right of the Members panel.
Create a new profile for your SOA / BPM server. Click the green plus sign icon next to the Application Server field to launch the Create Application Server Connection wizard.
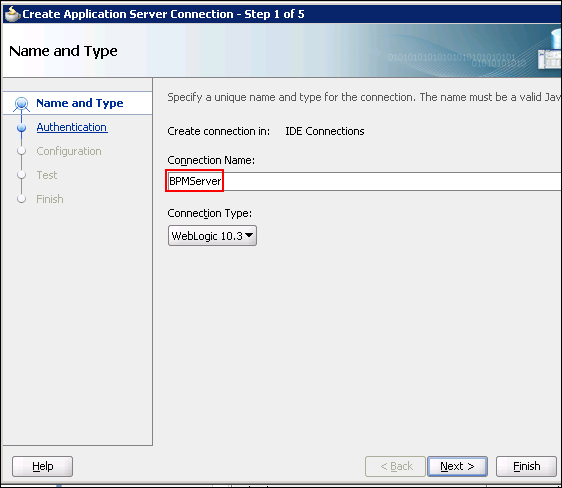
In the Name and Type page of the wizard, enter BPMServer. Make sure that the Connection Type is WebLogic 10.3. Click Next.
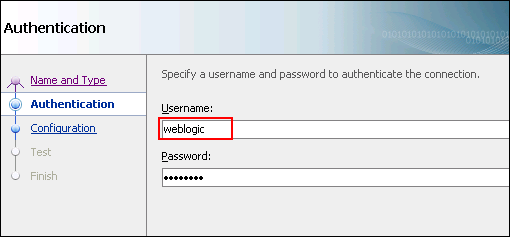
In the Authentication page of the wizard, enter weblogic as the Username and welcome1 as the Password (or substitute your weblogic password). Click Next.
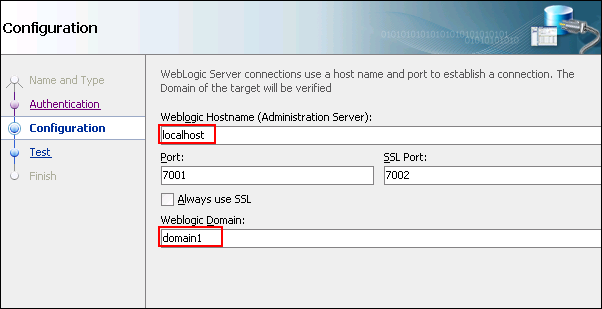
In the Configuration page of the wizard, enter your WebLogic Hostname (localhost used here). Accept the default values for Port and SSL Port, and enter domain1 in the WebLogic Domain field. Click Next.
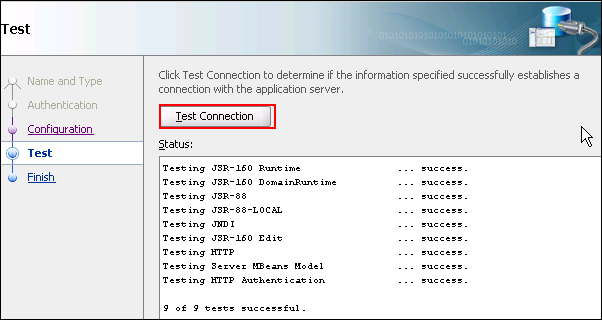
In the Test page of the wizard, click the Test Connection button. You should see results similar to those shown below. If not, click the Back button, correct any errors and test again.
You are now returned to the Identity Lookup window.
Select BPMServer from the Application Server list. After a few seconds, Studio will connect to the LDAP server in the BPM server and you see jazn.* appearing in the Realm field.
Click the browse icon next to the User Name field to bring up a list of all users in the Demo Community from the LDAP server. Select jcooper from the list and click the Select button.
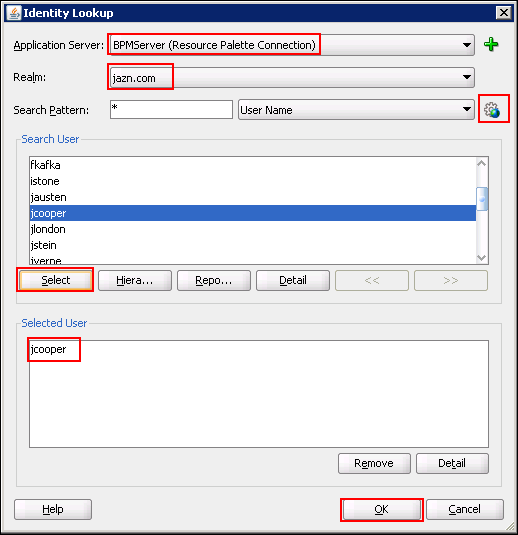
jcooper will appear in the Selected Users panel of this window. Click OK to return to the Organization editor.
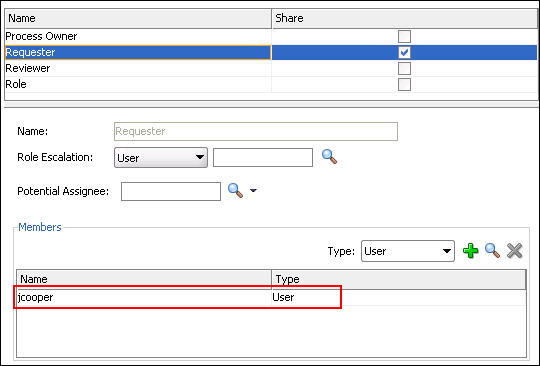
jcooper appears now as a user member of the Requester role.
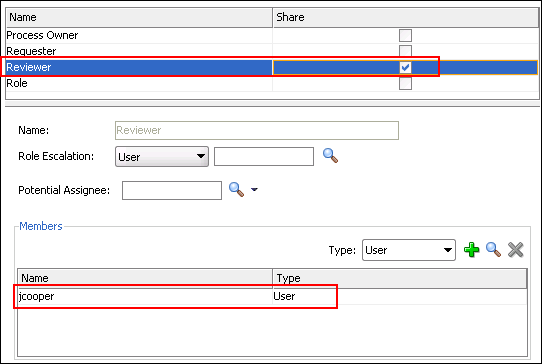
Follow the same procedure as in the previous step to add jcooper to the Reviewer role as well.
Click Save All and close the Organization editor.
Deploying the Process
When you deploy a BPM application, there are actually two pieces that get deployed: a SOA composite application, and a web application containing the user interface (UI) modules.
While it is possible to deploy both of these with a single deployment, a redeployment would fail. Therefore, you will deploy the composite application first, then create a custom deployment profile to deploy the UI modules.
Deploy the composite application.
In the Application Navigator, right click the HelloWorldProject and select Deploy > HelloWorldProject.
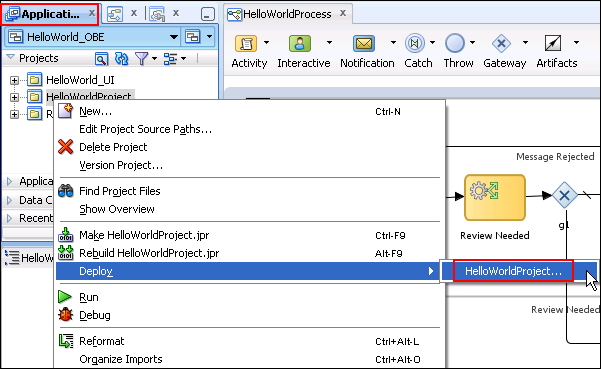
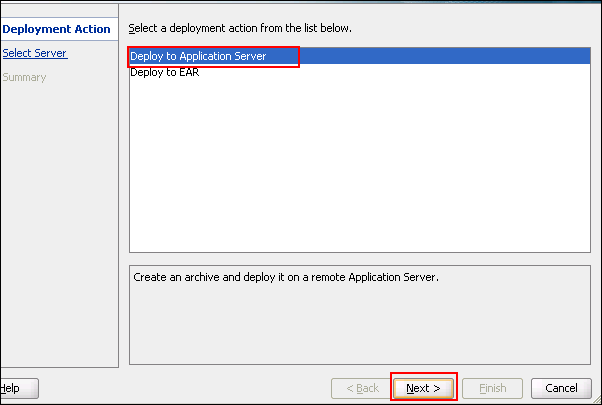
The Deploy HelloWorldProject wizard opens.
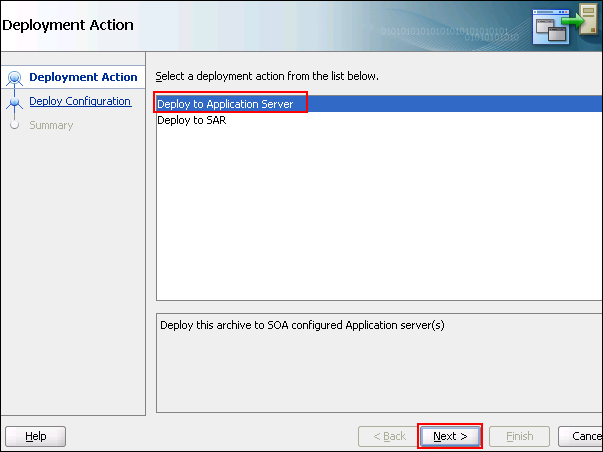
In the "Deployment Action" page of the wizard, select Deploy to Application Server and click Next.
In the "Deploy Configuration" page, click the Overwrite any existing composites with the same revision ID checkbox, but deselect the Keep running instances on after deployment checkbox.

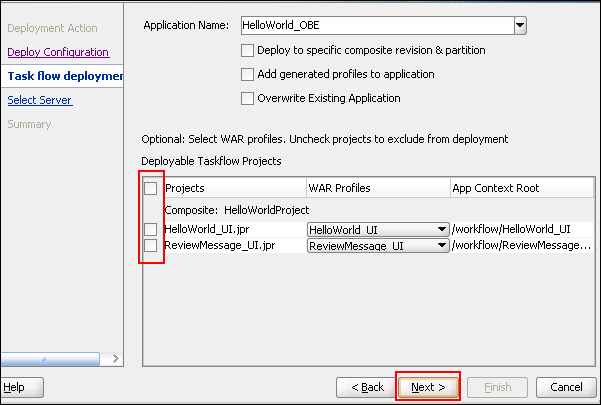
In the "Task flow deployment" page, do not select any of the checkboxes. We do not want to deploy any task flows here. Click Next.
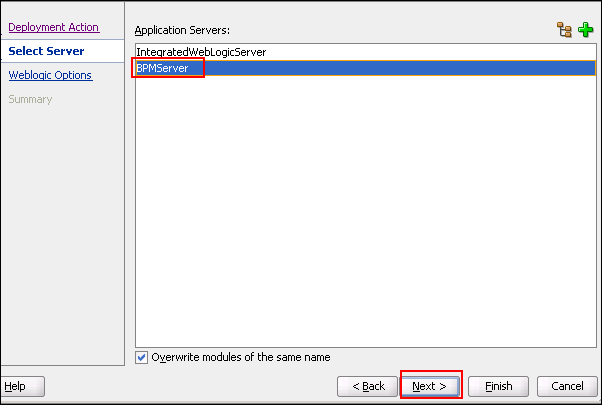
In the "Select Server" page, select BPMServer. Click Finish.
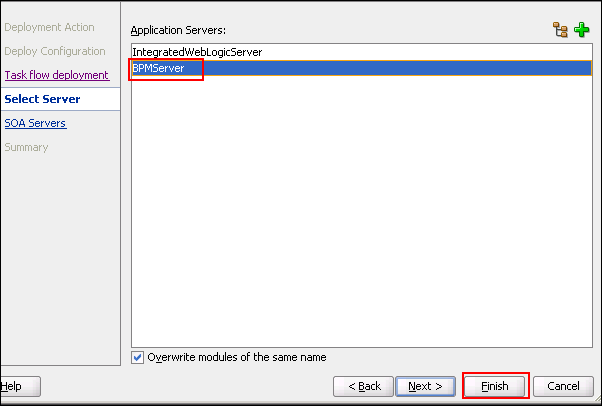
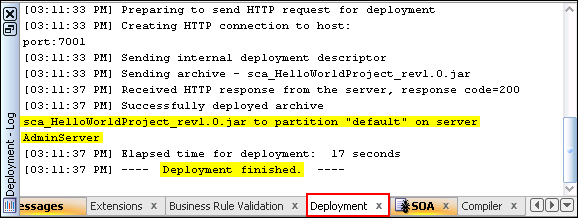
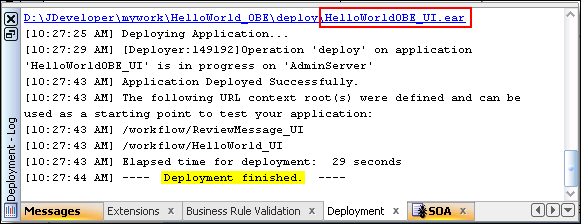
Check the Deployment tab in the Log panel in the lower central portion of the Studio window to watch the progress and determine when deployment has finished. The SOA composite is deployed as a JAR file, called sca_HelloWorldProject_rev1.0.jar.
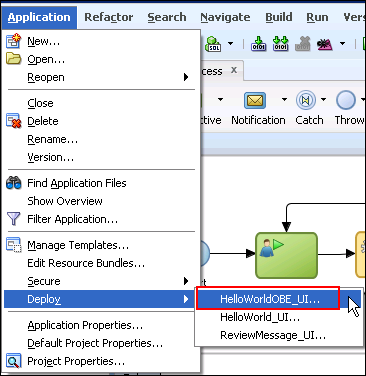
Deploy the UI modules.
Select Application > Application Properties from the main menu.
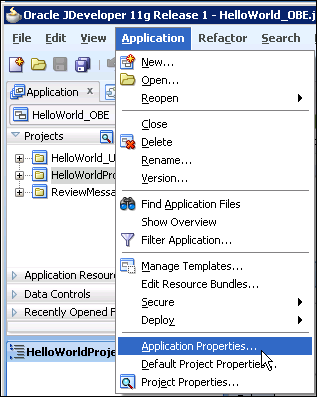
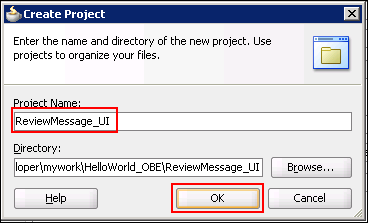
The Application Properties dialog opens. Select the Deployment node in the left column. In the right column, you see the existing deployment profiles - one for each of the task flows you created. You create a custom deployment profile now that will deploy both task flows together in one web application.
Click the New button to create a new deployment profile.
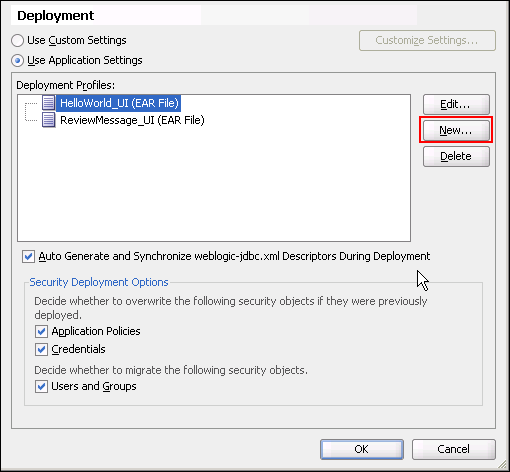
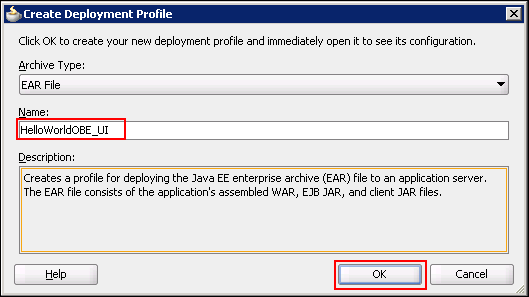
Click OK.

Deploy the UI modules using the custom deployment profile. From the Application menu, select Deploy > HelloWorldOBE_UI.
The Deployment wizard opens. On the Deployment Action page, select Deploy to Application Server. Click Next.
On the Select Server page, select BPMServer. Click Next.
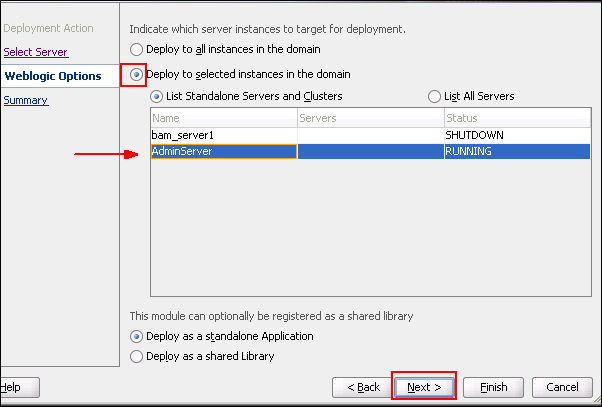
On the Weblogic Options page, click the Deploy to selected instances in the domain radio button. Then select the Admin Server from the list of standalone servers and clusters.
Note: Your list of servers may be different than what is shown in the screenshot.
Click Next.
Review the Summary page information and then click Finish.
Review the Deployment tab of the Log panel as you did earlier to determine when the deployment has finished. Notice that the task flows (UI modules) were deployed as a web application in the form of an EAR file.
Testing the Process in BPM Workspace
Open a browser and enter the following URL:
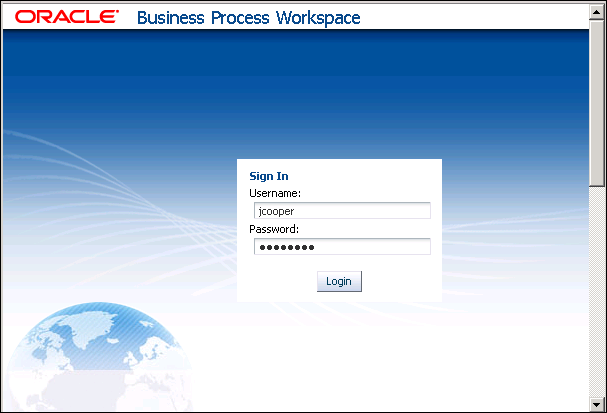
http://<your server hostname or localhost>:7001/bpm/workspace
When the Welcome page of the Workspace appears, enter jcooper in the Username field and welcome1 in the Password field. Click Log In.
The main workspace window opens.
Instantiate the process. Select Applications in the left panel. Then click the HelloWorldProcess link.
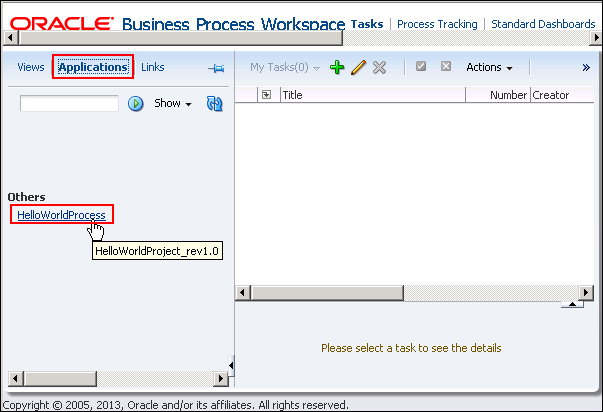
This action executes the first task of the process, Request Hello.

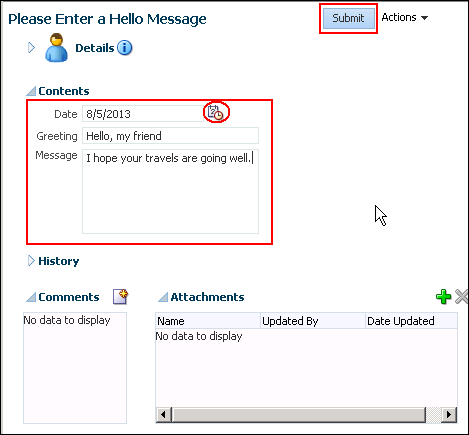
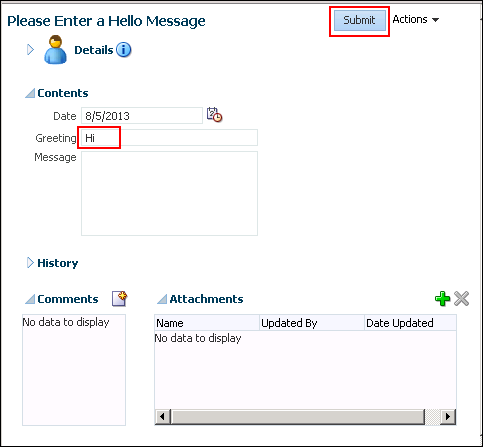
For the first test, enter a message that will not require review. In the Please Enter a Hello Message browser window that appears, enter a value in the Date field by clicking the calendar icon and selecting a date. Also enter values in the Greeting and Message fields.
Both the Greeting and the Message field values should have a length greater than 5 characters in order to avoid review.
Click Submit to save the values and close the window.
After submitting the message, the process goes to the ReviewNeeded business rule. Since both the Greeting and the Message are considered "Medium" in length, the message does not require a review. Hence the process goes through the g1 gateway, the reviewOutcome data object is initialized in the script task, and the process flows on through the g2 gateway to the Write Message task.
Write Message is a service task, rather than an interactive task, therefore there will be no indication of its action in the Workspace.
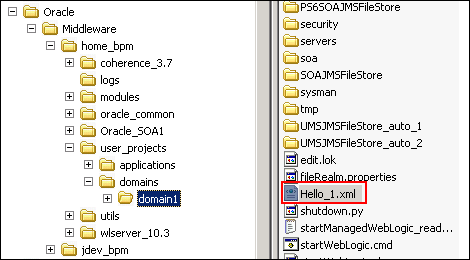
Open the file that was created by the Write Message implementation. Recall that you configured the file adapter to write the file to the relative path "." (dot). This is relative to the domain1 directory within the WebLogic file structure.
Locate and open the file:
<path to your Middleware Home>/user_projects/domains/domain1/Hello_1.xml
Open it in a text editor or browser to view the outcome from your process.
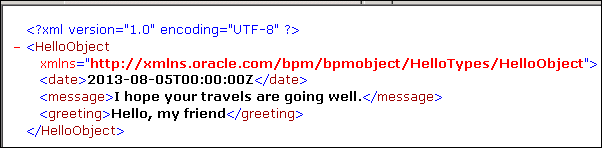
It should look something like this:
Create another instance of the Hello World process by once more clicking the HelloWorldProcess link. (You may need to log in again if your session has timed out.)
This time, enter a message that will be routed to the Review Message user task.
When the "Please Enter a Hello Message" window appears, enter a date and a greeting that has length < 5. Leave the Message field blank. Click Submit.
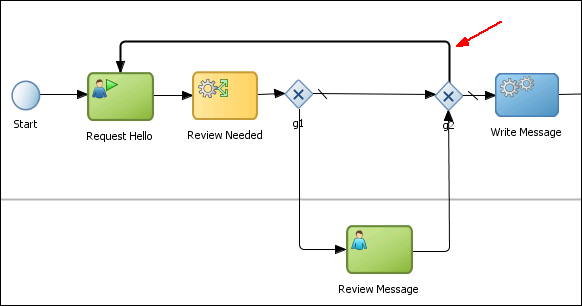
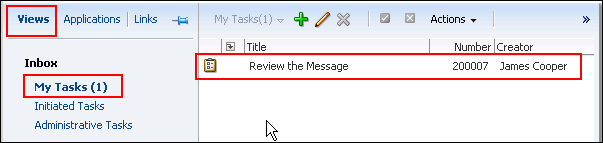
The process now flows, as before, to the business rule where the greeting is found to be "Short". As you'll recall, when the greeting is "short", the message requires review, regardless of what is in the Message field. Consequently, the process now flows to the Review Message task, which is assigned to the Reviewer role.
Remember that jcooper has both the Requester and the Reviewer roles. In order to see the Review Message task that has been routed to him, click the Views tab in the left column, and then click the My Tasks (0) link. As soon as you click it, the (0) is replaced by (1), reflecting the number of tasks currently awaiting jcooper's attention.
The Review the Message human task can now be seen in the Inbox. Click it to see the details in the lower panel of the Inbox.
In the details panel, you can see the taskflow form that you created for this activity, containing form elements for both the HelloObject and the ReviewObject. Notice that the ReviewObject attributes have been assigned by the Business Rules engine after executing the business rule for this message.

Click Reject when you have finished examining the details.
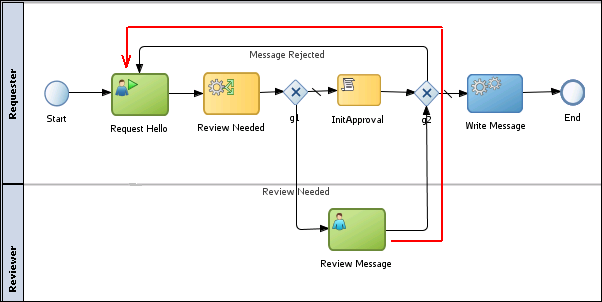
The Please Enter a Hello Message link appears in the Inbox. This is the title string for the human taskflow associated with the Request Hello task. Previously, this task did not appear in the Inbox because it was opened in a separate browser window immediately upon instantiation of the process. This time it appears in the Inbox.

Click the link to view the input form and enter a more appropriate message that does not require review as you did in Step 3. Click Submit when finished.
The process now flows through the two gateways to the Write Message activity and to the End activity. The Inbox is now empty. The process has completed.
Log out of the Workspace. The tutorial is finished!
Summary
- Modeling complex business logic with the Studio IDE
- Creating business rules with complex decision tables
- Creating auto-generated forms for human interaction
- Moving and persisting data throughout a business process
- Integrating a business process with external systems
- Testing a process using the BPM Workspace
- Mastering BPM 11g Webinar Series
- Oracle BPM 11g: Implement the Process Model Ed 3: This is a 5 day course available through Oracle University. It is available as an Instructor Led course, or Live Virtual Classroom format.
- Many samples, demos, and viewlets are available at https://java.net/projects/oraclebpmsuite11g/pages/Home
- To learn more about Oracle BPM 11g refer to additional OBEs and demos in the Oracle Learning Library
- Lead Curriculum Developer: Jill Moritz
- Other Contributors: Heidi Buelow
In this tutorial, you have learned how to create a simple process that illustrates some of the basic features of Oracle BPM's modeling and implementation capability. This is just a start. However, it has given you hands on exposure to some of the key benefits of the product such as:
Resources
Credits
To navigate this Oracle by Example tutorial, note the following:
- Hide Header Buttons:
- Click the title to hide the buttons in the header. To show the buttons again, click the title again.
- Topic List:
- Click a topic to navigate to that section.
- Expand All Topics:
- Click the button to show or hide the details for the sections. By default, all topics are collapsed.
- Hide All Images:
- Click the button to show or hide the screenshots. By default, all images are displayed.
- Print:
- Click the button to print the content. The content that is currently displayed or hidden is printed.
To navigate to a particular section in this tutorial, select the topic from the list.