Before Your Begin
Purpose
This tutorial covers how to use complex ASCII files as datastores, and how to invoke web services to and from ODI packages.
Time to Complete
Approximately 1 hour.
Background
Sometimes it makes more sense to store data in a flat, ASCII file than in a relational database. Other times you need to have data from a flat ASCII file be available for combining with RDBMS tables. ASCII files come in several forms: CSV, column-delimited, and complex. Complex files often have header and detail records. Complex files can be in XML format or JSON format. This OBE explores how to take the XML format and represent it by multiple RDBMS tables.
Web services may be present in your enterprise, or "out there" on the Internet. It is helpful to be able to call a web service from inside of an ODI package. Likewise, it is helpful to be able to invoke an ODI package from a web service. This OBE explores how to invoke a remote web service from inside an ODI package and return a SOAP response.
Scenario
A web service already exists on the Internet that returns a list of countries as an XML file. You want to invoke it from inside of an ODI package.
What Do You Need?
The following is a list of software and hardware requirements used in this Oracle By Example (OBE):
- Software
- Oracle Enterprise Linux (OEL) 6.4 or higher
- Oracle Database 12c Release 1 Enterprise Edition (12.1.0.2) - including Oracle Big Data SQL-enabled external tables, Oracle Advanced Analytics, Oracle OLAP, Oracle Partitioning, Oracle Spatial and Graph, and more
- Oracle Data Integrator (ODI) 12.2.1 or higher
- Alternatively, the Oracle Data Integrator Getting Started Virtual Machine (the VM) contains all of the above pre-installed.
- Hardware
- At least 2 GB RAM for each target (database or ODI)
- At least 6 GB RAM for the VM (if you are using that)
Prerequisites
Before starting this tutorial, you should:
- Have at least 6 GB RAM if you're using the Oracle Data Integrator Getting Started VM
- Have access to or have installed the sample lab artifacts
- Have attended ODI 12c training, [D82167GC10] Oracle Data Integrator 12c: Integration and Administration, or equivalent experience.
Typographic Conventions
These are the conventions used throughout this practice to indicate who types what.
-
Filenameor/path/subdirectory/. Often you can navigate to a destination without having to type it. - Command or value that you type, such as gedit .bashrc. Be mindful of periods at the end of sentences that are not part of the command.
- Click this such as or .
- Some variable or
<variable>as something you replace. Often prefixed with "my" such as<myName>or<myHost>. - A Menu Item or dialog Field Prompt or Tab name. For example, "click the Designer tab and select Models > New Model".
- Generally a red rectangle in the graphics is not part of the original image, but added to draw your attention to an item.
1. Complex Files
Complex files are files that are not simply
column-delimited, but rather have objects of a
certain custom-defined type (for example, addressType:
work, home, school) nested within objects (for
example, personType: customer,
employee, vendor). Examples of complex files are
JSON, XML, and so on. These files are defined by a
schema. To create a schema file so that ODI can
parse these ASCII files as relational database
tables, perform the following steps:
1.1 Start ODI
-
Go to the Linux Desktop, and using either the File Browser or an editor from the command line, open OBE
_Files/Complex_Files/Purchase_sample.txtfile. Review its contents as shown below: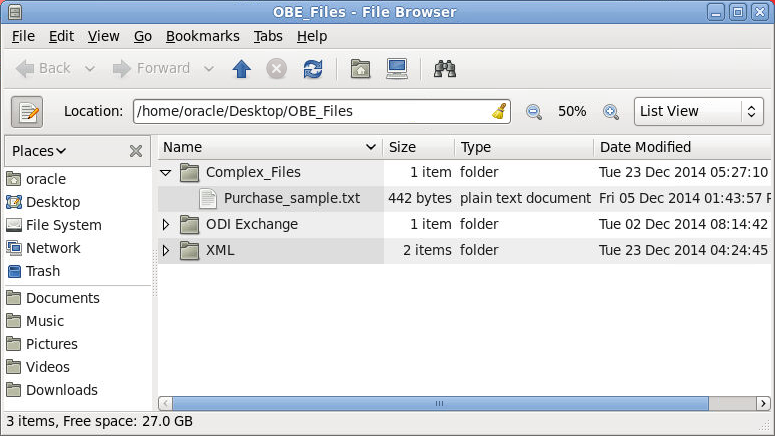
 6335722^Company One^First Street   999       San Jose       95129USCA650-801-6250
        ^Oracle^Bridge Parkway 1600      Redwood Shores 94065USCA650-506-7000
 001|Oracle Data Integrator EE|20000,2,+40000+
 002|Application Adapter for ODI|10000,5,+50000+
 003|BPEL Process Manager Enterprise Edition|20000,2,+40000+
 004|BPEL Process Manager Standard Edition|10000,5,+50000+
 005|BPEL Process Manager Developer Edition|1000,20,+20000+#110000
Note that the field separators are sometimes pipes (vertical bars), sometimes carets, sometimes commas, and sometimes plusses. Other times the fields are fixed length. The structure is not obvious, and not self-documenting!
-
Start ODI Studio using the Desktop shortcut icon
 .
. 
Alternatively, if there is a Desktop Launcher shortcut, click on that.
-
Click Connect to Repository. Log in to ODI Getting Started repository.
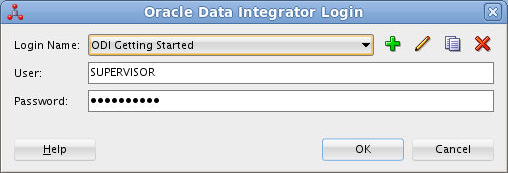
The userid and password should be stored and pre-populated from the Wallet. (If you are ever challenged for the Wallet password, it is welcome1.)
ODI is now started and ready to build nXSD schemas.
1.2 Create an nXSD with Native Format Builder Wizard
-
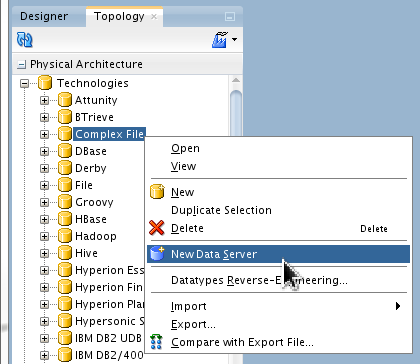
Go to Topology > Physical Architecture > Technologies > Complex File, right-click Complex File and select New Data Server.
-
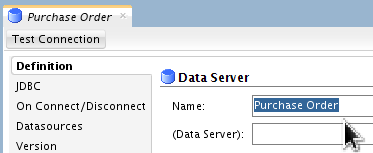
In the Definition panel, name the Data Server Purchase Order.
-
In the JDBC panel, click Search (
 ) and select ODI JDBC
Driver for Complex Files from the
list.
) and select ODI JDBC
Driver for Complex Files from the
list. 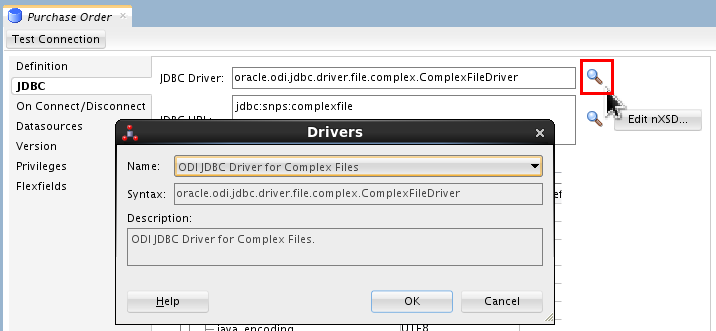
Click .
-
Click to open the Native Format Builder wizard.
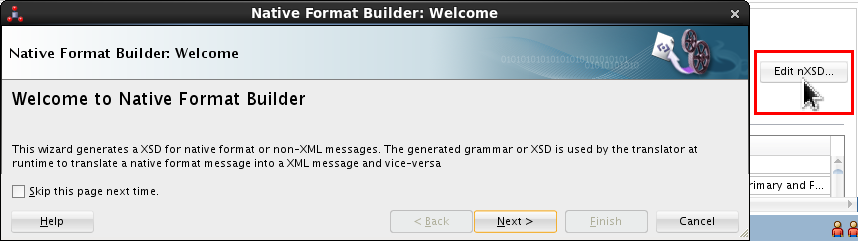
Your screen may look longer, it has been trimmed here for brevity. Click .
-
Enter PurchaseOrder.xsd as the File Name.
and select
/home/oracle/Desktop/OBE_Files/Complex_Filesas the Directory Name.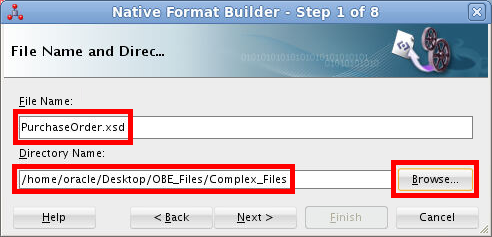
Click .
-
Select Complex Type in file type list.
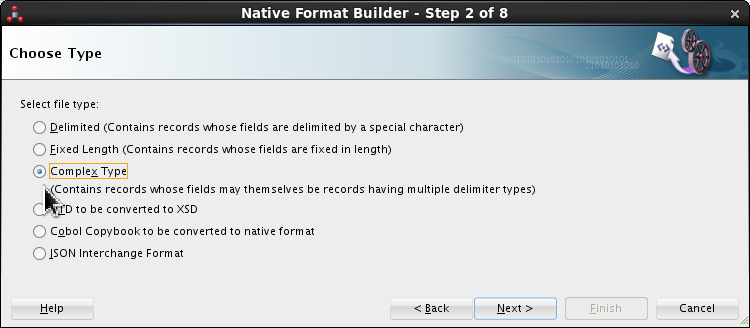
Click .
-
In the File Description screen, browse and select
/home/oracle/Desktop/OBE_Files/Complex_Files/Purchase_sample.txtas the File name.Enter http://xmlns.oracle.com/odi/complexfile/demo as the Target namespace.
Enter invoice as the Root element.
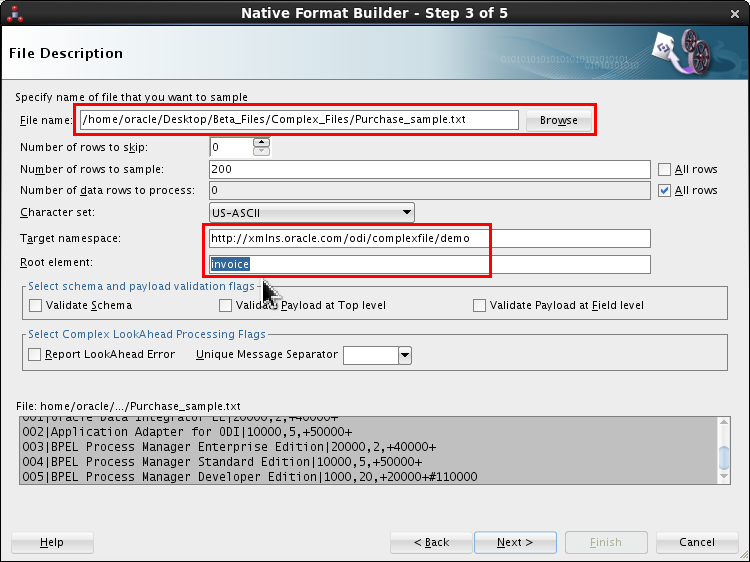
Most of these entries are case-sensitive.
Preview the content of the file in the dark gray box. Scroll to see the header records.
Click .
-
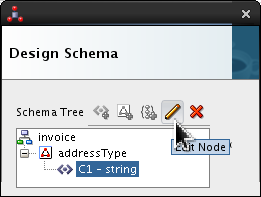
Design the nXSD file using the Design Schema panel. Click the Add Complex Type icon (
 ).
). 
-
Double-click <new_complex_type> and rename it addressType.
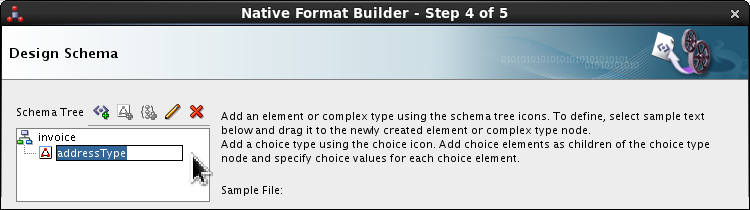
Press Enter.
-
Expand
![[+]](icons/expand.png)
addressType, selectC1and click Edit ( ).
). 
Your panel will look wider, this has been trimmed for clarity. Set the following values:
- Field Name = street1.
- Style = fixedLength
- Length = 15
- Pad Style = tail
- Padding = Single Space (which is the default)
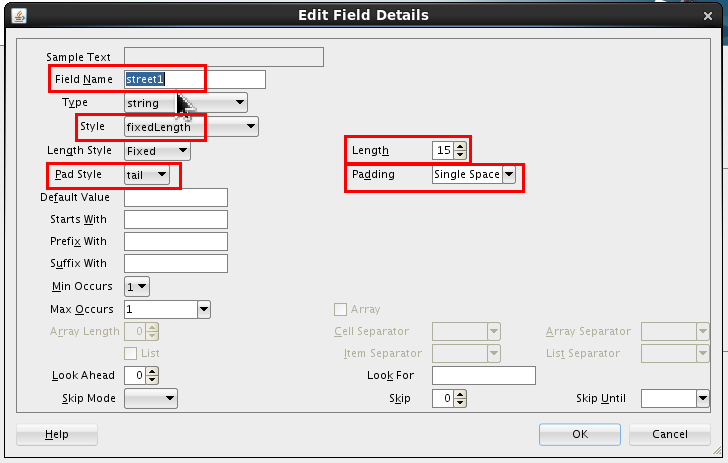
Click .
-
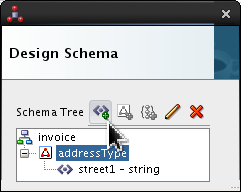
Click
addressTypeand click Add Element icon ( ).
). 
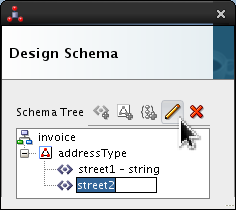
Select <new_element> and rename it street2. Click Edit (
).
Set the following values:
- Style = fixedLength
- Length = 10
- Pad Style = tail
- Padding = Single Space (which is the default)
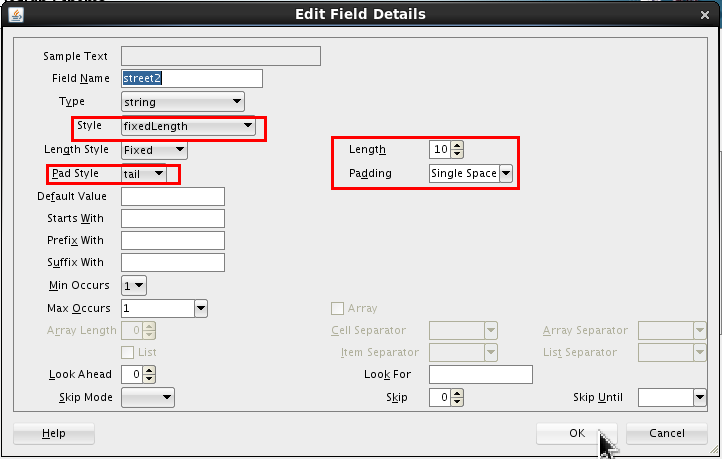
Click .
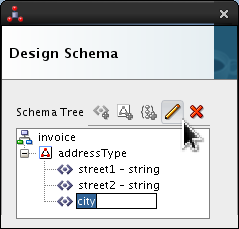
-
Click
addressTypeand click Add Element icon (). 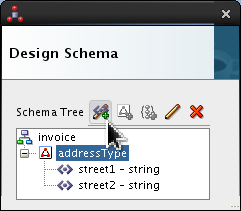
Select <new_element> and rename it city. Click Edit (
). 
Set the following values:
- Style = fixedLength
- Length = 15
- Pad Style = tail
- Padding = Single Space (which is the default)
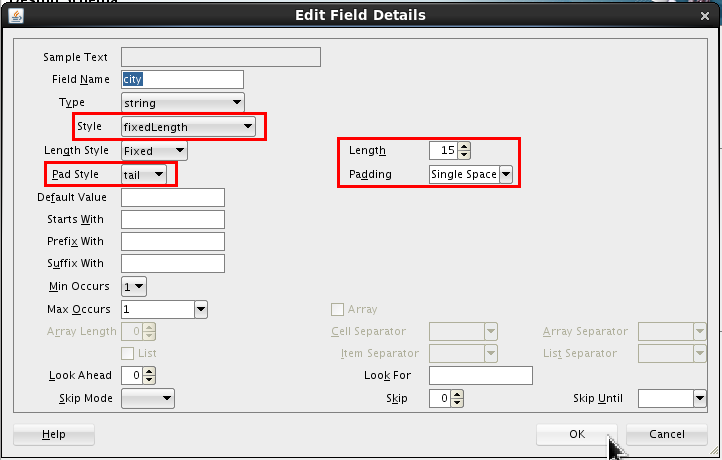
Click .
-
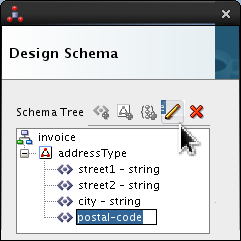
Click
addressTypeand click Add Element icon (). 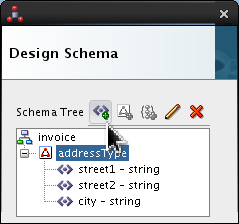
Select <new_element> and rename it postal-code. Click Edit (
).
Set the following values:
- Style = fixedLength
- Length = 5
- Pad Style = none
- Padding = (blank) (which is the default)
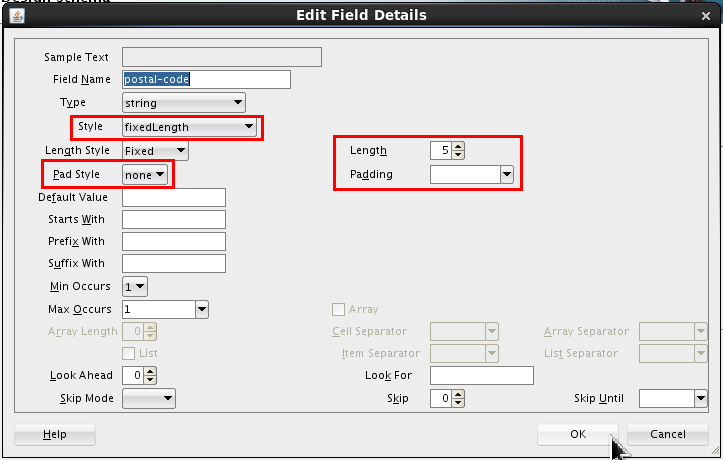
Click .
-
Click
addressTypeand click Add Element icon (). 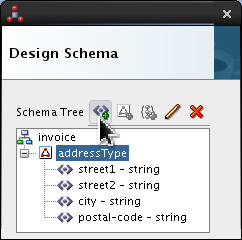
Select <new_element> and rename it country. Click Edit (
).
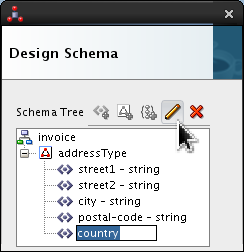
Set the following values:
- Style = fixedLength
- Length = 2
- Pad Style = none
- Padding = (blank) (which is the default)
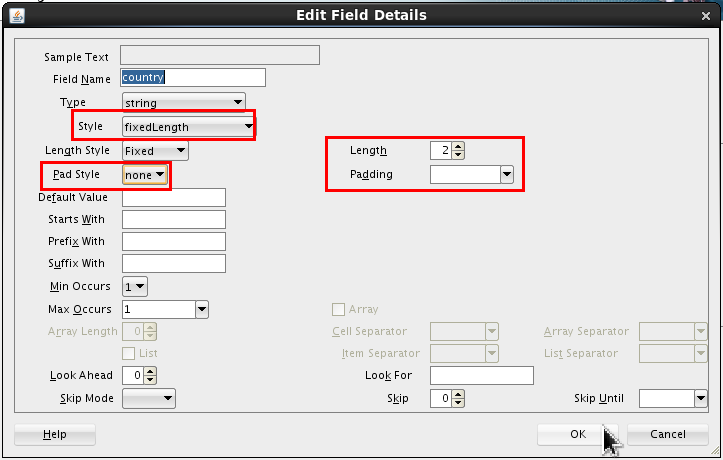
Click .
-
Click
addressTypeand click Add Element icon (). 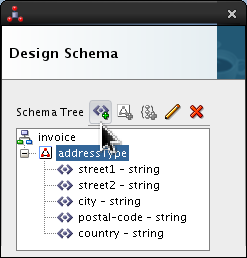
Select <new_element> and rename it state. Click Edit (
). 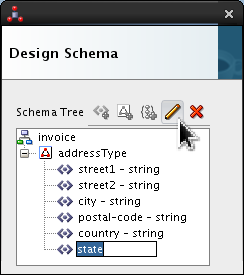
Set the following values:
- Style = fixedLength
- Length = 2
- Pad Style = tail
- Padding = Single Space (which is the default)
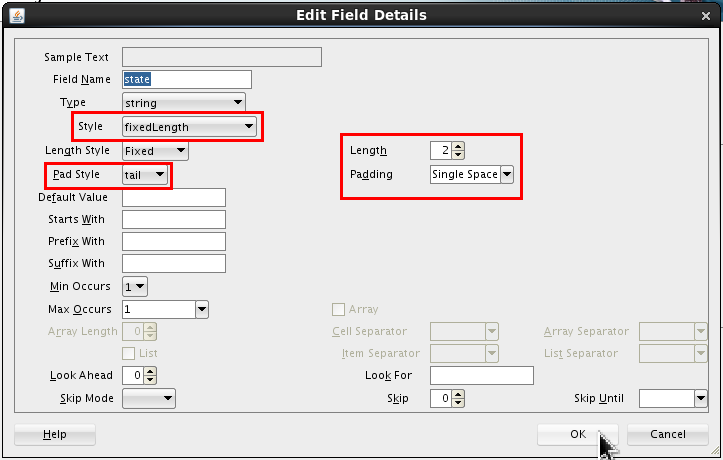
Click .
-
Click
addressTypeand click Add Element icon (). 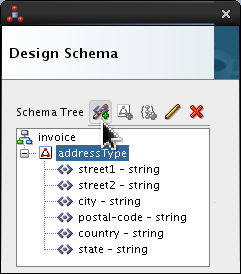
Select <new_element> and rename it phone. Click Edit (
). 
Set the following values:
- Style = terminated
- Terminated By = ${eol}
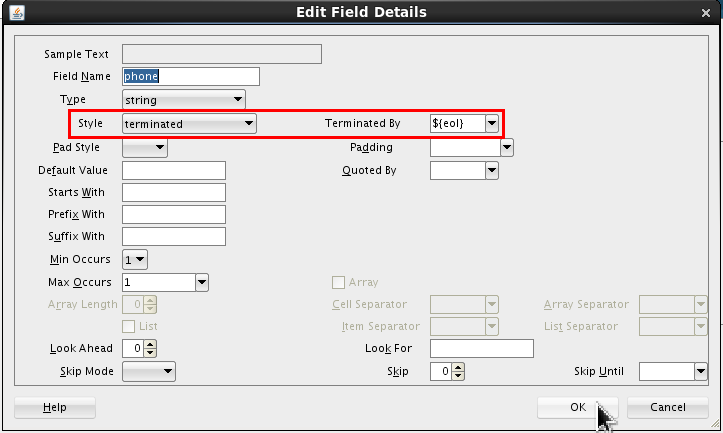
Click .
-
Select
invoiceand click Add Complex Type icon (). 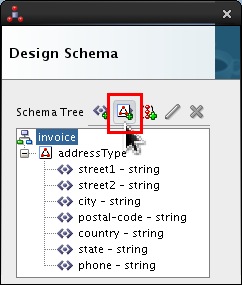
-
Double-click <new_complex_type> and rename it line-itemType.

Press Enter.
-
Expand
line-itemType, selectC1and click Edit (). 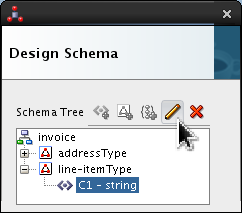
Set the following values:
- Field Name = uid.
- Style = fixedLength
- Length = 3
- Pad Style = none
- Padding = (blank) (which is the default)
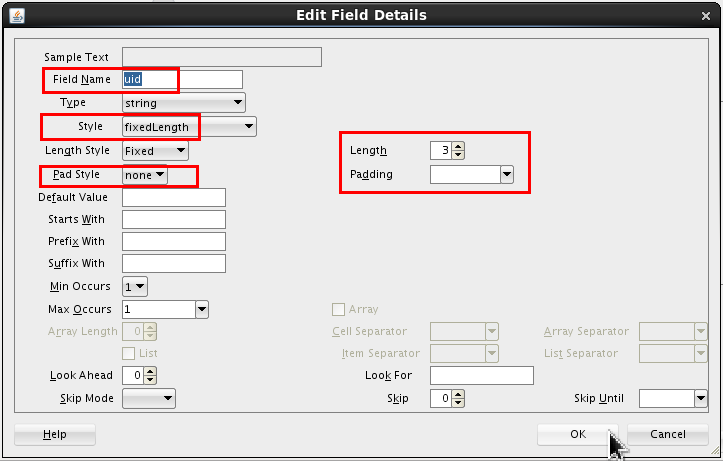
Click .
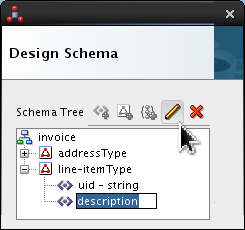
-
Click
line-itemTypeand click Add Element icon (). 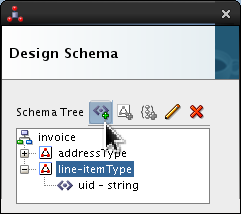
Select <new_element> and rename it description. Click Edit (
).
Set the following values:
- Style = surrounded
- Surrounded By = | (the vertical bar or pipe)

Click .
-
Click
line-itemTypeand click Add Element icon (). 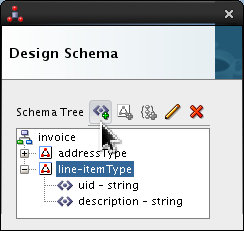
Select <new_element> and rename it price. Click Edit (
). 
Set the following values:
- Type = double
- Style = terminated
- Terminated By = , (comma)
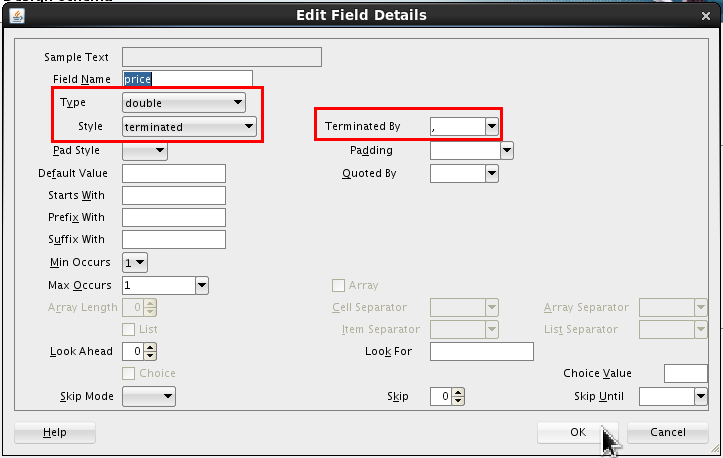
Click .
-
Click
line-itemTypeand click Add Element icon (). 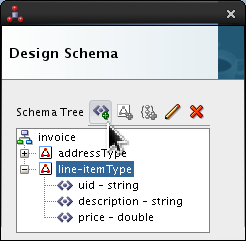
Select <new_element> and rename it quantity. Click Edit (
).
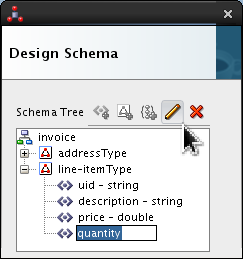
Set the following values:
- Type = integer
- Style = terminated
- Terminated By = , (comma)
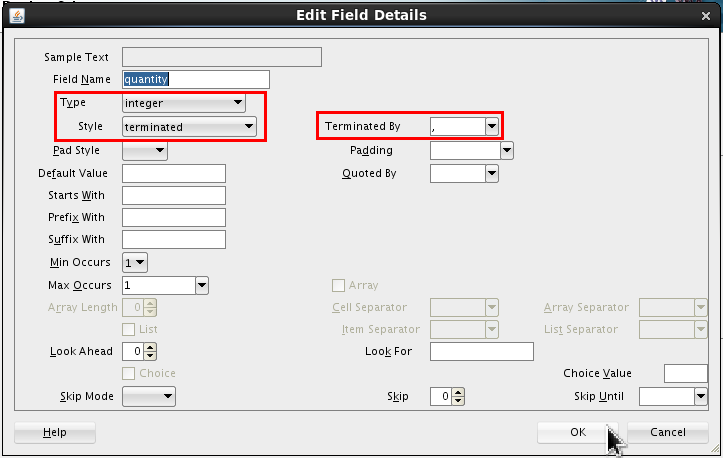
Click .
-
Click
line-itemTypeand click Add Element icon (). 
Select <new_element> and rename it line-total. Click Edit (
).
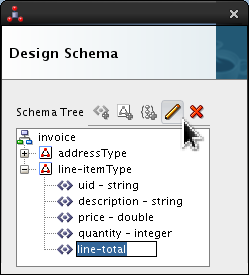
Set the following values:
- Type = double
- Style = surrounded
- Surrounded By = + (plus)
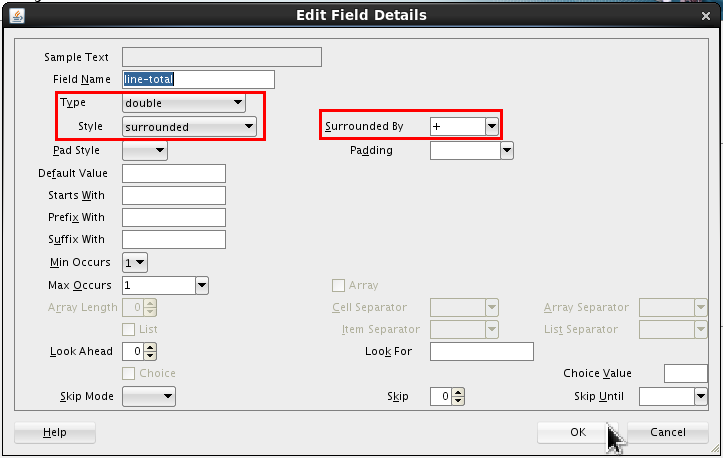
Click .
-
Select
invoiceand click Add Complex Type icon (). 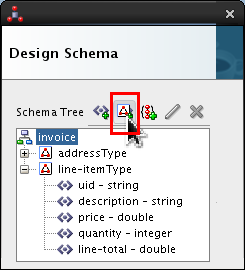
-
Double-click <new_complex_type> and rename it partnerType.
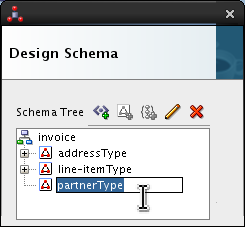
Press Enter.
-
Expand
partnerType, selectC1and click Edit (). 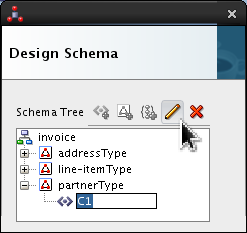
Set the following values:
- Field Name = uid.
- Style = fixedLength
- Length = 7
- Pad Style = tail
- Padding = Single Space (which is the default)
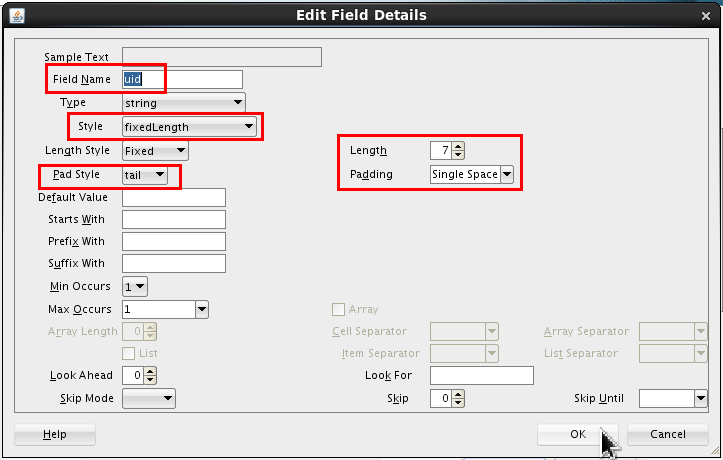
Click .
-
Click
partnerTypeand click Add Element icon (). 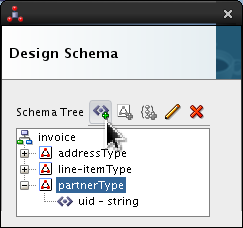
Select <new_element> and rename it name. Click Edit (
). 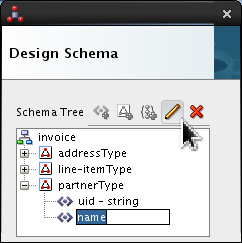
Set the following values:
- Style = surrounded
- Surrounded By = ^ (caret)
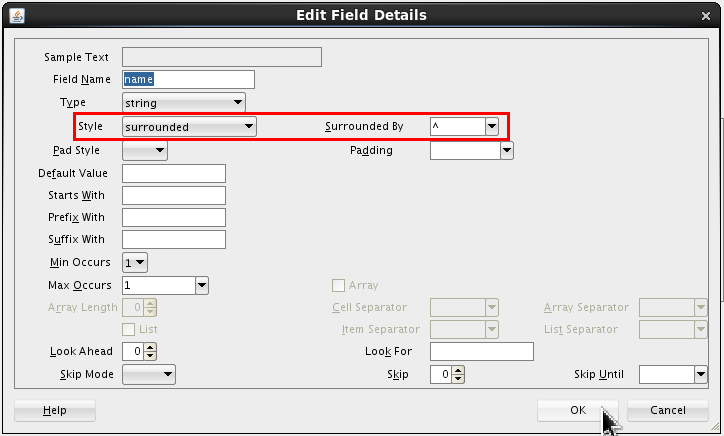
Click .
-
Click
partnerTypeand click Add Element icon (). 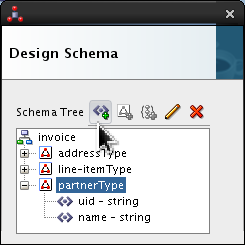
Select <new_element> and rename it address. Click Edit (
).
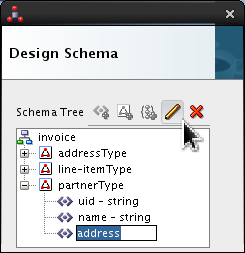
Set the following value:
- Type = addressType
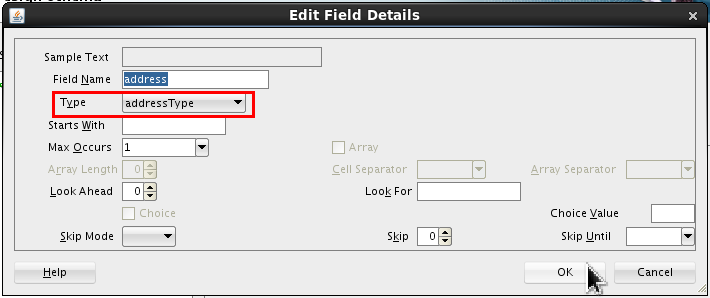
Click .
-
Select
invoiceand click Add Complex Type icon (). 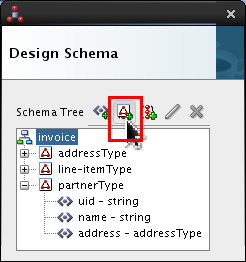
-
Double-click <new_complex_type> and rename it invoiceType.
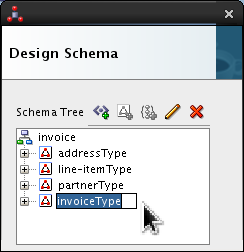
Press Enter.
-
Expand
invoiceType, selectC1and click Edit (). 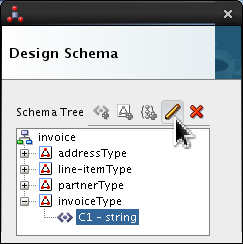
Set the following value:
- Field Name = purchaser.
- Type = partnerType
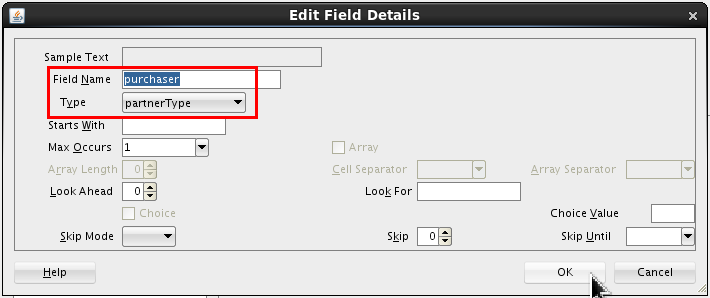
Click .
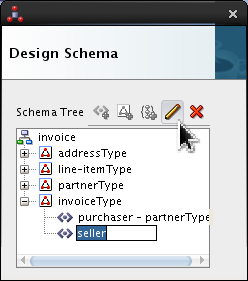
-
Click
invoiceTypeand click Add Element icon (). 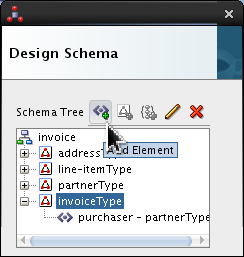
Select <new_element> and rename it seller. Click Edit (
). 
Set the following value:
- Type = partnerType
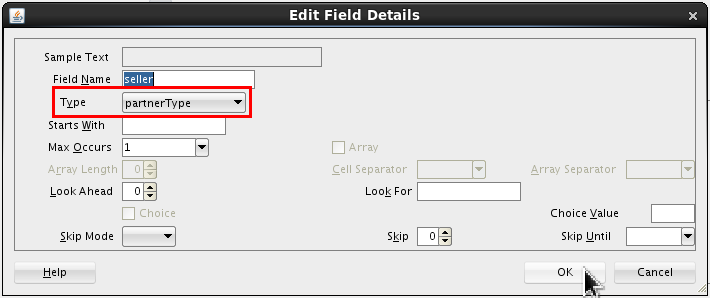
Click .
-
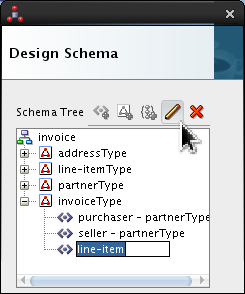
Click
invoiceTypeand click Add Element icon (). 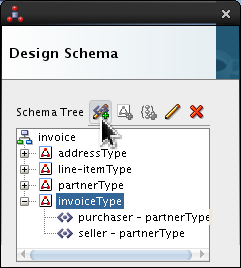
Select <new_element> and rename it line-item. Click Edit (
).
Set the following values:
- Type = line-itemType
- Max Occurs = UNBOUNDED
- Select Array
- Cell Separator = ${eol}
- Array Separator = # (hash)
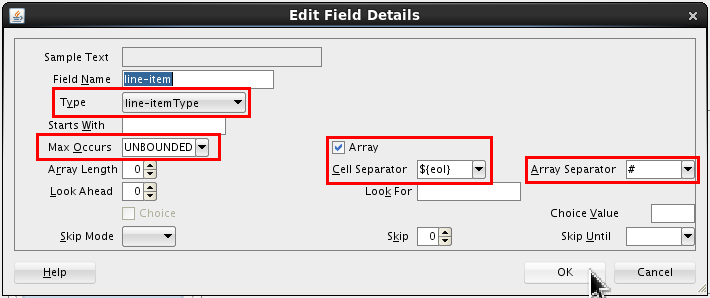
Click .
-
Click
invoiceTypeand click Add Element icon (). 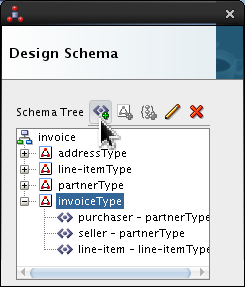
Select <new_element> and rename it total. Click Edit (
). 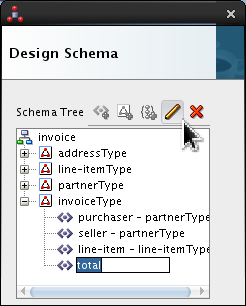
Set the following values:
- Type = Double
- Style = terminated
- Terminated By = ${eol}
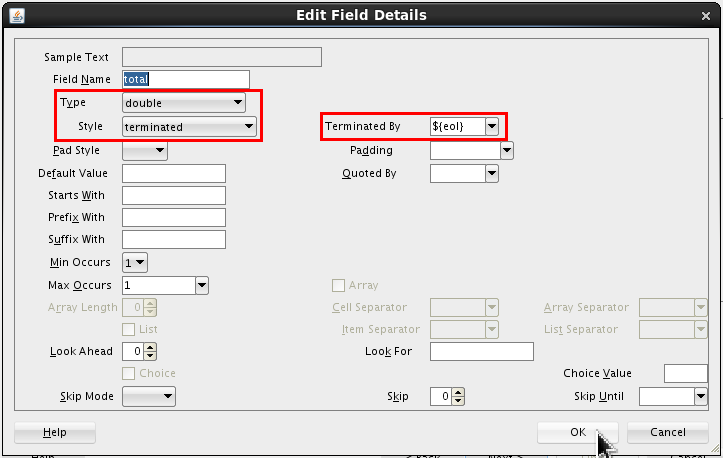
Click .
-
Click
invoice(not invoiceType) and click Add Element icon ().
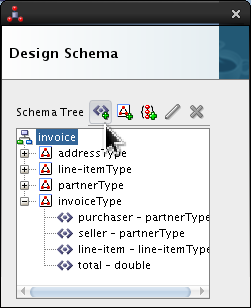
Select <new_element> and rename it invoiceElt. Click Edit (
).

Set the following value:
- Data Type = invoiceType
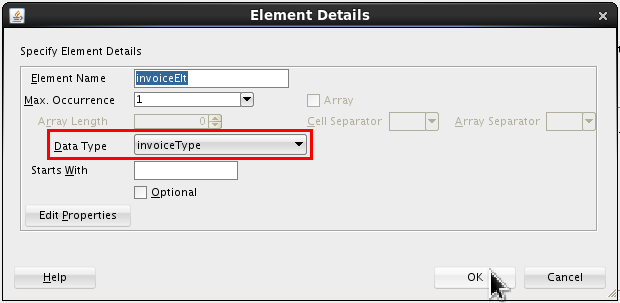
Click . On Design Schema, click .
-
Review the XSD, scroll up and down to see it all. Click .

-
Click Play (
 )
to preview (on the right side) the XML file
that will be created by the Complex File
driver.
)
to preview (on the right side) the XML file
that will be created by the Complex File
driver. 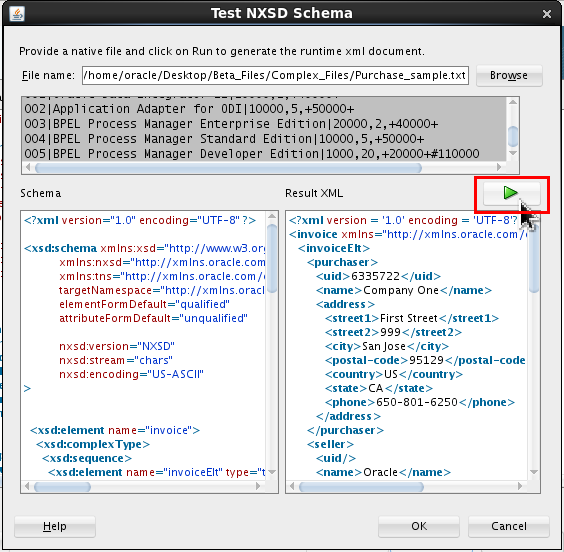
Click , click , click to close the Wizard.
-
Using the Properties table in the JDBC panel of the Data Server set file to
/home/oracle/Desktop/OBE_Files/Complex_Files/Purchase_sample.txt.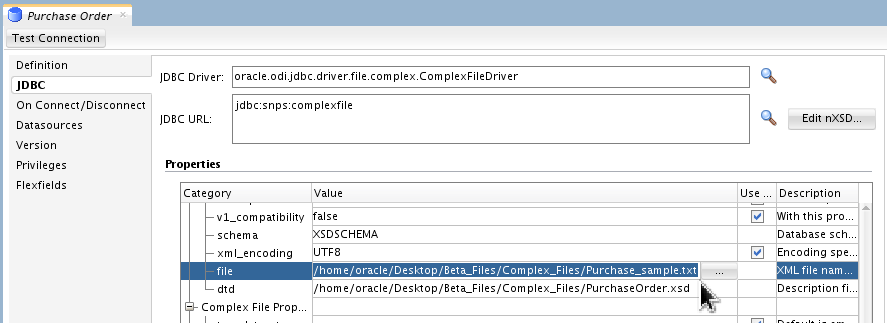
You have to scroll down a bit to get to the file field.
-
Click and Save (
 ) the newly created Data
Server.
) the newly created Data
Server. 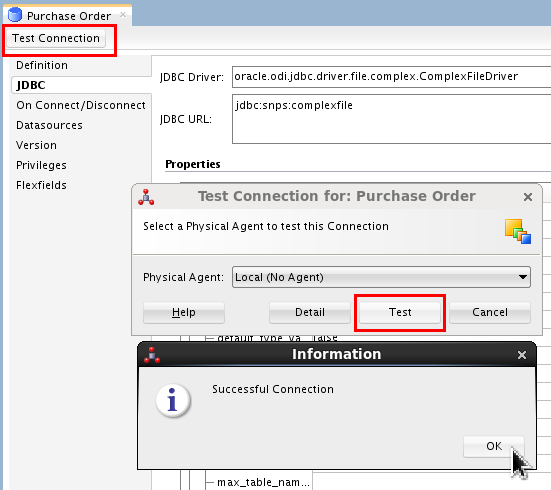
Ignore the other informational messages about Physical Schemas and Contexts, you will do that next. Close the Purchase Order tab.
You have successfully created an nXSD using the Native Format Builder Wizard. (There are other tools as well that you could have used.)
1.3 Create Topology and Designer Objects
-
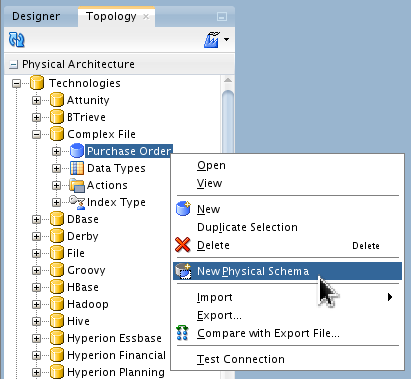
In Topology > Physical Architecture > Technologies > Complex File, right-click Purchase Order to create a New Physical Schema for the Purchase Order Data Server.
Set Schema and Work Schema fields to
XSDSCHEMA.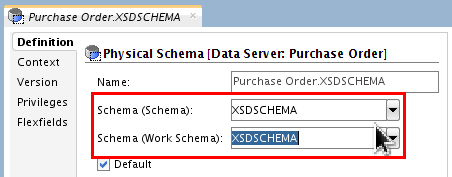
Click Save (
) and close the tab.
Ignore the Information message about
Context, you will do that next. -
In Topology > Logical Architecture > Technologies > Complex File, right-click Complex File to create a New Logical Schema.
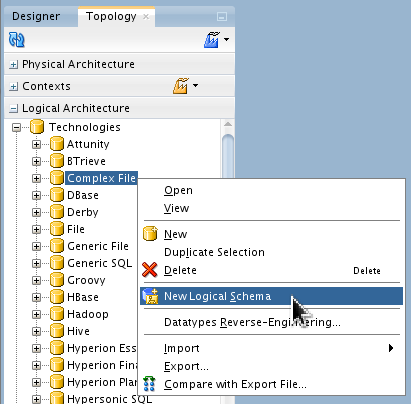
Name it LSC_PO_CPLX_FILE, and assign the Global Context for the Physical Schemas to
Purchase
                                            Order.XSDSCHEMA
.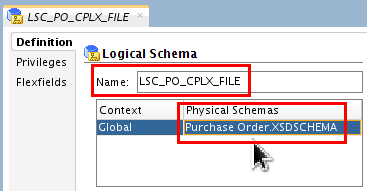
Click Save (
) and close the tab. -
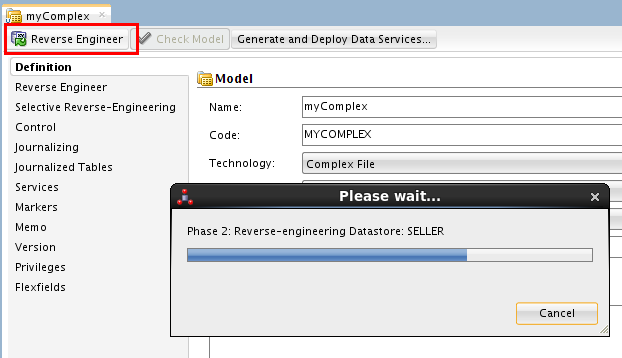
In Designer > Models, click the pull-down and create a New Model linked to this logical schema.
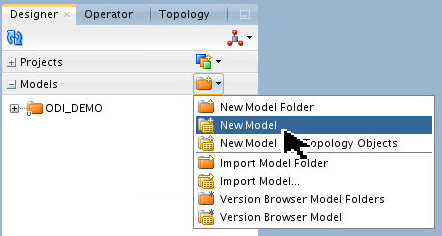
Name it myComplex and set Technology: Complex File.

Click Save (
) but leave the tab
open. -
the Model.
Close the tab.
-
Expand
myComplex and right-click LINE_ITEMdatastore to View Data.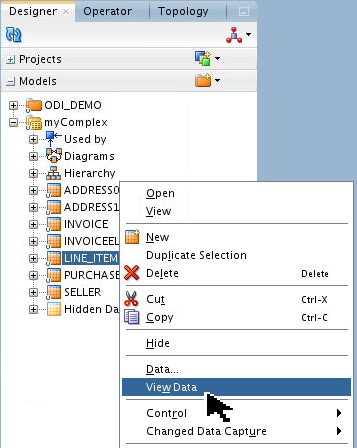
Look at some of the other tables as well to see how they correspond to the ASCII file.
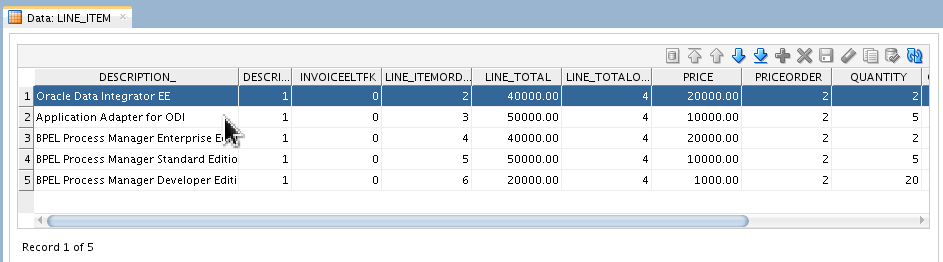
Close the Data tab.
You have created the Topology and Designer objects.
You have created a complex file schema definition and model for ODI to represent an ASCII file as a set of RDMBS tables.
2. Using ODI JDBC Drivers Properties
The objective is to access ASCII XML files via JDBC, and to represent them in ODI as relational tables. To do this, perform the following steps:
2.1 Prolog
The sample XML file is geographic data (countries, regions, cities, and populations).
-
Go to the Linux Desktop, and using either the File Browser or an editor from the command line, open the
/home/oracle/Desktop/OBE_Files/XML/GEO_DIM.xmlfile. Review its contents as shown below: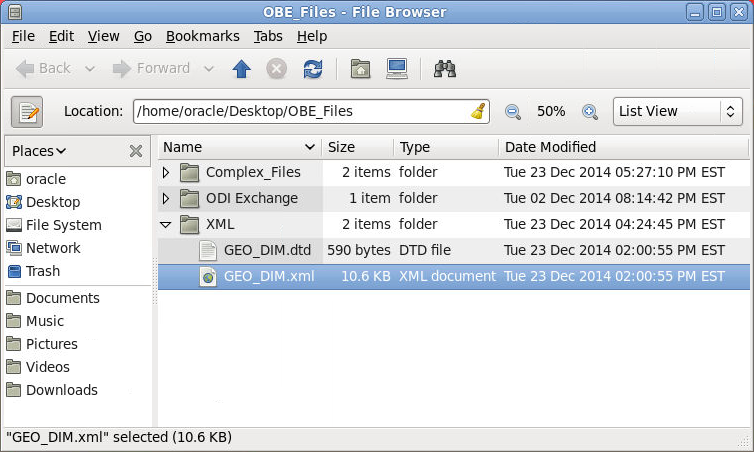
<?xml version="1.0" encoding="UTF-8"?>
<GEOGRAPHY_DIM>
    <country COUNTRY_ID="6" COUNTRY_NAME="Autralia">
        <region REGION_ID="72" REGION_NAME="Queensland">
            <city CITY_ID="63" CITY_NAME="Brisbane" POPULATION="505179"/>
            <city CITY_ID="64" CITY_NAME="Gold Coast" POPULATION="575174"/>
        </region>
        <region REGION_ID="70" REGION_NAME="South Wales">
            <city CITY_ID="61" CITY_NAME="Canberra" POPULATION="353288"/>
            <city CITY_ID="60" CITY_NAME="Sidney" POPULATION="890962"/>
        </region>
        <region REGION_ID="71" REGION_NAME="Victoria">
            <city CITY_ID="62" CITY_NAME="Melbourne" POPULATION="857478"/>
        </region>
    </country>
    <country COUNTRY_ID="2" COUNTRY_NAME="France">
        <region REGION_ID="31" REGION_NAME="French Alps">
            <city CITY_ID="24" CITY_NAME="Grenoble" POPULATION="488825">
                <client ADRESS="12 allee Victor Hugo" AGE="42.0"
                    CLIENT_ID="204.0" FIRST_NAME="Martin" LAST_NAME="Christine"/>
            </city>

<!-- (...many lines skipped for clarity...) -->
Note that the fields are semi-self-documenting, but it still does not indicate explicitly whether "country" is string or number, whether it is required or optional, or the maximum occurrences of each field. That is what the DTD is for!
-
If ODI Studio is not started, start it now.
The steps to do that are in previous Topic 1.1.
-
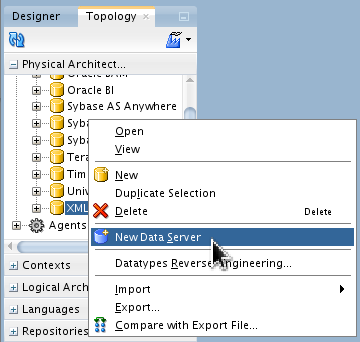
In Topology > Physical Architecture > Technologies > XML, right-click XML and create a New Data Server.
-
In the Definition panel, name the Data Server GEO_DIM.
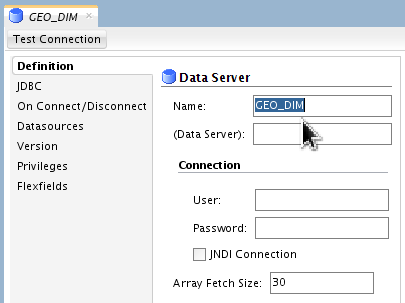
Leave the other fields as their defaults or blank.
-
In the JDBC panel, click Search (
) and select ODI JDBC
Driver for XML from the list. 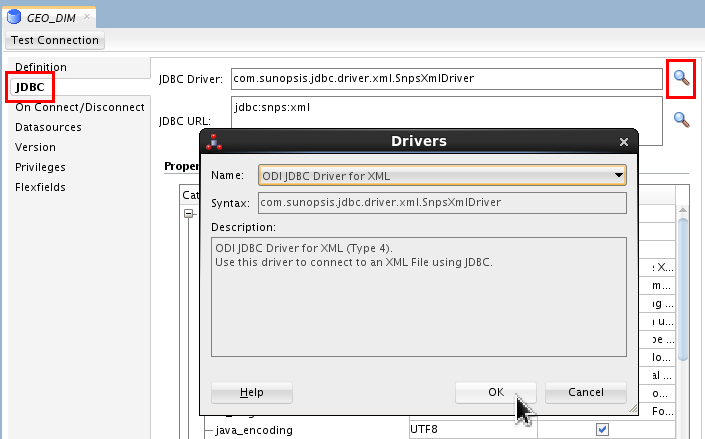
Click .
That was the easy part! Now comes the actual JDBC configuration...
2.2 JDBC Properties Table
The XML Data Server configuration is now done using the Properties table.
-
Scroll down in the list and click Browse in the Value field of the file row to Open an XML file.
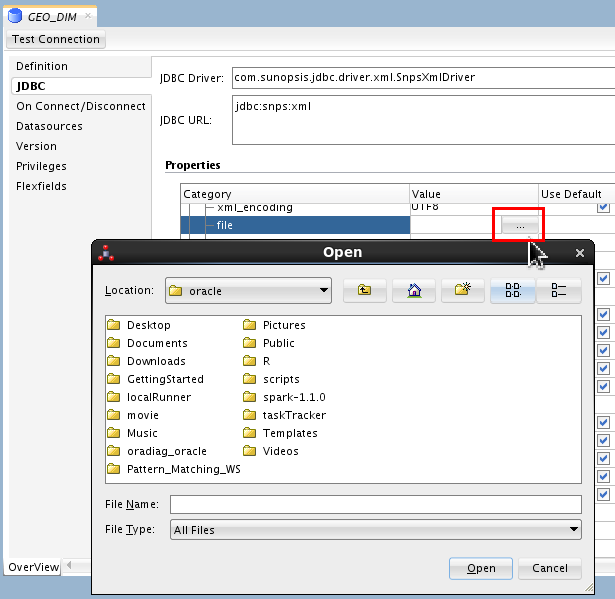
The fields are not listed in any logical order, just scroll down until you see Category file.
-
Navigate to
/home/oracle/Desktop/OBE_Files/XMLand selectGEO_DIM.xml.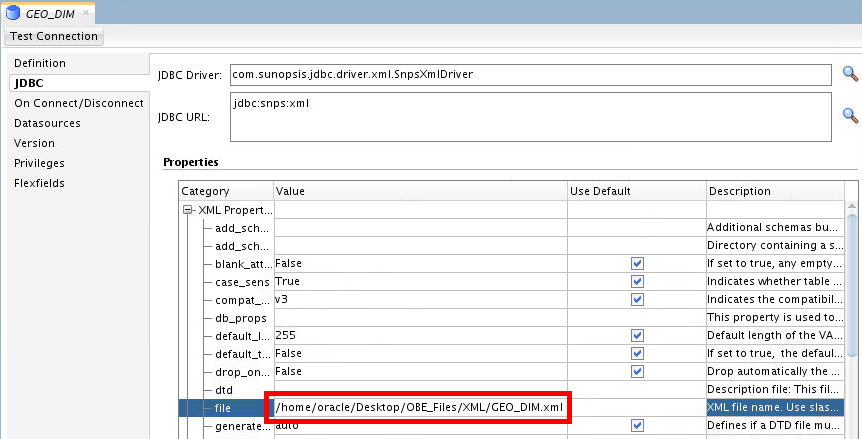
Select the file and click .
-
Click Browse corresponding to the dtd Value field and select
/home/oracle/Desktop/OBE_Files/XML/GEO_DIM.dtd.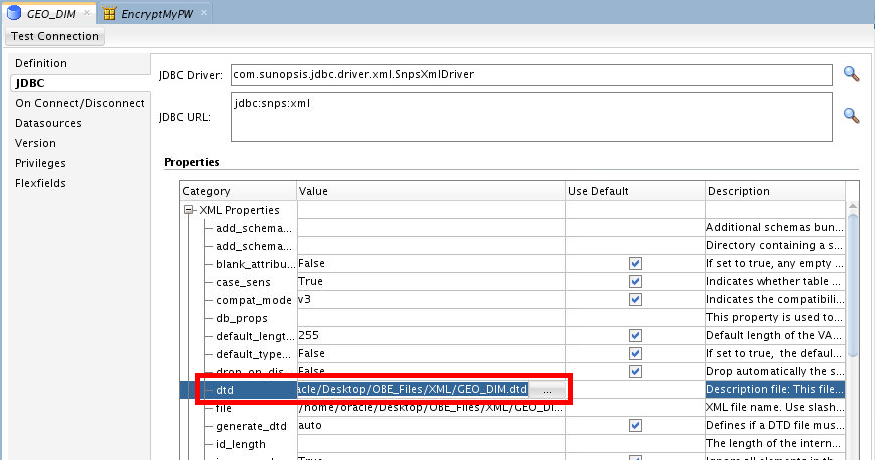
Select the file and click .
-
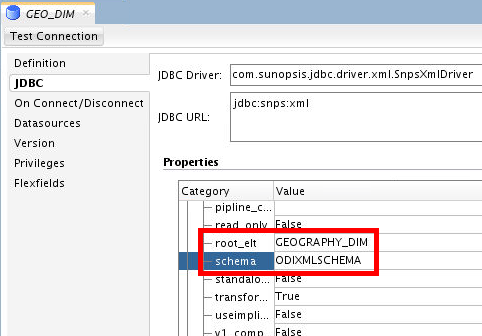
Set root_elt to GEOGRAPHY_DIM to define the XML file root element.
Set schema to ODIXMLSCHEMA.
-
To hold the XML data into a DB schema instead of the memory of the ODI agent, use the External DB Properties fields. Scroll down in the list and set
dp_driver =oracle.jdbc.OracleDriver.Set dp_schema to ODIXMLSCHEMA.
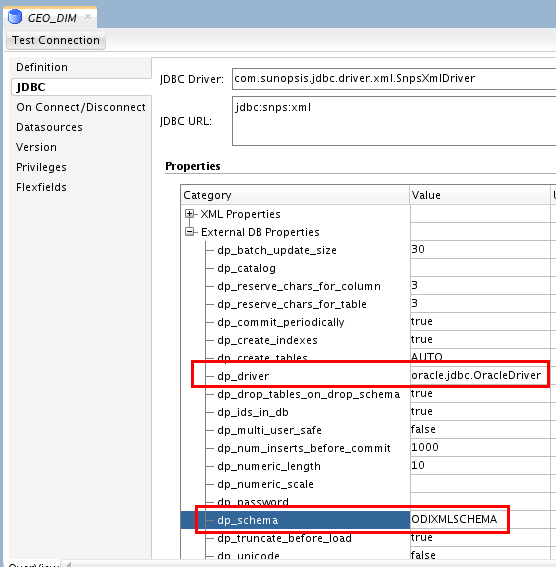
You have to type these values, it does not read them from a list of choices.
-
Set dp_password to qFgaJhVx7tdruALdT6Sm1g== (encoded version of oracle).
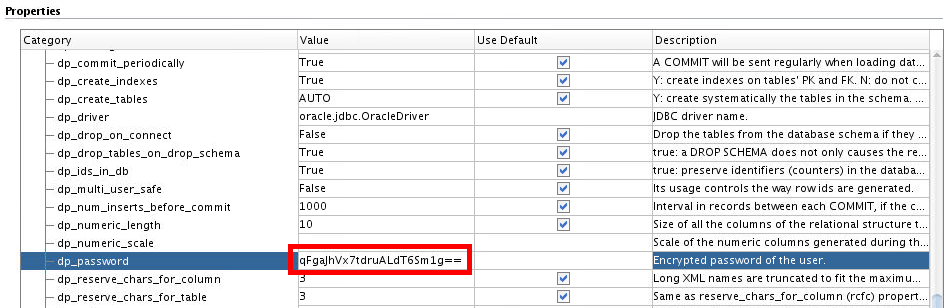
If you wondered how that encrypted password came to be, optionally do the following steps:
-
In Designer > Projects > (any project) > First Folder > Packages, create a New Package named EncryptMyPswd.
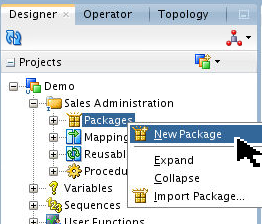
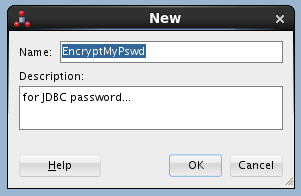
Since this is a throw-away package, you can put it anywhere and name it anything.
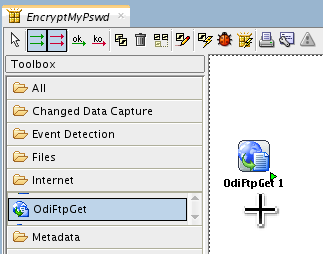
-
Under Toolbox > Internet, add an OdiFtpGet tool step.
-
Configure it by entering your password oracle.

The password you enter will display as circles (
 ).
). -
Click the Command tab, you should see the encoded string corresponding to oracle for your current repository.
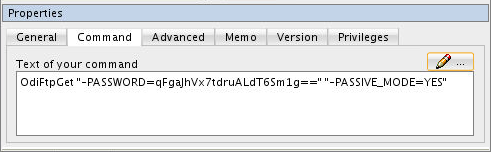
You can copy and paste this password into configuration fields. The resulting encryption is different for each repository. Close the tab, you can choose to save the package or not (you should not need it any more.)
-
-
Set dp_url to jdbc:oracle:thin:@localhost:1521/orcl.
Set dp_user to system.
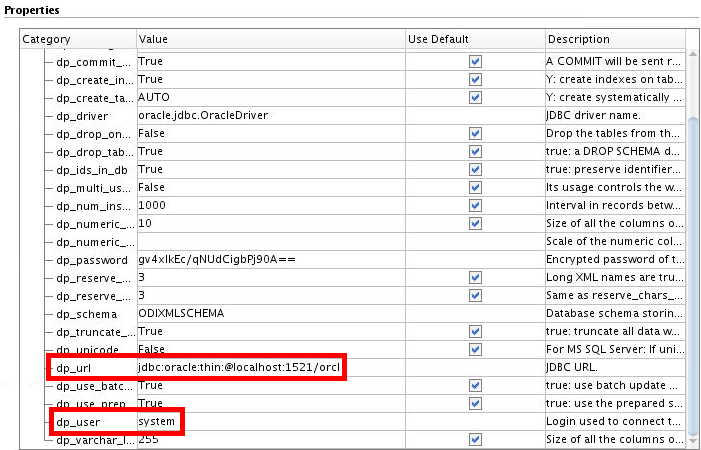
This url syntax is different from the earlier versions of ODI where the final port delimiter was a : (colon) and not a / (slash). This is due to JDBC syntax, not to ODI. For example, Pluggable database would only support the slash.
-
Click and Save (
) the newly created Data
Server. 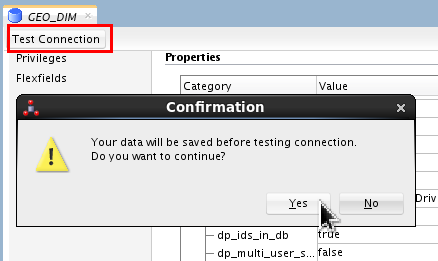
Click , click , click . Close the
GEO_DIMtab.
The JDBC portion is successfully configured.
2.3 Create Topology and Designer Objects
-
Under Topology > Physical Architecture > Technologies > XML > GEO_DIM, right-click to create a New Physical Schema for this Data Server.
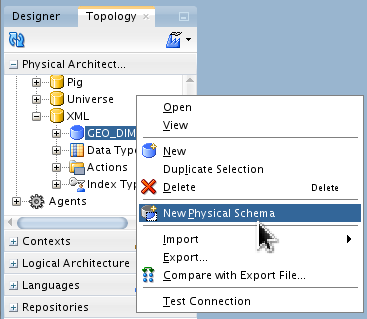
Set Schema and Work Schema to ODIXMLSCHEMA.

Save (
)
and close the GEO_DIM.ODIXMLSCHEMAtab. -
Under Topology > Logical Architecture > Technologies > XML, right-click to create a New Logical Schema.
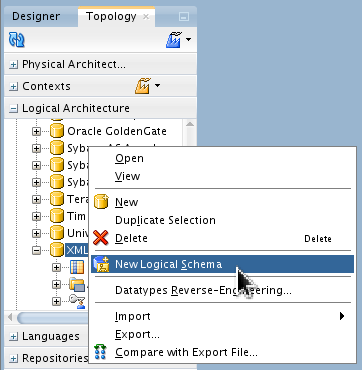
Name it LSC_GEO_DIM. in the Context Global, associate it with Physical Schemas
GEO_DIM.ODIXMLSCHEMA.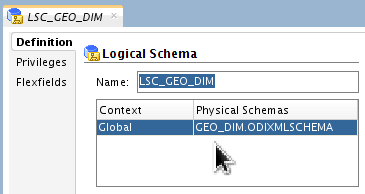
Save (
)
and close the LSC_GEO_DIMLogical Schema tab. -
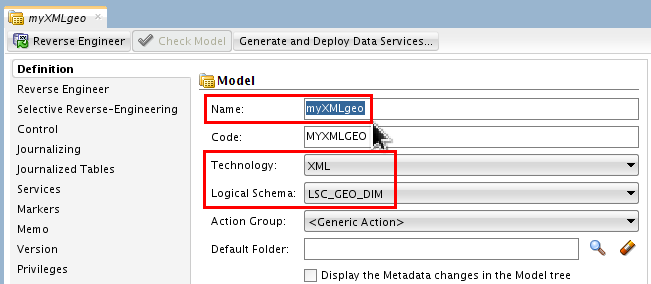
In Designer > Models, use the pull-down to create a New Model.
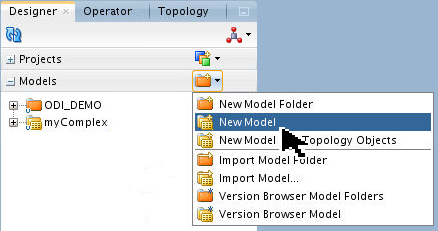
Name it myXMLgeo, set Technology: XML and set Logical Schema: LSC_GEO_DIM.
-
Go to Selective Reverse Engineering tab, select New Datastores and Objects to Reverse Engineer.
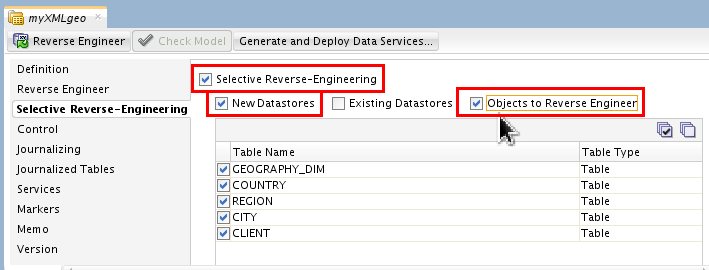
Since you are leaving the default of selecting everything, this step is really optional.
-
Click .
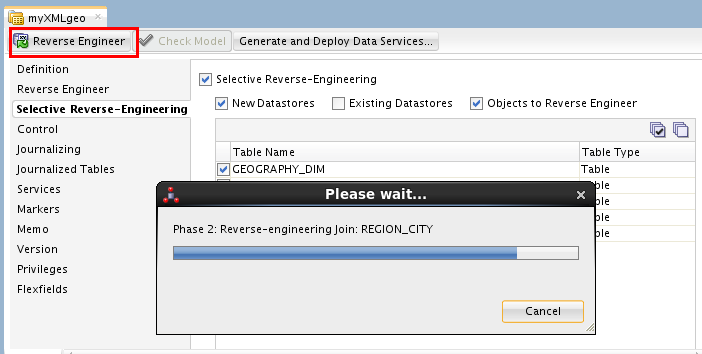
Click when prompted. Close the
myXMLgeotab. -
Expand
myXMLgeo. Right-click COUNTRY datastore and select View Data.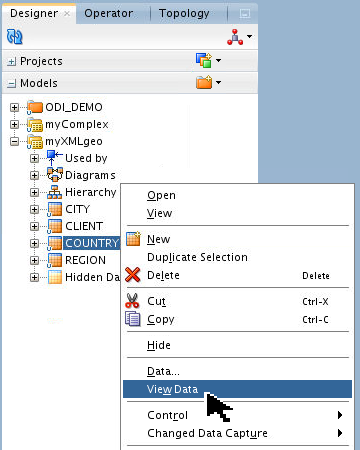
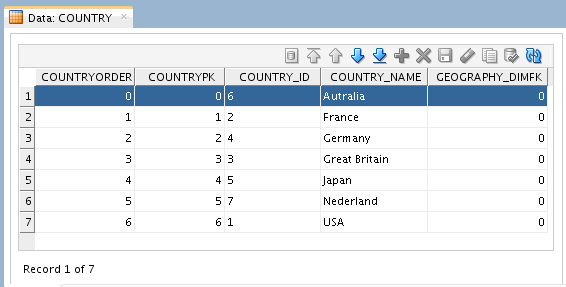
Close the Data: COUNTRY tab.
-
Using a Terminal, connect to the Oracle Database using SQL*Plus and review the data at the DB level:
[OS] sqlplus system/oracle
SQL> col country_id format a8
SQL> col country_name format a15
SQL> select * from ODIXMLSCHEMA.ODIXMLSCHEMA_COUNTRY;

COUNTRYORDER  COUNTRYPK COUNTRY_ COUNTRY_NAME	 GEOGRAPHY_DIMFK
------------ ---------- -------- --------------- ---------------
	   0	      0 6	 Autralia		       0
	   1	      1 2	 France 		       0
	   2	      2 4	 Germany		       0
	   3	      3 3	 Great Britain		       0
	   4	      4 5	 Japan			       0
	   5	      5 7	 Nederland		       0
	   6	      6 1	 USA			       0

7 rows selected.

SQL> exit;
(Don't worry about the spelling of Australia...)
You have created the Topology and Designer objects.
You have created an XML Data Server configuration for ODI to represent an XML ASCII file as a set of RDMBS tables.
3. Web Service Data Server
To invoke a Web Service from an ODI package, perform the following steps:
3.1 Configuring Topology
-
If ODI Studio is not started, start it now.
The steps to do that are in previous Topic 1.1.
-
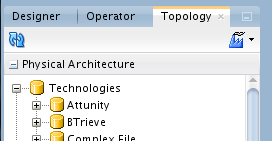
In the Navigation panel, go to Topology > Physical Architecture > Technologies.
-
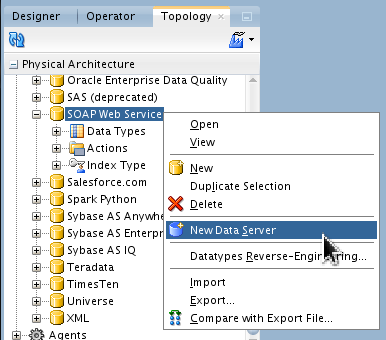
Under Physical Architecture > Technologies, right-click SOAP Web Service and select New Data Server.
-
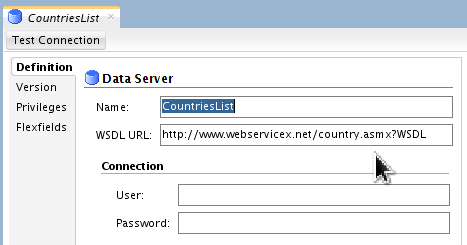
Set Name: CountriesList.
Set WSDL URL: http://www.webservicex.net/country.asmx?WSDL. (The trailing period is not part of the URL.)
On the main menu bar, click Save (
).
Click
on the Information dialog for
physical schemas. -
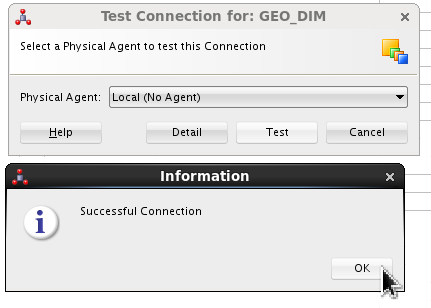
Click . On Test Connection, use Local (no agent) by clicking .
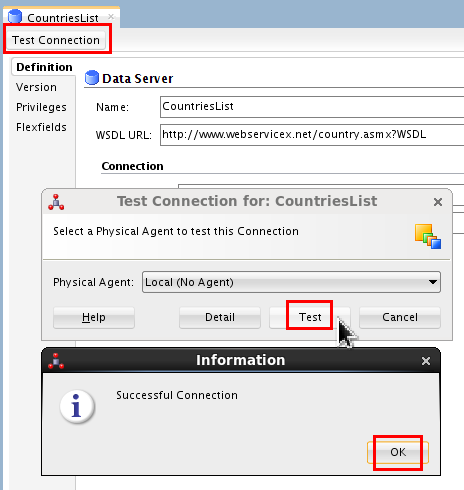
If successful, click . Close the
CountriesListtab. -
Right-click CountriesList and select New Physical Schema.
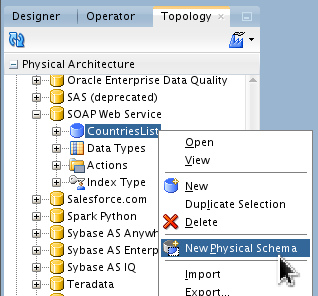
Accept the default Name.
-
Set Service: country.
Set Port: countrySoap.
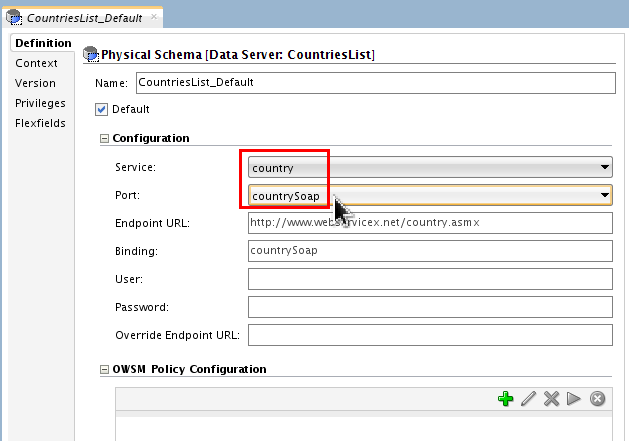
Accept the default Endpoint URL and Binding.
-
Click Context tab and Add (
 ) a new Logical
Schema: LSC_WS_COUNTRIESLIST
linked to the Context: Global.
) a new Logical
Schema: LSC_WS_COUNTRIESLIST
linked to the Context: Global. 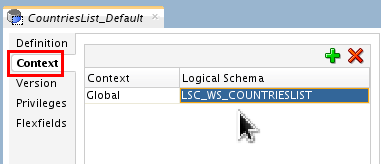
On the main menu bar, click Save (
).
Close the CountriesList_Defaulttab.
You have configured the Topology Physical and Logical Architectures.
3.2 Configuring Designer
-
On the Designer tab, expand
Projects
> Demo > Sales Administration >
Packages. Right-click Packages and
create a New Package.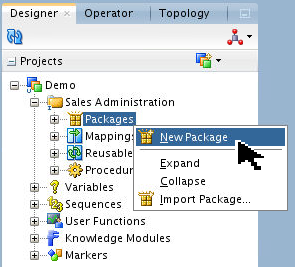
-
Name it Invoke Web Service.

Click .
-
Create an OdiInvokeWebService tool step (Toolbox > Internet > OdiInvokeWebService).
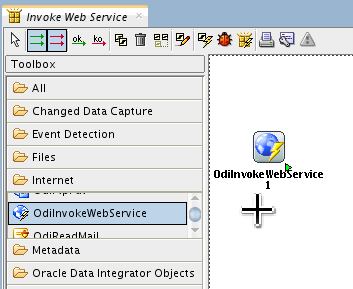
The order is: first select the Free Choice (
 )
tool, then click the Odi tool itself,
then click (not drag) in the work area.
)
tool, then click the Odi tool itself,
then click (not drag) in the work area.
-
In Properties, set the following paramters and values:
- Step name: Get List of Countries
- Context: Global
- Logical Schema: LSC_WS_ COUNTRIESLIST
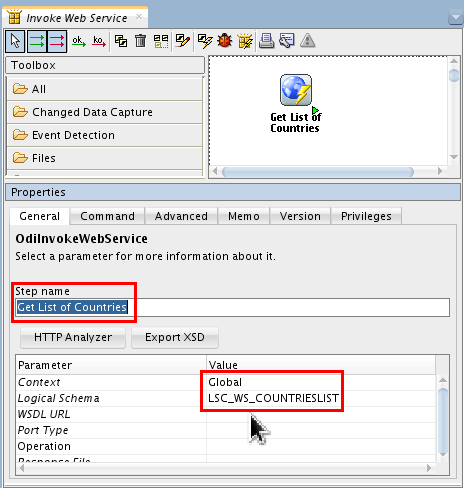
You are only half-done. Leave the package open.
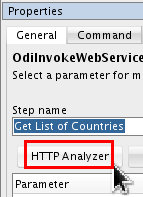
The basic parts of the tool step are configured. Next is the HTTP Analyzer.
3.3 Configuring HTTP Analyzer
-
On Properties > General, click (a.k.a. "Advanced Editor").
-
In the Advanced Editor, set Operations: countrySoap.GetCountries(,).
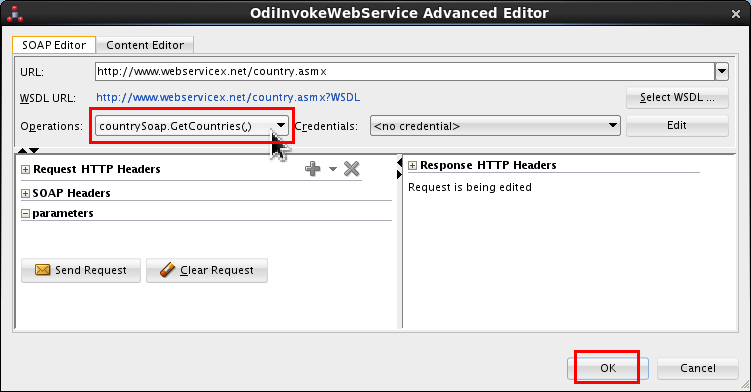
Leave Credentials as-is: <no credential>. Click .
-
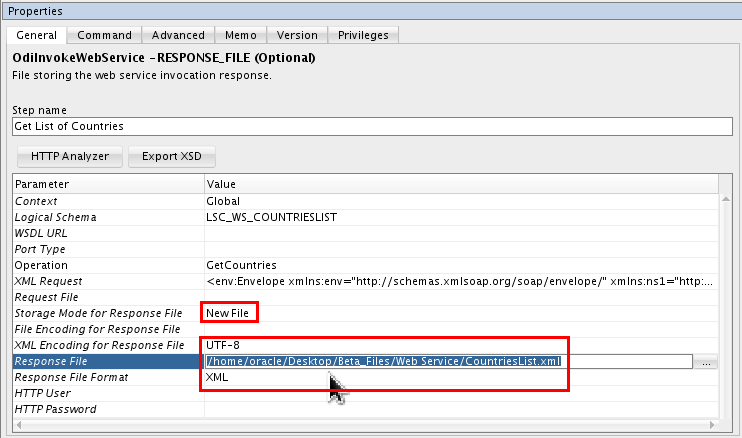
In Properties, set the following paramters and values:
- Storage Mode for Response File: New File
- XML Encoding for Response File: UTF-8
- Response File: /home/oracle/Desktop/OBE_Files/Web
Service/CountriesList.xml
(Since the file itself does not exist, you cannot navigate to it with browse , you must enter the whole path.) - Response File Format: XML
Click Save (
), and close the
package tab.
The package that invokes web service is created and configured.
3.4 Running the Package
-
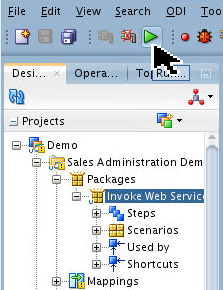
Select the
Invoke Web Servicepackage and click Run ( ).
). 
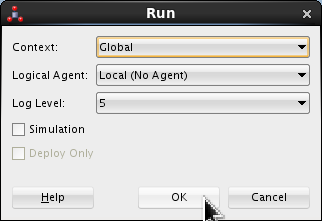
Accept the defaults for the Run dialog. Click .
-
Review the execution in the Operator tab. Make sure there are no errors.
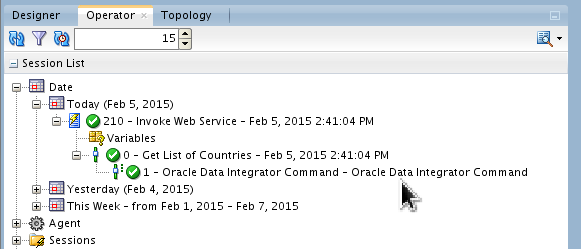
You can find your session under several different nodes: Date or Sessions.
-
From the Linux Desktop, open the
OBE_Files/Web
                                      Service
folder and openCountriesList.xmlto review its content.[OS]$ cd ~/Desktop/OBE_Files/Web\ Service/ [OS]$ ll total 16 -rw-r-----. 1 oracle oinstall 15264 Feb 5 14:41 CountriesList.xml [OS]$ more CountriesList.xml <?xml version = '1.0' encoding = 'UTF-8'?> <GetCountriesResponse xmlns="http://www.webserviceX.NET"> <GetCountriesResult><NewDataSet> <Table> <Name>Afghanistan, Islamic State of</Name> </Table> <Table> <Name>Albania</Name> </Table> <Table> <Name>Algeria</Name> </Table> <Table> <Name>American Samoa</Name> </Table> <Table> <Name>Andorra, Principality of</Name> </Table> <Table> <Name>Angola</Name> </Table> --More--(6%)Press the letter Q to quit the
morefile list.
You have tested the package and examined the returned file.
This web service creates an XML file of a list of countries on your VM from the remote host.
What to Learn More?
In this Oracle By Example (OBE) tutorial, you learned how to:
- Access complex files by creating nXSD using the FOrmat Builder Wizard
- Configure JDBC Drivers for ODI
- Configure Web Services using the HTTP Analyzer
- Create a package that invokes a web service that returns an XML file.
Resources
Conceptual or procedural Help topics relevant to the topic of this tutorial:
- ODI product home page
- Documentation on releases 12.2.1 and 12.1.3
- Training
- [D82167GC10] Oracle Data Integrator 12c: Integration and Administration. 5 days.
- [D87557GC10] Oracle Data Integrator 12c: Advanced Integration and Development. 3 days.
- ODI A-Team Blogs
- To learn more about ODI, refer to additional OBEs in the Oracle Learning Library, perhaps starting with this ODI 12c series.
Credits
As always, a team effort. This is a partial list of the team:
- Lead Curriculum Developer: Julien Testut
- Other Contributors: Steve Friedberg, Alex Kotopoulis, Ayush Ganeriwal