Before You Begin
Purpose
This tutorial covers using Apache™ Subversion® for ODI software configuration management (SCM) and object version control.
(Apache, Apache Subversion, and the Apache feather logo are trademarks of The Apache Software Foundation. Subversion and the Apache Subversion logo are registered trademarks of The Apache Software Foundation.)
Time to Complete
Approximately 1 hour.
Background
Previous versions of ODI had an internal form of object version control. The internal versions were stored in the ODI Master Repositories. Starting with version 12.2.1, you can use an external tool for version control such as Subversion. This requires a separate repository. Subversion maintains its repository in the file system. It does not need a database for it. So Subversion's repository and ODI's repository have no connection. In the ODI repository, you configure Subversion connectivity by specifying the underlying Subversion repository URL.
Scenario
Subversion has already been installed for another project. ODI has already been installed for another project. This lab connects the two so that a data warehouse administrator can use Subversion for ODI SCM.
What Do You Need?
- Software
- Oracle Enterprise Linux (OEL) 6.4 or higher
- Oracle Database 12c Release 1 Enterprise Edition (12.1.0.2) - including Oracle Big Data SQL-enabled external tables, Oracle Advanced Analytics, Oracle OLAP, Oracle Partitioning, Oracle Spatial and Graph, and more
- Oracle Data Integrator (ODI) 12.2.1 or higher
- Alternatively, the Oracle Data Integrator Getting Started Virtual Machine (the VM) contains all of the above pre-installed.
- Hardware
- At least 2 GB RAM for each target (database or ODI)
- At least 6 GB RAM for the VM (if you are using that)
Prerequisites
Before starting this tutorial, you should:
- Have at least 6 GB RAM available if you're using the Oracle Data Integrator Getting Started VM
- Have access to or have installed the sample lab artifacts
- Have attended ODI 12c training, [D82167GC10] Oracle Data Integrator 12c: Integration and Administration, or equivalent experience.
Typographic Conventions
These are the conventions used throughout this practice to indicate who types what.
-
Filenameor/path/subdirectory/. Often you can navigate to a destination without having to type it. - Command or value that you type, such as gedit .bashrc. Be mindful of periods at the end of sentences that are not part of the command.
- Click this such as or .
- Some variable or
<variable>as something you replace. Often prefixed with "my" such as<myName>or<myHost>. - A Menu Item or dialog Field Prompt or Tab name. For example, "click the Designer tab and select Models > New Model".
- Generally a red rectangle in the graphics is not part of the original image, but added to draw your attention to an item.
1. Setup / Administration
The SVN repository and its http server should already be installed, configured, started, and available in the VM.
1.1 SVN Setup
-
Open the web browser and go to http://localhost/svn/svnrepository. Enter User Name: odiuser1 and Password: oracle.
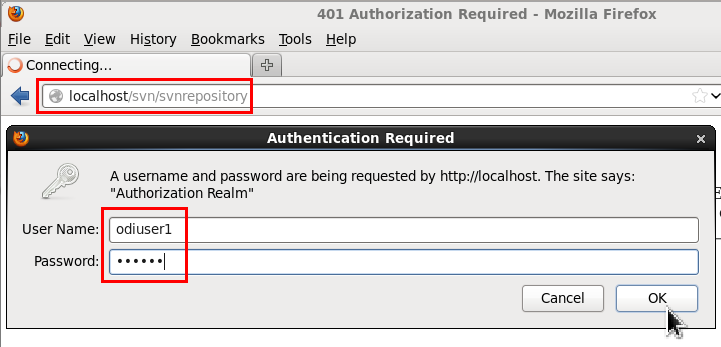
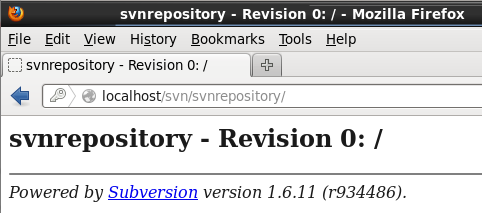
Click to continue. You should see the following success message with the version displayed.
-
If the URL does not work in the previous step, then run the following commands as
rootto (re)start the httpd server:[OS]$ su - root [OS]# service httpd restart Stopping httpd: [ OK ] Starting httpd: [ OK ] [OS]# exit [OS]$Retry the previous step 1 to see if Subversion works now.
- OPTIONAL: After class, you can find
out more about Subversion by clicking the
logo:
 .
.
Subversion is configured and started.
1.2 ODI Subversion Connectivity Setup
Choose a Version Control Application for ODI Studio.
-
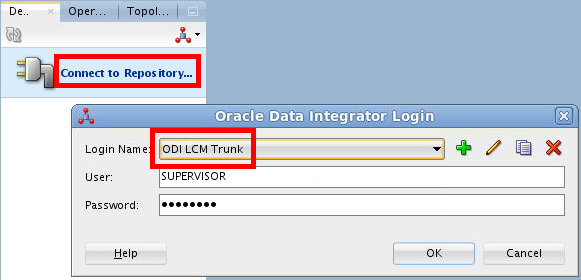
If ODI Studio is not started, then start it and Connect to Repository. If you are asked for a wallet password, enter
welcome1.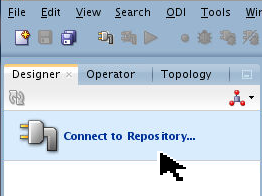
-
Connect to Login Name: ODI LCM Trunk. (This is the main login for these series of labs.)
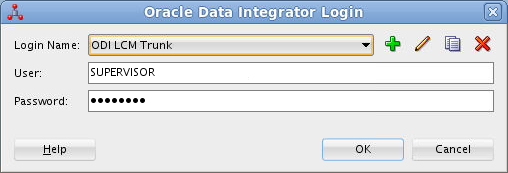
Click to continue.
-
On the main menu bar, go to Team > Select Versioning Application.
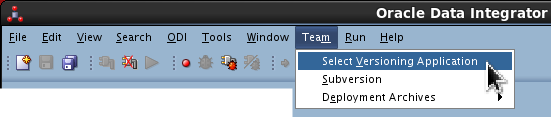
-
Select Subversion and click .

In this environment, there is only one choice for a version application. You could use others.
-
Click in the Confirmation dialog to disable Legacy Version Control System.
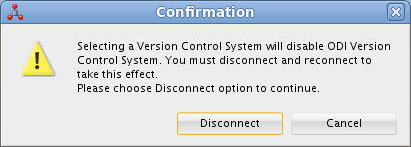
ODI Studio will now use SVN as the team versioning application.
1.3 SVN Connectivity Setup
-
If needed, connect to ODI LCM Trunk again.
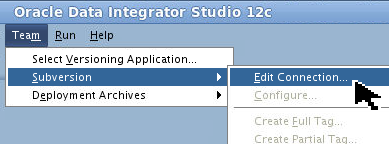
-
On the main menu bar, go to Team > Subversion > Edit Connection.
-
In the SVN Connection dialog, set the following options:
- Authentication Type: Http Basic Authentication
- SVN URL: http://localhost/svn/svnrepository
- User: odiuser1
- Password: oracle (non-display)
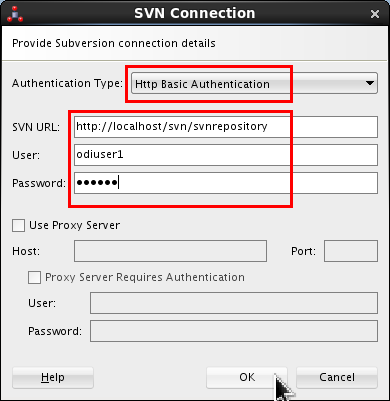
Click .
-
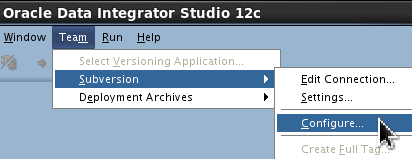
Go to Team > Subversion > Configure.

- Click Create Default Project Structure.
- Set SVN Project Name: ODI_BETA and add Comments that it is the trunk of the svn project where ODI artifacts are maintained.
- Set ODI_BETA for the SVN project name, select Trunk. Select VCS Key. Click . Enter New VCS Key: oracle123 twice.
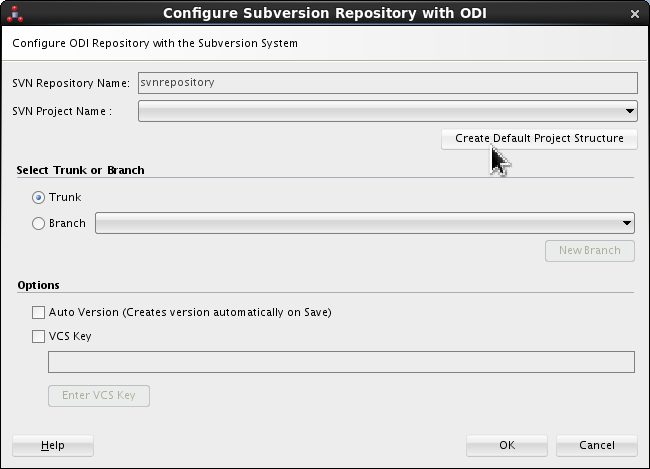
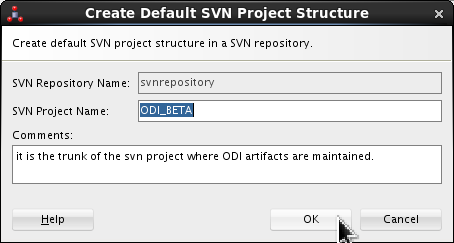
Generally speaking, the Comments or Description in SVN is mandatory. Click .
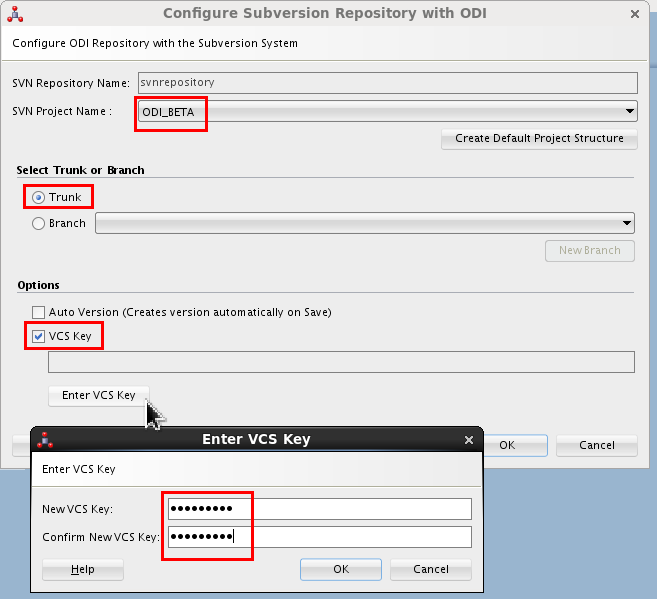
Click on Enter VCS Key dialog. (VCS stands for "Version Control System.") Click on the Configure dialog.
The SVN configuration is done and it can be used for creating ODI artifacts versions. (There is no "Test" button.) You may be prompted to disconnect from the repository for the changes to take effect. Reconnect to the ODI LCM repository before continuing with the steps in this OBE.
You should now have SVN connectivity set up.
2. Checkin / Checkout ODI artifacts in SVN
During the lifecycle of an ODI object (folder, datastore, package, most any kind of object), you may add, view, save, compare, change, restore, and delete versions of that object.
2.1 Adding ODI artifacts to SVN
-
On the Designer tab, expand
![[+]](icons/expand.png) Projects
> Demo > Sales Administration Demo
> Mappings.
Projects
> Demo > Sales Administration Demo
> Mappings. Right-click
Load TRG_SALESand select Version > Subversion > Add to VCS.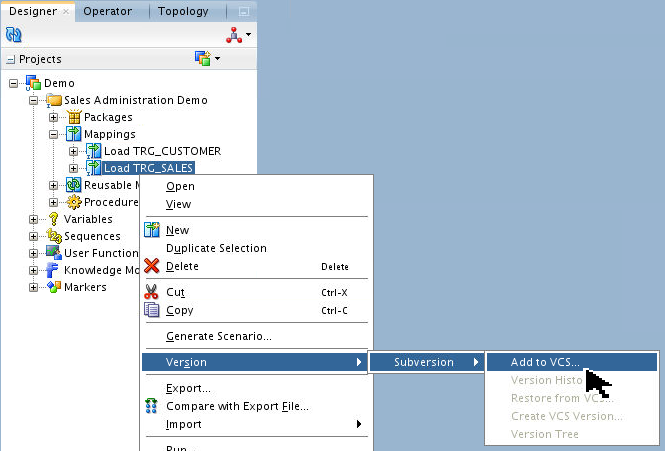
-
A dialog is opened showing that the parent objects for the mapping are also going to be added to VCS.
Set Comments as something similar to, "This is the initial state."
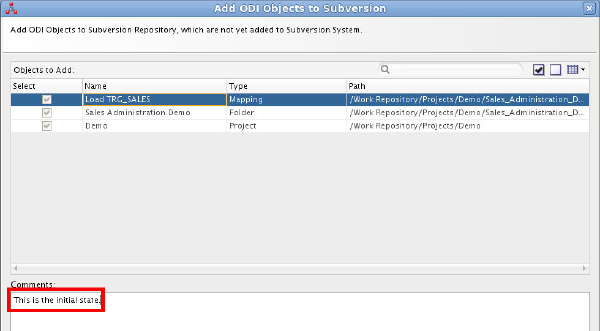
Click .
-
Click on the success Information dialog.
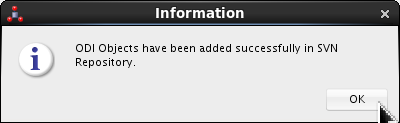
You have added a version of an object to the SVN.
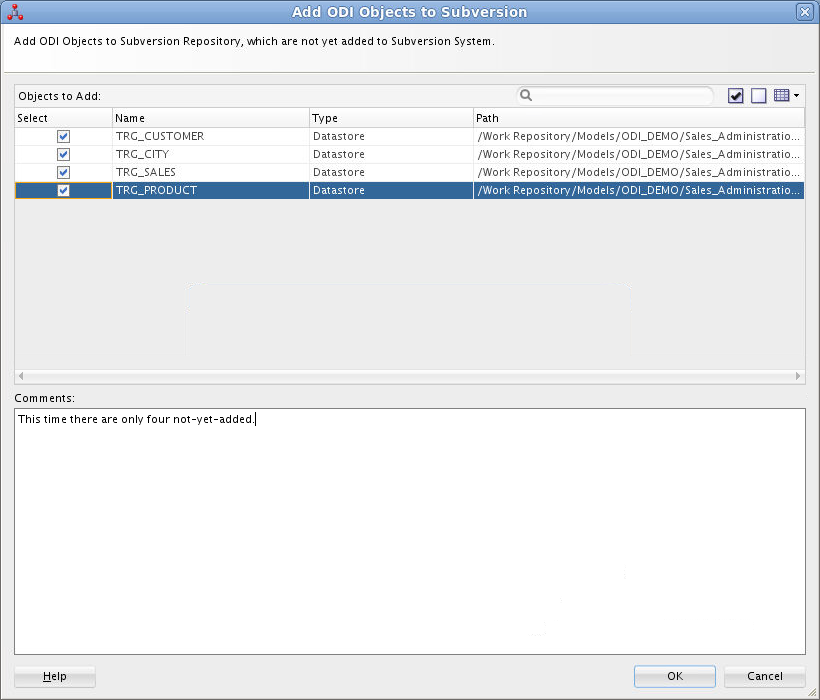
2.2 Adding All Non-Versioned Objects to Subversion
This will be done in two waves: the first wave is adding most of the objects, but we will pretend that the last four objects did not exist yet. The second wave we will pretend happened some time later after four new objects are created and now need to be versioned.
-
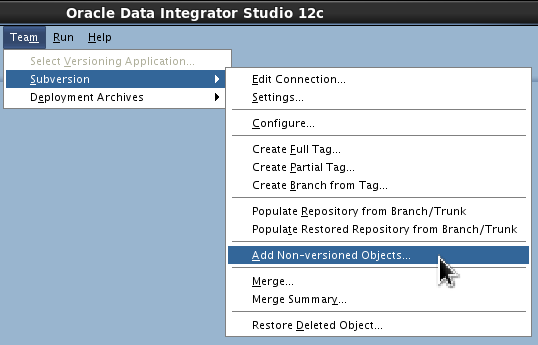
On the main menu bar, go to Team > Subversion > Add Non-versioned Objects.
-
In the Add ODI Objects to Subversion dialog, deselect the last four entries, and set Comments as something similar to,
"I deselected the last four entries."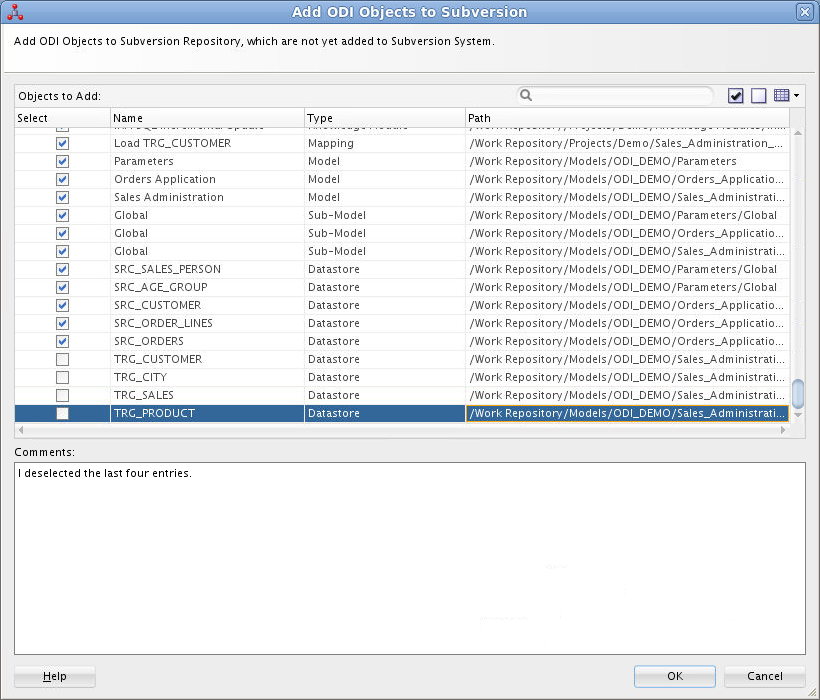
Click (this may take a while).
-
Click on the success Information dialog.

-
Repeat step 2.2.1 again. Only the four objects that were not added earlier appear in the list.
Add some Comments: and click to add them to SVN.
Click on the success Information dialog.
You have added a version of ALL objects to the SVN.
2.3 Viewing Version History
-
On the Designer tab, expand
Models
> ODI_DEMO > Sales Administration
> TRG_CUSTOMER. Right-click
TRG_CUSTOMERand select Version > Subversion > Version History.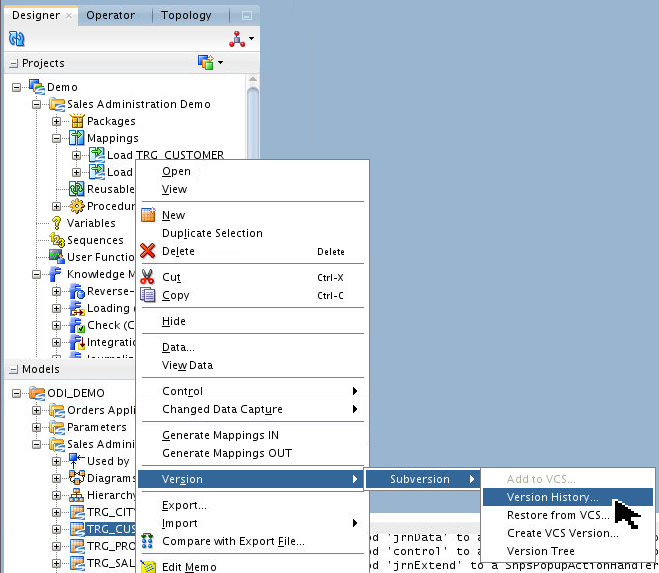
-
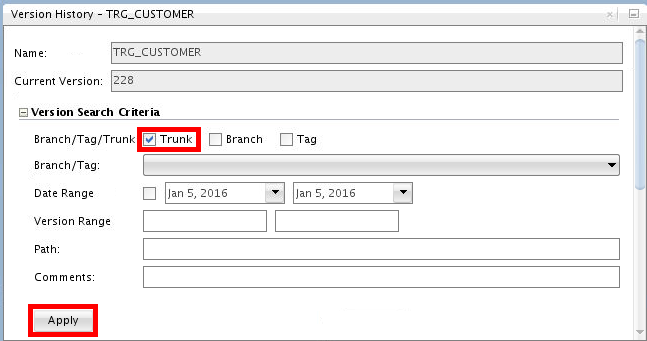
Expand Version Search Criteria, and then make sure that Trunk and Date Range are selected as Search Criteria.
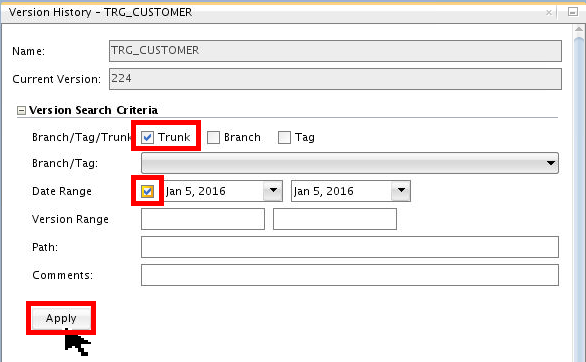
Click . The Date Range is assumed to be today.
-
The object versions available in the Subversion repository are listed in the dialog.
Inspect different columns in the table to the version attributes.
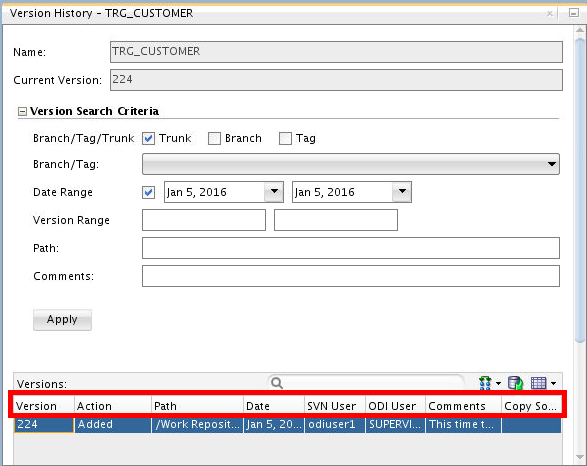
Columns are Version, Action, Path, Date, SVN User, ODI User, Comments, and Copy Source. Your values for Version, and of course Date, will be different from what is shown.
-
Select the entry from the list and click Compare (
 )
to compare the Subversion version with
repository object.
)
to compare the Subversion version with
repository object. 
-
A dialog would be shown saying, "No difference found."
Click on the Information dialog. Close the Version History tab.
You have viewed version history. In initial (trivial) cases, that may be no history of differences.
2.4 Saving Updates to SVN
-
On the Designer tab, expand
Models
> ODI_DEMO > Sales Administration
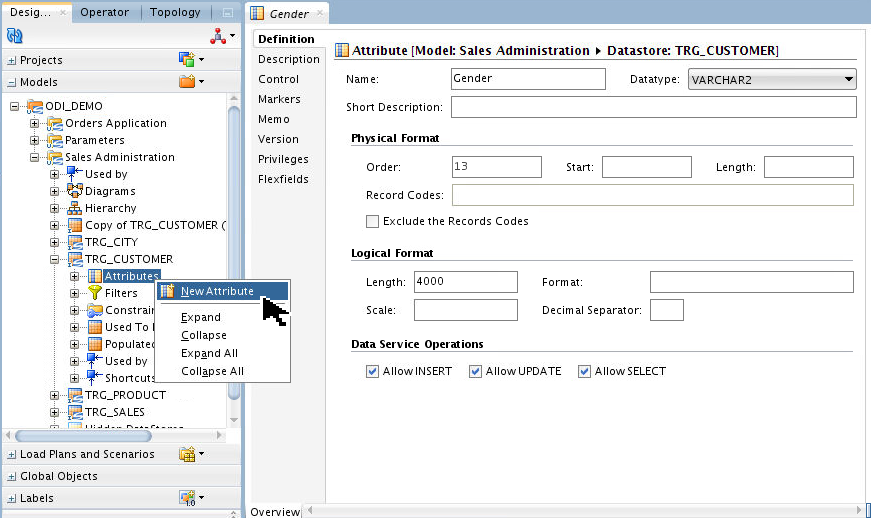
> TRG_CUSTOMER > Attributes.
Right-click Attributes and add any New
Attribute, for example, Email.
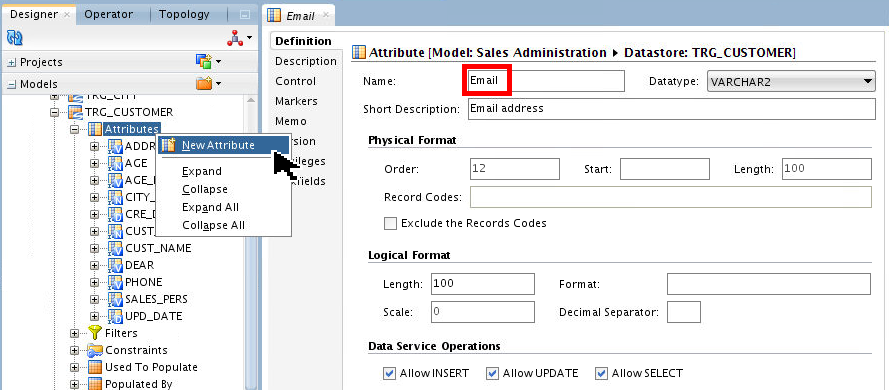
Save
 the attribute. Close the tab.
 -
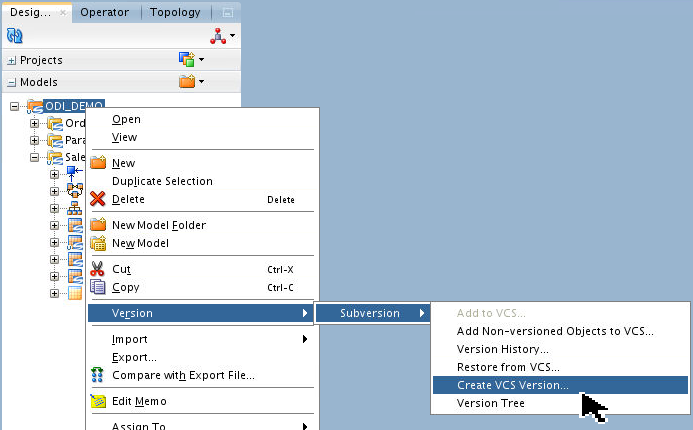
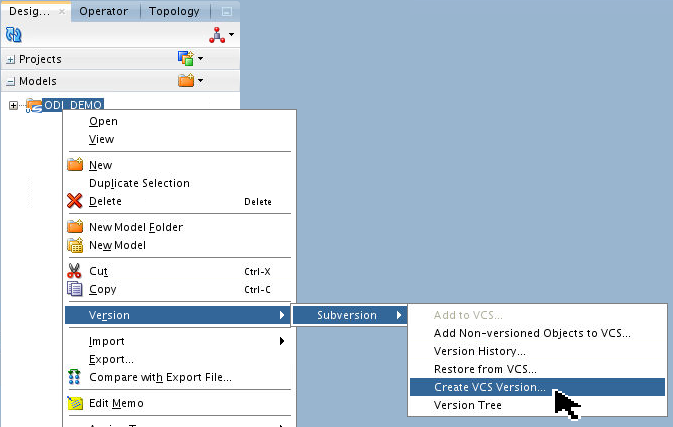
Right-click TRG_CUSTOMER and select Version > Subversion > Create VCS Version.

-
Add Comments. You do not need to add name/date of change as that is included automatically.
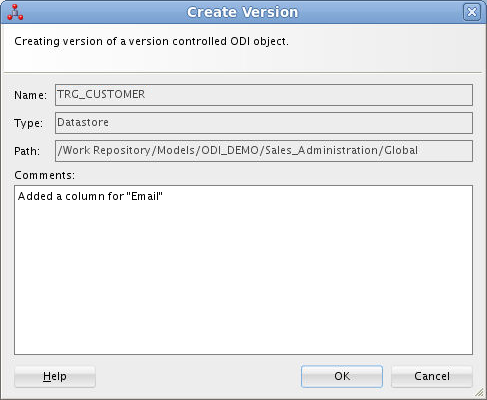
Click .
-
An Information dialog is shown notifying the successful operation.
Click .
-
View the version history again by right-clicking Models > ODI_DEMO > Sales Administration > TRG_CUSTOMER and select Version > Subversion > Version History.

-
Make sure that the Trunk checkbox is selected. Click .
Multiple versions of the object are shown in the version history. (Scroll horizontally to see them all, especially the comments.)
Close the Version History tab.
You have saved object changes to SVN.
2.5 Comparing SVN Objects and Comparing Objects
-
Open the Version History Dialog by expanding
Models > ODI_DEMO > Sales
Administration > TRG_CUSTOMER,
right-click TRG_CUSTOMER, and select
Version > Subversion > Version
History. Click .
-
Hold [Ctrl] and select the two version entries.
Click the Compare icon (
) and select Compare
Selected Versions. 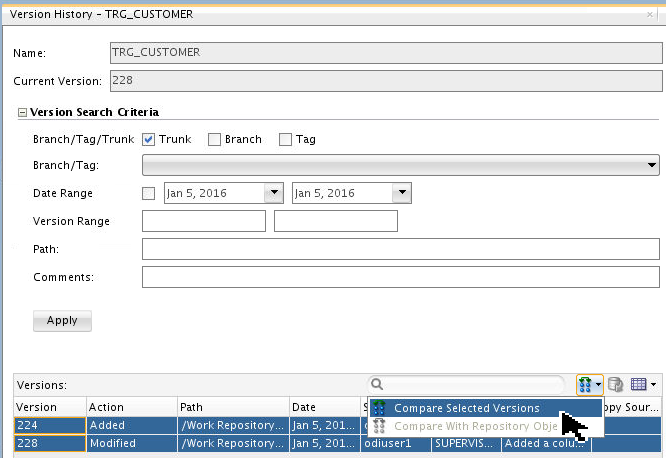
-
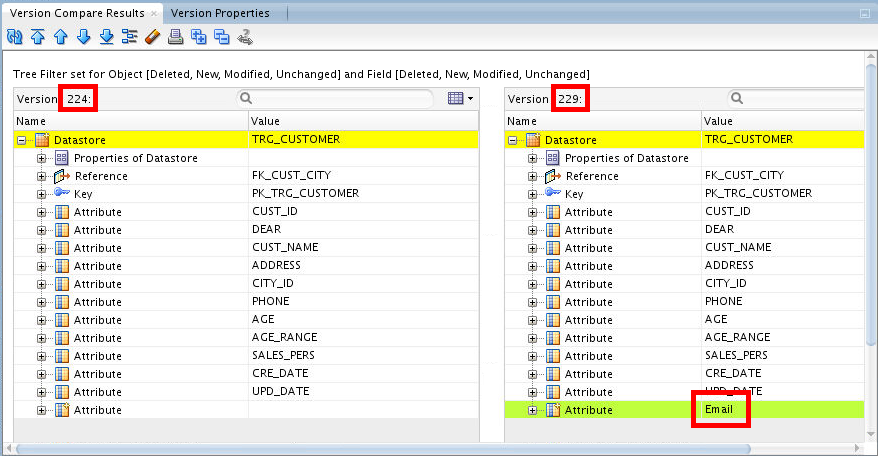
The Version Compare Results window is opened showing the difference between the two object versions.
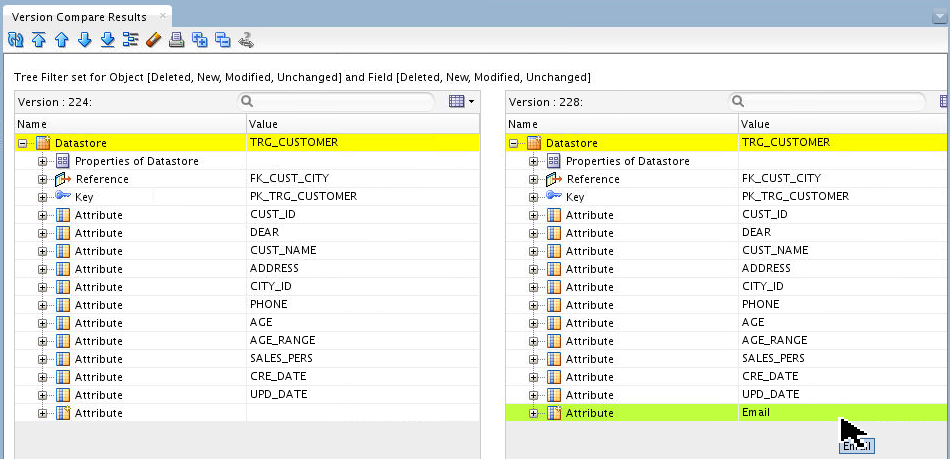
Note the attribute you added at the end, in green.
-
Click the Coloring and Filtering icon (
 ).
Deselect the Unchanged (white)
filter for both Object and Field. This would
now show only the difference between
the two objects.
).
Deselect the Unchanged (white)
filter for both Object and Field. This would
now show only the difference between
the two objects. 
You can further narrow the difference if you are interested in only additions or deletions. You can also change the colors used for a given status (for example, if you are red/green colorblind).
Click in Display Options.
-
Inspect the differences by expanding
the
nodes. 
Notice the two version numbers selected (in this case 224 and 228, your numbers may be different) are shown at the top of the columns. Close the Version Compare Results tab.
-
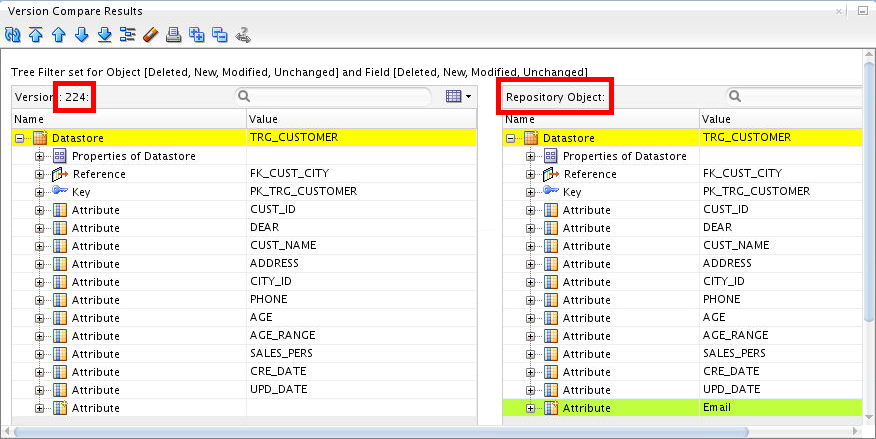
Open Version History again (step #1) and select only one entry, the top (earliest) one. Click Compare (
) to compare the
SVN version with the current (latest) object
in the repository. 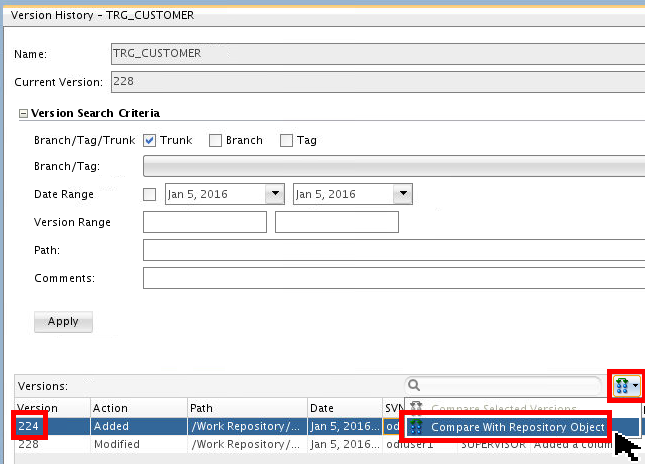
Your version numbers may vary from what is shown in this example.
-
Click the Coloring and Filtering icon (
)
and uncheck Unchanged (white)
checkbox to see only the modified
attributes. 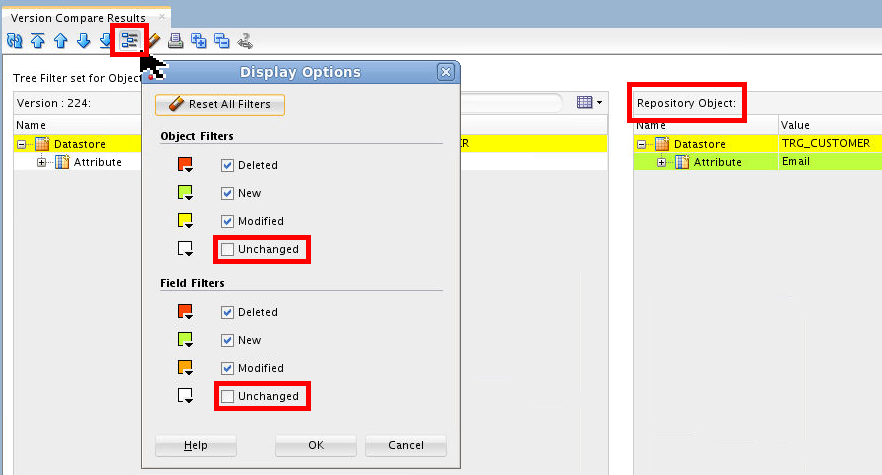
Notice the right-hand column at the top used to have a Version number, now it simply says, "Repository Object." Close the Version Compare Results tab.
You have compared versions of objects to each other and compared an object to the current repository object.
2.6 Restoring from Subversion
There are two flavors of restore: Without Merge and With Merge. They are pretty similar right up until the last step.
WITHOUT MERGE:
-
On the Designer tab, expand
Models
> ODI_DEMO > Sales Administration
> TRG_CUSTOMER. Right-click TRG_CUSTOMERand select Version > Subversion > Restore from VCS.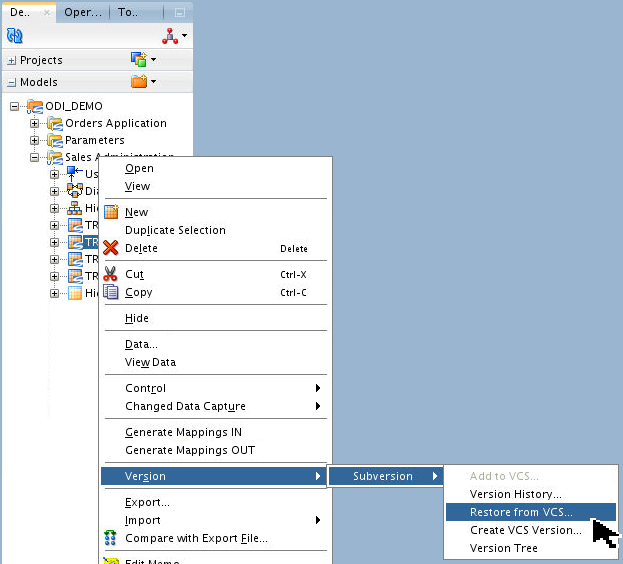
-
Click Select Version in the Restore Object from Subversion Repository dialog.
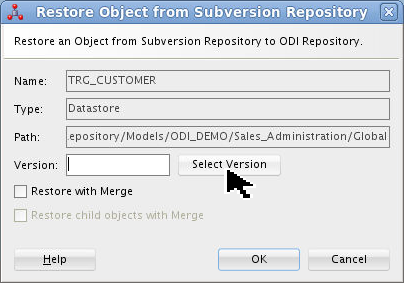
This will populate the empty Version box.
-
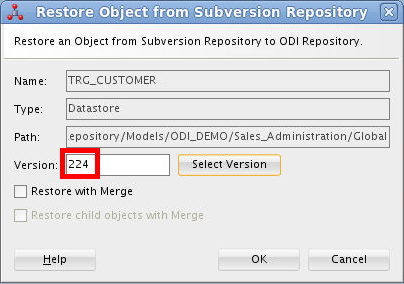
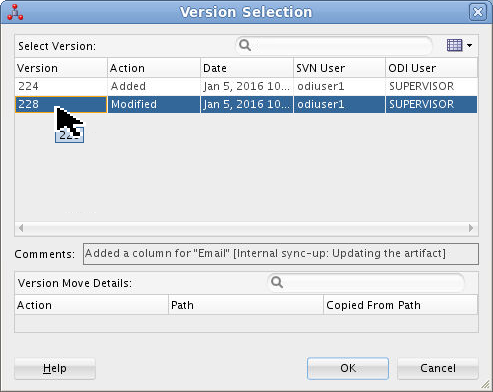
Select the oldest version from the Version Selection dialog.

Click . Note that hovering over a truncated field (such as Date) displays the whole field (in this case, with hh:mm:ss).
-
Now that the Version: field is populated, click .
-
The Import Report is shown for successfully importing the object from repository. Open the
TRG_CUSTOMERdatastore, expand Attributes, and verify that your newly added column (Email) is not present anymore. (You may have to Refresh ( )
to clear out the column from the Designer
> Models tab.)
)
to clear out the column from the Designer
> Models tab.) 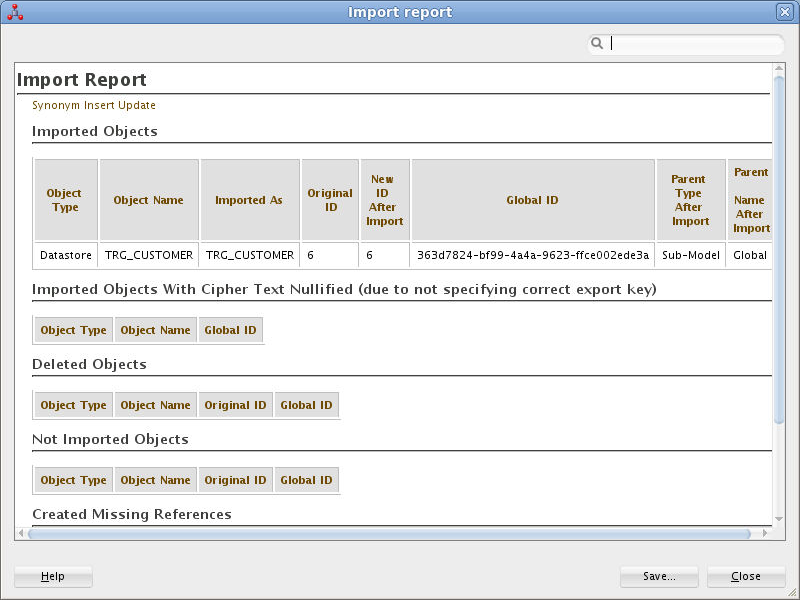
the Import Report.
WITH MERGE:
-
Perform Step #1-2 again and select the newest version this time, which has the newly-added attribute.
Click .
-
Select Restore with Merge.
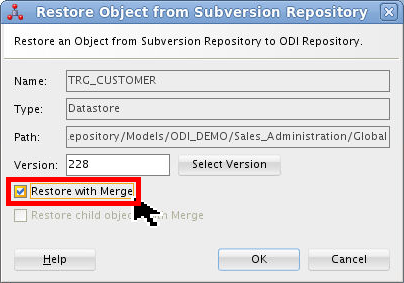
Click .
-
The difference in the repository object and Subversion object is shown in the Compare Results tab.
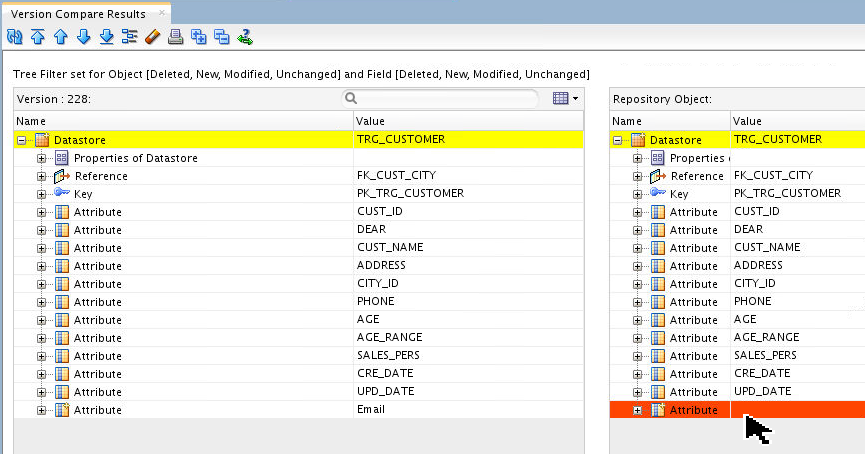
Notice that it is showing the missing attributes in the repository copy of the object which is present in VCS copy.
-
Click Perform Merge (
 ) to open the
Merge Results window below.
) to open the
Merge Results window below. 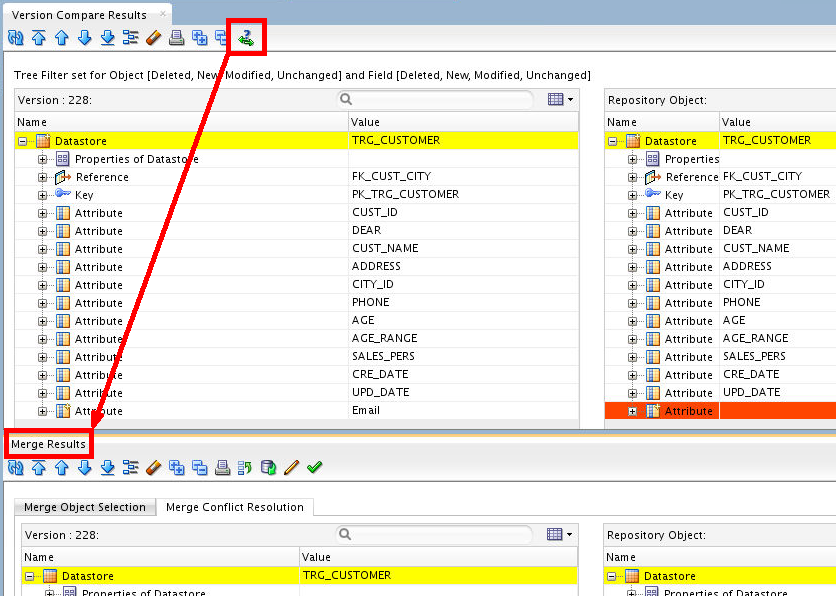
Scroll down (or filter) to see the conflicts marked with a red x on the Attribute icon (
 ).
). -
In Merge Results, click Edit Repository Object (
 )
to open the corresponding datastore. In
)
to open the corresponding datastore. In TRG_CUSTOMER, click Add ( )
and make changes as needed.
)
and make changes as needed. 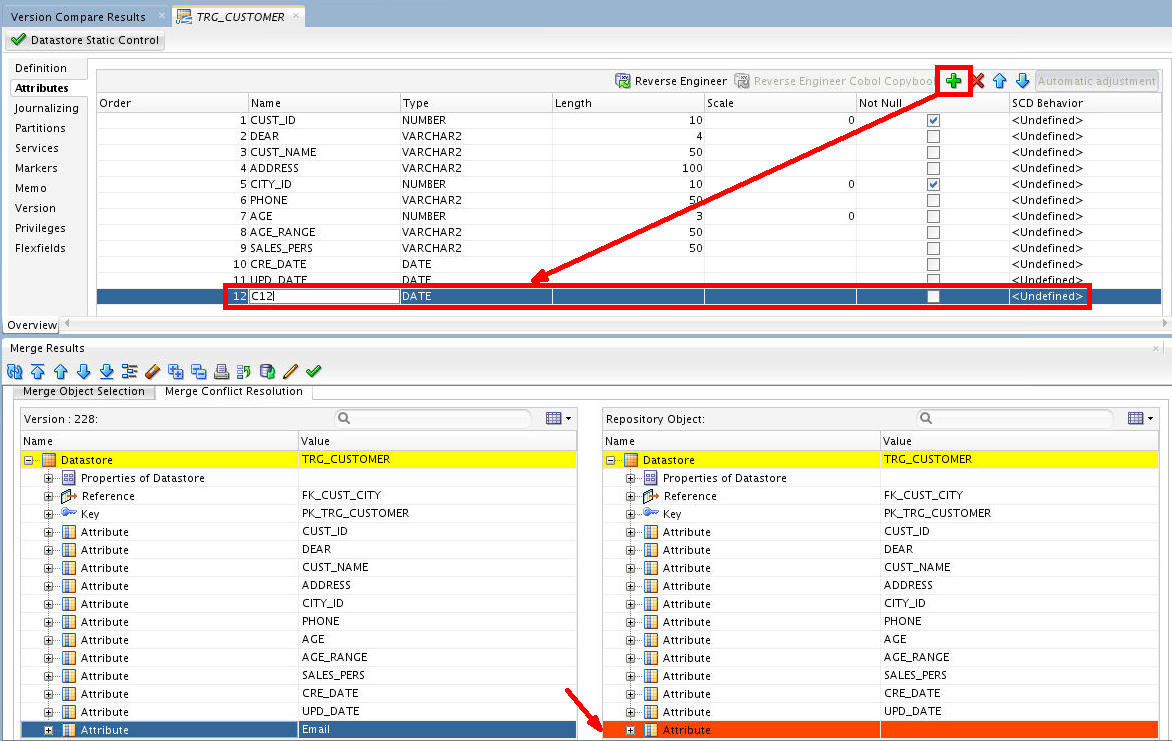
Save
it. Close all of the Version tabs.
You have done a restore from Subversion both with and without a merge (manual resolution).
2.7 Restoring Deleted Objects
-
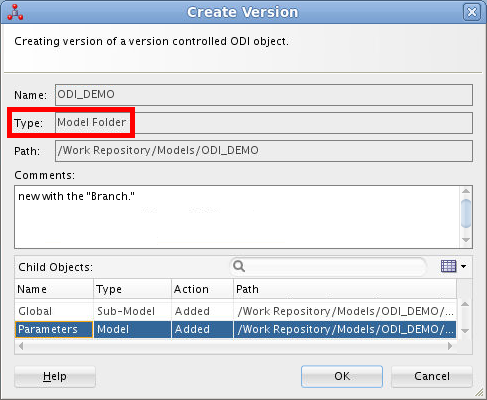
On the Designer tab, right-click Models > ODI_Demo and select Version > Subversion > Create VCS Version.
-
Add Comments.
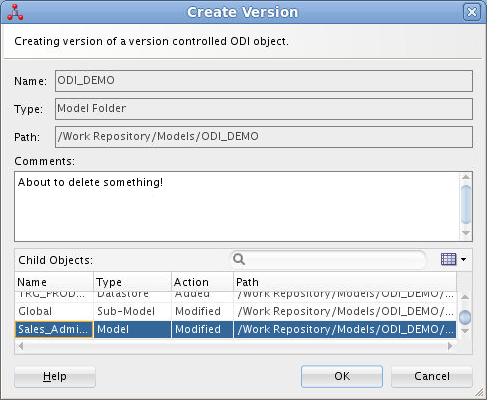
On the Create Version dialog, click . On the Information dialog, click .
-
Delete Models > ODI_DEMO > Sales Administration > TRG_SALES.
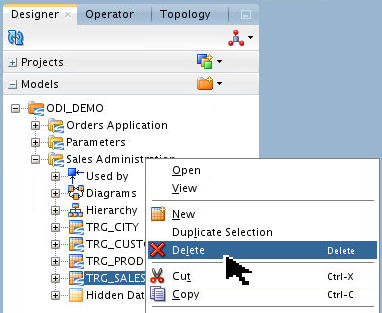
On the Confirmation dialog, click to remove TRG_SALES.
-
Repeat steps 1 and 2 again (Create Version, Add Comments).

Notice
TRG_SALESis missing from the Designer Models, and is so noted in the Action as Deleted. Click twice. -
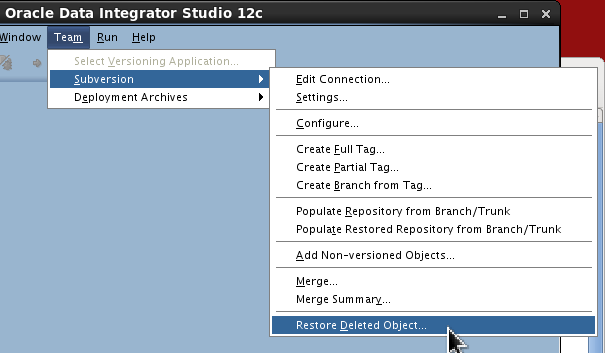
On the main menu bar, go to Team > Subversion > Restore Deleted Object.
-
Select an appropriate date range (defaults to today, which is fine).
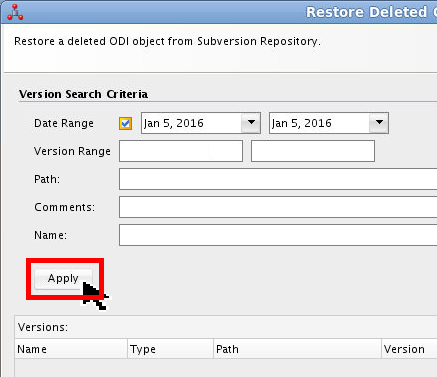
Click .
-
Select the
TRG_SALESentry to restore and click the Restore object icon ( ).
).

If the Import Report looks okay and says that
TRG_SALEShas been imported successfully, the report, then the Restore Deleted dialog. -
Click Refresh (
) and verify that the
deleted datastore TRG_SALEShas reappeared in the list of Models.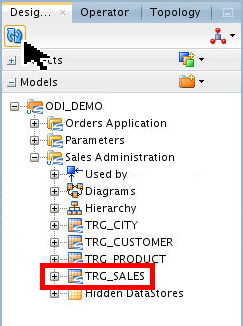
You have restored a deleted object.
You have checked in and checked out ODI objects in SVN.
3. Branch and Label Management
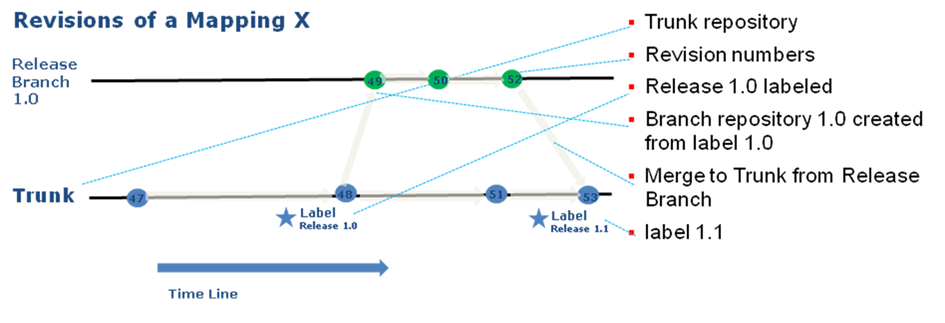
A quick overview of versioning terminology might be helpful:
- Tag and label corresponds to
same thing. A tag/label is applied a particular
version of a set of objects/files so that the same
set of objects versions can be retrieved from SVN
system using this tag. For example, Tag
T1is created for file A version 21 and file B version 51. So whenever you retrieve files for TagT1you will always get A v21 and B v51. - A branch is created from a tag so that so that any changes made on the branch are isolated within the branch.
The following diagram illustrates the versions, tags and branch for a file in a trunk and branch:
3.1 Creating Tags
There are three kinds of tags: full, partial, and branch from tags.
-
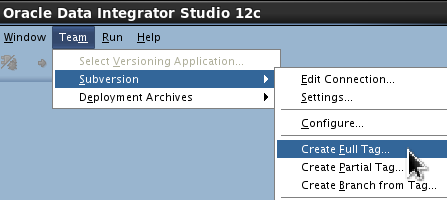
Create a full tag as follows:
- On the main menu bar, go to Team
> Subversion > Create Full Tag.
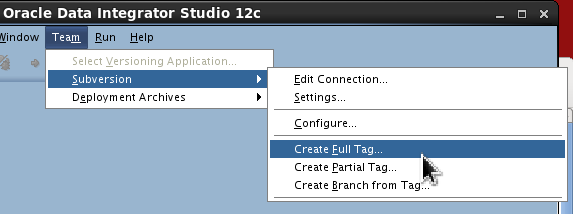
- Set Tag name as Full Label 1.0
and comment.

Click . (This may take a while.) Click in the success Information dialog.
- On the main menu bar, go to Team
> Subversion > Create Full Tag.
-
Create a partial tag as follows:
- On the main menu bar, go to Team
> Subversion > Create Partial Tag.
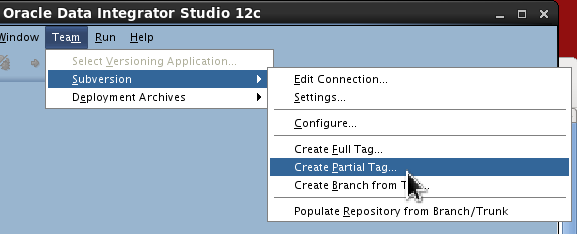
- Drag and drop Version Control Folder under Projects > Beta and the Version Control folder under Models on the left side of Objects to be Added. It automatically brings in all the dependent objects.
- Set Tag name as Partial
Label VCS and comment.

Click . Click in the success Information dialog.
- On the main menu bar, go to Team
> Subversion > Create Partial Tag.
-
Create a branch from tag as follows:
- On the main menu bar, go to Team
> Subversion > Create Branch from
Tag.
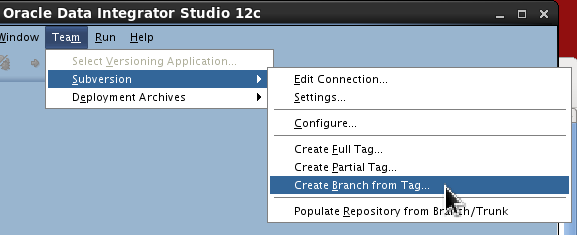
- Set the Branch name as DevBranch
and comment, select the
Partial
                                        Label VCS
tag.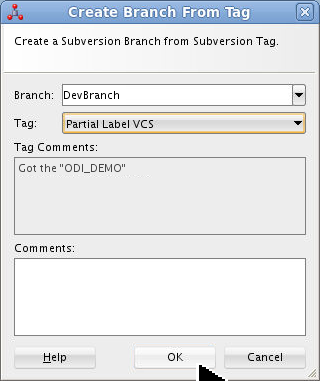
Click . Click in the success Information dialog.
- On the main menu bar, go to Team
> Subversion > Create Branch from
Tag.
You have created three kinds of tags: full, partial, and branch from.
3.2 Viewing Version Tree
-
On the Designer tab, expand
Models
> ODI_DEMO > Sales Administration
> TRG_CUSTOMER, then right-click TRG_CUSTOMERand and select Version > Subversion > Version Tree.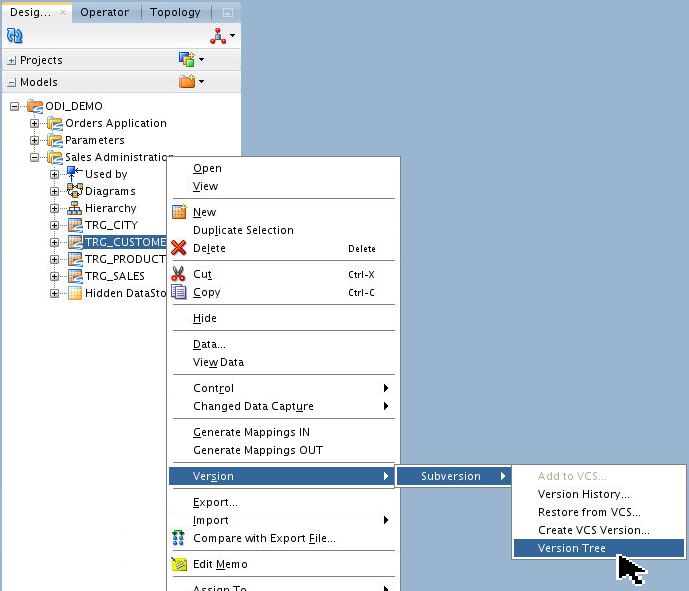
The Version Tree editor is opened showing different version, tags, and branches for the object from Subversion.
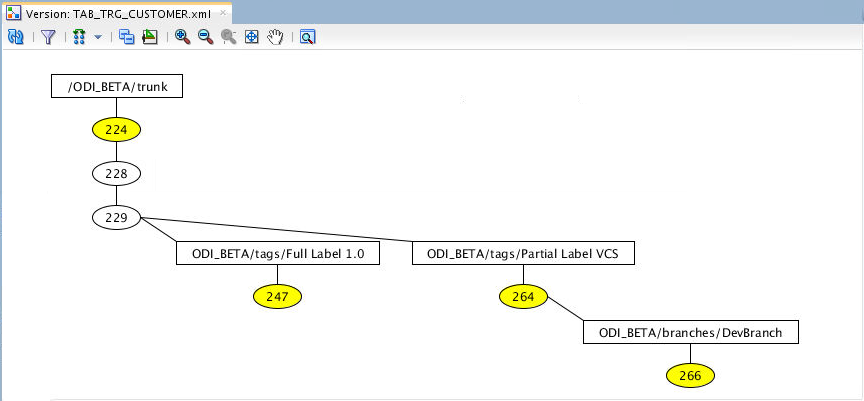
You have to scroll pretty far horizontally to see everything. Notice the Thumbnail in the top left corner for fast scrolling.
-
Click different versions to view the version attributes. (Your numbers may vary.)

Rectangles are versions, ovals are actions. Yellow oval means Action=Added, White oval means Action=Modified.
-
Select two version nodes and click Compare (
)
to compare the versions. 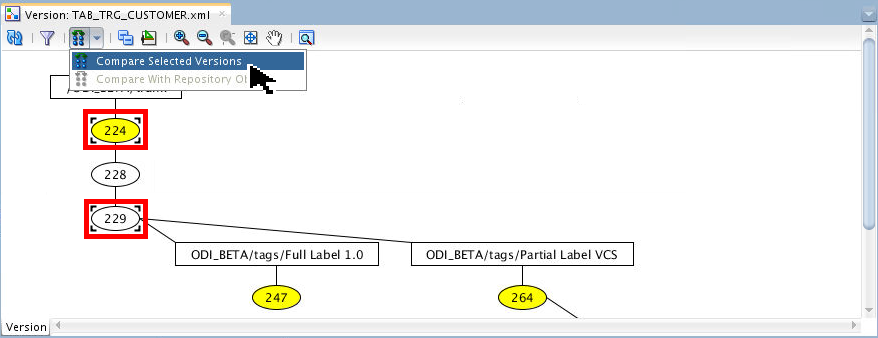
Close the Version Compare Results tab, leave
TAB_TRG_CUSTOMER.xmlopen. -
Select a single version node and click Compare (
)
to compare it with Repository Object. 
Close the Version Compare Results tab, leave
TAB_TRG_CUSTOMER.xmlopen. -
Click the Filter (
 ) to filter out nodes based
on date range.
) to filter out nodes based
on date range. 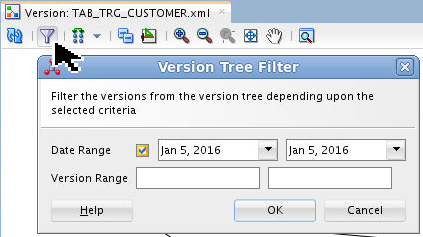
Click .
- Click Refresh () to refresh and see the
full version tree again. Close the
TAB_TRG_CUSTOMER.xml tab.
You have explored the version tree.
3.3 Configuring ODI Repository for SVN Branch
-
From the main menu bar, select ODI > Disconnect. Then Connect to Repository, to the blank repository using Studio Login ODI LCM Branch.
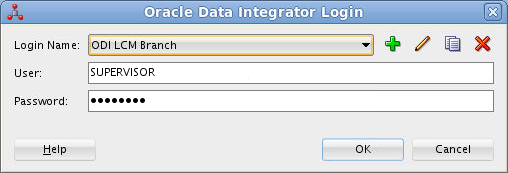
The User/Password should be pre-populated. Click . (If you are ever prompted for the Wallet password, it is welcome1.)
-
Select Subversion as the Versioning Application, configure Connection URL/User/Password, and Settings Work/Merge area. This was covered in all of Topic 1.2 and Topics 1.3.1 through 1.3.3. Studio will remember many of the values as defaults from the previous Repository configuration.
-
Go to Team > Subversion > Configure.
-
Set the following configuration values:
- Subversion Project Name:
ODI_BETA. - Select Branch radio button and
select the branch
DevBranchfrom drop down. - Select VCS Key. Click . Enter New VCS Key as oracle123 twice. Click .
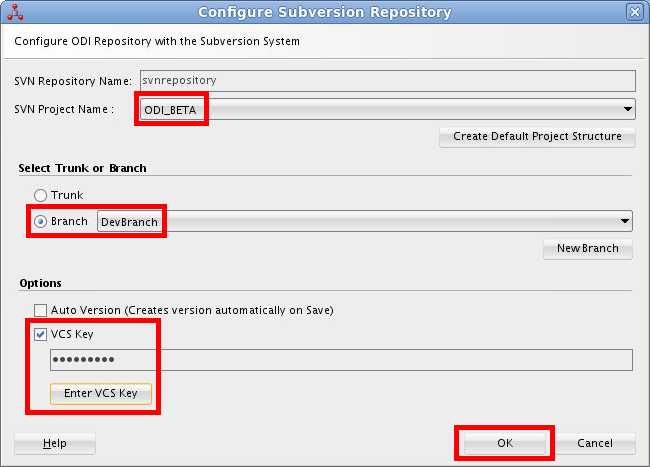
Note: You can also create a new branch from a tag by clicking .
Click . You are required to then reconnect in order for the changes to take effect.
- Subversion Project Name:
You have configured the SVN repository for a branch.
3.4 Populating Repository from VCS
-
From the main menu bar, go to Team > Subversion > Populate Repository from Branch/Trunk.
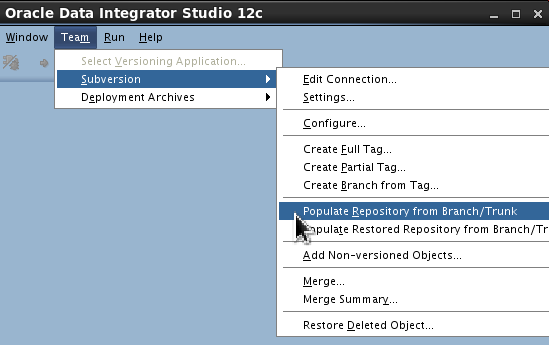
This is still using the new repository ODI LCM Branch from the previous topic 3.3.
-
Click on the confirmation dialog.
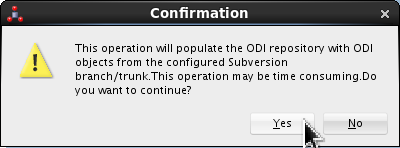
As it warns you, this could take a while. the Import Report if it looks successful.
-
On the Designer tab, click Refresh (
)
and verify that the Sales
Administration Demo mappings and
models are populated in Studio. 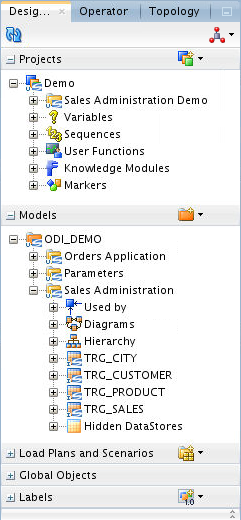
You have populated an empty repository from VCS.
3.5 Performing Branch Merge
-
Still using the new repository login ODI LCM Branch from the previous topic 3.3, make following changes:
- Duplicate Models > ODI_DEMO >
Sales Administration > TRG_CUSTOMER
datastore.
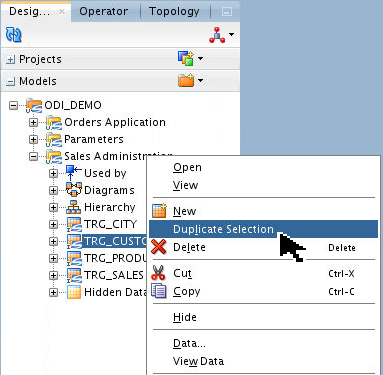
Click in the Confirmation dialog.
- Add a New Attribute to the Models
> ODI_DEMO > Sales Administration
> TRG_CUSTOMER datastore.
Save
and close the datastore. - Open Projects > Demo > Sales
Administration Demo > Mappings >
Load TRG_CUSTOMER and edit the
Target Expression
SRC_CUSTOMER.CUSTID
                                        + 1
to be SRC_CUSTOMER.CUSTID + 2. (Any trivial change to the mapping is the goal.)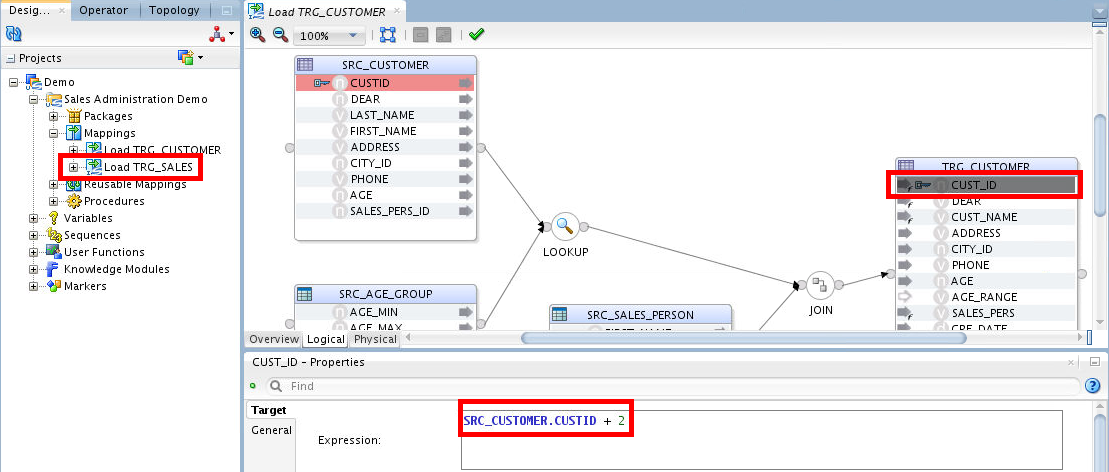
Save
and close the mapping.
- Duplicate Models > ODI_DEMO >
Sales Administration > TRG_CUSTOMER
datastore.
-
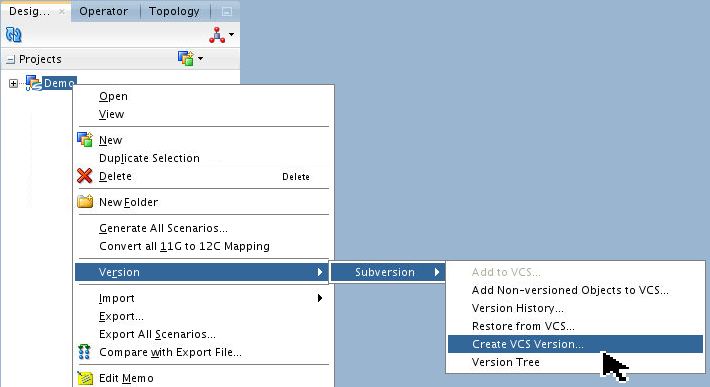
Right-click Designer > Models > ODI_DEMO and select Version > Subversion > Create VCS Version.
Add a Comment.
Click twice.
-
Similarly, create a version of Projects > Demo too.
Add a Comment.
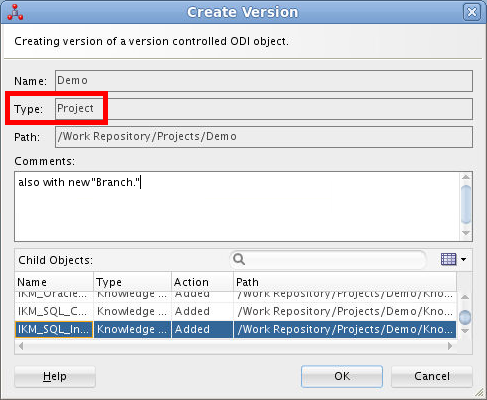
Click twice.
-
Log out (ODI > Disconnect) and log in (Connect to Repository) with ODI LCM Trunk main Login Name for trunk.
Click .
-
On the main menu bar, go to Team > Subversion > Create Full Tag.
Name the full tag Full Label 2.0. Add Comments.
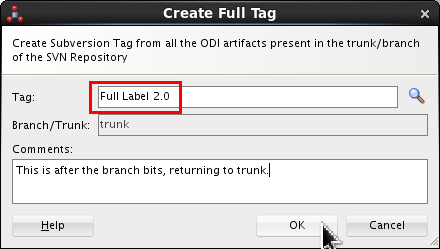
Click . (This may take a while.) Click again.
-
On the main menu bar, go to Team > Subversion > Merge.
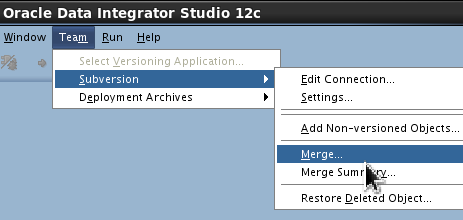
Select Merge Type: Branch radio button, and select the branch Source:
DevBranchfrom drop down.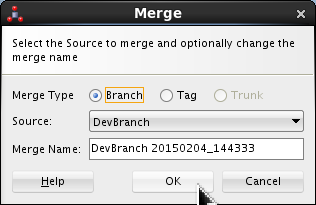
The default Merge Name (with date/time suffix) is fine. Click . If the Merge Summary looks successful, click .
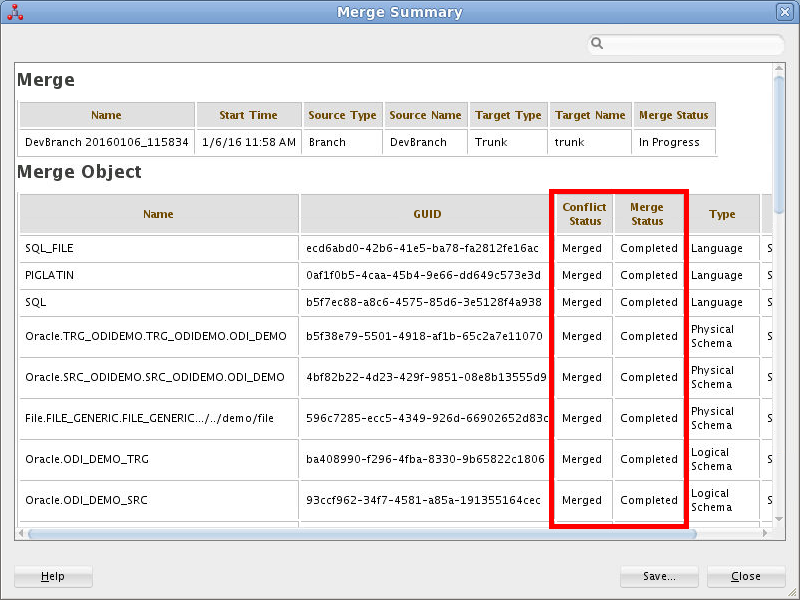
-
Merge is performed and the Merge Summary is shown. Examine the conflicts in the objects that are modified in the branch.
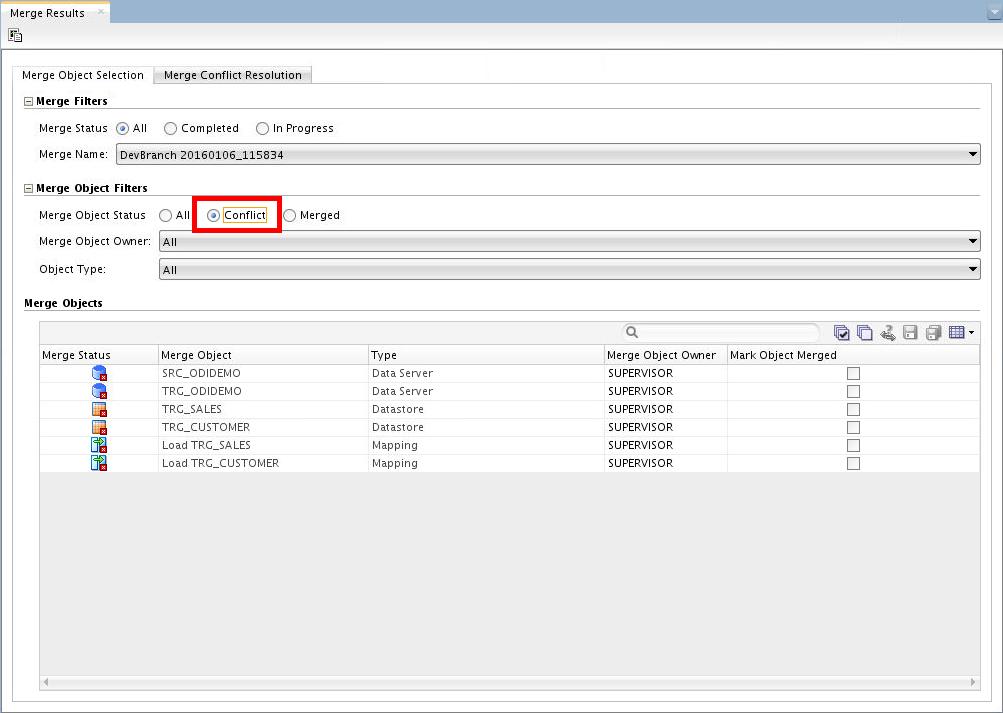
-
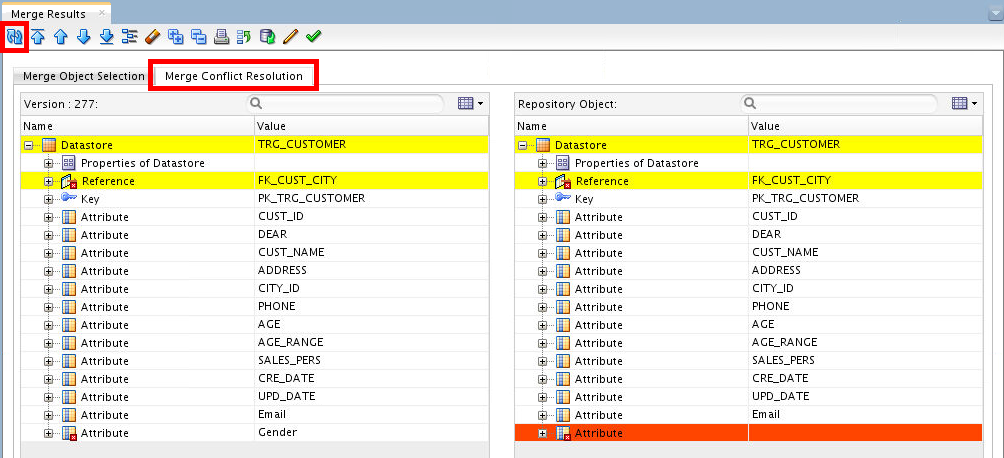
Close Merge Summary page and the Merge Results editor is shown with the Merge Objects list. Select Merge Object Filter as Conflict to view only the conflicted objects.
-
Select the datastore TRG_CUSTOMER and click Fix Merge Conflict (
 )
which will open the Merge Conflict
Resolution tab with the differences
between the two objects.
)
which will open the Merge Conflict
Resolution tab with the differences
between the two objects. 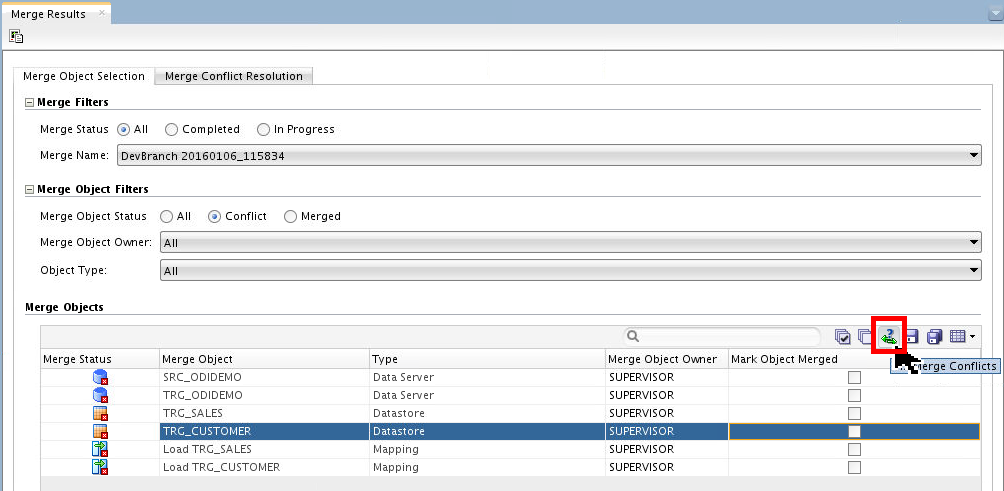
-
Inspect the differences and click Edit repository object (
) which will open the
datastore to make changes. 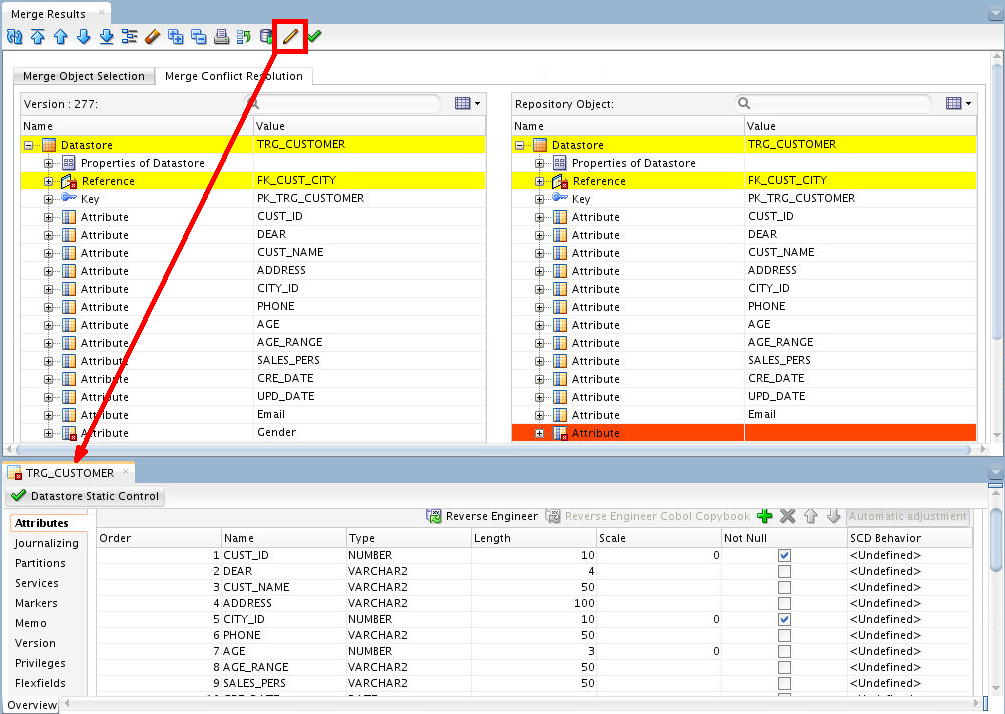
Currently the editor is opened in readonly mode.
-
Notice the red X indicator (
) next to the datastore in the
navigation tree. Open the datastore for
editing. Add/modify the datastore based upon
the differences: remove the Genderattribute, then save the datastore. -
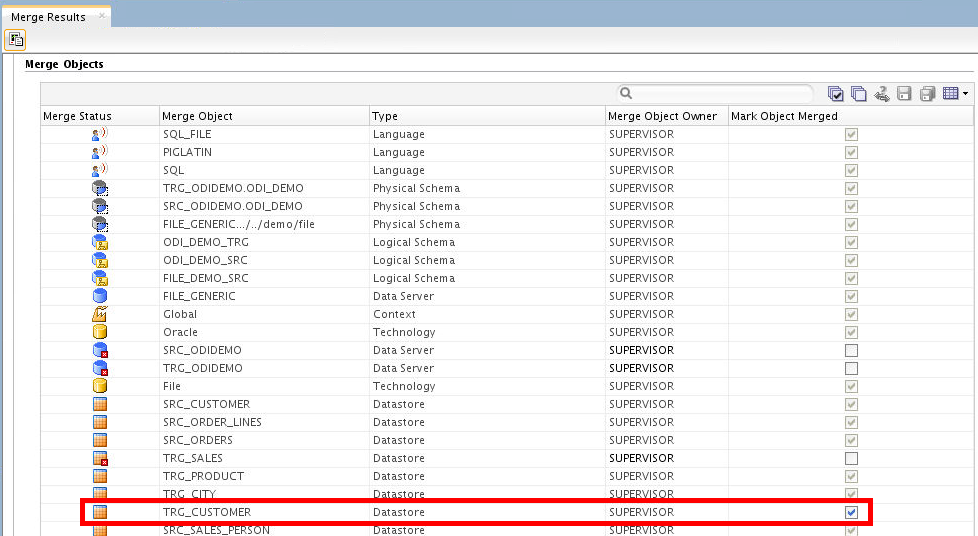
Click on the green check (
 ) to mark the object as
resolved/fixed.
) to mark the object as
resolved/fixed. 
After you click it, it will go from green to gray.
-
Go back to the Merge Object Selection tab. Notice the Mark Object Merged column. The datastore is marked as resolved.
-
Resolve conflicts in
Load
                                      TRG_CUSTOMER
: Change Target expression forCUST_IDattribute to SRC_CUSTOMER.CUSTID + 2. Mark them as resolved.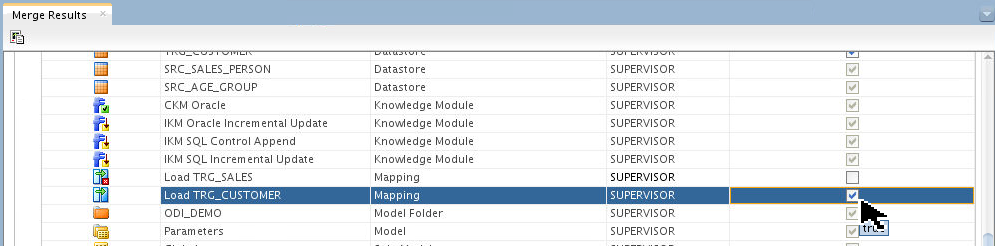
-
Mark all other object as resolved by Selecting All objects (
 ) and click Save All (
 ).
).
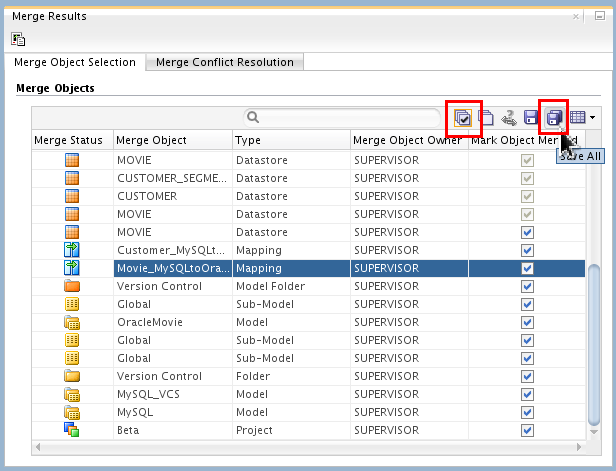
Close the Merge Results tab.
You have completed a branch merge.
3.6 Viewing Merge Summary
You automatically get to see the Summary report of the last merge you just did, this option shows you merges that may have happened before that.
-
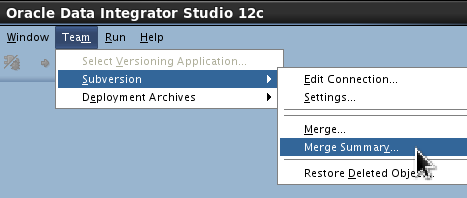
Go to Team > Subversion > Merge Summary.
-
Accept the defaults. (There is currently only one merge to choose from.)
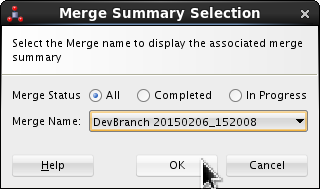
Click .
-
Inspect the Merge Summary reports available by changing the Merge Status filters (All, Completed, In Progress) on the previous dialog.
If any objects are
In Progress, then the whole merge isIn Progress. Click .
You have viewed the merge summaries.
You have created tags, viewed version trees, made branches, and merged them.
4. Release Management
You will create, view, apply, and roll back archives and patches.
4.1 Creating Deployment Archives
There are several kinds of Deployment Archives: Full, Selected, and from VCS tags.
-
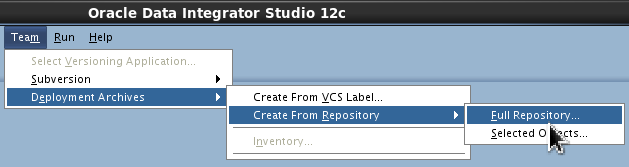
Create a Full Repository Archive:
- From the main menu bar, go to Team
> Deployment Archives > Create
From Repository > Full Repository.
- Set Deployment Archive Name, Folder Path, and Description.
- Set Export Key as oracle123
twice.
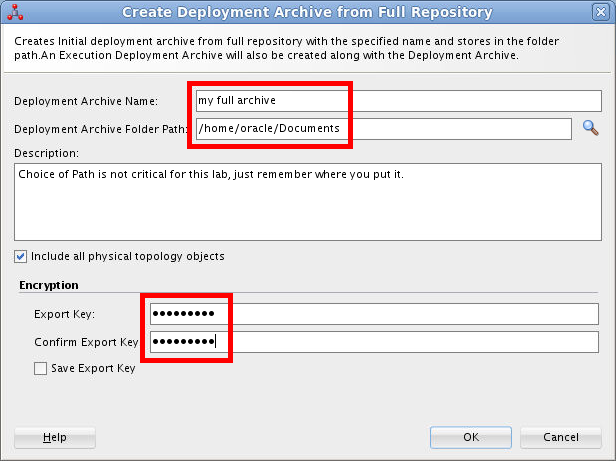
Click on Create dialog. (This takes a long time, approx 5 minutes. Get coffee.) Click on Success dialog.
- From the main menu bar, go to Team
> Deployment Archives > Create
From Repository > Full Repository.
-
Selected Objects from Repository:
- From the main menu bar, go to Team
> Deployment Archives > Create
From Repository > Selected Objects.
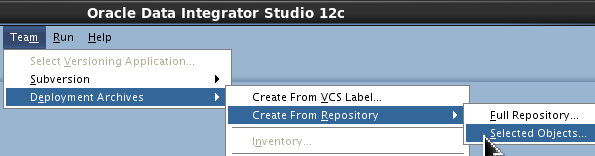
- Set Deployment Archive Name, Folder Path, and Description.
- Set Export Key as oracle123 twice.
- Drag and drop Project
Version
                                        Control
into the Objects to be added dialog.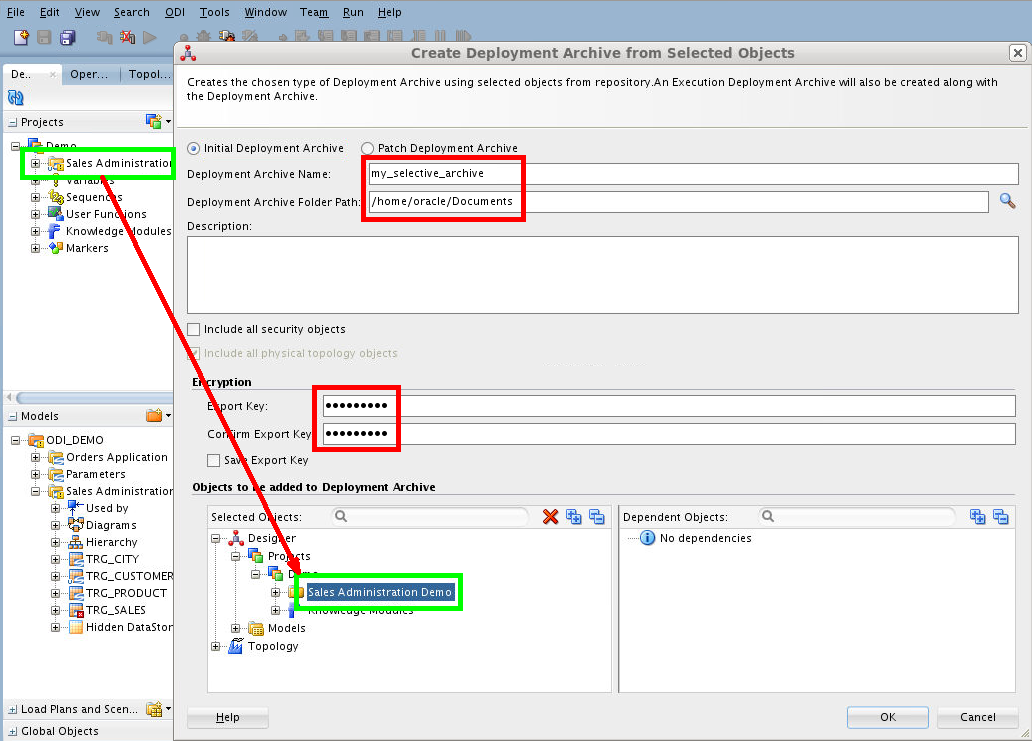
Click on Create dialog. Click on Success dialog.
- Repeat Step 4.1.2.a. through 4.1.2.c.
while selecting only a couple of mappings
to create a Patch Deployment Archive. MAKE
SURE you select Patch Deployment
Archive (not Initial as the
default).
Click on Create dialog. Click on Success dialog.
- Check the file structure you created so
far.
 [OS]$ cd ~/Documents/
 [OS]$ ll
 total 12208
 -rw-r-----. 1 oracle oinstall 5931861 Feb  6 21:44 EXEC_my_full_archive.zip
 -rw-r-----. 1 oracle oinstall     530 Feb  6 22:04 EXEC_my_patch_archive.zip
 -rw-r-----. 1 oracle oinstall     523 Feb  6 21:33 EXEC_my_selective_archive.zip
 -rw-r-----. 1 oracle oinstall 6341439 Feb  6 21:44 my_full_archive.zip
 -rw-r-----. 1 oracle oinstall  105352 Feb  6 22:04 my_patch_archive.zip
 -rw-r-----. 1 oracle oinstall  105344 Feb  6 21:33 my_selective_archive.zip
 [OS]$
You can put them anywhere, this is just an example.
- From the main menu bar, go to Team
> Deployment Archives > Create
From Repository > Selected Objects.
-
From VCS tag:
- On the main menu bar, go to Team > Deployment Archives > Create from VCS Label.
- Set Deployment Archive Name, Folder Path, VCS label, and Description.
- Set export key as oracle123.
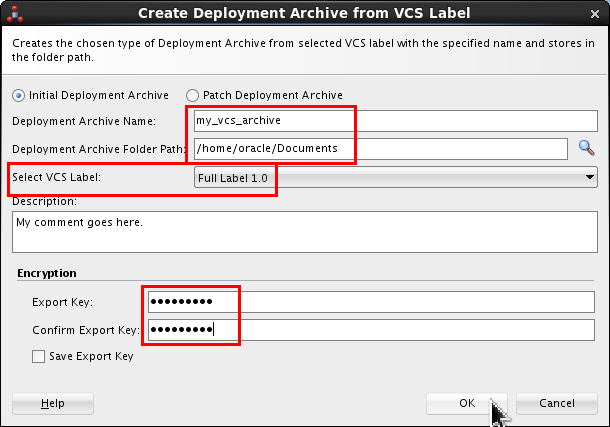
Click . Click on Success dialog. A Deployment Archive is created with the objects present in the VCS tag/label.
You have created multiple kinds of deployment
archives (zip files) and stored them in /Documents.
4.2 Viewing Available Deployment Archives
-
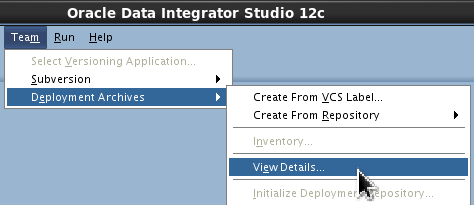
On the main menu bar, go to Team > Deployment Archives > View Details.
-
Set the Folder Path where the Deployment Archives were created.
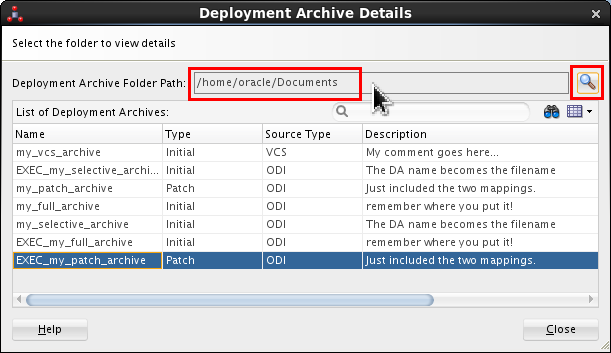
You cannot type the Folder Path, you must use Browse (
 ).
). -
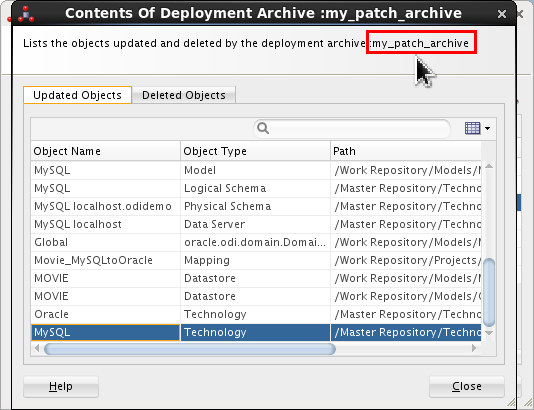
View various Initial and Patch deployment archives.
Click twice.
You have viewed initial and patch deployment
archives (zip files) from /Documents.
4.3 Applying Initial Deployment Archive
-
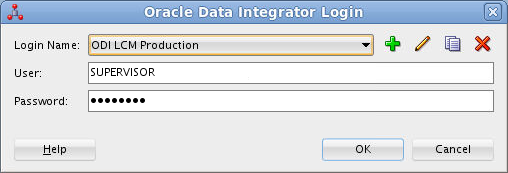
On the main menu toolbar, do ODI > Disconnect, then Connect to Repository, then switch to Login for ODI LCM Production. (The User/Password should be pre-populated, but if not, then use SUPERVISOR/welcome1.)
The production repositories are not supposed to be connected to SVN. SVN configuration is allowed only for development repositories.
-
On the main menu bar, go to Team > Deployment Archives > Initialize Deployment Repository.
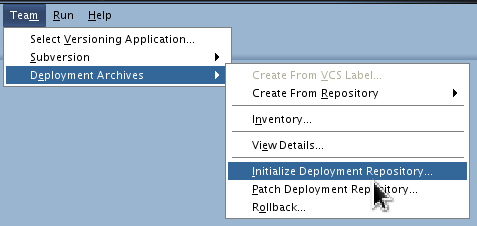
If the options are grayed out, then you must not have picked the PRODUCTION repository.
-
Set the path to the folder
/home/oracle/Documents(or wherever you put them).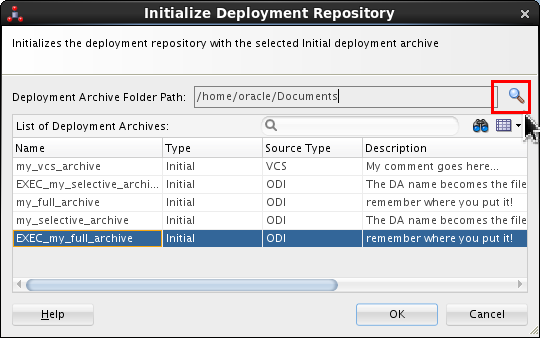
You cannot type the Folder Path, you must use Browse (
). -
Select deployment
my_selective_archiveand click .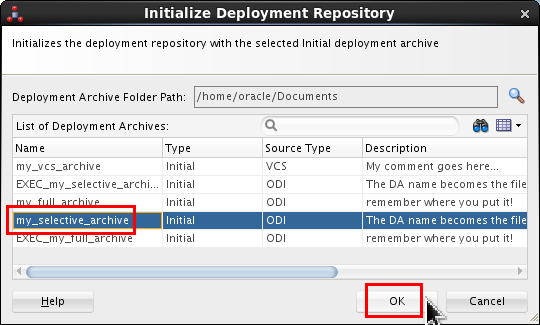
Q: "Why
EXEC_prefixes?"
A: ODI has two types of work repositories: development and execution. Development repositores can hold all kinds of artifacts that developers create, such as mappings, datastores, packages, and so on. Execution repositories are strictly for production environments where modifying objects is not allowed. So in an execution repository, only scenarios and loadplans are allowed to reside, which are the executable objects in ODI. So hereEXEC_archives contain only the executable artifacts and is for the execution repository where design-time objects cannot reside. -
Enter the Export Key of oracle123.

The export key is what is used for the import operation... Click on Success dialog.
You have deployed a production initial archive.
4.4 Applying Patch Deployment Archive
-
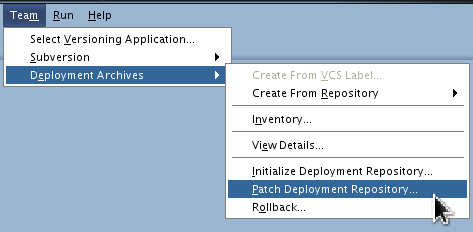
On the main menu bar, go to Team > Deployment Archives > Patch Deployment Repository.
-
Set the Path to the folder
/home/oracle/Documents(or wherever you put them), and selectmy_patch_archivepatch deployment.
(See the discussion on step 4.3.4 for the difference betweenmy_patch_archiveandEXEC_my_patch_archive.)Select Create Rollback Deployment Archive, set the Rollback DA Path where rollback deployment archive zip is to be created.
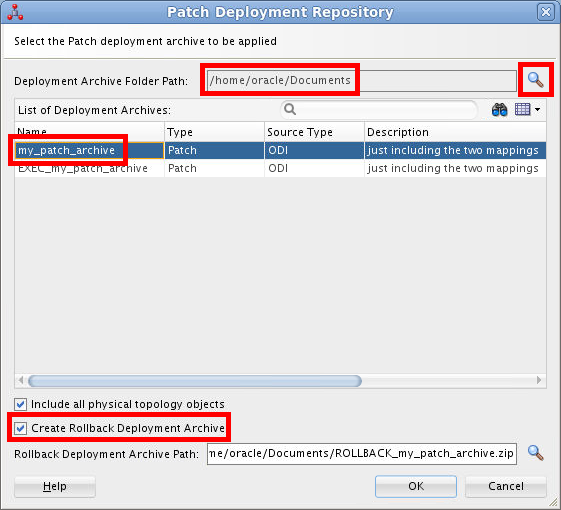
Click .
-
Enter the Export Key of oracle123.
Click on Success dialog.
You have deployed a production patch archive.
4.5 Viewing Applied Patches
-
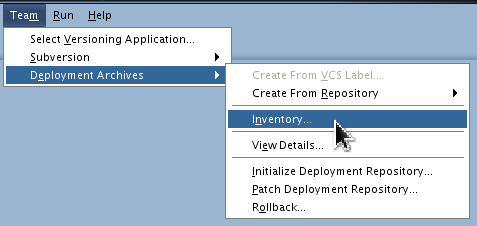
On the main menu bar, go to Team > Deployment Archives > Inventory.
-
The list of patch and full Deployment Archives are listed in the tables.

Click .
You have viewed the patches and deployment archives that have been applied to the production repository.
4.6 Rollback a Patch
-
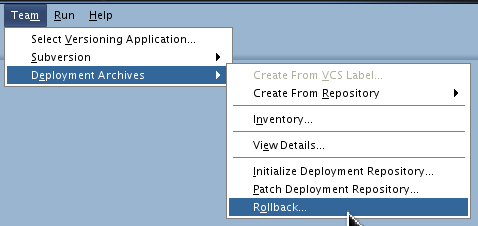
On the main menu bar, go to Team > Deployment Archives > Rollback.
-
Set the following parameters:
- Set Deployment Archive Folder Path:
to
/home/oracle/Documents(or wherever you put them). - Select a rollback Deployment Archive. Click .
- Enter the Export Key of oracle123.
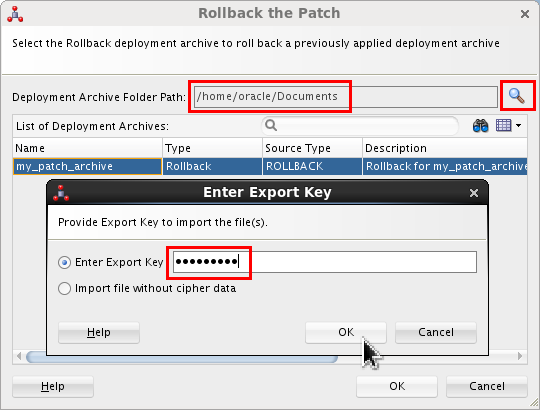
Click .
- Set Deployment Archive Folder Path:
to
You have rolled back a patch archive to the previous state.
You have managed the creation, release, rollout, and rollback of deployment archives.
Want to Learn More?
In this Oracle By Example (OBE) tutorial, you learned how to:
- Perform the initial setup and administration of Apache Subversion (SVN) and ODI
- Check objects in and out of SVN, add, delete, and restore objects
- Configure branch and label management
- Manage releases of software
Resources
Conceptual or procedural Help topics relevant to the topic of this tutorial:
- ODI product home page
- Documentation on releases 12.2.1 and 12.1.3
- Training
- [D82167GC10] Oracle Data Integrator 12c: Integration and Administration. 5 days.
- [D87557GC10] Oracle Data Integrator 12c: Advanced Integration and Development. 3 days.
- ODI A-Team Blogs
- The Apache Software Foundation web site, home of Subversion, among many other projects.
- To learn more about ODI, refer to additional OBEs in the Oracle Learning Library, perhaps starting with this ODI 12c series.
Credits
As always, a team effort. This is a partial list of the team:
- Lead Curriculum Developer: Ayush Ganeriwal
- Other Contributors: Steve Friedberg, Julien Testut, Alex Kotopoulis