Native Mobile login using Oracle Mobile and Social Access Management
Overview
Purpose
In this tutorial you will learn
how to configure and test native mobile login using an Android
emulator. You also learn how to test Mobile Single Sign On and
how to use REST calls to access a protected resource.The
installation and configuration of all the software required is
not covered in this OBE.
Time to Complete
Approximately 1.5 hour
Introduction
The Oracle Access Management Mobile and Social service acts as an intermediary between a user seeking to access protected resources, and the back-end Access Management and Identity Management services that protect the resources. Mobile and Social provides simplified client libraries that allow developers to quickly add feature-rich authentication, authorization, and identity capabilities to registered applications.A protected resource can be accessed from a mobile device.Protected resources can only be exposed using REST APIs.Mobile single sign-on (SSO) allows a user to run multiple mobile applications on the same device without having to provide credentials for each application. Single Sign-On covers web applications, native mobile applications, and also the RESTful API’s and web services accessed from the device.
Scenario
John works as an administrator of ABC Corporation. He is responsible for
- Simplifying Access management in the organization.Ensuring that users and organization can access their protected resource using any of their devices like mobile, laptop etc.
- Help manage security of enterprise information held on personal and company-owned mobile devices.
To implement this solution in his company's environment quickly, easily and efficiently, he must :
- Install Access Management using Mobile and Social
- Configure Mobile Services
Hardware and Software Requirements
The following is a list of software and hardware requirements:
- Oracle Linux Version 6 Update 3 or later
- Oracle Database 11g version 11.2.0
- Sun JDK version 7u40
- Oracle WebLogic Server 11g version 10.3.6
- Oracle Identity Management Suite 11g version 11.1.2.2.0
- Oracle Repository Creation Utility 11gR2 version 11.1.2.2.0
- Oracle Unified Directory 11gR2 version 11.1.2.2.0
- Android ADT Version 20131030 or later
- One PC with atleast 8GB RAM and 100GB diskspace
Prerequisites
Before starting this tutorial, you should complete the OBE
Setting up the environment for Oracle Mobile and Social Access Management hands-on
Creating a sample android emulator
Android SDK serves as a security layer for developing secure
mobile applications on Android devices.Android Development Tools
(ADT) is a plugin for the Eclipse IDE that is designed to give you
a powerful, integrated environment in which to build Android
applications.Using Android ADT you will create a sample emulator
and deploy an android package.From the sample device a user will
login to access a protected resource
Checking if Android ADT is downloaded and unzipped
-
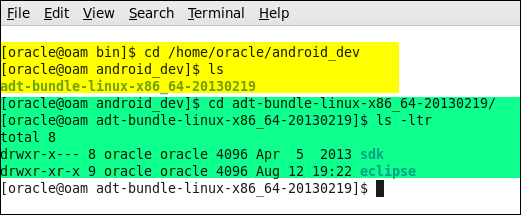
Android ADT is downloaded and unzipped as part of the pre-requisite to the OBE.
Go to the directory which has Android SDK and check for two sub directories sdk and eclipse.
Creating an Android Virtual device
-
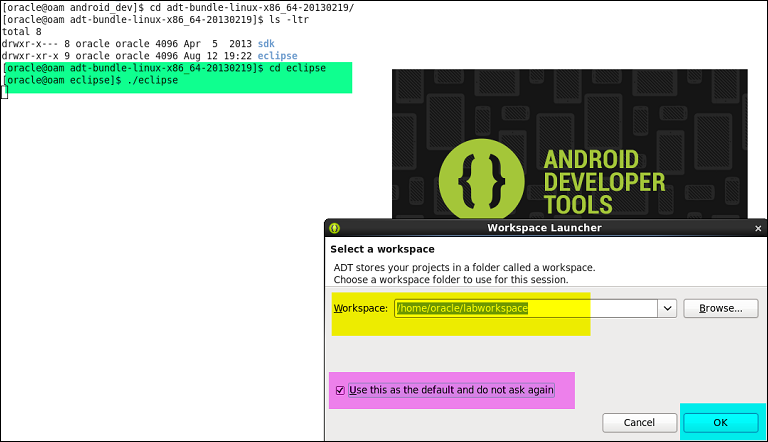
Launch Eclipse IDE
cd /home/oracle/android_dev/adt-bundle-linux-x86_64-20130219/eclipse
./eclipse -
Select a workspace for example /home/oracle/labworkspace Check "Use this as the default and do not ask again"
-
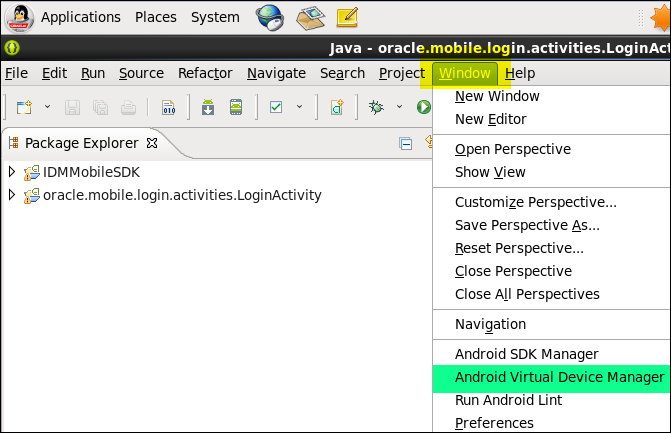
From the menu options, go to Windows AVD Manager
-
Click on New to create a new AVD
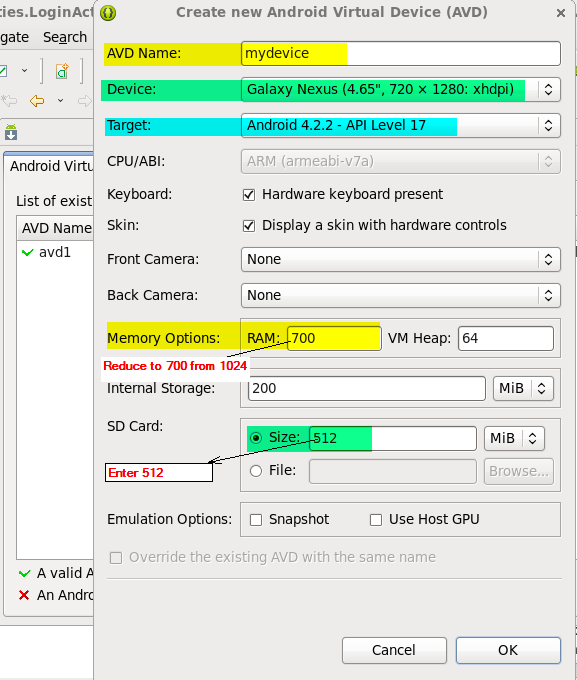
- Specify the property values as shown in the screenshot.
- Give your device a name (e.g. mydevice) and select a device type to emulate. The lab uses a Galaxy Nexus device running Android 4.2.2.
- Change the RAM value under Memory Options to 700 from 1024 .
- Take the rest of the property value defaults and select OK.
Starting AVD device
-
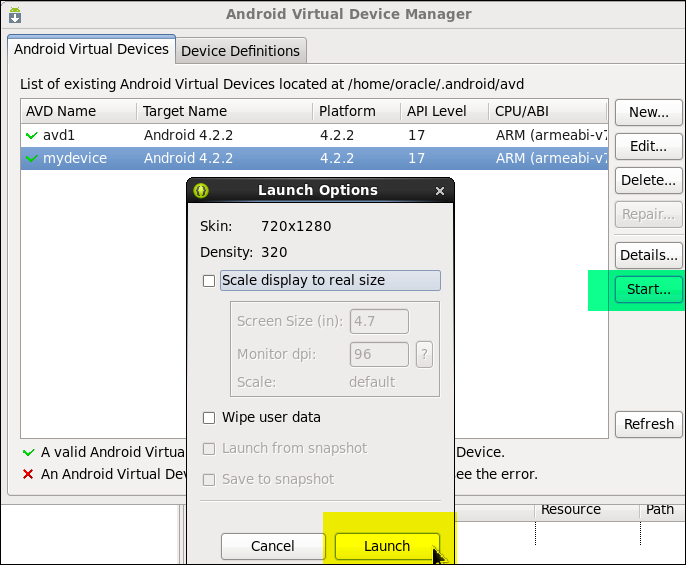
From the AVD Manager, Select your device (mydevice) and click on Start to start the mydevice in emulator.
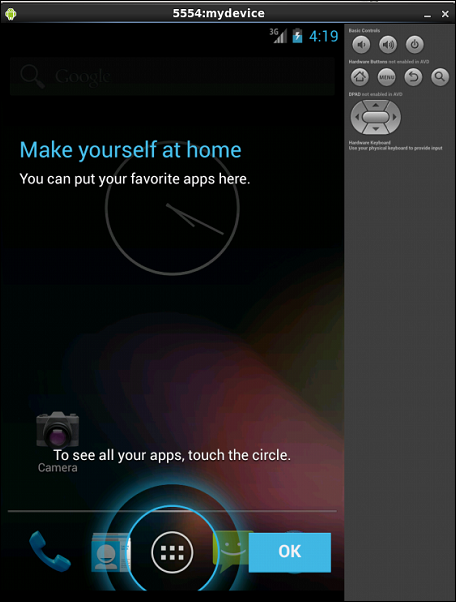
On the Launch Options window, Click Launch.This should launch the mydevice in the emulator as shown in the screen.
Importing Sample Android Login package
-
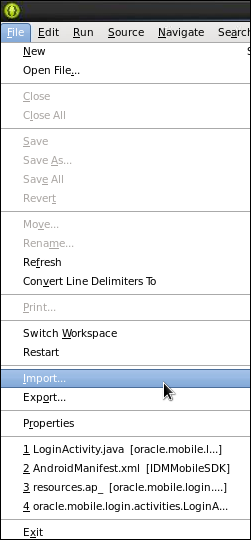
Open the Eclipse IDE. Choose File > Import;
-
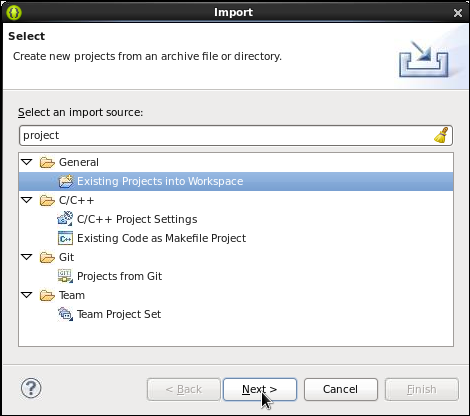
In the "Select and import source" box type "project". Select General- Existing Projects into workspace and click Next
-
Navigate to the Android Lab zip file and select it. Note that the sample project file(android-lab.zip) includes the OAM Mobile and Social Android SDK (IDMMobileSDK).
Expand the IDMMobileSDK and oracle.mobile.login.activities.LoginActivity packages under the left side package explorer.
Note: If you don't see the packages, click on the top right corner icon showing two square icons to show you the design editing environment.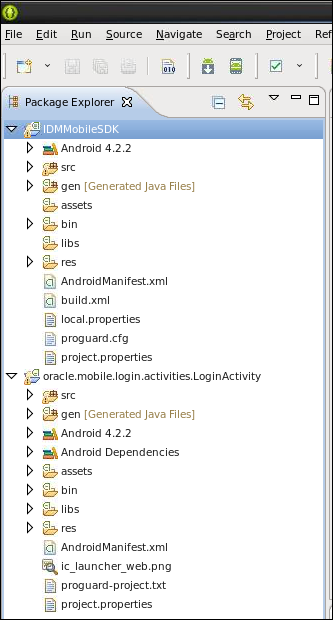
Deploying the sample Android (.apk) file
-
If the android emulator is not already running, launch it now.
You can launch it from the directory
/home/oracle/android_dev/adt-bundle-linux-x86_64-20130219/sdk/tools or from Eclipse AVD manager.
To launch it from command prompt:
cd /home/oracle/android_dev/adt-bundle-linux-x86_64-20130219/sdk/tools
./emulator -avd mydevice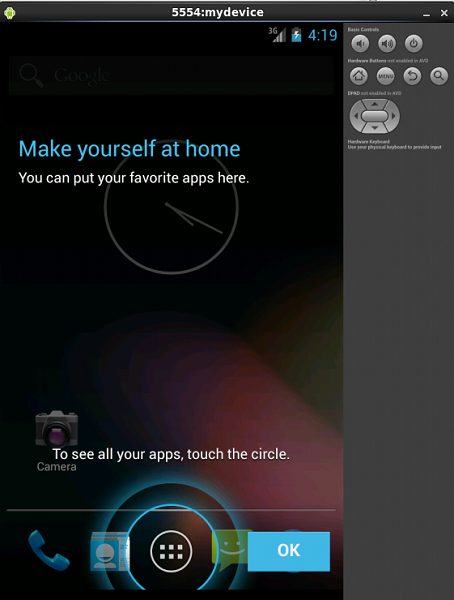
-
To install the apk file, perform the following on the command line from the
/home/oracle/android_dev/adt-bundle-linux-x86_64-20130219/sdk/platform-tools directory
cd /home/oracle/android_dev/adt-bundle-linux-x86_64-20130219/sdk/platform-tools
./adb -e install /home/oracle/labworkspace/oracle.mobile.login.activities.LoginActivity.apk
The -e option tells adb to look for a running emulator to install the application
It should show a success message, if the apk file is successfully installed.
Android application package file (APK) is the file format
used to distribute and install application software and
middleware onto Google's Android operating system;
very similar to an MSI package in Windows or a Deb package
in Debian-based operating systems like Ubuntu.
The sample application
(oracle.mobile.login.activities.LoginActivity.apk) is a
compiled binary version of the application that you will
deploy to verify that your environment
is properly configured. You will view the application in the
emulator after it has been deployed.
Verifying the Login package installation using emulator
-
Notice the icons on the top right of the emulator - volume control button, lock button, Home, , Menu , Back, Search and DPAD buttons. If these are disabled, perform the following:
Open /home/oracle/.android/avd/mydevice.avd/config.ini file
-
Set the following properties to yes in the config.ini file :
hw.dPad=yes
hw.sdCard=yes
hw.mainKeys=yes
hw.trackBall=yes
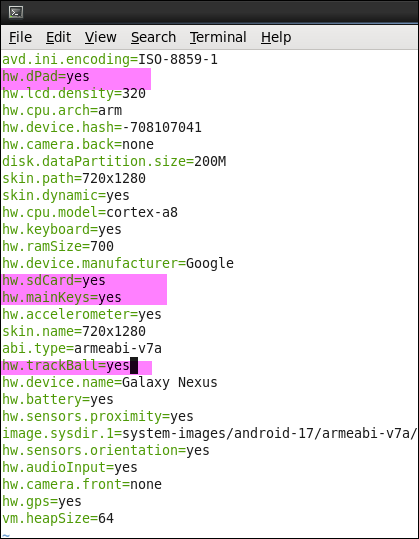
-
Save the file. Close and start the emulator again .Notice the icons are now enabled.
Unlock the android device(if you see a lock icon), using the mouse click on the lock icon and slide it to the right. -
Click on the Apps icon (Circle with the 6 buttons within it) on the bottom tray on the Home screen.
This will take you to screen showing all the apps on the android device.Notice the installed application - Login App is now visible on the apps screen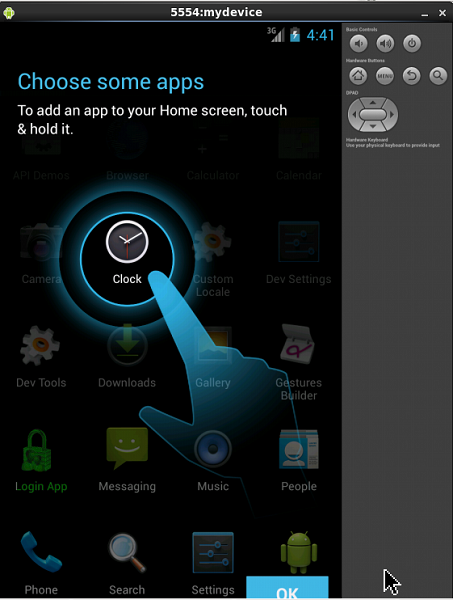
-
You can manage the Apps including Login app by clicking on the Menu icon on the top right corner. Now click on Manage Apps option at the bottom of the emulator window.
It will display all the apps on the device that you can manage. Scroll down to the Login app or start typing in login and it should automatically display you the Login app. Click on the Login app.
This brings up the App info page for the Login App. From here you can manage the app - Force stop the app, uninstall the app and view the storage info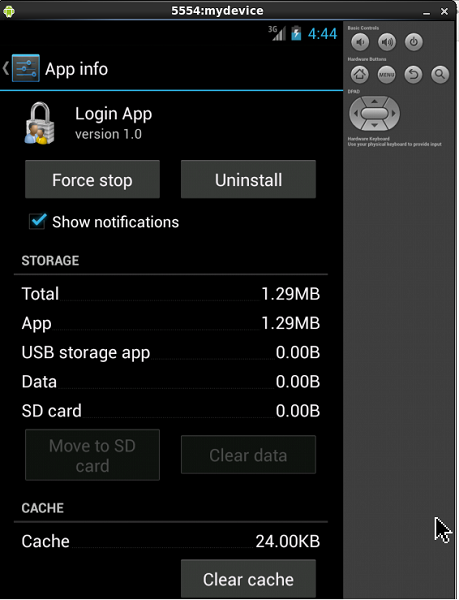
Navigate to the emulator window. If you notice a Lock icon
at the center of the emulator, then unlock the android
device by clicking on the lock icon
and sliding it to the right. This will unlock the device and
you will be in the Home screen.
You have now created a sample Android device and deployed a Login package
Configuring Oracle Access Manger for mobile services
Mobile Services connect applications running on client devices to
the security services and products available in the Oracle
Identity Access Management product suite.
The Mobile Services graphical user interface (GUI) can be
displayed after an administrator has successfully authenticated
and received access to the Oracle Access Management Console.
Using the Web Console , you can define how client apps and the
Mobile and Social server communicate as well as how the Mobile and
Social server and the back-end Identity services (that the client
apps consume) communicate.
Enabling Social and Mobile Service
-
Login to OAM Console using "http://oam.example.com:7001/oamconsole"
-
On Launch Pad, under Configuration, click Available Services.
Verify that Access Manager and Mobile and Social in the right pane are enabled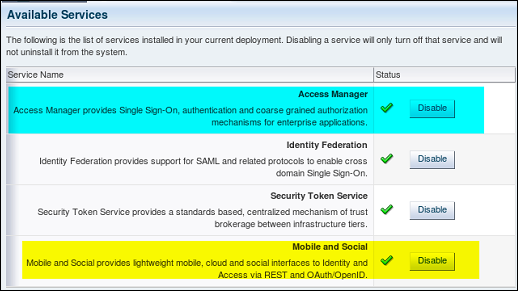
Creating User Identity Store Profile
-
On Launch Pad, under Configuration, click User Identity Stores
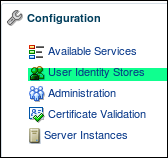
Click Create Under IDS profiles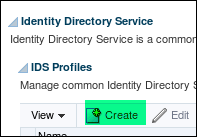
-
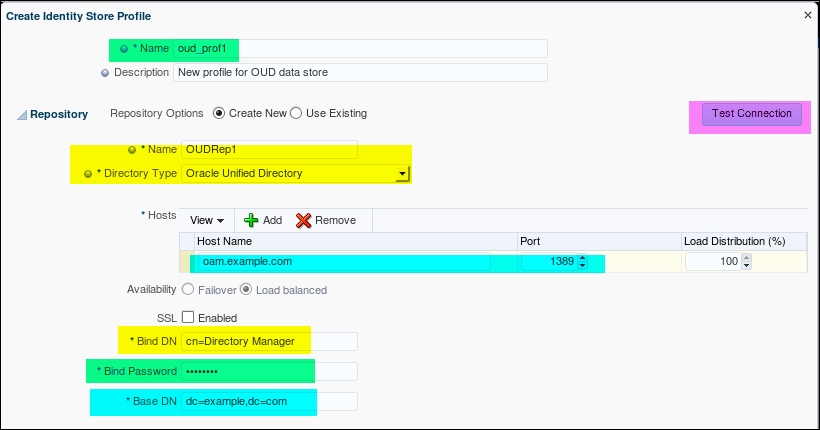
Create a new Identity Store Profile by providing the following details:
- Name : oud_prof1
- Description : New profile for OUD data store
- Repository Options : create New
- Repositiry Name : OUDRep1
- Directory Type : Oracle Unified Directory
- HostName :
oam.example.com - Port : 1389
- Bind DN :
cn=Directory Manager - Bind Password :
Welcome1 - Base DN :
dc=example,dc=com - User Base DN :
cn=users,dc=example,dc=com - Group Base DN :
cn=groups,dc=example,dc=com

Verify if the Identity Store Profile and the corresponding repository is created.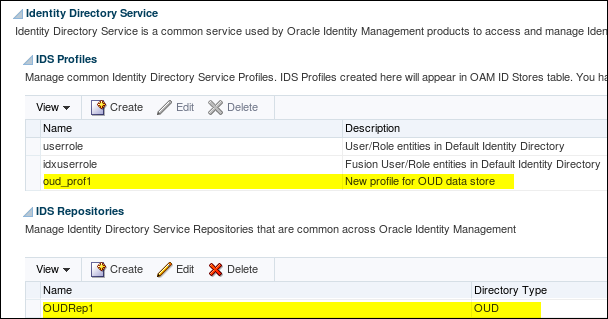
Creating User Profile Service Provider
- Open the Mobile Services Home Page in the Oracle Access
Management Console.
http://oam.example.com:7001/oamconsole
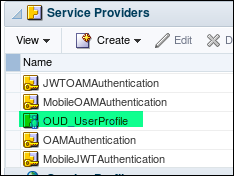
Click Create under Service Providers panel and choose User Profile Service Provider.
The User Profile Service Provider Configuration page displays.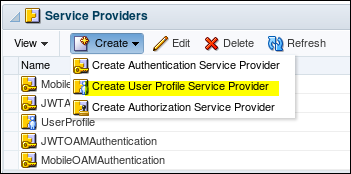
-
Enter the following information to create a User Profile Service provider
- Name : OUD_UserProfile
- Description : Service provider for OUD store
- Click + and add an attribute proxyAuth with value false
- Name of the Identity profile : oud_prof1
- Click Create to create the Service Provider

-
Make sure the OUD Service provider is successfully created
Creating User Profile Service Profile
-
Open the Mobile Services Home Page in the Oracle Access Management Console.
http://oam.example.com:7001/oamconsole
Click Create under Service Profiles panel and choose Create User Profile Service Profile.
The User Profile Service Profile Configuration page displays.
-
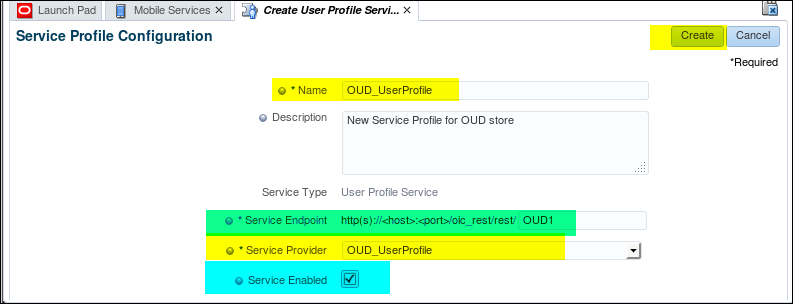
Enter values for the User Profile Service Profile general properties.
- Name : OUD_UserProfile
- Description : New Service profile for OUD store
- Service Type : User Profile Service
- Service Endpoint : http(s)://host:port/oic_rest/rest/OUD1
- Service Provider : OUD_UserProfile
- Service Enabled : Yes
-
Click Create to create the Service Profile configuration object. Check if the Service profile is created correctly.

Creating application profile
-
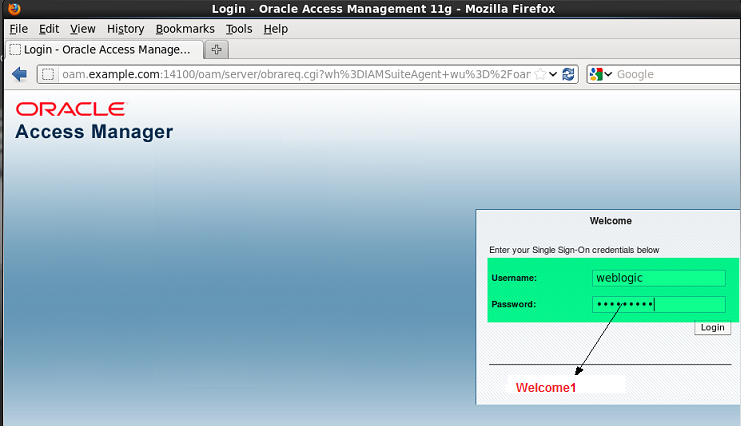
Login to OAM Console(http://oam.example.com:7001/oamconsole) as weblogic/Welcome1.
Under LanchPad,click Mobile Services and select "Create" under Application Profiles section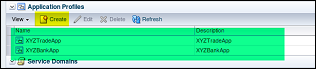
-
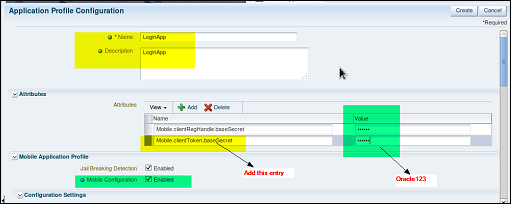
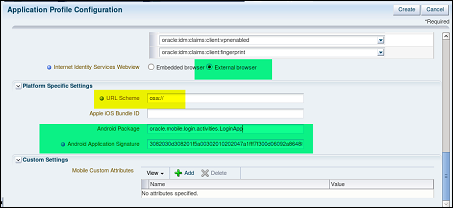
Enter the property values for the new Application profile as shown below
- Name: The application name. In this example we use LoginApp. The application name configured here must match the application name in the settings for the deployed Android application. The name is arbitrary, but it should reflect the SSO function. This name will be used and seen by the mobile application developer.
- baseSecret: Enter a password here (Oracle123). This does not need to match any existing password. It is used as an encryption key between the client and the OAMMS server. Provide a base secret value of Oracle123 under the attributes section. This value will not be referenced in other configurations, but is necessary for security.
- If it is a desktop app we use Mobile.clientToken.baseSecret whereas if it is a mobile app we use Mobile.clientRegHandle.baseSecret.
- Mobile Configuration check box: Enable this checkbox
for any mobile applications. This enables the SDK to
collect and send Mobile specific attributes to the OAMMS
server
-
- Webview: Controls the type of browser that the Android application will use when showing a Social login dialog. The embedded browser (default) will render the browser within the application. External will use the system standalone browser. External can sometimes be preferable for debugging.
- URL Scheme: Both Android and iOS use a custom URL scheme to register O/S handlers that will take control when OAMMS transfers control to device. Use the value osa:// This URL scheme is used for one native mobile app to be able to call another mobile app.
- Android Package: The fully qualified name of the Android application that you will deploy. This is taken from your application's AndroidManifest.xml file. This is used to tell Android which application to launch when an intent is received (for example osa://).
- Android Signature: This is the unique signature for your application. For development it is generated by the Android SDK tool. For production this value is a stable signing key available from Google as part of the Play store deployment process.
Note: If you are deploying the pre-compiled .apk sample application, the signature is found below:
3082030d308201f5a00302010202047a1fff7f300d06092a864886f70d01010b05003037310b30090603550406130255533110300e060355040a1307 416e64726f6964311630140603550403130d416e64726f6964204465627567301e170d3133303430323033323131305a170d34333033323630333231 31305a3037310b30090603550406130255533110300e060355040a1307416e64726f6964311630140603550403130d416e64726f6964204465627567 30820122300d06092a864886f70d01010105000382010f003082010a0282010100ea7205cff63b543db60df5559964194c5c5eb9bf22bdcfefaed9e7 05af2d194d4933f95cc0ec31ab3b2b64d3f2acd411f8a311b74c04ffb1a34004ce73b46dc8131f858da0b8ea7892bb865ca241b2e166f471e6db9d684 0616b658557101760c2116af803deee37ac5f0f65d1fe4616a200ec0713ea2b0bf25bb9783ff650f2ff531d657781094992832f7024658f7e3b339538 a6910e9d68ca72f4bb832148151c46893c0a75b52cbe5cdcb99082ea1ff0a0a5a2fb0716338d4f26207cc04b8a03d971f53b9520c55ff3058c13700ad 88c475df760973e7e8c1b62c8fac9df1428bb32d75bae91788ba4dac6b70dd9db415f0b9e9add508696bf60f459ce30203010001a321301f301d06035 51d0e0416041429f9925cf28dc948ab8dd3f004943cbe467e44ef300d06092a864886f70d01010b0500038201010043b8c6759b052cd58a8ab3994690 2fc6e4c54d246a31e5eb2111066d263c2f31fa4b9f5de8fbb0 9e56c5ff8c21b9fea216dfed6848a80b3a8b6cacabf1d21603868a306e126cc056f3ca 7ae1dc75015a3388989e2bb6f8c6b17d0178e9e2ddf67818e98846278b3414387a135f703a759cd99cfc52b42e485dc399c365113ef668af9c9b8f46e 1a878f69657969ae87f09a214f0d438609625a51ce5f8cb6733879cf5fb5671c8164b6e8028d9603851da4e2741812fba8af333d289a8c5f34d9d4658 e24828d7e35b10f96956c70b4a2894297d25ce012bfe20f820d870dc065c237387bfcd410acdb6e6c99699ec6b421f764963fc3dcdfd67dfd5af896ec8- If you are compiling the application in eclipse your signature will be unique to your SDK environment. You will need to extract your signature from the application logs.
-
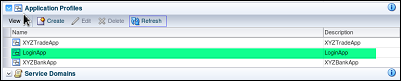
Confirm that application profiles have been successfully created by scrolling down to the application profile section in the right pane and clicking the Refresh button on the horizontal toolbar under the Application Profiles section
Creating the Native Login Mobile Service Domain
-
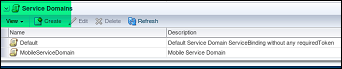
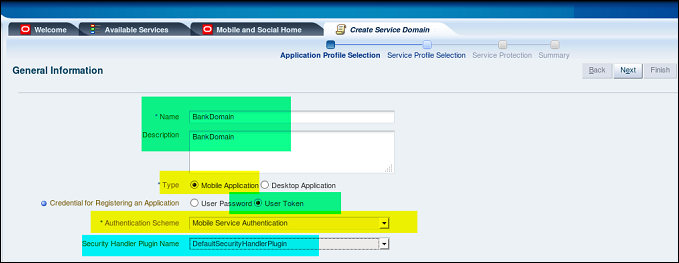
Select create under Service domains. Create a name for your domain (BankDomain is used below). The name configured must match the service domain set in the Android application
-
Application Profiles selection: click the browse button. Choose the application profile that you created in the previous step(LoginApp).
This associates the application with this service domain. A service domain can support multiple applications.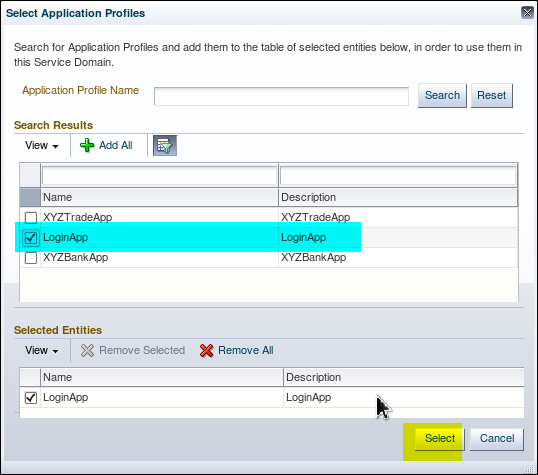
-
The LoginApp participates in Single Sign On (SSO) as an SSO agent (which means it is responsible for storing tokens and credentials, delivering device attributes, and communicating via REST to the mobile and social server).
More than one application can be configured as an SSO agent; in that case, the Agent Priority property along with which applications are installed on the mobile device will determine which application assumes the role.
For multiple applications that are configured as an SSO Agent, agent priority needs to be set. This is important when there are multiple agent apps installed on device, so the SDK based on this priority invokes the agent application (the one with highest priority). In this practice, you will define only one application, LoginApp, as an SSO agent.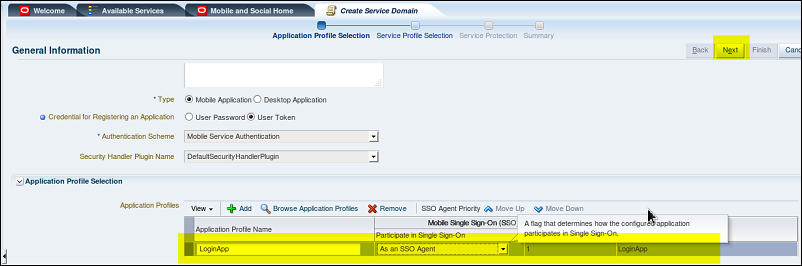
-
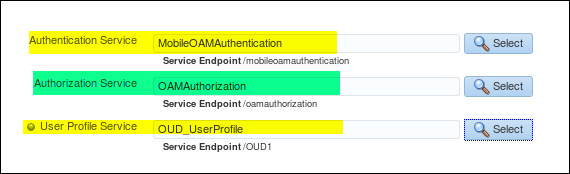
Service Profile Selection:
Advance to the next page of the wizard to configure the services for this domain. For this example we will use the following services:- Authentication - MobileOAMAuthentication. This will use the JWT (JSON Web Token) format authentication provider. The Android application upon successful authentication will receive a signed JWT token from OAMMS. This token will be used in subsequent calls to OAMMS
- Authorization - OAMAuthorization. The authorization provider. The SDK makes calls to this provider endpoint to obtain authorization decisions on resource requests. Authorization is not used in this demo.
- User Profile Service - OUD_UserProfile. This is the service that provides user profile services (attribute lookup, attribute modification). The OUD provider has been previously configured. It makes calls to Oracle Unified Directory to perform attribute operations
-
Service Protection : The REST services for a domain can be protected by requiring the caller to present a token to invoke the service. Make sure you enable writing of the profile.

-
A Summary of Service Domain called BankDomain is shown below.
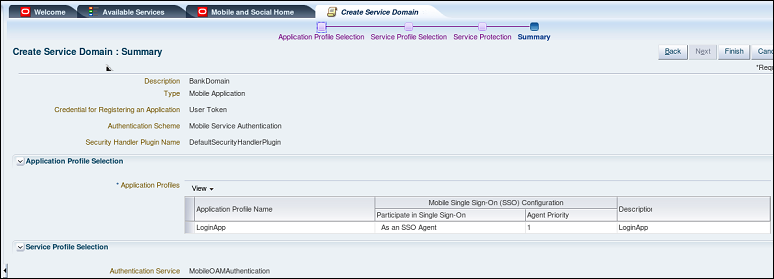
An OAMMS service domain binds together a set of configured interfaces for authentication, authorization and user profile services. Service domains provide flexibility to support different types of mobile clients. For example - an employee Mobile service domain would use a different authentication source than a Mobile service domain used by customers
You have now configured the Oracle Access management Suite for mobile services
Testing Native Mobile Login
A sample login package has been deployed in the Android emulator.
All the required back end configuration on the Access Management
Suite has been done to support mobile service.
You can now test the native mobile login. That is from the sample
Android device you can access a resource that is protected by
Oracle Access Manager
Testing the Mobile SSO login
-
On the Emulator, make sure you are logged in to the android device (Slide and unlock the lock screen).
Click on Apps icon on the bottom tray. Click on the Login App icon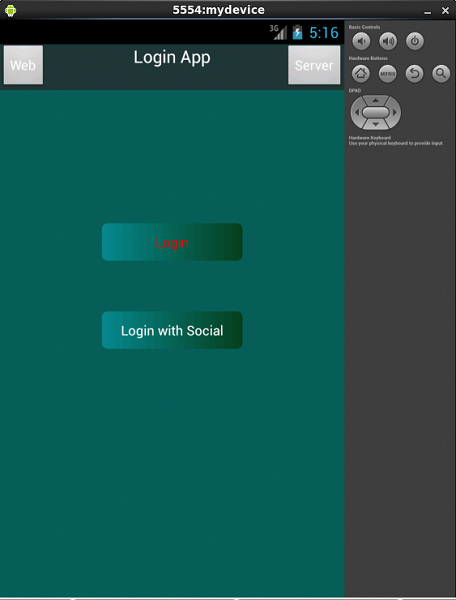
-
Click on the Server button on the top right corner. Enter the details as shown:
Note: You can also use the Fully Qualified Domain Name (FQDN) or IP address.
Note: The IP address will vary for each student. On a terminal window use ifconfig command to find out the IP address (eth1)
Note: RP stands for Relying Party which in our case is Facebook for social login.
Click Submit. It should flash “mms done” and “Setup Done” for a few seconds.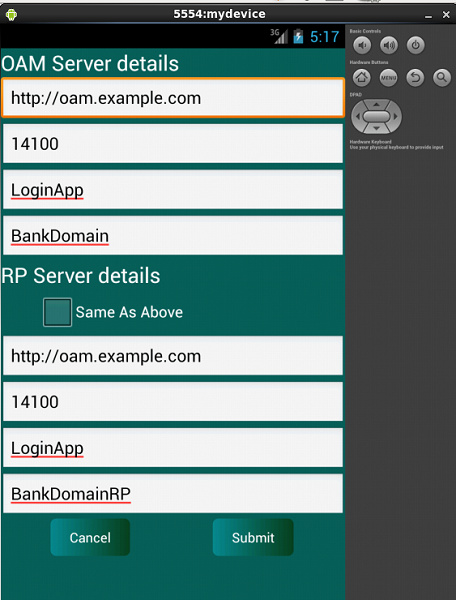
-
Login as ahall/welcome1. Click on Login
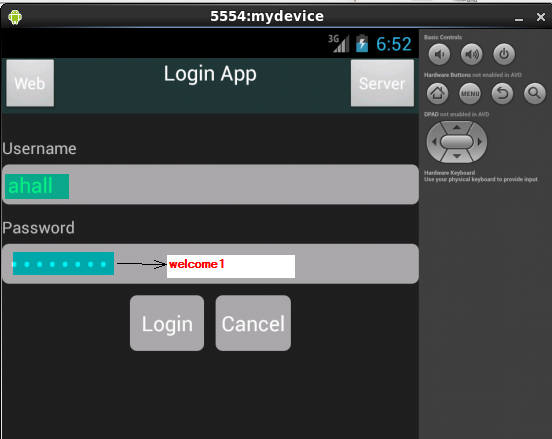
-
It should flash with a message “Logged in Successfully” followed by “Authentication Succeeded” messages.
The username is displayed which shows that the Login was successful.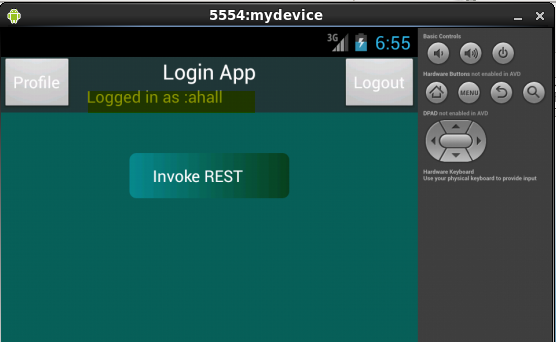
Fetching user data from OUD Server
-
After successful login, the profile of the user can be fetched from the OUD server.
After login, Click on the Profile to pull the user profile from OUD server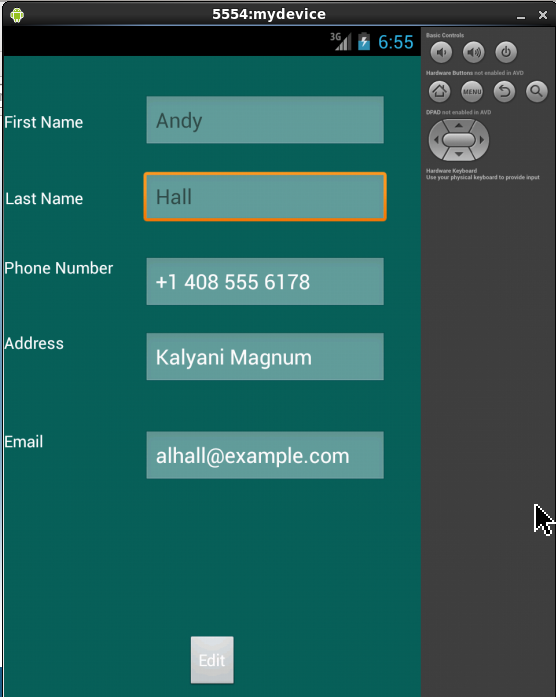
-
You can easily demonstrate that the user data is fetched from OUD server. Click on the back icon.
Open up terminal window and stop OUD server: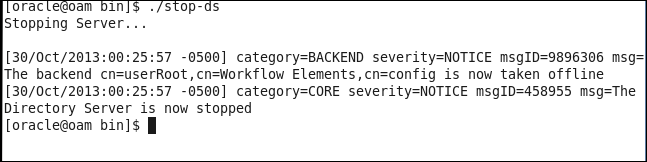
-
Navigate back to the Login App in the emulator and now click on the Profile button again.
Notice it comes out as blank fields (as OUD server is stopped).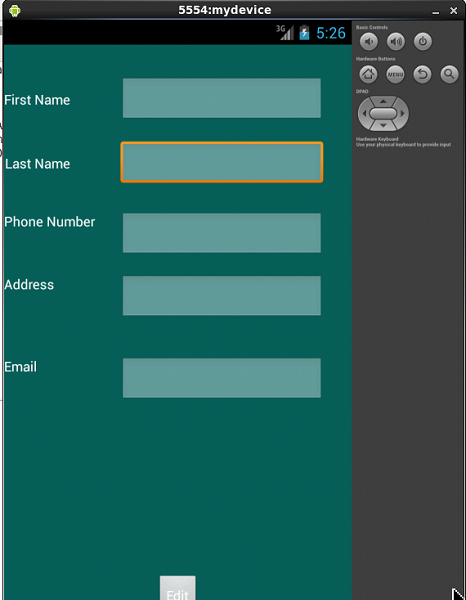
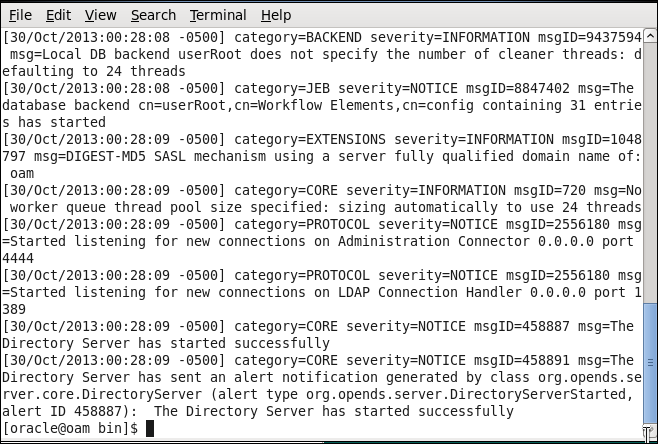
-
Open up terminal window and start OUD server. Now the username is displayed again
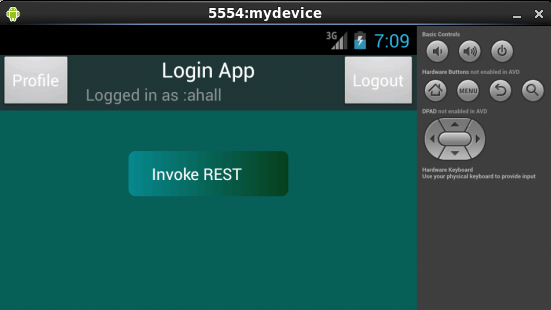
Invoking REST call to access protected resource
REST (Representational State Transfer) is a simple stateless
architecture that generally runs over HTTP.The client applications
use simple REST calls to communicate with the Mobile and Social
server.
The login application running on the sample mobile device
interfaces with the Mobile SSO Agent, which communicates with the
Mobile and Social server using REST calls. The server interfaces
with Access Manager and returns the necessary tokens to the Mobile
SSO Agent (again using REST calls). The agent forwards the tokens
back to the application, which can now access the protected
resource using the REST calls.
Using REST ful Web Services
This demonstrates a simple RESTful web service. The tables
corresponding to bank application are created and data is
populated at the Oracle database. This is done as a
pre-requisite.
BankDemo is a web application deployed on the Managed
(oam_server1) and admin server using Web Logic Server Admin
Console . This is also done as a pre-requisite to this
exercise
-
Click on Invoke REST button

-
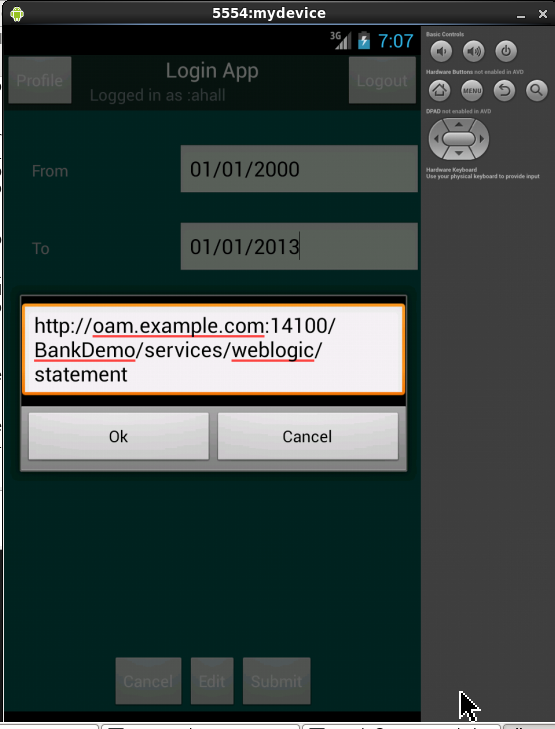
Enter the From and To dates and click the Edit button to specify the host/port details for the webservice call(specify the IP address or Fully qualified domain name – oam.example.com and 14100 port)
-
Click on the Submit button.
Notice the Registered webservice message that flashes for a few seconds. It should show you the result of the REST call to the registered web service.
Removing cached data
-
Click on the Home button and then on Menu button.
Select Manage Apps from the system tray menu option.Select Login App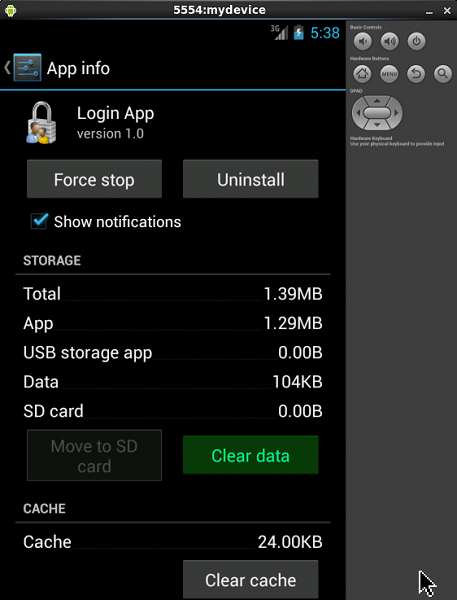
-
Click on Clear Data.
Select OK on the pop up window to confirm.Click on Home icon.Click on Apps icon on the system tray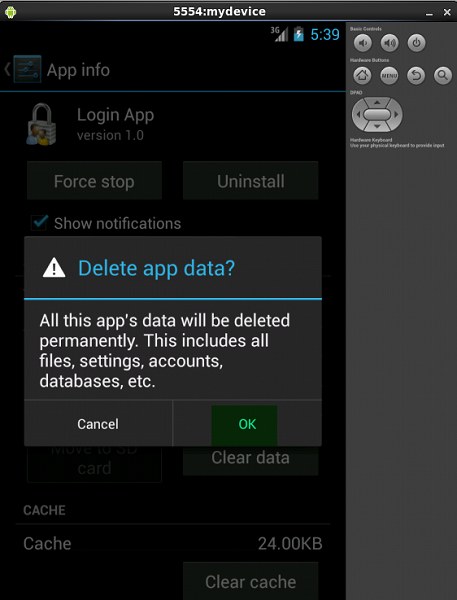
Summary
A sample Android application(LoginApp) has been deployed in an Android emulator. Mobile services are configured at the Oracle Mobile and Social Access management using Web console. Access to a protected resource is achieved using native mobile login. Using REST calls , a web service application is accessed by native mobile application.
In this tutorial, you learned to:
- Create a sample android device
- Deploy a sample android application
- Configure mobile services in Oracle Access Manager
- Test native mobile SSO login
- Use REST calls to access protected resource
Resources
- Oracle® Fusion Middleware Administrator's Guide for Oracle Access Management 11g Release 2 (11.1.2.2)
- Oracle® Fusion Middleware Developer's Guide for Oracle Access Management 11g Release 2 (11.1.2.2)
- Other OBE in the same course : Social Login using Oracle Mobile and Social Access Management
Credits
- Lead Curriculum Developer: Vandana Rajamani
- Product Manager: Kanishk Mahajan
- Other Contributors: Vishal Parashar
To navigate this Oracle by Example tutorial, note the following:
- Topic List:
- Click a topic to navigate to that section.
- Expand All Topics:
- Click the button to show or hide the details for the sections. By default, all topics are collapsed.
- Hide All Images:
- Click the button to show or hide the screenshots. By default, all images are displayed.
- Print:
- Click the button to print the content. The content that is currently displayed or hidden is printed.
To navigate to a particular section in this tutorial, select the topic from the list.