Setting up the OPSS Environment
Purpose
This tutorial covers setting up the Oracle Virtual Box image associated with the hands-on exercises for Oracle Platform Security Services (OPSS). You can alternatively download and install the environment directly on a machine as well.
After completing this exercise, you should be able to:
- Start the Oracle Identity Directory (OID) LDAP server and verify that it is running
- Create an OPSS-based WebLogic Server domain using the WebLogic Configuration Wizard
- Start an OPSS-based WebLogic Server domain
- Explore OID LDAP identities using JXplorer
Time to Complete
Approximately 1 hour not including download times
Overview
OPSS is Oracle's security framework for developing and managing security services in Java SE and EE environments. This tutorial is the prerequisite course for all OPSS OBE tutorials.
OBE Environment Architecture
This is the high-level architecture of the environment used for the OPSS hands-on OBE tutorials. The environment consists of the following:
- A single OPSS-enabled WebLogic AdminServer running on port 7001
- An OID LDAP-based identity store and security store
- Oracle Enterprise Manager FMW Control
- OPSS WLST Scripts
- A bootstrap credential store for connecting to the OPSS security store
- A jps-config.xml OPSS configuration file
- An ADF application that uses OPSS security
Software and Hardware Requirements
The following is a list of software requirements:
- This OBE is based on a pre-built Oracle Virtual Box virtual machine that contains some of the required products, which are already installed. Follow the instructions here to download and install the Virtual Box Database App Development VM from the Oracle Technology Network web site. (download)
NOTE: If you would prefer not to use a virtual image, and would prefer to use your own environment then you must download and install the products that are automatically included with the VB image as shown below. You do not have to explicitly install Java as it is installed as part of the WebLogic Server installation. Use the download and install links next to the products listed below to install them yourself. - The OPSS virtual image is based on Oracle Enterprise Linux 5.
- Login to the virtual image using the following credentials:
Username: oracle
Password: oracle
The following software products are already installed on the virtual image:
- Oracle Enterprise Linux 5 (download) (Installation guide is found on product download page)
- Java SE 1.6.0_20
- Oracle Database 11gR2 (11.2.0.2.0 or later) (download 1) (download 2) (installation guide)
- Mozilla Firefox 3.6
The following software products must be downloaded and installed on the virtual image:
NOTE: Be sure to install the software to the locations indicated in the Prerequisites section below. Be sure to follow all notes and instructions in the Prerequisites section as well.
- Oracle WebLogic Server 11gR1 (10.3.6.0)
- Oracle Identity Management 11gR1 (11.1.1.6.0)
- JXplorer 3.2.2 for managing OID LDAP entries
- Oracle JDeveloper 11gR1 (11.1.1.5.0 or later)
Prerequisites
Before starting this tutorial, you should ensure the following prerequisites are met:
. |
Oracle recommends taking the online self-study course: OPSS Concepts. The online course provides the concepts for this hands-on tutorial. |
||||||||||||||||||||||||||||||||||||||||||||||||
|---|---|---|---|---|---|---|---|---|---|---|---|---|---|---|---|---|---|---|---|---|---|---|---|---|---|---|---|---|---|---|---|---|---|---|---|---|---|---|---|---|---|---|---|---|---|---|---|---|---|
. |
After importing the Oracle Virtual Box image, change the following settings before starting the image:
|
||||||||||||||||||||||||||||||||||||||||||||||||
. |
Ignore the lab instructions and materials on the VM image desktop that are focused on database labs. |
||||||||||||||||||||||||||||||||||||||||||||||||
. |
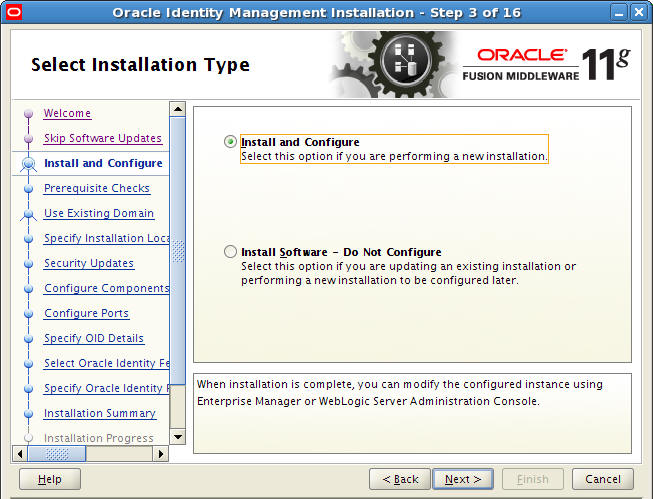
Install the following products, and in the following order, using the related installation guide from the product's documentation. NOTE: Be sure to download software to the / file system as there is not enough space on the /home file system. You will have to remove each download installer after installing that product. This is because there is limited space on the hard drive and these products take up a lot of space. For example, after extracting the contents of the IdM zip file, you should delete the zip file itself to reclaim that space. Deleting the zip files, the wls1036_linux32.bin, and Disk1, Disk2, Disk3 files when finished using them will ensure there is a lot of space available on the drive. ALTERNATIVELY: You can add a new disk to the virtual image to ensure you have enough disk space to serve all your needs. The root user login for the virtual image is root/oracle if needed. The FMW PS5 (11.1.1.6) version of Oracle Identity Management provides a full product installation option that should be used for this series of OBEs. As part of this process, be sure to choose the Install and Configure option as shown in the screen shot below:
Products to Install:
Here are my notes for configuring the IdM product during installation:
Click Install. This process will take a long time to complete on the VB image. After everything has installed successfully, continue on to the next step. |
||||||||||||||||||||||||||||||||||||||||||||||||
. |
Setup Launch Panel Icons: Drag and drop the Firefox desktop icon to the launch panel on the top of the screen, next to the When finished your launch panel should look similar to the following:
|
||||||||||||||||||||||||||||||||||||||||||||||||
. |
Install OBE lab files: Copy the lab files for this OBE series to the virtual image or your own environment:
$ cd /home/oracle/labs/bin
|
Understanding the environment:
. |
This set of OBE tutorials uses the following folder locations and variables for all product and lab materials:
|
||||||||||||||||||||||||||||||||||||||||
|---|---|---|---|---|---|---|---|---|---|---|---|---|---|---|---|---|---|---|---|---|---|---|---|---|---|---|---|---|---|---|---|---|---|---|---|---|---|---|---|---|---|
. |
The following convenience aliases are available to make navigation in the OBE environment easier. Please print out a copy of the folder locations and aliases for reference while performing the labs. This will save you a lot of typing. After sourcing the new environment you can easily recall these shortcuts by executing the alias command.
|
Start Oracle Identity Directory (OID) and Oracle Database
This series of hands-on tutorials uses an Oracle database, OID, and Enterprise Manager (EM) as the underlying infrastructure. These steps start these services for you using a simple script.
. |
NOTE: If using the virtual image, the database and listener are started automatically when the image is booted. If running on your own environment start the Oracle database before running this step. And of course, if the database is not running, then start it before running this step. You can modify the $LAB_HOME/bin/startenv.sh script to match your environment to start both the database and OID. Open a terminal window using the $LAB_HOME/bin/startoid.sh Your output should look similar to the following: $ $LAB_HOME/bin/startoid.sh opmnctl startall: starting opmn and all managed processes... Processes in Instance: asinst_1 /home/oracle OID started Now that the infrastructure required for doing the OBE series is running, let's create the WebLogic domain you will use to work with OPSS.
|
|---|
Create OPSS-Based WebLogic Domain
This section shows you how to create an OPSS-enabled WebLogic Server domain. This domain is used to perform the practices in this series of OBE tutorials. Follow the instructions below to create your domain.
. |
Within the same terminal window, execute the following command to start the WebLogic Configuration Wizard that is OPSS-aware: $MW_HOME/Oracle_IDM1/common/bin/config.sh The WebLogic Configuration Wizard Splash screen appears:
The WebLogic Configuration Wizard Welcome screen is displayed. Leave the default "Create a new WebLogic domain" selection and click Next.
|
|---|---|
. |
On the Select Domain Source screen, select Oracle Enterprise Manager - 11.1.1.0 [oracle_common] and Oracle JRF - 11.1.1.0 [oracle_common] and click Next. This component contains the OPSS framework and sets the domain to be OPSS-enabled:
|
. |
On the Select Domain Name and Location screen, leave the Domain location and Application Location as their default values, enter myxmldomain as the Domain name, and click Next. This specifies that your OPSS-enabled WebLogic domain is created at /u01/app/oracle/Middleware/user_projects/domains/myxmldomain:
|
. |
On the Configure Administrator User Name and Password screen, leave default user name of weblogic, enter welcome1 for the password and password confirmation fields, and click Next:
|
. |
On the Configure Server Start Mode and JDK screen, leave the default settings of Development Mode for the startup mode, Sun SDK 1.6.0, and click Next:
|
. |
On the Select Optional Configuration screen, leave all check boxes unchecked by default, and click Next:
|
. |
On the Configuration Summary screen, feel free to look over your domain settings. When ready click Create to initiate the creation of your domain using the WebLogic Configuration Wizard:
|
. |
On the Creating Domain screen, wait and watch the progress of your domain's configuration. When the progress bar reads 100% click Done to close the Configuration Wizard and complete the domain creation process. You should now how a new OPSS-enabled domain ready to use for the OPSS OBE tutorial series:
Now that you have created an OPSS-enabled domain, let's start the domain and get it configured to work with this series of OBE tutorials.
|

Start OPSS-Based WebLogic Domain
Now that you have created an OPSS-enabled WebLogic domain, you need to test it out to make sure that it works as expected. Follow the instructions below to start your domain, and check to see that it is OPSS-enabled.
. |
NOTE: Before continuing, execute the following command to shut down the servers running in the IDMDomain that were started as part of the IdM product installation and configuration. Within a terminal window: cd $LAB_HOME/bin You should see messages stating that two WebLogic Server instances were shut down. Next, execute the following commands to start the AdminServer in the myxmldomain: cd $DOMAINS/myxmldomain Your output should look similar to the following: $ ./startWebLogic.sh Note that this domain has not yet configured an authentication provider for OID so all authentication is using the embedded LDAP server within WebLogic by default. Also note that you can ignore any errors shown in your console as long as your server is in a RUNNING state.
|
|---|---|
. |
Validate that the Administration Console and Enterprise Manager Consoles are working. Open Firefox and browse to each of the URLs below. Login to each console using weblogic/welcome1 as the login credentials:
|
Explore OID LDAP Identities
This section shows you how to connect to the OID LDAP server and browse its contents. Follow the instructions below to connect to your LDAP server.
. |
Open JXplorer: Open the JXplorer LDAP browser tool using the
|
||||||||||||||||
|---|---|---|---|---|---|---|---|---|---|---|---|---|---|---|---|---|---|
. |
Click the connect icon in JXplorer to enter the information needed to connect to your running OID instance.
|
||||||||||||||||
. |
Enter the following information into the Open LDAP/DSML Connection window, and click OK to login to OID:
Note that if you are using the accompanying virtual image for this course that these values are already filled out for you except for the password.
|
||||||||||||||||
. |
Execute the following commands in the terminal window to set up the LDAP environment: cd $LAB_HOME/bin Your output should be similar to the following: [oracle@localhost bin]$ ./setup.sh add cn: add cn: add cn: Expand the com.oracle.us nodes in the left-hand navigation pane until you see Groups and Users. Refresh the view if needed.
|
||||||||||||||||
. |
Take a few moments and explore the LDAP Groups and Users entries to see what is configured:
These users and groups will be used in other OBE tutorials of this series. This is not a course on OID or LDAP so we do not cover configuring users and groups in the identity store.
|
Summary
You have now set up your environment so you are ready to continue with the other OBE tutorials included in this series. This tutorial is a dependency for all of the other OBE tutorials in this series. Now you should complete Configuring an OID Authentication Provider in WebLogic because some of the other OPSS OBE tutorials in this series depend on it to work.
In this tutorial, you have learned:
- An overview of each of the OBE tutorials included in the OPSS concepts series
- How to start the services needed for this OBE series, including the Oracle database, OID identity store, and EMAgent for FMW Control
- How to create and start an OPSS-enabled WebLogic Server domain
- How to browse the OID LDAP identity store using JXplorer
Resources
- Oracle Platform Security Services (OPSS) 11gR1 Self-Study Series
- Oracle FMW Application Security Guide
- To learn more about Oracle FMW products, refer to additional OBEs in the OLL Web site
Credits
- Lead Curriculum Developer: Mark Lindros
- Other Contributors: Srikant Tirumalai, Shankar Raman, Sachin Kapur, Robert La Vallie, Linda Ross, William Cai, Michael Khalandovsky, Andre Neto, Ganesh Kirti, Jason Haley, Akila Natarajan, Steve Jackal, Sophia Maler, Anand Vaidyanathan, Ganesh Kirti, Diganta Choudhury
![]()
|
|
Copyright © 2012, Oracle and/or its affiliates. All rights reserved |