Achieving Pixel-Perfect Page Design with HTML Templates
In this tutorial, you learn how to use HTML Templates to brand your Portal sites and build a richer Web presence.
Approximately 1 hour
This tutorial covers the following topics:
![]() Place
the cursor over this icon to load and view all the screenshots for this tutorial.
(Caution: Because this action loads all screenshots simultaneously, response
time may be slow depending on your Internet connection.)
Place
the cursor over this icon to load and view all the screenshots for this tutorial.
(Caution: Because this action loads all screenshots simultaneously, response
time may be slow depending on your Internet connection.)
A template is a tool for enforcing a standard layout and look and feel across multiple pages or within content regions.
In Oracle Portal you can create two types of templates: Portal Templates and HTML Templates.
Portal Templates are templates that you build declaratively by stepping through a template-building wizard. You can use Portal Template to enforce specific layouts, colors, fonts, and backgrounds.
HTML Templates provide greater flexibility to page designers who want to use HTML to design the appearance of their portal pages. You can use an HTML template for decorating pages and page portlets, for wrapping pages and page portlets in HTML or any other standard Web mark-up language, and for laying out and formatting item links in combination with their item attributes. You can build HTML Templates to wrap around page content or to format region content. You can place any valid HTML code in an HTML Template, including JavaScript and Macromedia Flash. You can also use Oracle Portal substitution tags in the template to indicate where Oracle Portal content should be placed on the page.
There are two types of HTML Templates:
| HTML Content Layouts | Content layouts define the appearance of all items in a specific region. When you apply an HTML Content Layout to an item or portlet region, the content layout is applied to each item or portlet in the region. HTML Content Layout templates enable you to define the layout and style for the attributes available for the item or portlet region.
|
| HTML Page Skins | Page skins define the appearance of a page (that is, the area surrounding the page's content). An HTML Page Skin can be applied to a portal page to standardize the look and feel of portal pages. You can use page skins to affect the surroundings of the content on the page, such as a banner, company logo, page title, a title background, navigation links, background colors, images, or header and footer to a Web page. You cannot, however, use a page skin to determine the layout of the content. |
Tip: You can apply only one page-level template to a page, but you may wish to apply both a Portal Template (to determine the layout of the regions on the page) and an HTML Page Skin (to add decoration to the area surrounding the page content). The solution is to apply the page skin to the Portal Template first; then apply the Portal Template to the page.
In this tutorial, you create and apply both types of HTML templates. The screenshot below shows the result of applying the HTML Page Skin and one of the HTML Content Layouts that you will create in this tutorial:

Before starting this tutorial, you should:
| |
Have access to or have installed Oracle Portal 10.1.4.
|
|||||||||||||||
| |
Have an Oracle Portal user name and password with appropriate access to manage templates and to create pages and items.
|
|||||||||||||||
| |
Have access to an Internet browser such as Mozilla Firefox or Microsoft Internet Explorer (IE).
|
|||||||||||||||
| |
Have downloaded portalOBE.zip and unzipped it into your working directory (referred to as <portal_unzip> in this tutorial). Note: If you have completed Establishing a Consistent Presentation Using Item Placeholders OBE tutorial, you will already have met this prerequisite. Tip: For the purposes of this tutorial, you copy the images used for the HTML page skin to your local machine. We took this approach because you may not have direct access to the files of your application server installation. Normally, however, you would upload the referenced images to the middle tier of your application server to make them visible to all users of your portal. To upload and reference images in Oracle Portal, perform the following steps:
|
In this section, you log in and create a new page group, which you will use to build the your portal.
Page groups are, literally, groups of pages. A page group is the structure that Oracle Portal uses to group related portal objects such as pages, page templates, styles, navigation pages, categories, perspectives, and more. The page group typically contains a collection of pages for organizing content.
To create the page group that you will use to build your portal, perform the following steps:
| 1. | Open a browser window and enter the appropriate URL for accessing Portal Builder; for example, for a default installation, the URL is: http://<hostname>:7778/pls/portal.
|
| 2. | Click the Login link in the Login portlet.
|
| 3. | Enter your user name and password and click Login.
Note: If you do not know your username or password, contact your portal administrator.
|
| 4. | From the Oracle Portal home page, click the Build tab.
|
| 5. | Click the Create Page Group link in the Page Groups portlet.
|
| 6. | In the Display Name field, enter <Your
Name> HTML Layouts, where <Your Name> is your name. Ensure that the default language is English.
|
| 7. | Click Create.
When you create a page group, a root page is automatically created for you with the same name as the page group itself. Every page that you create within this page group is a sub-page of the root page. After you create the page group, your root page automatically displays in Edit mode.
|
| 8. | On the top region, which contains your
navigation banner, click
|
| 9. | When prompted, click Delete Content.
Your portal page is created, as shown below. The page contains an undefined region by default.
|
Before you can experiment with various layouts, you need some content in your portal. In this section, you add three text items.
To add content to your new portal, perform the following steps:
| 1. | Click
|
||||||||||||
| 2. | Select Text from the
Content Item Types list. Click Next.
|
||||||||||||
| 3. | Enter the Text item's attributes, as shown below:
Tip: You can copy the text above and paste it in the appropriate fields. For optimal appearance, you can change the font preferences and font size as follows:
|
||||||||||||
| 4. | Click Finish.
The text item is displayed in your portal page.
|
||||||||||||
| 5. | Click
|
||||||||||||
| 6. | Select Text from the
Content Item Types list. Click Next.
|
||||||||||||
| 7. | Enter the Text item's attributes:
Tip: You can copy the text above and paste it in the appropriate fields. For optimal appearance, you can change the font preferences and font size as follows:
|
||||||||||||
| 8. | Click Finish.
|
||||||||||||
| 9. | Click
|
||||||||||||
| 10. | Select Text from the
Content Item Types list. Click Next.
|
||||||||||||
| 11. | Enter the Text item's attributes:
Tip: You can copy the text above and paste it in the appropriate fields. For optimal appearance, you can change the font preferences and font size as follows:
|
||||||||||||
| 12. | Click Finish. The text item is added to your portal.
|
You use HTML Content Layouts to define a formatting scheme for the content of an item or portlet region. In your HTML, you can define tables, font designs, colors, and any other encoding or object type that you can place in any other HTML Template. You can call a cascading style sheet (CSS) to apply a standard format that you use in other forms of company documentation.
To create your HTML Content Layout, use the Oracle Portal wizard or any third-party HTML editor. You can use HTML substitution tags to introduce portal elements, such as display names, descriptions, categories, and perspectives, into your content layout.
Note: You can apply only one content layout to a given region.
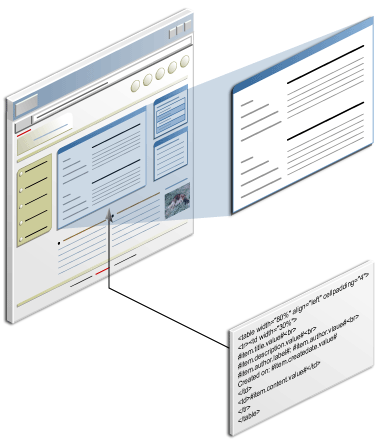
The graphic below indicates one possible layout that you can achieve with an HTML Content Layout:
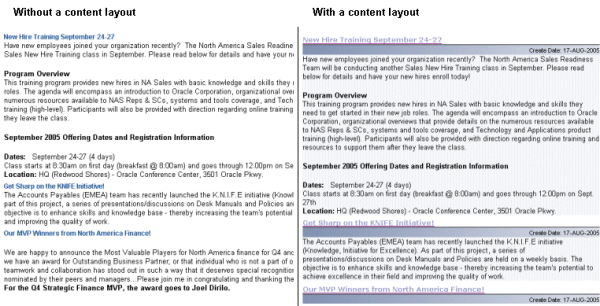
The screenshot below contrasts items displayed with no content layout and with the Blue Rows content layout, which you define at the end of this section.
In this section, you create three content layouts from predefined HTML.
| Create the Expandable Items Content Layout | |
| Create theScrollable Items Content Layout | |
| Create the Blue Rows Content Layout |
Create the Expandable Items Content Layout
The Expandable Items content layout allows you to expand and collapse the text for an item by clicking the item's title.
To create the Expandable Items content layout, perform the following steps:
| 1. | Click the Builder link.
|
|
| 2. | On the Build tab, select <Your
Name> HTML Layouts from the Work In list.
|
|
| 3. | In the Layout & Appearance section,
find HTML Templates and click the Create
link.
|
|
| 4. | Select HTML Content Layout from the Template Type list and enter expandable items as the template name.
|
|
| 5. | Delete the contents of the Template Definition field.
|
|
| 6. | Copy the HTML code below and paste it
in the Template Definition field. Optionally, you can click the Preview
button to preview your HTML Content Layout template. Tip: You can use [Ctrl] + [C] to copy and [Ctrl] + [V] to paste.
Note: In this example, EXPANDABLE ITEMS calls a JavaScript function from the HTML. For the purposes of this tutorial, the JavaScript function is also defined in the HTML Content Layout. Notice the substitution tags (for example, #ITEM.ID#) in EXPANDABLE ITEMS. Each tag represents an item attribute.
|
|
| 7. | Click the tags as substitution variables link in the Template Definition field to view a list of substitution tags you can use to add portal content and other portal elements, such as Edit and Help links, to your HTML Template.
Note: The tag lists are context sensitive, displaying only the tags that are allowed for this particular template type. You can see the list of tags that can be used in the HTML as substitution variables in a pop-up window.
|
|
| 8. | Click Create. Note: You can edit your HTML Templates by using a third-party application, such as Dreamweaver.
|
Create the Scrollable Items Content Layout
The Scrollable Items content layout automatically provides scrolling for long text items.
To create the Scrollable Items content layout, perform the following steps:
| 1. | When the message "Click EXPANDABLE ITEMS to edit the template" appears at the top of the page, you can create the next HTML Content Layout. With HTML Content Layout selected, enter scrollable items in the Template Name field.
|
|
| 2. | Delete the existing contents in the Template Definition field. Copy the HTML code below and paste it in the Template Definition field. Tip: You can use [Ctrl] + [C] to copy and [Ctrl] + [V] to paste.
Note: SCROLLABLE ITEMS uses the HTML <DIV> tag to specify a height and automatically invoke scrolling if the content is larger than 100 pixels.
|
|
| 3. | Click Create.
Click here to view the table that lists and describes the substitution tags available for use in HTML Content Layout templates.
|
Create the Blue Rows Content Layout
The Blue Rows content layout includes two images and some text that you need to replace with Oracle Portal substitution tags.
To create the Blue Rows content layout, perform the following steps:
| 1. | When the message "Click SCROLLABLE ITEMS to edit the template" appears at the top of the page, you can create the next HTML Content Layout.
Select HTML Content Layout from the Template Type list and enter blue rows as the template name.
|
|||||
| 2. | Delete the contents of the Template Definition.
|
|||||
| 3. |
|
|||||
| 4. | Click Create.
|
|||||
| 5. | When the name of the new HTML Content Layout appears at the top of the page, click Close.
|
In this section, you apply the HTML Content Layouts, one at a time, to the item region on your portal page. In each case, you view the page to see the results.
To apply content layouts to your region, perform the following steps:
| 1. | In the Layout & Appearance section of the Page Groups portlet, click <Your Name> HTML Layouts root page.
|
| 2. | Click
|
| 3. | Click the Attributes tab.
|
| 4. | Click Use HTML Content Layout and select EXPANDABLE ITEMS from the HTML Content Layout list. Optionally, you can click the Preview button to view your selection.
|
| 5. | Click OK. Only the item titles are now displayed in the region.
|
| 6. | Click each of the item titles. Notice
that the item expands to reveal the content. Click again to collapse the
item content.
|
| 7. | Click
|
| 8. | Click the Attributes tab.
|
| 9. | Click Use HTML Content Layout and select SCROLLABLE ITEMS from the HTML Content Layout list. Click OK.
|
| 10. | Click View Page to see the end user's view of the page.
|
| 11. | Notice that the items are now displayed in full, with the longer text items displayed in a scrollable fashion.
|
| 12. | Click the Back button in your browser's navigation tool bar to return to edit mode.
|
| 13. | Click
|
| 14. | Click the Attributes tab.
|
| 15. | Click Use HTML Content Layout and select BLUE ROWS from the HTML Content Layout list. Click OK
|
| 16. | Click View Page. Notice how the new HTML Content Layout has changed the appearance of your item region.
Note: Because of variations in the HTML code, your page will look similar but not identical to the example.
|
| 17. | Click the Back button in your browser's navigation tool bar to return to edit mode.
|
An HTML Page Skin is a template that defines the appearance of the area surrounding page content. Page skins use page-level substitution tags to stand in for standard page elements, such as the page title, the currently logged-in user, seeded site links, and so on. Substitution tags generate the HTML needed to render information stored in the Portal Repository. You can use HTML tables to make the page skin display content on all four sides of the page. You can add images, text, HTML formatting, JavaScript, and any other typical mark up or object type you could place on any other Web page. To introduce PL/SQL elements such as conditional statements into your template, use <oracle></oracle> tags.
You create your HTML Page Skin using the Oracle Portal wizard or any HTML editor.
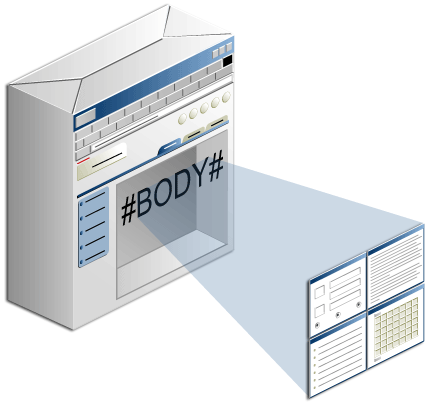
As the graphic below indicates, an HTML Page Skin template is a wrapper of HTML around the body of a page. The #BODY# substitution tag defines the location of the body area, where portal content (regions, tabs, items, and portlets) will be displayed.
As you can see in this preview of the page skin that you create in this section, a page skin can wrap around your portal page on all four sides—the white space around Page Content is part of the page skin.
| Create a Simple Page Skin | |
| Apply the Page Skin to a Page |
To create a simple page skin, perform the following steps:
| 1. | In Oracle Portal, click the Builder link.
|
|||||
| 2. | With <Your Name> HTML Layouts
selected in the Work In list of values, find HTML Templates and click
Create.
|
|||||
| 3. | With HTML Page Skin
selected as the Template Type, enter bluesky
pageskin as the template name.
|
|||||
| 4. | Delete the existing code block in the
Template Definition field.
|
|||||
| 5. |
Note: You can click the tags as substitution variables link in the Template Definition field to view a list of substitution tags you can use to add portal content to your HTML Template. Click here to view the table that lists and describes the substitution tags available for use in HTML Page Skin templates. You use the HTML Page Skin substitution tags to stand in for values present in Oracle Portal. These tags take their values from settings in the wizard that was used to build the portal page and from other Oracle Portal settings.
|
|||||
| 6. | Click Preview to preview the template that you have created.
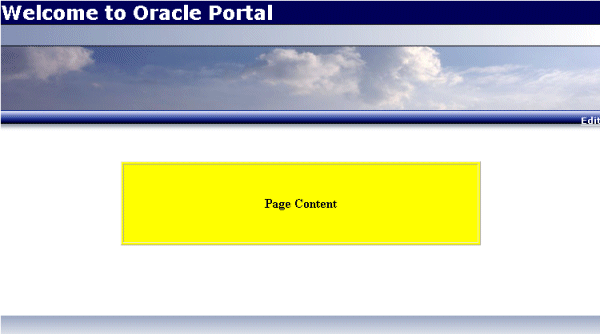
Notice the yellow box, which is the graphical representation of the #BODY# tag defined in the page skin. When you apply the HTML Page Skin to your portal page, the page content will be rendered in the location indicated by the yellow box.
|
|||||
| 7. | Click Create.
|
|||||
| 8. | When the name of your template appears at the top of the page, you know that the page skin has been successfully created. Click Close.
|
| 1. | In the Layout & Appearance section of the Page Groups portlet, click <Your Name> HTML Layouts root page.
|
| 2. | Click the Properties link for the page.
|
| 3. | Click the Template tab.
|
| 4. | Click Use HTML Page Skin and choose BLUESKY PAGESKIN.
Click OK.
|
| 5. | Click View Page.
|
| 6. | Notice how the content layout you defined earlier works together with the BLUESKY PAGESKIN page skin.
To return to edit mode, click your browser's Back button.
|
If you apply a page skin to a page, the page skin also displays when the page is exposed as a portlet. The template wraps around the portlet.
Note: You could also use an HTML Content Layout template to achieve a similar effect.
| 1. | Click the Properties link to edit the page properties.
|
| 2. | Click the Optional tab.
|
| 3. | Select the Publish As Portlet checkbox.
|
| 4. | Deselect the Use Style Of Page On Which Portlet Is Placed check box. Enter My HTML Page Skin Portlet in the Portlet Display Name field. Click OK.
|
5. |
Click the Sub-Pages link.
|
| 6. | Enter HTML Page Skin Portlet Container in the Display Name field. Click Finish.
|
| 7. | Click Properties to view the properties of the HTML Page Skin Portlet Container page.
|
| 8. | Click the Template tab.
|
| 9. | Notice that the page is created based on the BLUESKY PAGESKIN template, which you created earlier and applied to the My Portal Content Page portal page. Select Do not use a template. The click OK.
|
| 10. | Click the Delete icon on the banner region.
When prompted to proceed, click Delete Content.
|
| 11. | Click the Add
Portlet
|
| 12. | Click the Published Portal Content link.
|
| 13. | Click the My HTML Page Skin Portlet link in the <Your Name> HTML Layouts group. Move it to the Selected Portlets section. Click OK.
|
| 14. | Click the View Page link.
You can see that the page contains the My HTML Page Skin Portlet page portlet and the portlet renders the page content with the HTML Page Skin template.
|
Congratulations! You have created three HTML Content Layouts, which you applied to an item region in your portal. You also created an HTML Page Skin, which dramatically changed the appearance of your portal page. Finally, you published your root page as a portlet and saw that the page skin also displayed when the portlet was added to a page.
To learn about using page skins with Portal Templates for items, see the Establishing a Consistent Presentation Using Item Placeholders OBE tutorial. |
|
| To learn more about Oracle Portal 10.1.4, read the OracleAS Portal 10.1.4 New Features white paper. | |
| To learn more about Oracle Portal, visit the Oracle Portal Center. |
 Place the cursor over this icon to
hide all screenshots.
Place the cursor over this icon to
hide all screenshots.
Oracle and the Oracle logo are trademarks or registered trademarks of Oracle Corporation in the United States and other countries. All other names are trademarks and/or registered trademarks of their respective owners.
| Oracle Corporation World Headquarters 500 Oracle Parkway Redwood Shores, CA 94065, USA http://www.oracle.com/ |
Worldwide Inquiries: 1-800-ORACLE1 Fax 650.506.7200 |
Copyright and Corporate Info |
