Installing and Configuring Oracle Web Tier
Purpose
This tutorial describes and shows you how to install and configure the Oracle Web Tier Instance.
Time to Complete
Approximately 30 minutes.
Overview
Oracle Web Tier contains two main components: Oracle HTTP Server and Oracle Web Cache. Oracle Process Manager and Notification Server (OPMN) is also installed by default. Together, these products are responsible for managing incoming HTTP requests, caching web messages, and sending XML and HTML back to the client.
- Oracle HTTP Server: Oracle HTTP Server provides a listener for Oracle WebLogic Server and the framework for hosting static pages, dynamic pages, and applications over the Web. It is based on Apache 2.2.10 infrastructure, and includes modules developed specifically by Oracle. The features of single sign-on, clustered deployment, and high availability enhance the operation of the Oracle HTTP Server.
- Oracle Web Cache: Oracle Web Cache is a content-aware server accelerator, or reverse proxy, for the Web tier that improves the performance, scalability, and availability of Web sites that run on Oracle HTTP Server. Oracle Web Cache is the primary caching mechanism provided with Oracle Fusion Middleware. Caching improves the performance, scalability, and availability of Web sites that run on Oracle WebLogic Server by storing frequently accessed URLs in memory.
- Oracle Process Manager and Notification Server (OPMN): OPMN provides a command-line interface for you to monitor and manage Oracle Fusion Middleware components and sub-components. The OPMN server should be started as soon as possible after turning on the computer. OPMN must be running whenever OPMN-managed components are turned on or off.
The Oracle Web Tier installation gives you the option of installing Oracle HTTP Server and Oracle Web Cache. Oracle Process Manager and Notification Server is automatically installed and you do not have the option to de-select this product.
Software Requirements
The following is a list of software requirements:
| Item | Specification |
| Processor Type | Intel Xeon or Pentium IV |
| Processor Speed | 2.4 GHz or higher |
| Number of Processors | 1 or more (if required) |
| Memory | 2 GB |
| Hard Disk Space | 20 GB (initial size) |
| Operating System | RedHat Enterprise Linux 4 Update 5 |
Prerequisites
Before starting this tutorial, you should:
|
. |
Have an instance of Oracle WebLogic Server 10.3 |
|---|---|
|
. |
Have configured a domain |
Installing Oracle Web Tier
To install Oracle Web Tier Utilities suite of products, perform the following steps:
|
. |
Open a new terminal and navigate to the staged location for the Linux installable. Run the following command: $ cd /stage $./runInstaller Click Next in the Welcome screen.
|
|---|---|
|
. |
Select Install Software - Do Not Configure and click Next to install the product binaries in an Oracle Home directory. You must manually run the Configuration Tool from your Web_Tier_Oracle_Home/bin directory to configure your products before you can use them. After this is complete, you should be able to begin managing your products using the Administration Console or Enterprise Manager.
|
|
. |
The Prerequisite Checks screen appears. This screen verifies prerequisite requirements based on the options selected in the previous screen. Click Next in the Prerequisite Checks screen.
|
|
. |
The Specify Installation Location screen appears. Enter the path to the Oracle home directory (/u01/app/oracle/product/fmw/11.1.1.1/as_4) where you want to install the products and click Next. All software binaries will reside in this directory, and no runtime process can write to this directory.
|
|
. |
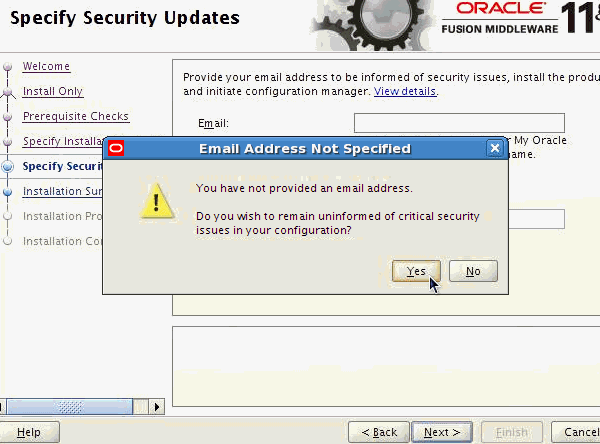
In the Specify Security Updates screen, deselect "I wish to receive security updates via My Oracle Support" and click Next to continue. Click Yes to confirm.
|
|
. |
In the Installation Summary screen, verify the information and click Install to begin the installation.
|
|
. |
This screen shows the progress of installation.
|
|
. |
This screen summarizes the installation that was just completed. Click Finish to complete the installation and exit the installer.
|
|
. |
Next, navigate to the Web_Tier_Oracle_Home/bin directory and run the configuration tool to configure your products. $cd /u01/app/oracle/product/fmw/11.1.1.1/as_4/bin $./config.sh
|


|
. |
The Welcome screen is displayed each time you start the installer. Before you associate your Web Tier installation with a WebLogic Server, make sure that your WebLogic Server is up and running. Click Next in the Welcome screen to continue with the Web Tier configuration.
|
|---|---|
|
. |
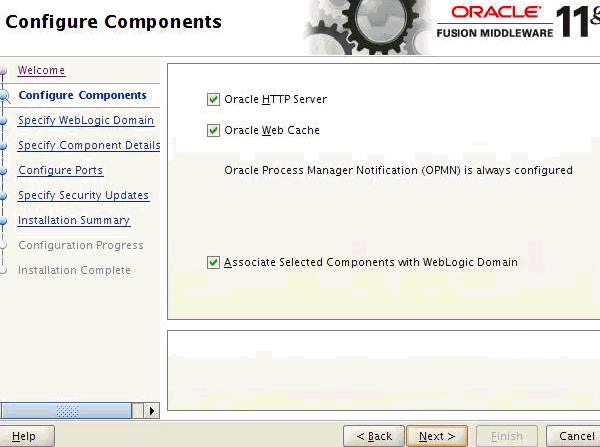
The Configure Components screen shows the products and components that are available for installation and configuration. Oracle Process Manager Notification (OPMN) is configured by default. Select "Associate Selected Components with WebLogic Domain" to make these components available for use by your applications in an existing WebLogic domain. This enables you to manage these components using Enterprise Manager (EM).
|
|
. |
Specify WebLogic Domain screen appears if you selected Associate Selected Components with WebLogic Domain in the Configure Components screen. Enter the credentials for your existing WebLogic Server domain and click Next. For example:
|


|
. |
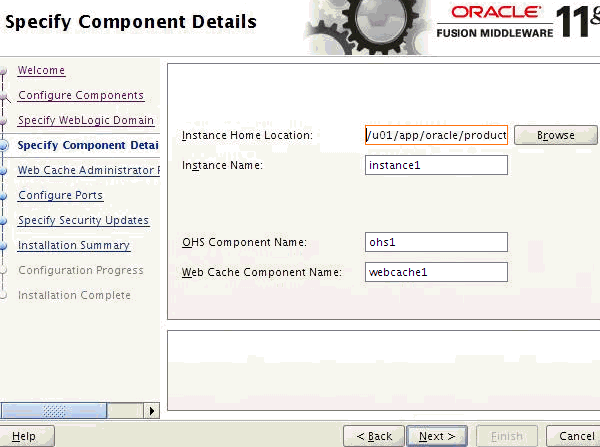
Verify the Oracle Instance location and names for your components and click Next to continue. Instance Home Location refers to the directory where your Oracle Instance will reside. Application configuration files reside in this directory and the application process runs from this directory. Runtime components write only to this location. Instance Name refers to the unique name of your Oracle Instance. OHS Component Name refers to the name of your Oracle HTTP Server (OHS) component. WebCache Component Name refers to the unique name of your WebCache component.
|
|---|
|
. |
The Web Cache Administrator Password screen appears if you selected Oracle Web Cache in the Configure Components screen. Enter the password for your Oracle Web Cache administrator and click Next to continue.
|
|---|

|
. |
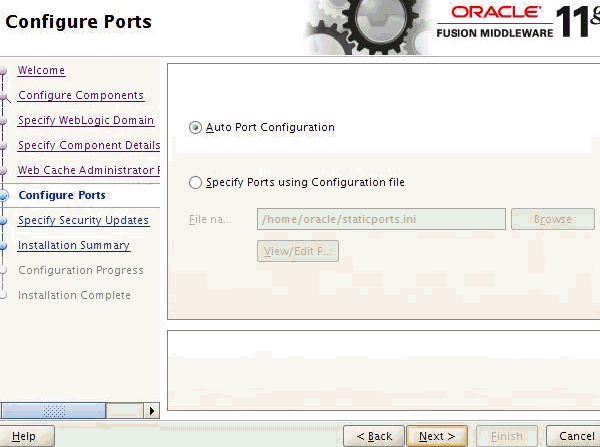
Select Auto Port Configuration if you want the installer to automatically assign the default ports to the components and click Next.
|
|---|
|
. |
In the Specify Security Updates screen, deselect "I wish to receive security updates via My Oracle Support" and click Next to continue. Click Yes to confirm.
|
|---|

|
. |
In the Installation Summary screen, verify the information and click Configure to begin the installation.
|
|---|

|
. |
This screen shows the progress of the component configuration.
|
|---|---|
|
. |
This screen summarizes the installation that was just completed. Click Finish to complete the installation and exit the installer..
|


Summary
In this tutorial, you have learned how to:
- Verify the prerequisites
- Install Oracle Web tier
- Configure Oracle Web Tier
Resources
- Oracle Fusion Middleware Installation Guide for Oracle Web Tier 11g Release 1 (11.1.1)
- Configuring and Managing Oracle Web Cache eStudy
- To learn more about
, refer to additional OBEs on the OTN Web site (can link to a specific set of OBEs on the subject)
![]()