WebCenter Content (WCC) 11g Installation: Part 2 - Installating Oracle WebLogic Server (WLS)
Overview
- Oracle Database (DB)
- Java
- WebLogic Server 11g (WLS)
- Repository Creation Utility (RCU)
- WebCenter Content (WCC)
- Optionally JRockit - JRockit Mission Control (JRMC) - this should include the JRockit JVM as well. In this demo the JVM already installed on the server is the Sun JVM. See the Oracle website http://www.oracle.com/technetwork/middleware/webcenter/content/overview/index.html or just manually go to http://www.oracle.com and look for the Oracle Technology Network.
- Oracle WebLogic Server (WLS) to host the WebCenter Content application
- WebCenter Content (but the Database needs to be prepared with Repository Creation Utility first, which is demonstrated in Part 1 of this tutorial)
- JRockit Java Virtual Machine (JVM) if the default Sun JVM packed with WebLogic Server is not desired. Note: Both JVMs will eventually be combined into one to take advantages of the best of both.
- Step 1. Repository Creation Utility executed to configure the Database for the WebCenter Content installation.
- Step 1. WebLogic Server installation to host WebCenter Content.
- Step 2. Installing WebCenter Content.
- Step 2.a. Installing JRockit if desired with the WebLogic Server install.
- Step 3. Deploying WebCenter Content to the running application server.
- Launch the Graphical Weblogic Server installer
- Install WebLogic Server
- Oracle Database (DB) and Java have been downloaded
- Repository Creation Utility and WebCenter Content have been downloaded.
- Database (DB) has been prepared with Repository Creation Utility (OBE Part 1 - Configuring the Database with Repository Creation Utility (RCU))
- You have a basic understanding of the following technologies: Database, Java
Oracle WebCenter Content (WCC) 11g Installation Overview
Software to be pre-installed:
Software to be downloaded:
Software to be installed:
Order of Operations:
- Step 1 is assigned to the Repository Creation Utility configuration and the WebLogic Server installation because they are not related to each other and can be done in either order.
But both need to be done before installing WebCenter Content.
Purpose of this Tutorial
This tutorial covers how to install Oracle WebCenter Content (WCC) Part 2. The demonstration installation of WebCenter Content is split into multiple OBE´s. The intended flow of the OBE´s is as follows:
- Part 1. Configuring the Database with Repository Creation Utility
- Part 2. WebLogic Server installation (demonstrated in this OBE)
- Part 3. WebCenter Content installation and deployment
Time to Complete
Approximately 30 minutes
Introduction
The following demo is configured in a Linux environment. Command shortcuts and program mappings may be different than yours. Contact your local administrator to assist you, if the commands in this demo do not work for you.
Start with the Installation Documentation. Keep it open while installing for reference. Keep the documentation handy while installing. Downloads can be found in multiple places and the Readme file gives you some direction.
Scenario
Now that you have your other required parts installed and configured by completing Part 1 (Configuring the Database with Repository Creation Utility (RCU)), you move on to installing and deploying WebLogic Server to host WebCenter Content.
To run graphical installers, the system (in this case Oracle Linux) needs to have a JVM/JRE to execute. In this OBE you will use graphical installers. There are command line (non-graphical) installation options which can be found in the documentation.
Installation Options
You have a choice between graphical installers and command-line installation.
This demo uses graphical installers.
In order to run graphical installers, the system (in this case Oracle Linux) needs to have a JVM/JRE to execute.
The documentation and downloads can be accessed many ways including:
- 1. Download of full documentation libraries and installers from https://edelivery.oracle.com/.
- 2. Oracle Technology Network: http://www.oracle.com/technetwork/index.html.
- 3. Specific WebCenter Content location: http://www.oracle.com/technetwork/middleware/webcenter/content/overview/index.html.
- 4. Oracle WebLogic Server: http://www.oracle.com/technetwork/middleware/weblogic/overview/index.html.
Minimize but do not close your documentation pages.

The installer file is found in this training environment inside the apps/softwareInstall/wls directory.
In this tutorial you will install Oracle WebLogic Server 11g. The steps described here are specific for hosting WebCenter Content.
For a more complete guide on how to install WebLogic Server refer to the documentation or read the OBE, which has been created specifically for WebLogic Server administrators.
You will perform the following:
Prerequisites
This tutorial is written specifically to be used in your product environment. The following demo is configured in a Linux environment. Command shortcuts and program mappings may be different than yours. Contact your local administrator for help if the commands in this demo do not work for you.
The following prerequisites are assumed:
Launching the WebLogic Server 11g Graphical Installer
Before installing WebCenter Content, as mentioned in the documentation, you need a preconfigured DB and you need an installation of WebLogic Server. This OBE is focused on installing WebLogic Server.
Navigate to the apps/softwareInstall/wls folder to execute the installer.
Using the command window (terminal session) navigate to the location of the WLS installation media. The installer is the Java-based installer that is generic to the Operating System and therefore can be used in 64 bit Windows as well as Linux.
Use the "change directory" command (cd) to navigate to the apps/softwareInstall/wls directory.
Type cd / and hit Enter. This takes you to the root directory.
Type cd /apps and hit Enter.
Type cd /softwareInstall and hit Enter.
Type cd wls and hit Enter.

Type ls here and hit Enter.
You should see the wls1036_generic.jar file. The file name is based on the version of the software.
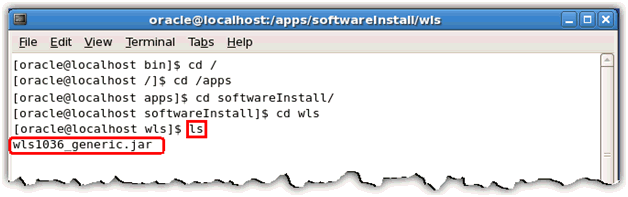
Type java -jar <name of installer file>.jar here and hit Enter.

The installer will extract and execute. This may take some time.

The graphical "Oracle Installer - WebLogic 10.3.6.0" opens.
Installing WebLogic Server 11g
In this topic, you install WebLogic Server.
The entry screen in the Installer is the "Choose Middleware Home Directory" screen. In this OBE, you will mostly use default information and locations. Generally, you do not have to use the defaults. You can use the "Browse..." button and select any desired location for the Middleware Home directory.
Click Next once the home directory is specified.

The next few options and screens deal with automatic update notices which are quite useful to ensure to keep an install up to date, however for the purposes of this informational OBE you will skip this notification and update system. Depending on company requirements it is probably best to fill these out for the best possible update schedules.
Configuration Manager is an application to help gather data about a system for use by Oracle Support. Gathering logs and potential errors is faster and easier with Configuration Manager.
On the "Register for Security Updates" window click Yes in the "Are you sure?" popup to bypass installing Configuration Manager and logging your email for updates since this is simply a training VM. This is most likely not the case for a production installation.

Still on the "Register for Security Updates" window select the check box next to "I wish to receive security updates via My Oracle Support", if no updates are being done. Otherwise fill out the Email field with the registered email used in My Oracle Support for this account.

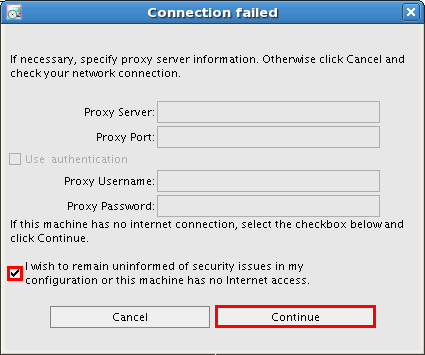
In the "Connection failed" window, select the checkbox next to "I wish to remain uninformed of security issues in my configuration or this machine has no Internet access" if no updates are desired. In the case of this OBE the VM running this training is not connected to the internet.
Click Continue.
This takes you to the "Choose Install Type" window.
There are different media packs for installing WebLogic Server. The Typical option will install WebLogic Server with Coherence. WebLogic Server is an application server, and Coherence is a package to help distribute load in complex setups. In this training installation, a custom installation is being done and Coherence is going to be deselected.
Select Custom and click Next.

This takes you to the "Choose Products and Components" screen.
Click the checkbox next to "Coherence" to deselect Coherence. Note that this would most likely only be done in a sandbox (testing/training) style installation.
Click Next.

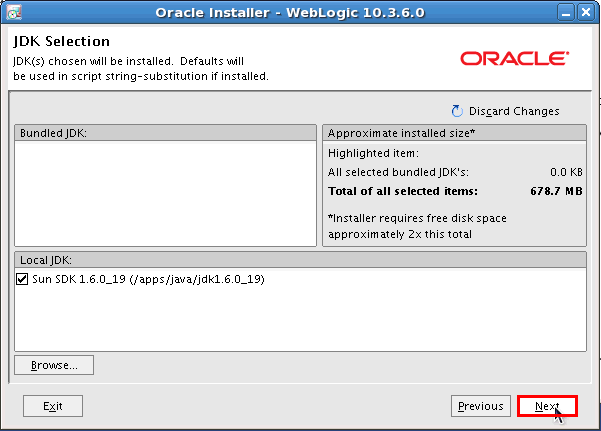
You are now in the "JDK Selection" window.
Weblogic Server can currently be installed with either the Sun Java Virtual Machine or JRockit. Though eventually both will merge to become one Java Virtual Machine with the best features of both. If running a test environment the Sun Java Virtual machine is currently suggested, and if running a production environment JRockit is suggested.
Browse to another installed Java Virtual machine if desired or as seen on the below screen use the detected local one. Some installers come with a bundled Java Virtual Machine as well.
Click Next.
In the "Choose Product Installation Directories" the installer default will create the new Middleware home directory. Again this can be changed if desired. The defaults are being used for the OBE.
Click Next unless the defaults need to be changed.

In the "Installation Summary" window click Next.

Click Next to initiate the installation.

On the "Installation Complete" window click Done.

Once installation is complete, you will see: "INFO: Created user preferences directory."

Then, a Quick Start Guide opens automatically if the check box was selected.
Note: For the WebCenter Content installation the quick start for WebLogic Server is not used. This Quick Start page is helpful for WLS administrators. For this training, you need WebLogic Server to host the WebCenter Content (WCC) installation, coming up in the next OBE.
Since you are only installing WebCenter Content and not upgrading any existing Application Server domain, this screen can be closed.

Summary
- Launch the Graphical Weblogic Server installer
- Install WebLogic Server
In this tutorial, you have learned how to:
Resources
To help navigate this Oracle by Example, note the following:
- Hiding Header Buttons:
- Click the Title to hide the buttons in the header. To show the buttons again, simply click the Title again.
- Topic List Button:
- A list of all the topics. Click one of the topics to navigate to that section.
- Expand/Collapse All Topics:
- To show/hide all the detail for all the sections. By default, all topics are collapsed
- Show/Hide All Images:
- To show/hide all the screenshots. By default, all images are displayed.
- Print:
- To print the content. The content currently displayed or hidden will be printed.
To navigate to a particular section in this tutorial, select the topic from the list.