Oracle WebLogic Server 12c: Deploying and Undeploying Applications
Overview
- Oracle Linux 5.6+
- Oracle WebLogic Server 12c (12.1.3)
- Oracle WebLogic Server 12c: Installing WebLogic Server and Creating a Domain
- Oracle WebLogic Server 12c: Configuring Managed Servers.
Purpose
This tutorial shows you how to use the Oracle WebLogic Server 12c administration console to deploy a Java Platform, Enterprise Edition (Java EE) web application.
Time to Complete
Approximately 20 minutes
Introduction
A Java web application, like any Java EE application, can be deployed to an application server as an archive file. Web application archives use the .war file extension.
This tutorial covers using the Oracle WebLogic Server 12c (12.1.3) administration console to deploy a simple Java EE web application. You learn how to start and run the application, redeploy an updated version of the application, and undeploy the application.
Hardware and Software Requirements
Prerequisites
Before starting this tutorial, you should have completed the Oracle by Example tutorials titled:
Deploying and Starting an Application
- Open a Terminal window and navigate to the domain directory. In this tutorial, the domain directory is /scratch/domains/mydomain.
- In the domain directory, enter the following command:
- At the prompt, enter the administrator username and password that you entered when you created the domain.
- Open a Terminal window and navigate to the bin directory under your domain directory. In this tutorial, the domain directory is /scratch/domains/mydomain.
- In the bin directory, enter the following command: startManagedWebLogic.sh. This command takes two arguments:
- The name of the managed server you want to start
- The URL of the administration server
- server1
- http://<ip_address>:7001
- Open a web browser and enter the URL:
http://hostname:port/console.
In this tutorial, that is http://<ip_address>:7001/console.
Note: Use your administration server machine's host name or IP address for <ip_address>. Also, if you used a different port number for the administration server, use that port instead.
- On the Welcome screen, log in by using the username and password that you entered to start the administration server.
- To the right of Current Location, click the links to browse to the location where you placed the downloaded benefits.war file. In this tutorial, the file is in the /scratch/apps directory.
- Select the benefits.war option that is displayed after you click the link and locate the benefits.war file. The console fills in the Path field for you. Alternatively, you can manually enter the path and the file name in the Path field.
- Click Next.
To deploy a Java web application and start it by using the administration console, perform the following steps:
Download the benefits.war file to the machine where your domain's administration server is located. This is a sample Java web application archive to deploy.
If the administration server of the domain is not already running, start it.
$> ./startWebLogic.sh

In this tutorial, the username is weblogic and the password is Welcome1.
Note: The password is not displayed.

If the server1 managed server is not already running, start it.
In this tutorial, those arguments are:
$> cd /scratch/domains/mydomain/bin
$> ./startManagedWebLogic server3 http://<ip_address> :7001
Note: Replace <ip_address> with the host name or IP address of your administration server.

At the prompt, enter the administrator username and password.
Note: The password is not displayed.

After both servers are up and running, access the WebLogic Server administration console.

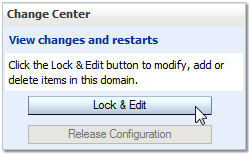
Deploying an application is a change to the domain's configuration, so you must first lock it. In the Change Center, click Lock & Edit.
Under Domain Structure, click Deployments.

On the right, above the Deployments table, click Install.

Locate the downloaded archive file.

On the next screen, ensure that Install this deployment as an application is selected, and then click Next.

On the targets screen, select server1, and then click Next.

On the next screen, keep all the default values and click Next.

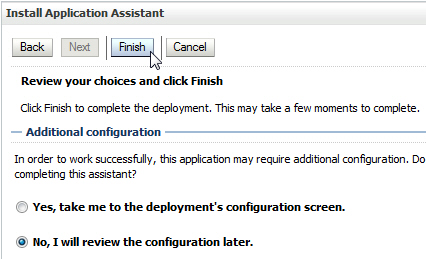
On the review screen, select No, I will review the configuration later, and then click Finish.
Messages indicate that the deployment was installed, but changes must be activated. The benefits application is listed in the Deployments table.

To activate the changes, click Activate Changes in the Change Center.

In the Deployments table, select the check box to the left of the benefits application, and then select Servicing all requests in the Start list.

Click Yes to continue.

A message indicates that a start request was sent. Momentarily, the state of the benefits application becomes "Active." This means that the application is available to those who have access to the server.

Testing the Application
To test the newly deployed web application, perform the following steps:
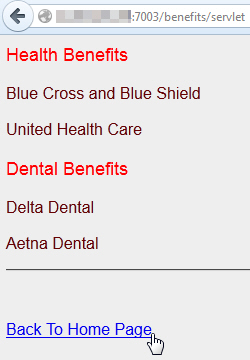
In another web browser window or tab, enter the host and port for the server1 managed server, followed by /benefits.
In this tutorial, the URL is http://<ip_address>:7003/benefits.
Note: Replace <ip_address> with the host name or IP address of the server1 machine.
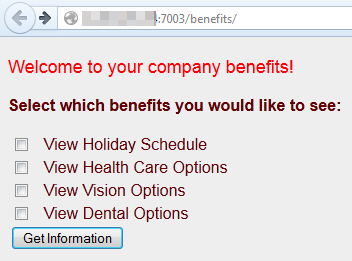
Select one or more of the benefit check boxes, and then click Get Information.
Click the Back To Home Page link.
Updating the Application
To update the deployed web application with a new version, perform the following steps:
Download an updated version of the web application, the benefits2.war file.
Delete the current benefits.war file, change the name of benefits2.war to benefits.war, and then move the new version of benefits.war to the same directory where you just deleted the old version.
Updating an application is a change to the domain's configuration, so you must first lock it. In the Change Center, click Lock & Edit.
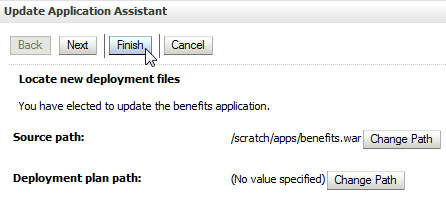
On the Deployments page in the administration console, select the check box to the left of the benefits application in the Deployments table, and then click Update.

On the next screen, click Finish.
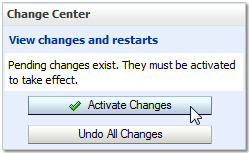
In the Change Center, click Activate Changes.
Note: After the changes are activated, the State of the benefits application is "Active." You do not have to manually start an updated application.
In another web browser window or tab, enter the host and port for the server1 managed server, followed by /benefits.
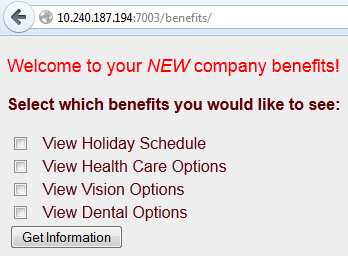
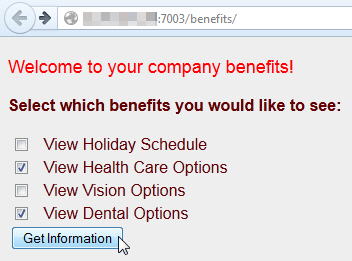
The application was updated. The title now includes the word "NEW." Also, if you select some of the check boxes and click the Get Information button, you might notice that some of the benefit providers also change. If you do not see "NEW" on the benefits home page, perhaps the web browser cached pages. In that case, click the web browser's Refresh button.
Undeploying the Application
Undeploying an application means stopping it and then removing it from the configuration of the server or servers on which it was deployed. You do not have to remove the application archive file.
To undeploy the web application, perform the following steps:
On the Deployments page of the administration console, select the check box to the left of the benefits application in the Deployments table, and then select Force Stop Now in the Stop list.

Click Yes to continue.

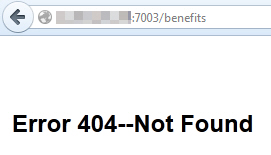
The benefits application is stopped and is no longer available. When you enter its URL in a web browser, the server returns a 404 error.
Note: The web browser may have cached pages. If the benefits application does appear, click the web browser's Refresh button.
Return to the administration console and click Lock & Edit in the Change Center.
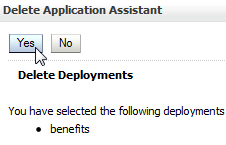
On the Deployments page, select the check box to the left of the benefits application in the Deployments table, and then click Delete.

Click Yes to continue.
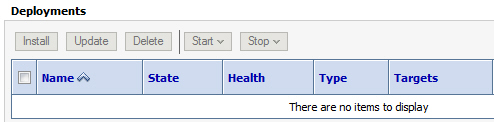
Messages indicate that the deployment was deleted, but the changes must be activated. In the Change Center, click Activate Changes.

The benefits application is no longer listed in the Deployments table.
Summary
- Deploy a Java EE web application to an instance of WebLogic Server
- Start and run a web application
- Update a web application to a new version
- Undeploy a web application
- For documentation on Oracle WebLogic Server 12c (12.1.3), visit the Oracle WebLogic Server Documentation Library.
- For more information on deployment, see the Deploying Applications to Oracle WebLogic Server document.
- To learn more about Oracle WebLogic Server, refer to additional OBEs in the Oracle Learning Library.
- Lead Curriculum Developer: Bill Bell
- Original Oracle by Example tutorial for version 11g created by: TJ Palazzolo
- Editor: Susan Moxley
In this tutorial, you learned how to perform the following actions in the WebLogic Server administration console:
Resources
Credits
To navigate this Oracle by Example tutorial, note the following:
- Hide Header Buttons:
- Click the title to hide the buttons in the header. To show the buttons again, click the title again.
- Topic List:
- Click a topic to navigate to that section.
- Expand All Topics:
- Click the button to show or hide the details for the sections. By default, all topics are collapsed.
- Hide All Images:
- Click the button to show or hide the screenshots. By default, all images are displayed.
- Print:
- Click the button to print the content. The content that is currently displayed or hidden is printed.
To navigate to a particular section in this tutorial, select the topic from the list.