Before You Begin
Purpose
Time to Complete
Background
This tutorial shows you how to use the Oracle WebLogic Server 12c (12.2.1) administration console to create a basic cluster and add servers to it. Additional tutorials extend this cluster's capabilities to support load balancing and failover of Java Platform, Enterprise Edition applications.
What Do You Need?
Creating a Cluster of Existing Servers
To create a cluster of existing managed servers, perform the following steps:
- If the administration server of the domain is
not already running, start it.
- Open a Terminal window and navigate to the domain directory. In this tutorial, the domain directory is /scratch/u01/app/fmw/user_projects/domains/mydomain.
- In the domain directory, enter the following
command: ./startWebLogic.sh

- At the prompt, enter the credentials of the
domain administrator. In this tutorial, the
username is weblogic and the
password is welcome1.
Note: The password is not displayed.
Wait until the administration server is running before continuing.
- If any of the managed servers of the domain are
running, shut them down. (You cannot change the
machine of a running server.)
- Open a web browser and enter the following
URL for the administration console: http://hostname:port/console
In this tutorial, the URL is http://<ip_address>:7001/console. Replace <ip_address> with the host name or IP address of your administration server. - On the Welcome screen, log in with the
username and password that you entered to
start the administration server.

- In the administration console, under Domain
Structure, expand Environment, and
then click Servers.

- On the Control tab, under Summary of
Servers, select the check box for each running
managed server, and then select Force
Shutdown Now from the Shutdown list.

- At the prompt, click Yes, refresh
the browser, and ensure that all managed
servers show the SHUTDOWN state.

- Open a web browser and enter the following
URL for the administration console: http://hostname:port/console
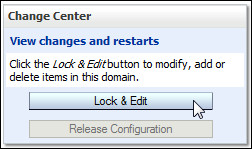
- Creating a cluster is a change to the domain's
configuration, so you must first lock the
configuration. In the Change Center, click Lock
& Edit.
- Under Domain Structure, expand Environment,
click Clusters, and then select Cluster
from the New list above the Clusters table.

- On the Create a New Cluster page, enter cluster1
for the name, select Unicast for the
messaging mode, leave Unicast Broadcast
Channel blank, and then click OK.
Note: Because Unicast is selected, the two Multicast fields are disabled.
A message indicates that the cluster was created successfully.
- In the Clusters table, click cluster1 (the name
of the new cluster). In "Settings for cluster1,"
click the Configuration tab and the Servers
subtab, and then click Add in the Servers
table.

- On the Add a Server to Cluster page, ensure
that Select an existing server, and add it as
a member of this cluster is selected, select
a managed server, and then click Finish.

- Repeat step 7 to add the two remaining managed
servers to the cluster.

- In the Change Center, click Activate
Changes.
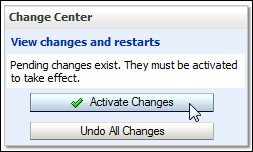
The following message is displayed: "All changes have been activated. No restarts are necessary."
Starting the Clustered Servers
To start the managed servers that are now part of a cluster, perform the following steps:
- Start server1.
- Open a Terminal window and navigate to the
bin directory under your domain directory. In
this tutorial, the domain directory is /scratch/u01/app/fmw/user_projects/domains/mydomain.
Enter the following command: startManagedWebLogic.sh.
This command takes two arguments:
- The name of the managed server that you want to start
- The URL of the administration server
In this tutorial, those arguments are:
- server1
- http://<hostname>:7001
Note: Replace <hostname> with the host name or IP address of your administration server.
- At the prompt, enter the administrator
username and password.
Note:The password is not displayed.
- Open a Terminal window and navigate to the
bin directory under your domain directory. In
this tutorial, the domain directory is /scratch/u01/app/fmw/user_projects/domains/mydomain.
- In the Terminal window, look for messages from
the <Cluster> subsystem, and notice the
message that indicates the server is listening for
communication from other cluster members. To
ensure that the server starts successfully, wait
for the following message: The server started in RUNNING mode.
This message means that the server is up and
running.

- In two other Terminal windows, repeat steps 1
and 2 to start the server2 and server3
managed servers.

Monitoring the Cluster
To monitor the cluster by using the WebLogic Server administration console, perform the following steps:
- In the administration console, under Domain
Structure, expand Environment, click Clusters,
and then click cluster1 in the
Clusters table.

- Under "Settings for cluster1," click the Monitoring
tab and the Summary subtab.
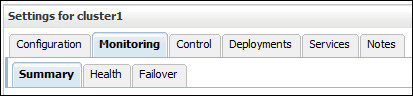
- The table under the Summary subtab indicates
that all three managed servers are currently
participating in the cluster. Other cluster
information is also displayed. To see even more
information in the table, click the Customize
this table link.

- In the Available area, select columns of
interest, click the right arrow to add them to the
Chosen area, and then click Apply.
You can also move columns that do not interest you from Chosen to Available.
Want to Learn More?
-
For documentation on Oracle WebLogic Server 12c (12.2.1), visit the Oracle WebLogic Server Documentation Library.
- See "Understanding Managed Servers and Managed Server Clusters" in Understanding Oracle Fusion Middleware for more information on clusters.
-
To learn more about Oracle WebLogic Server, refer to additional OBEs in the Oracle Learning Library
Credits
- Lead Curriculum Developer: Tom Eliason
- Original Oracle by Example tutorial for version 12c created by: Bill Bell
- Original Oracle by Example tutorial for version 11g created by: TJ Palazzolo
- Other Contributors: Veerabhadra Rao Putrevu, Susan Moxley
Version
- 01-15-001-CreatingaBasicCluster