Oracle WebLogic Server 12c: Creating a Boot Identity File for Easier Server Start Up
Purpose
This tutorial shows how to create a boot identity file to make it easier to start an instance of Oracle WebLogic Server 12c (12.1.1).
Time to Complete
Approximately 15 minutes
Overview
A boot identity file contains the user credentials for starting and stopping an instance of WebLogic Server. An administration server or managed server can refer to this file for user credentials instead of prompting at the command line to provide them. Because the credentials are encrypted, using a boot identity file is more secure than storing plain text credentials in a startup or shutdown script. There can be a different boot identity file for each server in a domain.
If you choose Development Mode when creating a domain by using the Configuration Wizard, a boot identity file is automatically created for the administration server. This tutorial covers creating a boot identity file manually for a Production Mode domain.
If you use Node Manager to start managed servers rather than running start scripts manually, you do not need to create boot identity files for them. Node Manager creates its own boot identity files and stores them under each server's directory in the data/nodemanager subdirectory.
This tutorial covers creating a boot identity file to store the credentials for starting an Oracle WebLogic Server 12c (12.1.1) administration server.
Software Requirements
The following is a list of software requirements:
- Oracle WebLogic Server 12c (12.1.1)
Prerequisites
Before starting this tutorial, you should have completed the Oracle by Example tutorial titled Oracle WebLogic Server 12c: Installing WebLogic Server and Creating a Domain.
Creating a Boot Identity File
To create a boot identity file for the administration server, perform the following steps:
. |
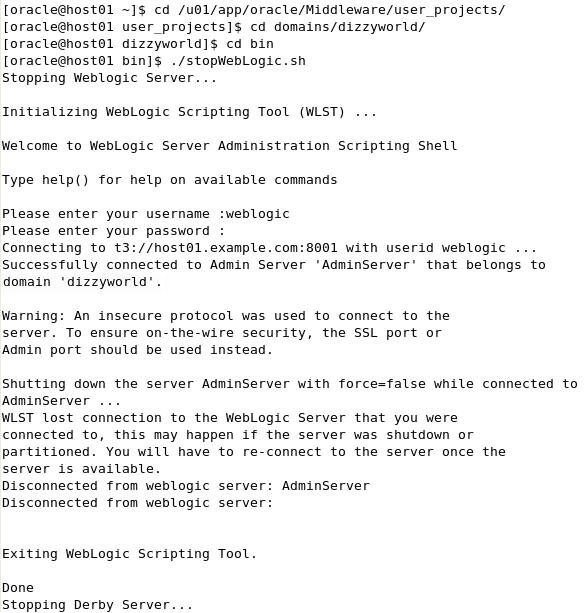
If the administration server of the domain is running, stop it. If it was started with the start script in a Terminal window, you can click Ctrl + C in that window to kill the server. Alternatively, open another Terminal window, navigate to the domain directory, then cd into the bin subdirectory. In this tutorial that directory is /u01/app/oracle/Middleware/user_projects/domains/dizzyworld/bin. Enter the command: $ ./stopWebLogic.sh This runs the script to stop the administration server of the domain When prompted for a username and password, enter the credentials of the domain administrator.
Notice that you were prompted for the username and password. This also happens when you start the administration server by using the startWebLogic.sh script. Creating a boot identify file will allow the start and stop scripts to run without that prompting.
|
|---|---|
. |
In a Terminal window, navigate to the domain directory. In this tutorial, that is /u01/app/oracle/Middleware/user_projects/domains/dizzyworld. Then cd into the servers/AdminServer subdirectory. Note: If your administration server has a different name, cd into that directory under servers. Create a subdirectory there called security and cd into it:
$ mkdir security
Note: If there is already a security subdirectory under the administration server's directory, you do not need to create it.
|
. |
In the security directory, create a text file called boot.properties and edit it. In this tutorial, the gedit editor is used. $ gedit boot.properties
|
. |
In the file, put two lines:
username=weblogic Save the file and exit the editor.
Note: The administrator username and password for your domain may be different. Make sure the values following the = are correct for your domain.
|
. |
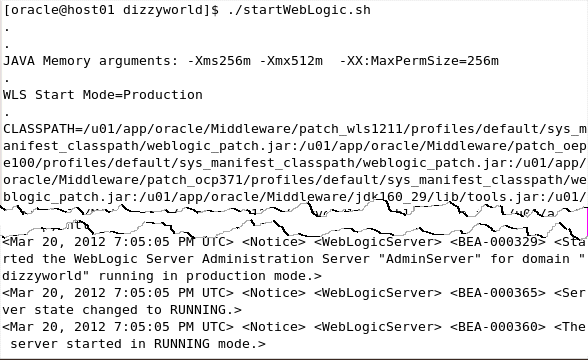
Now restart the administration server. In a Terminal window, navigate to the domain directory, and enter the command: $ ./startWebLogic.sh
Notice that you are not prompted for the username and password.
|
. |
To see that the username and password are safe in the file, in a Terminal window, return to the security directory and display the contents of the boot.properties file. $ cat boot.properties
You can see that the username and password have been encrypted by the server. A comment has also been added with the timestamp when the encryption occurred.
|
Summary
In this tutorial, you learned how to:
- Configure a boot identity file for an Oracle WebLogic Server 12c administration server
Resources
- For documentation on Oracle WebLogic Server 12c, visit the Documentation Library.
- For more information on boot identity files, see the Boot Identity Files section of the Managing Server Startup and Shutdown document.
- To learn more about Oracle WebLogic Server, refer to additional OBEs in the OLL website.
Credits
- Lead Curriculum Developer: Bill Bell
- Original OBE Created By: TJ Palazzolo
![]()
 |
Copyright © 2011, Oracle and/or its affiliates. All rights reserved |


