Using Oracle Enterprise Manager to Administer Forms Services
Purpose
This tutorial covers using Oracle Fusion Middleware Enterprise Manager to control Forms Services.
Time to Complete
Approximately 1 hour
Overview
In this tutorial you learn how to manage and monitor Forms Services by using Oracle Enterprise Manager's Fusion Middleware Control. You learn to perform configuration steps by using Oracle Enterprise Manager to edit Forms configuration files. You control user sessions and set URL security. You then configure tools for monitoring Forms sessions, and you use Oracle Enterprise Manager to view the output that is logged.
Scenario
You have just deployed a Forms application to Oracle Fusion Middleware, and you need to configure Forms Services on the middle tier so that users can run the application and so that icons are displayed correctly in the forms. You also need to be able to log information about running applications and perform administrative tasks, such as controlling user sessions and setting certain parameters so that users cannot pass them in the URL.
Prerequisites
Before starting this tutorial, you should:
. |
Have access to or have installed Oracle Fusion Middleware 11g WebLogic Server.
|
||||||||||
|---|---|---|---|---|---|---|---|---|---|---|---|
. |
Have access to or have installed Oracle Forms 11g; at a minimum you should have selected for installation the Forms application and the Enterprise Management system component.
|
||||||||||
. |
Have a .fmx file, with associated icons contained in a JAR file; you can use this sample if you wish. The sample contains:
Place the .fmb and .fmx files in a directory of your choice, such as D:\Data\MyForms. Place the JAR file in <Middleware_Home>\as_1\forms\java.
| ||||||||||
. |
This tutorial contains several path references, defined as follows (for a default installation):
|
Starting Oracle Enterprise Manager
Oracle Enterprise Manager 11g Fusion Middleware Control is a browser-based interface that enables configuring, managing, and monitoring a WebLogic Server domain. You can use it to configure Forms Services parameters and the run-time environment. Using Enterprise Manager enables you to modify the configuration without concern for the locations or structures of the respective files.
Oracle Enterprise Manager also enables you to monitor and control user sessions and examine metrics for a Forms Services instance.
To start Oracle Enterprise Manager, perform the following steps:
. |
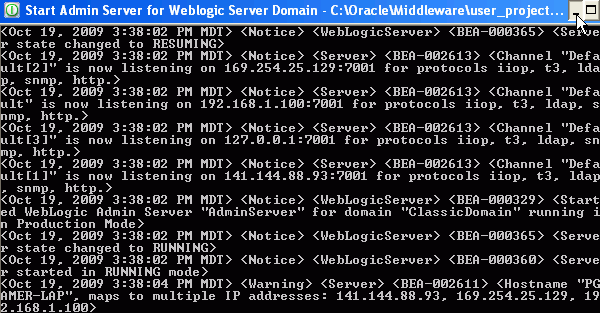
If it is not already running, start the Admin Server for the ClassicDomain WebLogic domain. You can do this from the command window. Navigate to <DOMAIN_HOME>\bin (for example, C:\Oracle\Middleware\user_projects\domains\ClassicDomain\bin) and enter the command: startWebLogic
Alternatively, you can select from the Windows Start menu: Programs > Oracle WebLogic > User Projects > ClassicDomain > Start Admin Server for Weblogic Server Domain.
When prompted, you need to enter the username and password of the Admin user, which were specified when WebLogic was installed. When the command window displays the message "Server started in RUNNING mode" you may minimize the window, but do not close it.
|
|---|---|
. |
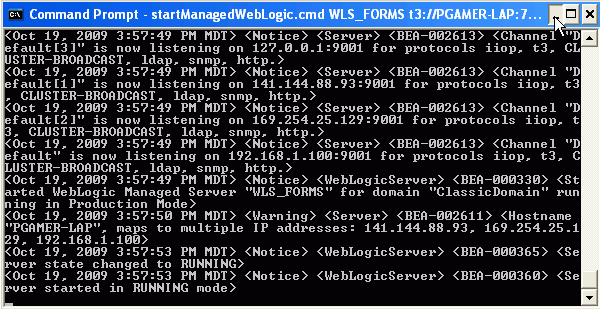
If it is not already running, start the WLS_FORMS Managed Server. You can do this either from the Start menu or from a command window. To use a command window, open one and navigate to <DOMAIN_HOME>\bin (for example, C:\Oracle\Middleware\user_projects\domains\ClassicDomain\bin). For example: startManagedWebLogic.cmd WLS_FORMS t3://PGAMER-LAP:7001
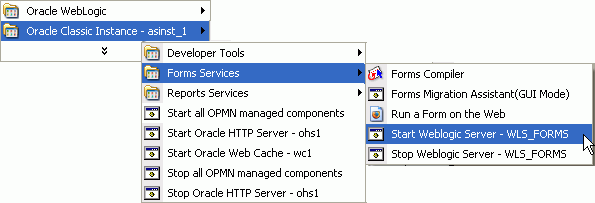
Alternatively, you can select from the Windows Start menu: Programs > Oracle Classic Instance - asinst_1 > Forms Services > Start Weblogic Server - WLS FORMS
When prompted, you need to enter the username and password of the Admin user, which were specified when WebLogic was installed. When the messages indicate that the the server is started in running mode, minimize (but do not close) the command prompt window:
|
. |
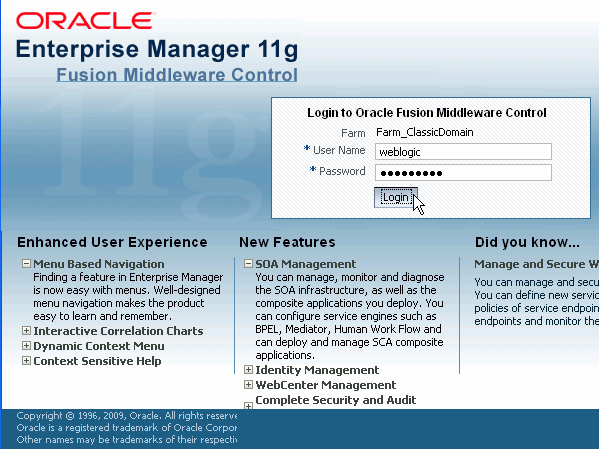
In a browser, enter the URL for Oracle Enterprise Manager 11g Fusion Middleware Control. This URL is included in the text that displays at the end of the Oracle Fusion Middleware installation procedure. The URL consists of the host name and port number of the WebLogic Admin Server (separated by a colon), followed by /em; for example: http://pgamer-lap:7001/em. When the browser displays the login window, log in with the WebLogic user name and password.
|
. |
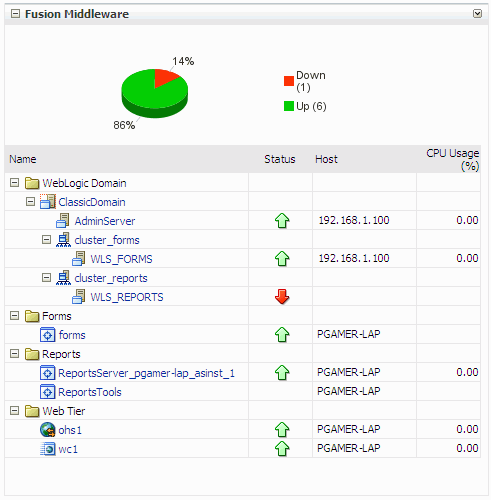
A Farm is a group of Oracle WebLogic Server instances that share a metadata repository. When you log in to Fusion Middleware Control, the first page you see is the Farm home page. You can see a navigation panel at the left of the window that enables you to return to the home page at any time or to navigate to other parts of the application...
...and three main panels at the right of the window:
|


Configuring Forms Services
Configuring Forms Services for your application involves the following tasks:
- Setting parameter values: You want to ensure that the default behavior of Forms is to fill up the entire browser window with the Forms applet.
- Adding named configurations: You want to define the form to run for your particular application.
- Setting environment variables: You want to tell Forms Runtime where to find your .fmx file.
- Specifying icon locations: You want to specify that the JAR file containing your icons should download to the client at run time and that buttons in your application should use these downloaded icons.
- Controlling user sessions: You stop a user session and disable future connections.
- Defining URL security: You want to prevent users from passing the userid parameter on the URL.
Setting Parameter Values
Users can pass parameters to Forms applications in the browser's URL, but you can also set parameters in the Forms Servlet configuration file, formsweb.cfg. This file is located in <DOMAIN_HOME>\servers\WLS_FORMS\stage\formsapp\11.1.1\formsapp\config
(for example, C:\Oracle\Middleware\user_projects\domains\ClassicDomain\servers\WLS_FORMS\stage\formsapp\11.1.1\formsapp\config.)
You can edit this text file directly. However, using Oracle Enterprise Manager 11g Fusion Middleware Control enables you to edit this and other configuration files without regard for their locations, thus simplifying configuration tasks.
Warning: If you do not restart Enterprise Manager after manually editing any of the configuration files, changes that you make through Enterprise Manager overwrite the manual changes that you made.
In this task, you ensure that the default behavior of Forms is to fill up the entire browser window with the Forms applet.
. |
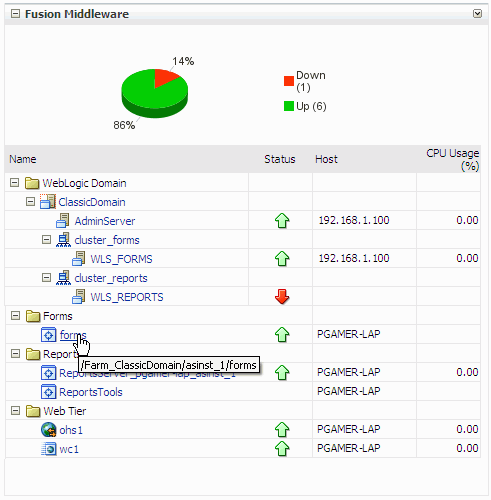
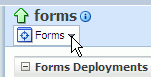
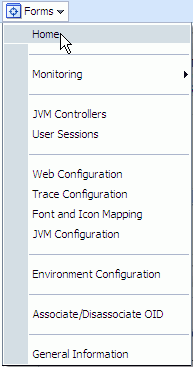
To perform most management tasks for a Forms server using Fusion Middleware Control, expand the Forms node in the Fusion Middleware panel and click the forms link to navigate to the Forms home page.
Alternatively, you could use the navigation tree to invoke the Forms home page by expanding the Forms node and selecting the forms node.
|
|---|---|
. |
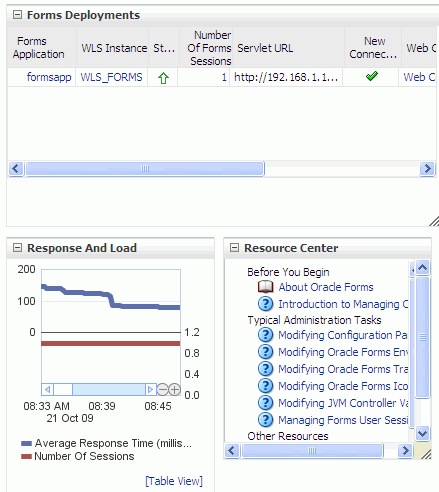
The Forms home page contains several elements:
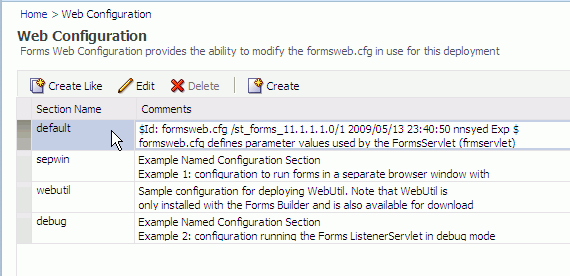
From the Forms menu, select Web Configuration.
|
. |
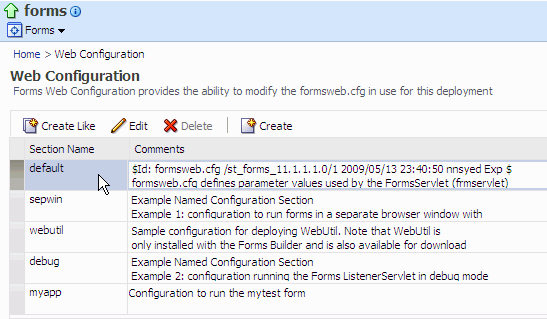
The top section of the Web Configuration page lists the named configurations that have been defined for the Forms deployment. Named configurations enable you to set application-specific values for Forms parameters. Select the default configuration, which contains all parameter values that are used when not overridden by another named configuration or by parameters passed in the URL.
|
. |
The bottom portion of the Web Configuration page enables you to define parameters and their values for the selected named configuration. There is a pop-list where you can select the category of parameter to narrow the list, or you may select to display all parameters. With the basic category selected from the pop-list, set Width and Height parameters to 100%, ensuring that the Forms applet consumes all of the browser window at run time.
Click Apply. Warning: You must apply changes before navigating to another page or parameter category, or your changes may be lost. |


Adding Named Configurations
In this task, you define the form to run for your particular application.
. |
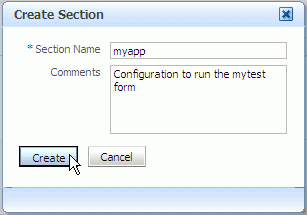
In the upper portion of the Web Configuration page, click Create to create a named configuration that is specific to your application.
Any parameters that you define in a named configuration override the values of parameters in the default configuration when the user adds config=<configuration_name> to the URL. However, by default users can override the parameters in a named configuration by specifically passing those parameter values in the URL.
|
|---|---|
. |
In the Create Section dialog box, enter a name for your configuration. You can optionally add comments describing the purpose of the named configuration that you are defining.
Click Create.
|
. |
In the Confirmation dialog box, click Close to acknowledge the successful creation message.
|
. |
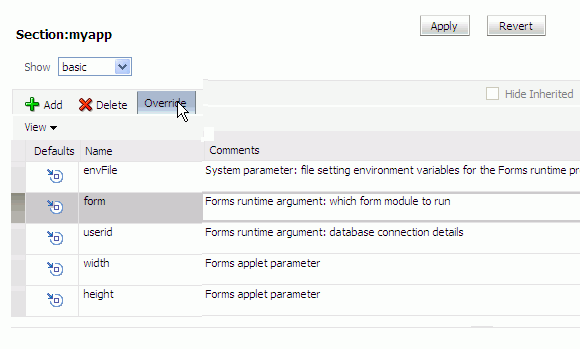
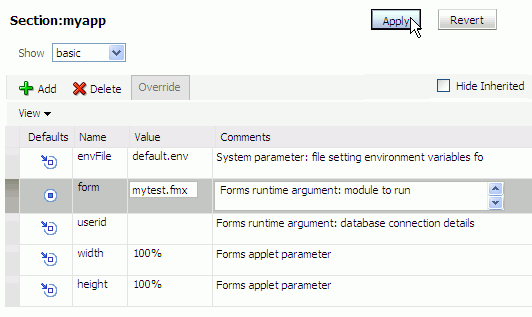
In the section at the bottom of the page, you can see the parameters listed with the inherit symbol Select the form parameter and click Override.
|
. |
The override symbol Enter the name of your form in the Value field, such as mytest.fmx. You can optionally edit the Comments field, if desired.
Click Apply.
|
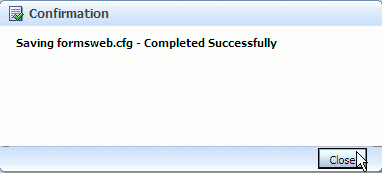
. |
Click Close to acknowledge the success message.
|


Setting Environment Variables
Your next task is to tell Forms Runtime where to find your .fmx file.
. |
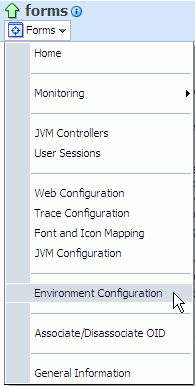
From the Forms menu, select Environment Configuration.
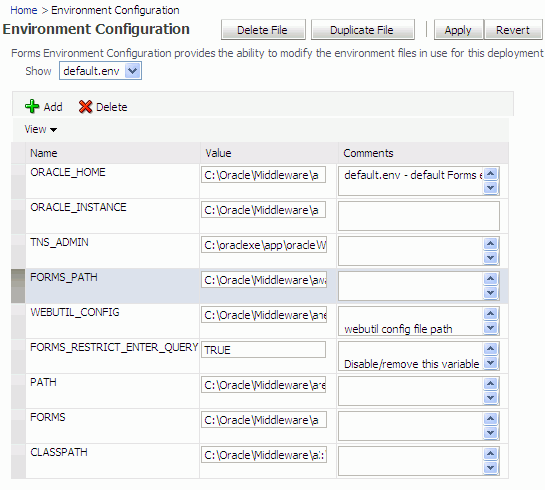
Environment configuration enables you to edit the default.env file, which like formsweb.cfg is located in <DOMAIN_HOME>\servers\WLS_FORMS\stage\formsapp\11.1.1\formsapp\config.
|
|---|---|
. |
The Environment Configuration page has a pop-up list where you can select the environment file to edit. It also has buttons to enable you to delete or duplicate files. This is useful when you need application-specific environment files. However, in this tutorial you work with the default environment file.
Select FORMS_PATH, and add the path to your .fmx file, separated from the remainder of the path by a semicolon. For example, add to the end of the path: ;D:\Data\MyForms
|
. |
Click Apply
|


Specifying Icon Locations
As stated earlier, icons for your application are contained in a JAR file. You should place this JAR file in <ORACLE_HOME>\forms\java.
In this task you specify that:
- The JAR file containing your icons should download to the client at run time (specified in the Forms Servlet configuration file, formsweb.cfg)
- Buttons in your application should use these downloaded icons (specified in the Forms registry file, registry.dat)
. |
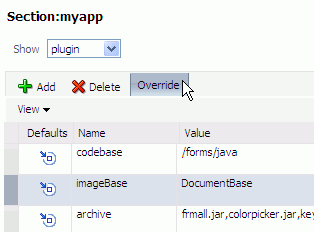
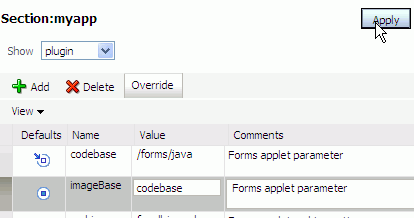
First you specify that the JAR file should be downloaded at run time. This involves setting two parameters. The first parameter, imageBase, tells Forms where to begin the search for icons. The default value for this parameter is DocumentBase, which is defined as <ORACLE_HOME>\forms. To modify this parameter, use the Forms menu to invoke the Web Configuration page. Select the named configuration myapp. Select plugin from the drop-down list, and then select the imageBase parameter and click Override.
Set the value for imageBase to codebase, and then click Apply.
Click Close to acknowledge the success message.
|
|---|---|
. |
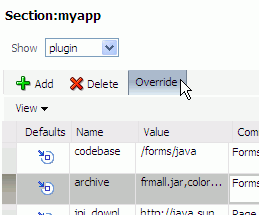
The second parameter, archive, tells Forms which JAR files to download to the client at run time. The frmall.jar file should always be downloaded, but you can specify additional files needed for an application in its named configuration. In the myapp named configuration, with plugin selected from the drop-down list, select the archive parameter and click Override.
Set the value of archive to frmall.jar,myicons.jar and then click Apply.
Click Close to acknowledge the success message.
|
. |
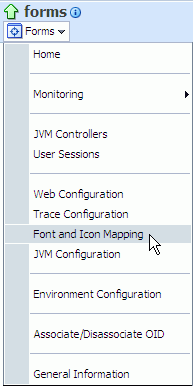
Next you specify that buttons in your application should use these downloaded icons. This is done with two variables that are defined in the Forms registry file. The Forms registry file is registry.dat, located in <ORACLE_INSTANCE>\config\FormsComponent\forms\registry\oracle\forms\registry. To edit the registry file with Fusion Middleware Control, select Font and Icon Mapping from the Forms menu.
|
. |
You could define a new application class for your application in the registry file by clicking Add, and then adding variables for your application, such as myapp.icons.iconpath. If you did that, you would have to also specify a different value for the serverApp parameter (set it to myapp) either in formsweb.cfg or in the URL. Also, installing a patch may overwrite this file so that additional application classes no longer exist. So that application classes do not get overwritten, a better option is to create a new registry file for each application. You would then need to set the serverApp parameter to the virtual path to the file. In this tutorial, rather than creating a separate application class, you simply modify the default values that are used by all applications:
If you make changes to these settings, be sure to click Apply Note: If your icons are not in a JAR file, you can place them anywhere on the middle tier computer and use an absolute path mapping with a leading forward slash, such as /myicons/, for the iconpath setting. You would need to map a virtual directory called myicons to the physical directory where you have placed the icons. If you do place the icons in a subdirectory of the directory pointed to by imageBase, you can use a relative path, with no leading forward slash, such as icons/. Such a mapping would mean that the icons should be, for this example, in \forms\java\icons when imageBase is set to codebase. |


Controlling User Sessions
In this section of the tutorial, you start a user session and then use Fusion Middleware Control to stop it. You then start another user session and disable further sessions from starting.
. |
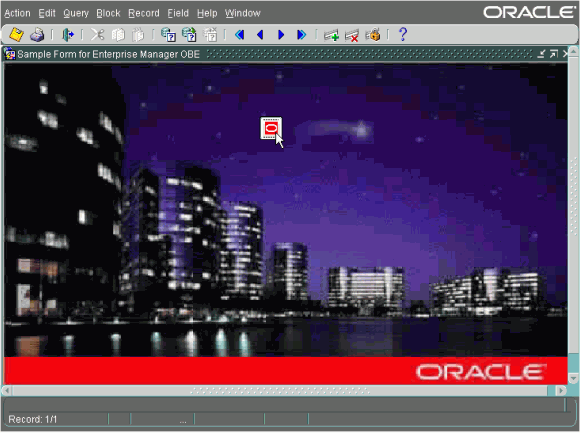
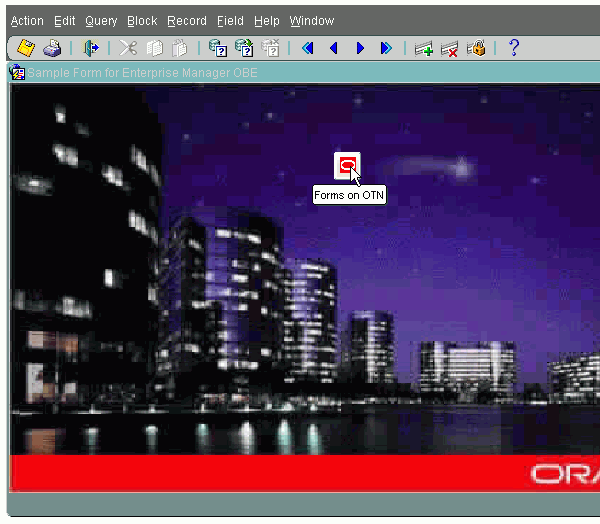
To begin, start a user session. Open a new browser window, and enter the URL to start your form: Your form should now appear in the browser window. If you are using the sample form and have performed the configurations correctly, you should see a button that displays an icon representing OTN.
|
|---|---|
. |
Now that you have a user session running, return to the Forms home page by selecting Home from the Forms menu.
You should see information about the Forms session.
|
. |
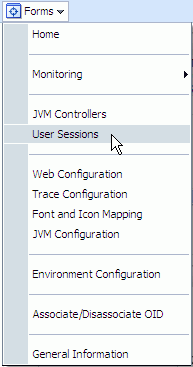
Now select Forms > User Sessions from the Forms menu.
|
. |
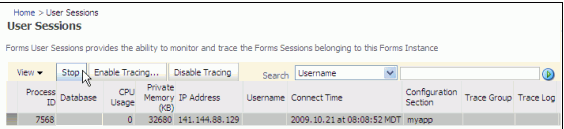
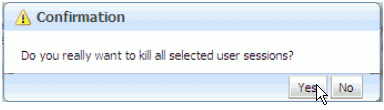
The User Sessions page displays information about the user session. By default the table displays process ID, database if connected (the sample form does not require a database connection), CPU usage, private memory, IP address, database user name if connected, connect time, configuration used, and trace group and log if tracing. You can change the columns that are displayed by using the View menu. If the user is connected to the database, you can view more information about the database session for that Forms session by clicking the database name. Select the user session and click Stop.
Click Close at the confirmation window.
|
. |
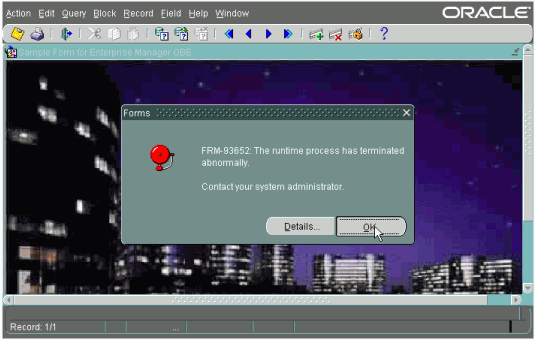
Return to the browser window where the form is running. The session has ended, and an alert displays the error: FRM-93652: The runtime process has terminated abnormally. Contact your system administrator. Click OK to close the alert.
|
. |
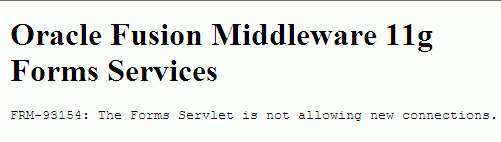
Start another user session by reloading the URL for your form in the browser, then return to Fusion Middleware Control and navigate to the Web Configuration page. Select the default configuration. You must use the default configuration; you cannot disable new connections in a user-named configuration, because the ability to start a new session pertains to the server as a whole, not to a specific application. Select advanced in the Show drop-down list, and then edit the value for allowNewConnections, setting it to false.
Click Apply to save the change, and then click Close to acknowledge the success message. When you disable new user sessions, existing Forms sessions are unaffected and the Oracle WebLogic Managed Server instance remains up.
|
. |
Attempt to start another user session:
The browser displays an error message.
However, when you navigate to the other browser window where the form is already running, you can continue to use the form.
|
. |
Before continuing with this tutorial, change the allowNewConnections parameter back to true. |

Defining URL Security
In this task you restrict the userid parameter so that in cannot be specified in the URL. You might have any of several reasons for doing his, such as:
- Like the sample form, your application does not require a database connection.
- You want users to always connect with the userid that you specify in the configuration.
- You want to force users to log in by using the default login window.
To restrict the userid parameter so that in cannot be specified in the URL, perform the following:
. |
In Fusion Middleware Control, navigate to the Web Configuration page by selecting Web Configuration from the Forms menu.
|
|---|---|
. |
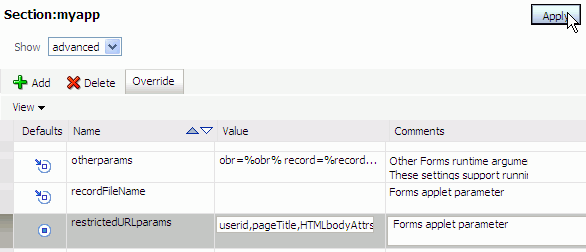
Select the myapp configuration and select the advanced category from the Show drop-down list. Select the restrictedURLparams parameter and click Override. Add userid to the list of restricted parameters and click Apply.
Click Close to acknowledge the success message.
|
. |
Open a new browser window and enter the URL to run your application, appending the userid parameter to it, like the following example: The browser displays an error message.
Note: Before continuing with this tutorial, you should remove the restricted parameter userid from the list of restricted URL parameters if you want to use Forms Builder's one-button run, which passes the userid parameter to the Forms run-time session. |


Monitoring Forms Services
In this task, you initiate Forms Trace and also Oracle Diagnostic Logging (ODL).
Using Forms Trace
Forms Trace enables you to record information about a precisely defined part of forms functionality or a class of user actions. This is accomplished by defining events for which you want to collect trace information. For example, you can record information about trigger execution, mouse-clicks, or both. From the Enterprise Manager Fusion Middleware Control, you can use trace output to diagnose performance and other problems with Oracle Forms applications.
To record information about trigger execution, perform the following steps:
. |
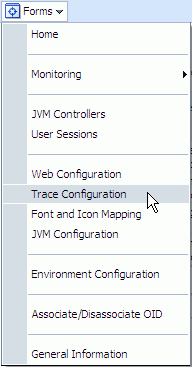
In Fusion Middleware Control, select Trace Configuration from the Forms menu.
|
|---|---|
. |
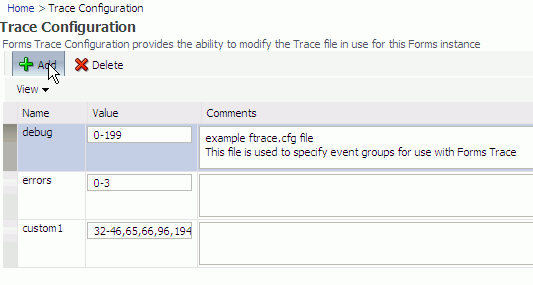
The Trace Configuration page appears. This page enables you to easily edit the ftrace.cfg file, which is located in <Oracle_Instance>\config\FormsComponent\forms\server. Click Add to add a new trace group.
|
. |
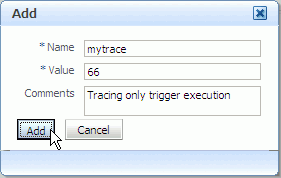
In the Add dialog box, enter a name, such as mytrace, with a value of 66, and then click Add.
You can see a list of traceable events in the Fusion Middleware 11g Forms Deployment Guide.
|
. |
Click Apply to save the changes.
A confirmation message is displayed in the upper left part of the Trace Configuration page.
|
. |
You can enable trace on a per-session basis, or for all sessions. To initiate a trace, you specify two parameters:
You also can optionally specify the log parameter and set its value to a file name. In this tutorial you enable trace for all sessions. Select Web Configuration from the Forms menu, and edit the myapp configuration. Select trace from the Show drop-down list, and override the following parameter values:
Click Apply
|
. |
Start another user session as in the first step of the section Controlling User Sessions. When the form opens, click the button to execute a trigger that loads the Forms on OTN page.
Keep the Forms session open (do not close the form.)
|
. |
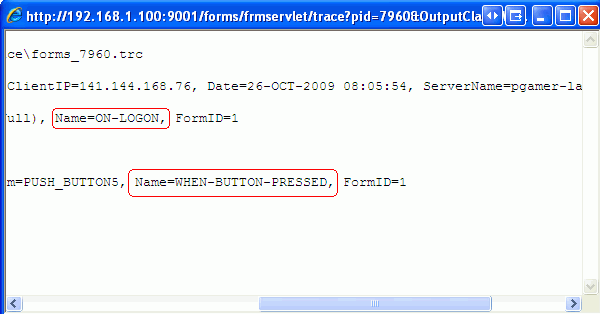
In Fusion Middleware Control, select User Sessions from the Forms menu. The User Sessions page displays the information for the existing session. Click the eyeglass icon in the Trace Log column.
|
. |
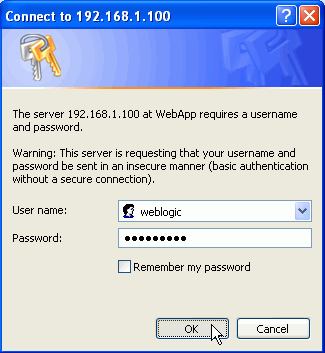
In the Connect to dialog box, enter the administrative user name and password for WebLogic Server, such as weblogic/weblogic1. If you have set up security for the formsapp deployment, you would need to use the user name and password for a user belonging to a group with the Administrator privilege.
|
. |
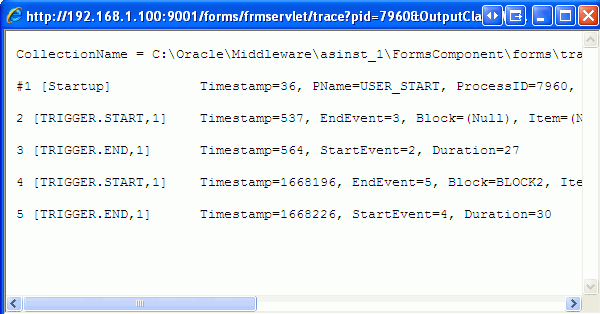
A separate browser window opens and displays the log.
You can examine the log to see the triggers that fired (in this case, ON-LOGON and WHEN-BUTTON-PRESSED), along with time stamps, durations, initiating blocks and items, and information about form startup. When you are finished examining the log, exit the form and close the browser windows. |


Using Oracle Diagnostic Logging (ODL)
Oracle Diagnostics and Logging (ODL) is a feature of Oracle Fusion Middleware that enables administrators to keep a record of all Oracle Forms sessions, monitor Oracle Forms-related network traffic, and debug site configuration problems. Some of the features of Oracle Diagnostics and Logging available to Forms Services include:
-
Recording of all Oracle Forms sessions, including session start and end times, and the user's IP address and host name (session-level logging)
-
Monitoring of Oracle Forms-related network traffic and performance (session-performance and request-performance-level logging)
-
Generating debugging information for site configuration issues (debug-level logging)
-
Logging handled through Fusion Middleware Control
-
Correlating events in these log files with events in the database
-
Automatic handling of log file rotation.
-
Handling of log size restriction by the mechanism rather than by OS level scripts as was done previously
When you enable logging, the Listener Servlet writes log messages to the servlet log file. You enable logging by adding one of the following strings to the serverURL parameter:
| Appended String | Description of Logging |
| (none) | During Forms servlet initialization, a message is written to the log file stating the name and path of the configuration file being used. Messages of levels equal to or higher than the log level set for the default logger in logging.xml are logged. Default Value is set to NOTIFICATION:1. That means logs of level NOTIFICATION:1, WARNING, ERROR and INTERNAL_ERROR are logged.
|
| /session | Log messages are written whenever a Forms session starts or ends. These messages include the host name and IP address of the client (the computer on which the user's Web browser is running), the run-time process id, and a unique internal session id number.
|
| /sessionperf | Performance summary statistics are included with the session end message.
|
| /perf | A performance message is written for every request from the client.
|
| /debug | Other debug messages are written in addition to the messages mentioned above. This logging level is very verbose and is intended mainly for debugging and support purposes. |
To use Oracle Diagnostic Logging for your application, perform the following steps:
. |
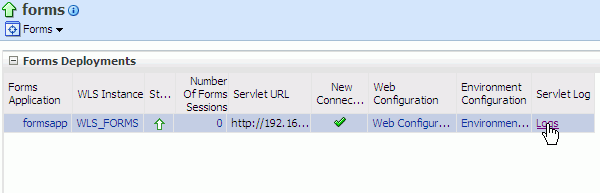
First, look at the logs that are generated by default. In Fusion Middleware Control. Navigate to the Forms home page and click Logs.
|
|---|---|
. |
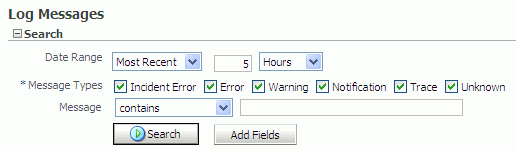
On the Log Messages page, enter an appropriate time period, select all of the check boxes, and click Search.
|
. |
The results appear in a table at the lower part of the window. Select any of the displayed messages to show details about in in the panel below the table.
|
. |
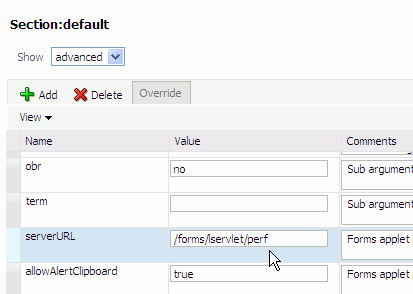
Now that you have seen the logging that takes place by default, you can change the logging level. Navigate to the Forms Web Configuration page and modify the default configuration.
|
. |
Select the advanced category from the Show drop-down list, and append /perf to the serverURL parameter.
Click Apply
|
. |
In a separate browser window, enter the URL to run the form. You can run several sessions if you like. Now in Fusion Middleware Control navigate back to the Log Messages for formsapp again. You should see additional types of messages displayed; these messages relate to session and request performance.
|


Summary
In this tutorial, you have learned how to:
- Start Oracle Enterprise Manager
- Configure Forms Services
- Monitor Forms Services
Resources
- For more information about managing Oracle Fusion Middleware, see
Oracle® Fusion Middleware Administrator's Guide
11 g Release 1 (11.1.1). - For more information about managing Forms by using Oracle Enterprise Manager, see
Oracle® Fusion Middleware Forms Services Deployment Guide
11 g Release 1 (11.1.1). - To learn more about
using Oracle Forms 11g, refer to the OTN Web site.
![]()