 Creating Autocomplete Validations for ADP Global Payroll Integration
 Before You Begin
HCM Cloud integration with ADP Global Payroll is currently under Controlled Availability. Please have a Service Request with Oracle Support to know more about this integration.
Background
Basic information about Autocomplete Rules and why you want to setup validation.
Prerequisites
- Sandbox access.
- Autocomplete tool access.
- Roles required: Application Implementation Consultant.
- How to check if roles are allocated to a username?
- Login with a user who has IT_SECURITY_MANAGER access provisioned.
- Navigate to security console: Navigation > [Tools] Security Console
- Select Users tab.
- Search for the user name.
- Check if the user has the required role: Application Implementation Consultant. If the required role is missing, add it using Edit > Add Role.
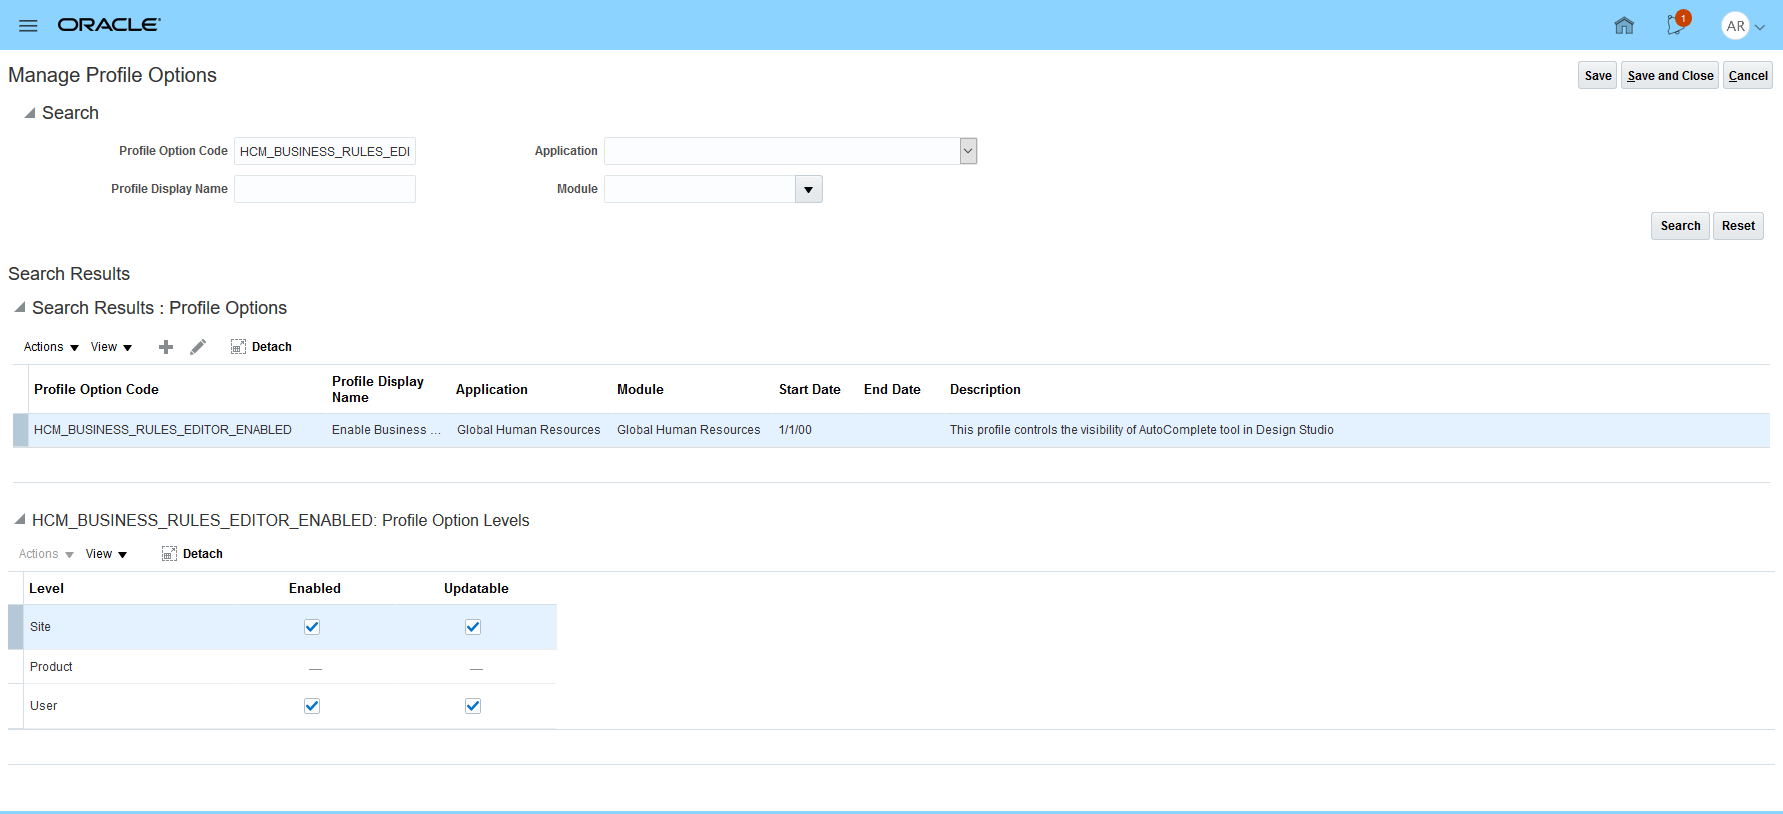
- Access Setup and Maintenance, then Manage Profile Options.
- Check if the Profile Option Code named HCM_BUSINESS_RULES_EDITOR_ENABLED is set.
- If it is not there, you must add the record. Click
 icon and, for each field, enter the following values:
- Profile Option Code: 'HCM_BUSINESS_RULES_EDITOR_ENABLED'.
- Profile Display Name: 'Enable Business Rule Editor'.
- Application: 'Global Human Resources'.
- Module: 'Global Human Resources'.
- Start Date: 1/1/00 (January 1, 2000).
- Description: 'This profile controls the visibility of Autocomplete tool in Design Studio'.
 Important Note: Autocomplete tool is currently under Controlled Availability. Review KM Note: 2637151.1 Controlled Availability of Oracle HCM Autocomplete tool for details on how to get access to this tool.
Configure Environment
In this section we are going to create a Publishable sandbox.
Navigate to Sandboxes: Navigator > [Configuration] Sandboxes
Click the side arrow
 for the sandbox you want to activate.
A yellow ribbon (named Sandbox ribbon further in this document) appeared with 2 menu items:
- Active Sandbox Name: the sub-items will allow to access the Sandbox details, publish the sandbox and leave the current sandbox.
- Tools: the sub-items correspond to the Tools selected when creating the sandbox. Here, only HCM Experience Design Studio appears.

 Common Rules
This section describes how to setup validations for 5 rules, applicable to both Germany, Mexico and Romania, for ADP integrations. Accessing the Autocomplete tool is a prerequisite for all validation setups.
Person Name Validations
This rule covers the following ADP requirements:
- Person First Name is required.
- Person First Name cannot have more than 40 characters.
- Person Last Name cannot have more than 40 characters.
- Person Title is required.
- Person Academic Title cannot have more than 100 characters.
- Person Birth Name cannot have more than 40 characters.
Access Autocomplete tool
- Once the sandbox is activated, select Tools > HCM Experience Design Studio from the sandbox ribbon.
- Once in HCM Experience Design Studio window, click Autocomplete Rules in the left menu.
Create Autocomplete Rule - Person Name
- From the dropdown list located below the Business Object title, select Person Name.
- At the right end of Business Object Rules title, click the Add button. A submenu appeared; click Object Validation Rule Type.
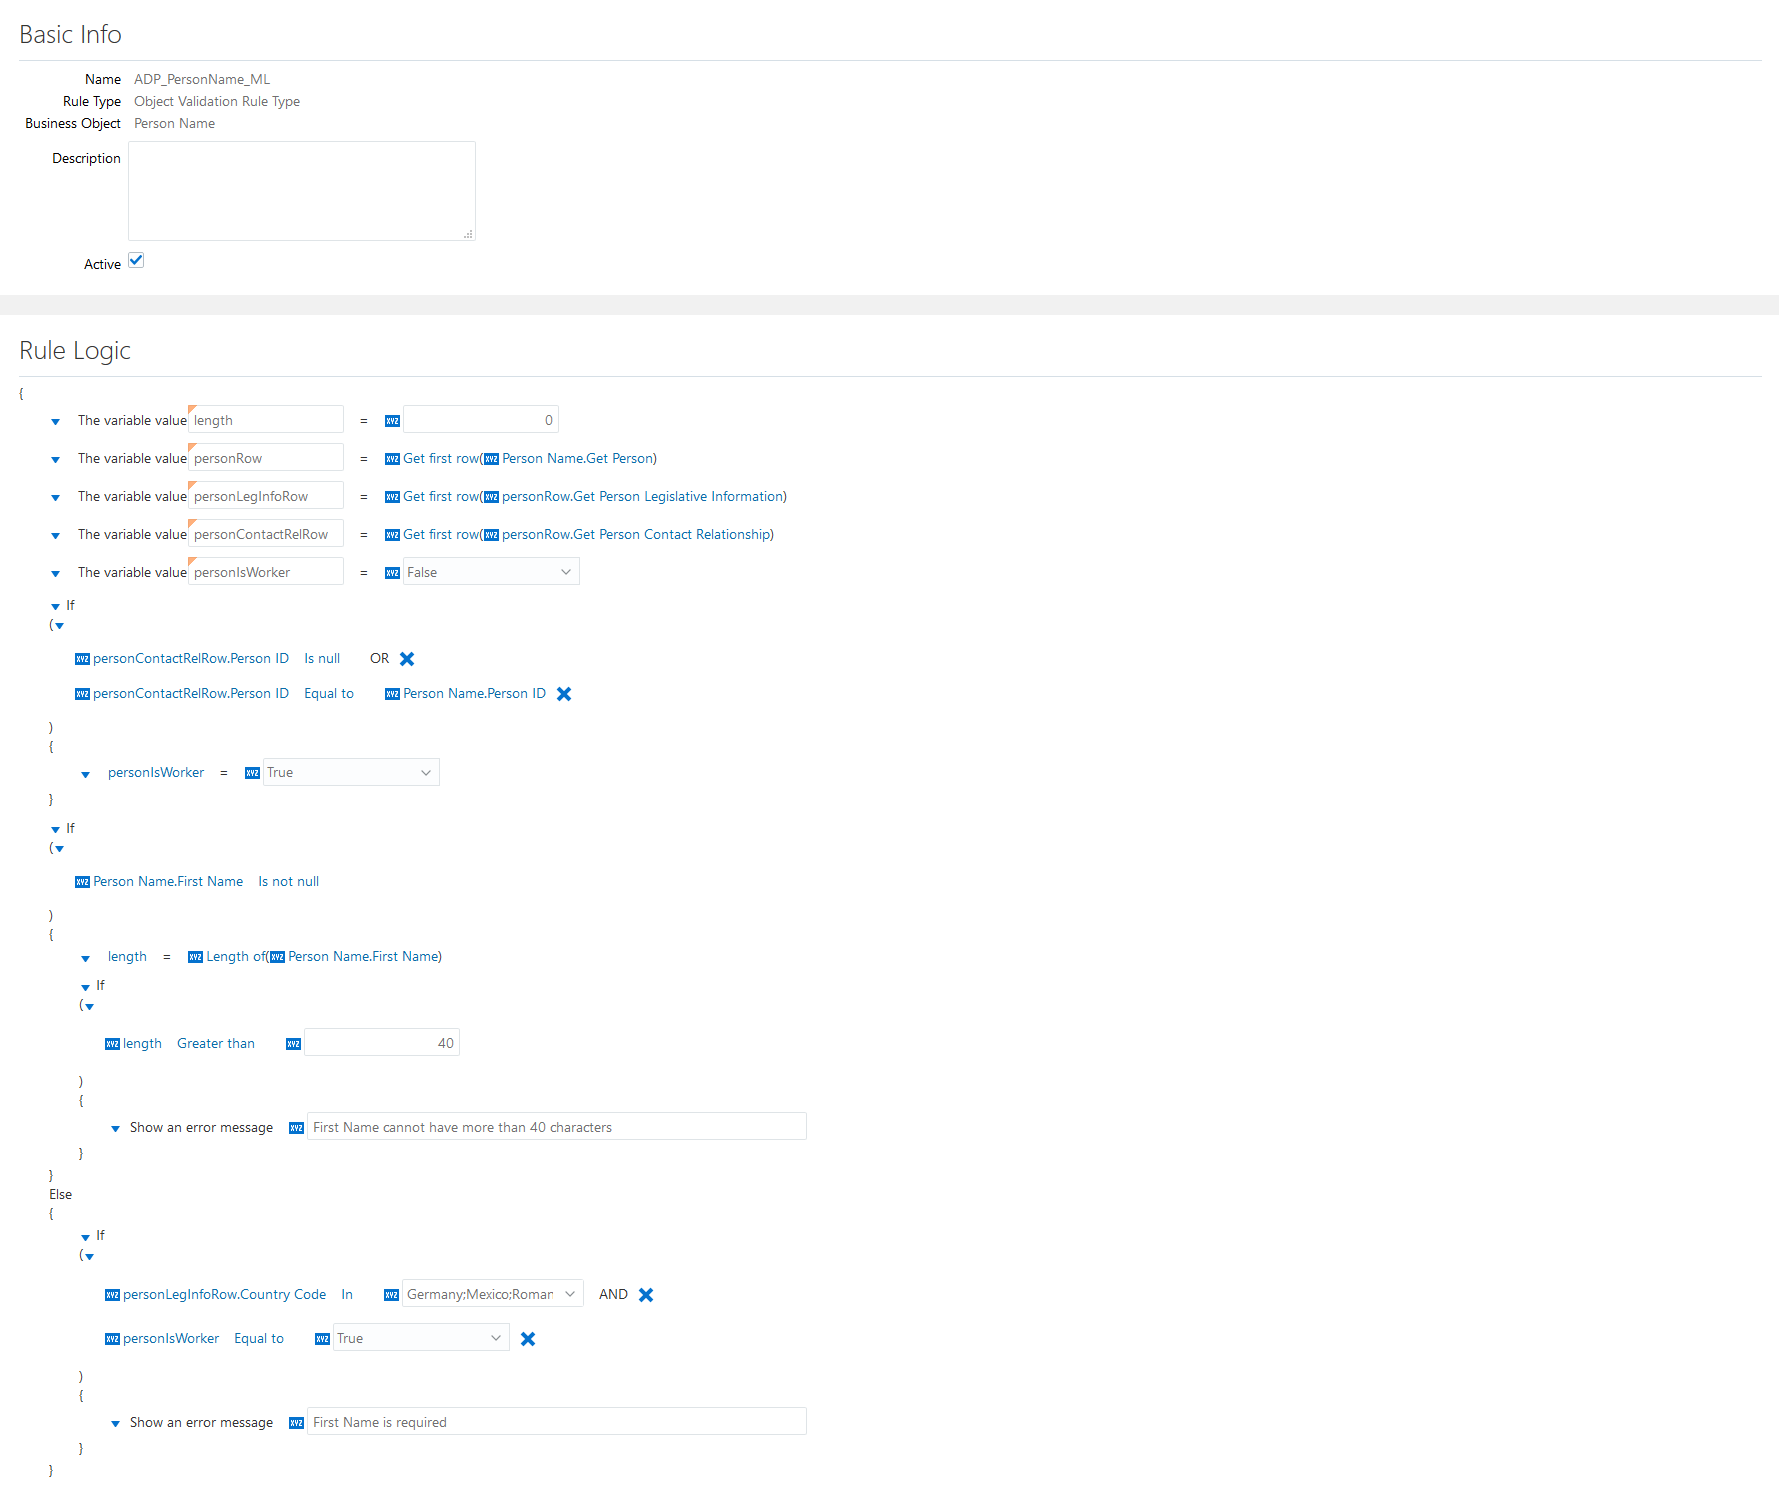
In Name textbox, enter: 'ADP_PersonName_ML'. Make sure Active is checked
 .
.Prepare the Rule Code:
length := 0;
personRow := GetFirstRow(PersonName.person);
personLegInfoRow := GetFirstRow(personRow.personLegislativeInfo);
personContactRelRow := GetFirstRow(personRow.personContactRelationship);
isWorker := False;
IF ((personContactRelRow.PersonID Is null)
    OR (personContactRelRow.PersonID = PersonName.PersonID)) THEN
  isWorker := True;

IF (PersonName.FirstName Is not null) THEN
  length := LengthOf(PersonName.FirstName);
  IF (length > 40) THEN
    ShowError('First Name cannot have more than 40 characters');
ELSE
  IF ((personLegInfoRow.Country In ('DE','MX','RO')) AND (isWorker = True)) THEN
    ShowError('First Name is required');

IF (PersonName.LastName Is not null) THEN
  length := LengthOf(PersonName.LastName);
  IF (length > 40) THEN
    ShowError('Last Name cannot have more than 40 characters');

IF (PersonName.Title Is null) THEN
  IF ((personLegInfoRow.Country In ('DE','MX','RO')) AND (isWorker = True)) THEN
    ShowError('Title is required');

IF ((PersonName.NameInformation15 Is not null)
    AND (personLegInfoRow.Country In ('DE')) THEN
  length := LengthOf(PersonName.NameInformation15);
  IF (length > 100) THEN
    ShowError('Academic Title cannot have more than 100 characters');

IF ((PersonName.NameInformation16 Is not null) THEN
    AND (personLegInfoRow.Country In ('DE')) THEN
  length := LengthOf(PersonName.NameInformation16);
  IF (length > 40) THEN
    ShowError('Birth Name cannot have more than 40 characters');
Person First Name Validations
The following table explains how to implement length := 0
Step Details Add a new integer variable Click the down arrow
 beside The variable value 'stringVar_', then Add next, then Add a new variable type then select Integer.
Access the textbox containing 'integerVar_', double click 'integerVar_' and type: 'length'.
Initialize the variable In the textbox following
 , enter: '0'.
Clean up the rule Click the down arrow beside The variable value 'stringVar_', then select Delete. The row is now deleted.
The following table explains how to implement personRow := GetFirstRow(PersonName.person)
Step Details Add a new row variable Click the down arrow
beside The variable value 'length', then Add next, then Add a new variable type then select Row.Double click 'rowVar_' and enter: 'personRow'.
Set GetFirstRow function Click
just beside PersonName.Current Row, then select Change to a function. 'Get first row(PersonName.person)' is now displayed.
The following table explains how to implement personLegInfoRow := GetFirstRow(personRow.personLegislativeInfo)
Step Details Add a new row variable Click the down arrow
beside The variable value 'personRow', then Add next, then Add a new variable type then select Row.Double click 'rowVar_' and enter: 'personLegInfoRow'.
Set GetFirstRow function Click
just beside PersonName.Current Row, then select Change to a function. 'Get first row(PersonName.person)' is now displayed.Click PersonName.person, then personRow then select personLegislativeInfo. 'Get first row(personRow.personLegislativeInfo)' is now displayed.
The following table explains how to implement personContactRelRow := GetFirstRow(personRow.personContactRelationship)
Step Details Add a new row variable Click the down arrow
beside The variable value 'personLegInfoRow', then Add next, then Add a new variable type then select Row.Double click 'rowVar_' and enter: 'personContactRelRow'.
Set GetFirstRow function Click
just beside PersonName.Current Row, then select Change to a function. 'Get first row(PersonName.person)' is now displayed.Click PersonName.person, then personRow then select personContactRelationship. 'Get first row(personRow.personContactRelationship)' is now displayed.
The following table explains how to implement isWorker := False
Step Details Add a new boolean variable Click the down arrow
beside The variable value 'personContactRelRow', then Add next, then Add a new variable type then select Boolean.Double click 'booleanVar_' and enter: 'isWorker'.
Initialize the variable Just following
, click True then select False.
The following table explains how to implement IF ((personContactRelRow.PersonID Is null) OR (personContactRelRow.PersonID = PersonName.PersonID)) THEN...
Step Details Add a conditional block without ELSE clause Click the down arrow
beside The variable value 'isWorker', then Add next, then select Add condition block.Click the down arrow
beside If, then select Delete else block.Set the first condition Click the first PersonName.BusinessGroupID, then personContactRelRow then select PersonID. Left part is now personContactRelRow.PersonID.
Click the current operator, then select Is null.
Add a second condition Click the down arrow
above personContactRelRow.PersonID Is null, then Add condition. A new line appeared: PersonName.BusinessGroupID = PersonName.BusinessGroupID.Click the first PersonName.BusinessGroupID, then personContactRelRow then select PersonID. Left part is now personContactRelRow.PersonID.
The operator should be Equal to already, If not, click the current operator, then select Equal to.
Click
just following Equal to, then select Change to a field. PersonName.BusinessGroupID is now displayed.Click the right part attribute PersonName.BusinessGroupID, then PersonName then select PersonID. Right part is now PersonName.PersonID.
Set the conjunction linking the new condition group conditions Click the down arrow
above personContactRelRow.PersonID Is null, then select Change conjunction. The AND conjunction became OR.Set THEN clause Click the down arrow
beside The variable value 'stringVar_1', then Add next, then select Assign value to variable. A new line appeared, showing 'actionTypeCode' variable.Click the current variable (possibly length), then select isWorker.
The right part of the assignment should be set to 'True'. If not, click False then select True.
Clean up the rule Click the down arrow beside The variable value 'stringVar_1', then select Delete. The row is now deleted.
The following table explains how to implement IF (PersonName.FirstName Is not null) THEN... ELSE...
Step Details Add a conditional block with ELSE clause Click the down arrow beside the previous If clause, then Add next, then select Add condition block.Set IF condition Click PersonName.BusinessGroupID, then PersonName then select First Name. PersonName.FirstName is now displayed.
Click Equal to, then select Is not null. The operator is Is not null and the right part of the clause just disappeared.
The following table explains how to implement length := LengthOf(PersonName.FirstName)
Step Details Set length variable Click the down arrow beside The variable value 'stringVar_1', then Add next, then select Assign value to variable. If 'length' is not selected, click the current variable and select 'length'.Set LengthOf function Click
just following the '=' operator, then select Change to a function. The function 'YearOf' appeared.Click Year of then Standard functions then select Length of. The function 'LengthOf' is now set.
Click
just following Length of, then select Change to a field. The business attribute PersonName.CharSetText appeared.Click this business attribute, then Person Name then select First Name. The 'LengthOf' argument is now set.
Clean up the rule Click the down arrow beside The variable value 'stringVar_1', then select Delete. The row is now deleted.
The following table explains how to implement IF (length > 40) THEN...
Step Details Add a conditional block without ELSE clause Click the down arrow
beside The variable value 'length', then Add next, then Add condition block.Click the down arrow
beside If, then Delete else block.Set IF condition Click
just beside PersonName.BusinessGroupID, then select Change to a variable. If the displayed variable is not 'length', then click this variable and select 'length'.Click Equal to, then select Greater than. The operator is now set to Greater than.
In the textbox just following
, enter: '40'.Add and set the error message clause Click the down arrow
beside The variable value 'stringVar_12', then Add next then select Add error message.In the textbox following Show an error message, type: 'First Name cannot have more than 40 characters'.
Clean up the rule Click the down arrow beside The variable value 'stringVar_12', then select Delete. The row is now deleted.
The following table explains how to implement IF ((personLegInfoRow.Country In ('DE','MX','RO')) AND (isWorker = True)) THEN...
Step Details Add a conditional block without ELSE clause Click the down arrow
beside The variable value 'stringVar_1' (ELSE block), then Add next, then select Add condition block.Click the down arrow
beside If, then select Delete else block.Set the first condition Click PersonName.BusinessGroupID, then personLegInfoRow then select Country. personLegInfoRow.Country is now displayed.
The operator should be In already; if not, click the current operator, then select In.
Next to In operator, click the dropdown arrow
 and check both 'Germany', 'Mexico' and 'Romania'.
Add a second condition to the IF clause Click the down arrow beside '(' just below If, then select Add condition. A new condition is now displayed. It is linked to the first condition by AND conjunction.Set the conjunction linking both conditions of the IF clause Make sure the current conjunction is AND. If not, click the down arrow beside '(' just below If, then select Change conjunction until the conjunction is AND.Set the second condition Click
just beside the first PersonName.BusinessGroupID, then select Change to a variable.Click length, then select isWorker.
The right part of the assignment should be set to 'True'. If not, click False then select True.
Add and set the error message clause Click the down arrow
beside The variable value 'stringVar_12', then Add next then select Add error message.In the textbox following Show an error message, type: 'First Name is required'.
Clean up the rule Click the down arrow beside The variable value 'stringVar_12', then select Delete. The row is now deleted.Person Last Name Validation
The following table explains how to implement IF (PersonName.LastName Is not null) THEN...
Step Details Add a conditional block without ELSE clause Click the down arrow
beside If (PersonName.FirstName Is not null), then Add next, then select Add condition block.Click the down arrow
beside If, then select Delete else block.Set IF condition Click PersonName.BusinessGroupID, then PersonName then select Last Name. PersonName.LastName is now displayed.
Click Equal to, then select Is not null. The operator is Is not null and the right part of the clause just disappeared.
The following table explains how to implement length := LengthOf(PersonName.LastName)
Step Details Set length variable Click the down arrow beside The variable value 'stringVar_1', then Add next, then select Assign value to variable. If 'length' is not selected, click the current variable and select 'length'.Set LengthOf function Click
just following the '=' operator, then select Change to a function. The function 'YearOf' appeared.Click Year of then Standard functions then select Length of. The function 'LengthOf' is now set.
Click
just following Length of, then select Change to a field. The business attribute PersonName.CharSetText appeared.Click this business attribute, then Person Name then select Last Name. The 'LengthOf' argument is now set.
Clean up the rule Click the down arrow beside The variable value 'stringVar_1', then select Delete. The row is now deleted.
The following table explains how to implement IF (length > 40) THEN...
Step Details Add a conditional block without ELSE clause Click the down arrow
beside The variable value 'length', then Add next, then select Add condition block.Click the down arrow
beside If, then select Delete else block.Set IF condition Click
just beside PersonName.BusinessGroupID, then select Change to a variable. If the displayed variable is not 'length', then click this variable and select 'length'.Click Equal to, then select Greater than. The operator is now set to Greater than.
In the textbox just following
, enter: '40'.Add and set the error message clause Click the down arrow
beside The variable value 'stringVar_12', then Add next then select Add error message.In the textbox following Show an error message, type: 'Last Name cannot have more than 40 characters'.
Clean up the rule Click the down arrow beside The variable value 'stringVar_12', then select Delete. The row is now deleted.Person Title Validation
Important Note: Make sure Person Name Title attribute is visible in Mobile UI. If not, make it visible using 'Manage Person Name Styles'.
The following table explains how to implement IF (PersonName.Title Is null) THEN...
Step Details Add a conditional block without ELSE clause Click the down arrow
beside If (PersonName.LastName Is not null), then Add next, then select Add condition block.Click the down arrow
beside If, then select Delete else block.Set IF condition Click PersonName.BusinessGroupID, then PersonName then select Title. PersonName.Title is now displayed.
Click Equal to, then select Is null. The operator is Is null and the right part of the clause just disappeared.
The following table explains how to implement IF ((personLegInfoRow.Country In ('DE','MX','RO')) AND (isWorker = True)) THEN...
Step Details Add a conditional block without ELSE clause Click the down arrow
beside The variable value 'stringVar_1', then Add next, then select Add condition block.Click the down arrow
beside If, then select Delete else block.Set the first condition Click PersonName.BusinessGroupID, then personLegInfoRow then select Country. personLegInfoRow.Country is now displayed.
The operator should be In already; if not, click the current operator, then select In.
Next to In operator, click the dropdown arrow
and check both 'Germany', 'Mexico' and 'Romania'.Add a second condition to the IF clause Click the down arrow beside '(' just below If, then select Add condition. A new condition is now displayed. It is linked to the first condition by AND conjunction.Set the second condition Click
just beside the first PersonName.BusinessGroupID, then select Change to a variable.Click length, then select isWorker.
The right part of the assignment should be set to 'True'. If not, click False then select True.
Set the conjunction linking the initial condition and the new condition group Make sure the current conjunction is AND. If not, click the down arrow beside '(' just below If, then select Change conjunction until the conjunction is AND.Add and set the error message clause Click the down arrow
beside The variable value 'stringVar_12', then Add next then select Add error message.In the textbox following Show an error message, type: 'Title is required'.
Clean up the rule Click the down arrow
beside The variable value 'stringVar_1', then select Delete. The row is now deleted.Click the down arrow
beside The variable value 'stringVar_12', then select Delete. The row is now deleted.Person Academic Title Validation
Assertion: Person Academic Title is stored in NameInformation15 attribute. Make sure it is the case by accessing 'Manage Person Name Styles', for country = 'Germany'.
The following table explains how to implement IF ((PersonName.NameInformation15 Is not null) AND (personLegInfoRow.Country In ('DE')) THEN...
Step Details Add a conditional block without ELSE clause Click the down arrow
beside If (PersonName.Title Is null), then Add next, then select Add condition block.Click the down arrow
beside If, then select Delete else block.Set IF first condition Click PersonName.BusinessGroupID, then PersonName then select NameInformation15. PersonName.NameInformation15 is now displayed.
Click Equal to, then select Is not null. The operator is Is not null and the right part of the clause just disappeared.
Add a second condition to the IF clause Click the down arrow beside '(' just below If, then select Add condition. A new condition is now displayed. It is linked to the first condition by AND conjunction.Set the second condition Click PersonName.BusinessGroupID, then personLegInfoRow then select Country. personLegInfoRow.Country is now displayed.
The operator should be In already; if not, click the current operator, then select In.
Next to In operator, click the dropdown arrow
and check 'Germany'.Set the conjunction linking the initial condition and the new condition group Make sure the current conjunction is AND. If not, click the down arrow beside '(' just below If, then select Change conjunction until the conjunction is AND.
The following table explains how to implement length := LengthOf(PersonName.NameInformation15)
Step Details Set length variable Click the down arrow beside The variable value 'stringVar_1', then Add next, then select Assign value to variable. If 'length' is not selected, click the current variable and select 'length'.Set LengthOf function Click
just following the '=' operator, then select Change to a function. The function 'YearOf' appeared.Click Year of then Standard functions then select Length of. The function 'LengthOf' is now set.
Click
just following Length of, then select Change to a field. The business attribute PersonName.CharSetText appeared.Click this business attribute, then Person Name then select NameInformation15. The 'LengthOf' argument is now set.
Clean up the rule Click the down arrow beside The variable value 'stringVar_1', then select Delete. The row is now deleted.
The following table explains how to implement IF (length > 100) THEN...
Step Details Add a conditional block without ELSE clause Click the down arrow
beside The variable value 'length', then Add next, then select Add condition block.Click the down arrow
beside If, then select Delete else block.Set IF condition Click
just beside PersonName.BusinessGroupID, then select Change to a variable. If the displayed variable is not 'length', then click this variable and select 'length'.Click Equal to, then select Greater than. The operator is now set to Greater than.
In the textbox just following
, enter: '100'.Add and set the error message clause Click the down arrow
beside The variable value 'stringVar_12', then Add next then select Add error message.In the textbox following Show an error message, type: 'Academic Title cannot have more than 100 characters'.
Clean up the rule Click the down arrow beside The variable value 'stringVar_12', then select Delete. The row is now deleted.Person Birth Name Validation
Assertion: Person Birth Name is stored in NameInformation16 attribute. Make sure it is the case by accessing 'Manage Person Name Styles', for country = 'Germany'.
The following table explains how to implement IF ((PersonName.NameInformation16 Is not null) AND (personLegInfoRow.Country In ('DE')) THEN...
Step Details Add a conditional block without ELSE clause Click the down arrow
beside If (PersonName.NameInformation15 Is null), then Add next, then select Add condition block.Click the down arrow
beside If, then select Delete else block.Set IF first condition Click PersonName.BusinessGroupID, then PersonName then select NameInformation16. PersonName.NameInformation16 is now displayed.
Click Equal to, then select Is not null. The operator is Is not null and the right part of the clause just disappeared.
Add a second condition to the IF clause Click the down arrow beside '(' just below If, then select Add condition. A new condition is now displayed. It is linked to the first condition by AND conjunction.Set the second condition Click PersonName.BusinessGroupID, then personLegInfoRow then select Country. personLegInfoRow.Country is now displayed.
The operator should be In already; if not, click the current operator, then select In.
Next to In operator, click the dropdown arrow
and check 'Germany'.Set the conjunction linking the initial condition and the new condition group Make sure the current conjunction is AND. If not, click the down arrow beside '(' just below If, then select Change conjunction until the conjunction is AND.
The following table explains how to implement length := LengthOf(PersonName.NameInformation16)
Step Details Set length variable Click the down arrow beside The variable value 'stringVar_1', then Add next, then select Assign value to variable. If 'length' is not selected, click the current variable and select 'length'.Set LengthOf function Click
just following the '=' operator, then select Change to a function. The function 'YearOf' appeared.Click Year of then Standard functions then select Length of. The function 'LengthOf' is now set.
Click
just following Length of, then select Change to a field. The business attribute PersonName.CharSetText appeared.Click this business attribute, then Person Name then select NameInformation16. The 'LengthOf' argument is now set.
Clean up the rule Click the down arrow beside The variable value 'stringVar_1', then select Delete. The row is now deleted.
The following table explains how to implement IF (length > 40) THEN...
Step Details Add a conditional block without ELSE clause Click the down arrow
beside The variable value 'length', then Add next, then select Add condition block.Click the down arrow
beside If, then select Delete else block.Set IF condition Click
just beside PersonName.BusinessGroupID, then select Change to a variable. If the displayed variable is not 'length', then click this variable and select 'length'.Click Equal to, then select Greater than. The operator is now set to Greater than.
In the textbox just following
, enter: '40'.Add and set the error message clause Click the down arrow
beside The variable value 'stringVar_12', then Add next then select Add error message.In the textbox following Show an error message, type: 'Birth Name cannot have more than 40 characters'.
Clean up the rule Click the down arrow beside The variable value 'stringVar_12', then select Delete. The row is now deleted.- The rule is now completed. Click Save.

Person Validations
This rule covers the following ADP requirements:
- Person Correspondence Language is required.
- Person Date of Birth is required.
Access Autocomplete tool
- Once the sandbox is activated, select Tools > HCM Experience Design Studio from the sandbox ribbon.
- Once in HCM Experience Design Studio window, click Autocomplete Rules in the left menu.
Create Autocomplete Rule - Person
- From the dropdown list located below the Business Object title, select Person.
- At the right end of Business Object Rules title, click the Add button. A submenu appeared; click Object Validation Rule Type.
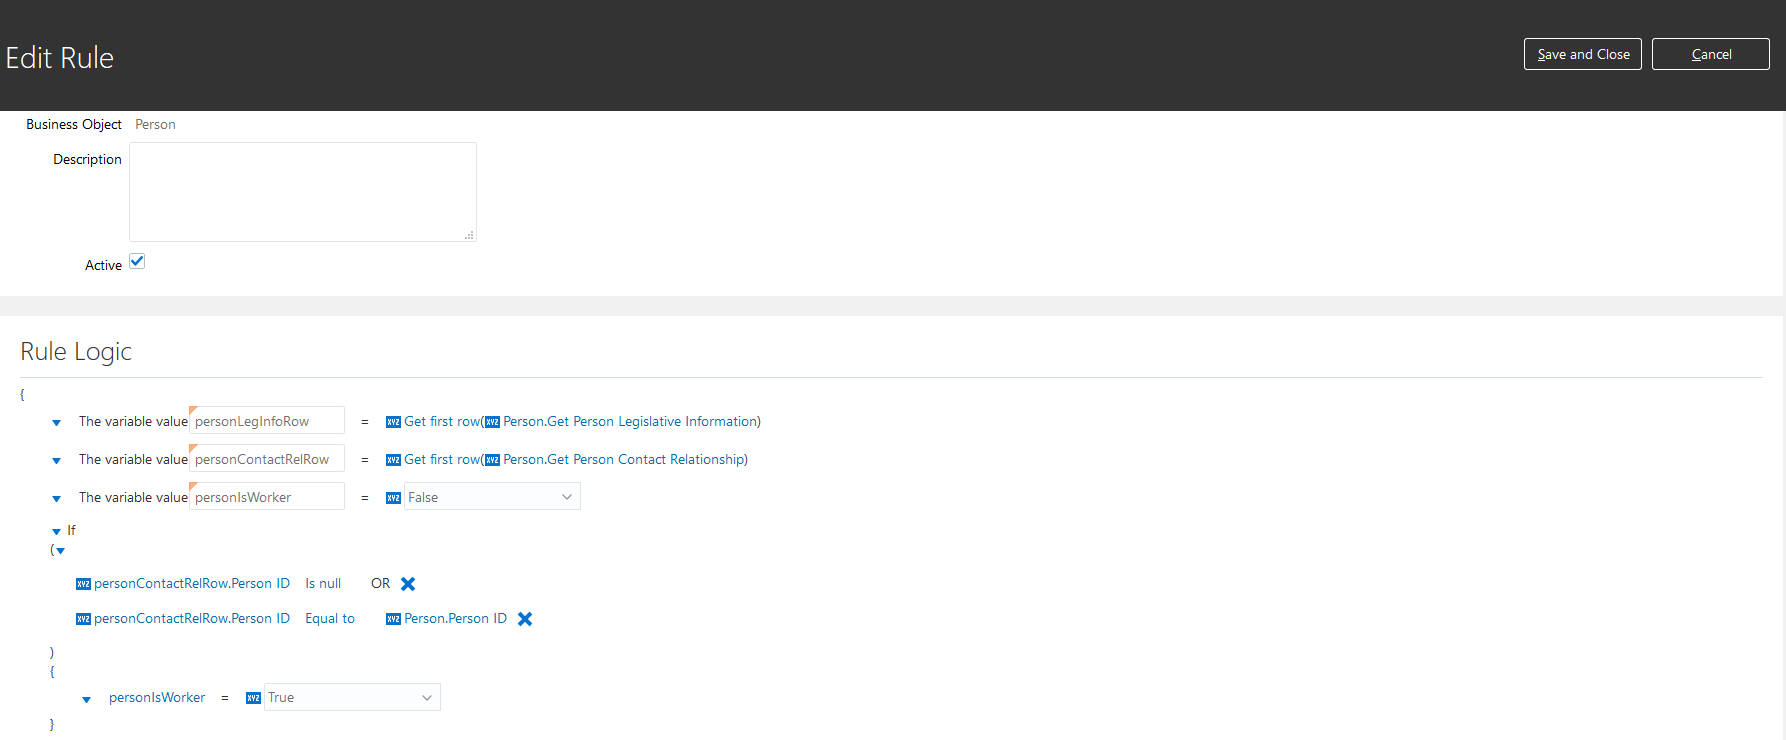
In Name textbox, enter: 'ADP_Person_ML'. Make sure Active is checked
.Prepare the Rule Code:
personLegInfoRow := GetFirstRow(Person.personLegislativeInfo);
personContactRelRow := GetFirstRow(Person.personContactRelationship);
isWorker := False;
IF ((personContactRelRow.PersonID Is null)
    OR (personContactRelRow.PersonID = Person.PersonID)) THEN
  isWorker := True;

IF (Person.CorrespondenceLanguage Is null) THEN
  actionTypeCode := GetStringValueFromHcmParams('EMP_Groovy_ActionTypeCode', Person.CurrentRow);
  IF ((personLegInfoRow.Country In ('DE','RO')) AND (isWorker = True)) THEN
    ShowError('Correspondence Language is required');
  IF ((personLegInfoRow.Country In ('MX')) AND (actionTypeCode != 'EMPL_ADD_EMP') AND (isWorker = True)) THEN
    ShowError('Correspondence Language is required');

IF (Person.DateOfBirth Is null) THEN
  IF ((personLegInfoRow.Country In ('DE','MX','RO')) AND (isWorker = True)) THEN
    ShowError('Date of Birth is required');
Person Correspondence Language Validation
The implementation steps are very similar to 'Person Title Validation'. But first, make sure to declare 'personLegInfoRow' and 'personContactRelRow' variables, as done in 'Person Title Validations'. Also declare 'isWorker' as a boolean variable.
As 'actionTypeCode' variable is more complex, it will be detailed here.
The following table explains how to implement actionTypeCode := GetStringValueFromHcmParams('EMP_Groovy_ActionTypeCode', Person.CurrentRow)
Step Details Add a new string variable Click the down arrow
beside The variable value 'stringVar_1', then Add next, then Add a new variable type then select String.Double click 'stringVar_' and enter: 'actionTypeCode'.
Set the right part of the assignment clause Click
just following the '=' operator, then select Change to a function. 'Get date in custom format(...)' is now displayed.Click Get date in custom format, then Global functions then select Get string value from HCM Params. 'Get string value from HCM Params(..., Person.CurrentRow)' is now displayed.
Just after Get string value from HCM Params function name, in the textbox following
, enter: 'EMP_Groovy_ActionTypeCode'.
Person Date of Birth Validation
The implementation steps are very similar to 'Person Title Validation'. But first, make sure to declare 'personLegInfoRow' and 'personContactRelRow' variables, as done in 'Person First Name Validations'.

Person Address Validations
This rule covers the following ADP requirement:
- Person Address Type is required.
Access Autocomplete tool
- Once the sandbox is activated, select Tools > HCM Experience Design Studio from the sandbox ribbon.
- Once in HCM Experience Design Studio window, click Autocomplete Rules in the left menu.
Create Autocomplete Rule - Person Address
- From the dropdown list located below the Business Object title, select Person Address.
- At the right end of Business Object Rules title, click the Add button. A submenu appeared; click Object Validation Rule Type.
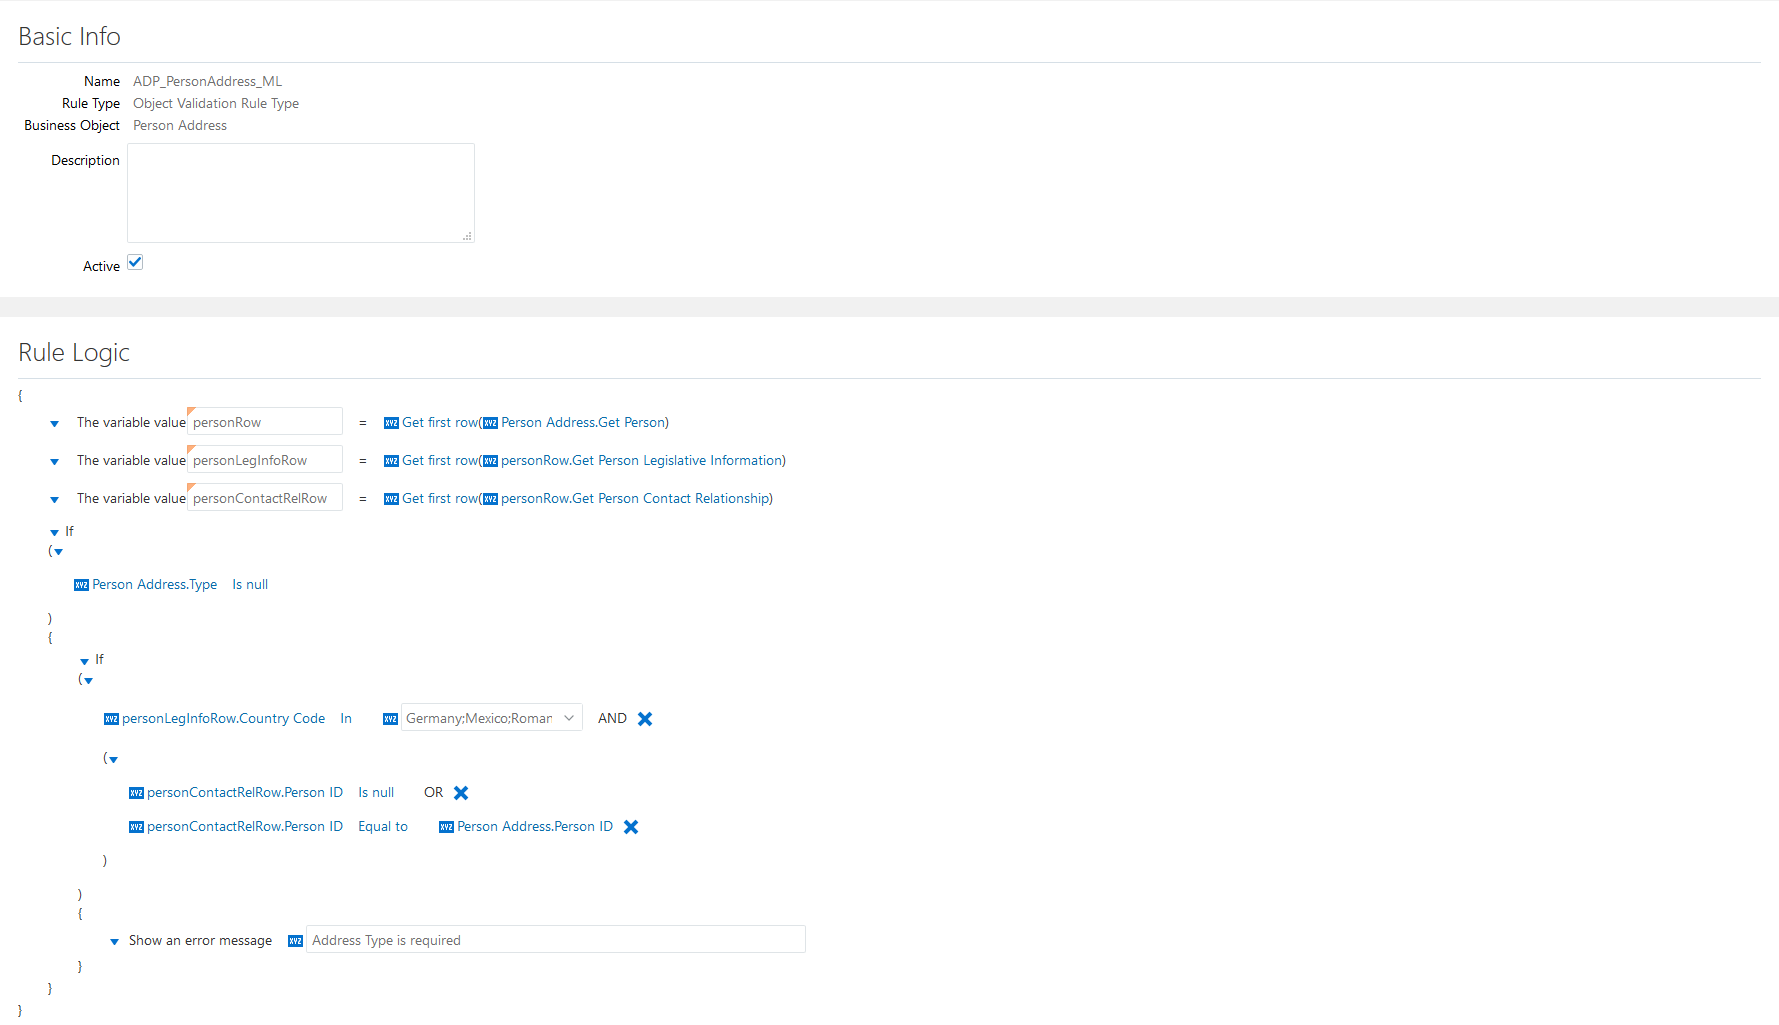
In Name textbox, enter: 'ADP_PersonAddress_ML'. Make sure Active is checked
.Prepare the Rule Code:
personRow := GetFirstRow(PersonAddress.person);
personLegInfoRow := GetFirstRow(personRow.personLegislativeInfo);
personContactRelRow := GetFirstRow(personRow.personContactRelationship);
IF (PersonAddress.Type Is null) THEN
  IF ((personLegInfoRow.Country In ('DE','MX','RO'))
      AND ((personContactRelRow.PersonID Is null)
           OR (personContactRelRow.PersonID = PersonAddress.PersonID))) THEN
    ShowError('Address Type is required');
Person Address Type
The implementation steps are very similar to 'Person Title Validation'. Make sure to declare 'personRow', 'personLegInfoRow' and 'personContactRelRow' variables, as done in 'Person First Name Validations'.
Address Validations
This rule covers the following ADP requirements:
- Address Line 1 is required when address country is Mexico or Romania.
- Address Line 1 cannot have more than 40 characters.
- Address Line 2 is required when address country is Mexico.
- Address Line 2 cannot have more than 40 characters.
- Total length of Address Lines 1 and 2 cannot exceed 60 characters, when address country is Germany.
- Address City is required when address country is Germany, Mexico or Romania.
- Address State is required when address country is Mexico or Romania.
- Address Postal Code is required when address country is Mexico or Romania.
- Address Postal Code cannot have more than 10 characters.
- Address Postal Code must have 5 characters, when address country is Germany or Mexico.
- Address Postal Code must have 6 characters, when address country is Romania.
- Address Country is required.
Access Autocomplete tool
- Once the sandbox is activated, select Tools > HCM Experience Design Studio from the sandbox ribbon.
- Once in HCM Experience Design Studio window, click Autocomplete Rules in the left menu.
Create Autocomplete Rule - Address
- From the dropdown list located below the Business Object title, select Address.
- At the right end of Business Object Rules title, click the Add button. A submenu appeared; click Object Validation Rule Type.
In Name textbox, enter: 'ADP_Address_ML'. Make sure Active is checked
.Prepare the Rule Code:
length := 0;
IF (Address.AddressLine1 Is not null) THEN
  length := LengthOf(Address.AddressLine1);
  IF (length > 40) THEN
    ShowError('Address Line 1 cannot have more than 40 characters');
ELSE
  IF (Address.Country In ('MX','RO')) THEN
    ShowError('Address Line 1 is required');

IF (Address.AddressLine2 Is not null) THEN
  length := LengthOf(Address.AddressLine2);
  IF (length > 40) THEN
    ShowError('Address Line 2 cannot have more than 40 characters');
ELSE
  IF (Address.Country In ('MX')) THEN
    ShowError('Address Line 2 is required');

IF (Address.Country In ('DE')) THEN
  lengthAddrLine1 := 0;
  lengthAddrLine2 := 0;
  IF (Address.AddressLine1 Is not null) THEN
    lengthAddrLine1 := LengthOf(Address.AddressLine1);
  IF (Address.AddressLine2 Is not null) THEN
    lengthAddrLine2 := LengthOf(Address.AddressLine2);
  totalLength := lengthAddrLine1 + lengthAddrLine2 + 1;
  IF (totalLength > 60) THEN
    ShowError('Total length of Address Lines 1 and 2 cannot exceed 60 characters');

IF (Address.TownOrCity Is null) THEN
  IF (Address.Country In ('DE','MX','RO')) THEN
    ShowError('City is required');

IF (Address.Region2 Is null) THEN
  IF (Address.Country In ('MX','RO')) THEN
    ShowError('State is required');

IF (Address.PostalCode Is not null) THEN
  length := LengthOf(Address.PostalCode);
  IF (length > 10) THEN
    ShowError('Postal Code cannot have more than 10 characters');
  IF ((Address.Country In ('DE','MX')) AND (length != 5)) THEN
    ShowError('Postal Code must have 5 characters');
  IF ((Address.Country In ('RO')) AND (length != 6)) THEN
    ShowError('Postal Code must have 6 characters');
ELSE
  IF (Address.Country In ('MX','RO')) THEN
    ShowError('Postal Code is required');

IF (Address.Country Is null) THEN
  ShowError('Address Country is required');
Address Line 1 Validation
The following table explains how to implement length := 0
Step Details Add a new integer variable Click the down arrow
beside The variable value 'stringVar_', then Add next, then Add a new variable type then select Integer.Access the textbox containing 'integerVar_', double click 'integerVar_' and type: 'length'.
Initialize the variable In the textbox following
, enter: '0'.Clean up the rule Click the down arrow beside The variable value 'stringVar_', then select Delete. The row is now deleted.
The following table explains how to implement IF (Address.AddressLine1 Is not null) THEN... ELSE...
Step Details Add a conditional block with ELSE clause Click the down arrow beside The variable value 'length', then Add next, then select Add condition block.Set IF condition Click Address.AdditionalAttribute1, then Address then select Address Line 1. Address.AddressLine1 is now displayed.
Click Equal to, then select Is not null. The operator is Is not null and the right part of the clause just disappeared.
The following table explains how to implement length := LengthOf(Address.AddressLine1)
Step Details Set length variable Click the down arrow beside The variable value 'stringVar_1' (following If), then Add next, then select Assign value to variable. If 'length' is not selected, click the current variable and select 'length'.Set LengthOf function Click
just following the '=' operator, then select Change to a function. The function 'YearOf' appeared.Click Year of then Standard functions then select Length of. The function 'LengthOf' is now set.
Click
just following Length of, then select Change to a field. The business attribute Address.AdditionalAttribute1 appeared.Click this business attribute, then Address then select Address Line 1. The 'LengthOf' argument is now set.
Clean up the rule Click the down arrow beside The variable value 'stringVar_1', then select Delete. The row is now deleted.
The following table explains how to implement IF (length > 40) THEN...
Step Details Add a conditional block without ELSE clause Click the down arrow
beside The variable value 'length', then Add next, then select Add condition block.Click the down arrow
beside If, then select Delete else block.Set IF condition Click
just beside Address.AdditionalAttribute1, then select Change to a variable. If the displayed variable is not 'length', then click this variable and select 'length'.Click Equal to, then select Greater than. The operator is now set to Greater than.
In the textbox just following
, enter: '40'.Add and set the error message clause Click the down arrow
beside The variable value 'stringVar_12', then Add next then select Add error message.In the textbox following Show an error message, type: 'Address Line 1 cannot have more than 40 characters'.
Clean up the rule Click the down arrow beside The variable value 'stringVar_12', then select Delete. The row is now deleted.
The following table explains how to implement IF (Address.Country In ('MX','RO')) THEN...
Step Details Add a conditional block without ELSE clause Click the down arrow
beside The variable value 'stringVar_1', then Add next, then select Add condition block.Click the down arrow
beside If, then select Delete else block.Set IF condition Click
just beside Address.AdditionalAttribute1, then Address then select Country. The left operand is now set to Address.Country.The operator should be In already; if not, click the current operator, then select In.
Next to In operator, click the dropdown arrow
, then check both 'Mexico' and 'Romania'.Add and set the error message clause Click the down arrow
beside The variable value 'stringVar_12', then Add next then select Add error message.In the textbox following Show an error message, type: 'Address Line 1 is required'.
Clean up the rule Click the down arrow
beside The variable value 'stringVar_12', then select Delete. The row is now deleted.Click the down arrow
beside The variable value 'stringVar_1', then select Delete. The row is now deleted.Address Line 2 Validation
The implementation steps are very similar to 'Address Line 1 Validation'. However, Address Line 2 is only required for Mexico.
Address Lines 1 + 2 Validation
The following table explains how to implement IF (Address.Country In ('DE')) THEN...
Step Details Add a conditional block without ELSE clause Click the down arrow
beside If (Address.AddressLine2 Is not null), then Add next, then select Add condition block.Click the down arrow
beside If, then select Delete else block.
The following table explains how to implement lengthAddrLine1 := 0
Step Details Add a new integer variable Click the down arrow
beside The variable value 'stringVar_1', then Add next, then Add a new variable type then select Integer.Access the textbox containing 'integerVar_', double click 'integerVar_' and type: 'lengthAddrLine1'.
Initialize the variable In the textbox following
, enter: '0'.Clean up the rule Click the down arrow beside The variable value 'stringVar_1', then select Delete. The row is now deleted.
The following table explains how to implement lengthAddrLine2 := 0
Step Details Add a new integer variable Click the down arrow
beside The variable value 'lengthAddrLine1', then Add next, then Add a new variable type then select Integer.Access the textbox containing 'integerVar_', double click 'integerVar_' and type: 'lengthAddrLine2'.
Initialize the variable In the textbox following
, enter: '0'.
The following table explains how to implement IF (Address.AddressLine1 Is not null) THEN...
Step Details Add a conditional block without ELSE clause Click the down arrow
beside The variable value 'lengthAddrLine2', then Add next, then select Add condition block.Click the down arrow
beside If, then select Delete else block.Set IF condition Click Address.AdditionalAttribute1, then Address then select Address Line 1. Address.AddressLine1 is now displayed.
Click Equal to, then select Is not null. The operator is Is not null and the right part of the clause just disappeared.
The following table explains how to implement lengthAddrLine1 := LengthOf(Address.AddressLine1)
Step Details Set length variable Click the down arrow beside The variable value 'stringVar_1' (following If), then Add next, then select Assign value to variable. If 'length' is not selected, click the current variable and select 'length'.Set LengthOf function Click
just following the '=' operator, then select Change to a function. The function 'YearOf' appeared.Click Year of then Standard functions then select Length of. The function 'LengthOf' is now set.
Click
just following Length of, then select Change to a field. The business attribute Address.AdditionalAttribute1 appeared.Click this business attribute, then Address then select Address Line 1. The 'LengthOf' argument is now set.
Clean up the rule Click the down arrow beside The variable value 'stringVar_1', then select Delete. The row is now deleted.
The following table explains how to implement IF (Address.AddressLine2 Is not null) THEN...
Step Details Add a conditional block without ELSE clause Click the down arrow
beside the previous If (Address.AddressLine1 Is not null), then Add next, then select Add condition block.Click the down arrow
beside If, then select Delete else block.Set IF condition Click Address.AdditionalAttribute1, then Address then select Address Line 2. Address.AddressLine2 is now displayed.
Click Equal to, then select Is not null. The operator is Is not null and the right part of the clause just disappeared.
The following table explains how to implement lengthAddrLine2 := LengthOf(Address.AddressLine2)
Step Details Set length variable Click the down arrow beside The variable value 'stringVar_1' (following If), then Add next, then select Assign value to variable. If 'length' is not selected, click the current variable and select 'length'.Set LengthOf function Click
just following the '=' operator, then select Change to a function. The function 'YearOf' appeared.Click Year of then Standard functions then select Length of. The function 'LengthOf' is now set.
Click
just following Length of, then select Change to a field. The business attribute Address.AdditionalAttribute1 appeared.Click this business attribute, then Address then select Address Line 2. The 'LengthOf' argument is now set.
Clean up the rule Click the down arrow beside The variable value 'stringVar_1', then select Delete. The row is now deleted.
The following table explains how to implement totalLength := lengthAddrLine1 + lengthAddrLine2 + 1
Step Details Add a new integer variable Click the down arrow
beside the previous If (Address.AddressLine2 Is not null), then Add next, then Add a new variable type then select Integer.Access the textbox containing 'integerVar_', double click 'integerVar_' and type: 'totalLength'.
Set right operands Click
just following the '=' operator, then select Change to an arithmetic expression. Two operands appeared, linked by '+' operator.Click
just following '(', then select Change to a variable. If the displayed variable is not 'lengthAddrLine1', then click this variable and select 'lengthAddrLine1'.Click
just following the '+' operator, then select Change to an arithmetic expression. Two additional operands appeared, linked by '+' operator.Click
just following the second '(', then select Change to a variable. If the displayed variable is not 'lengthAddrLine2', then click this variable and select 'lengthAddrLine2'.In the textbox following the last
, enter: '1'.
The following table explains how to implement IF (totalLength > 60) THEN...
Step Details Add a conditional block without ELSE clause Click the down arrow
beside The variable value 'totalLength', then Add next, then select Add condition block.Click the down arrow
beside If, then select Delete else block.Set IF condition Click
just beside Address.AdditionalAttribute1, then select Change to a variable. Then click the current variable and select 'totalLength'.Click Equal to, then select Greater than. The operator is now set to Greater than.
In the textbox just following
, enter: '60'.Add and set the error message clause Click the down arrow
beside The variable value 'stringVar_12', then Add next then select Add error message.In the textbox following Show an error message, type: 'Total length of Address Lines 1 and 2 cannot exceed 60 characters'.
Clean up the rule Click the down arrow beside The variable value 'stringVar_12', then select Delete. The row is now deleted.
Address City Validation
The following table explains how to implement IF (Address.TownOrCity Is null) THEN...
Step Details Add a conditional block without ELSE clause Click the down arrow
beside If (Address.Country In ('DE')), then Add next, then select Add condition block.Click the down arrow
beside If, then select Delete else block.Set IF condition Click Address.AdditionalAttribute1, then Address then select Town or City. Address.TownOrCity is now displayed.
Click Equal to, then select Is null. The operator is Is null and the right part of the clause just disappeared.
The following table explains how to implement IF (Address.Country In ('DE','MX','RO')) THEN...
Step Details Add a conditional block without ELSE clause Click the down arrow
beside The variable value 'stringVar_1', then Add next, then select Add condition block.Click the down arrow
beside If, then select Delete else block.Set IF condition Click
just beside Address.AdditionalAttribute1, then Address then select Country. The left operand is now set to Address.Country.The operator should be In already; if not, click the current operator, then select In.
Next to In operator, click the dropdown arrow
and check both 'Germany', 'Mexico' and 'Romania'.Add and set the error message clause Click the down arrow
beside The variable value 'stringVar_12', then Add next then select Add error message.In the textbox following Show an error message, type: 'City is required'.
Clean up the rule Click the down arrow
beside The variable value 'stringVar_12', then select Delete. The row is now deleted.Click the down arrow
beside The variable value 'stringVar_1', then select Delete. The row is now deleted.Address State Validation
The implementation steps are very similar to 'Person Address City Validation'.
Address Postal Code Validation
The following table explains how to implement IF (Address.PostalCode Is not null) THEN... ELSE...
Step Details Add a conditional block with ELSE clause Click the down arrow beside If (Address.Region2 Is null), then Add next, then select Add condition block.Set IF condition Click Address.AdditionalAttribute1, then Address then select Postal Code. Address.PostalCode is now displayed.
Click Equal to, then select Is not null. The operator is Is not null and the right part of the clause just disappeared.
The following table explains how to implement length := LengthOf(Address.PostalCode)
Step Details Set length variable Click the down arrow beside The variable value 'stringVar_1', then Add next, then select Assign value to variable. If 'length' is not selected, click the current variable and select 'length'.Set LengthOf function Click
just following the '=' operator, then select Change to a function. The function 'YearOf' appeared.Click Year of then Standard functions then select Length of. The function 'LengthOf' is now set.
Click
just following Length of, then select Change to a field. The business attribute Address.AdditionalAttribute1 appeared.Click this business attribute, then Address then select Postal Code. The 'LengthOf' argument is now set.
Clean up the rule Click the down arrow beside The variable value 'stringVar_1' (in then clause, not in else), then select Delete. The row is now deleted.
The following table explains how to implement IF (length > 10) THEN...
Step Details Add a conditional block without ELSE clause Click the down arrow
beside The variable value 'length', then Add next, then select Add condition block.Click the down arrow
beside If, then select Delete else block.Set IF condition Click
just beside Address.AdditionalAttribute1, then select Change to a variable. If the displayed variable is not 'length', then click this variable and select 'length'.Click Equal to, then select Greater than. The operator is now set to Greater than.
In the textbox just following
, enter: '10'.Add and set the error message clause Click the down arrow
beside The variable value 'stringVar_12', then Add next then select Add error message.In the textbox following Show an error message, type: 'Postal Code cannot have more than 10 characters'.
Clean up the rule Click the down arrow beside The variable value 'stringVar_12', then select Delete. The row is now deleted.
The following table explains how to implement IF ((Address.Country In ('DE','MX')) AND (length != 5)) THEN...
Step Details Add a conditional block without ELSE clause Click the down arrow
beside The variable value 'length', then Add next, then select Add condition block.Click the down arrow
beside If, then select Delete else block.Set IF condition Click
just beside Address.AdditionalAttribute1, then Address then select Country. The left operand is now set to Address.Country.The operator should be In already; if not, click the current operator, then select In.
Next to In operator, click the dropdown arrow
and check 'Germany' and 'Mexico'.Add another condition to the IF clause Click the down arrow beside '(' just below If, then select Add condition. A new condition is now displayed. It is linked to the first condition by AND conjunction.Set second condition Click
just beside Address.AdditionalAttribute1, then select Change to a variable. If the displayed variable is not 'length', then click this variable and select 'length'.Click Equal to, then select Not equal to. The operator is now set to Not equal to.
In the textbox just following
, enter: '5'.Add and set the error message clause Click the down arrow
beside The variable value 'stringVar_12', then Add next then select Add error message.In the textbox following Show an error message, type: 'Postal Code must have 5 characters'.
Clean up the rule Click the down arrow beside The variable value 'stringVar_12', then select Delete. The row is now deleted.
The following table explains how to implement IF ((Address.Country In ('RO')) AND (length != 6)) THEN...
Step Details Add a conditional block without ELSE clause Click the down arrow
beside The variable value 'length', then Add next, then select Add condition block.Click the down arrow
beside If, then select Delete else block.Set IF condition Click
just beside Address.AdditionalAttribute1, then Address then select Country. The left operand is now set to Address.Country.The operator should be In already; if not, click the current operator, then select In.
Next to In operator, click the dropdown arrow
and check 'Romania'.Add another condition to the IF clause Click the down arrow beside '(' just below If, then select Add condition. A new condition is now displayed. It is linked to the first condition by AND conjunction.Set second condition Click
just beside Address.AdditionalAttribute1, then select Change to a variable. If the displayed variable is not 'length', then click this variable and select 'length'.Click Equal to, then select Not equal to. The operator is now set to Not equal to.
In the textbox just following
, enter: '6'.Add and set the error message clause Click the down arrow
beside The variable value 'stringVar_12', then Add next then select Add error message.In the textbox following Show an error message, type: 'Postal Code must have 6 characters'.
Clean up the rule Click the down arrow beside The variable value 'stringVar_12', then select Delete. The row is now deleted.
The following table explains how to implement IF (Address.Country In ('MX','RO')) THEN...
Step Details Add a conditional block without ELSE clause Click the down arrow
beside The variable value 'stringVar_1', then Add next, then select Add condition block.Click the down arrow
beside If, then select Delete else block.Set IF condition Click
just beside Address.AdditionalAttribute1, then Address then select Country. The left operand is now set to Address.Country.The operator should be In already; if not, click the current operator, then select In.
Next to In operator, click the dropdown arrow
and check both 'Mexico' and 'Romania'.Add and set the error message clause Click the down arrow
beside The variable value 'stringVar_12', then Add next then select Add error message.In the textbox following Show an error message, type: 'Postal Code is required'.
Clean up the rule Click the down arrow
beside The variable value 'stringVar_12', then select Delete. The row is now deleted.Click the down arrow
beside The variable value 'stringVar_1', then select Delete. The row is now deleted.Address Country Validation
The following table explains how to implement IF (Address.Country Is null) THEN...
Step Details Add a conditional block without ELSE clause Click the down arrow
beside If (Address.PostalCode Is not null), then Add next, then select Add condition block.Click the down arrow
beside If, then select Delete else block.Set IF condition Click Address.AdditionalAddressAttribute1, then Address then select Country. Address.Country is now displayed.
Click Equal to, then select Is null. The operator is Is null and the right part of the clause just disappeared.
Add and set the error message clause Click the down arrow
beside The variable value 'stringVar_1', then Add next then select Add error message.In the textbox following Show an error message, type: 'Address Country is required'.
Clean up the rule Click the down arrow
beside The variable value 'stringVar_1', then select Delete. The row is now deleted.Click the down arrow
beside The variable value 'stringVar_12', then select Delete. The row is now deleted.- The rule is now completed. Click Save.


Person National Identifier Validation
This validation covers the following ADP requirement:
- Mexican 'CURP' National Identifier is required when legal employer's country is Mexico, at payroll processing time.
Important Note: This CURP validation will only apply when at least one National Identifier was created.
Access Autocomplete tool
- Once the sandbox is activated, select Tools > HCM Experience Design Studio from the sandbox ribbon.
- Once in HCM Experience Design Studio window, click Autocomplete Rules in the left menu.
Create Autocomplete Rule - Person National Identifier
From the dropdown list located below the Business Object title, select Person.
Autocomplete tool constraint: The rule will apply each time Person is updated. For instance, the rule will be executed when adding/updating Person Citizenship info, Person Legislative Info or Person Name; it will not be executed when adding/updating Employment info without modifying Person.- At the right end of Business Object Rules title, click the Add button. A submenu appeared; click Object Validation Rule Type.
In Name textbox, enter: 'ADP_NationalIdentifierType_M'.
Make sure Active is checked
.Prepare the Rule Code:
nidEntered := False;
count := 0;
isWorker := False;
actionTypeCode := GetStringValueFromHcmParams('EMP_Groovy_ActionTypeCode', Person.CurrentRow);
personLegInfoRow := GetFirstRow(Person.PersonLegislativeInfo);
personContactRelRow := GetFirstRow(Person.personContactRelationship);
personNIDrowSet := Person.personNationalIdentifier;
IF ((personContactRelRow.PersonID Is null)
    OR (personContactRelRow.PersonID = Person.PersonID)) THEN
   isWorker := True;

IF ((personLegInfoRow.Country In ('MX')) AND (isWorker = True)
    AND (actionTypeCode != 'EMPL_ADD_EMP')) THEN
   FOR EACH ROW personNIDrowMX In personNIDrowSet
      count := count + 1;
      IF ((personNIDrowMX.Country = 'MX')
          AND (personNIDrowMX.NationalIdType = 'CURP')) THEN
         nidEntered := True;
   END-FOR;
   IF ((nidEntered = False) AND (count > 1)) THEN
      ShowError('CURP is required');
Variables Declaration and Initialization
The following table explains how to implement nidEntered := False
Step Details Add a new boolean variable Click the down arrow
beside The variable value 'stringVar_', then Add next, then Add a new variable type then select Boolean.Double click 'booleanVar_' and enter: 'nidEntered'.
Initialize the variable Just following
, click True then select False.Clean up the rule Click the down arrow beside The variable value 'stringVar_', then select Delete. The row is now deleted.
The following table explains how to implement count := 0
Step Details Add a new integer variable Click the down arrow
beside The variable value 'nidEntered', then Add next, then Add a new variable type then select Integer.Access the textbox containing 'integerVar_', double click 'integerVar_' and type: 'count'.
Initialize the variable In the textbox following
, enter: '0'.
The following table explains how to implement isWorker := False
Step Details Add a new boolean variable Click the down arrow
beside The variable value 'count', then Add next, then Add a new variable type then select Boolean.Double click 'booleanVar_' and enter: 'isWorker'.
Initialize the variable Just following
, click True then select False.
The following table explains how to implement actionTypeCode := GetStringValueFromHcmParams('EMP_Groovy_ActionTypeCode', Person.CurrentRow)
Step Details Add a new string variable Click the down arrow
beside The variable value 'isWorker', then Add next, then Add a new variable type then select String.Double click 'stringVar_' and enter: 'actionTypeCode'.
Set the right part of the assignment clause Click
just following the '=' operator, then select Change to a function. 'Get date in custom format(...)' is now displayed.Click Get date in custom format, then Global functions then select Get string value from HCM Params. 'Get string value from HCM Params(..., Person.CurrentRow)' is now displayed.
Just after Get string value from HCM Params function name, in the textbox following
, enter: 'EMP_Groovy_ActionTypeCode'.
The following table explains how to implement personLegInfoRow := GetFirstRow(Person.PersonLegislativeInfo)
Step Details Add a new row variable Click the down arrow
beside The variable value 'actionTypeCode', then Add next, then Add a new variable type then select Row.Double click 'rowVar_' and enter: 'personLegInfoRow'.
Set the right part of the assignment clause Click
just beside Person.Current row, then select Change to a function. 'Get first row(Person.PersonAddressUsage)' is now displayed.Click Person.PersonAddressUsage, then Person then select PersonLegislativeInfo. 'Get first row(Person.PersonLegislativeInfo)' is now displayed.
The following table explains how to implement personContactRelRow := GetFirstRow(Person.PersonContactRelationship)
Step Details Add a new row variable Click the down arrow
beside The variable value 'personLegInfoRow', then Add next, then Add a new variable type then select Row.Double click 'rowVar_' and enter: 'personContactRelRow'.
Set GetFirstRow function Click
just beside Person.Current row, then select Change to a function. 'Get first row(Person.PersonAddressUsage)' is now displayed.Click Person.PersonAddressUsage, then Person then select PersonContactRelationship. 'Get first row(Person.PersonContactRelationship)' is now displayed.
The following table explains how to implement personNIDrowSet := Person.PersonNationalIdentifier
Step Details Add a new row collection variable Click the down arrow
beside The variable value 'personContactRelRow', then Add next, then Add a new variable type then select Row collection.Double click 'rowsetVar_' and enter: 'personNIDrowSet'.
Set the right part of the assignment clause Click Person.PersonAddressUsage, then Person then select PersonNationalIdentifier.
The following table explains how to implement IF ((personContactRelRow.PersonID Is null) OR (personContactRelRow.PersonID = Person.PersonID)) THEN...
Step Details Add a conditional block without ELSE clause Click the down arrow
beside The variable value 'personNIDrowSet', then Add next, then select Add condition block.Click the down arrow
beside If, then select Delete else block.Set the first condition Click the first Person.Attribute1, then personContactRelRow then select PersonID. Left part is now personContactRelRow.PersonID.
Click the current operator, then select Is null.
Add a second condition Click the down arrow
above personContactRelRow.PersonID Is null, then Add condition. A new line appeared: Person.Attribute1 Equal to Person.Attribute1.Click the first Person.Attribute1, then personContactRelRow then select PersonID. Left part is now personContactRelRow.PersonID.
The operator should be Equal to already, If not, click the current operator, then select Equal to.
Click
just following Equal to, then select Change to a field. Person.Attribute1 is now displayed.Click the right part attribute Person.Attribute1, then Person then select PersonID. Right part is now Person.PersonID.
Set the conjunction linking the new condition group conditions Click the down arrow
above personContactRelRow.PersonID Is null, then select Change conjunction. The AND conjunction became OR.Set THEN clause Click the down arrow
beside The variable value 'stringVar_1', then Add next, then select Assign value to variable. A new line appeared, showing 'actionTypeCode' variable.Click actionTypeCode, then select isWorker.
The right part of the assignment should be set to 'True'. If not, click False then select True.
Clean up the rule Click the down arrow beside The variable value 'stringVar_1', then select Delete. The row is now deleted.CURP is required for MX
The following table explains how to implement IF ((personLegInfoRow.Country In ('MX')) AND (isWorker = True) AND (actionTypeCode != 'EMPL_ADD_EMP')) THEN...
Step Details Add a conditional block without ELSE clause Click the down arrow
beside the previous If and select Add condition block.Click the down arrow
beside If, then select Delete else block.Set IF condition Click the first Person.Attribute1, then personLegInfoRow then select Country. personLegInfoRow.Country is now displayed.
The operator should be In already; if not, click the current operator, then select In.
Next to In operator, click the dropdown arrow
and check 'Mexico'.Add a second condition to the IF clause Click the down arrow beside '(' just below If, then select Add condition. A new condition is now displayed. It is linked to the first condition by AND conjunction.Set the conjunction linking both conditions of the IF clause Make sure the current conjunction is AND. If not, click the down arrow beside '(' just below If, then select Change conjunction until the conjunction is AND.Set the second condition Click
just beside the first Person.Attribute1, then select Change to a variable.Click actionTypeCode, then select isWorker.
The right part of the assignment should be set to 'True'. If not, click False then select True.
Add a third condition to the IF clause Click the down arrow beside '(' just below If, then select Add condition. A new condition is now displayed. It is linked to the first condition by AND conjunction.Set the third condition Click
just beside the first Person.Attribute1, then select Change to a variable.If the current variable is not 'actionTypeCode' click this variable, then select actionTypeCode.
Click the current Equal to operator, then select Not equal to.
In the textbox following
, enter: 'EMPL_ADD_EMP'.
The following table explains how to implement FOR EACH ROW personNIDrowMX In personNIDrowSet...
Step Details Add a looping block Click the down arrow beside The variable value 'stringVar_' (last current instruction), then Add next, then select Add row collection looping block.Set row name In the textbox following For each row, enter: 'personNIDrowMX'.
Set row set name The field that appeears after In should be personNIDrowSet. If not, just click the current value and select personNIDrowSet.
Clean up the rule Click the down arrow beside The variable value 'stringVar_' (just above FOR EACH ROW...), then select Delete. The row is now deleted.
The following table explains how to implement count := count + 1
Step Details Assign value to integer variable Click the down arrow
beside The variable value 'stringVar_1', then Add next, then Assign value to variable.Then click the current variable and select 'count'.
Set right operands Click
just following the '=' operator, then select Change to an arithmetic expression. Two operands appeared, linked by '+' operator.Click
just following '(', then select Change to a variable. If the displayed variable is not 'count', then click this variable and select 'count'.In the textbox following the last
, enter: '1'.
The following table explains how to implement IF ((personNIDrowMX.Country In ('MX')) AND (personNIDrowMX.NationalIdType In ('CURP'))) THEN...
Step Details Add a conditional block without ELSE clause Click the down arrow
beside The variable value 'count', then Add next, then select Add condition block.Click the down arrow
beside If, then select Delete else block.Set IF condition Click the first Person.Attribute1, then personNIDrowMX. Then select Country. personNIDrowMX.Country is now displayed.
Click Equal to operator, then select In.
Next to In operator, click the dropdown arrow
and check 'Mexico'.Add another condition to the IF clause Click the down arrow beside '(' just below If, then select Add condition. A new condition is now displayed. It is linked to the first condition by AND conjunction.Set the conjunction linking both conditions of the IF clause Make sure the current conjunction is AND. If not, click the down arrow beside '(' just below If, then select Change conjunction until the conjunction is AND.Set the second condition Click Person.Attribute1, then personNIDrowMX then select National ID Type. personNIDrowMX.NationalIDType is now displayed.
The operator should be In already; if not, click the current operator, then select In.
Next to In operator, click the dropdown arrow
and check 'CURP Population Registry Unique Key'.Set THEN clause Click the down arrow
beside The variable value 'stringVar_12', then Add next, then select Assign value to variable. A new line appeared, showing an existing variable.Click this existing variable, then select nidEntered.
The right part of the assignment should be set to 'True'. If not, click False then select True.
Clean up the rule Click the down arrow
beside The variable value 'stringVar_', then select Delete. The row is now deleted.Click the down arrow
beside The variable value 'stringVar_1', then select Delete. The row is now deleted.Click the down arrow
beside The variable value 'stringVar_12', then select Delete. The row is now deleted.
The following table explains how to implement IF ((nidEntered = False) AND (count > 1)) THEN...
Step Details Add a conditional block without ELSE clause Click the down arrow
beside For each row 'personNIDrowSet', then Add next, then select Add condition block.Click the down arrow
beside If, then select Delete else block.Set IF condition Click
just beside Person.Attribute1, then select Change to a variable.Click the current variable name just beside
, then select nidEntered.Next to the '=' operator, click the dropdown arrow
and select False.Add another condition to the IF clause Click the down arrow beside '(' just below If, then select Add condition. A new condition is now displayed. It is linked to the first condition by AND conjunction.Set the conjunction linking both conditions of the IF clause Make sure the current conjunction is AND. If not, click the down arrow beside '(' just below If, then select Change conjunction until the conjunction is AND.Set the second condition Click
just beside Person.Attribute1, then select Change to a variable.Click the current variable name just beside
, then select count.Click Equal to, then select Greater than. The operator is now set to Greater than.
In the textbox just following
, enter: '1'.Add and set the error message clause Click the down arrow
beside The variable value 'stringVar_1', then Add next then select Add error message.In the textbox following Show an error message, type: 'CURP is required'.
Clean up the rule Click the down arrow
beside The variable value 'stringVar_1', then select Delete. The row is now deleted.- The rule is now completed. Click Save.


Person National Identifier Type
 Additional Rules for Germany
This section describes how to setup validations for specific Germany rules for ADP integrations. Accessing the Autocomplete tool is a prerequisite for all validation setups.
Address Lines 1 and 2 Validation
This validation covers one ADP requirement:
- The total length of Address Line 1 and Address Line 2 cannot be more than 60 characters when legal employer's country is Germany.
Important Note: This rule is covered by 'Address Lines 1 + 2 Validation' in 'Address Validations' (Common Rules).
Person Academic Title Validation
This validation covers one ADP requirement:
- Person Academic Title cannot have more than 100 characters when legal employer's country is Germany.
Important Note: This rule is covered by 'Person Academic Title Validation' in 'Person Name Validations' (Common Rules).
Person Birth Name Validation
This validation covers one ADP requirement:
- Person Birth Name cannot have more than 40 characters when legal employer's country is Germany.
Important Note: This rule is covered by 'Person Birth Name Validation' in 'Person Name Validations' (Common Rules).
 Additional Rules for Mexico
This section describes how to setup validations for specific Mexico rules for ADP integrations. Accessing the Autocomplete tool is a prerequisite for all validation setups.
Person Gender Validation
This validation covers one ADP requirement:
- Person Gender is required when legal employer's country is Mexico.
Access Autocomplete tool
- Once the sandbox is activated, select Tools > HCM Experience Design Studio from the sandbox ribbon.
- Once in HCM Experience Design Studio window, click Autocomplete Rules in the left menu.
Create Autocomplete Rule - Person Gender
- From the dropdown list located below the Business Object title, select Person Legislative Information.
- At the right end of Business Object Rules title, click the Add button. A submenu appeared; click Object Validation Rule Type.
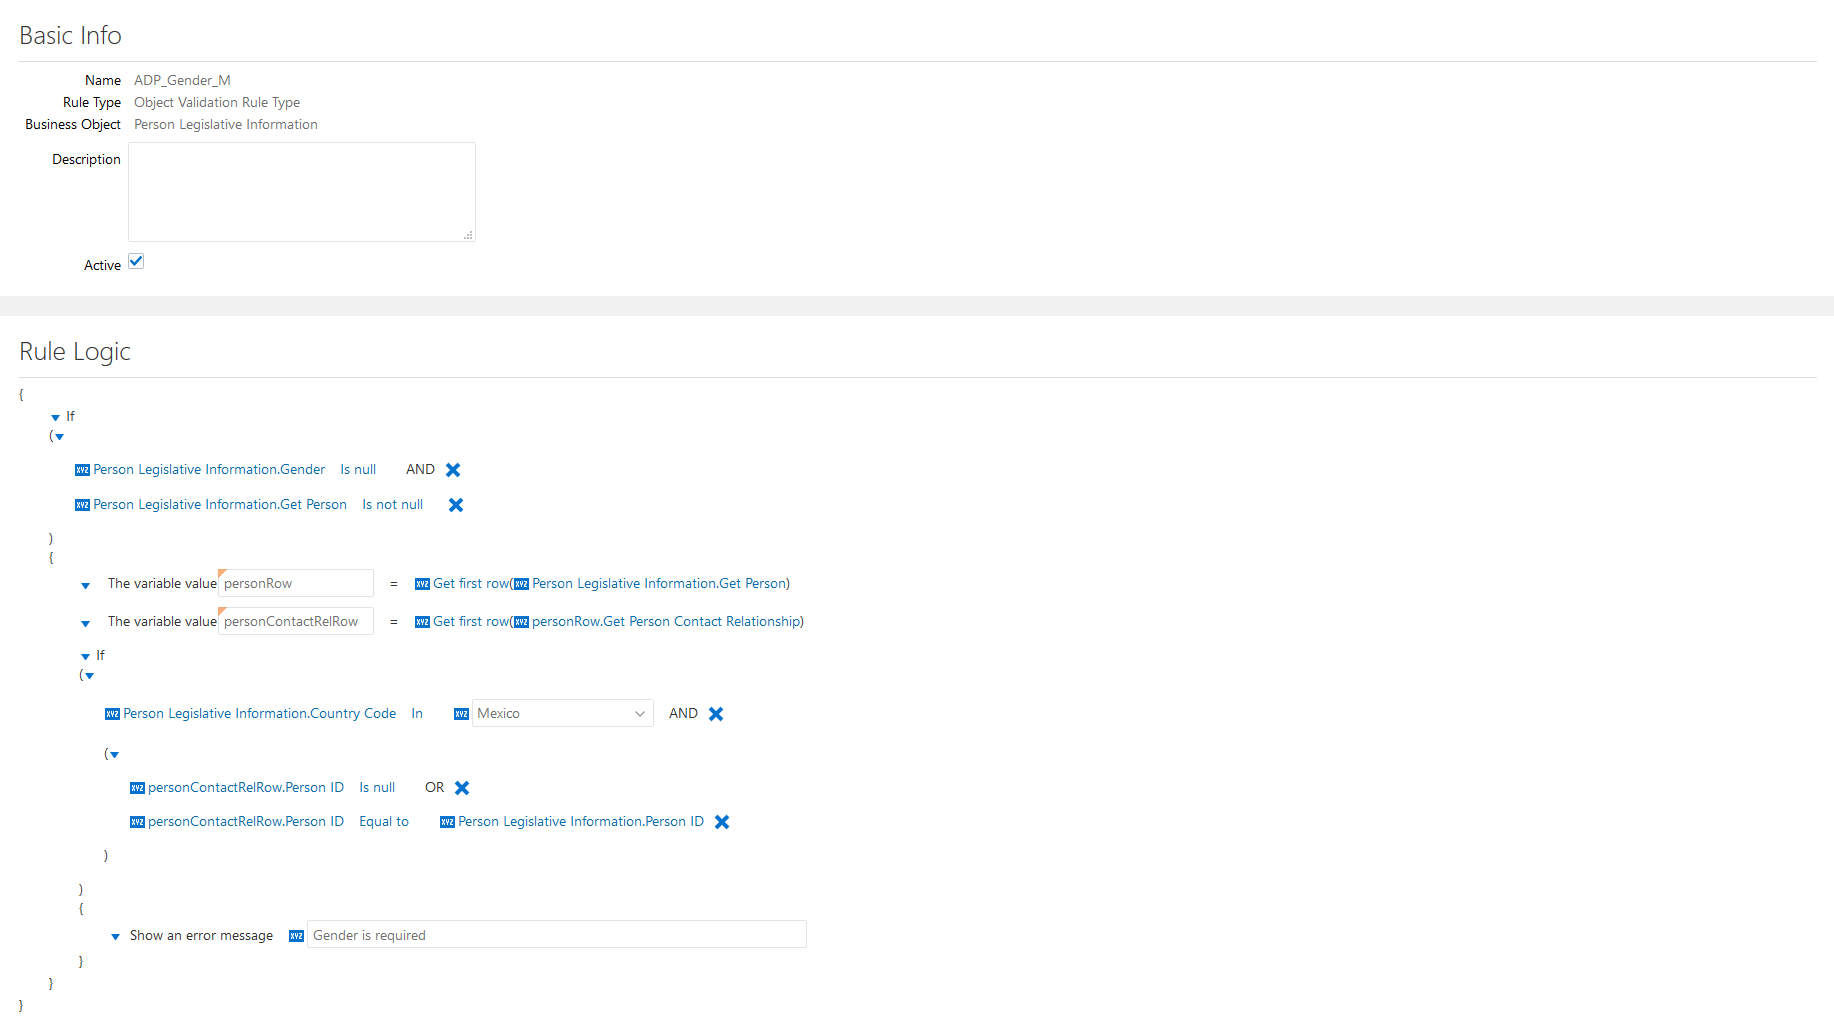
In Name textbox, enter: 'ADP_Gender_M'. Make sure Active is checked
.Prepare the Rule Code:
IF ((PersonLegislativeInfo.Gender Is null)
    AND (PersonLegislativeInfo.person Is not null)) THEN
  personRow := GetFirstRow(PersonLegislativeInfo.person);
  personContactRelRow := GetFirstRow(personRow.personContactRelationship);
  IF ((PersonLegislativeInfo.Country In ('MX'))
      AND ((personContactRelRow.PersonID Is null)
           OR (personContactRelRow.PersonID = PersonLegislativeInfo.PersonID))) THEN
    ShowError('Gender is required');
The following table explains how to implement IF ((PersonLegislativeInfo.Gender Is null) AND (PersonLegislativeInfo.person Is not null)) THEN...
Step Details Add a conditional block without ELSE clause Click the down arrow
beside The variable value 'stringVar_', then Add next, then select Add condition block.Click the down arrow
beside If, then select Delete else block.Set IF condition Click PersonLegislativeInfo.Attribute1, then PersonLegislativeInfo then select Gender. PersonLegislativeInfo.Gender is now displayed.
Click Equal to, then select Is null. The operator is Is null and the right part of the clause just disappeared.
Click the down arrow
beside The variable value 'stringVar_, then Delete. The row is now deleted.Add another condition to the IF clause Click the down arrow beside '(' just below If, then select Add condition. A new condition is now displayed. It is linked to the first condition by AND conjunction.Set second condition Click
just beside PersonLegislativeInfo.Attribute1, then PersonLegislativeInfo then select person. PersonLegislativeInfo.person is now displayed.Click Equal to operator, then select Is not null. The operator is Is not null and the right part of the clause just disappeared.
Clean up the rule Click the down arrow beside The variable value 'stringVar_', then select Delete. The row is now deleted.
The following table explains how to implement personRow := GetFirstRow(PersonLegislativeInfo.person)
Step Details Add a new row variable Click the down arrow
beside The variable value 'stringVar_1', then Add next, then Add a new variable type then select Row.Double click 'rowVar_' and enter: 'personRow'.
Set GetFirstRow function Click
just beside PersonLegislativeInfo.Current Row, then select Change to a function. 'Get first row(PersonLegislativeInfo.person)' is now displayed.
The following table explains how to implement personContactRelRow := GetFirstRow(personRow.personContactRelationship)
Step Details Add a new row variable Click the down arrow
beside The variable value 'personRow', then Add next, then Add a new variable type then select Row.Double click 'rowVar_' and enter: 'personContactRelRow'.
Set GetFirstRow function Click
just beside PersonLegislativeInfo.Current Row, then select Change to a function. 'Get first row(PersonLegislativeInfo.person)' is now displayed.Click PersonLegislativeInfo.person, then personRow, then select personContactRelationship. 'Get first row(personRow.personContactRelationship)' is now displayed.
The following table explains how to implement IF ((PersonLegislativeInfo.Country In ('MX')) AND ((personContactRelRow.PersonID Is null) OR (personContactRelRow.PersonID = PersonLegislativeInfo.PersonID))) THEN...
Step Details Add a conditional block without ELSE clause Click the down arrow
beside The variable value 'personContactRelRow', then Add next, then select Add condition block.Click the down arrow
beside If, then select Delete else block.Set the first condition Click PersonLegislativeInfo.Attribute1, then PersonLegislativeInfo then select Country. PersonLegislativeInfo.Country is now displayed.
The operator should be In already; if not, click the current operator, then select In.
Next to In operator, click the dropdown arrow
and check 'Mexico'.Add a condition group and set its first condition Click the down arrow
below If, then select Add condition group. A new line appeared: PersonLegislativeInfo.Attribute1 Equal to PersonLegislativeInfo.Attribute1.Click the first: PersonLegislativeInfo.Attribute1, then personContactRelRow then select PersonID. Left part is now personContactRelRow.PersonID.
Click the current operator, then select Is null.
Add a second condition to the condition group Click the down arrow
above personContactRelRow.PersonID Is null, then select Add condition. A new line appeared: PersonLegislativeInfo.Attribute1 Equal to PersonLegislativeInfo.Attribute1.Click the first: PersonLegislativeInfo.Attribute1, then personContactRelRow then select PersonID. Left part is now personContactRelRow.PersonID.
The operator should be Equal to already, If not, click the current operator, then select Equal to.
Click the right part attribute PersonLegislativeInfo.Attribute1, then PersonLegislativeInfo then select PersonID. Right part is now PersonLegislativeInfo.PersonID.
Set the conjunction linking the new condition group conditions Click the down arrow
above personContactRelRow.PersonID Is null, then select Change conjunction. The AND conjunction became OR.Set the conjunction linking the initial condition and the new condition group Make sure the current conjunction is AND. If not, click the down arrow beside '(' just below If, then select Change conjunction until the conjunction is AND.Add and set the error message clause Click the down arrow
beside The variable value 'stringVar_1', then Add next then select Add error message.In the textbox following Show an error message, type: 'Gender is required'.
Clean up the rule Click the down arrow beside The variable value 'stringVar_1', then select Delete. The row is now deleted.- The rule is now completed. Click Save.
 Additional Rules for Romania
This section describes how to setup validations for specific Romania rules for ADP integrations. Accessing the Autocomplete tool is a prerequisite for all validation setups.
There are no specific rules for Romania, for the moment.