 Create
an OPA Application (Design)
Create
an OPA Application (Design)Create an application
An application is the component used to capture all of the artifacts that are used to create, design and implement the end to end business process within OPA.
To get started:
- Open the Process Applications page.
- Click Create.
- Enter information into the Create Application dialog
box replacing ## with your initials or another unique value.
Field Value Description Title and Description ##EmployeeUniformRequest Make sure the application Title and Description are useful. Give the user a good idea of what the application is all about and why they might want to use it.
Good Titles and Descriptions help users distinguish applications with a similar title or purpose. You can’t change the name after the application is created.
Identifier Name ##EmployeeUniformRequest System generated value that can be edited. Version Tag 1.0 (Default) System generated value that can be edited. 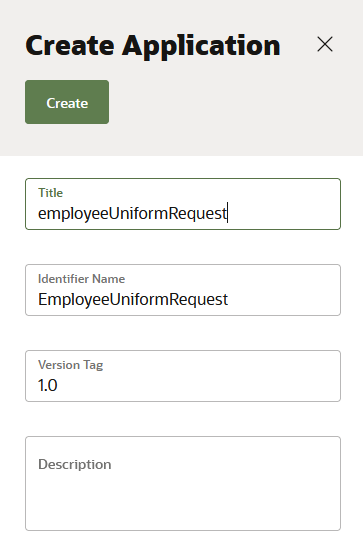
-
Click Create.
This will add a new application to the Process Applications list on the OPA home page as shown below.

Create a REST API Connector
Firstly, the connection to the HCM Cloud will be configured. Your process applications can communicate and exchange data with HCM via REST services. To do this you need the following service information:.
- Definition of the REST service to connect too
- URLs to the location of the different resources
- Access to these URLs to get the JSON sample used to create the types needed to send and receive data to/from the service
- List of operations to use on each resource
- List of parameters to pass to operations
Additionally, for a secure REST service, the username and password required to access the service will be needed. Creating a REST connector involves the following main tasks:
- Create the connector.
- Apply authentication to the connector.
- Add resources to the connector.
- Add operations to resources.
- Specify request and response parameters for operations
Create the connector
- Open the newly created application from the previous step.
- On the Process page.
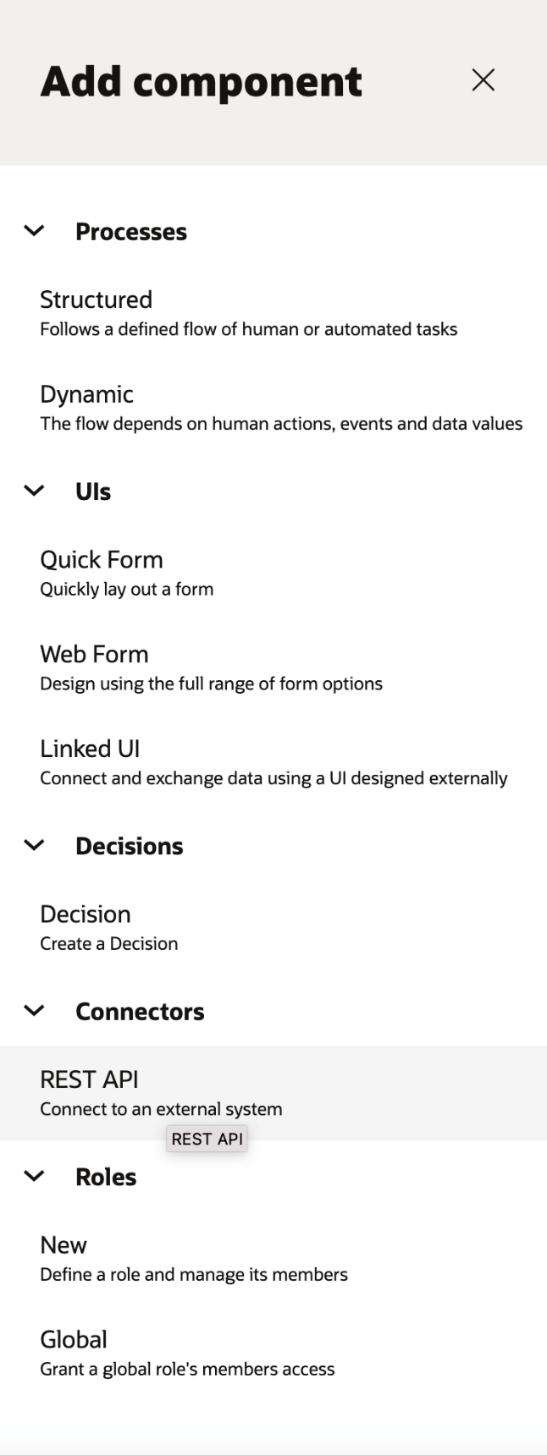
- Click Add
- Select Connectors
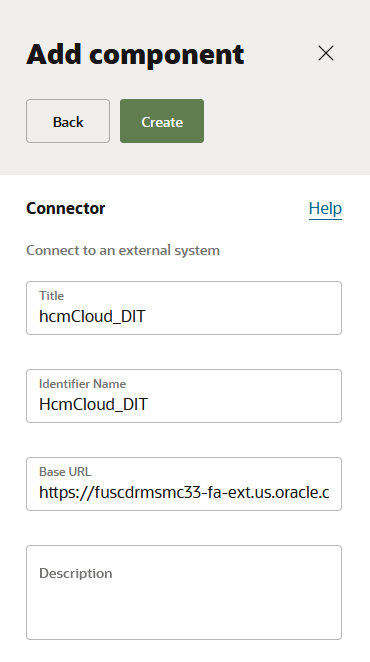
- Click REST API and complete the following fields substituting the Base URL with the URL from your environment:
- Click Create
- Open the connector.
| Field | Value | Description |
|---|---|---|
| Title | ##HCMCloud_DIT | Name of the Connector e.g. HCM Cloud |
| Identifier Name | ##HCMCloud_DIT | System generated value but can be edited. |
| Base URL | https://servername.fa.us2.oraclecloud.com | URL of the HCM Cloud instance you are connecting too. E.g. https://servername.fa.us2.oraclecloud.com |
| Description | Tutorial Connection to Oracle Environment. | Meaningful description of the endpoint e.g. Test Oracle HCM environment |
Apply authentication to the connector
By default, no security is configured. You can apply HTTP basic authentication, which provides access control to web resources by requiring a user name and password when making requests.
Note: the authentication credentials cannot be updated when the process is active. If you need to modify the credentials a new version should be created.
- On the REST Connector tab, select the padlock icon
 to open the Security tab.

- On the Security tab select the edit icon
 to apply authentication to the REST
connector
to apply authentication to the REST
connector - Select Security Type Basic Auth and complete the following fields for an HCM integration user:
- Username
- Password
- Click Save
Want to learn more about managing HCM REST credentials? Configuring HCM REST API Security Settings.
Add resources to the connector: getWorker
The first resource we are going to add to the newly created Connector is one to retrieve Worker data. A resource contains one or more operations that control data by performing basic create, read, update, and delete operations (CRUD) on resources using standard HTTP method requests.
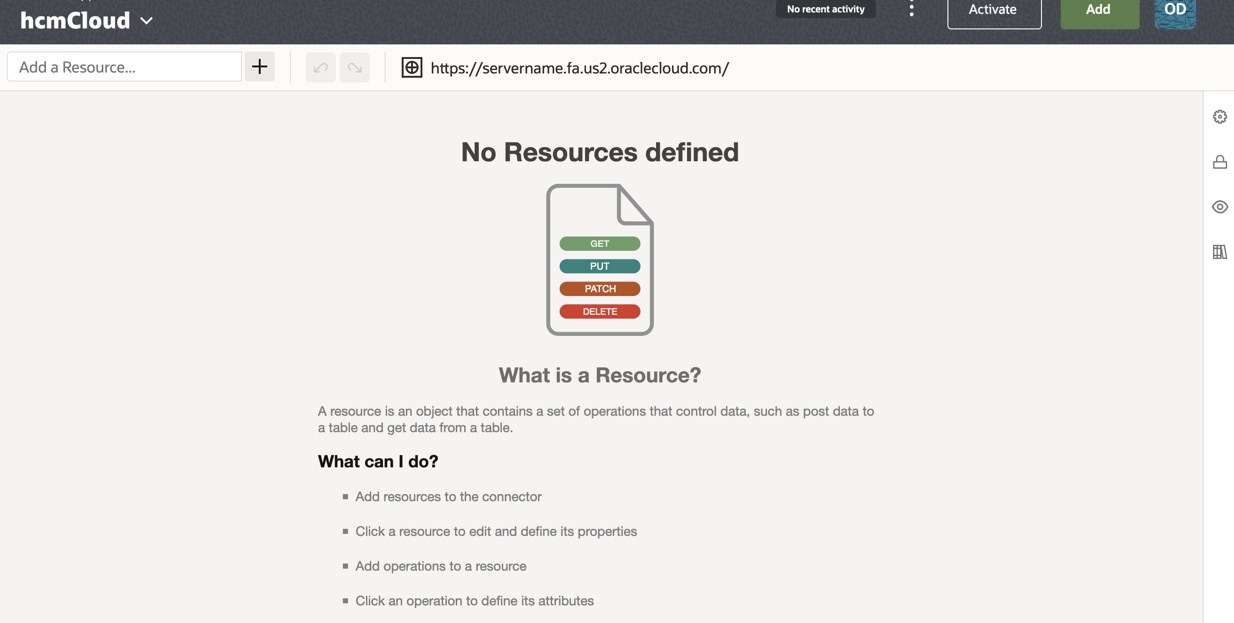
- At the top of the Resources section, click Add.

- Click the new resource that was added to the Resources list to expand it.
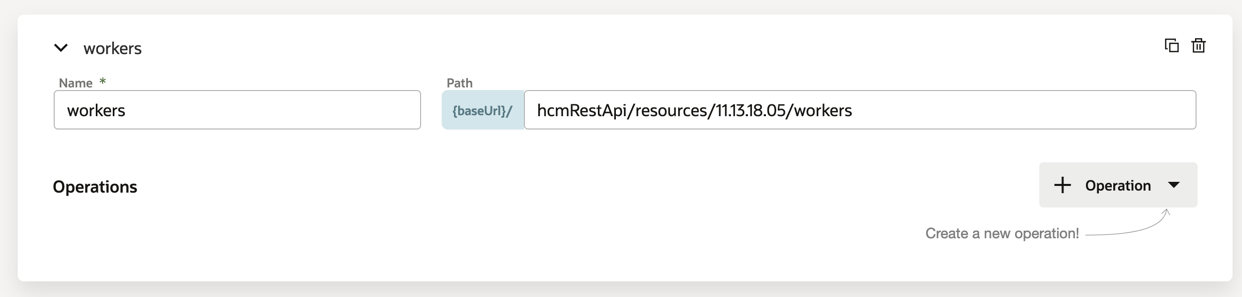
Enter a Name, workers, for the resource.
You’ll select this resource name when implementing a service task. E.g. workers
- In the Path field, identify the resource path within
the base URL: hcmRestApi/resources/11.13.18.05/workers
Add operations to resources: getWorker
- In the Operations section, click

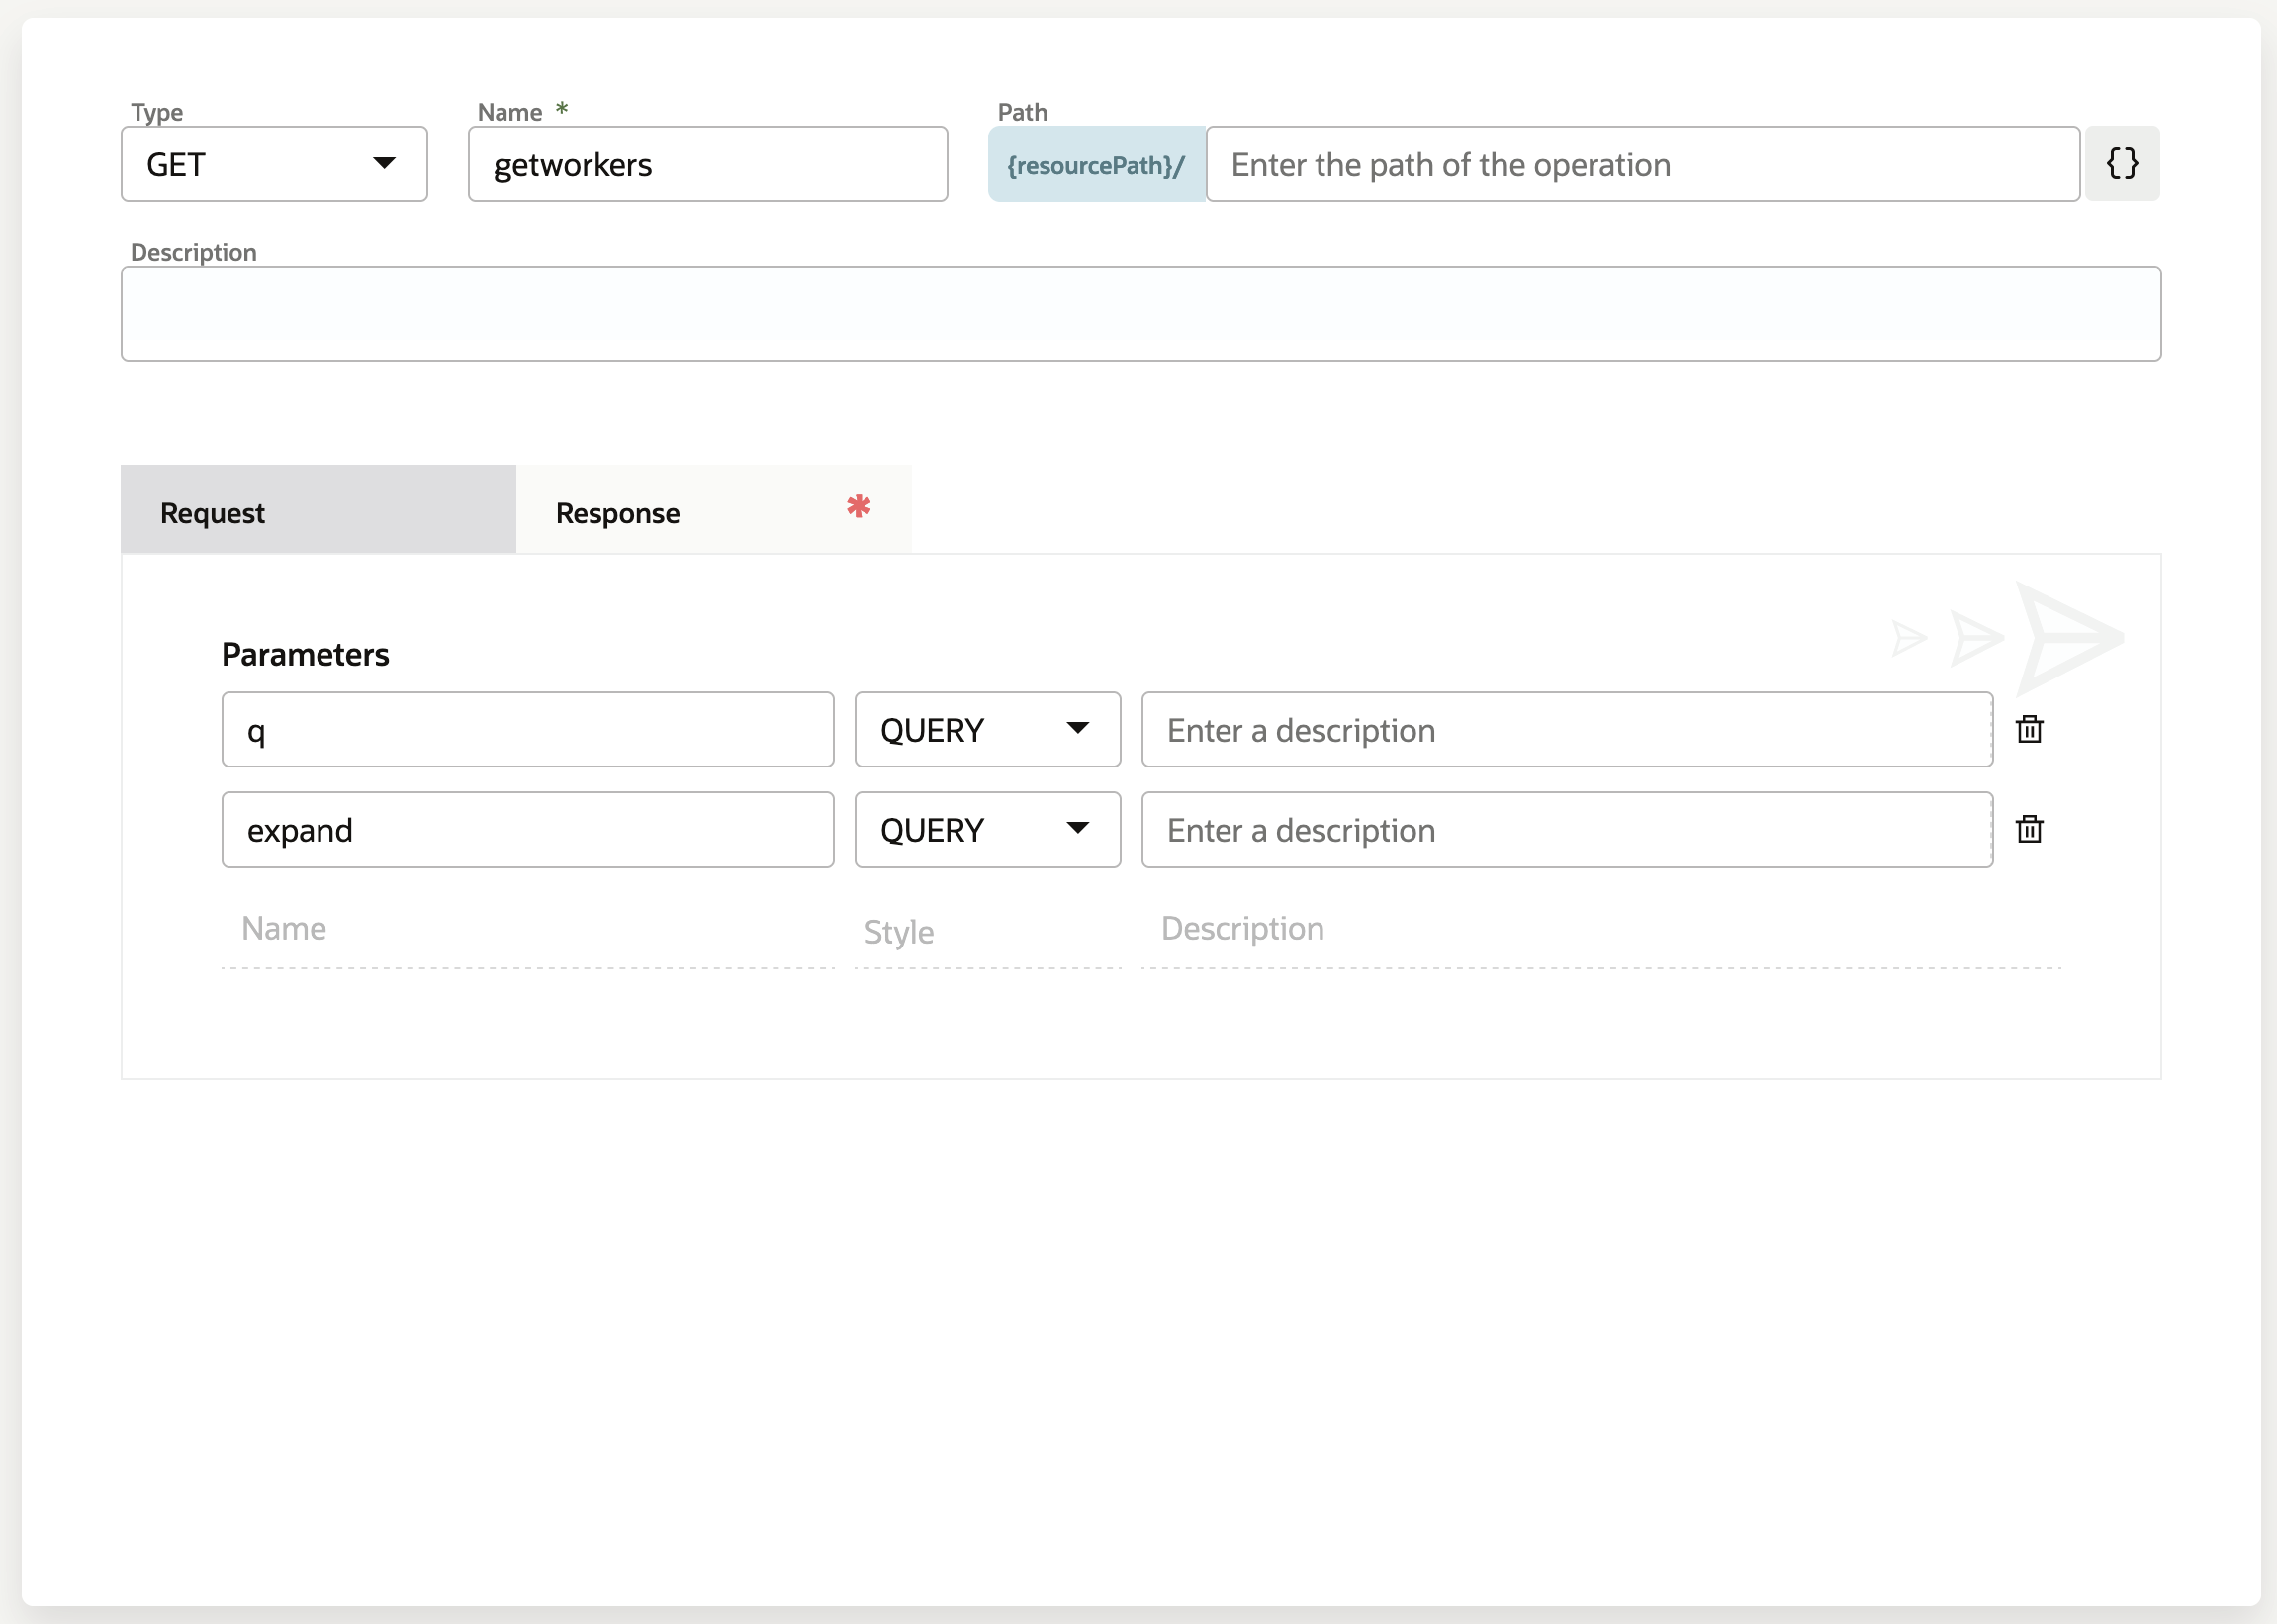
- From the dropdown select the GET method to add. The new operation is added to the Operations list, along with its name and path.
Specify request and response parameters for operations:getWorker
Select the newly created Operations, this will open the Operations Detail panel. On the Request tab:
- Enter q in the first parameter
- Enter expand in the second parameter field
Click the Response Tag
The Response tab is where the returned payload from HCM is used to create a schema for OPA. This initially can be generated from a response payload from Postman.
- Select
 which opens the
Types panel
which opens the
Types panel

- Select
 which opens the
Sample
which opens the
Sample
- Paste the body of the JSON payload into the Sample field. A sample response can be downloaded here.
- Select Next, this will validate the sample payload and generate a schema.
- Select Create, this will generate a Body Definition to be used in subsequent Process.
- Select Apply, this will save the Connector and the newly added Operation.


Add resources to the connector: getUserName
The second resource we are going to add to the newly created Connector is one to retrieve User data.
- At the top of the Resources section, click Add. Click the new resource that was
added to the Resources list to expand it.
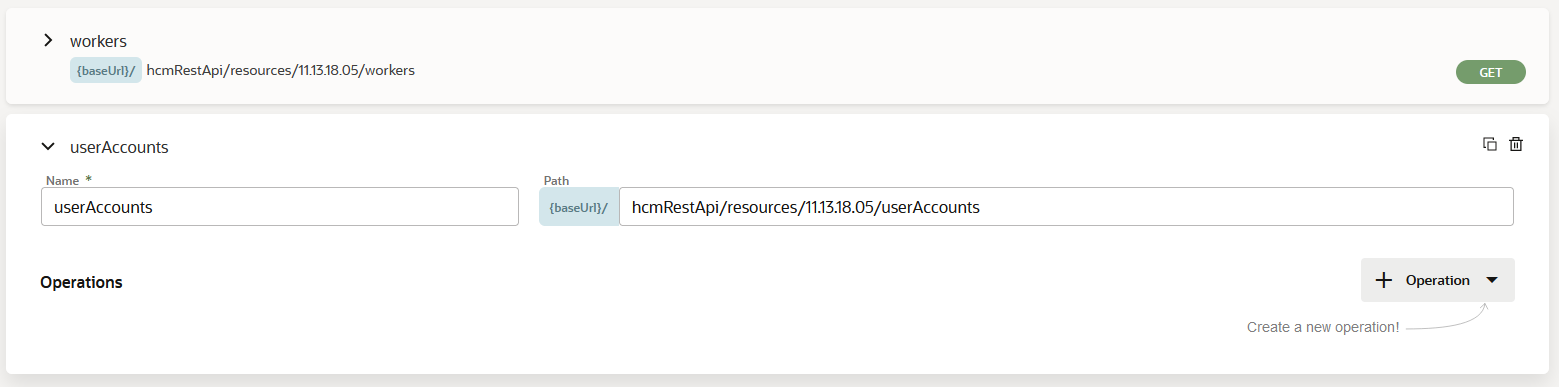
- Enter a Name for the resource. You’ll select this resource name when implementing a service task. E.g. Users
- In the Path field, identify the resource path within
the base URL. E.g.,
hcmRestApi/resources/11.13.18.05/userAccounts
Add operations to resources: getUserName
The second resource we are going to add to the newly created Connector is one to retrieve User data.
- In the Operations section, click . Click the new resource
that was added to the Resources list to expand it.
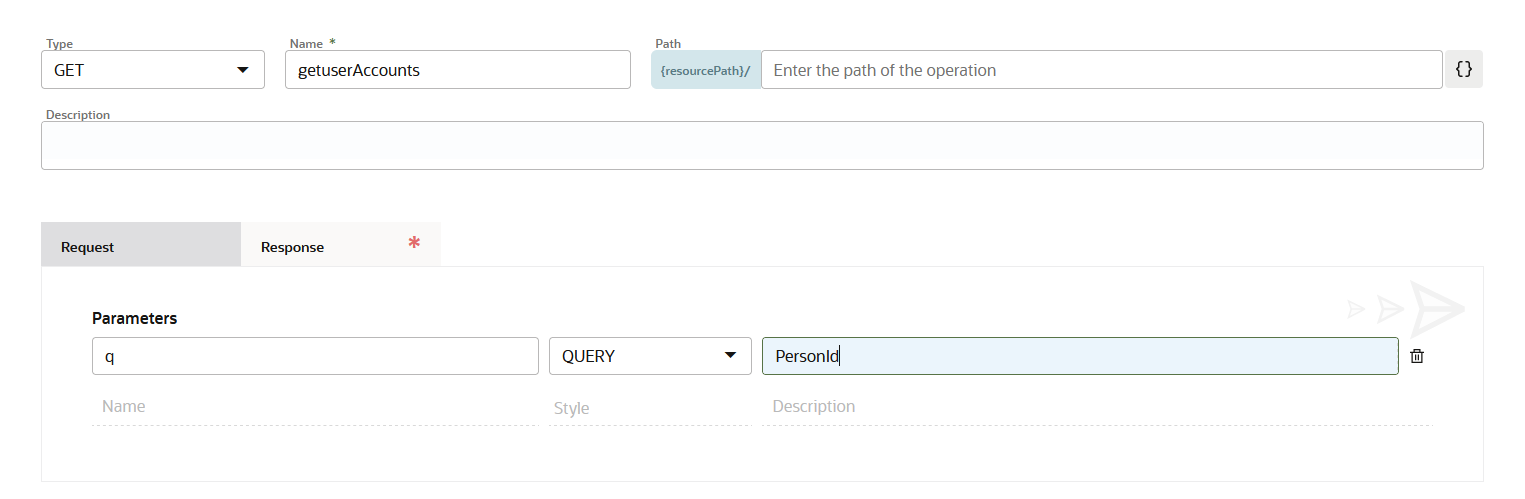
- From the dropdown select the GET method to add. The new
operation is added to the Operations list, along with
its name and paths

Specify request and response parameters for operations: getUserName
Select the newly created Operations, this will open the Operations Detail panel. On the Request tab:
- Enter q in the first parameter list, along with its
name and paths
On the Response tab is where the returned payload from HCM is used to create a schema for OPA. This initially can be generated from a response payload from Postman.
- Select which opens the
Types panel
- Select which opens the
Sample
- Paste the body of the JSON payload into the Sample
field

- Select Next, this will validate the sample payload and generate a schema.
- Select Create, this will generate a Body Definition to be used in subsequent Process.
- Select Apply, this will save the Connector
and the newly added getUserAccount Operation.

Create a Structured Process
At this time, HCM Journeys is only designed to work with Structured Processes within OPA. The following steps should be taken when creating a structured process to be used with HCM Journeys.
When developing a structured process, your first step is to determine the people and roles required to complete each task that requires user interaction. You then use the various elements, such as human tasks, system activities, and other events, to design the flow of your process.
A structured process is a sequence of tasks that, after performed, results in a well-defined outcome. A process usually represents work that is performed within the context of a company or organization.
A structured process contains a start event, an end event, and possibly other flow elements. You can start your process from scratch (that is, with an empty start event), with a form, or when a message is received. Alternatively, you can select a pre-defined process pattern to begin creating a new process.
Note: BPMN is an industry standard notation for defining business processes. OPA supports BPMN 2.0.
- On the Process page.
- Click Add.
- Select Processes

- Select Structured and complete the following fields:
Field Description Title Name of the Connector e.g. UniformSelection Identifier Name System generated value but can be edited. Description Meaningful description of the Process. 
Change Type
By default, a new process has a start event of type form. As the OPA process will be triggered by HCM Journeys, it is necessary to change this to message start.
-
To do this click the Start event and then click the change type icon
 and select
message start.
and select
message start.
The message start event triggers a process instance when a message is received. This message can be sent from another business process or from a service, in this instance the HCM Journeys application.
Define Argument Definitions
Once the Message event type has been set, it is necessary to define the Argument Definitions been sent by HCM Journeys. Argument Definitions refer to the json payload fields been sent by the calling application.
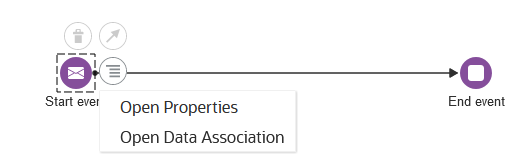
- Click the Start event
- On the Start event menu, select Open Properties
- On the properties tab, under the Argument Definitions
section select the
to add a new Definition
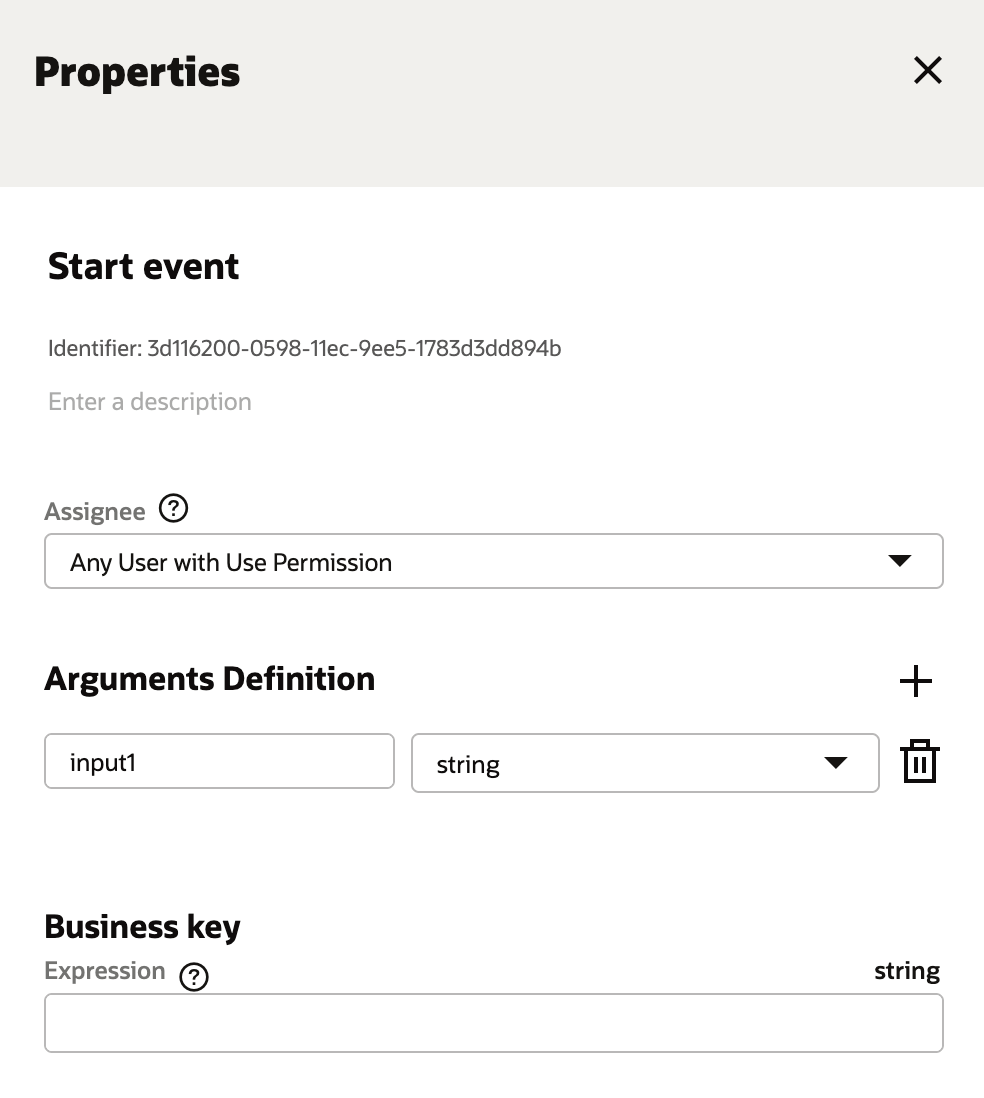
- For each for the values in the following table add a Name
and Type corresponding Argument Definition.
Argument Name Type workerJourneyTaskId string workerJourneyId string personId string assignmentId string The final set of Arguments Definition will look like the following.

Create Data Objects
While flow elements are used to define the behavior of a structured process, data objects are used to define and store the information used by a process. Data Objects are variables that are defined during the modeling and implementation of a process. A process instance uses these variables to store specific information. At runtime, the process instance generates and stores specific values for these variables.
- Select the
 icon on the properties tab
of the Process.
icon on the properties tab
of the Process.

- Select
the to add a new Data Object
- For each for the values in the following table add a
Name and Type corresponding Data Object .
Data Object Type do_PersonId string do_userName string do_displayName string do_emailAddress string do_uniformGender string do_poloShirt string do_jacket string do_sweatshirt string The final set of Arguments Definition will look like the following.

Map the Output of the Message Start
One of the values which is sent from HCM Journeys is the PersonId of the individual triggering the Journey task within HCM. This can be used to personalize and notify them to events within OPA as part of a process execution. To do this you need to retrieve the PersonId value from the Message start payload and map it to the do_PersonId Data Object created in the previous step.
- Click the Start event
- On the Start event menu, select Open Data
Association

This will open the corresponding Data Mapper. The Data Mapper enables you to assign the value of a process data object, predefined variable, or literal to another data object or variable within the process.
- Expand the Input value in the left-hand panel. Select the personId value and drag it into the field string under Start event.
- Next expand the Process Data value on the right-hand
panel. Select the do_PersonID value and drag on the
field string under Eur001 as shown below
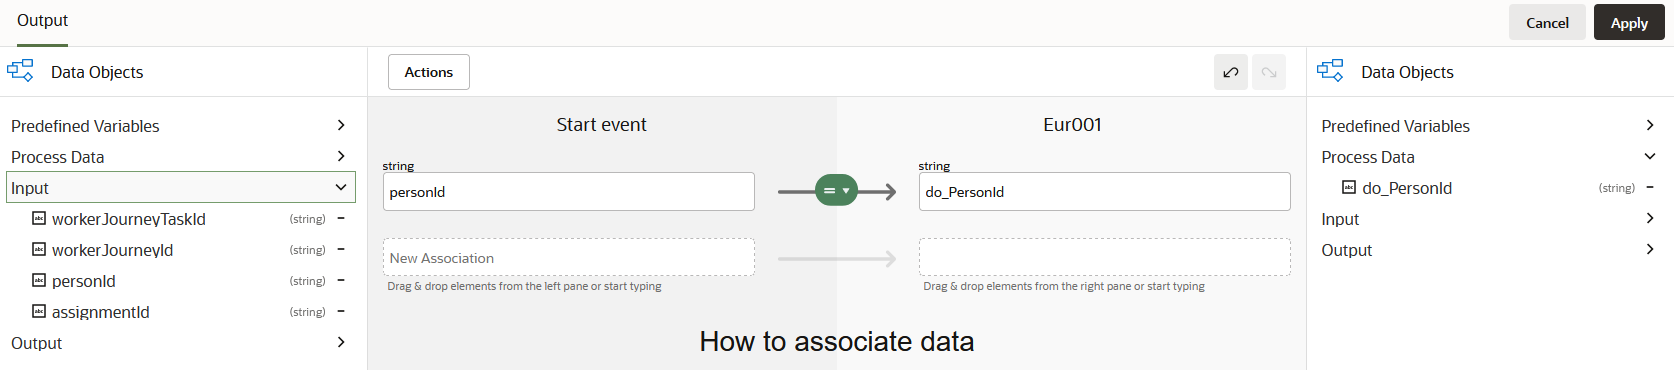
The personId from HCM Journeys is now assigned to the data object do_PersonId.
Add Connector (getWorkerDetails)
Next the Process will make a call back to HCM Cloud to retrieve further information on the worker using the retrieved personId value. This is done by invoking Connector defined in the earlier steps.
- On the Process tab, open the right hand menu to revel the Elements Palette.
- Expand the Connectors menu item to display the previously
created HCM Cloud Connector.

- Drag and drop the previously created Connector to the
process behind the Start event.

- Click the Hcm Cloud element
- On the Hcm Cloud, select Open Properties

- On the properties tab, change the name to getWorkerDetails.
- Select the resource to be workers
- Select the Operation to be getWorkers.
These values should correspond to the values created when defining the HCM Cloud Worker service in the earlier steps
.
Complete Data Association – getWorkerDetails (request)
Next the values need to the execute the call to HCM will be mapped.
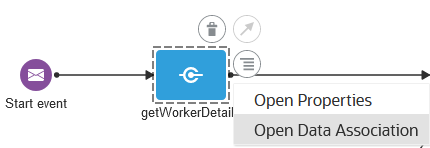
- Click the getWorkerDetails element
- On the getWorkerDetails, select Open Data Association
- On the Input tab, enter the following values either by
dragging and dropping or typing directly into the
corresponding fields.
Eur001 getWorkerDetails "PersonId" +do_PersonId input.q "workRelationships.assignments,names,emails" input.expand 
Next the values returned from HCM will be mapped to Data Objects.
Complete Data Association – getWorkerDetails (response)
Next the values returned from HCM will be mapped to Data Objects.
- On the Output tab, enter the following values either by
dragging and dropping or typing directly into the
corresponding fields.
getWorkerDetails Eur001 output.body.items[1].names[1].DisplayName do_displayName output.body.items[1].emails[1].EmailAddress do_emailAddress 
The field values for the workers name and email address are now stored as Data Objects within OPA and can be reference later in the process.
- Click Apply.
Add Connector (getUserAccountName)
Next the Process will make a call to HCM Cloud to retrieve user account information for the worker again using the retrieved personId value. This is done by invoking Connector defined in the earlier steps.
- Return to the process.
- On the Process tab, open the right hand menu to revel the Elements Palette.
- Expand the Connectors menu item to display the previously created HCM Cloud Connector.
- Drag and drop the previously created Connector to the process behind the getWorkerDetails
- On the properties tab, change the name to getUserName.
- Select the resource to be userAccounts
- Select the Operation to be getUserAccounts.

Complete Data Association – getUserName (Request)
As before, in order to execute the getUserAccount REST call, the personId will be used as an input as the query value in the request body.
- 1. On the Input tab, enter the following value either by dragging and dropping or typing directly into the corresponding fields.
-
Eur001 getUserName "PersonId = " +do_PersonId input.q 
Complete Data Association – getUserDetails (response)
Next the values returned from HCM will be mapped to Data Objects.
- On the output tab, enter the following values either by
dragging and dropping or typing directly into the
corresponding fields.
getWorkerDetails Eur001 output.body.items[1].Username do_userName 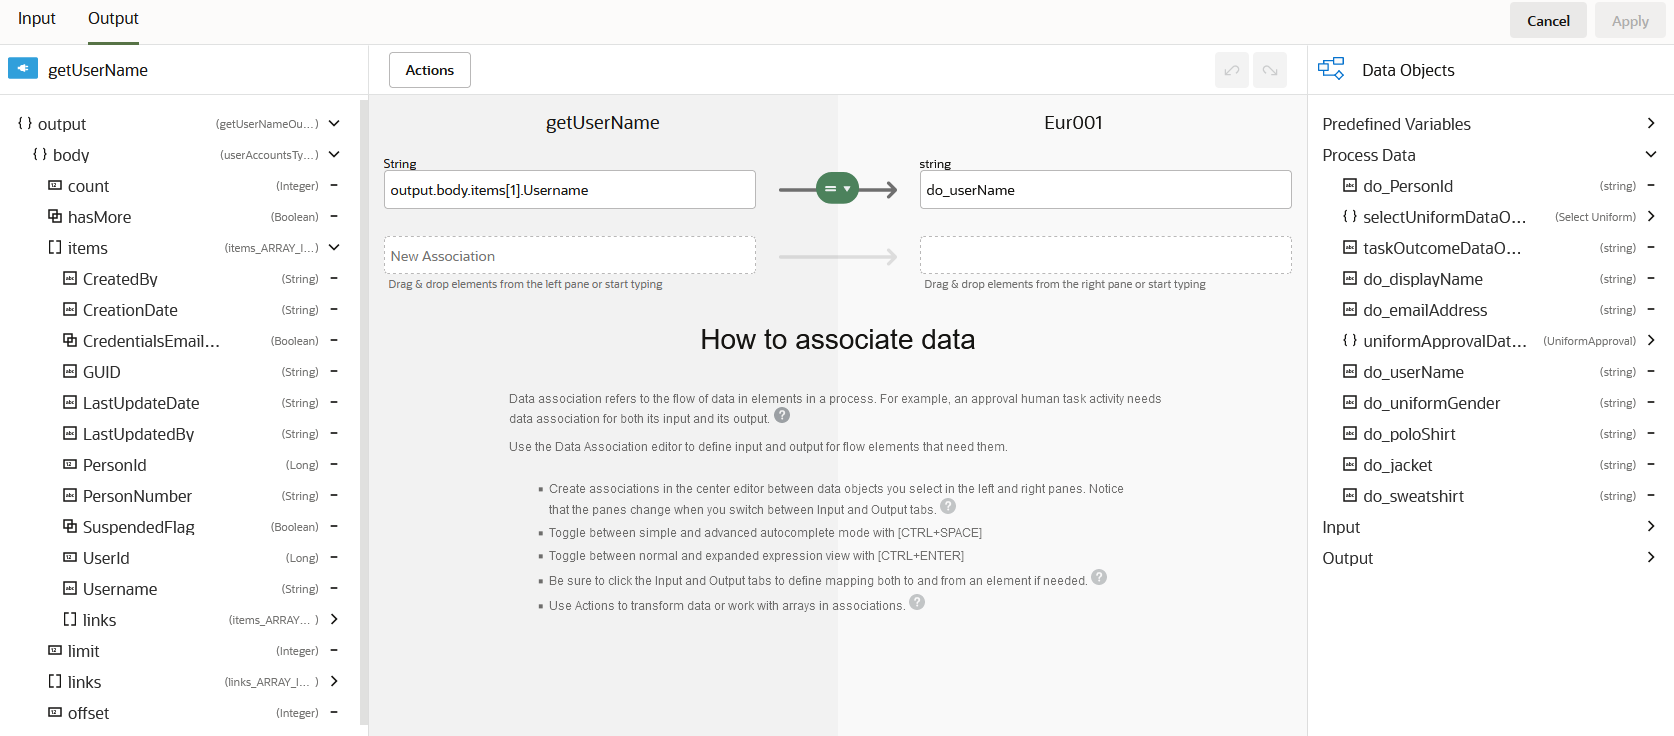
- Select Apply
Create a new UI Web Form (Select Uniform)
In OPA, you create web forms to interact with end users. As part of creating a web form, add its controls, configure its data, and define form behavior.
Within a web form, you bind form controls to data attributes that hold input values entered by end users. You can bind data to controls automatically or manually. You can also automatically create web forms based on business types defined for the application.
In this instance a Web Form will be used to capture the details of the Uniform requirements for a specific worker.
- On the Uniform Selection Process page.
- Click Add
- Select UIs

- Select Web Form and complete the following fields:
Field Description Title Name of the Web Form e.g. Select Uniform Identifier Name System generated value but can be edited. Description Meaningful description of the Web Form. 
Add UI Web Form Component
In the editor, drag, drop, and position controls onto the form’s central canvas. Select from a wide variety of controls on the Basic and Advanced Palettes, ranging from standard text and drop-down fields to tables, list of value (LOV) fields, sections, panels, and special fields such as URLs, videos, and images. Alternatively, automatically create a form from a business type defined for the application.
After adding some controls, further develop your form by creating multiple views (presentations), reusing other forms in the form, and customizing its styling by uploading a CSS stylesheet and applying styling properties.
- Drag and drop the following basic and advanced elements on
the main form presentation.
Element Name Label Type Data binding Option Names 
Panel1 Uniform Selection N/A N/A N/A 
Text Vision Corp Industries Inc. provides an employee uniform. Please select your uniform size for the following items below. N/A N/A N/A 
Select Gender string uniformGender Male Female Select1 Polo Shirt string poloShirt S M L Select2 Jacket string jacket S M L Select3 Sweatshirt string jacket S M L Add a role (Employee)

Add a role (Employee)
Roles are assigned to swimlanes and determine who or what in your business organization is responsible for performing the work of your process-based application. The key to designing a business process is to determine the people and roles required to complete each task that requires user interaction. Some tasks may be performed by any user or handled automatically by the system. You use swimlanes to group flow elements based on the roles defined within your business process.
- On the Processes page.
- Click Add
- Select Roles

- Select New and complete the following fields:
- Click Create
- In the Search by drop down, select Users
- In the accompanying text box enter the username for the OPA administrator.
- Select the Application Permission Level to Manage.
| Field | Description |
|---|---|
| Title | Name of the Web Form e.g. employee |
| Identifier Name | System generated value but can be edited. |
| Description | Meaningful description of the Web Form. |
| Scope | Application |


This will provide access to tasks within this swim lane to the OPA administrator. In addition, it will be possible to assign individual users at runtime to a specific task.
Add a role (Approver)
- On the Processes page.
- Click Add.
- Select Roles
- Select New and complete the following fields:
Field Description Title Name of the Web Form e.g. Approver Identifier Name System generated value but can be edited. Description Meaningful description of the Web Form. Scope Application 
- Click Create
- In the Search by drop down, select Users
- In the accompanying text box enter the username of the individual who will be responsible for approval uniform requests. This individual will need to be in IDCS, though they do not necessarily have to be present in the HCM Cloud. This allows for the flexibility of assign no HCM users to be involved in the Submission and Approval tasks within OPA.
- Set the Application Permission Level to Use.
Assign Swinlanes to the Process (employee)
- Navigatge to the Uniform Selection Process page.
- A default swimlane is created with no associated role. Click on the swimlane and click the edit icon to edit the properties of the swimlane and assign it the role of Process User.
- Click add under the Process User on the right
hand-side of the process editor canvas. This will add a new swinlane to the process.
- Click the newly available pencil to open the Properties for the swimlane
- Select the Employee value from the drop down – assigning the employee user to the newly
created swimlane.

- Repeat the above steps for Approver role.

Add a new Human Submit task (Submit Uniform Request)
You can use human tasks to model user interaction with the application. Human tasks enable you to display a form for the user to view or complete, and click an action to perform.
There are different types of human tasks that enable you to model different types of interactions:
- Submit Tasks: Enable you to display a form that the user must submit to create a request or to provide information about a certain subject.
- Approval Tasks: Enable you to display a form that the user must review or complete and then perform a certain action. The user might approve or reject the request. You can also define custom actions for the user to perform. Approval tasks enable you to define an approval pattern. Generally you use the outcome of the approval task to drive the rest of the process flow.
The first task to be built will be related to the submission of the employee uniform.
- On the Process tab, open the right hand menu to revel the Elements Palette.
- Expand the Human menu item to display the previously the available tasks.

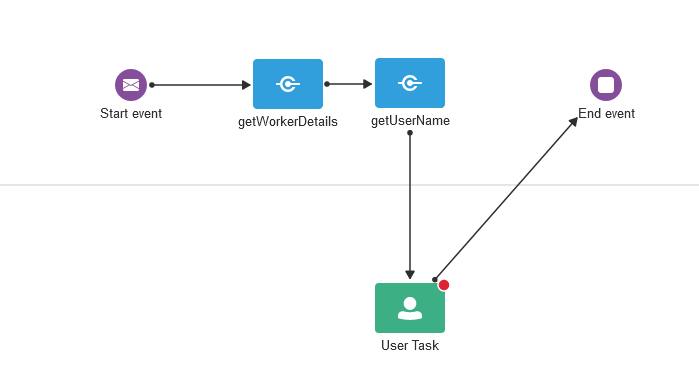
- Drag and drop the Submit task after the getUserName task
- Drag the newly added User task task down the canvas into the Employee swimlane
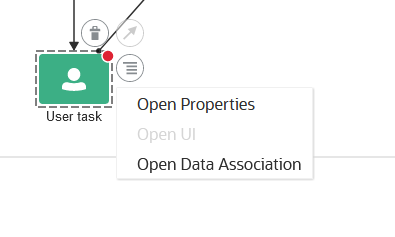
- Open the task menu for the newly added User task and select Open Properties

- On the Properties tab, change the name to Select Uniform.
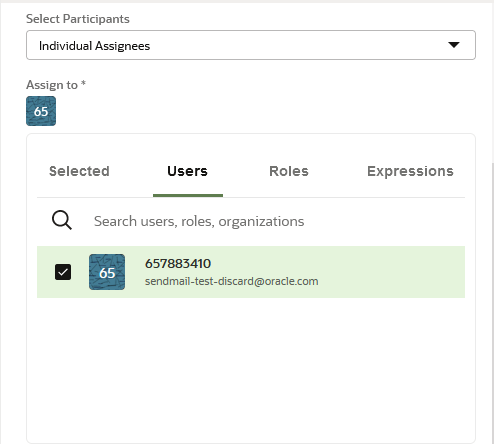
- Under Assignees, select the Individual Assignees value in the drop down.
- Select the to add an Assignee
- Select the Expressions tab
- Enter in the Create Expression text box enter the following value.
IdentityService.getUserId(“do_UserName”)
This allows the process at runtime to assign this specific task to the employee identified from the original Journeys task in HCM. This means no other employees will be able to see this specific task other than the OPA Administrator who was assigned as well to the Employee Swimlane.

- Enter a Title value under End User Display e.g. Select Uniform
- Select the UI form previously built e.g. Select Uniform

Notifying a user of an assign task
Keep your users informed about their task assignments and the progress of a process. You can easily configure notification emails for human tasks and create templates for those notifications.
- Select
 to open the Notifications tab on the
Select
Unform task properties.
to open the Notifications tab on the
Select
Unform task properties.
- Uncheck the Disable Notifications
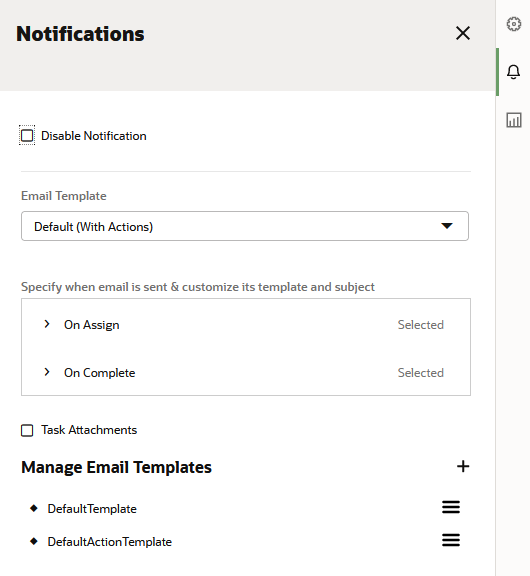
If you enable email notification for a human task, you can either select a default template or create a new one for your use. By default, the following two email templates are available:
- Default (With Actions) – Contains outcomes defined for a task, such as Approve or Reject. You can click on these outcomes to act on the task using your email client, without having to sign in to the application. In addition, you can add comments and attachments to the task.
- Default (No Actions) – Contains a link that lets the end user sign in to the application, view the task, and complete it. If the end user is viewing the email on a mobile device and clicks the link, then the mobile app launches by default, if it’s installed.
Complete Data Association
To capture the output of the form, the user selected values need to be mapped to the Data Objects defined earlier.
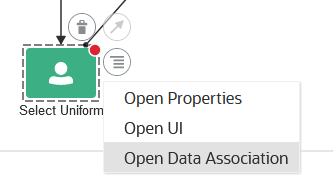
To get started:
- On the Select Uniform task, select the Open Data Associations
- On the Output tab in mapping editor, enter the following value either by dragging and
dropping or
typing directly into the corresponding fields.
Select Uniform Eur001 output.selectUniform.uniformGender do_uniformGender output.selectUniform.poloShirt do_poloShirt output.selectUniform.jacket do_jacket output.selectUniform.sweatshirt do_sweatshirt - Select Apply
Create UI Web Form Approve Uniform Request
Next the Web Form used to capture the Approval of the Uniform Approver will be built..
- On the Process page.
- Click Add .
- Select UIs
- 4. Select Web Form and complete the following fields:
Field Description Title Name of the Web Form e.g. UniformAprovalIdentifier Name System generated value but can be edited. Description Meaningful description of the Web Form. 
Add UI Web Form Components
- Drag and drop the following basic and advanced elements on the main form presentation.
Element Name Label Type Data binding Option Names Text Please review and approve the following uniform request.. N/A N/A N/A 
InputText Employee Name string employeeName Read-Only InputText Polo Shirt string poloShirt Read-Only InputText Jacket string jacket Read-Only InputText Jacket string jacket Read-Only InputText Sweatshirt string sweatshirt Read-Only The completed Web Form should look similar to the following.

Add a new Human Approve task (Approve Uniform Request)
Next the newly created Webform UI needs to be associated with a Human task.
To get started:
- On the Process tab, open the right hand menu to revel the Elements Palette.
- Expand the Human menu item to display the previously the available tasks.
 >
>
- Drag and drop the Approve task after the Select Uniform task
- Drag the newly added User task down the canvas into the Approver swimlane

- Open the task menu for the newly added User task and select Open Properties
- On the Properties tab, change the name to Select Uniform.
- Under Assignees, select the Individual Assignees value in the drop down.
- Select the
 to add an Assignee
 - Select the Users tab
- Select a specific user responsible for Uniform Approval
This allows the process at runtime to be assigned to the user required to do approvals.
- Enter a Title value under End User Display e.g.
Approve Uniform Request - Select the UI form previously built e.g.
UniformApproval
Notifying a user of an assign task
Keep your users informed about their task assignments and the progress of a process. You can easily configure notification emails for human tasks and create templates for those notifications.
- Select to open the Notifications tab on the
Approve
Unform Request task properties.
- Uncheck the Disable Notifications

Complete Data Association
To capture the output of the form, the user selected values need to be mapped to the Data Objects defined earlier.
- On the Approve Uniform Request task, select the Open Data Associations

- On the Input tab in mapping editor, enter the following value either by dragging and dropping or
typing directly into the corresponding fields.
Eur001 Approve Uniform Request selectUniformDataObject.poloShirt input.uniformApproval.poloShirt selectUniformDataObject jacket input.uniformApproval.jacket selectUniformDataObject sweatshirt input.uniformApproval.sweatshirt do_displayName input.uniformApproval.employeeName - Select Apply
Add System Notification (Confirmation Email)
The final task is to add an email notification for the communication of the Approved Uniform Request to the uniform supplier. The notification task is used generate and send notifications. The notify task, which is similar to the service task, uses a predefined service to perform notifications. You use expressions to determine which users receive the notifications generated by the notify task. Currently, email is the only type of notification supported in Process. This type of notification sends an email to the users you specify.
- On the Process tab, open the right hand menu to revel the Elements Palette.
- Expand the System menu item to display the different System elements.
- Select the Service task
- Drag and drop the Service task after the Approve Uniform Request task
- Drag the newly added Service task down the canvas into the Process User swimlane
- On the Properties tab, change the name to Confirmation
Email.
- Under Assignees, select the Individual Assignees value in the drop down.
- Select the to add an Assignee
- Select the Users tab
- Select a specific user to receive the details of the employee uniform request.
- In the Subject text box enter Approval for New Employee Uniform
- Select the
 to enable the
  expression mode for the Body text box.
 - In the body text box enter the following expression.
"NewEmployeeUniform: UserName" +do_userName +" Gender: " + selectUniformDataObject.uniformGender+"
                  PoloShirt:" +uniformApprovalDataObject.poloShirt +" Jacket:" +uniformApprovalDataObject.jacket +"
                  Sweatshirt: " +uniformApprovalDataObject.sweatshirt